LIRAPA:
HOW TO GET THE BEST
FROM YOUR GARDEN
LIRAPA:
HOW TO GET THE BEST
FROM YOUR GARDEN
A handbook for intensive food production in Lesotho
CONTENTS
Living and eating well ......................................................................................................1
Vegetable production and nutrition ...........................................................................13
Farmer experimentation ..............................................................................................17
Seedling production .......................................................................................................25
Mulching ...........................................................................................................................33
Improving your soil ........................................................................................................37
Bed design ........................................................................................................................57
Planting vegetables .........................................................................................................67
Wind and frost protection ..........................................................................................91
Pest and disease management ...................................................................................101
Growing fruit trees ......................................................................................................111
Seed saving .....................................................................................................................137
Saving and using water ................................................................................................151
Conservation farming .................................................................................................165
Homestead irrigation techniques .............................................................................173

LIRAPA: How to get the best from your garden
A Handbook for Intensive food production in Lesotho
Second edition
Copyright Reserved
The Ministry of Agriculture and Food Security would like to thank Care-Lesotho and other
Organizations for their participation and contributions. Many different individuals gave their
time and advice over the period of production. Their input is highly appreciated.
Specific thanks goes to the following:
Nutrition & Home Economics division and Horticulture division of the Ministry of Agriculture
and Food Security;
United Kingdom Department for International Development (DFID)
Maluti Hospital Wellness Centre
These materials have been produced by:
Authors: Erna Kruger
Illustrations: Kathy Arbuckle
Layout and Design: John Bertram, Tangerine Design
Translations: L. Makoae and N.Martins, Ministry of Agriculture and Food Security
Editor: Sello Thulo, Priority Support Programme
Ministry of Agriculture and Food Security
Nutrition and Home Economics Division
PO Box 14915, Maseru, Lesotho 100
Tel. +266 22 320673 / 22 314230
Horticulture Division
PO Box 7260, Maseru, Lesotho 100
Tel. +266 22 322971 / 22 324827
Fax: +266 22 310517

Content adapted from the CINDI booklet ‘Living and Eating Well’LIVING AND EATING WELLpage 1
WHAT IS NUTRITION?
We all need to eat. Our bodies
need food to stay alive, for energy
and to grow and recover from
illness. The food that we eat is
used by our bodies in many
different ways. Different parts
of the food are used for different
things like giving us energy
and helping us to get better.
We need to eat lots of different
and healthy foods so that our
bodies get all the things that they
need. If we eat well we have a
better chance of feeling good and
living a better life.
LIVING AND EATING WELL
It is
best for babies
to drink breast milk only.
Babies get all the things that
their bodies need from their
mothers’ milk.
Children need to eat vegetables and fruit to
keep them healthy. They also need to eat
foods that will help them to grow like egg,
cheese, meat, peanut butter, beans, lentils
and soya. Small children need to eat five
times a day.
Adults need to eat lots of different kinds
of food to keep their bodies functioning
well. It is most important to do
this if you are sick or if you
are pregnant.

page 2 LIVING AND EATING WELL Content adapted from the CINDI booklet ‘Living and Eating Well’
HOW CAN WE EAT WELLTO BE IN GOOD HEALTH?
To eat well means to eat lots of different kinds of food so that our bodies get all the good
things that they need. This does not mean that you need to buy expensive food. By thinking
carefully about what you eat, and what you prepare for your family, and choosing food well
you can eat in a healthy affordable way.
There are three main types of food:
Go foods, grow foods and glow
foods. You should eat things from
each of these types of food every day.
You should also drink about eight
glasses of water every day.
Good Energy/
Go Foods:
Sweet potato
Boiled, baked or mashed potato
Brown or white rice
sorghum
Macaroni, spaghetti or other noodles
Bread
Dried beans and peas
Oatmeal
Cereal
Bananas
Avocados
These foods give you energy.They are
important foods to eat, but remember
that you need to eat food from the
other two groups every day as well.
Go Foods
These foods help you to grow well.
They help to build your body and to
make it strong.
Grow Foods
These foods keep the body healthy.
They have lots of vitamins and
minerals which your body needs to
stay well.
Glow Foods
Try to have a fruit
or vegetable with
each of these meals.
It is also good to add
beans, meat, chicken
or fish if you can.
Content adapted from the CINDI booklet ‘Living and Eating Well’LIVING AND EATING WELLpage 3
Good grow foods
These are the foods that contain a lot of protein.
These foods help to maintain your body and
muscles. They also help to prevent infections. It is
important to eat some grow foods every day,
especially if you are ill. Children need extra protein
because they are growing. So do pregnant women.
Below is a list of some grow foods:
Beans
peas
soyabeans
groundnuts
chicken
chicken livers
fish
meat
eggs
cheese
maas (sour milk)
peanut-butter
nuts
sunflower seeds
Eggs
are especially
good for children and
pregnant women, as they
contain protein, vitamins,
fat and calcium.
Children can also eat beans or
peas every day.
It is good for children to
eat small meals more
often.
Food safety tip
Always wash your hands with soap and water before you touch
food, and after using the toilet. Wash both sides of your hands
for a long time – count to 15 while you wash!
Cover any wounds or sores that you have when you are
preparing food.
A meal of
brown rice and
beans is more nutritious
than meat! Brown rice is
the same as white rice,
except that the husks have not
been removed. This means
that it contains much more
proteins, minerals and
vitamins than white
rice.

page 4 LIVING AND EATING WELL Content adapted from the CINDI booklet ‘Living and Eating Well’
oranges
grapefruit
grapes
bananas
granadilla
yellow peaches
apricots
apples
pears
lemons
pineapple
spinach
tomatoes
potatoes
broccoli
pumpkin leaves
carrots
green beans
peas
mealies
beetroot
avocado
samp
moroho
rapa
Good glow foods
The foods that help to fight infections are glow foods. These are foods with lots of vitamins and
minerals. You need to eat lost of different kinds of glow foods as they all have different good
things in them.
Below is a list of good glow foods:
Dark
green leafy
vegetables and yellow
fruits and vegetables are
very important for children.
Children and pregnant
women should eat some
of these foods
every day.
SELECTION AND PREPARATION OF FOOD
Drink lots of water
You need at least 8 glasses a day. You may
not think that you need much water. But you
can try and experiment on yourself. For three
days drink 8 glasses of water. This does not
include cups of tea and coffee. After those
three days, how
do you feel? Do
you have more
energy and do
you feel good?
Food
safety tip
Water from a tap is safe. If
you get your water from a river
or a well you must boil the water
or add 1 teaspoon of bleach to every
25 litres of water before you drink
it. Store your water in a clean
covered container.
Remember
to wash the
fruit and
vegetables well in
clean water
before you eat
them.

Content adapted from the CINDI booklet ‘Living and Eating Well’LIVING AND EATING WELLpage 5
Make sure you keep the goodness in …
Fresh fruit and vegetables have lots of vitamins and minerals in them. But these vitamins and
minerals can disappear very quickly if you are not careful about how the food is prepared and
cooked. Here are some tips to help you keep the goodness in:
✔Eat raw fruit and vegetables whenever it is possible.
✔Eat as much of the fruit or vegetable as possible – including the skin.
✔Most of the vitamins are in the outside parts of the fruit and vegetables. Try not to peel.
✔Try to buy and eat fruit and vegetables as fresh as possible.
✔Cook the vegetables in big pieces. Small pieces will lose more vitamins.
✔It is best to steam vegetables.
✔Cook vegetables very slowly over a low heat until they are just cooked. Use the vegetable
cooking water to cook other foods in or to make soup or gravy.
✔Eat the vegetables as soon as they are cooked.
Eat each day:
• Grow foods – three of the following:
One cup of beans or peas (plus one tablespoon of uncooked sunflower oil); two eggs; a large
piece of meat, chicken or fish; one tablespoon of sunflower seeds; nuts such as almonds or
brazil nuts; one cup of milk or maas (sour milk); a big piece of cheese.
• Glow foods
Three whole fruits and one and a half cups of vegetables. Eat more vegetables if you do not
have fruit.
• Go foods – any or all of the following:
Bread; half a cup of pasta, rice (preferably brown rice), potato, maize; a cup of cereal such as
oats or sorghum porridge or maize meal.
ngekoebeans and sorghum/mabele leaves
likhetsounpeeled pumpkin portions with seeds
lepuyoung pumpkins with pumpkin leaves
lithotsiroast, cooked pumpkin seeds
lehalalesheleshele – maize or sorghum porridge made with milk
legebekoanasteamed wheat bread
motohofermented maize/sorghum porridge
likhobemaize/maize with peas/maize with beans
setampo tša koro whole wheat
mabele a tša batsoenghalf opened sorghum, ground and cooked to make buns
Some common traditional foods

page 6 LIVING AND EATING WELL Content adapted from the CINDI booklet ‘Living and Eating Well’
Herbs, spices and medicinal plants
• Spices, especially sweet spices like cinnamon, can help to make
food taste better. You can buy cinnamon sticks which you add
to food while it is cooking.
• Eating parsley after you have eaten will help to freshen your
mouth and it is good for you. Its easy to grow at home too.
• Ginger helps if you are feeling nauseous and for colds. You can
make a ginger tea.
• Garlic helps to fight infections. Make a tea or add garlic while
you are cooking.
• Thyme helps with digestion. You can add thyme leaves to food.
• Other good herbs to eat are sweet basil, coriander, oregano and
fennel. They are all easy to grow and can be added to your
food.
Food safety tip
You must eat meat on the day that you buy it if you cannot keep it in a fridge. You can only
keep meat in the fridge for two days. After two days it must be frozen.
Cook all types of meat well. Don’t ever eat raw eggs, meat, chicken or fish. Don’t use eggs
that are cracked.
WHAT TO EATWHEN YOU ARE SICK
Often when you feel sick the last thing on your mind is eating, but it is very important to eat
well when you are sick. Good eating will help you to:
✔keep up your body weight and strength.
✔fight the infection.
✔Take in enough vitamins and minerals to get better.
If you do not eat well when you are sick, it will take longer for you to get better.
What happens to your body when you get sick?
When your body is trying to fight off an illness it has to work harder than usual. This means
that you need to take in more good food than usual for your body to have enough energy,
vitamins and minerals to cope.
When you feel sick though, you may:
• feel too tired to prepare food and to eat,
• the medicine you are taking might make food taste strange, or
• have nausea, vomiting or diarrhea which make it difficult to eat.
• have sores in your mouth which make it difficult to eat.
Content adapted from the CINDI booklet ‘Living and Eating Well’LIVING AND EATING WELLpage 7
Even though it is difficult, you should try to eat well when you are sick.
The best way to eat well when you are sick is to:
• Have small meals often.
• Make sure you get extra energy.
Fever and night sweats
Fever is the natural way your body will fight an infection. They are good as the heat destroys
the germs. You need to be careful that the fever does not become too high, as this can cause
damage as well. Make sure that you drink lots of water. Eat lots of glow foods and grow foods
to get back your strength.
Stomach problems
A very common kind of stomach problem is diarrhea. Diarrhea is very dangerous because our
bodies lose a lot of the water we need. It is especially dangerous for babies, children and
people who are sick.
What causes diarrhea?
• Drinking dirty water
• Not washing hands well before eating and after using the toilet
• Not washing fruit and vegetables and cooking utensils well.
• Some medicines
• Infections in the stomach
• Stress
• Food that is rotten or bad
• Some types of food cause stomach problems in people whose bodies
cannot cope with that food.
Why is it important to eat well if you have diarrhea?
Diarrhea can cause weight loss. The body loses too much water and salt and becomes weak. It
is very important to drink a lot of fluids when you have diarrhea. Eat more after you have
diarrhea. A baby with diarrhea should be fed often.
Water is important
If you have diarrhea you
should drink about 3 litres of
fluid during the day and the
night. It is
best to drink
something
with salt and
sugar in it.
A good drink to have is to add ½ teaspoon salt
and 8 teaspoons of sugar to 1litre of water.
You can also have fruit juices and soups that
will help replace the water as well as some of
the other things your body has lost.
page 8 LIVING AND EATING WELL Content adapted from the CINDI booklet ‘Living and Eating Well’
Good foods for diarrhea
✔Eat soft, mashed, moist foods like soft fruit and vegetables,
porridge and stews.
✔Peel and cook vegetables and fruit.
✔Eat warm food.
✔Eat small meals often
throughout the day.
✔Drink diluted fruit juice
✔ Soups
✔Unripe Banana, Mangoes,
Orange, Grapefruit
✔Potato, Pumpkin, Tomato,
Carrots
✔ White rice
✔ Mealie meal
✔ White bread
✔ Pasta (macaroni)
Nausea and vomiting
• If the medicine you are taking causes the nausea try to take it at a time when it will not
affect meals.
• Eat small amounts of food often throughout the day. Even if you eat a small amount of
food it might help to settle your stomach.
• Try eating cold food.
• Some people find fried foods, fatty food and cheese difficult to digest. Try cutting out one
food at a time and seeing if it makes a difference.
• Don’t eat beans. Eat only small amounts of onions, green peppers, broccoli, and cauliflower.
• Only use a small amount of margarine or oil when you are cooking.
• Try dry foods like toast, biscuits or dry cereals.
• Avoid food that has a strong smell. Sometimes the smell of food can make you feel sick.
Some foods can make diarrhea
worse. Avoid: Cereals like
bran flakes, raw vegetables,
fruit and vegetables with the
skin on, mealies, spicy foods
with chillies or curry powder,
dried fruits or fruit with small
seeds like berries, tea and
coffee. You can also try and
have less milk, milk powder and
milk drinks and see if it helps.
Content adapted from the CINDI booklet ‘Living and Eating Well’LIVING AND EATING WELLpage 9
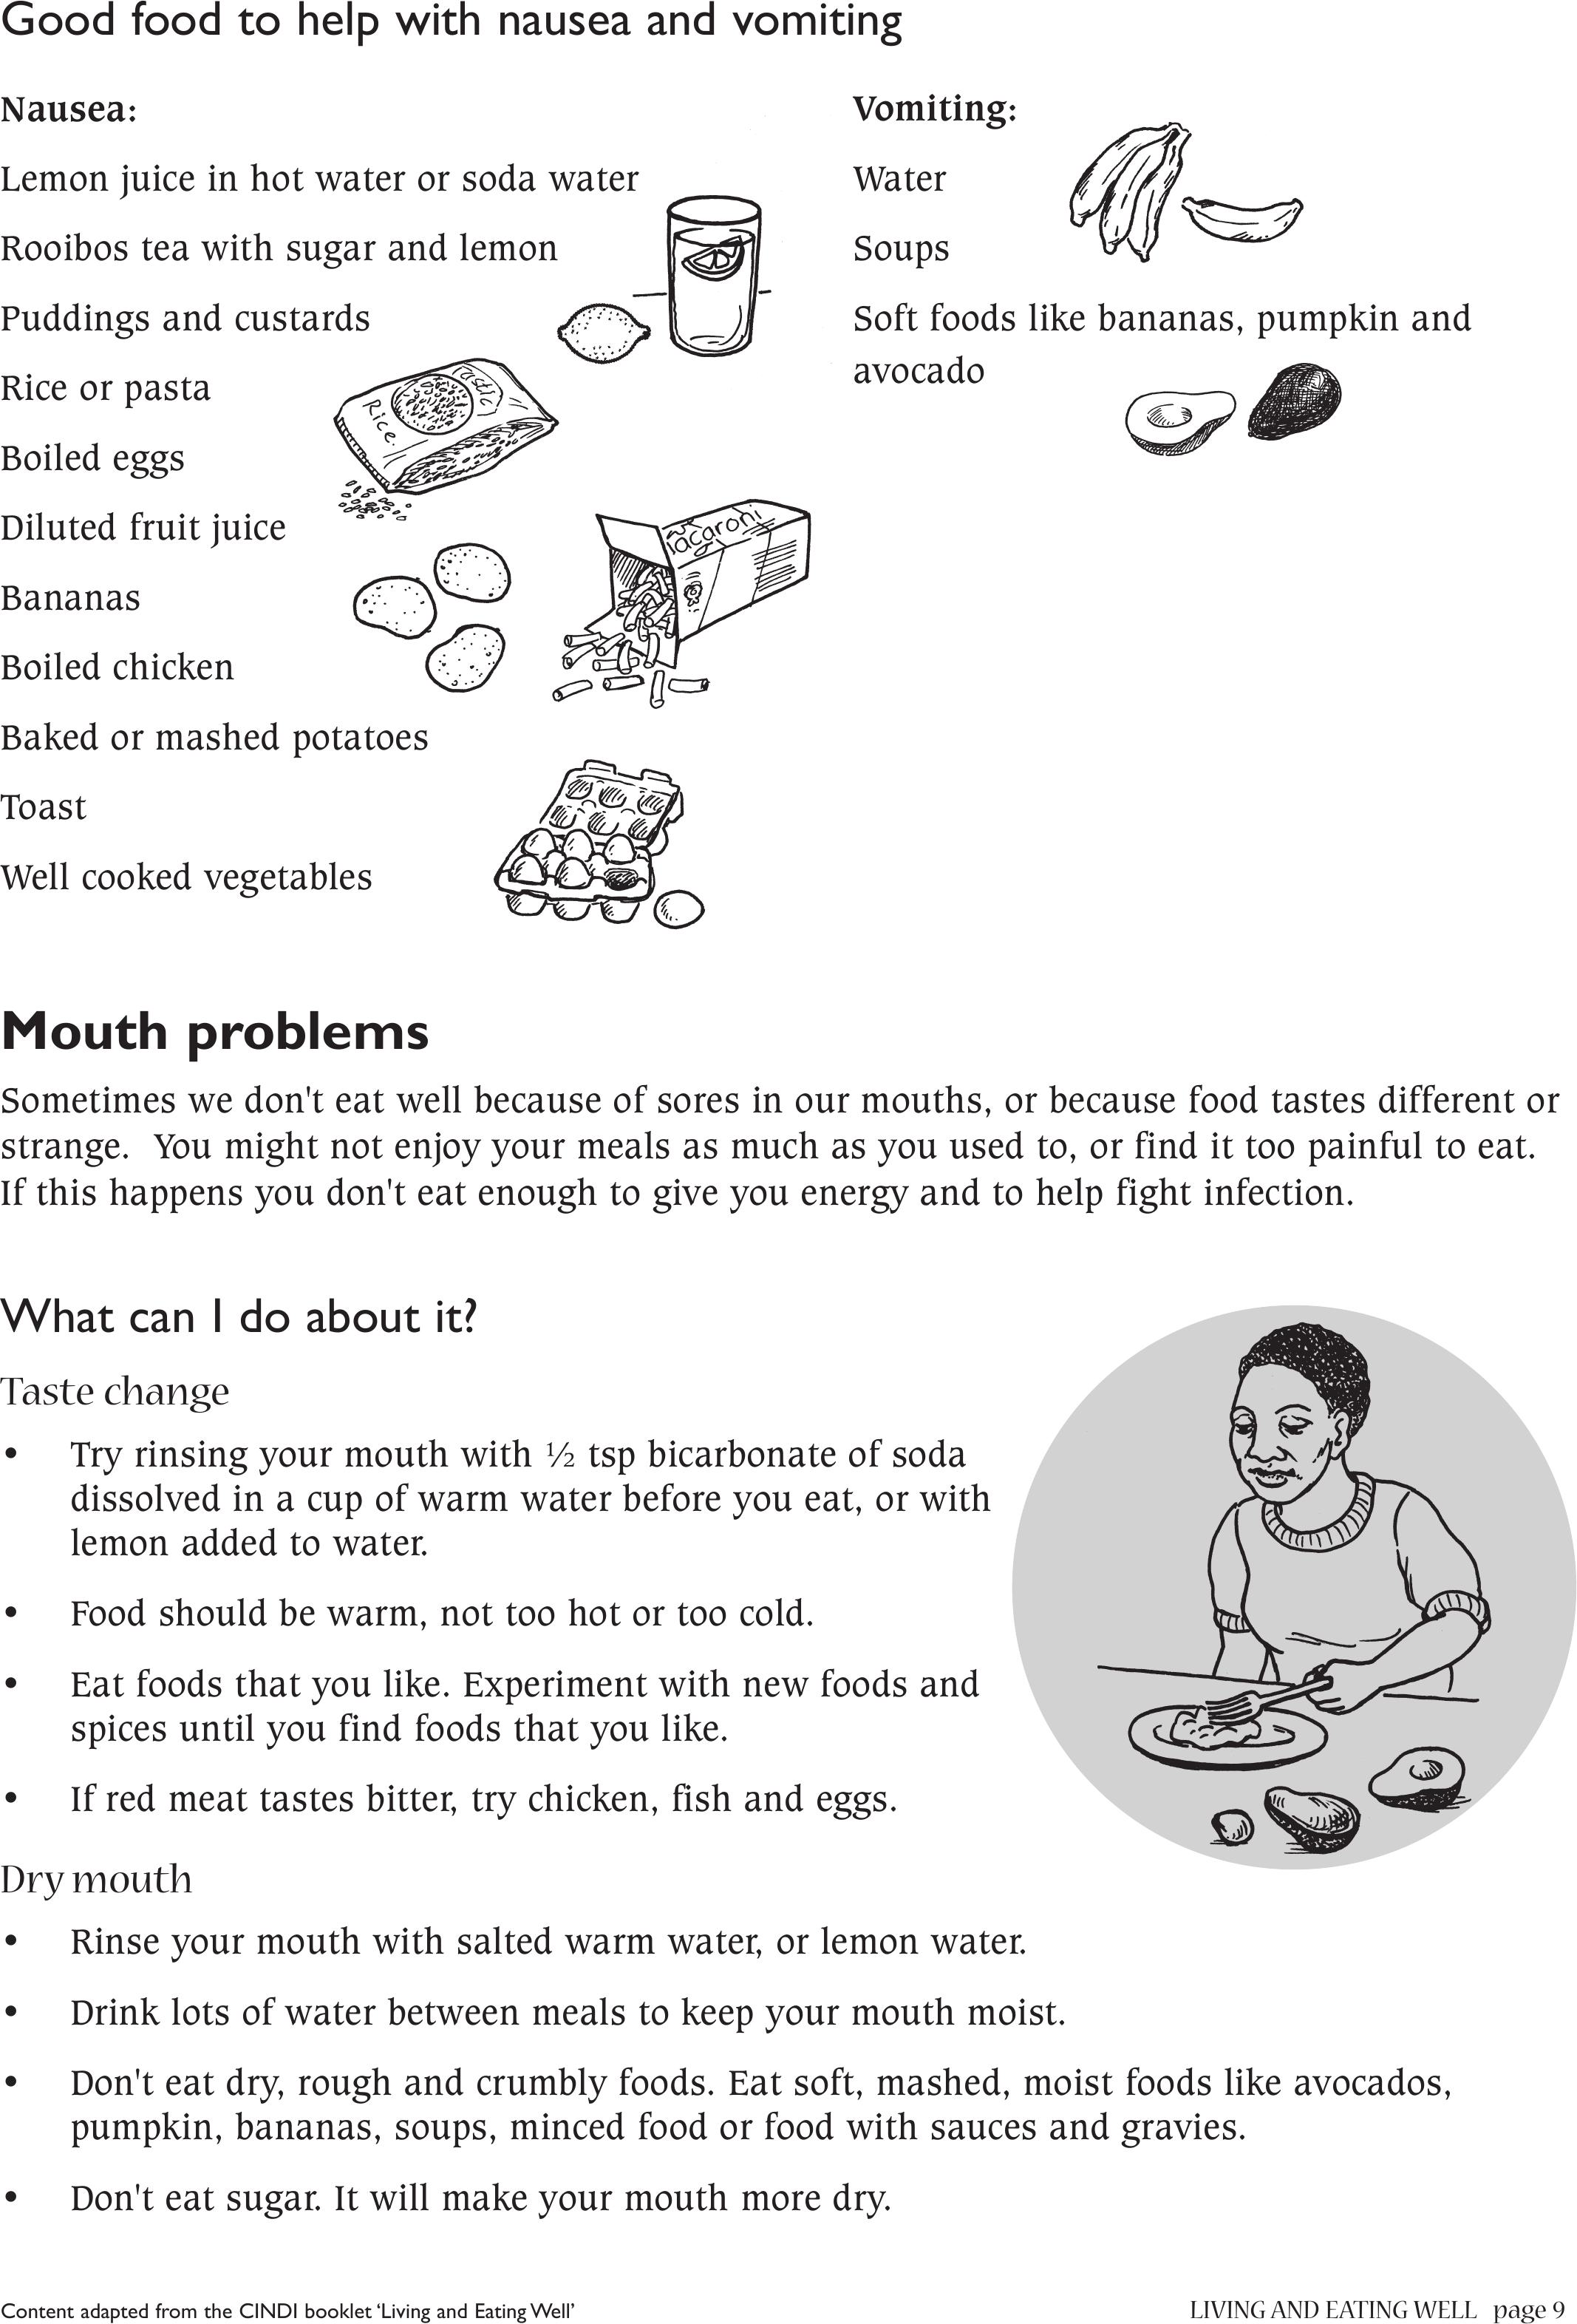
Good food to help with nausea and vomiting
Nausea:
Lemon juice in hot water or soda water
Rooibos tea with sugar and lemon
Puddings and custards
Rice or pasta
Boiled eggs
Diluted fruit juice
Bananas
Boiled chicken
Baked or mashed potatoes
Toast
Well cooked vegetables
Vomiting:
Water
Soups
Soft foods like bananas, pumpkin and
avocado
Mouth problems
Sometimes we don't eat well because of sores in our mouths, or because food tastes different or
strange. You might not enjoy your meals as much as you used to, or find it too painful to eat.
If this happens you don't eat enough to give you energy and to help fight infection.
What can I do about it?
Taste change
• Try rinsing your mouth with ½ tsp bicarbonate of soda
dissolved in a cup of warm water before you eat, or with
lemon added to water.
• Food should be warm, not too hot or too cold.
• Eat foods that you like. Experiment with new foods and
spices until you find foods that you like.
• If red meat tastes bitter, try chicken, fish and eggs.
Dry mouth
• Rinse your mouth with salted warm water, or lemon water.
• Drink lots of water between meals to keep your mouth moist.
• Don't eat dry, rough and crumbly foods. Eat soft, mashed, moist foods like avocados,
pumpkin, bananas, soups, minced food or food with sauces and gravies.
• Don't eat sugar. It will make your mouth more dry.
page 10 LIVING AND EATING WELL Content adapted from the CINDI booklet ‘Living and Eating Well’
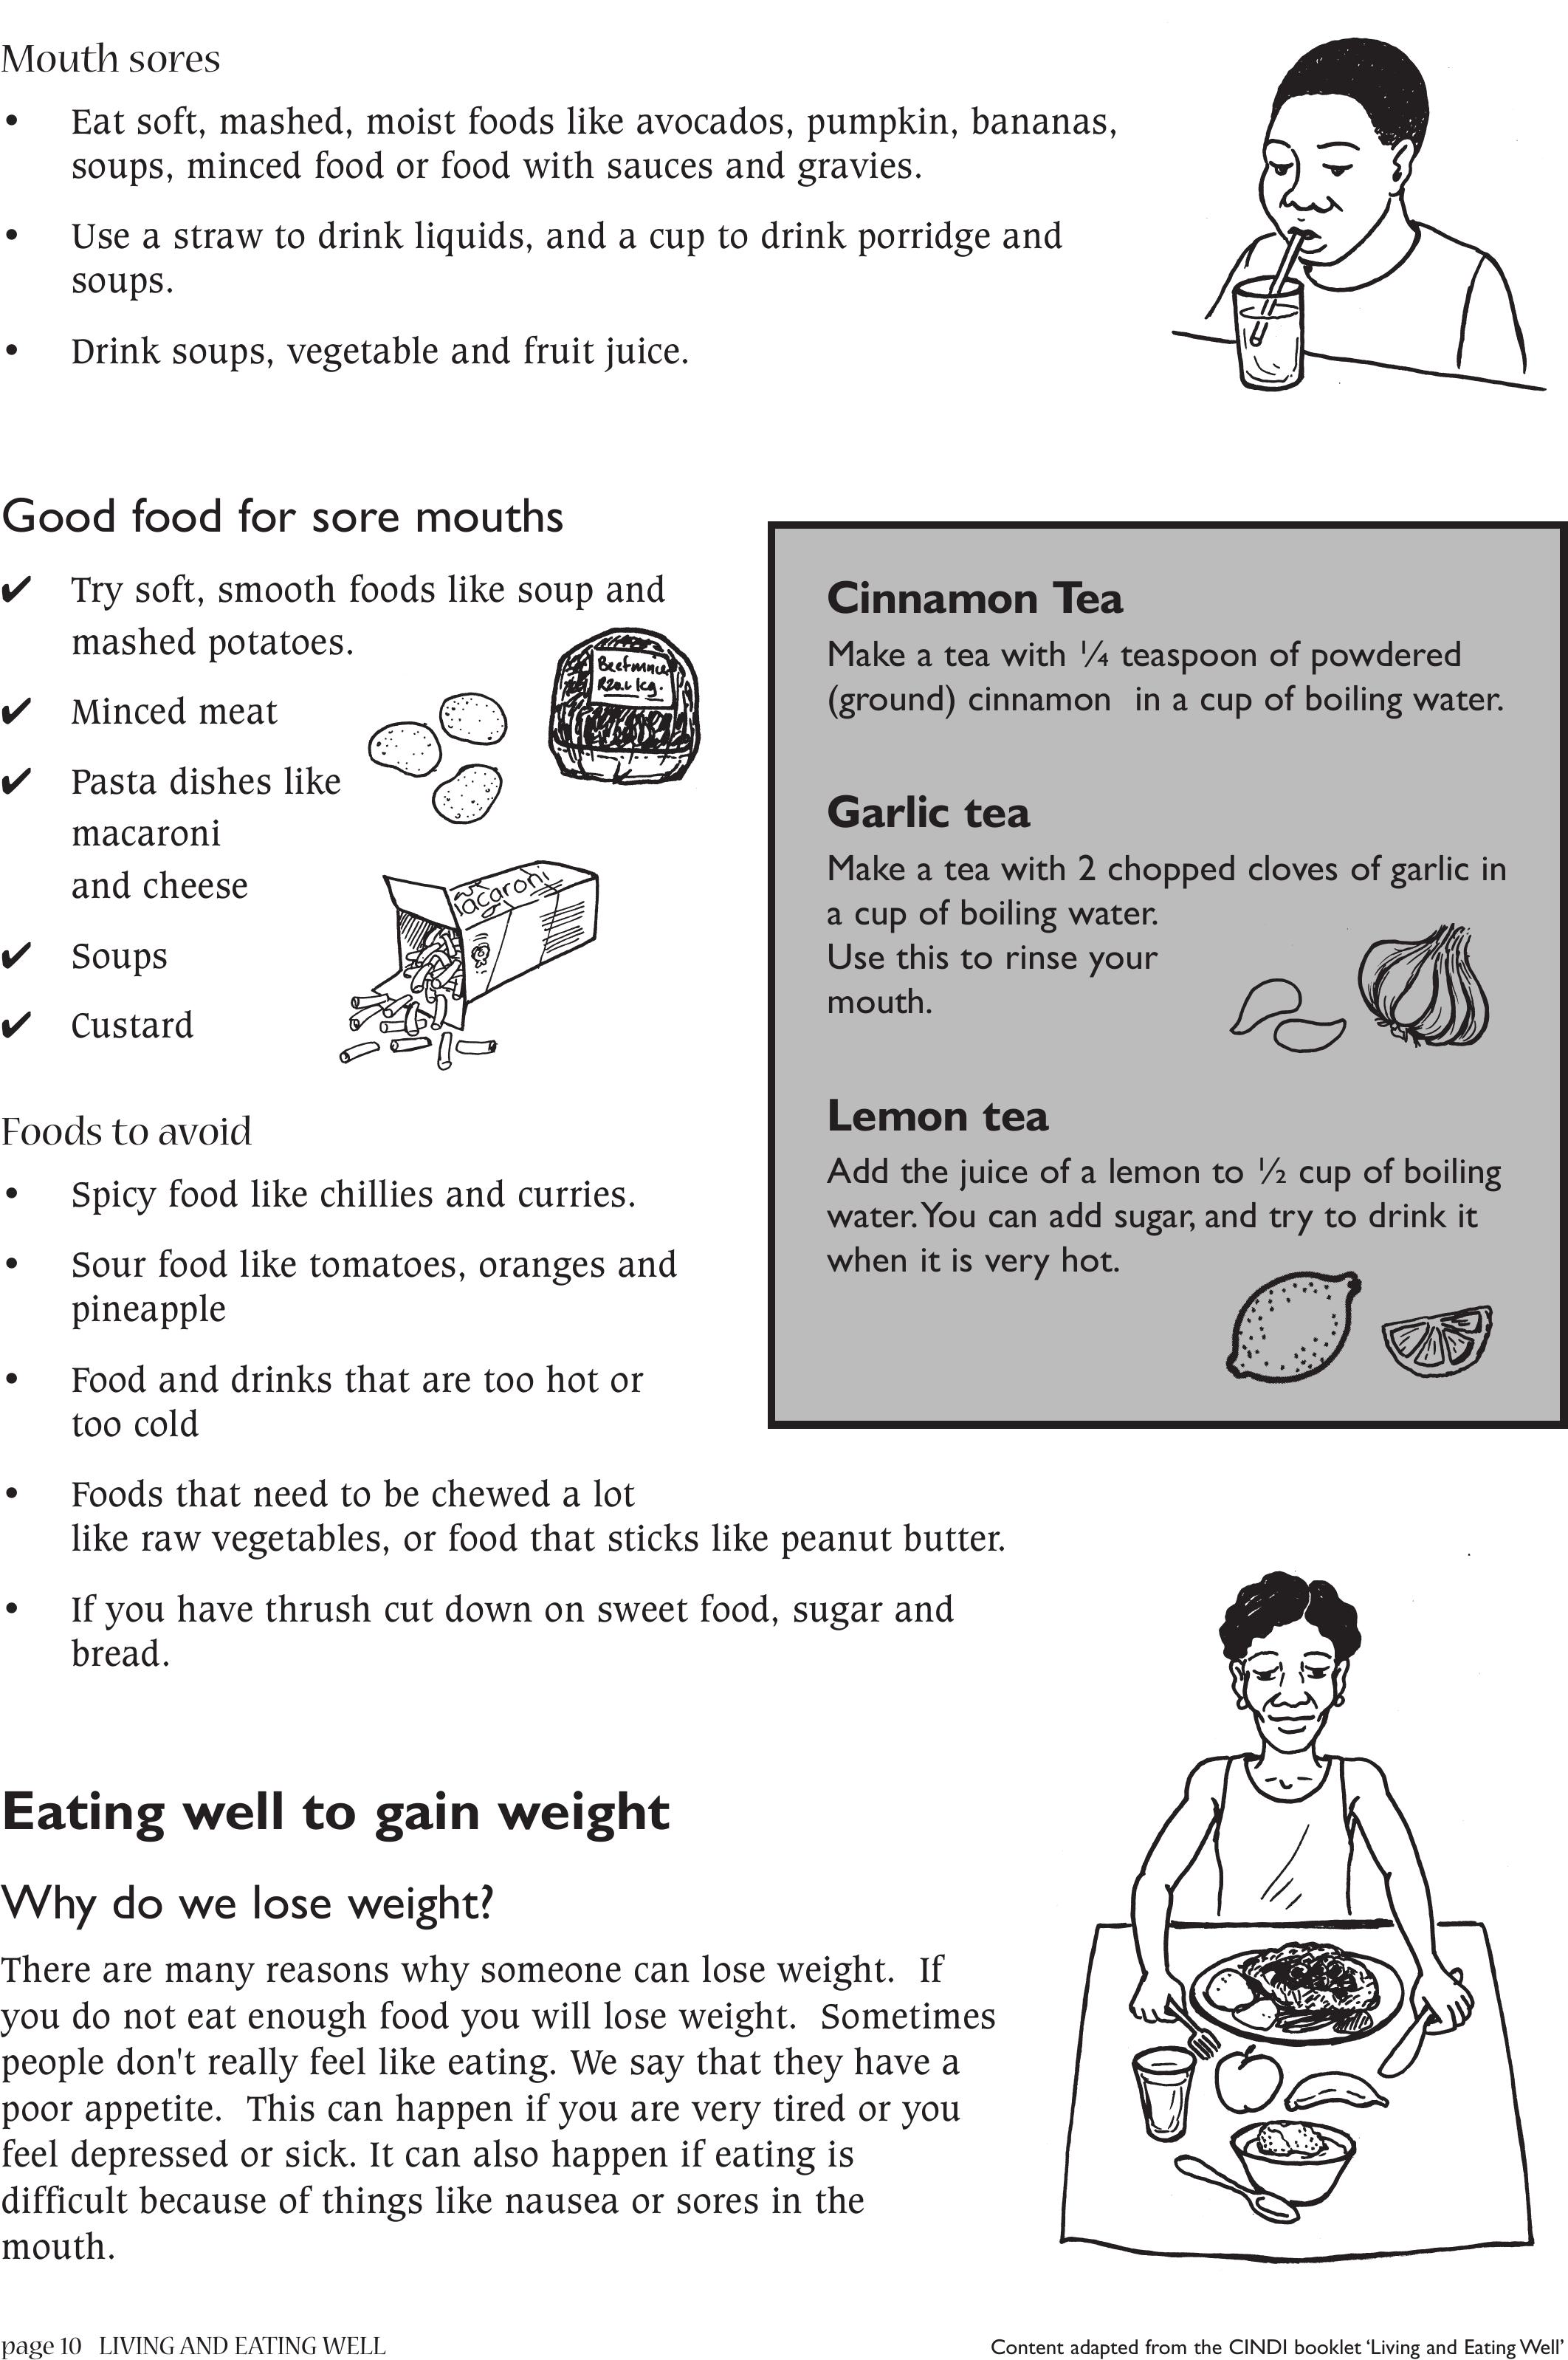
Mouth sores
• Eat soft, mashed, moist foods like avocados, pumpkin, bananas,
soups, minced food or food with sauces and gravies.
• Use a straw to drink liquids, and a cup to drink porridge and
soups.
• Drink soups, vegetable and fruit juice.
Good food for sore mouths
✔Try soft, smooth foods like soup and
mashed potatoes.
✔ Minced meat
✔Pasta dishes like
macaroni
and cheese
✔ Soups
✔ Custard
Foods to avoid
• Spicy food like chillies and curries.
• Sour food like tomatoes, oranges and
pineapple
• Food and drinks that are too hot or
too cold
• Foods that need to be chewed a lot
like raw vegetables, or food that sticks like peanut butter.
• If you have thrush cut down on sweet food, sugar and
bread.
Eating well to gain weight
Why do we lose weight?
There are many reasons why someone can lose weight. If
you do not eat enough food you will lose weight. Sometimes
people don't really feel like eating. We say that they have a
poor appetite. This can happen if you are very tired or you
feel depressed or sick. It can also happen if eating is
difficult because of things like nausea or sores in the
mouth.
Cinnamon Tea
Make a tea with ¼ teaspoon of powdered
(ground) cinnamon in a cup of boiling water.
Garlic tea
Make a tea with 2 chopped cloves of garlic in
a cup of boiling water.
Use this to rinse your
mouth.
Lemon tea
Add the juice of a lemon to ½ cup of boiling
water.You can add sugar, and try to drink it
when it is very hot.
Content adapted from the CINDI booklet ‘Living and Eating Well’LIVING AND EATING WELLpage 11
You might also lose weight because you are sick with infections, diarrhea, nausea or vomiting.
When you are sick your body does not take in the goodness that it needs from food very well.
At the same time, it needs more of this goodness to get well again.
Tips for gaining weight and increasing appetite
✔Try to eat 5 or 6 small meals every day even if you don't feel like
eating.
✔Try lots of different foods until you find those that you like.
✔Exercise will improve your appetite. Try to have a short walk before
a meal.
✔Don't eat lots of fried food or fatty meats.
✔Add flavour to food to make it look and taste
interesting. Try things like lemon juice, and
sweet spices like cinnamon. Or add herbs like
parsley, thyme, oregano and sweet basil.
✔Try rinsing your mouth out with bicarb or lemon
juice in water before you eat to help the food
taste better.
Examples of good foods for weight gain
• Eat more samp, rice, brown bread, oats, potatoes
and bananas.
• Eat chicken, fish, eggs, meat, beans and soya as
often as possible.
• Eat snacks like fruit, carrots, maas and peanut butter or jam sandwiches between meals.
How to improve what we eat at home
Here are some ideas to add 'weight gain food' to things you eat at home.
• Add sugar or jam to your porridge
• Put 1 teaspoon of margarine into your porridge.
• Cook beans and mix in with rice. Add a teaspoon of margarine
as well.
• Add margarine or oil to potatoes.
• Add meat or chicken whenever you can. Even a small amount in soups and gravies is good.
• Eat beans with pap, sorghum and samp.
• Add teaspoon of dry milk powder to any porridge, soup or stew.
The most
important ways to
gain weight are:
• Stop diarrhea.
• Treat any infections you
might have
• Make sure that you are
eating enough of the
right things.
page 12 LIVING AND EATING WELL Content adapted from the CINDI booklet ‘Living and Eating Well’
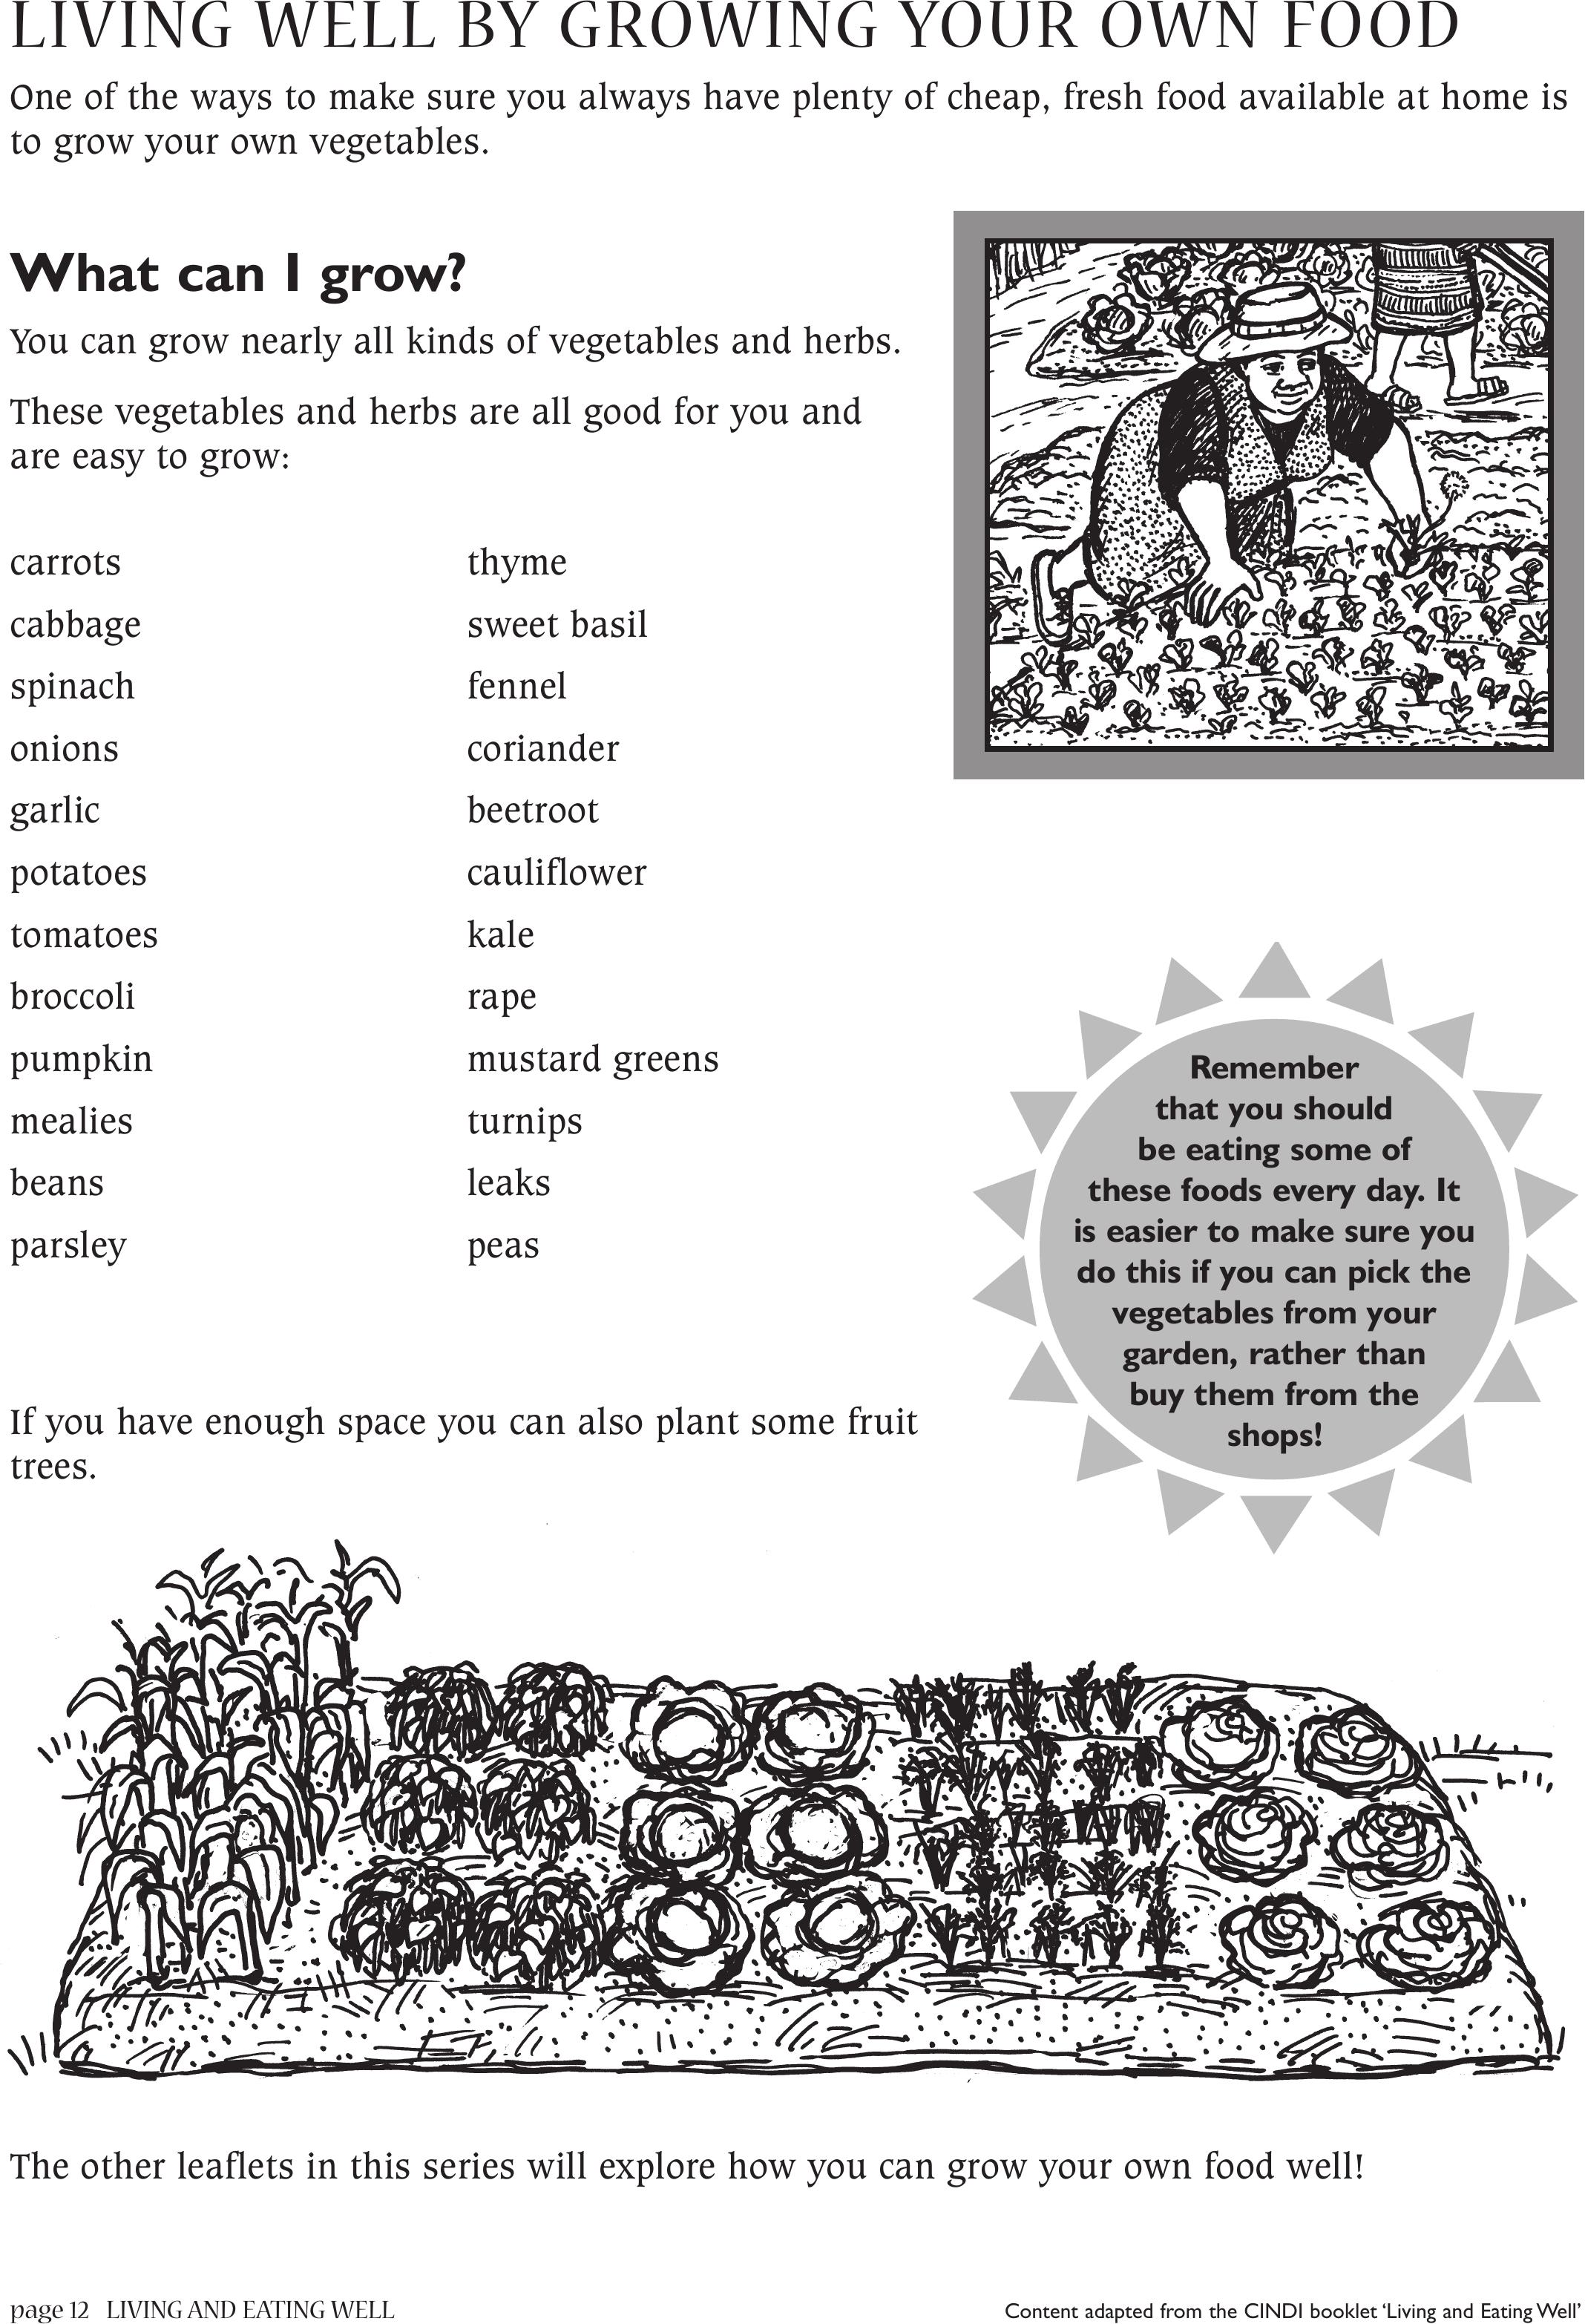
LIVING WELL BY GROWING YOUR OWN FOOD
One of the ways to make sure you always have plenty of cheap, fresh food available at home is
to grow your own vegetables.
What can I grow?
You can grow nearly all kinds of vegetables and herbs.
These vegetables and herbs are all good for you and
are easy to grow:
If you have enough space you can also plant some fruit
trees.
carrots
cabbage
spinach
onions
garlic
potatoes
tomatoes
broccoli
pumpkin
mealies
beans
parsley
thyme
sweet basil
fennel
coriander
beetroot
cauliflower
kale
rape
mustard greens
turnips
leaks
peas
Remember
that you should
be eating some of
these foods every day. It
is easier to make sure you
do this if you can pick the
vegetables from your
garden, rather than
buy them from the
shops!
The other leaflets in this series will explore how you can grow your own food well!
VEGETABLE PRODUCTION AND NUTRITIONpage 13
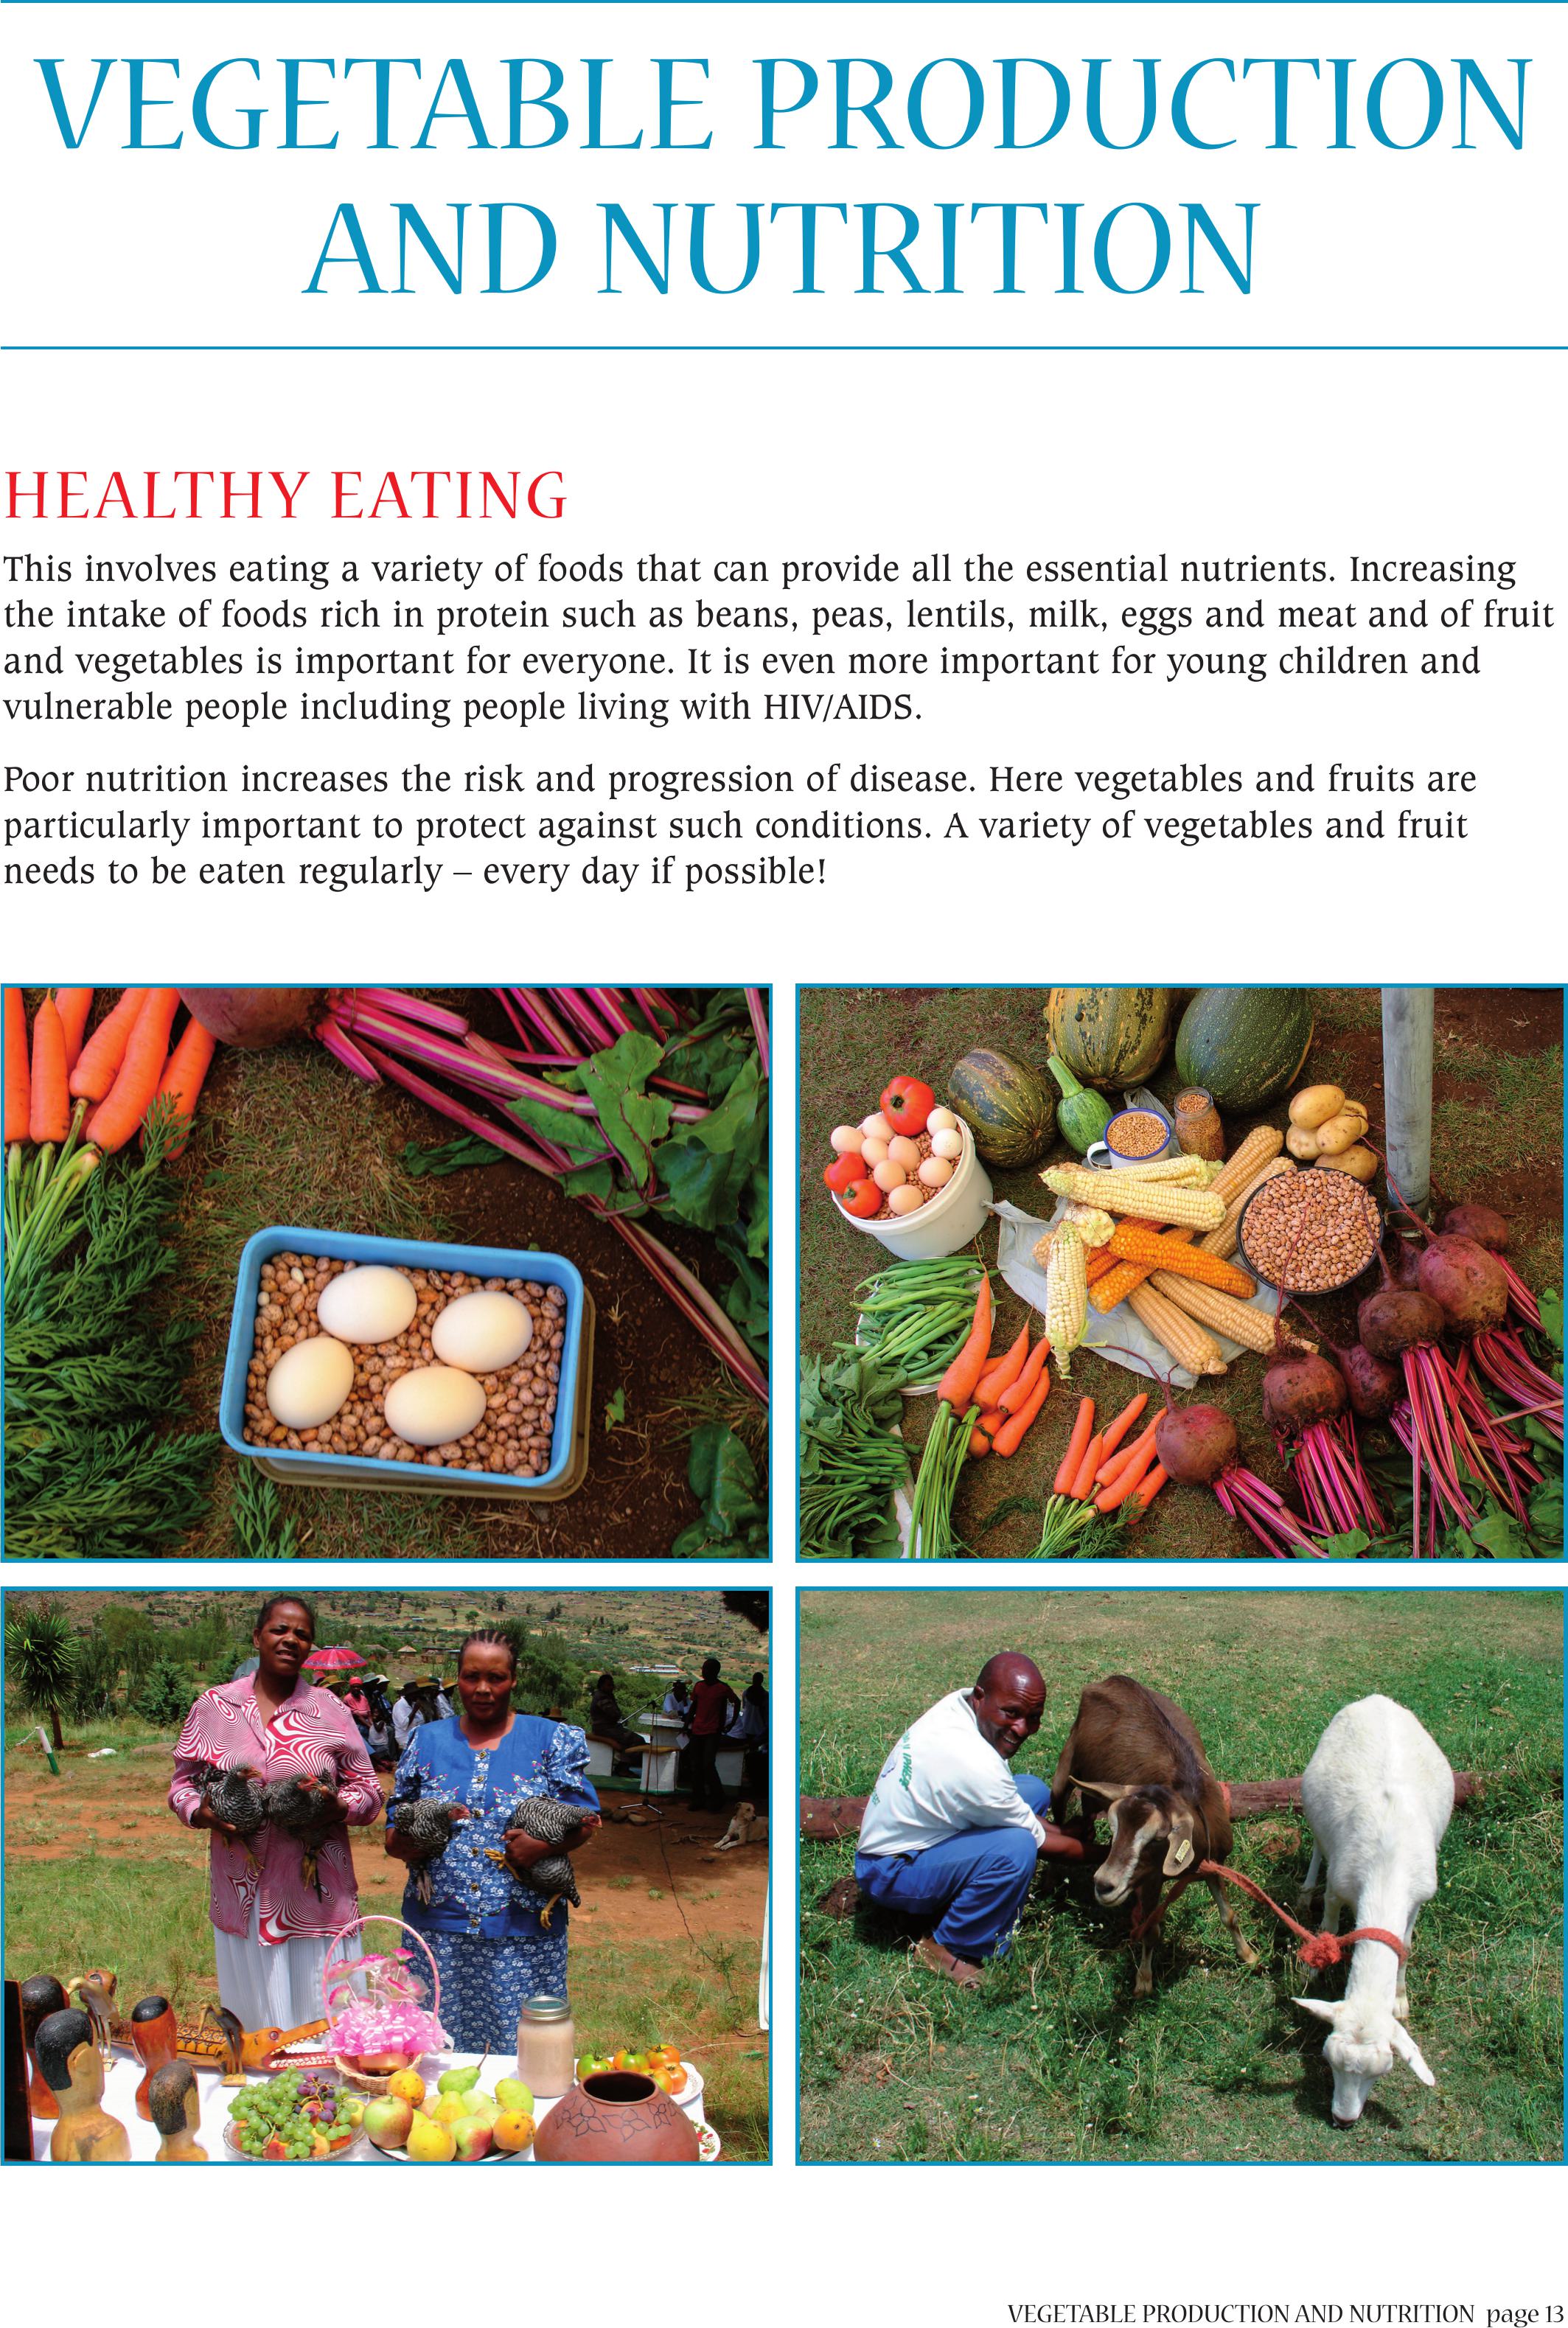
HEALTHY EATING
This involves eating a variety of foods that can provide all the essential nutrients. Increasing
the intake of foods rich in protein such as beans, peas, lentils, milk, eggs and meat and of fruit
and vegetables is important for everyone. It is even more important for young children and
vulnerable people including people living with HIV/AIDS.
Poor nutrition increases the risk and progression of disease. Here vegetables and fruits are
particularly important to protect against such conditions. A variety of vegetables and fruit
needs to be eaten regularly – every day if possible!
VEGETABLE PRODUCTION
AND NUTRITION
page 14 VEGETABLE PRODUCTION AND NUTRITION
WORKING WITH HIV/AIDS WITHIN NUTRITION
DIVISION
The Nutrition Division is the key Division within the Ministry of Agriculture and Food Security
of Lesotho for mainstreaming of HIV/AIDS into agricultural programmes. The aim is to reduce
the negative impact of HIV/AIDS and related diseases in the country. This section shows some
of the ways in which the Division helps people to do this.
Food gardens are promoted to increase the nutrition security of vulnerable families and
individuals. These include households headed by orphans women and the elderly. Food
gardens can provide year round food to households, supplementing the food bought, both in
terms of diversity and in terms of providing much needed nutrients – specifically Vitamins A
and C, calcium and iron.
Specific gardening techniques that can increase soil fertility, water holding in the soil (rain
water harvesting) and production capacity are promoted.
These include:
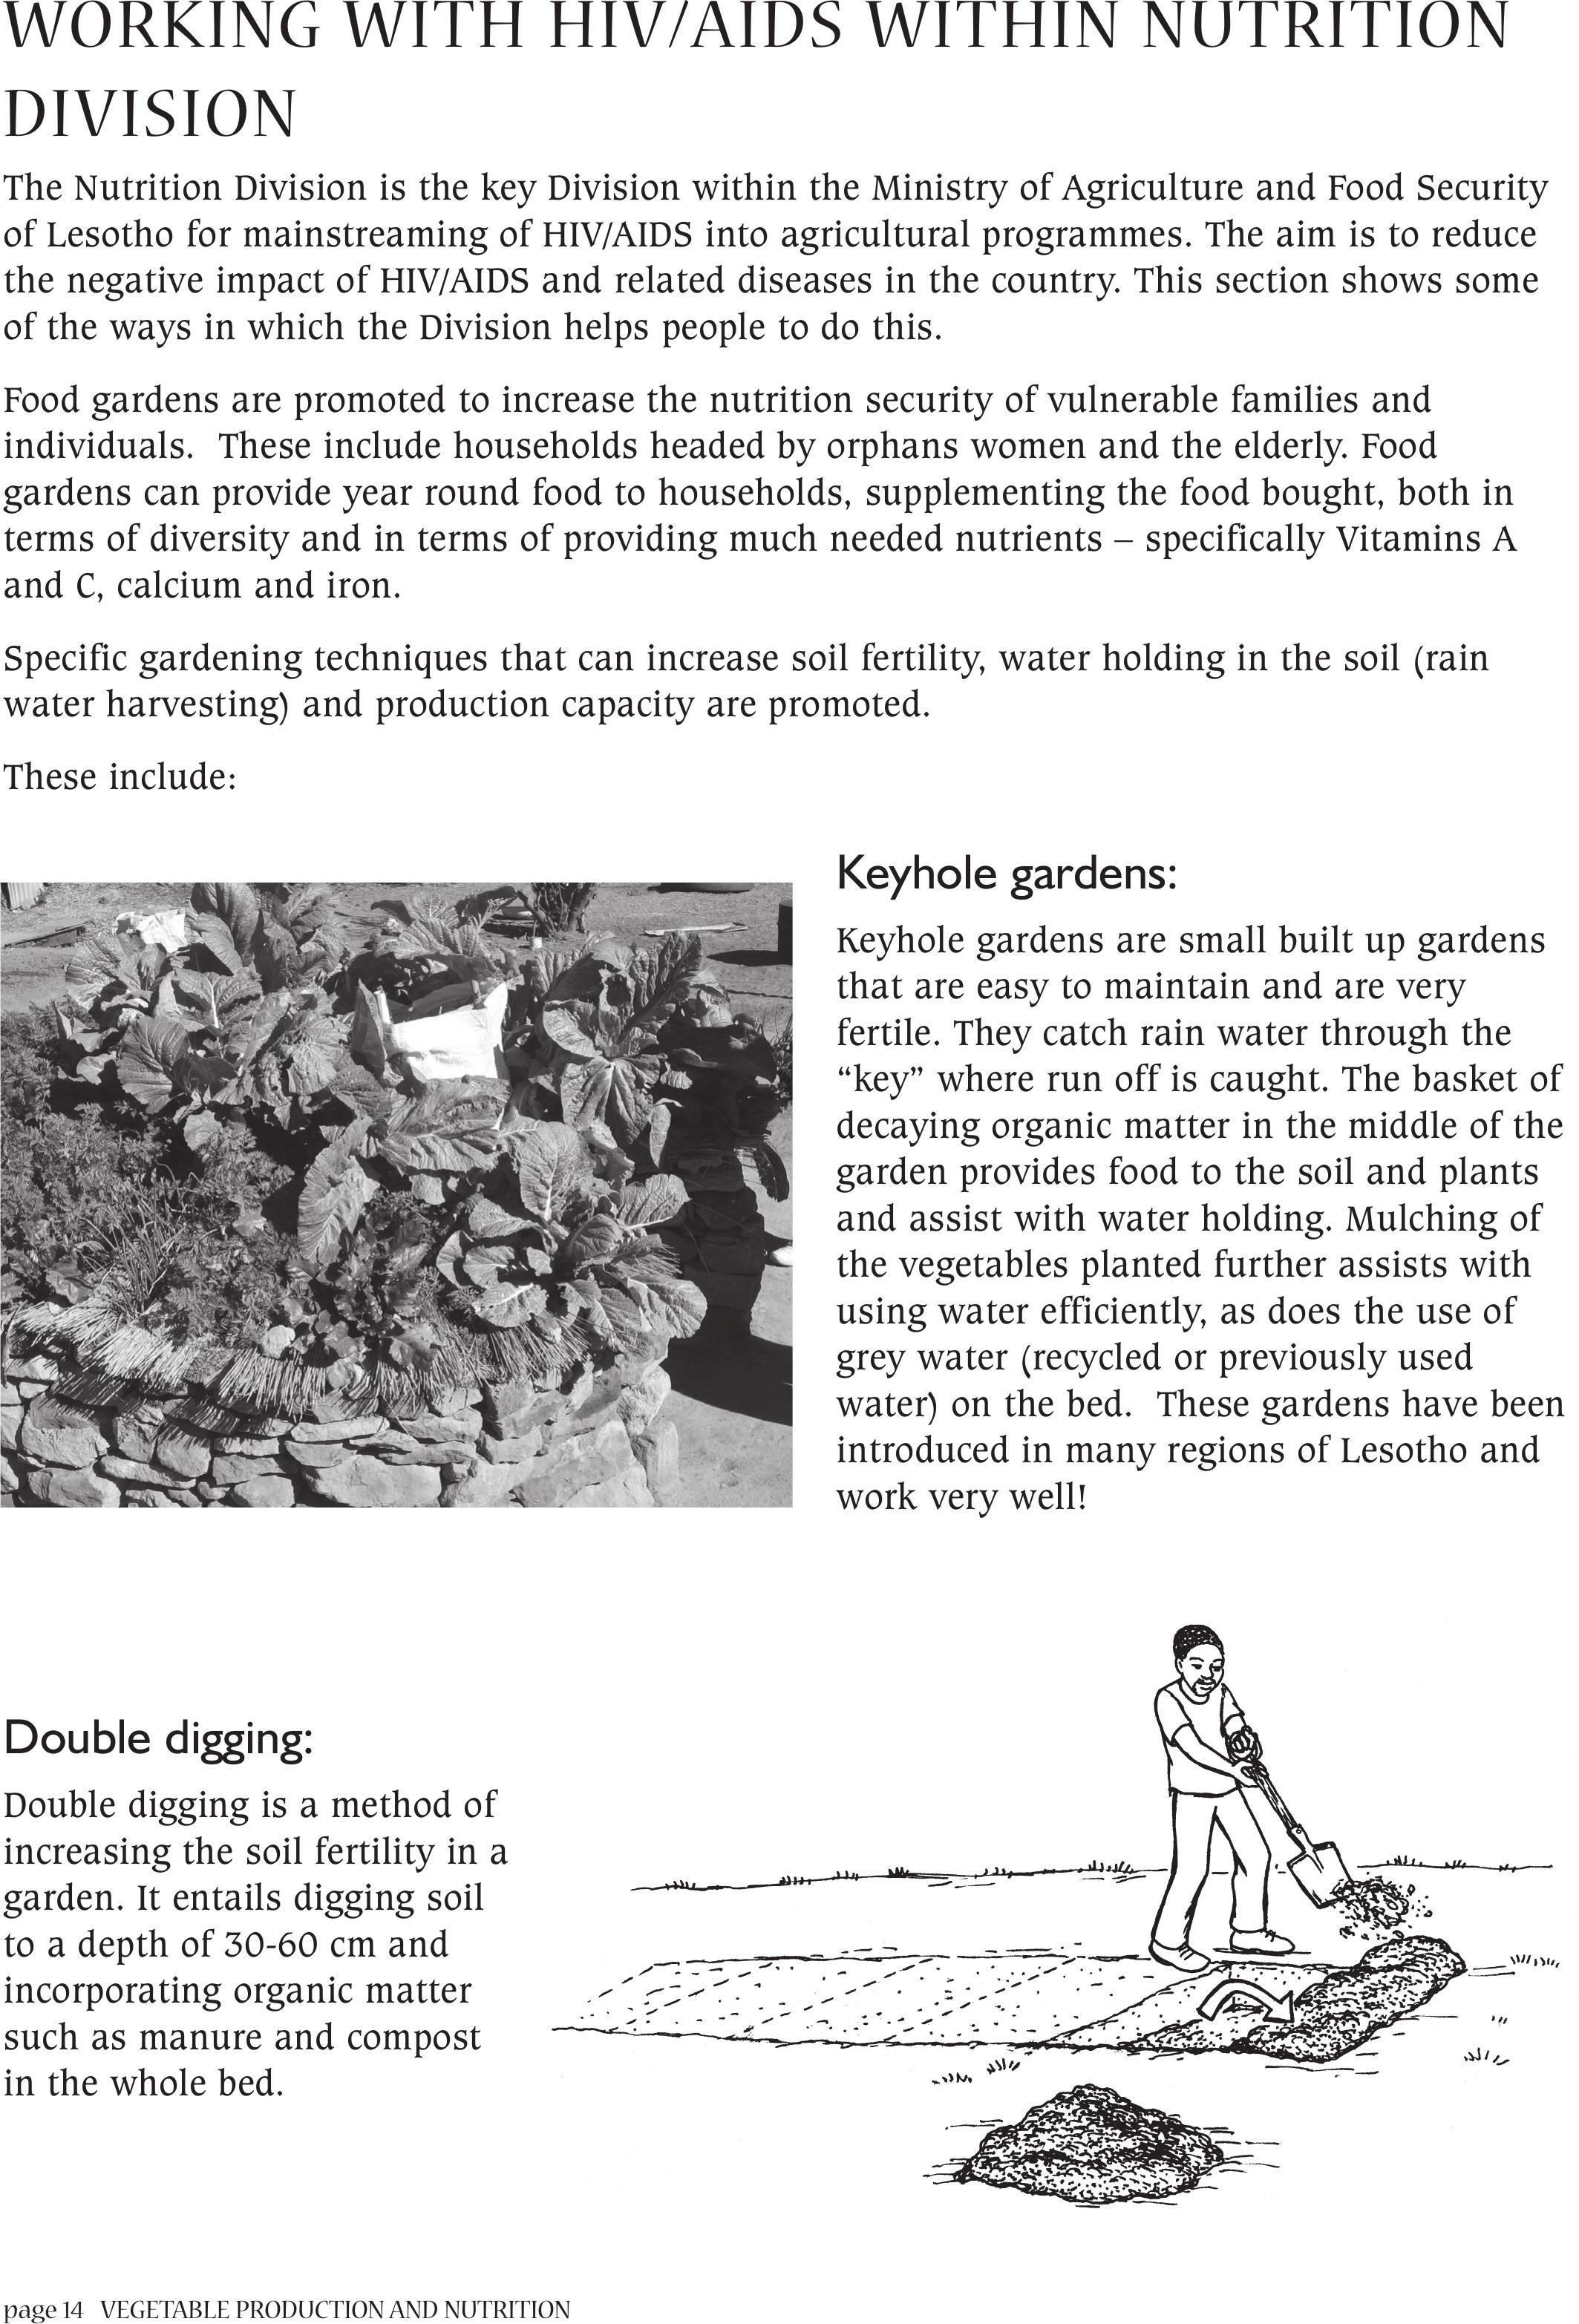
Keyhole gardens:
Keyhole gardens are small built up gardens
that are easy to maintain and are very
fertile. They catch rain water through the
“key” where run off is caught. The basket of
decaying organic matter in the middle of the
garden provides food to the soil and plants
and assist with water holding. Mulching of
the vegetables planted further assists with
using water efficiently, as does the use of
grey water (recycled or previously used
water) on the bed. These gardens have been
introduced in many regions of Lesotho and
work very well!
Double digging:
Double digging is a method of
increasing the soil fertility in a
garden. It entails digging soil
to a depth of 30-60 cm and
incorporating organic matter
such as manure and compost
in the whole bed.
VEGETABLE PRODUCTION AND NUTRITIONpage 15
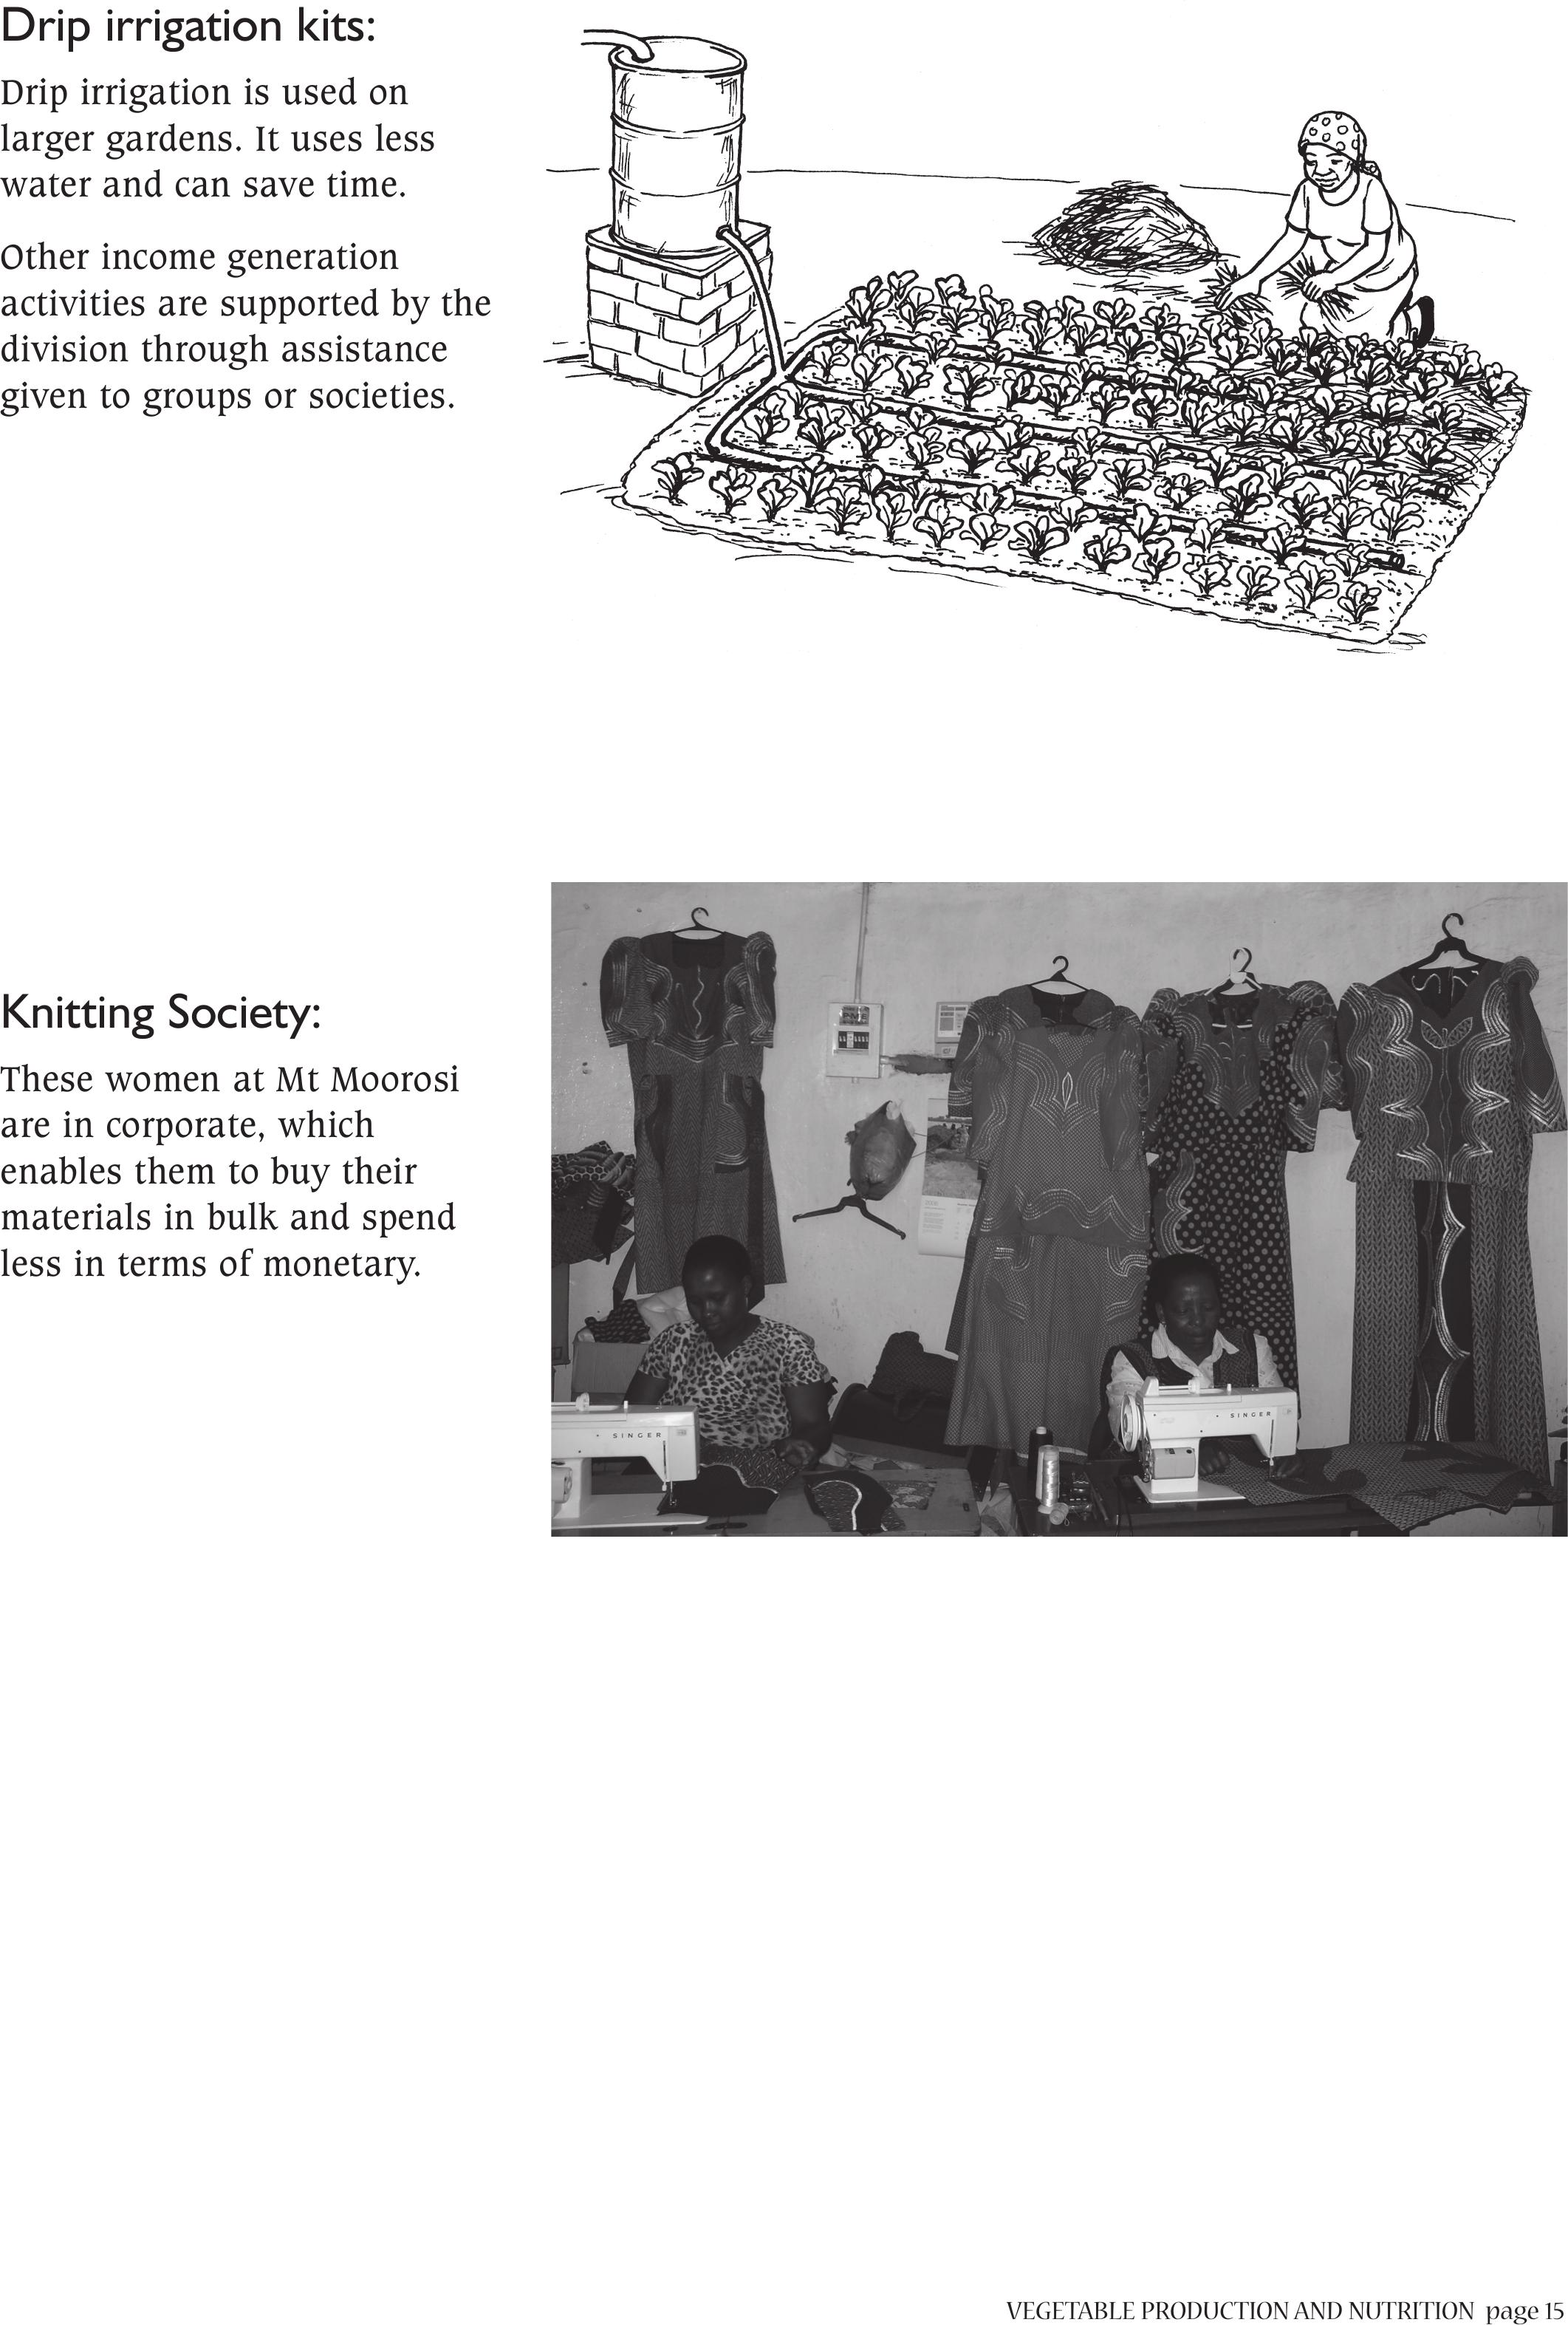
Drip irrigation kits:
Drip irrigation is used on
larger gardens. It uses less
water and can save time.
Other income generation
activities are supported by the
division through assistance
given to groups or societies.
Knitting Society:
These women at Mt Moorosi
are in corporate, which
enables them to buy their
materials in bulk and spend
less in terms of monetary.

page 16
FARMER EXPERIMENTATIONpage 17
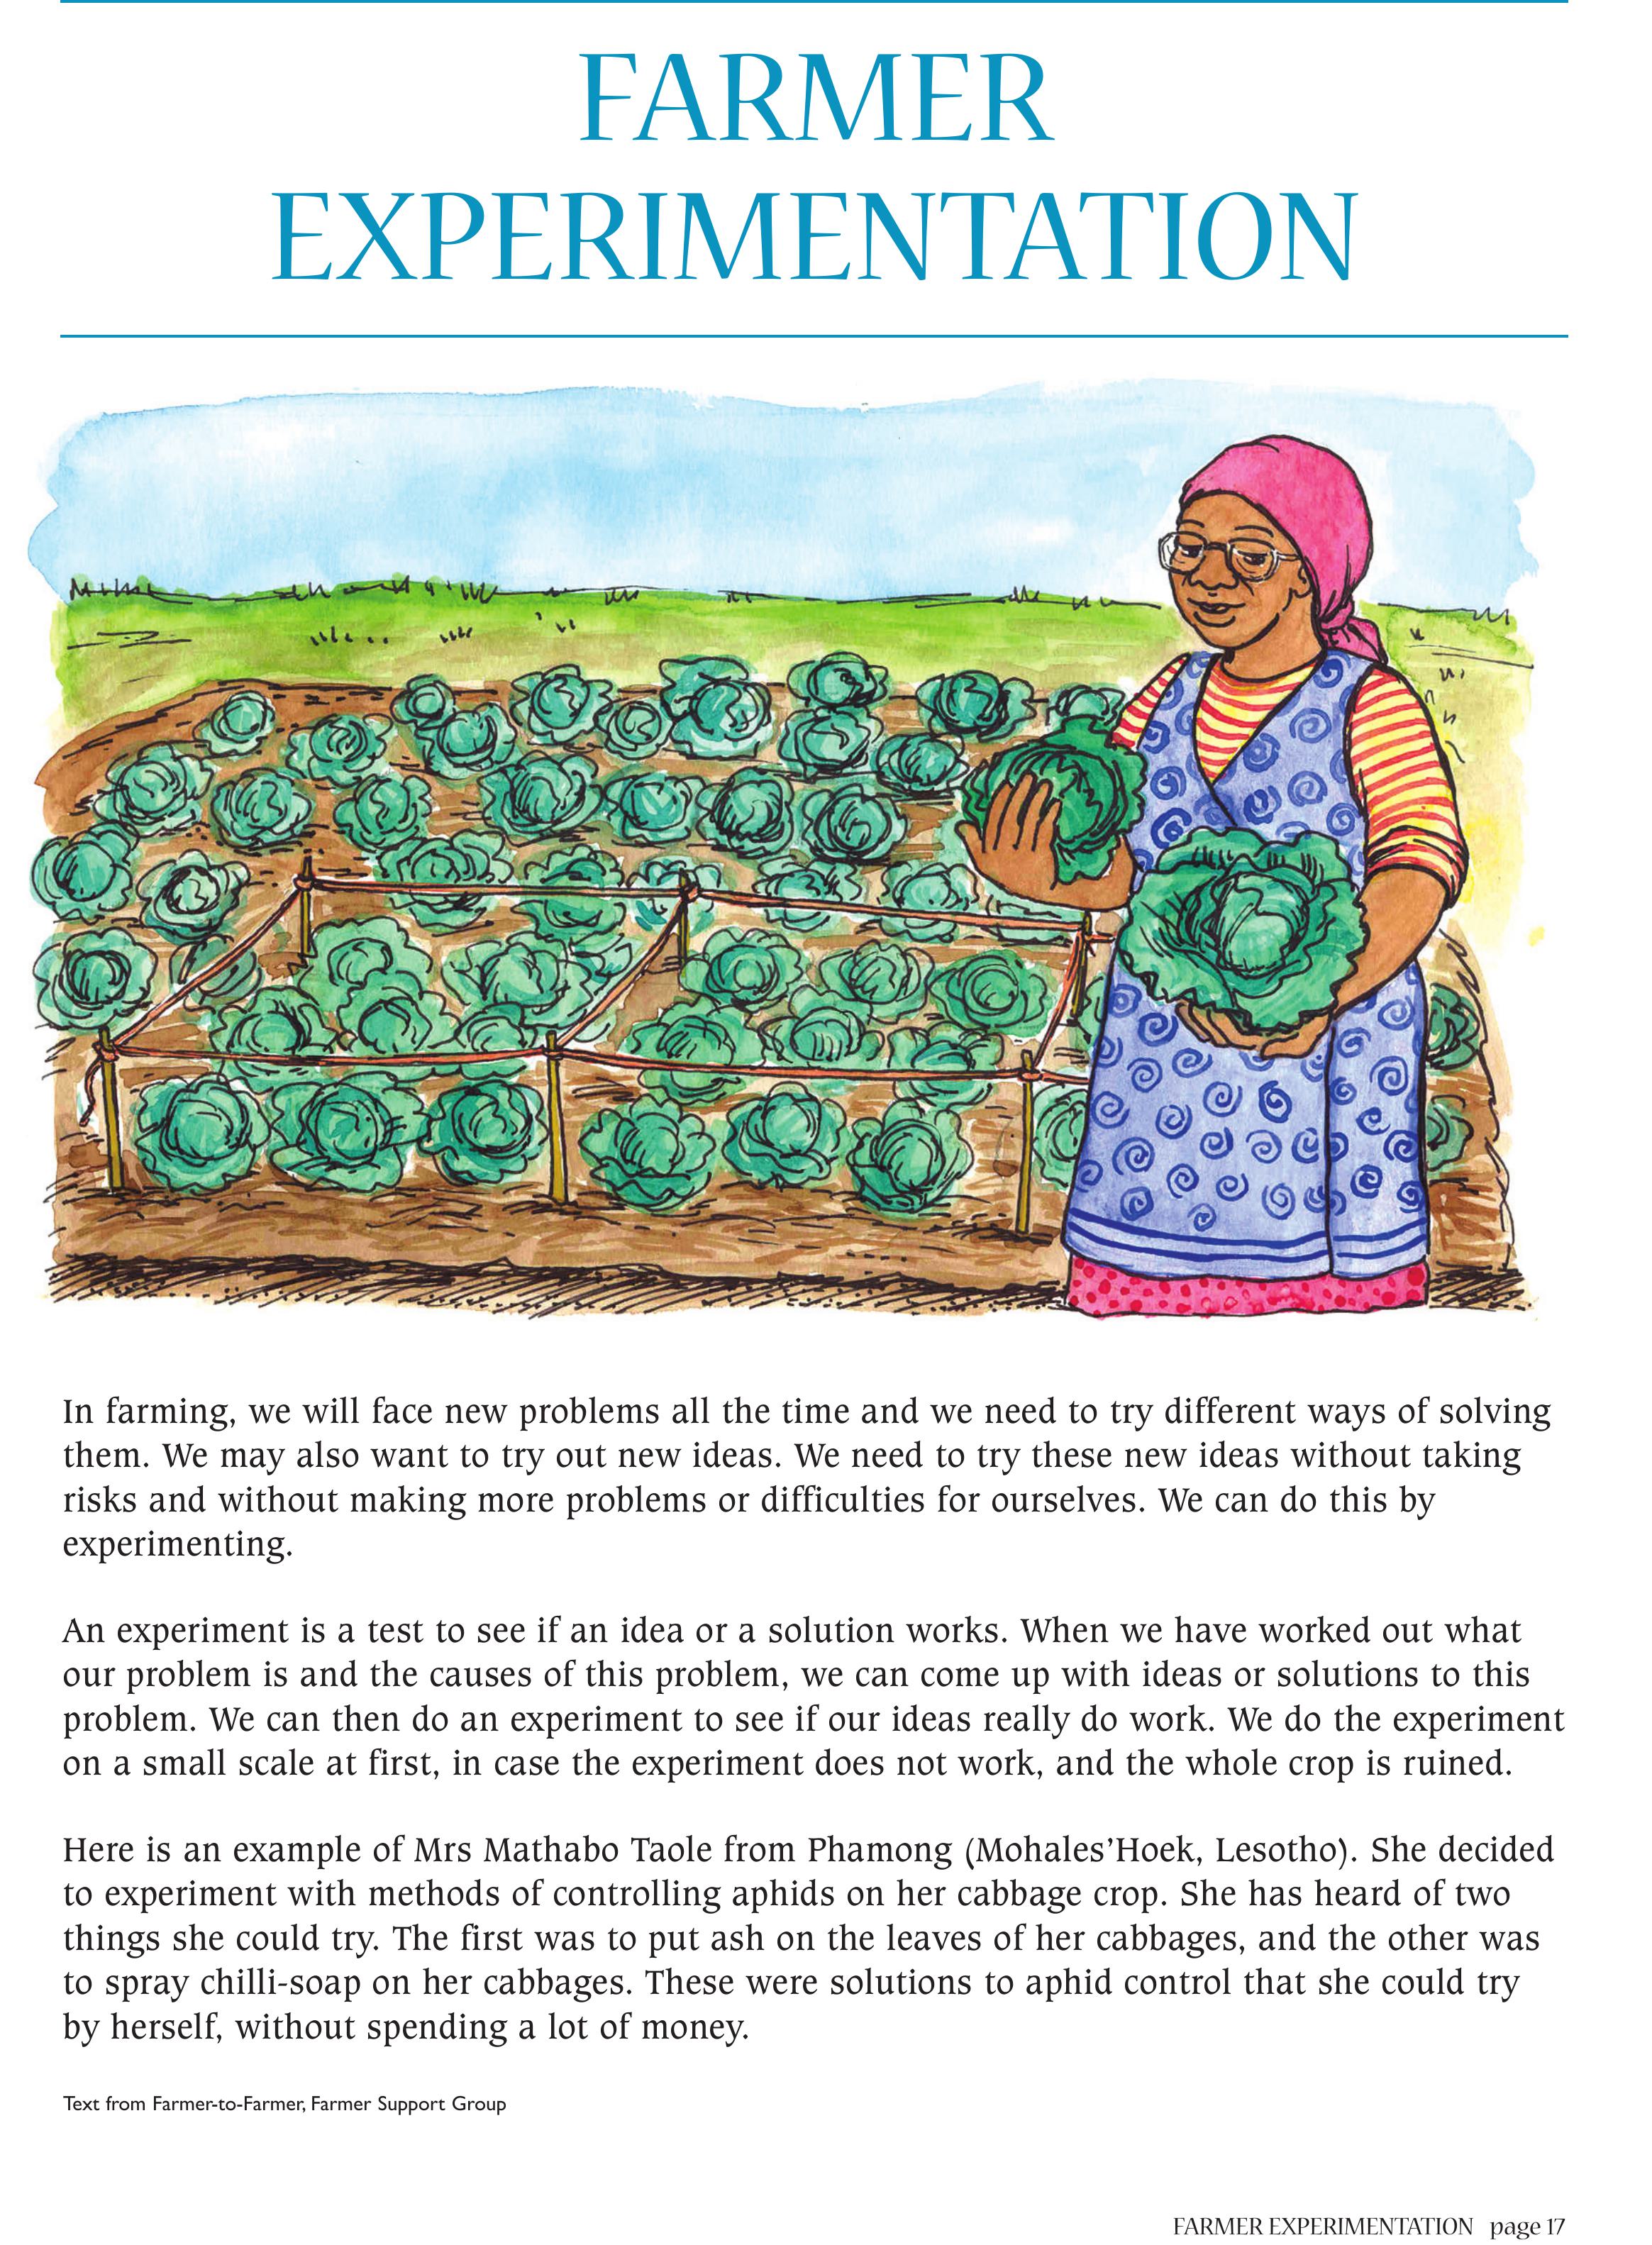
In farming, we will face new problems all the time and we need to try different ways of solving
them. We may also want to try out new ideas. We need to try these new ideas without taking
risks and without making more problems or difficulties for ourselves. We can do this by
experimenting.
An experiment is a test to see if an idea or a solution works. When we have worked out what
our problem is and the causes of this problem, we can come up with ideas or solutions to this
problem. We can then do an experiment to see if our ideas really do work. We do the experiment
on a small scale at first, in case the experiment does not work, and the whole crop is ruined.
Here is an example of Mrs Mathabo Taole from Phamong (Mohales’Hoek, Lesotho). She decided
to experiment with methods of controlling aphids on her cabbage crop. She has heard of two
things she could try. The first was to put ash on the leaves of her cabbages, and the other was
to spray chilli-soap on her cabbages. These were solutions to aphid control that she could try
by herself, without spending a lot of money.
FARMER
EXPERIMENTATION
Text from Farmer-to-Farmer, Farmer Support Group

page 18 FARMER EXPERIMENTATION
Mrs Taole took a small piece of her garden (1/10th) as the experimental plot. She divided the
plot into 3 sections and marked them out very carefully.
1. On the first one she sprinkled ash on
her cabbages.
2. On the second one she did a control.
This means she did not try out one
of her solutions here because she
was trying to see if her solutions
really worked. In other words, she
wanted to make sure that the
solution was better than doing
nothing.
3. On the third one she sprayed a chilli-soap solution.
Then she monitored and looked at her experiment. Every week she checked her cabbages and
wrote down how many aphids the cabbages had. She did this so that she could remember exactly
what happened, and at the end she could decide which method was better.
Here are her results:
Experimental plot Ash Control Chilli
1
2
soap
3
Garden planted with cabbages
Week 1 2 3
Ash Control Chilli-soap
1, 2 and 3 No aphids No aphids No aphids
4 Sprinkled ash when Aphids appeared; about Sprayed chilli-soap when
aphids appeared 10 on each plant. Only aphids appeared
some plants have aphids
5 Still some aphids, about Now aphids on all the Aphids seem to have
5 per plant leaves; about 100 disappeared
per plant
6 More aphids.Aphids Aphids on the plants that More aphids.Aphids
appearing on plants that did not have aphids appearing on plants
did not have them before.before that did not have them
Sprinkled ash again before. Sprayed chilli-
soap again
7 Fewer aphids. Some Aphid infestation now on Fewer aphids, some
plants free of aphids. Hot all the plants. Hot plants free of aphids.
weather, leaves look weather, no scorching Hot weather, no
scorched.Was it the ash? scorching
8 The scorched/burnt Plants not growing well.Few aphids, but
leaves have been pulled Aphids seem to move increasing
off and plants are still from here onto the ash
growing – few aphids and chilli-soap plots.
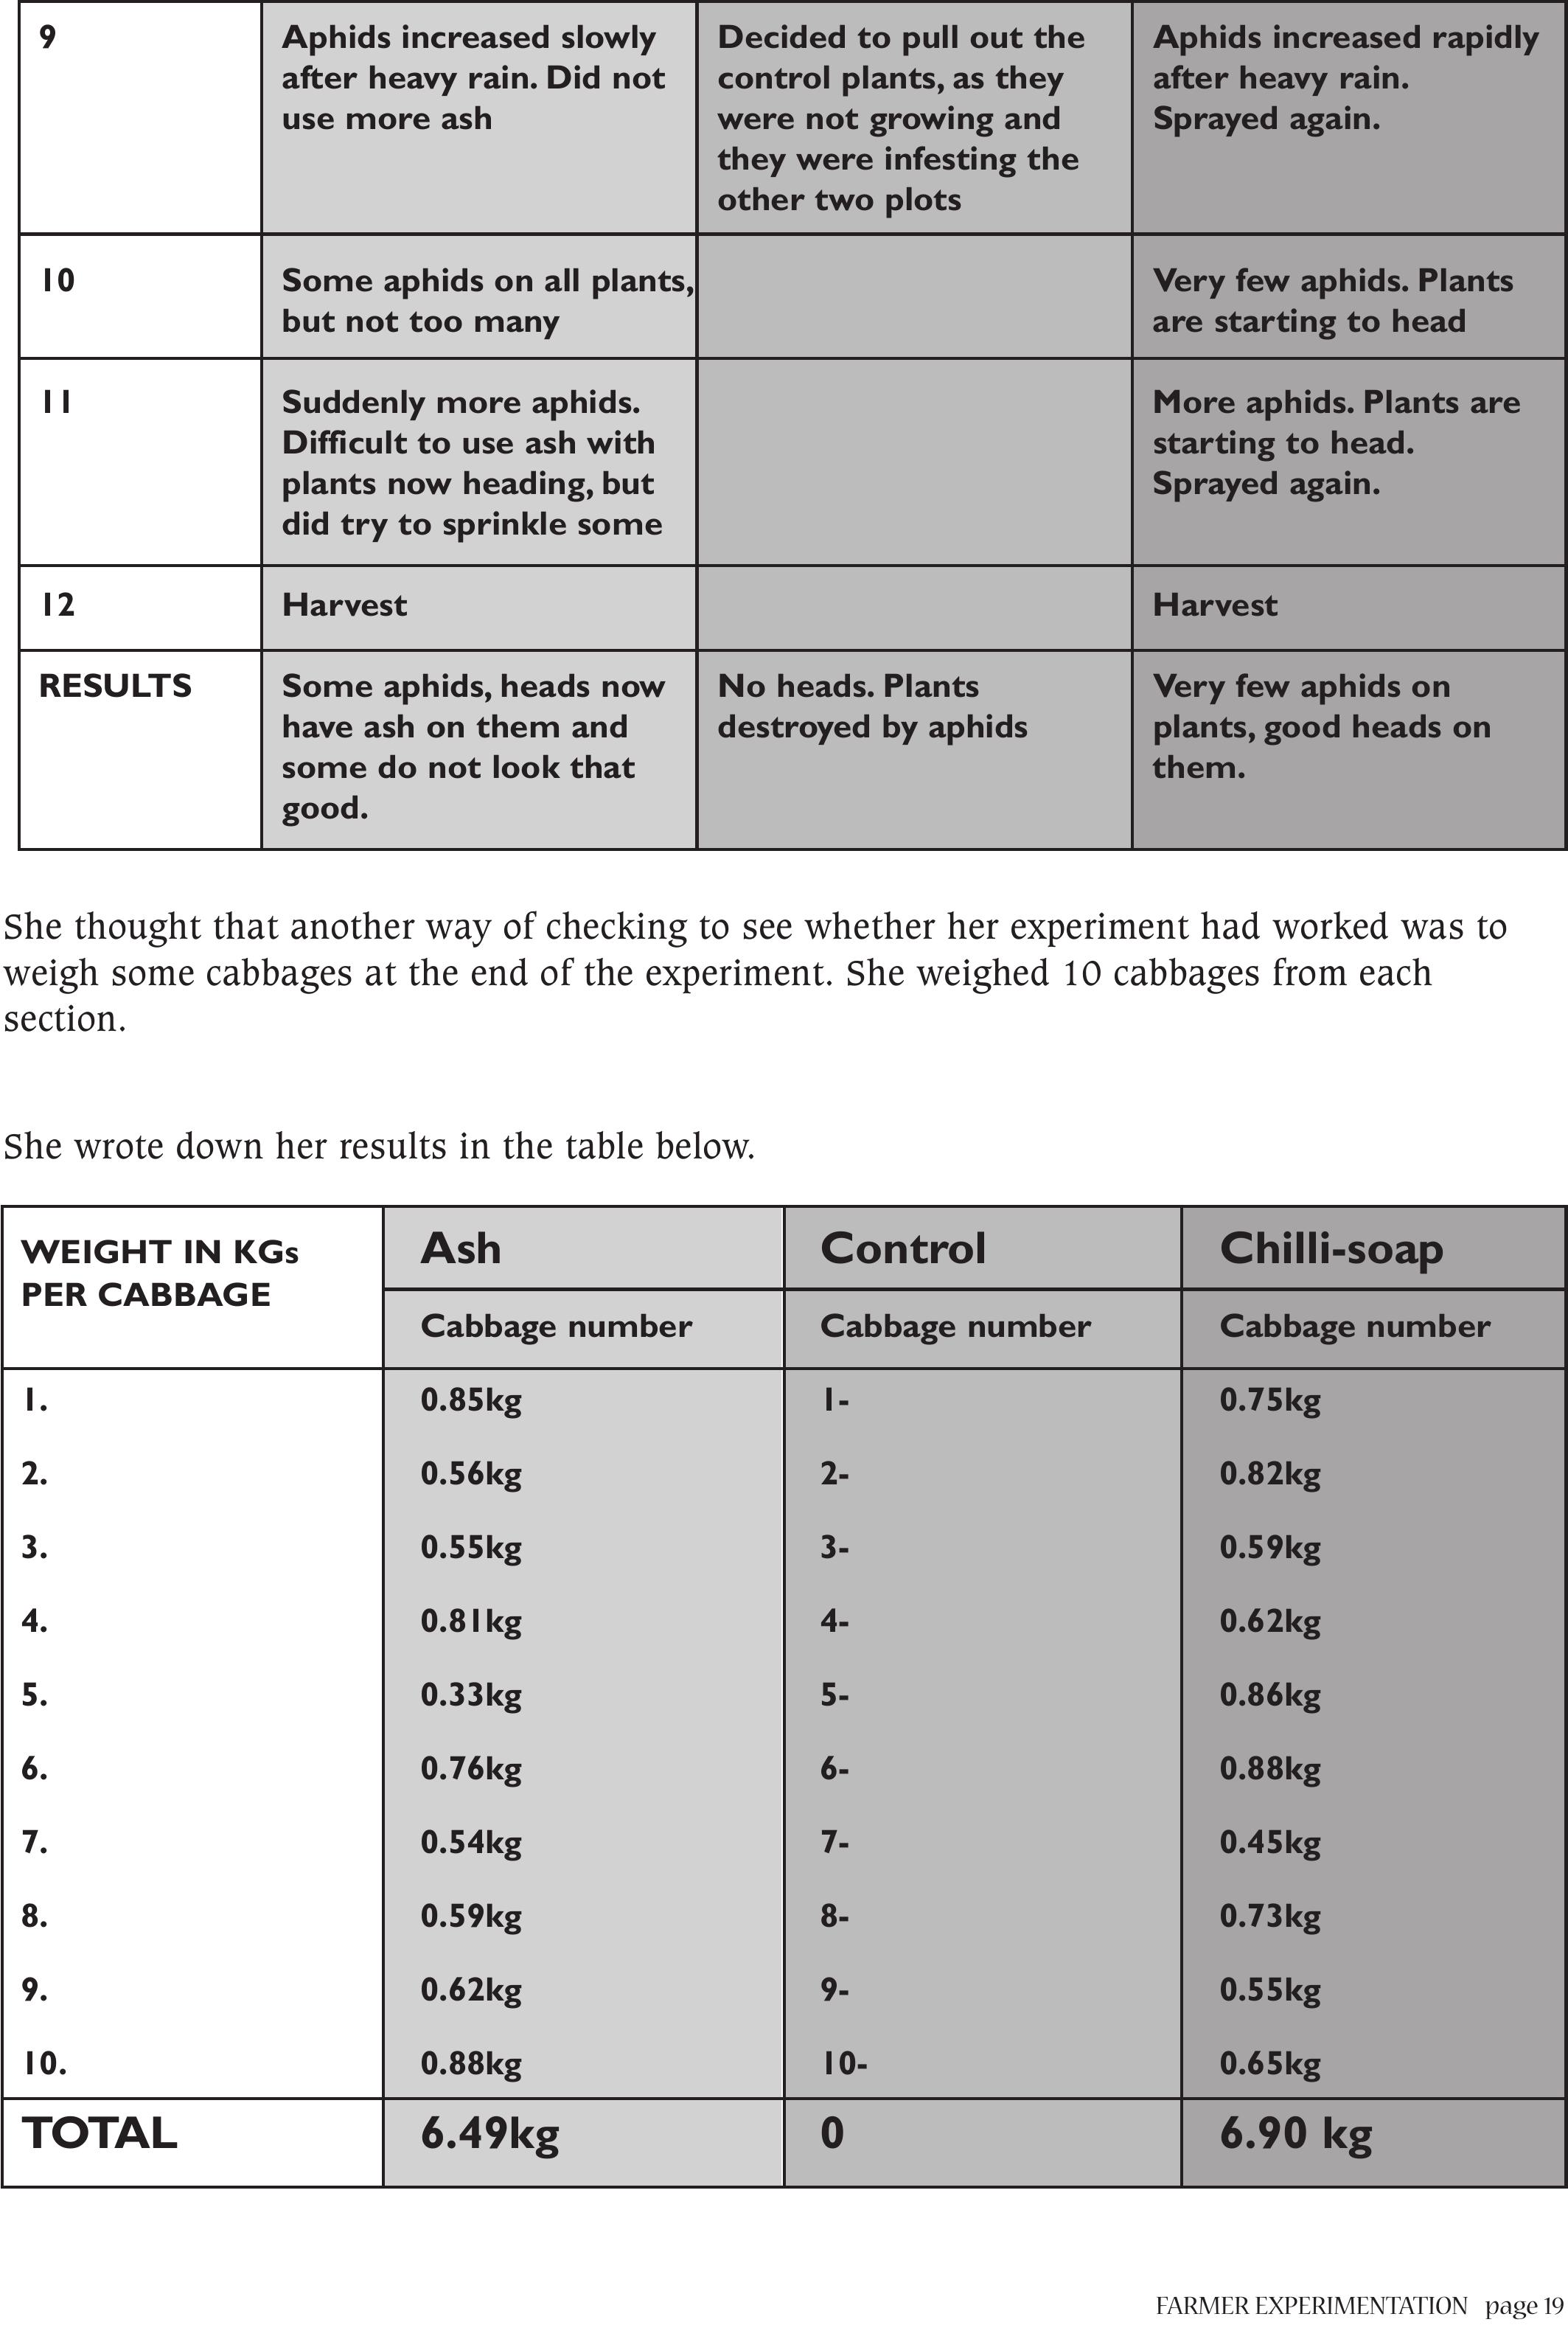
FARMER EXPERIMENTATIONpage 19
9 Aphids increased slowly Decided to pull out the Aphids increased rapidly
after heavy rain. Did not control plants, as they after heavy rain.
use more ash were not growing and Sprayed again.
they were infesting the
other two plots
10 Some aphids on all plants,Very few aphids. Plants
but not too many are starting to head
11 Suddenly more aphids.More aphids. Plants are
Difficult to use ash with starting to head.
plants now heading, but Sprayed again.
did try to sprinkle some
12 Harvest Harvest
RESULTS Some aphids, heads now No heads. Plants Very few aphids on
have ash on them and destroyed by aphids plants, good heads on
some do not look that them.
good.
She thought that another way of checking to see whether her experiment had worked was to
weigh some cabbages at the end of the experiment. She weighed 10 cabbages from each
section.
She wrote down her results in the table below.
WEIGHT IN KGs
PER CABBAGE
1.
2.
3.
4.
5.
6.
7.
8.
9.
10.
TOTAL
Ash
Cabbage number
0.85kg
0.56kg
0.55kg
0.81kg
0.33kg
0.76kg
0.54kg
0.59kg
0.62kg
0.88kg
6.49kg
Control
Cabbage number
1-
2-
3-
4-
5-
6-
7-
8-
9-
10-
0
Chilli-soap
Cabbage number
0.75kg
0.82kg
0.59kg
0.62kg
0.86kg
0.88kg
0.45kg
0.73kg
0.55kg
0.65kg
6.90 kg
page 20 FARMER EXPERIMENTATION
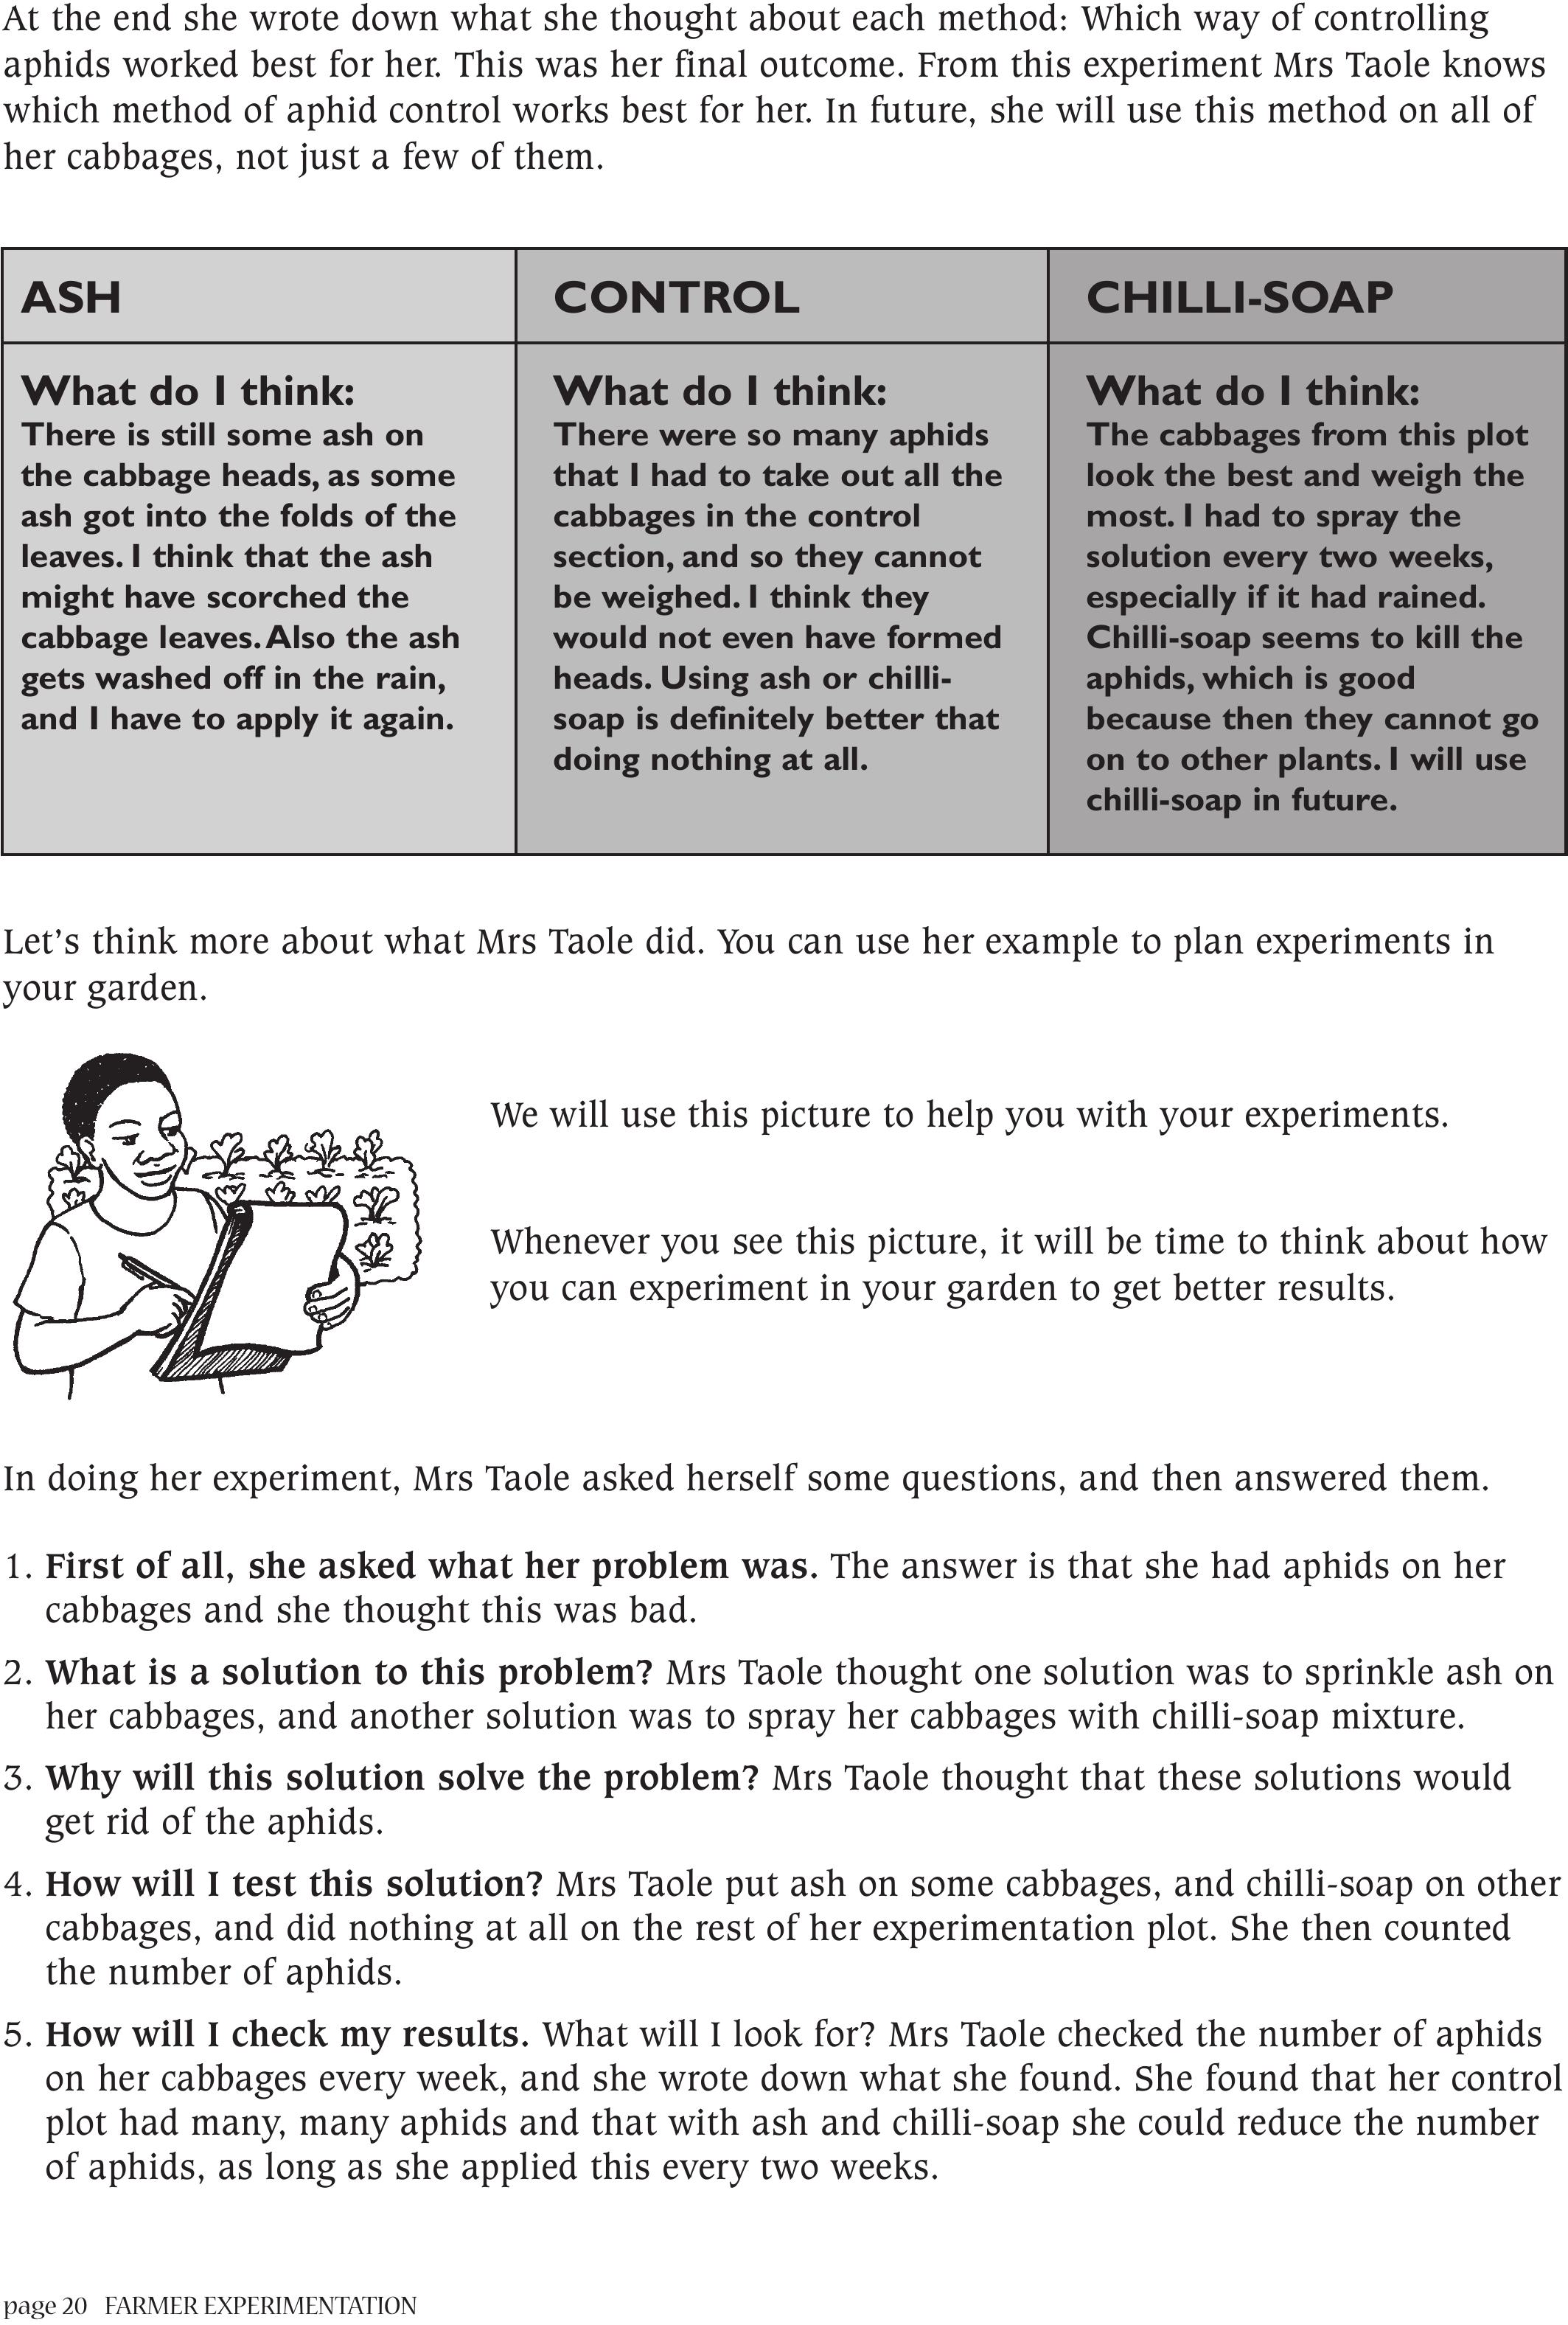
At the end she wrote down what she thought about each method: Which way of controlling
aphids worked best for her. This was her final outcome. From this experiment Mrs Taole knows
which method of aphid control works best for her. In future, she will use this method on all of
her cabbages, not just a few of them.
ASH
What do I think:
There is still some ash on
the cabbage heads, as some
ash got into the folds of the
leaves. I think that the ash
might have scorched the
cabbage leaves.Also the ash
gets washed off in the rain,
and I have to apply it again.
CONTROL
What do I think:
There were so many aphids
that I had to take out all the
cabbages in the control
section, and so they cannot
be weighed. I think they
would not even have formed
heads. Using ash or chilli-
soap is definitely better that
doing nothing at all.
CHILLI-SOAP
What do I think:
The cabbages from this plot
look the best and weigh the
most. I had to spray the
solution every two weeks,
especially if it had rained.
Chilli-soap seems to kill the
aphids, which is good
because then they cannot go
on to other plants. I will use
chilli-soap in future.
Let’s think more about what Mrs Taole did. You can use her example to plan experiments in
your garden.
We will use this picture to help you with your experiments.
Whenever you see this picture, it will be time to think about how
you can experiment in your garden to get better results.
In doing her experiment, Mrs Taole asked herself some questions, and then answered them.
1. First of all, she asked what her problem was. The answer is that she had aphids on her
cabbages and she thought this was bad.
2. What is a solution to this problem? Mrs Taole thought one solution was to sprinkle ash on
her cabbages, and another solution was to spray her cabbages with chilli-soap mixture.
3. Why will this solution solve the problem? Mrs Taole thought that these solutions would
get rid of the aphids.
4. How will I test this solution? Mrs Taole put ash on some cabbages, and chilli-soap on other
cabbages, and did nothing at all on the rest of her experimentation plot. She then counted
the number of aphids.
5. How will I check my results. What will I look for? Mrs Taole checked the number of aphids
on her cabbages every week, and she wrote down what she found. She found that her control
plot had many, many aphids and that with ash and chilli-soap she could reduce the number
of aphids, as long as she applied this every two weeks.

FARMER EXPERIMENTATIONpage 21
6. How else will I check my results. What will I measure? Mrs Taole weighed 10 cabbages
from each section at the end of the experiment at harvest time. She found that the 10
cabbages with ash treatment weighed 6.49 kilograms and the 10 cabbages with chilli-soap
treatment weighed 6.9kg. This means the cabbages treated with chilli-soap weighed more.
She did not keep her control cabbages to weigh.
7. How will I measure the results or outcomes? The cabbages with the fewest aphids or the
cabbages that weigh the most will be the best.
8.
How will I compare my experiment to my usual way of farming? Mrs Taole’s usual way of
farming was to do nothing about aphids, like she did on her control section. From this
experiment, she has seen that both ash and chilli-soap mixture reduces the number of aphids
on her plants. She has seen that she needs to re-apply both, especially when it rains. Now
she thinks that chilli-soap mixture is the best way of controlling aphids on her cabbages.
In the following table you will find the questions for planning your experiments, and space to
write your answers.
SMALL SCALE EXPERIMENTATION PLAN
1.What is the problem
2.What is a solution to this problem?
3.Why will this solution solve the problem?
4. How will I test this solution?
5.How will I check my results.What will
I look for?
6.How else will I check my results.What will
I measure?
7. How will I measure the results or outcomes?
8.How will I compare my experiment to my
usual way of farming?

page 22 FARMER EXPERIMENTATION
When doing experiments it is important that you can measure your results, and judge whether
the experiment has worked or not. If you try too many things at once, without thinking about
how you can measure the results, you might not know which solution has worked. This is what
happened in the following story.

FARMER EXPERIMENTATIONpage 23
The same thing would have happened to Mrs Taole if she had sprinkled ash and sprayed chilli-
soap on her cabbages at the same time. She would not have known which method was better at
controlling aphids.
One good thing about doing experiments is that you can share your knowledge with your
friends and neighbours, and this might help them. If they do experiments, they can also share
their knowledge with you, so that you do not have to do the experiment yourself. In this way
your community can decide what is best practice, and everyone can use that method of
farming.
from Farmer-to-Farmer, Farmer Support Group

page 24
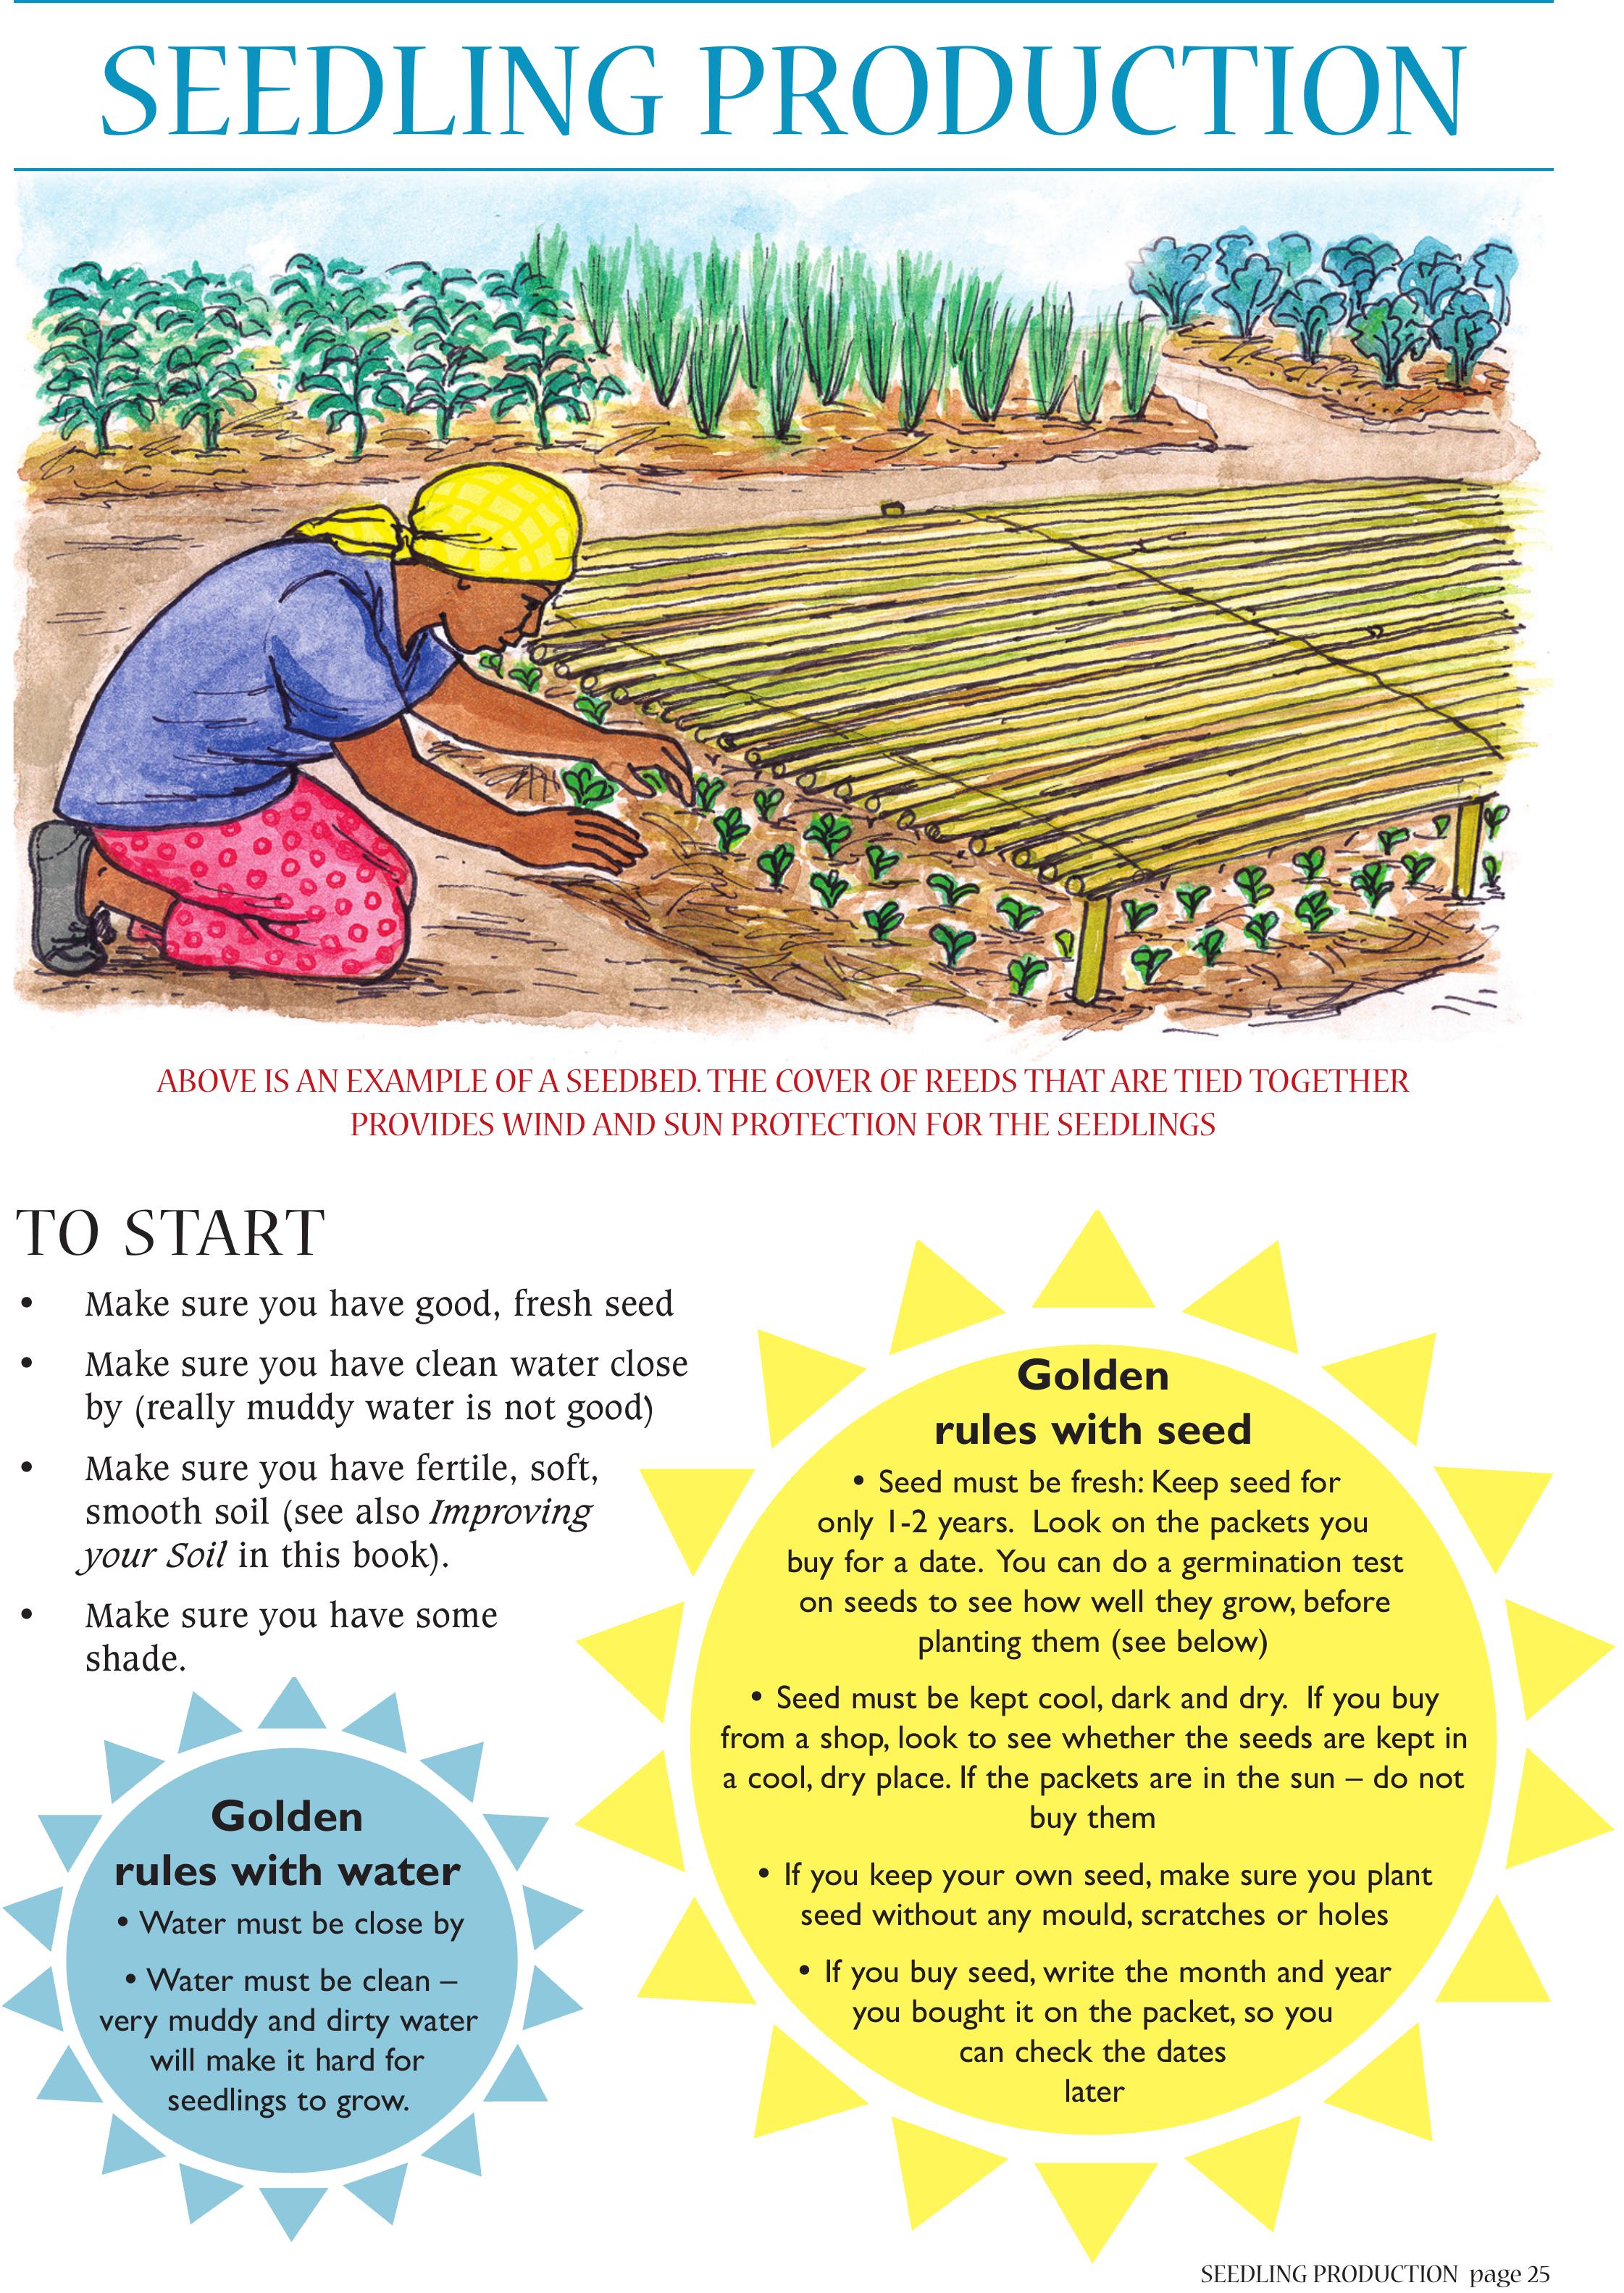
SEEDLING PRODUCTIONpage 25
SEEDLING PRODUCTION
Golden
rules with water
•Water must be close by
•Water must be clean –
very muddy and dirty water
will make it hard for
seedlings to grow.
Golden
rules with seed
• Seed must be fresh: Keep seed for
only 1-2 years. Look on the packets you
buy for a date.You can do a germination test
on seeds to see how well they grow, before
planting them (see below)
• Seed must be kept cool, dark and dry. If you buy
from a shop, look to see whether the seeds are kept in
a cool, dry place. If the packets are in the sun – do not
buy them
• If you keep your own seed, make sure you plant
seed without any mould, scratches or holes
• If you buy seed, write the month and year
you bought it on the packet, so you
can check the dates
later
TO START
• Make sure you have good, fresh seed
• Make sure you have clean water close
by (really muddy water is not good)
• Make sure you have fertile, soft,
smooth soil (see also Improving
your Soil in this book).
• Make sure you have some
shade.
ABOVE IS AN EXAMPLE OF A SEEDBED. THE COVER OF REEDS THAT ARE TIED TOGETHER
PROVIDES WIND AND SUN PROTECTION FOR THE SEEDLINGS

Before planting seeds they can be
tested for germination.You will test
how many of your seeds will grow.
• Take 50 seeds and place them on top
of some damp paper, cloth or toilet
tissue. Do not let the seeds stand in
water or dry out.
• Place the paper or cloth with the
seeds inside a plastic bag and blow air
into the bag, before closing it.
• Check the seeds regularly to see how
many germinate.This should take
3-10 days.
• Then count the seeds that have
germinated.
Here for example 40 out of 50 seeds germinated.This is a germination rate of 80% (80/100).
This means that only 80 out of 100 seeds that you plant will start to grow.
EVAPORATED MOISTURE INSIDE
THE BAG FROM THE DAMP CLOTH
MEASUREMENTS
ONE METRE
30 cm
ONE FINGER = 1.5 cmTWO FINGERS = 3 - 4 cmONE HAND = 20-30 cm
EXPERIMENTATION
GERMINATION TEST – you might want to try this if you are unsure
of the quality and freshness of your seeds
page 26 SEEDLING PRODUCTION
SEEDLING PRODUCTIONpage 27
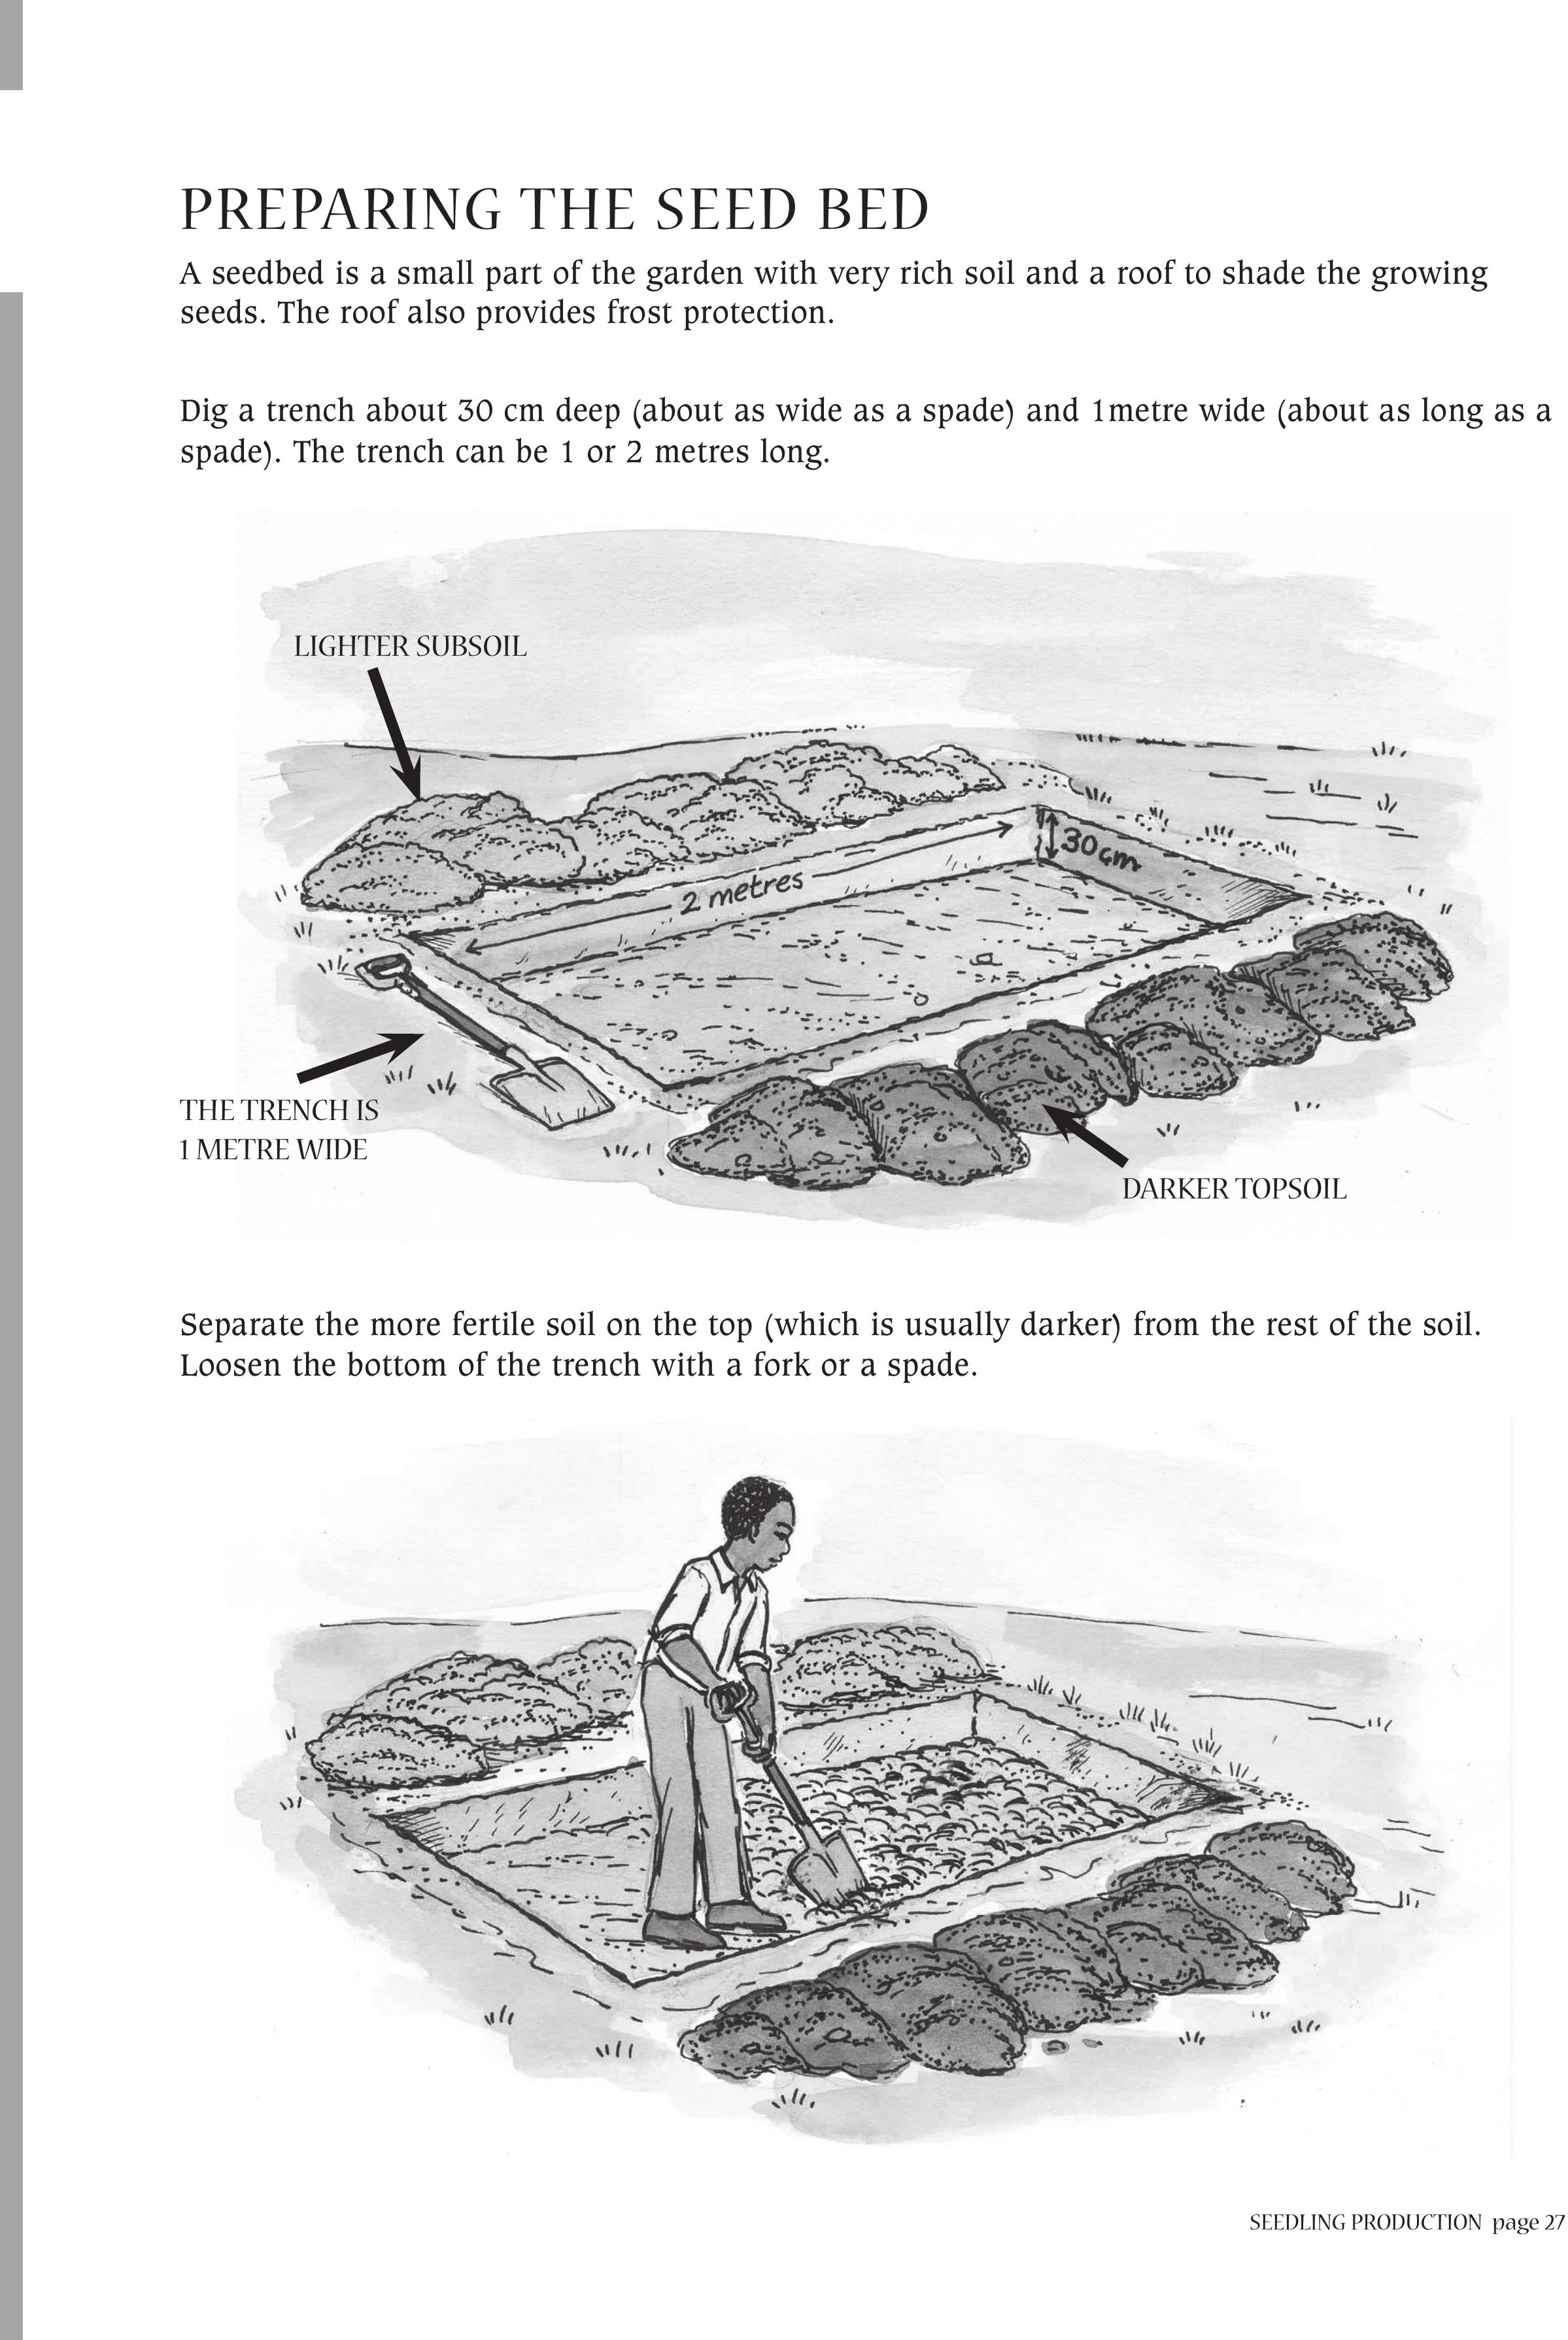
PREPARING THE SEED BED
A seedbed is a small part of the garden with very rich soil and a roof to shade the growing
seeds. The roof also provides frost protection.
Dig a trench about 30 cm deep (about as wide as a spade) and 1metre wide (about as long as a
spade). The trench can be 1 or 2 metres long.
Separate the more fertile soil on the top (which is usually darker) from the rest of the soil.
Loosen the bottom of the trench with a fork or a spade.
LIGHTER SUBSOIL
DARKER TOPSOIL
THE TRENCH IS
1 METRE WIDE
page 28 SEEDLING PRODUCTION
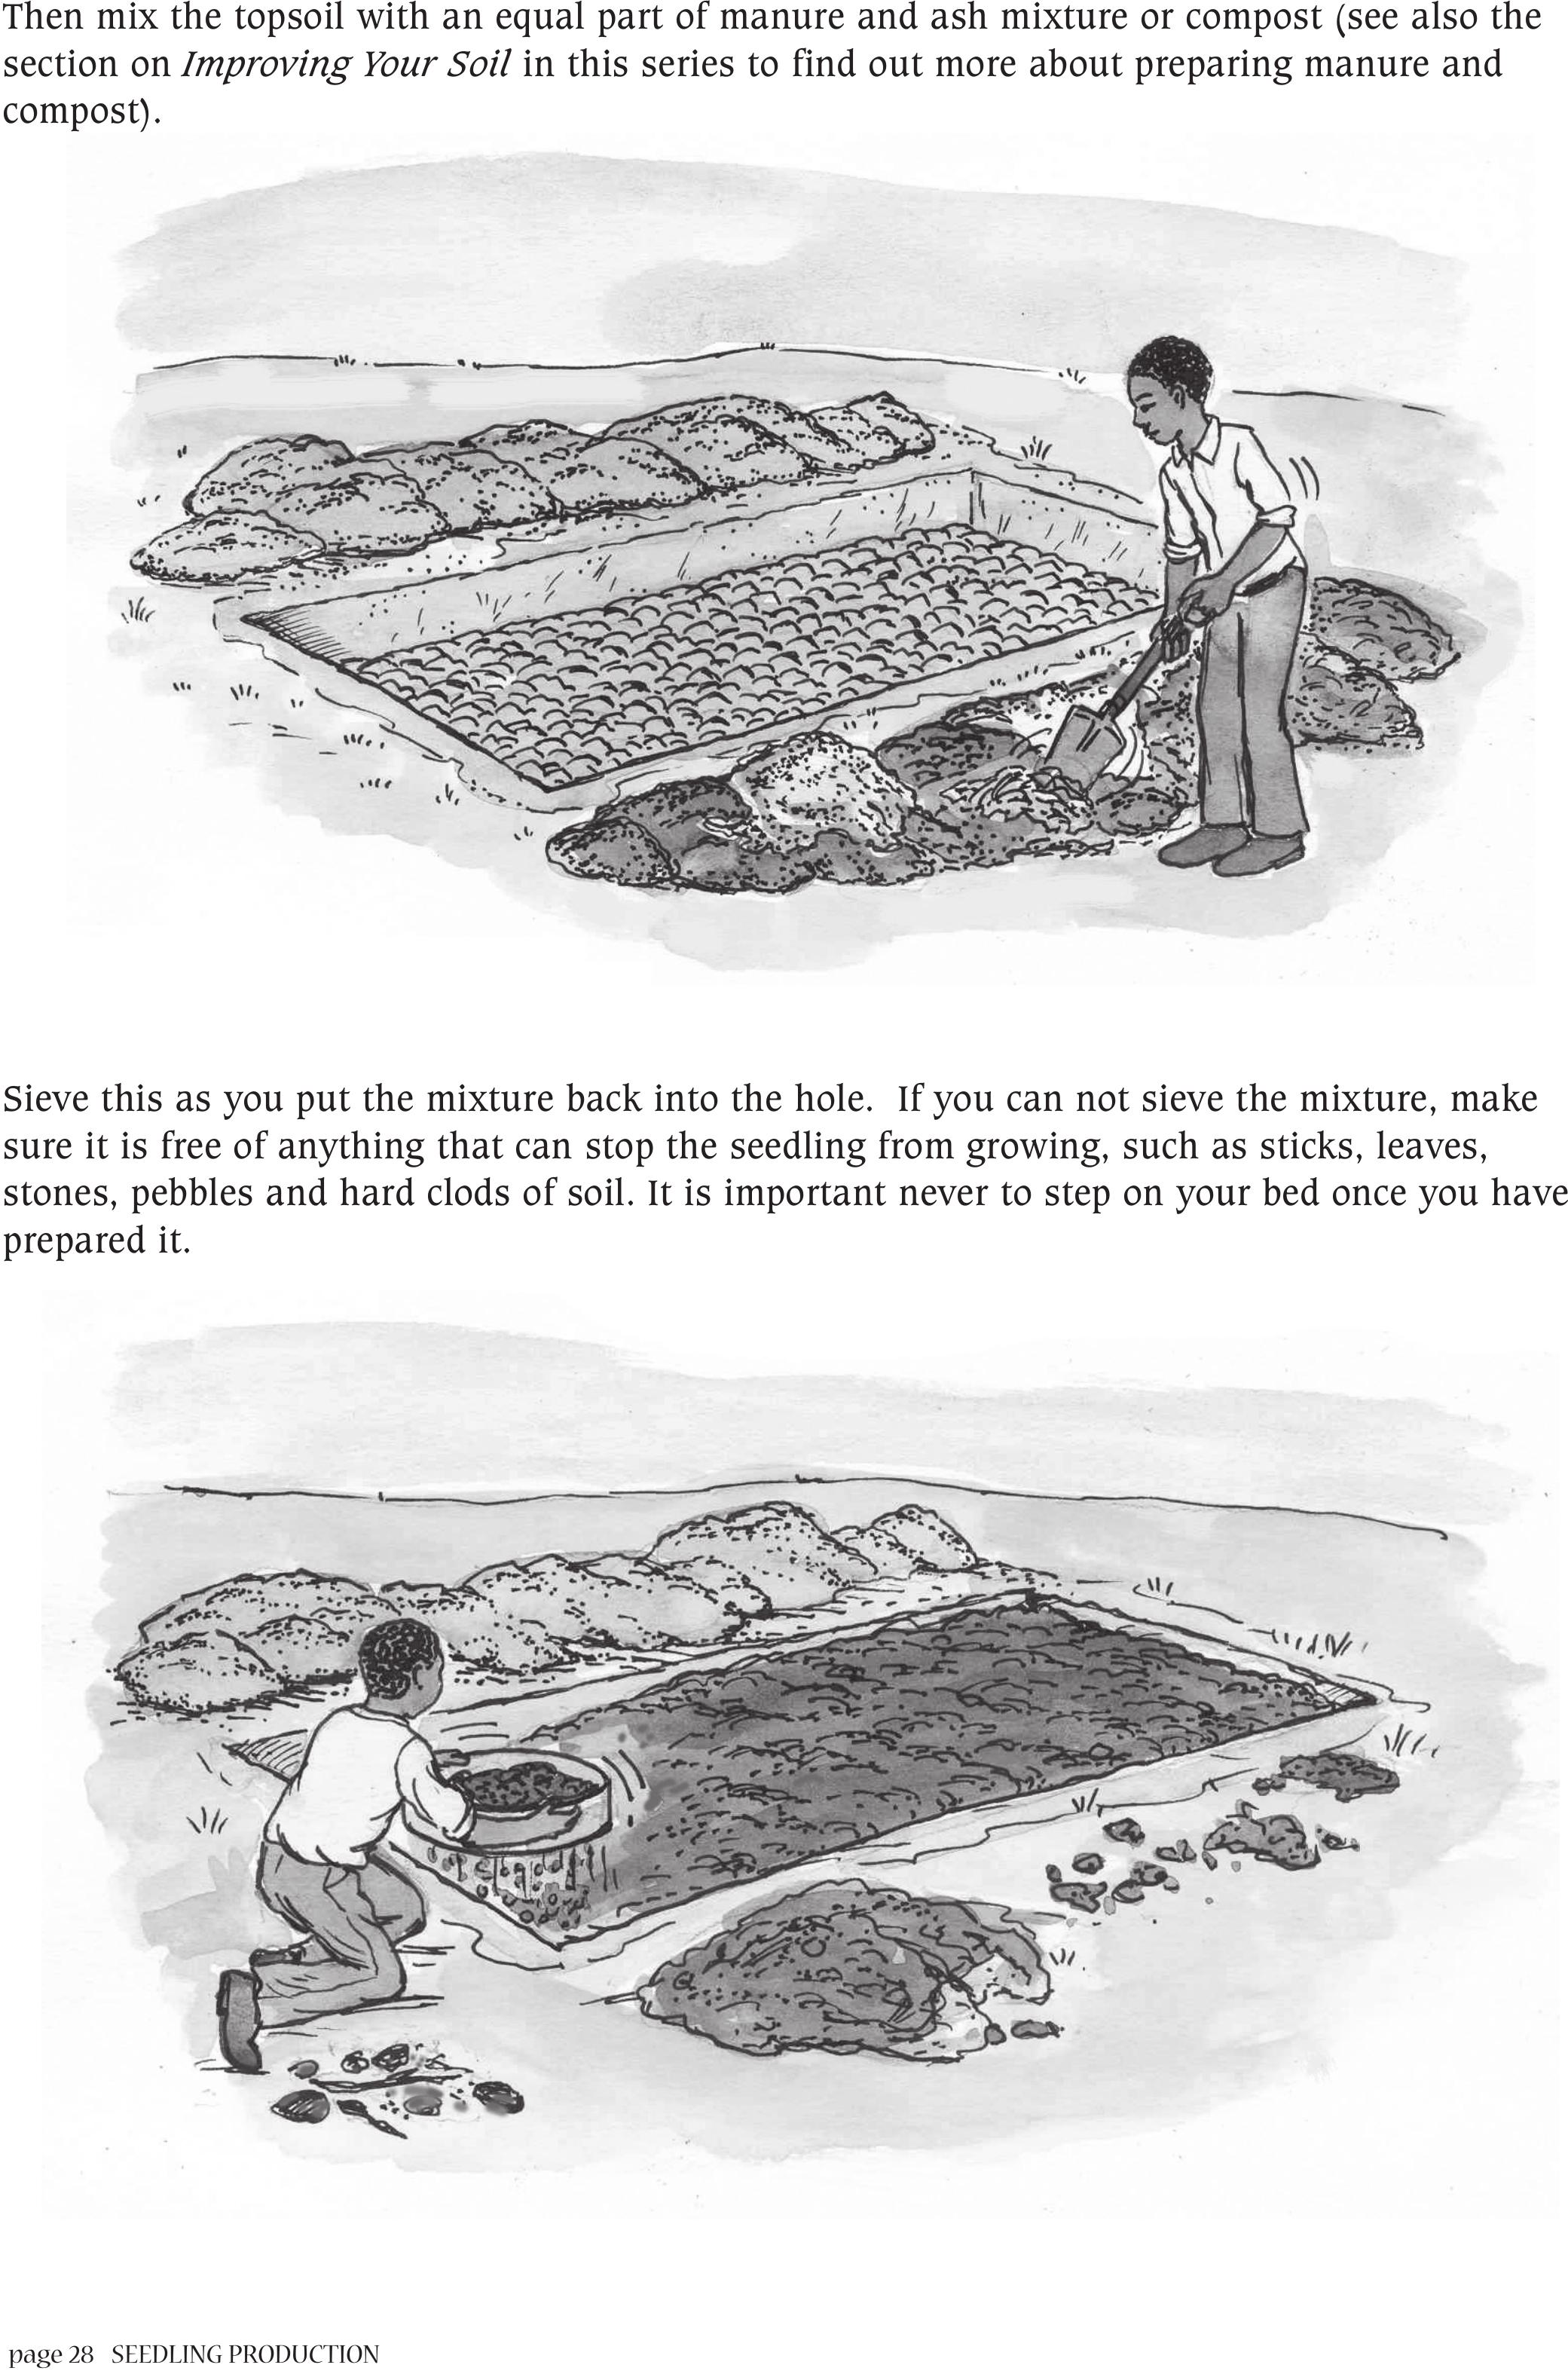
Then mix the topsoil with an equal part of manure and ash mixture or compost (see also the
section on Improving Your Soil in this series to find out more about preparing manure and
compost).
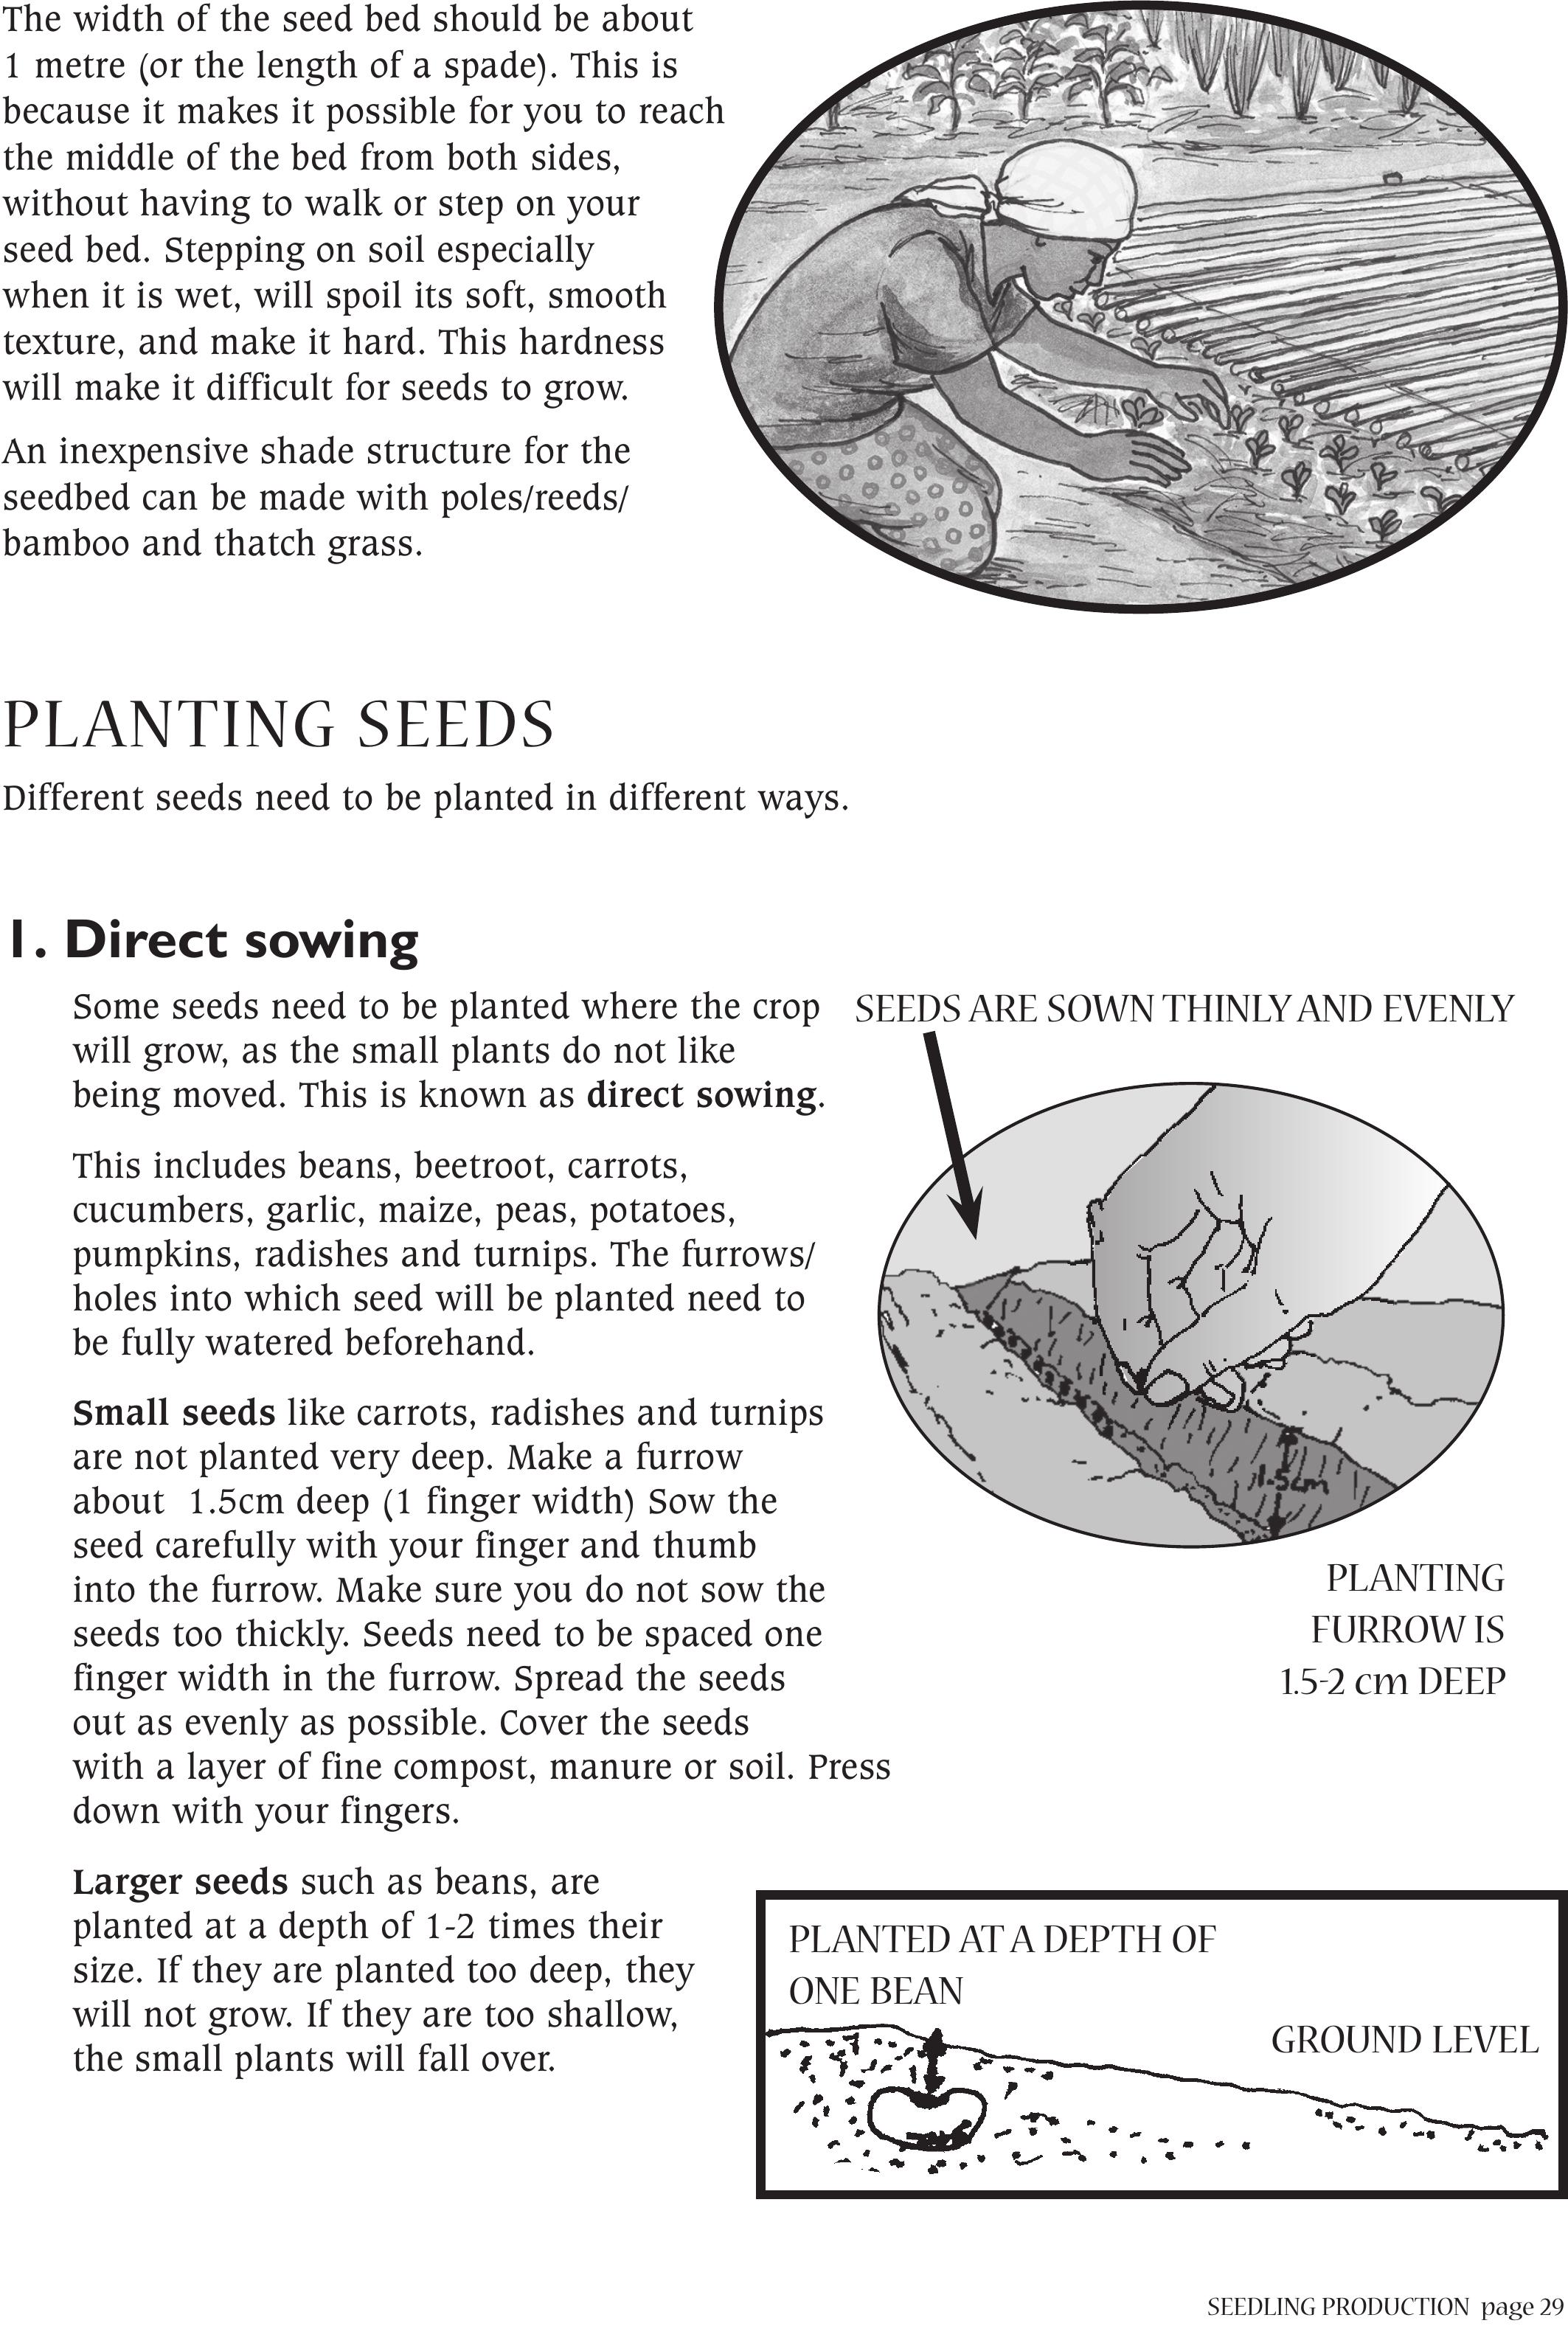
Sieve this as you put the mixture back into the hole. If you can not sieve the mixture, make
sure it is free of anything that can stop the seedling from growing, such as sticks, leaves,
stones, pebbles and hard clods of soil. It is important never to step on your bed once you have
prepared it.
SEEDLING PRODUCTIONpage 29
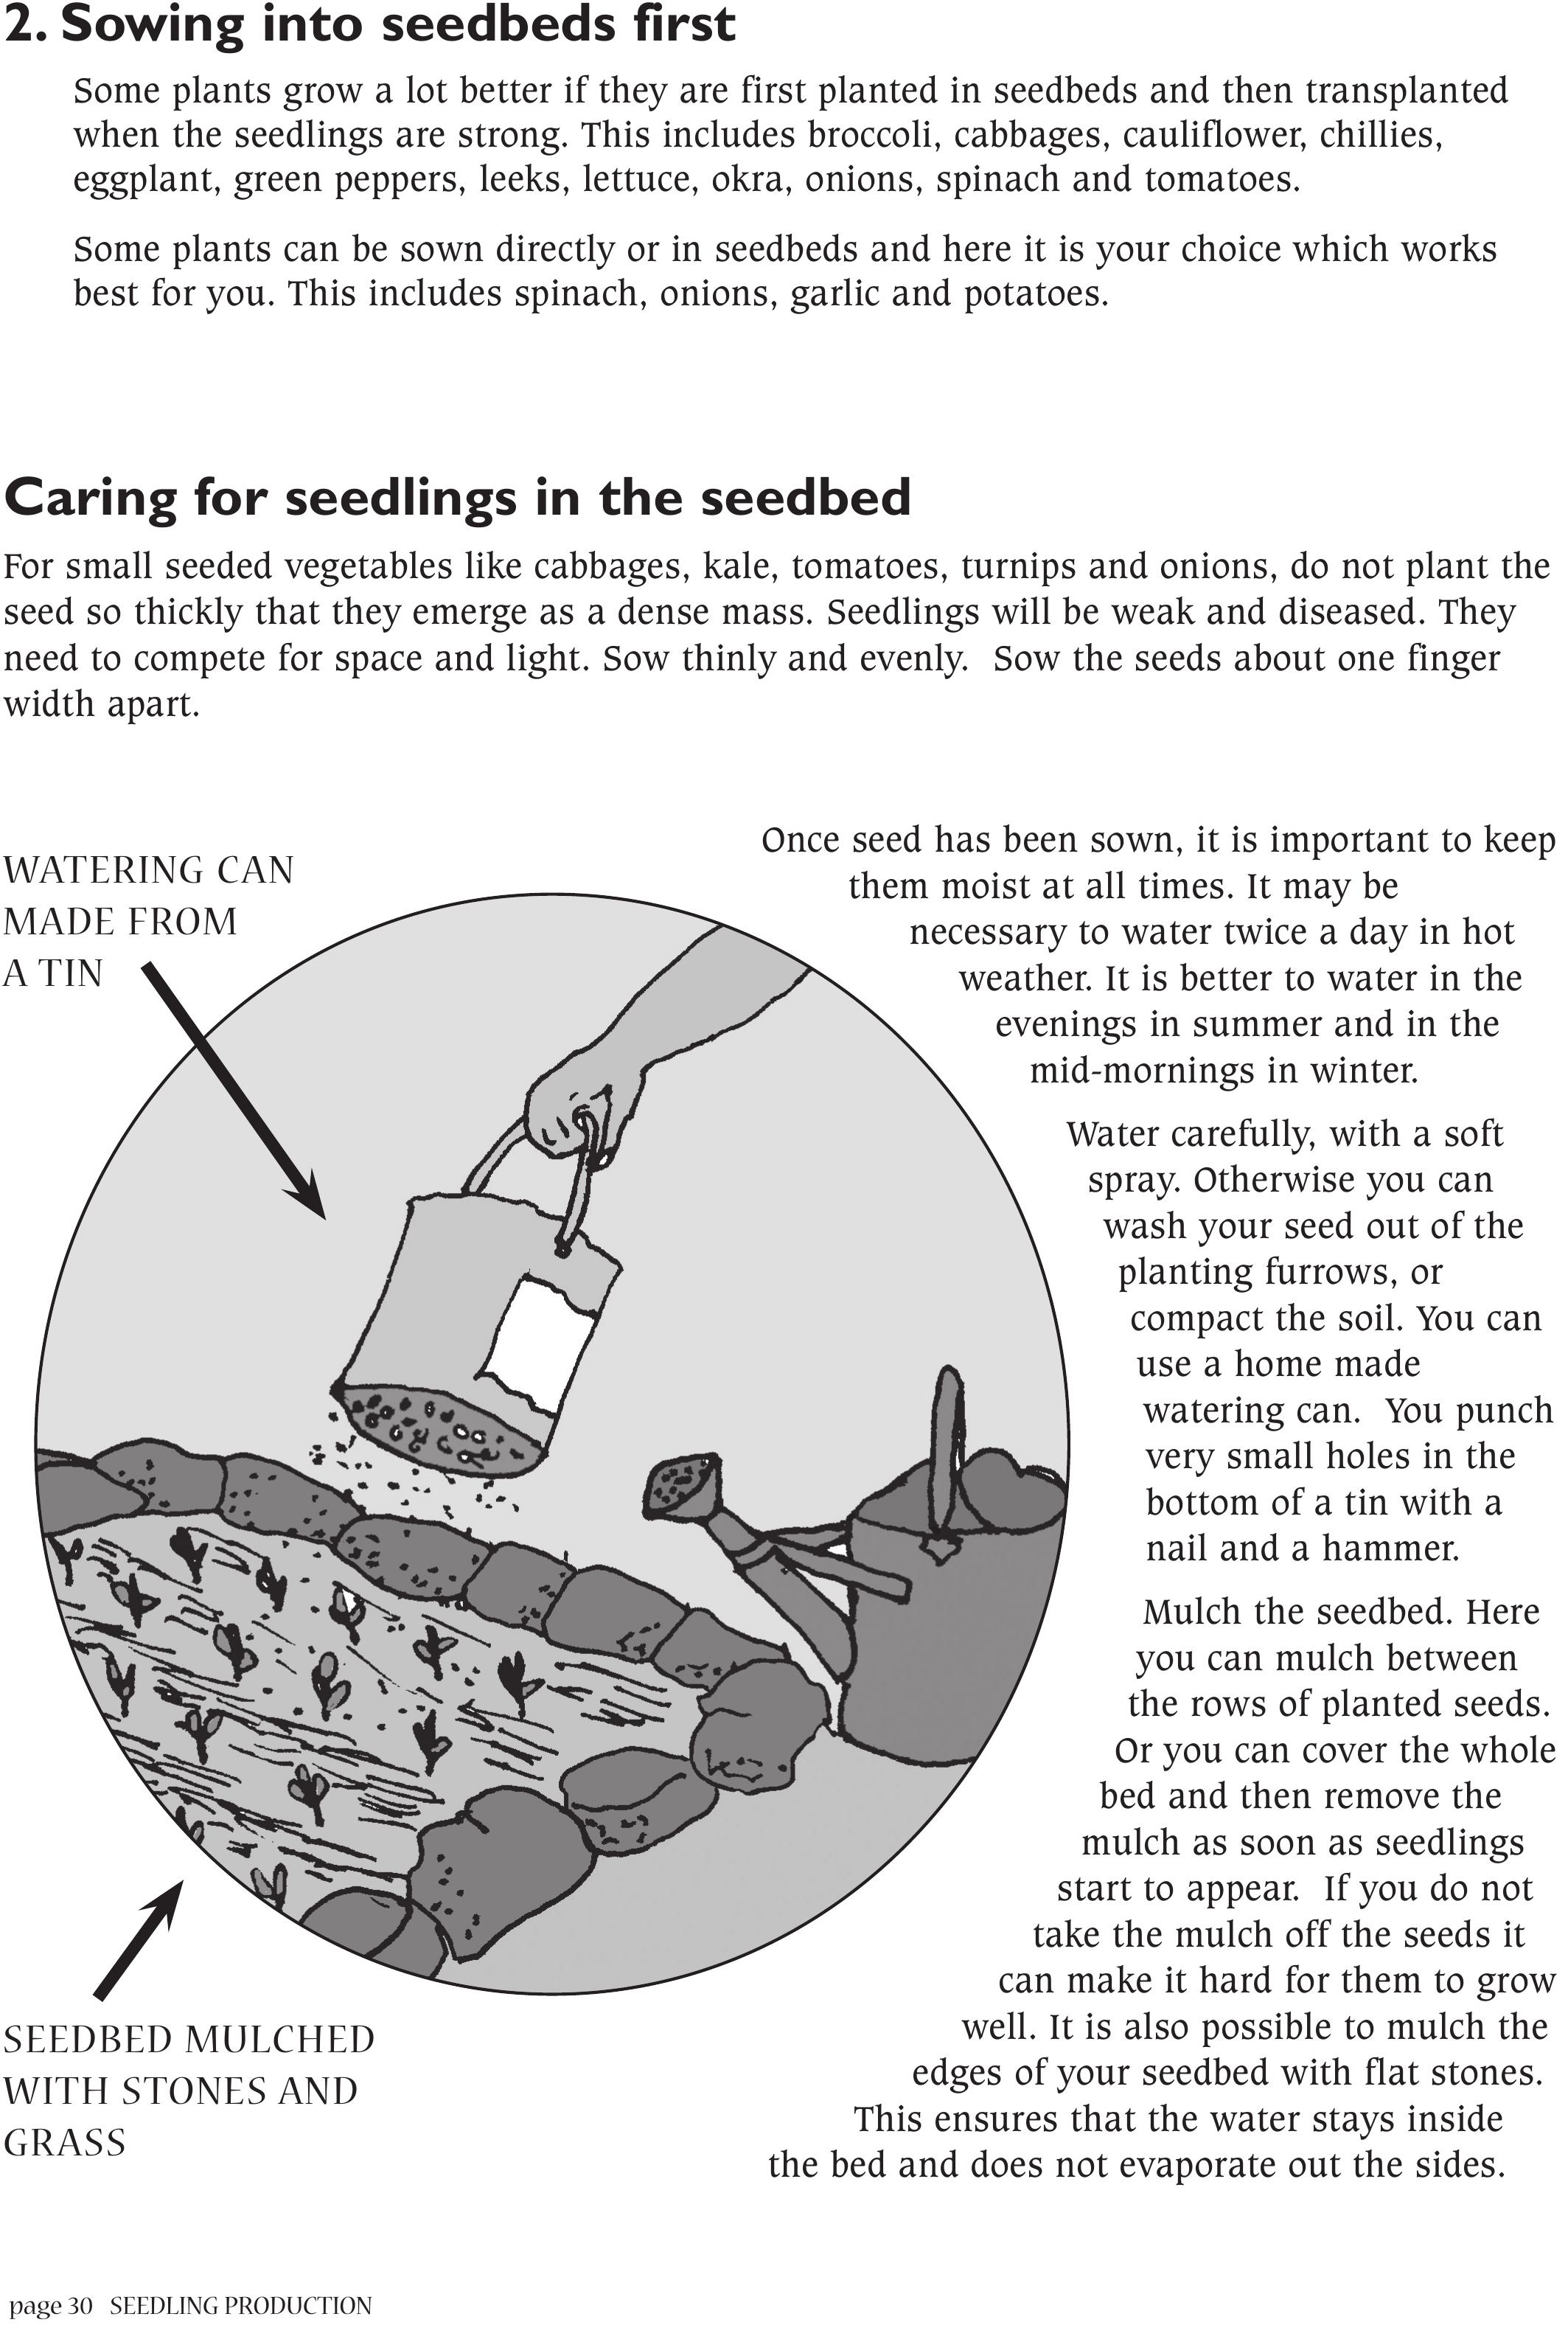
The width of the seed bed should be about
1 metre (or the length of a spade). This is
because it makes it possible for you to reach
the middle of the bed from both sides,
without having to walk or step on your
seed bed. Stepping on soil especially
when it is wet, will spoil its soft, smooth
texture, and make it hard. This hardness
will make it difficult for seeds to grow.
An inexpensive shade structure for the
seedbed can be made with poles/reeds/
bamboo and thatch grass.
PLANTING SEEDS
Different seeds need to be planted in different ways.
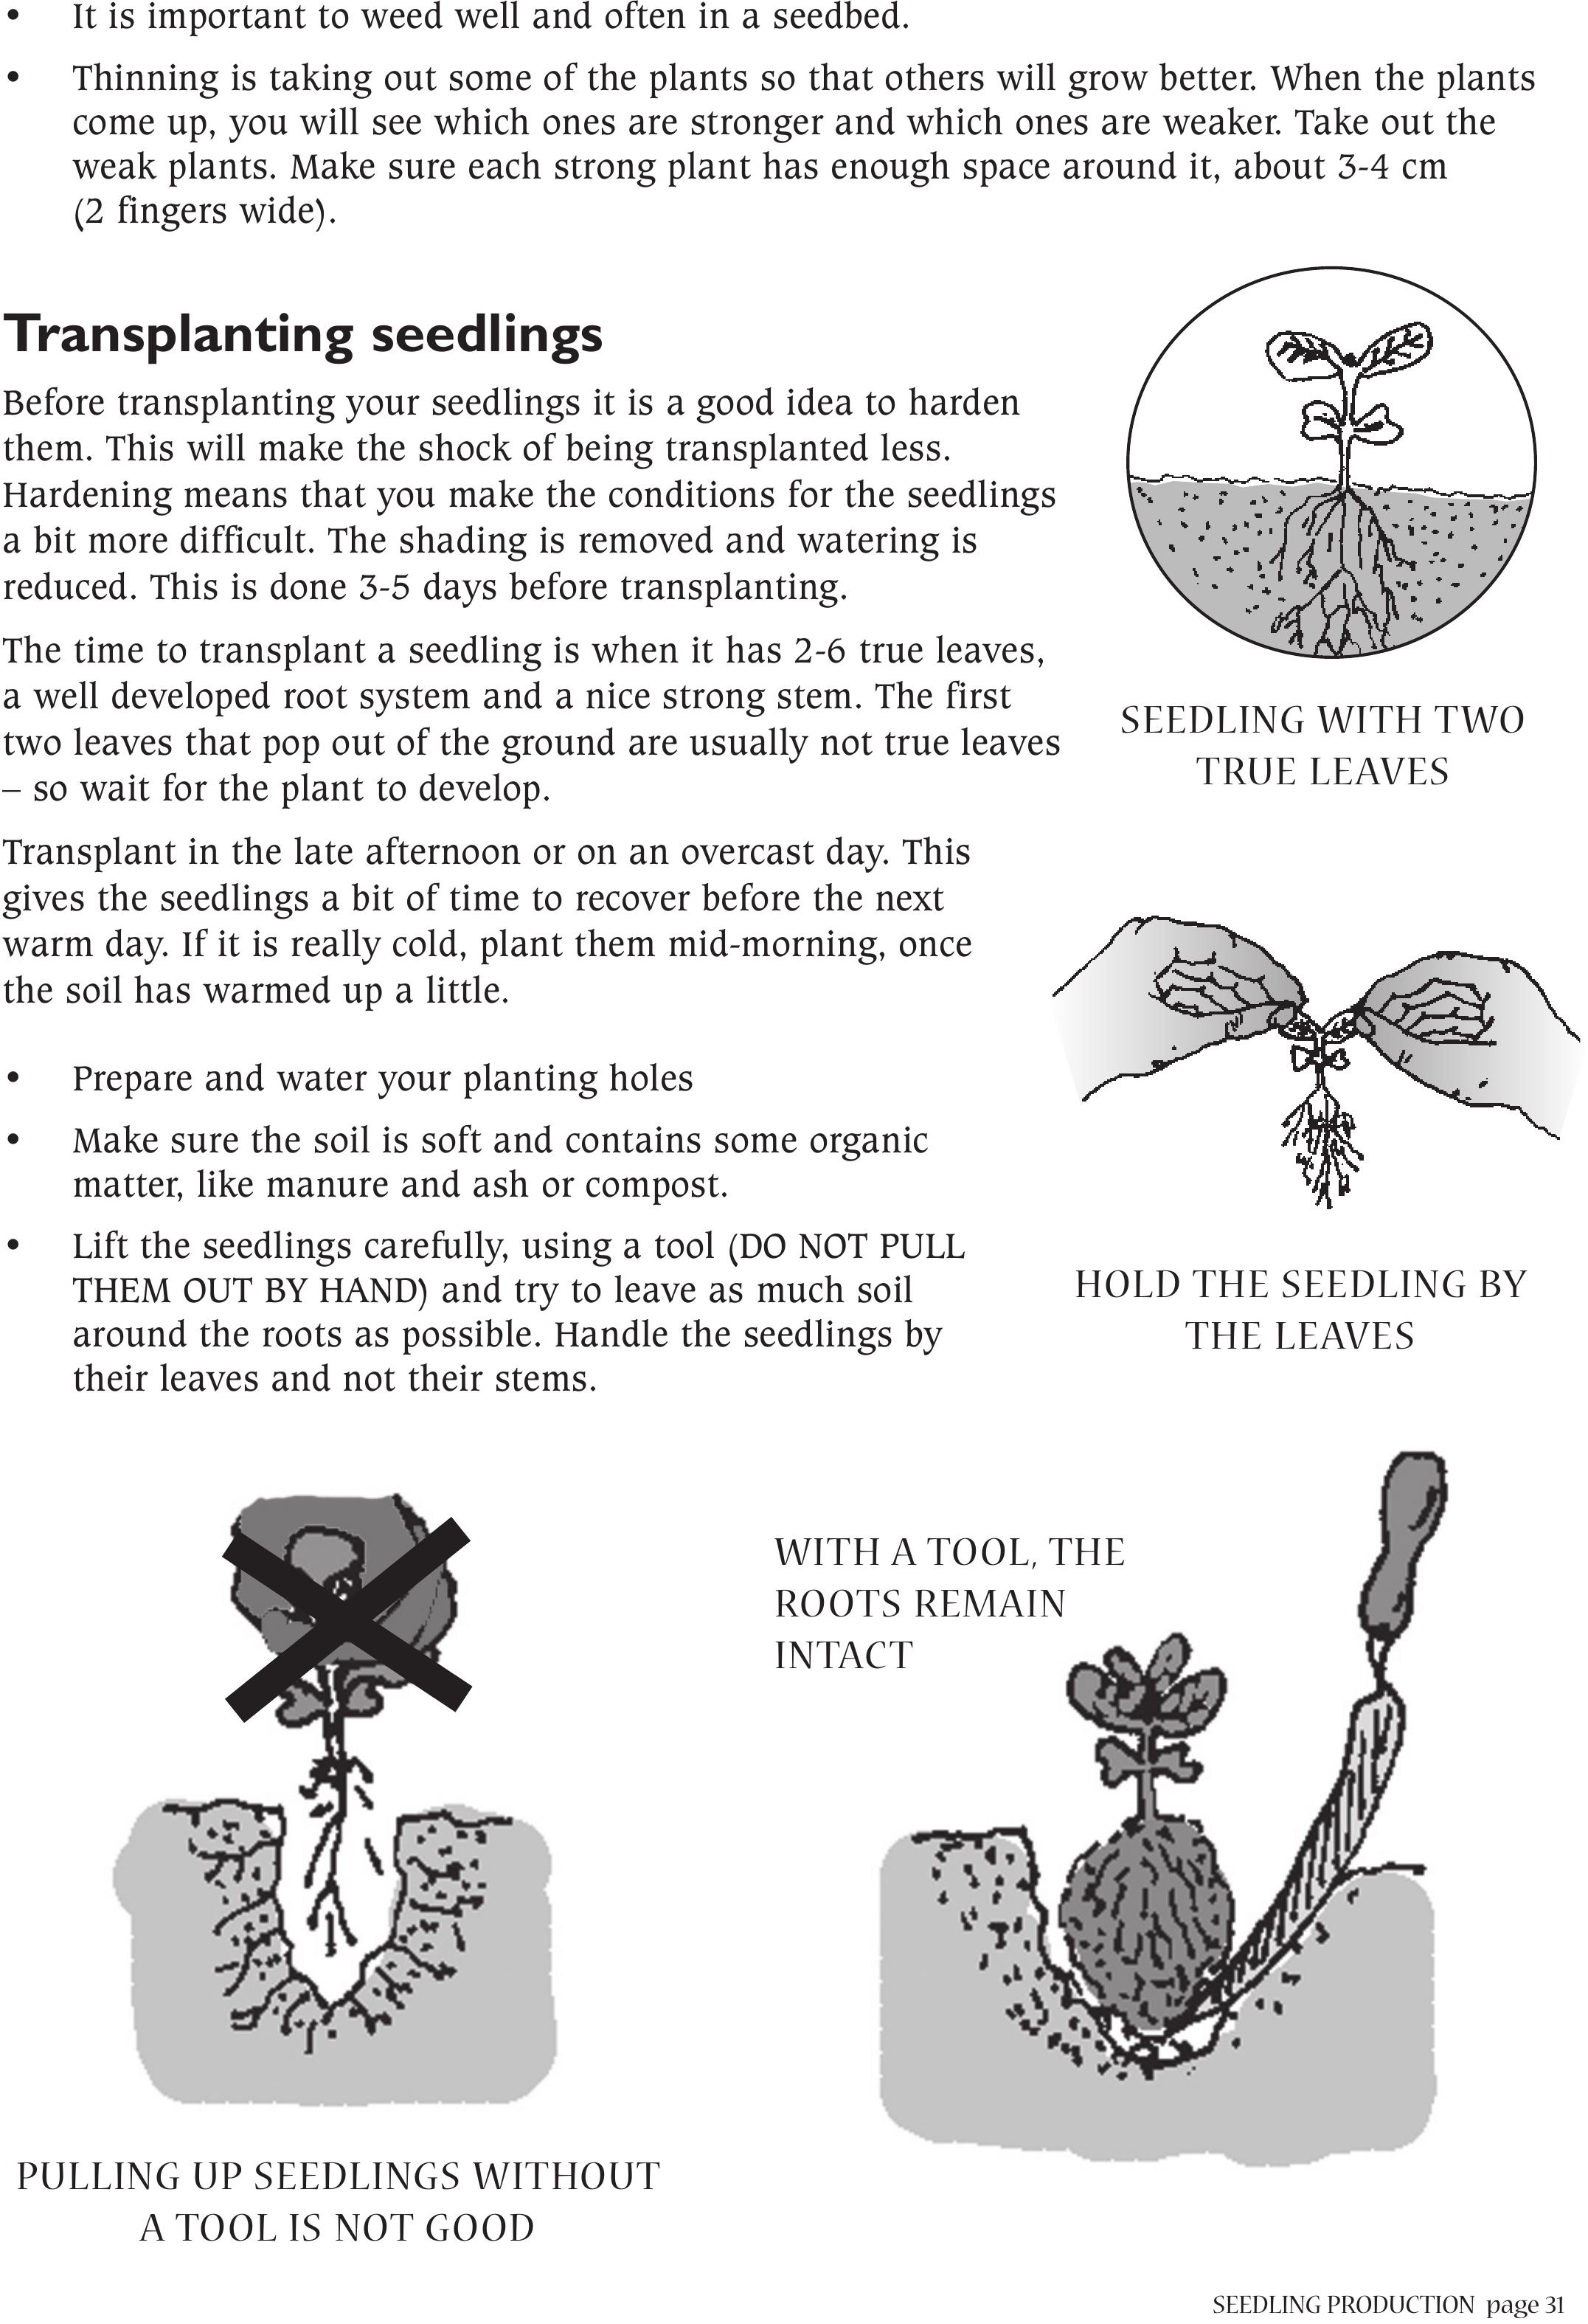
1. Direct sowing
Some seeds need to be planted where the crop
will grow, as the small plants do not like
being moved. This is known as direct sowing.
This includes beans, beetroot, carrots,
cucumbers, garlic, maize, peas, potatoes,
pumpkins, radishes and turnips. The furrows/
holes into which seed will be planted need to
be fully watered beforehand.
Small seeds like carrots, radishes and turnips
are not planted very deep. Make a furrow
about 1.5cm deep (1 finger width) Sow the
seed carefully with your finger and thumb
into the furrow. Make sure you do not sow the
seeds too thickly. Seeds need to be spaced one
finger width in the furrow. Spread the seeds
out as evenly as possible. Cover the seeds
with a layer of fine compost, manure or soil. Press
down with your fingers.
Larger seeds such as beans, are
planted at a depth of 1-2 times their
size. If they are planted too deep, they
will not grow. If they are too shallow,
the small plants will fall over.
PLANTING
FURROW IS
1.5-2 cm DEEP
PLANTED AT ADEPTH OF
ONE BEAN
GROUND LEVEL
SEEDS ARE SOWN THINLY AND EVENLY
page 30 SEEDLING PRODUCTION
2. Sowing into seedbeds first
Some plants grow a lot better if they are first planted in seedbeds and then transplanted
when the seedlings are strong. This includes broccoli, cabbages, cauliflower, chillies,
eggplant, green peppers, leeks, lettuce, okra, onions, spinach and tomatoes.
Some plants can be sown directly or in seedbeds and here it is your choice which works
best for you. This includes spinach, onions, garlic and potatoes.
Caring for seedlings in the seedbed
For small seeded vegetables like cabbages, kale, tomatoes, turnips and onions, do not plant the
seed so thickly that they emerge as a dense mass. Seedlings will be weak and diseased. They
need to compete for space and light. Sow thinly and evenly. Sow the seeds about one finger
width apart.
Once seed has been sown, it is important to keep
them moist at all times. It may be
necessary to water twice a day in hot
weather. It is better to water in the
evenings in summer and in the
mid-mornings in winter.
Water carefully, with a soft
spray. Otherwise you can
wash your seed out of the
planting furrows, or
compact the soil. You can
use a home made
watering can. You punch
very small holes in the
bottom of a tin with a
nail and a hammer.
Mulch the seedbed. Here
you can mulch between
the rows of planted seeds.
Or you can cover the whole
bed and then remove the
mulch as soon as seedlings
start to appear. If you do not
take the mulch off the seeds it
can make it hard for them to grow
well. It is also possible to mulch the
edges of your seedbed with flat stones.
This ensures that the water stays inside
the bed and does not evaporate out the sides.
WATERING CAN
MADE FROM
A TIN
SEEDBED MULCHED
WITH STONES AND
GRASS
SEEDLING PRODUCTIONpage 31
• It is important to weed well and often in a seedbed.
• Thinning is taking out some of the plants so that others will grow better. When the plants
come up, you will see which ones are stronger and which ones are weaker. Take out the
weak plants. Make sure each strong plant has enough space around it, about 3-4 cm
(2 fingers wide).
Transplanting seedlings
Before transplanting your seedlings it is a good idea to harden
them. This will make the shock of being transplanted less.
Hardening means that you make the conditions for the seedlings
a bit more difficult. The shading is removed and watering is
reduced. This is done 3-5 days before transplanting.
The time to transplant a seedling is when it has 2-6 true leaves,
a well developed root system and a nice strong stem. The first
two leaves that pop out of the ground are usually not true leaves
– so wait for the plant to develop.
Transplant in the late afternoon or on an overcast day. This
gives the seedlings a bit of time to recover before the next
warm day. If it is really cold, plant them mid-morning, once
the soil has warmed up a little.
• Prepare and water your planting holes
• Make sure the soil is soft and contains some organic
matter, like manure and ash or compost.
• Lift the seedlings carefully, using a tool (DO NOT PULL
THEM OUT BY HAND) and try to leave as much soil
around the roots as possible. Handle the seedlings by
their leaves and not their stems.
PULLING UP SEEDLINGS WITHOUT
A TOOL IS NOT GOOD
WITH A TOOL, THE
ROOTS REMAIN
INTACT
SEEDLING WITHTWO
TRUE LEAVES
HOLD THE SEEDLING BY
THE LEAVES
page 32 SEEDLING PRODUCTION
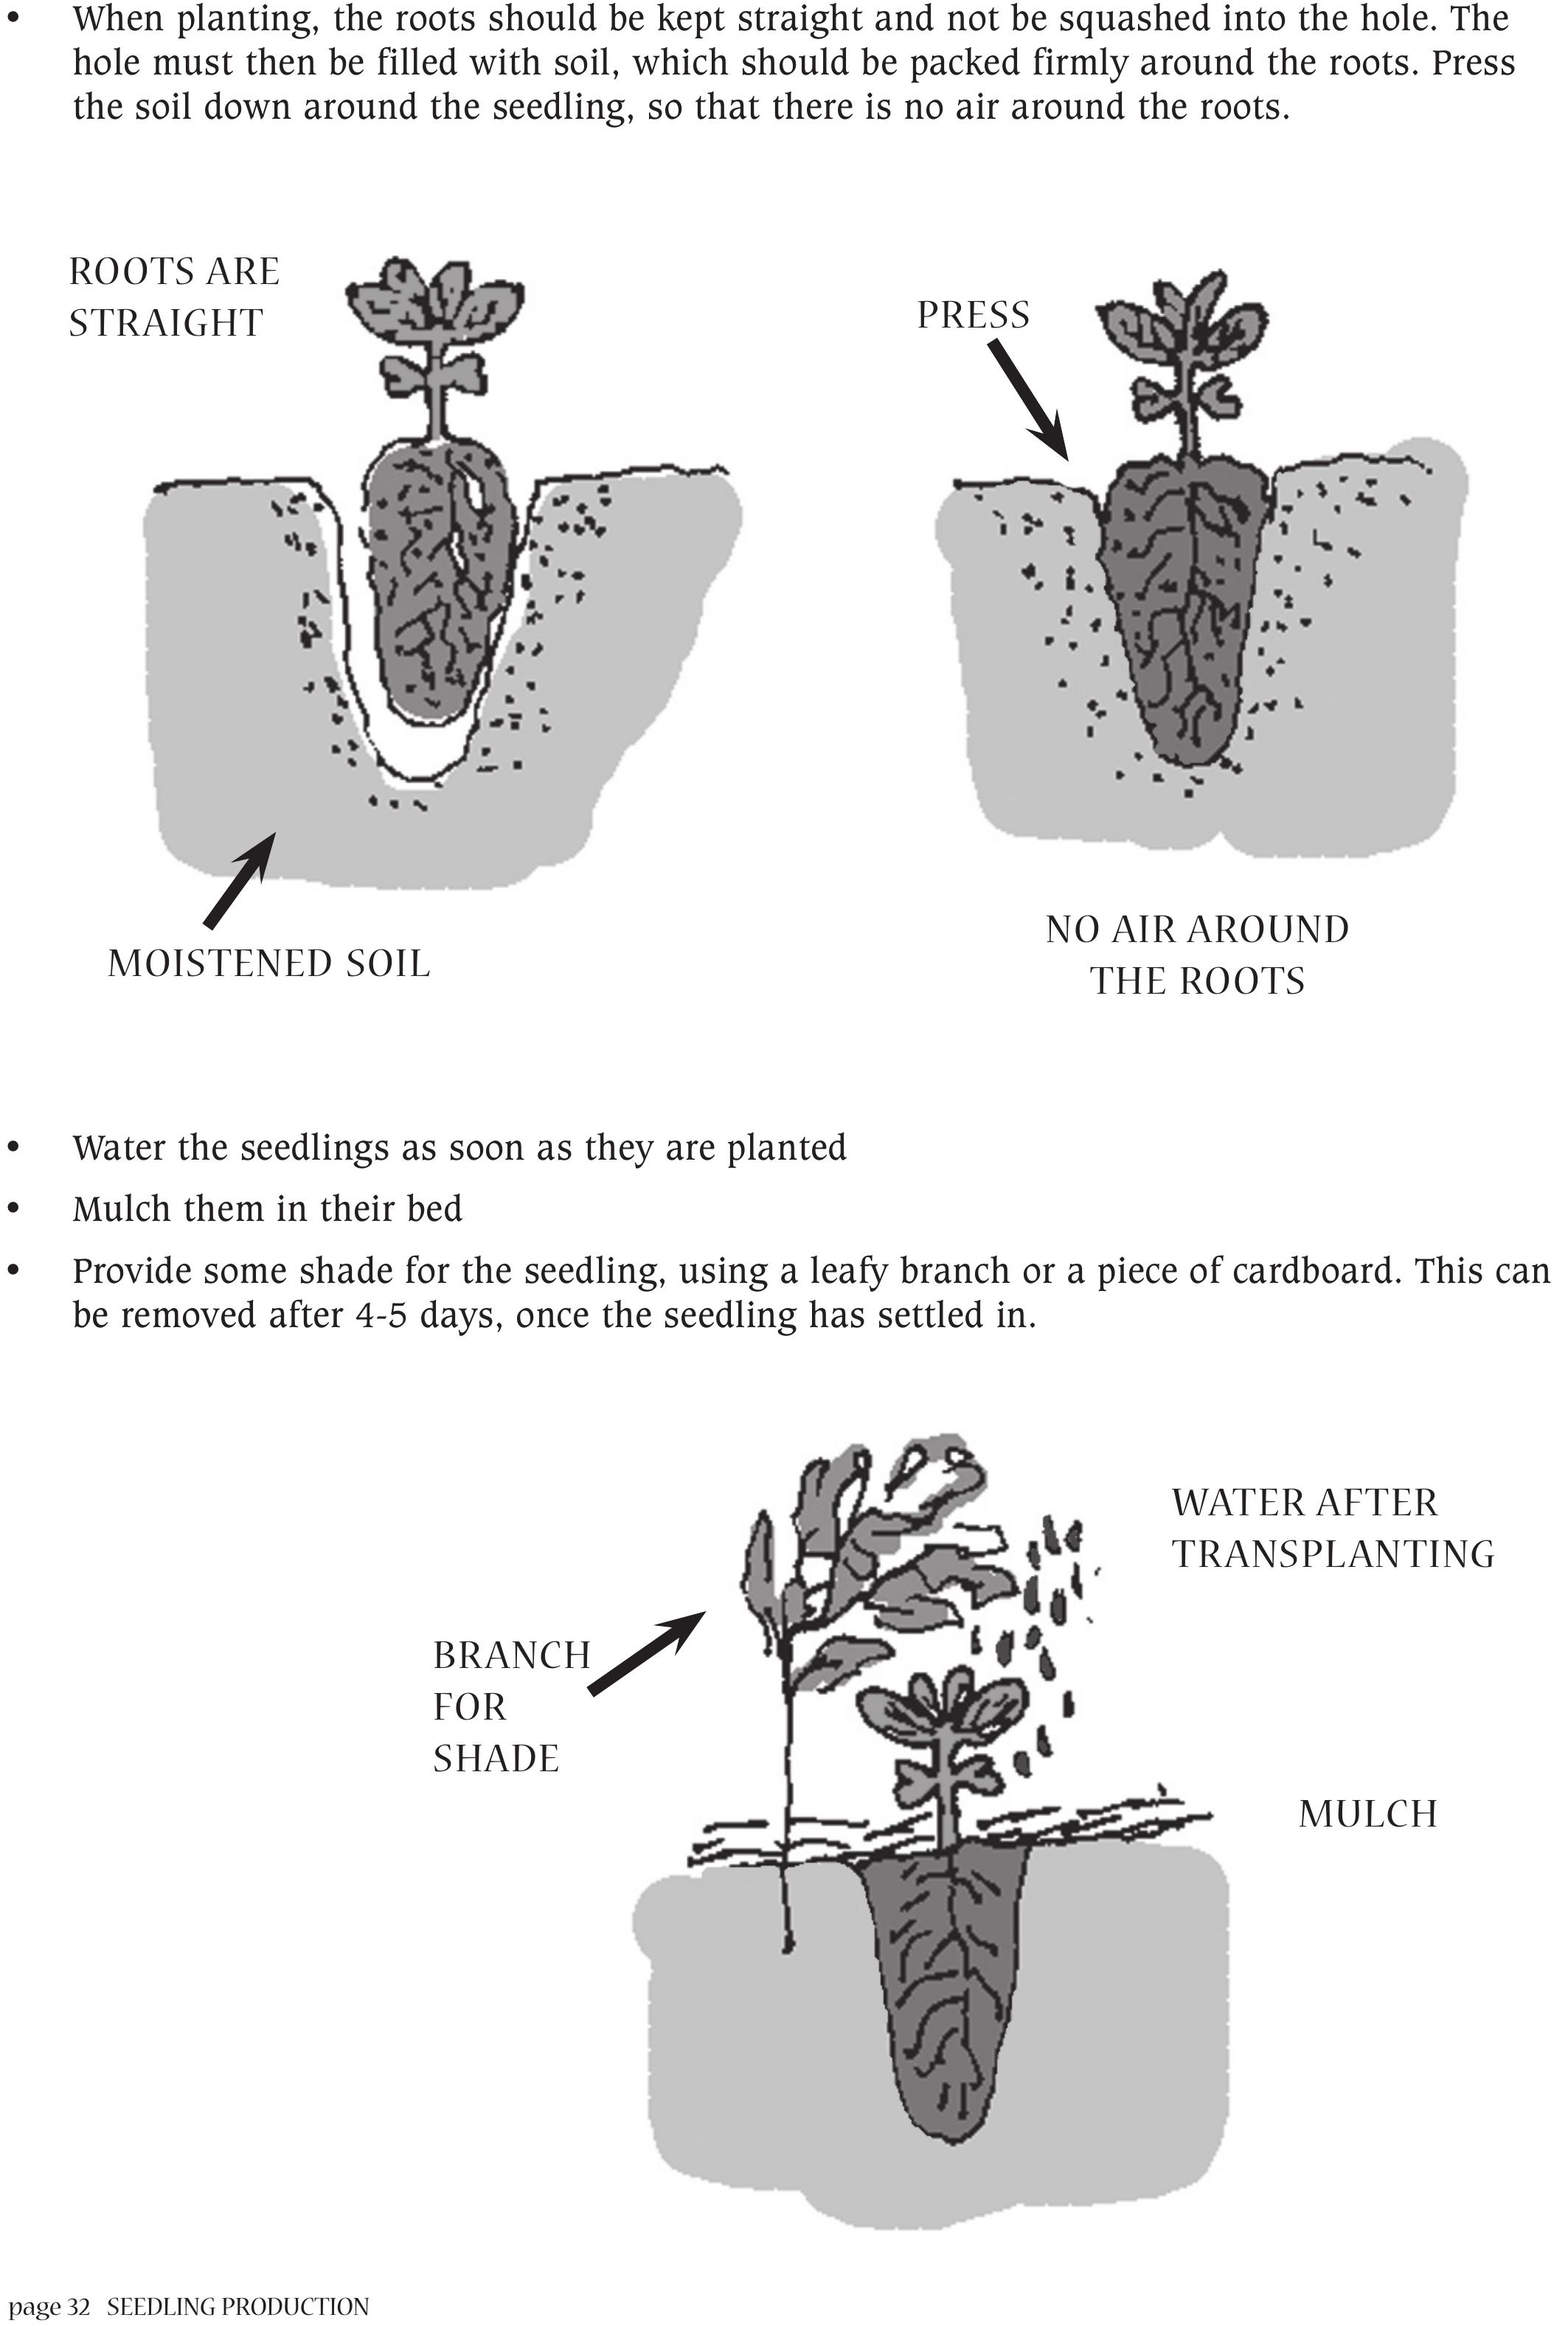
• When planting, the roots should be kept straight and not be squashed into the hole. The
hole must then be filled with soil, which should be packed firmly around the roots. Press
the soil down around the seedling, so that there is no air around the roots.
MULCH
ROOTS ARE
STRAIGHT
• Water the seedlings as soon as they are planted
• Mulch them in their bed
• Provide some shade for the seedling, using a leafy branch or a piece of cardboard. This can
be removed after 4-5 days, once the seedling has settled in.
PRESS
NO AIR AROUND
THE ROOTS
MOISTENED SOIL
BRANCH
FOR
SHADE
WATER AFTER
TRANSPLANTING
MULCHING page 33
MULCHING
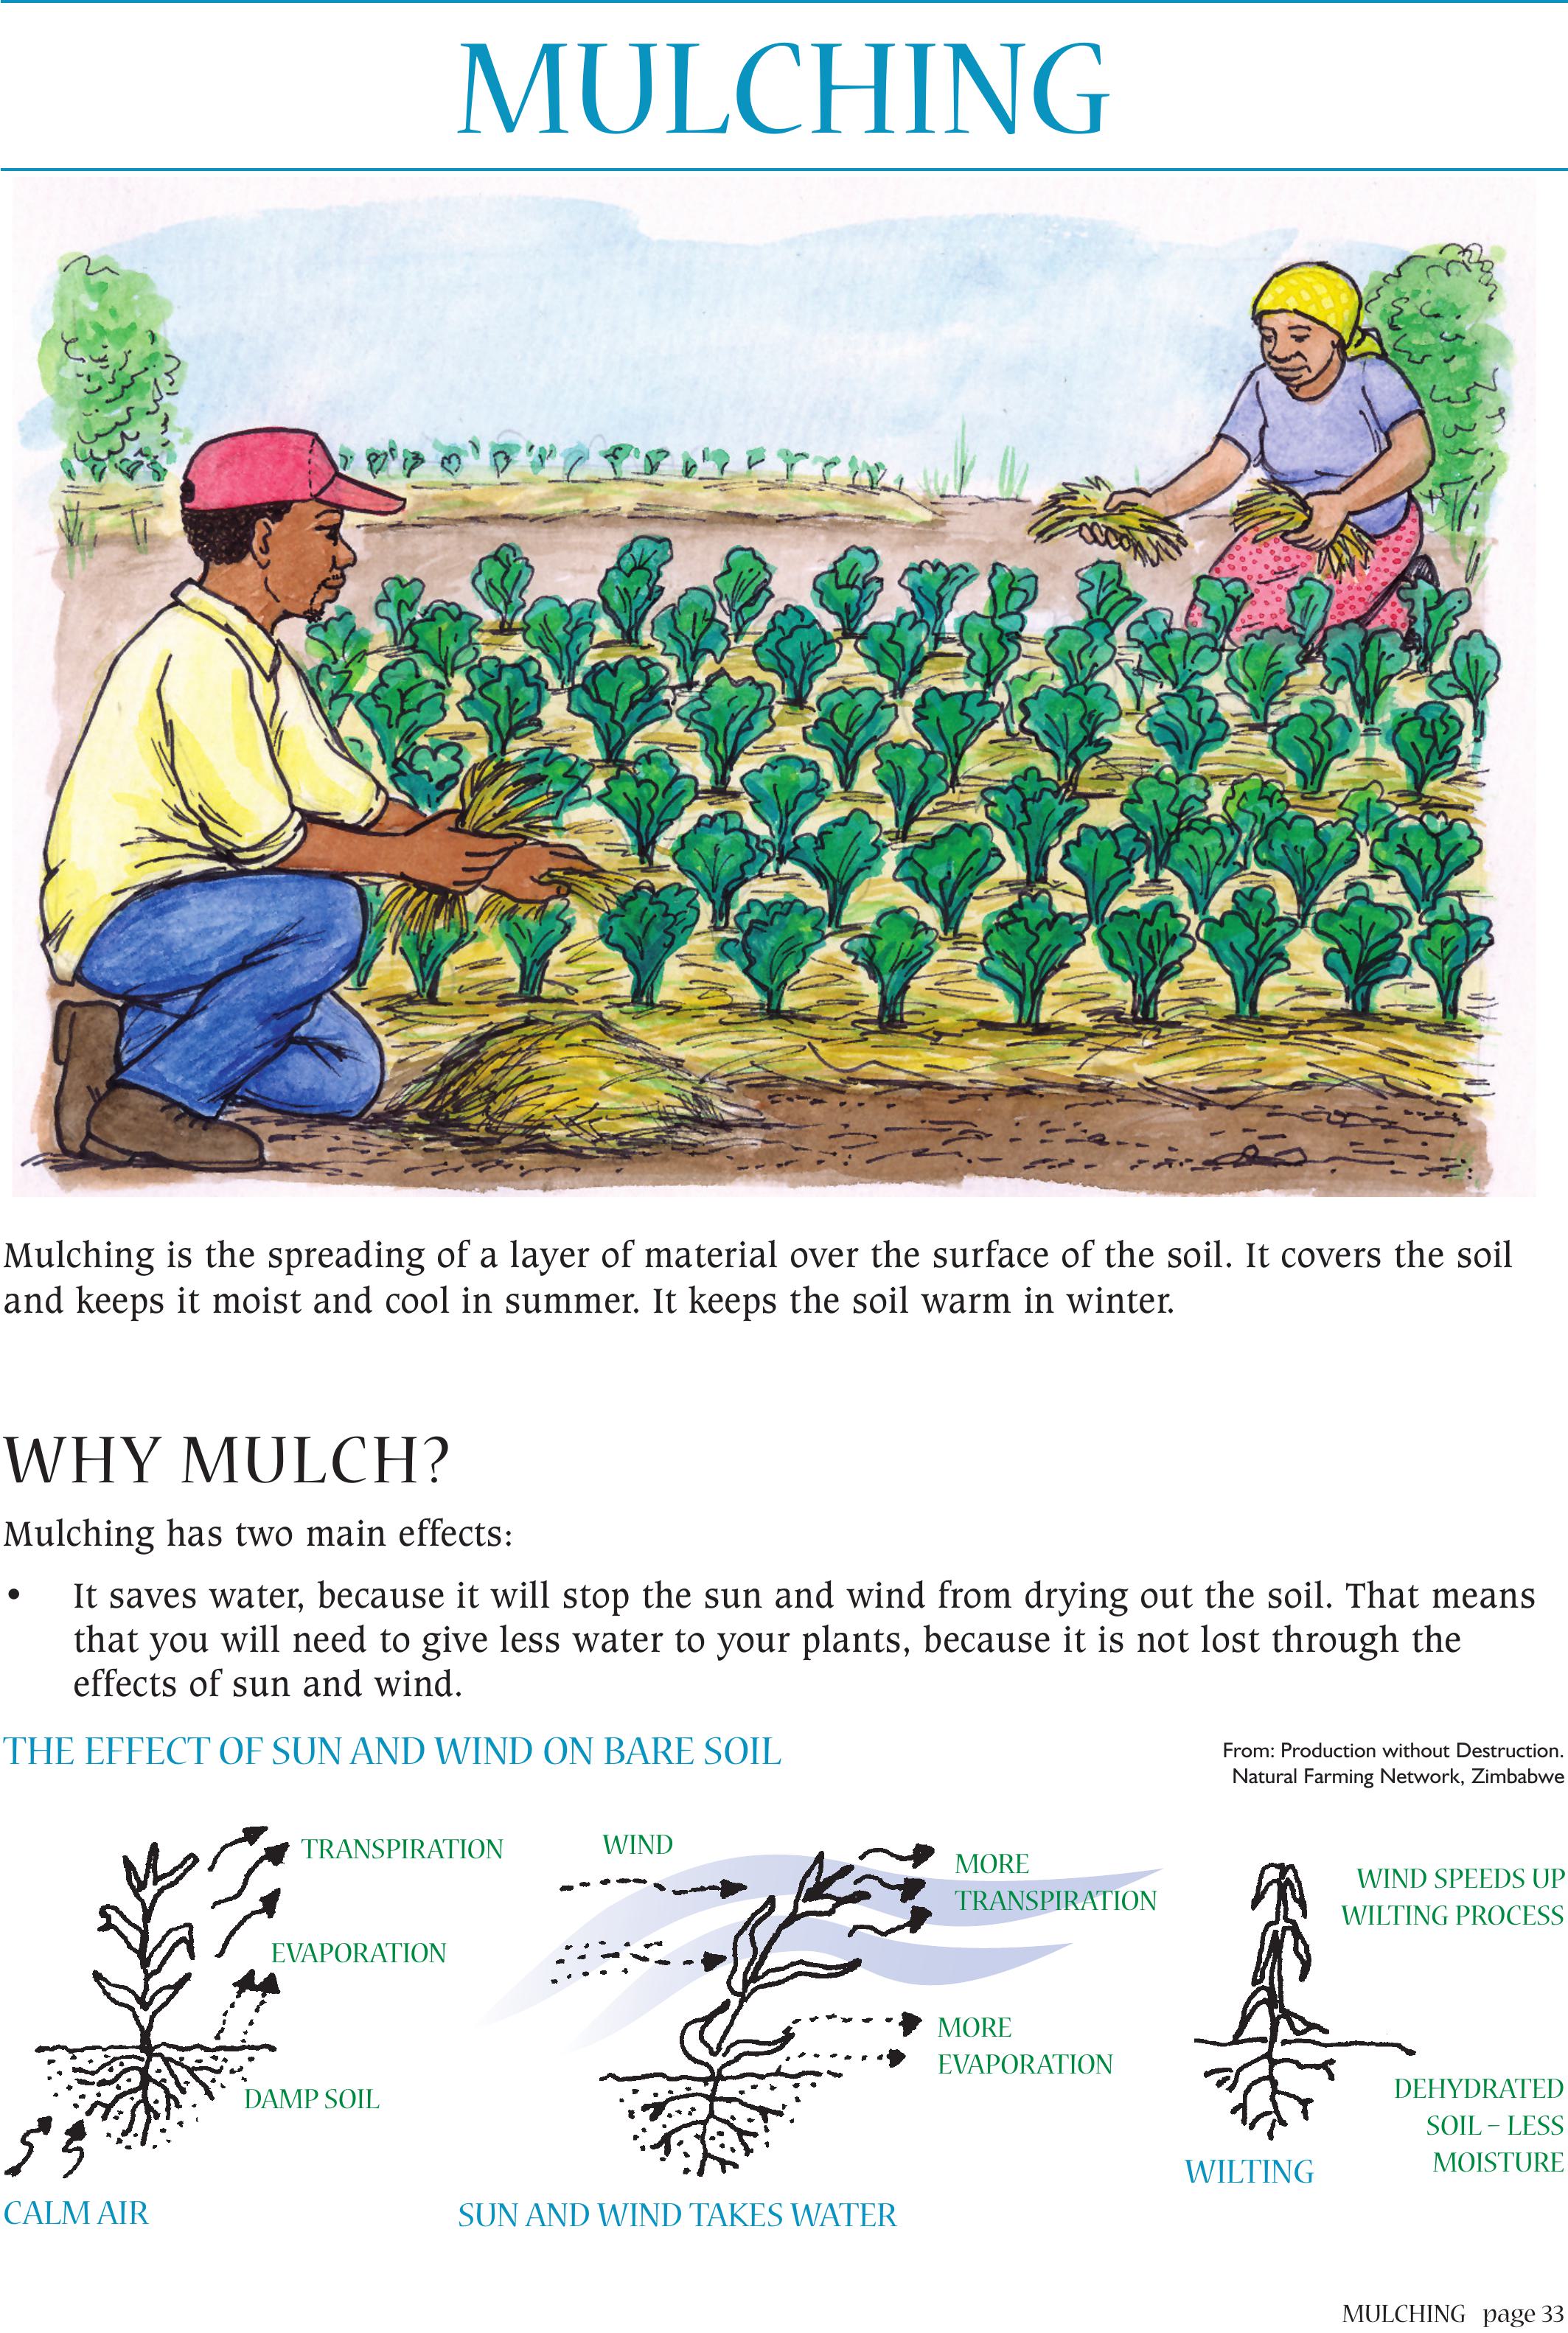
Mulching is the spreading of a layer of material over the surface of the soil. It covers the soil
and keeps it moist and cool in summer. It keeps the soil warm in winter.
WHY MULCH?
Mulching has two main effects:
• It saves water, because it will stop the sun and wind from drying out the soil. That means
that you will need to give less water to your plants, because it is not lost through the
effects of sun and wind.
TRANSPIRATION
WIND SPEEDS UP
WILTING PROCESS
MORE
EVAPORATION
SUN AND WIND TAKES WATER
WILTING
DEHYDRATED
SOIL – LESS
MOISTURE
EVAPORATION
DAMP SOIL
CALM AIR
THE EFFECT OF SUN AND WIND ON BARE SOILFrom: Production without Destruction.
Natural Farming Network, Zimbabwe
MORE
TRANSPIRATION
WIND

page 34 MULCHING
• It keeps the soil temperature more even. Mulching reduces too much heating and too much
cooling of the soil. This makes it easier for plants to grow.
RUN OFF
HIGH
EVAPORATION
DRY, HOT AND CAPPED
SOIL
NO SOIL ORGANISMS
BAD SOIL STRUCTURE
WEEDS
VERY LOW
INFILTRATION
BARE SOIL
LITTLE
EVAPORATION
HIGH
INFILTRATION
WEED CONTROLSOIL ORGANISMS
GOOD SOIL STRUCTURE
From: Production without Destruction.
Natural Farming Network, Zimbabwe
Negative
• It is sometimes hard
to find enough material to
mulch with
• Sometimes mulching on seed beds
can effect the growth of carrot
seedlings. They can become spindly
and weak
• Some people think it looks untidy
• Mulch can encourage slugs
and snails
Positive
• It stops loss of minerals/
nutrients from the soil
• It encourages soil organisms
• It reduces weed growth
• It prevents capping: that is the formation of a
hard layer of soil on the surface.
• A stronger root system develops closer to the
soil surface. This makes more nutrients and air
available to the roots
• Break down of mulch will add to soil fertility
• Breaks the impact of heavy rains and
splashing of soil on plants – that
can spread diseases
MULCHED SOIL
More effects of mulching
MULCHING page 35
Usually we use:
• Crop residues (stalks and leaves of harvested crops). NEVER use diseased crop residue. You
will infect the soil and your new crops!
• Weeds that have been pulled out and left to dry out
• Grasses from the veld. Make sure to use DRY grass. GREEN grass will take nutrients from
your soil and your crops will have less nutrients.
• Flat stones. These will cover but will not add nutrients. They are good around larger plants
and fruit trees.
• Newspaper. This will cover and add a little bit of nutrients/ plant food to the soil. Wet the
newspaper when you put it on the soil, so that it does not blow away.
• Manure; use DRY or OLD manure for this.
• Leaves collected under trees.
• Old thatch grass.
• Black plastic sheeting.
HOW DO WE MULCH?
1. It is best to chop up your mulching material (weeds and grass) to be
about the length of your hand (10-20 centimetres)
2. Use a thin layer of mulch for seedlings and small plants – about one
finger width deep (1.5 cm)
3. For larger plants use much thicker mulch – about 2-3 finger widths
(3-4 cm)
4. For trees, a really thick layer, one whole hand or more
(10-20 cm) can be added
When the mulch has broken down, you need to add more! You will be
amazed how quickly this happens. Usually mulch is added at least once
a season, or once every 3 months. In areas with extremely cold winters,
it may be an idea to make sure your mulch is compact or squashed
down once the frosts are heavy and the ground starts to freeze. Loose
mulch can make the effects of frost more severe.
ORGANIC DRY MATERIALALL REDUCE EVAPORATION
STONES
SHEETS OF PAPER
WHAT TO USE AS MULCH?From: Production without
Destruction. Natural Farming
Network, Zimbabwe
ONE FINGER =
1.5 cm
TWO FINGERS =
3 - 4
cm
ONE HAND =
10-20 cm

EXPERIMENTATION
Here are some questions that you can use to experiment
with adding mulch
• Did you use mulch on all of your plants, or only some?
• Were the plants that you mulched bigger and better than the ones that had no mulch?
• Did you use less water on the plants that were mulched?
• What did you use for mulch? Was it good? What will you use for mulch in future?
SMALL SCALE EXPERIMENT PLAN
1. What is the problem?
2. What is the possible solution?
3. Why will this solution solve the problem?
4. How will I test this solution step by step?
5. How will I check my results? What will I look for?
6. How else will I check my results? What will I measure?
7. How will I measure the results or outcomes?
8. How will I compare my experiment to my usual way of farming?
9. Make a drawing of the experimentation in the field.
Remember to use your experimentation plan for every new thing that you try.
page 36 MULCHING
IMPROVING YOUR SOIL page 37
IMPROVING YOUR SOIL
THE LIVING SOIL
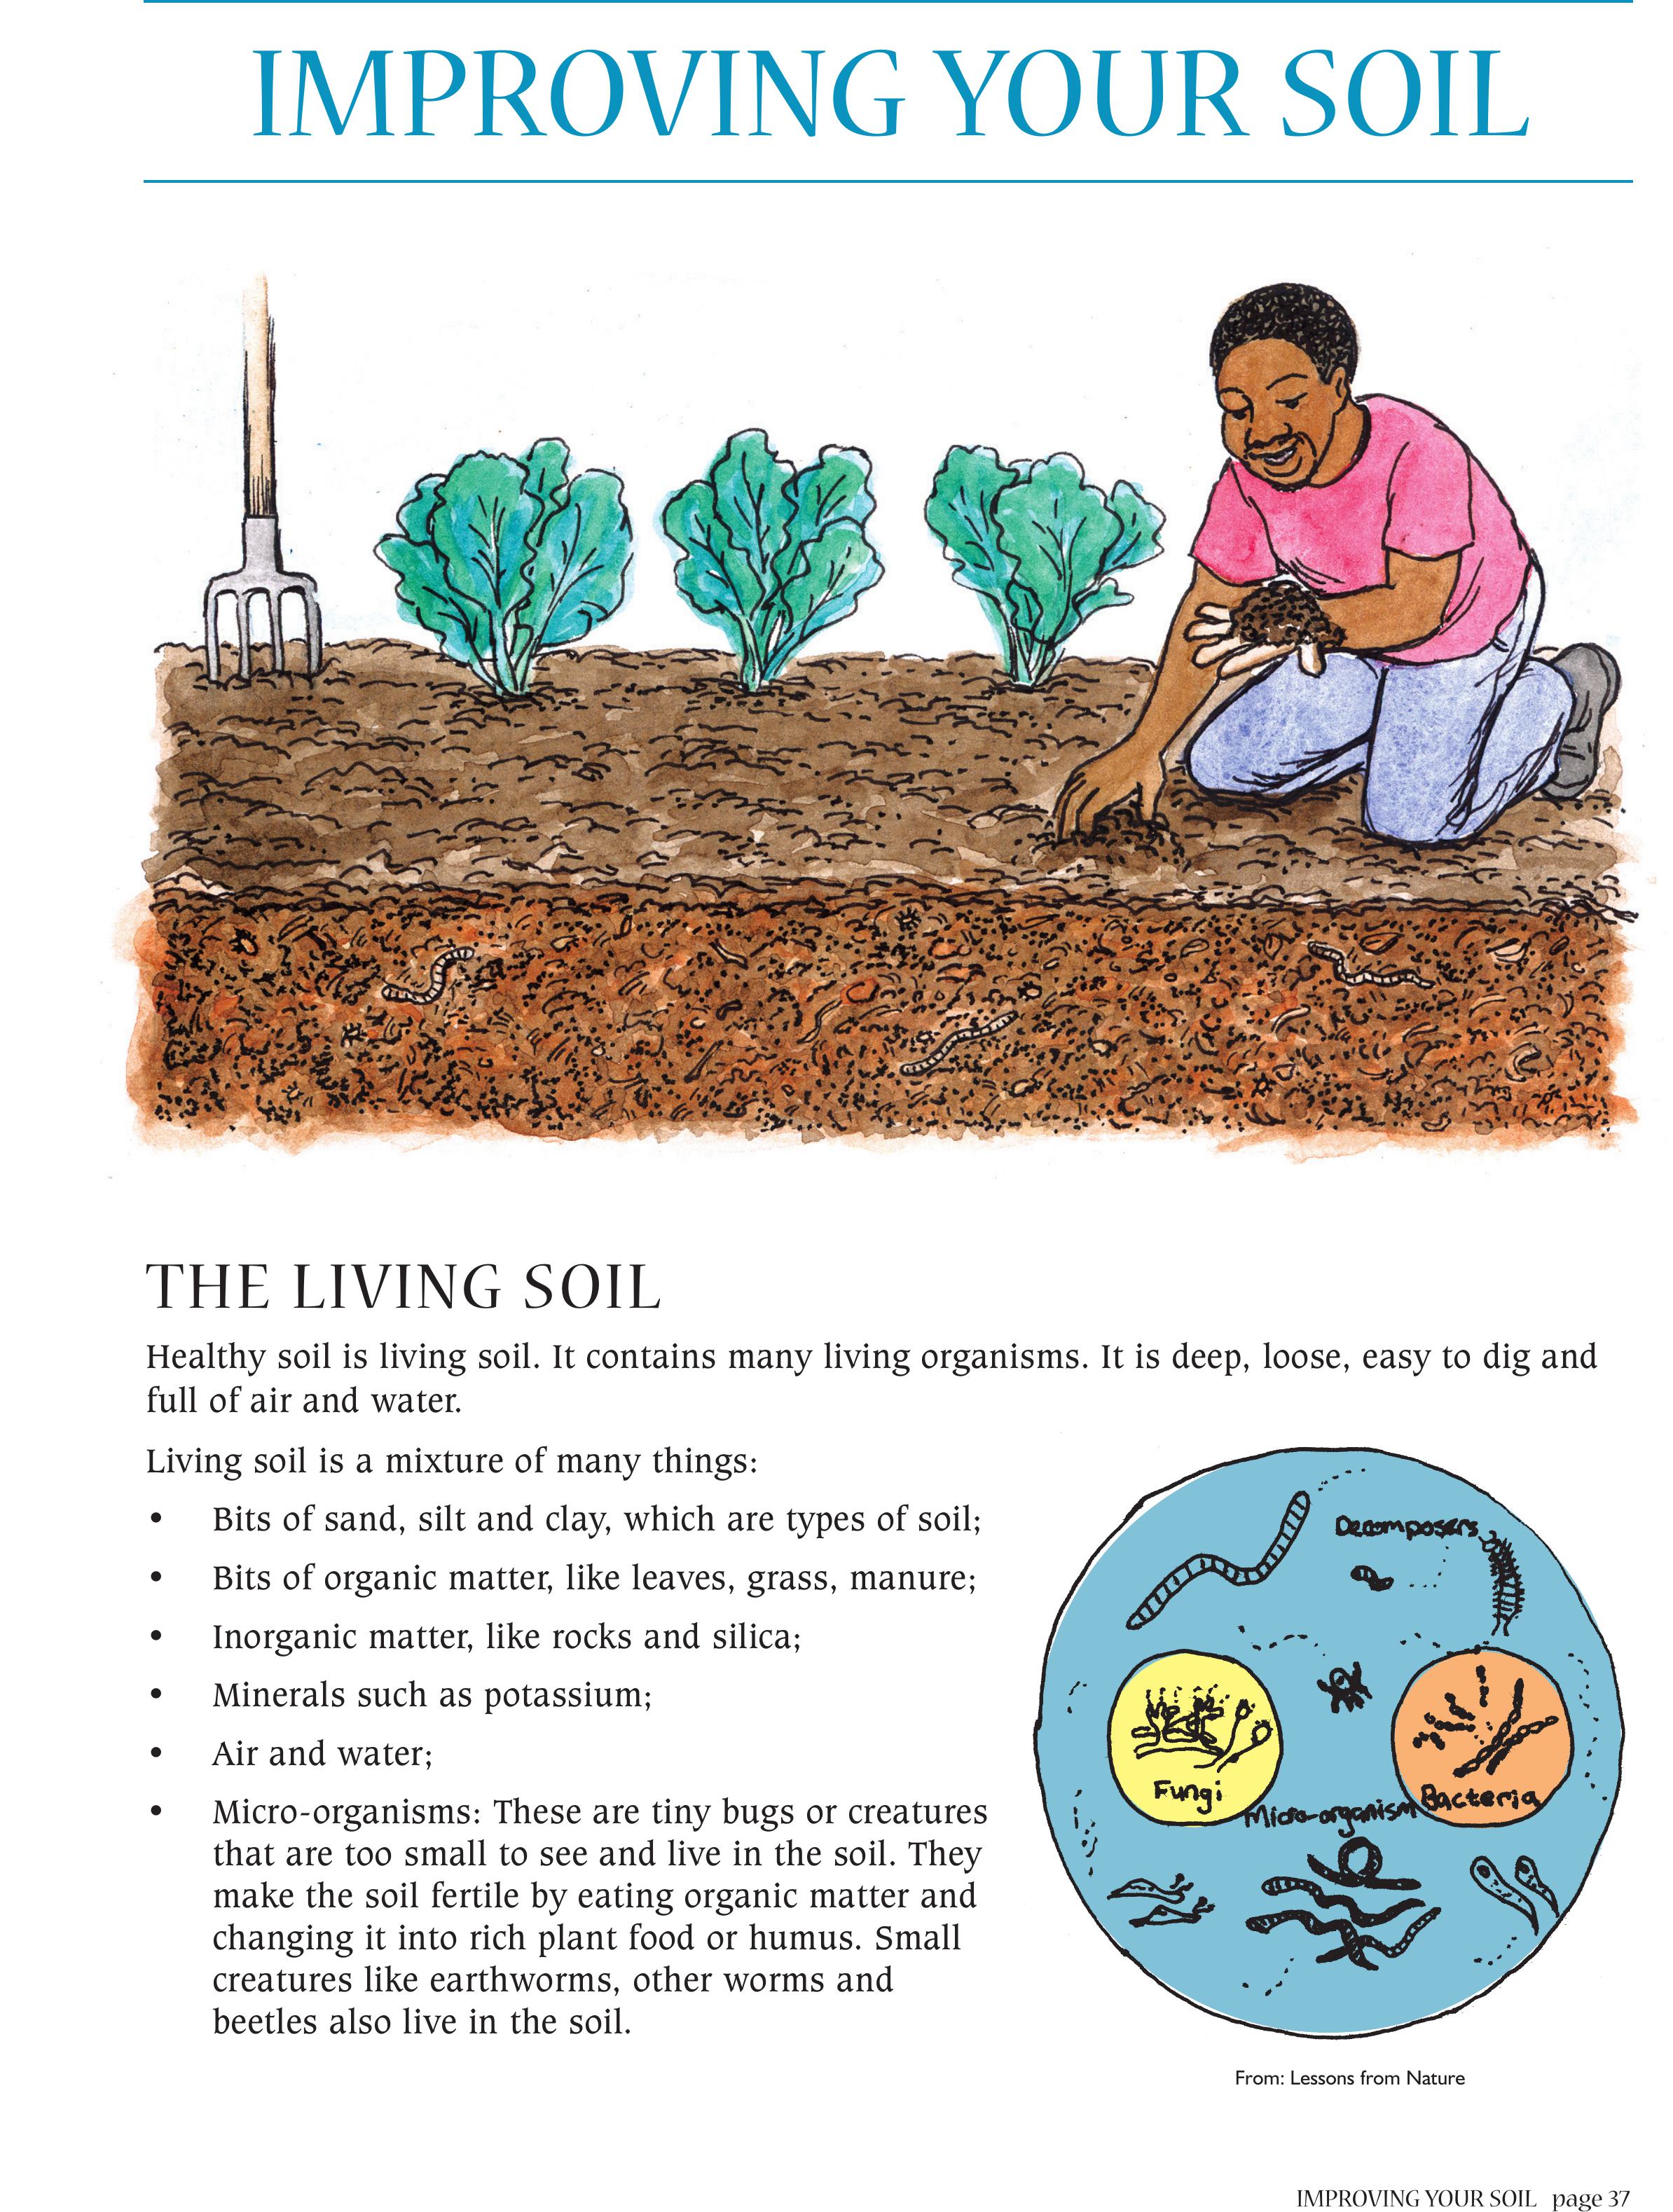
Healthy soil is living soil. It contains many living organisms. It is deep, loose, easy to dig and
full of air and water.
Living soil is a mixture of many things:
• Bits of sand, silt and clay, which are types of soil;
• Bits of organic matter, like leaves, grass, manure;
• Inorganic matter, like rocks and silica;
• Minerals such as potassium;
• Air and water;
• Micro-organisms: These are tiny bugs or creatures
that are too small to see and live in the soil. They
make the soil fertile by eating organic matter and
changing it into rich plant food or humus. Small
creatures like earthworms, other worms and
beetles also live in the soil.
From: Lessons from Nature
page 38 IMPROVING YOUR SOIL
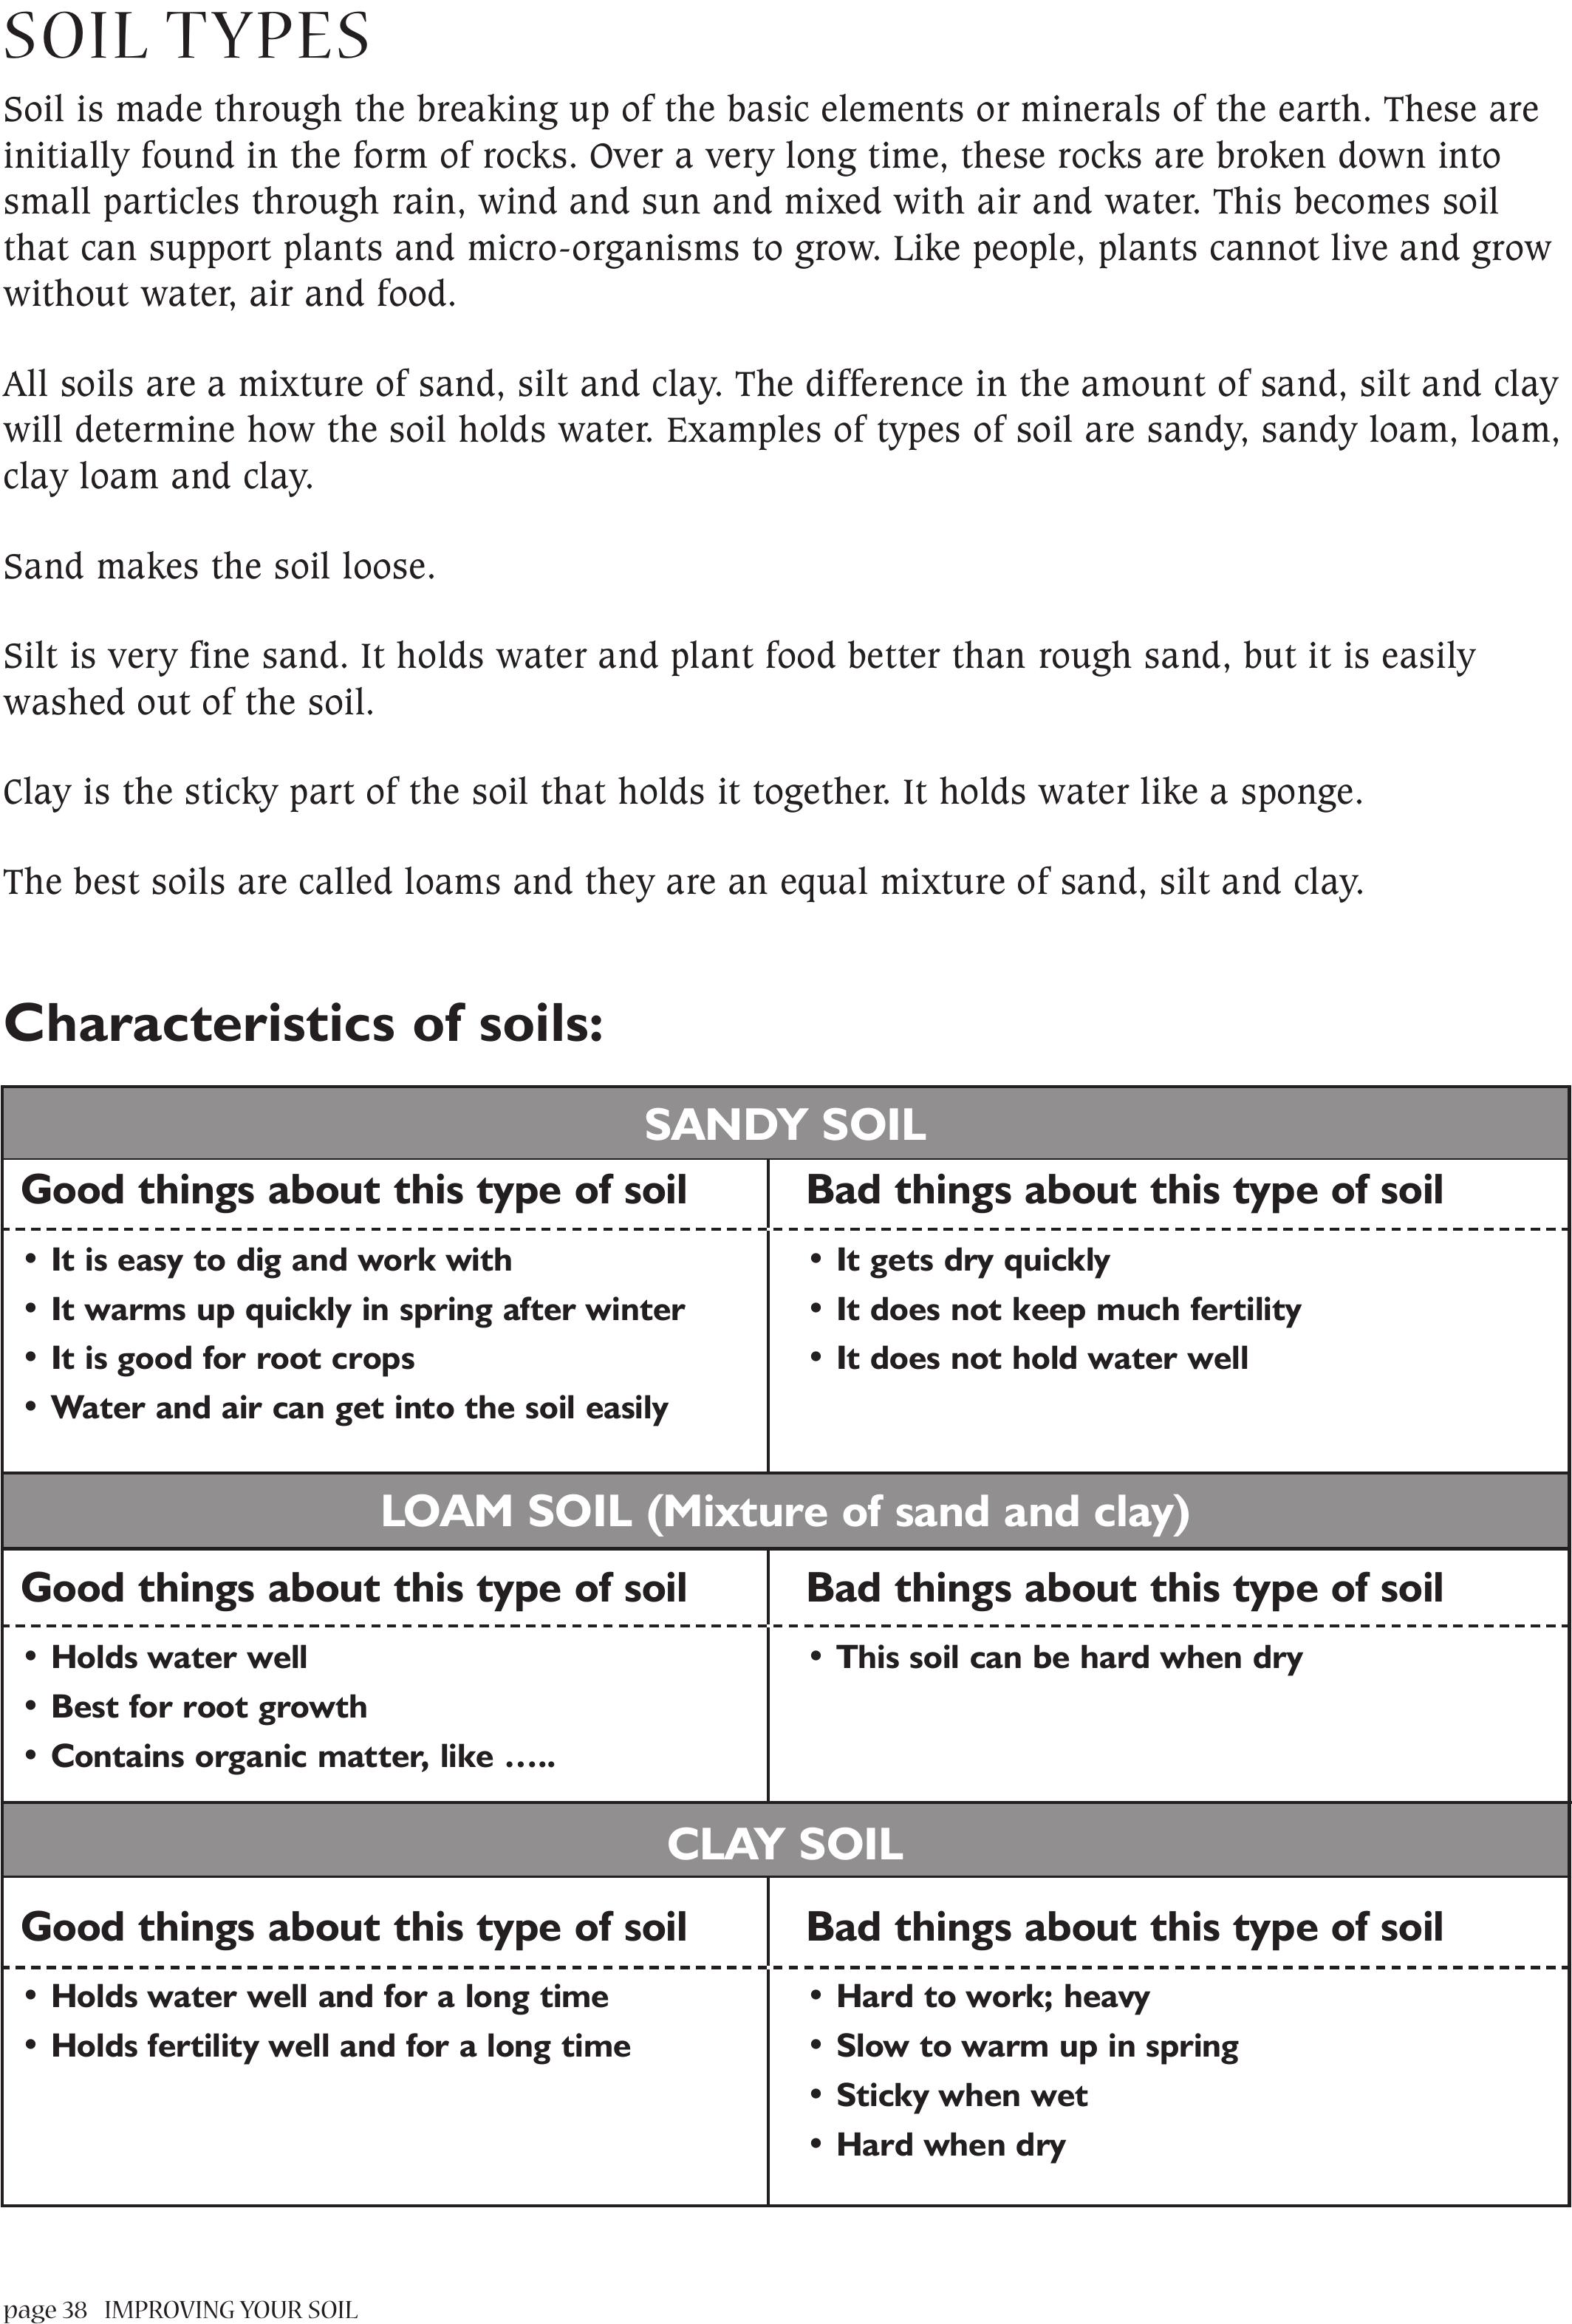
SOIL TYPES
Soil is made through the breaking up of the basic elements or minerals of the earth. These are
initially found in the form of rocks. Over a very long time, these rocks are broken down into
small particles through rain, wind and sun and mixed with air and water. This becomes soil
that can support plants and micro-organisms to grow. Like people, plants cannot live and grow
without water, air and food.
All soils are a mixture of sand, silt and clay. The difference in the amount of sand, silt and clay
will determine how the soil holds water. Examples of types of soil are sandy, sandy loam, loam,
clay loam and clay.
Sand makes the soil loose.
Silt is very fine sand. It holds water and plant food better than rough sand, but it is easily
washed out of the soil.
Clay is the sticky part of the soil that holds it together. It holds water like a sponge.
The best soils are called loams and they are an equal mixture of sand, silt and clay.
Characteristics of soils:
SANDY SOIL
Good things about this type of soil Bad things about this type of soil
• It is easy to dig and work with • It gets dry quickly
• It warms up quickly in spring after winter • It does not keep much fertility
• It is good for root crops • It does not hold water well
• Water and air can get into the soil easily
LOAM SOIL (Mixture of sand and clay)
Good things about this type of soil Bad things about this type of soil
• Holds water well • This soil can be hard when dry
• Best for root growth
• Contains organic matter, like …..
CLAY SOIL
Good things about this type of soil Bad things about this type of soil
• Holds water well and for a long time • Hard to work; heavy
• Holds fertility well and for a long time • Slow to warm up in spring
• Sticky when wet
• Hard when dry
IMPROVING YOUR SOIL page 39
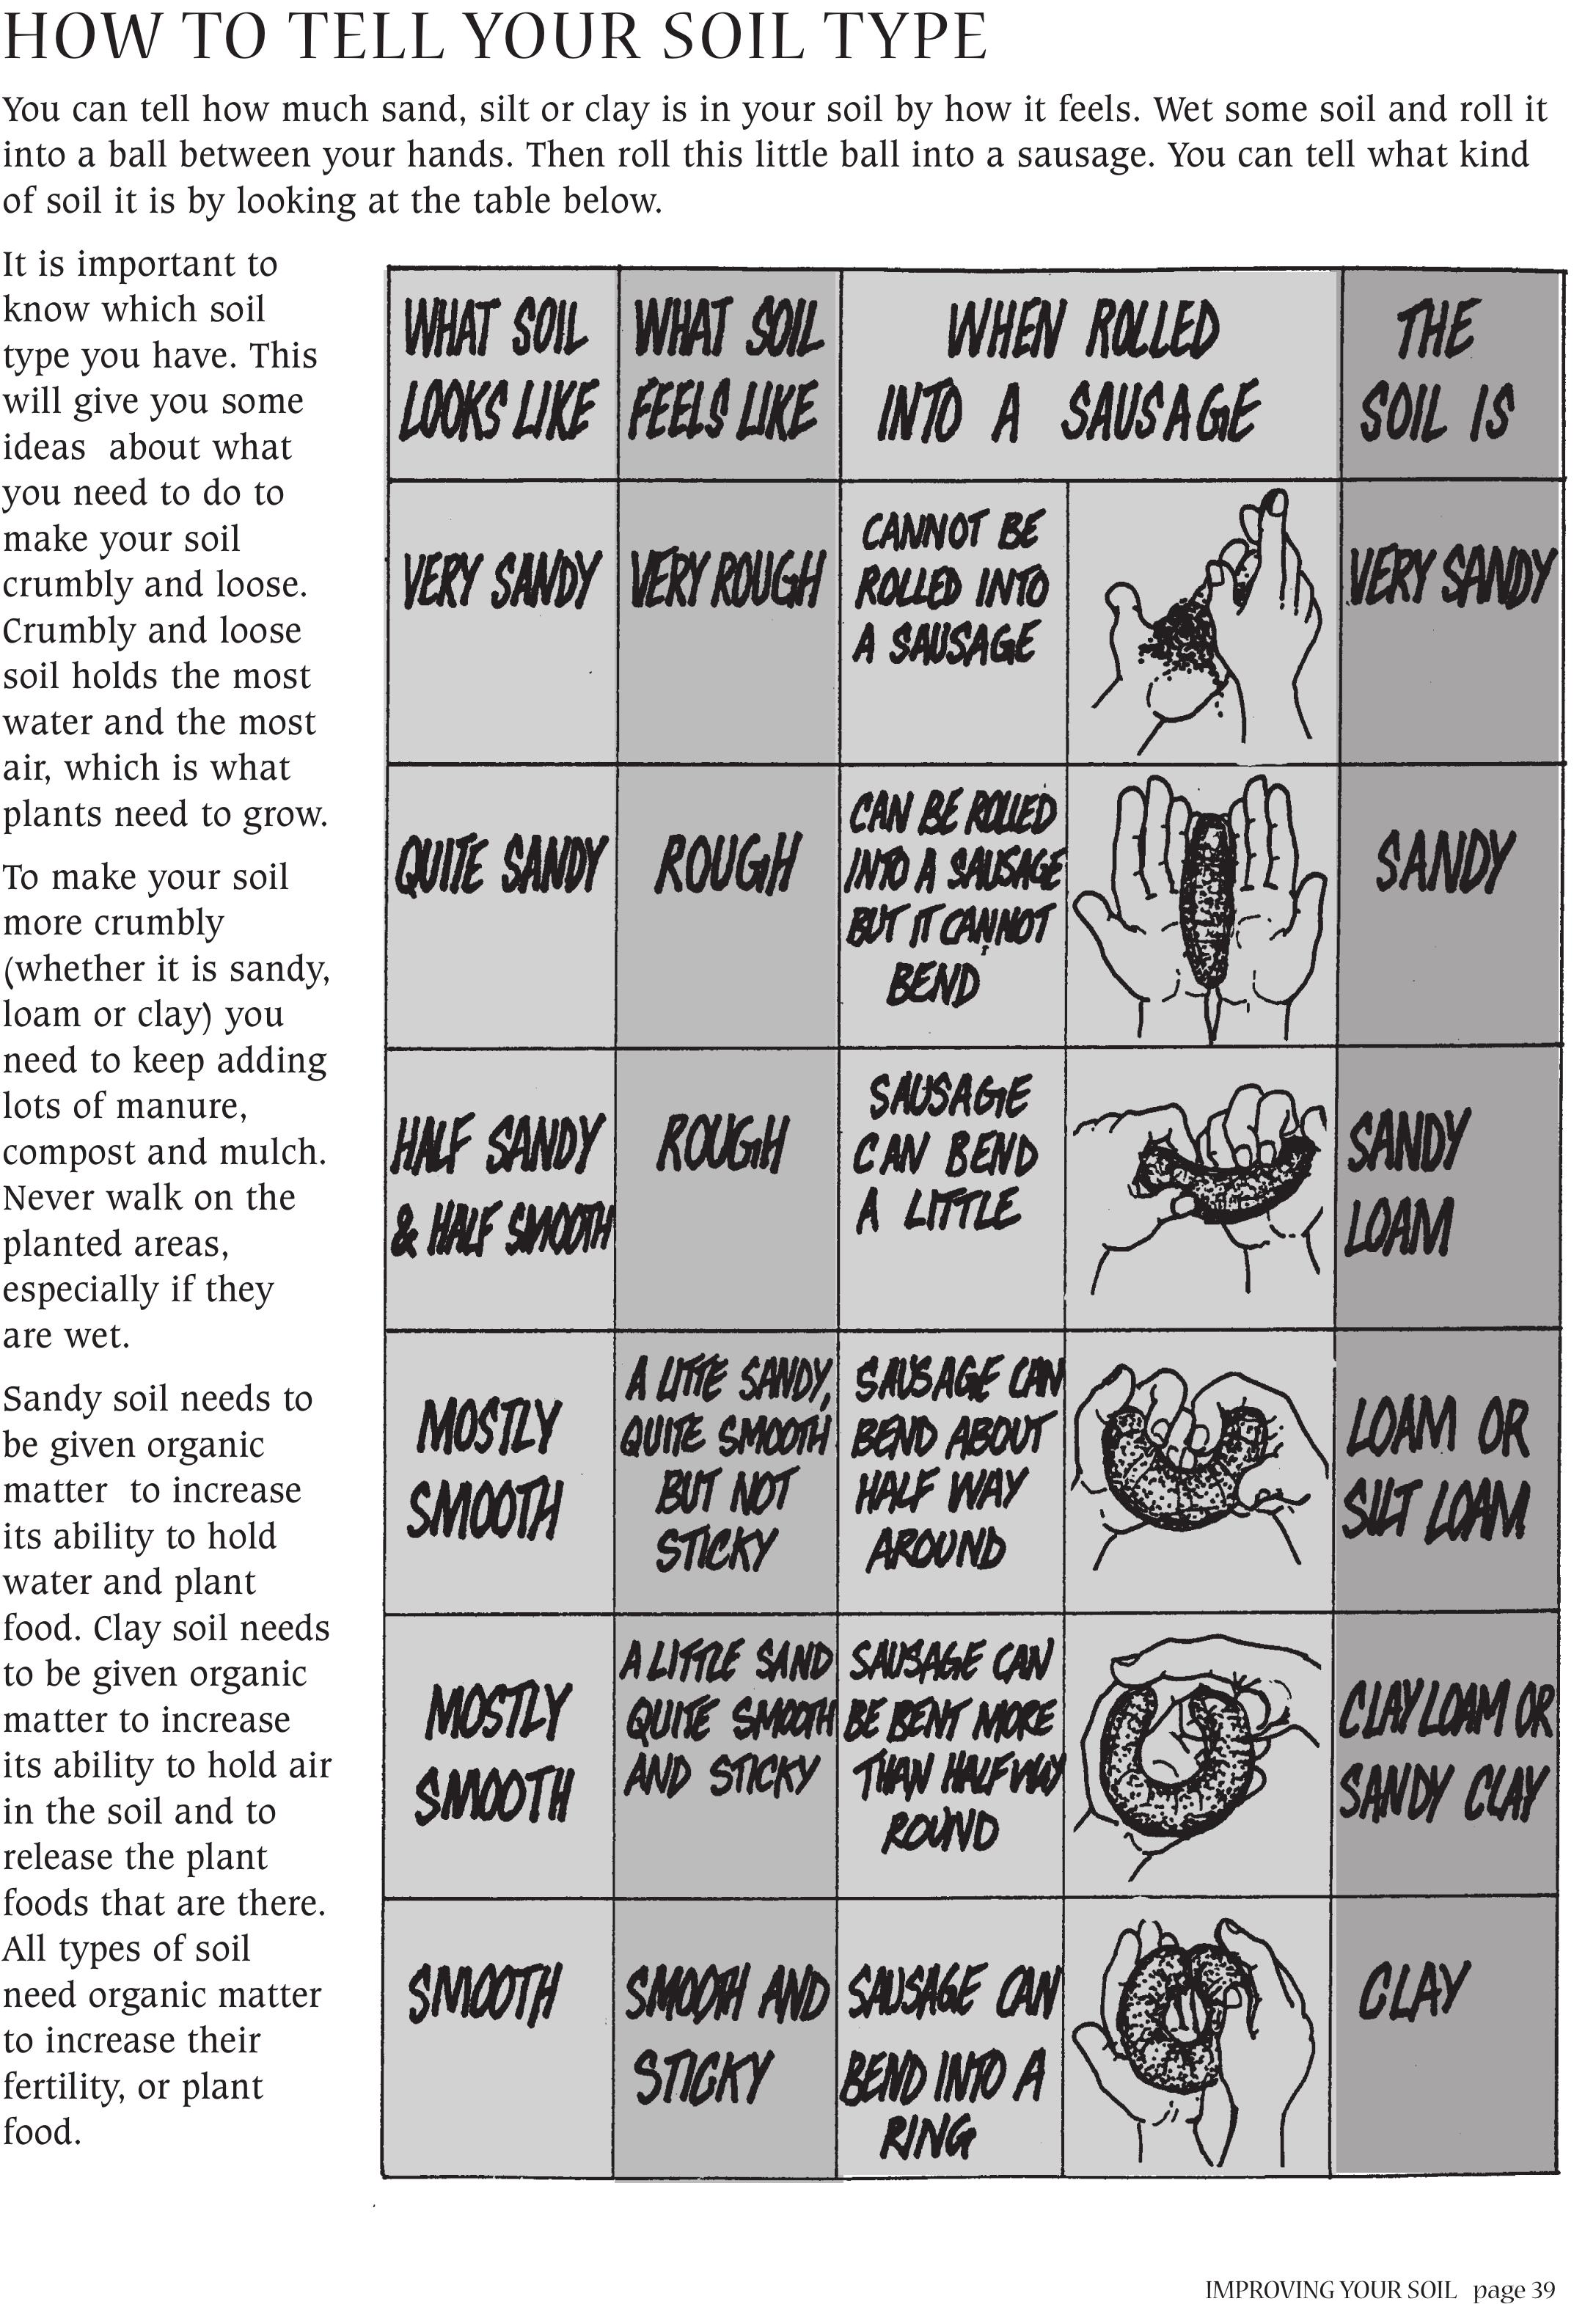
HOW TO TELL YOUR SOIL TYPE
You can tell how much sand, silt or clay is in your soil by how it feels. Wet some soil and roll it
into a ball between your hands. Then roll this little ball into a sausage. You can tell what kind
of soil it is by looking at the table below.
It is important to
know which soil
type you have. This
will give you some
ideas about what
you need to do to
make your soil
crumbly and loose.
Crumbly and loose
soil holds the most
water and the most
air, which is what
plants need to grow.
To make your soil
more crumbly
(whether it is sandy,
loam or clay) you
need to keep adding
lots of manure,
compost and mulch.
Never walk on the
planted areas,
especially if they
are wet.
Sandy soil needs to
be given organic
matter to increase
its ability to hold
water and plant
food. Clay soil needs
to be given organic
matter to increase
its ability to hold air
in the soil and to
release the plant
foods that are there.
All types of soil
need organic matter
to increase their
fertility, or plant
food.

page 40 IMPROVING YOUR SOIL
SOIL FERTILITY
All living things are composed of the basic elements of the earth. Plants consist mainly of
hydrogen, oxygen, carbon, nitrogen, phosphorus, potassium and smaller quantities of
magnesium, sulphur and calcium as well as many other elements in very small amounts (these
are called trace elements).
Plants need three main kinds of food:
• Nitrogen (N) – for healthy leaf and stem growth;
• Phosphorus (P) – for healthy roots and fruit formation;
• Potassium (K) – for general health and healthy flowers and fruit.
The capital letters in brackets (N, P, and K) are called the chemical symbols. If you buy fertiliser or
other chemicals, they may use these letters instead of writing out the name in full.
All three of these foods are found in good compost or manure. You can also increase the
amount of these foods in the soil by mulching with leguminous leaves (like beans, peas, pigeon
peas and Acacia (thorn tree leaves)) or comfrey, using liquid manures, earthworm castings and
effective micro-organisms. You will need to make the earthworm castings and effective micro-
organism brews and add them to your soil. These are different ways of improving fertility that
you will need to be shown.
NITROGEN
1. How do you know if your soil needs more
nitrogen?
You will know your plants need nitrogen when the leaves are
turning yellowish, instead of a strong bright green.
2. How can you add nitrogen to your soil?
This element is found in most manures (cattle, sheep, pig,
goat, chicken and rabbit). There is more nitrogen in chicken
and goat manure. These must be dried before being used in the
garden. Otherwise they can be too strong and ‘burn’ the plants.
3. Nitrogen is also found in legumes
These are plants that form nodules or little knots on their
roots. These nodules ‘fix’ nitrogen from the air, so that the
plant can take it up through its roots. There are micro-
organisms (bacteria) in the roots that help to ‘fix’ the nitrogen.
After the roots of the plant die the nitrogen is released into the
soil and can be used by surrounding plants.
IMPROVING YOUR SOIL page 41
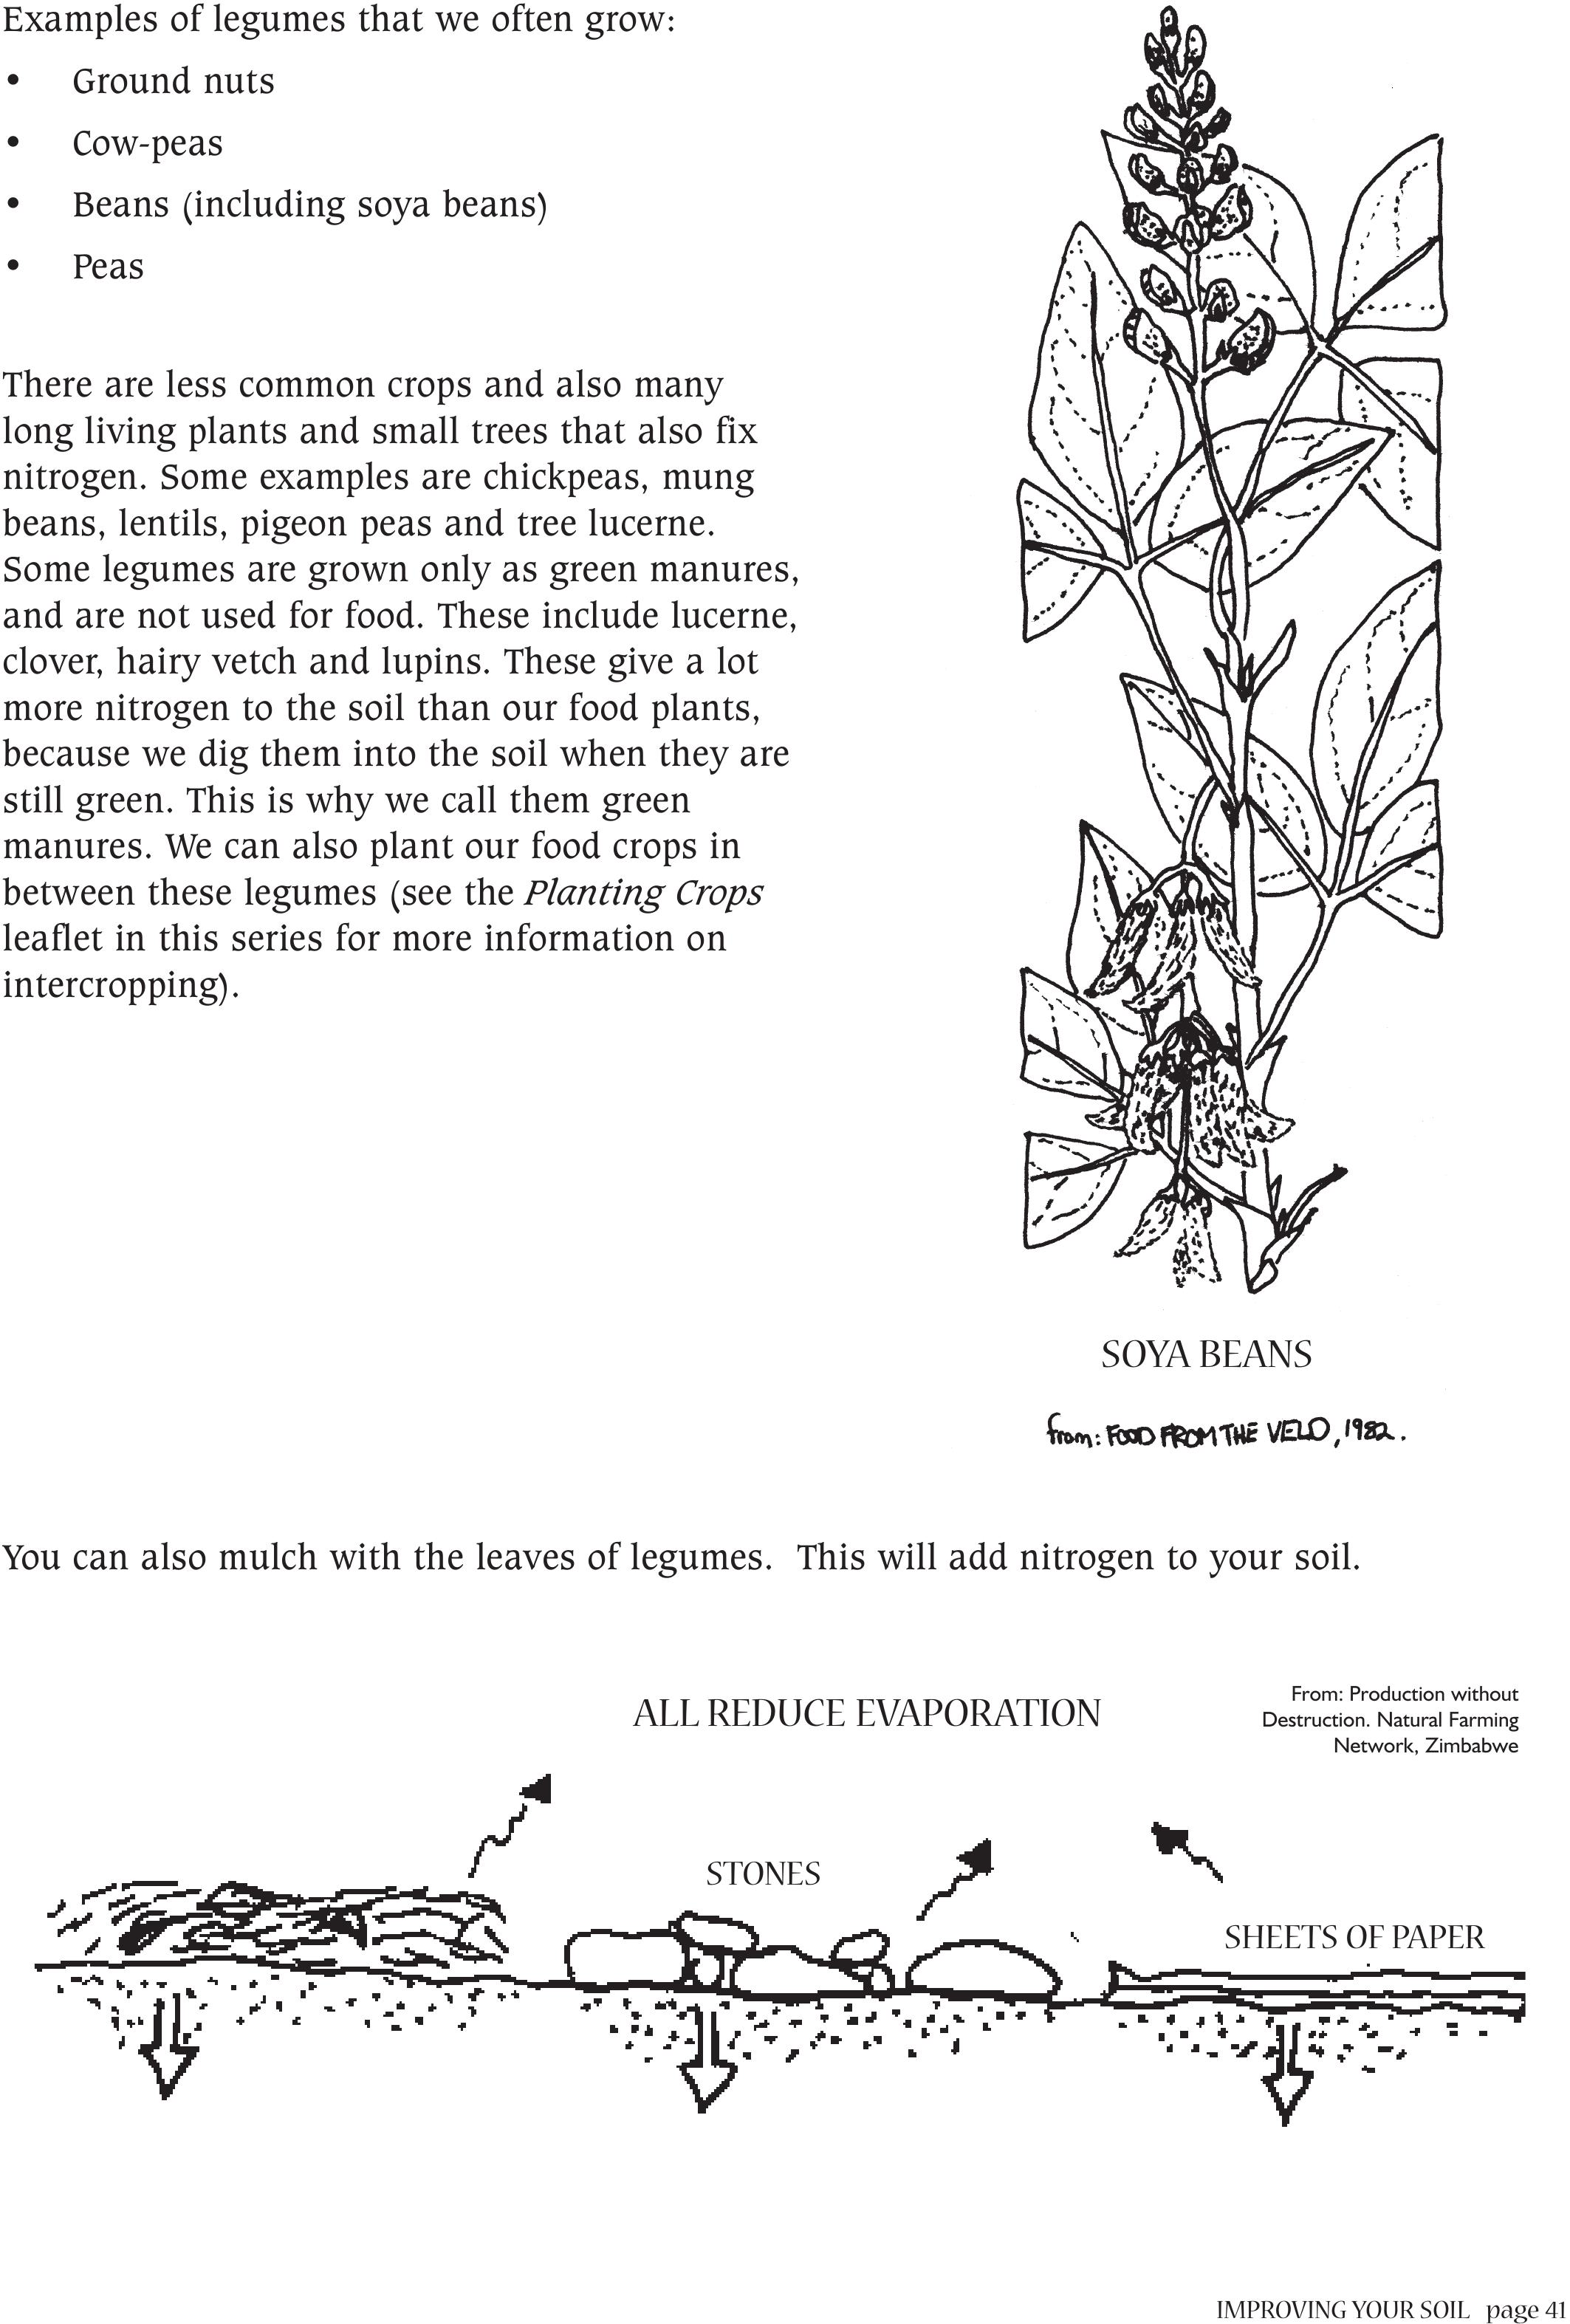
Examples of legumes that we often grow:
• Ground nuts
• Cow-peas
• Beans (including soya beans)
• Peas
There are less common crops and also many
long living plants and small trees that also fix
nitrogen. Some examples are chickpeas, mung
beans, lentils, pigeon peas and tree lucerne.
Some legumes are grown only as green manures,
and are not used for food. These include lucerne,
clover, hairy vetch and lupins. These give a lot
more nitrogen to the soil than our food plants,
because we dig them into the soil when they are
still green. This is why we call them green
manures. We can also plant our food crops in
between these legumes (see the Planting Crops
leaflet in this series for more information on
intercropping).
You can also mulch with the leaves of legumes. This will add nitrogen to your soil.
SOYA BEANS
ALL REDUCE EVAPORATION
STONES
SHEETS OF PAPER
From: Production without
Destruction. Natural Farming
Network, Zimbabwe
page 42 IMPROVING YOUR SOIL
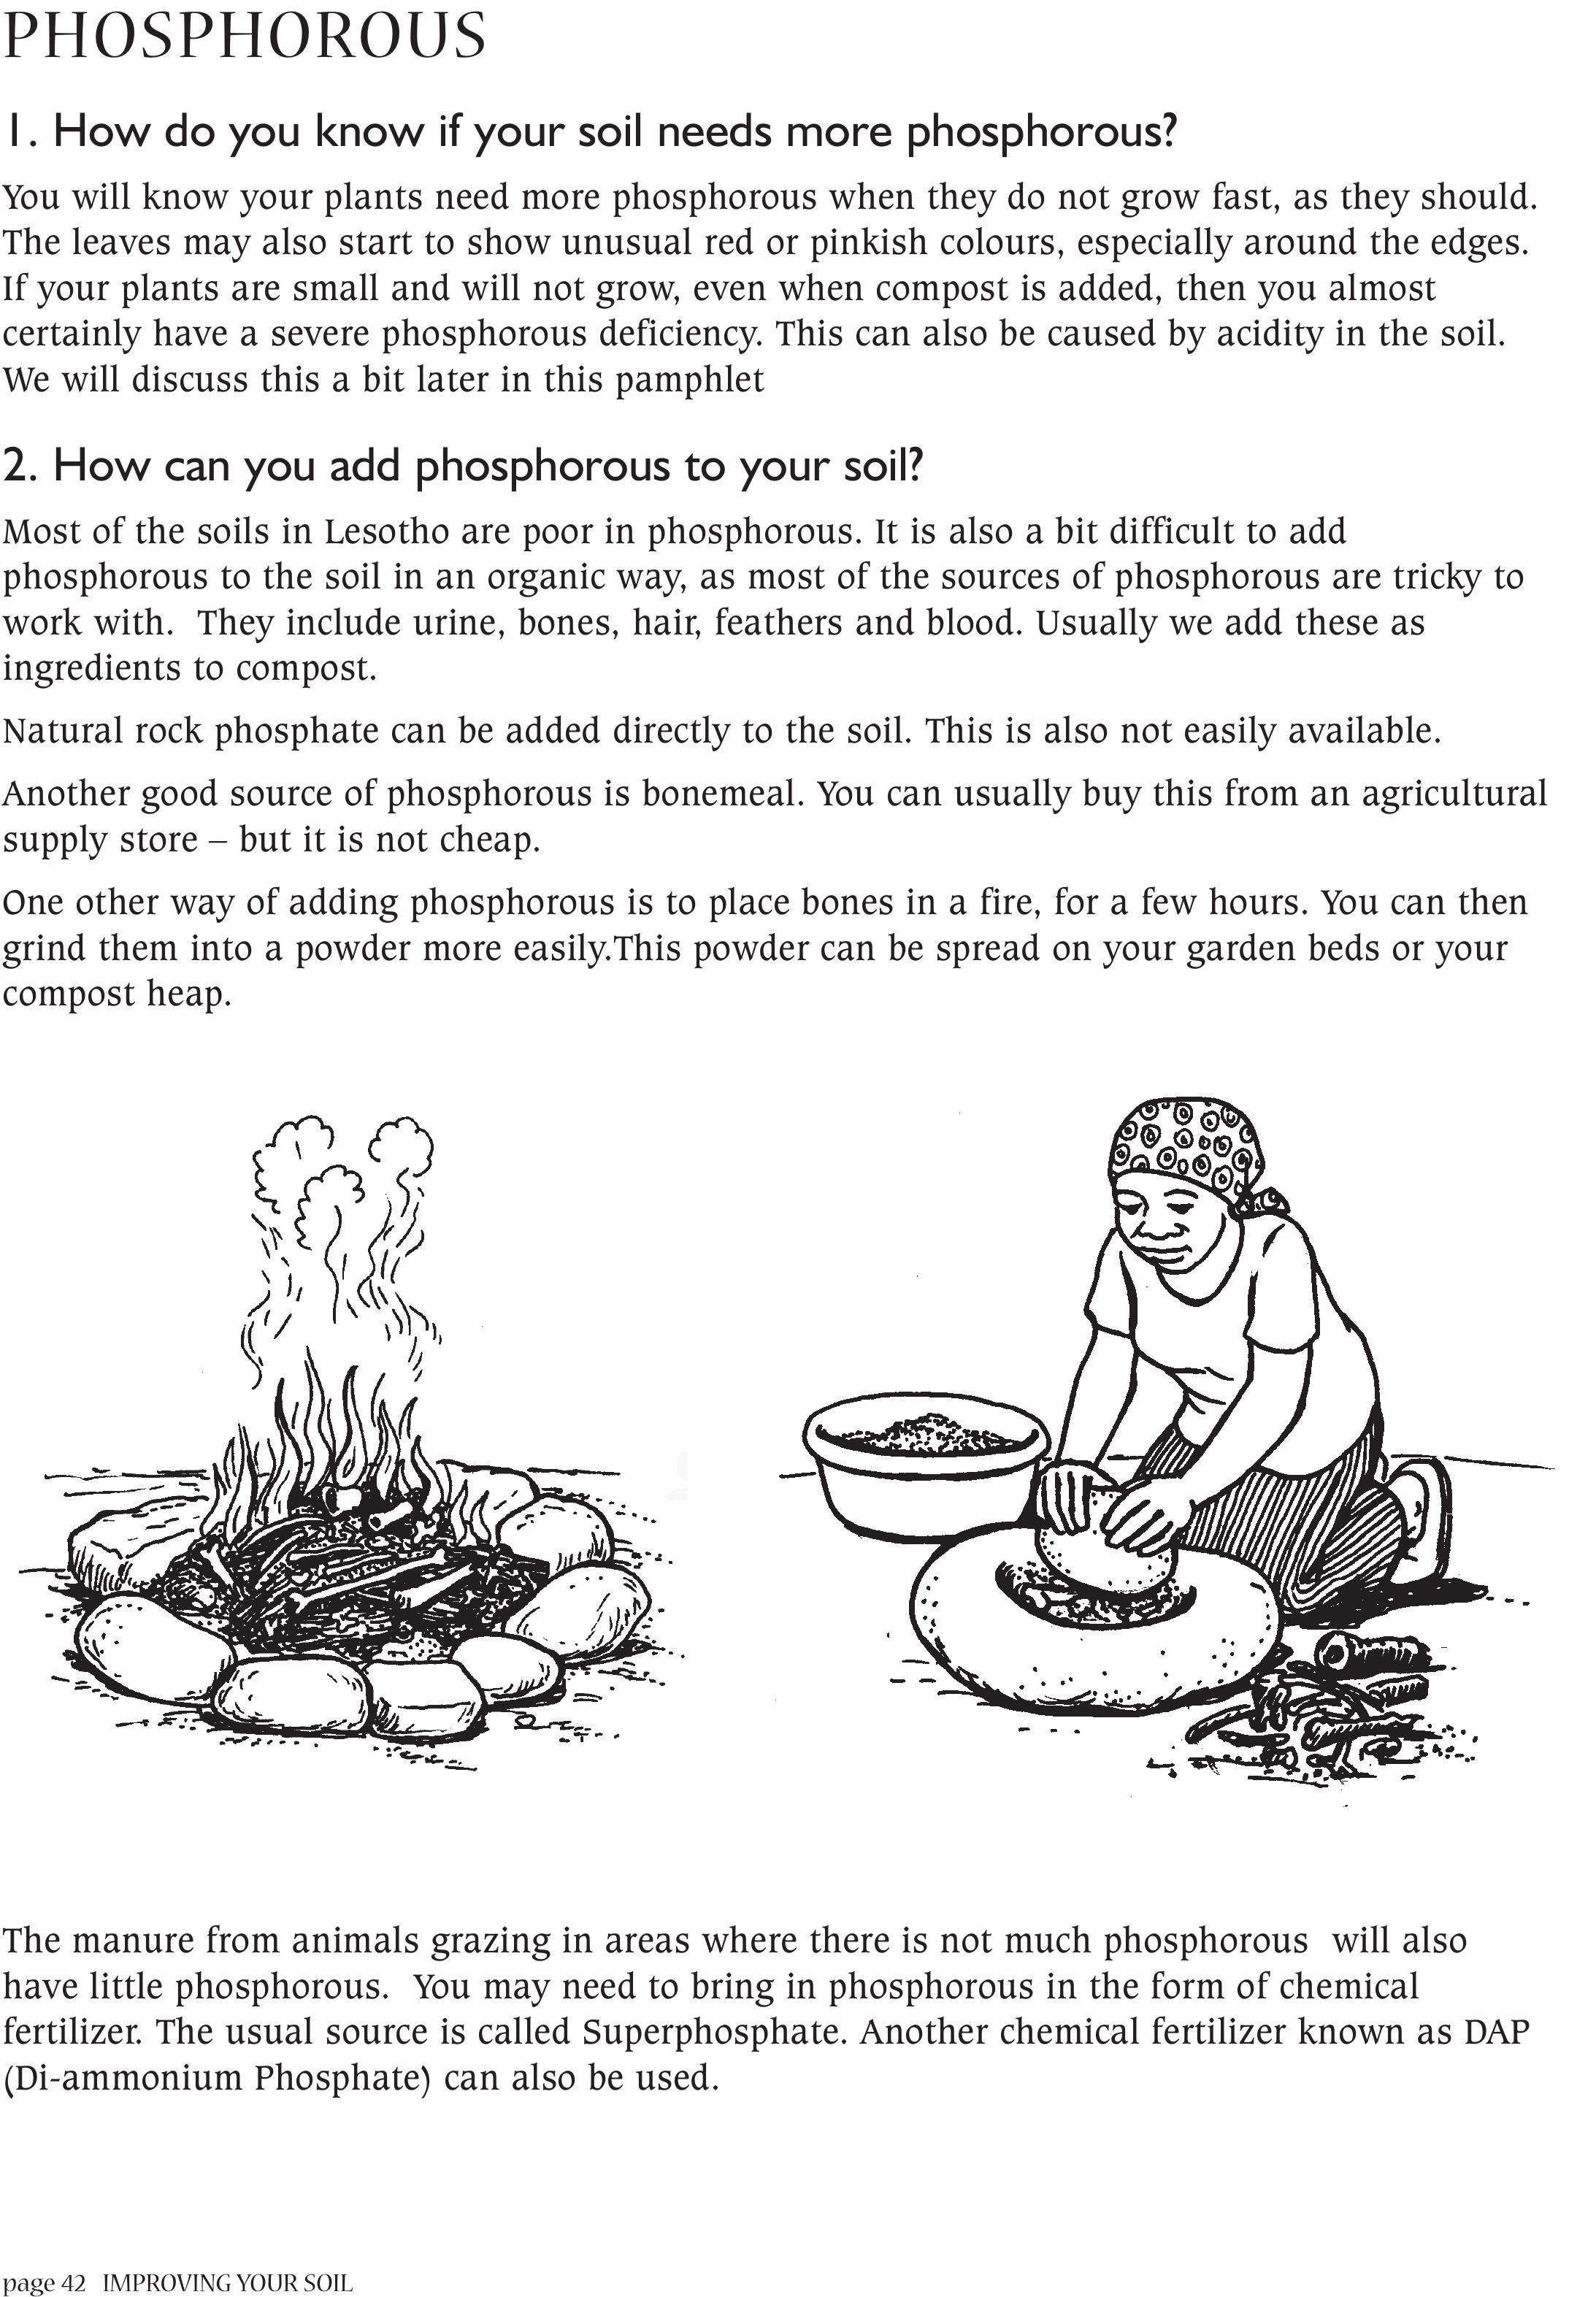
PHOSPHOROUS
1. How do you know if your soil needs more phosphorous?
You will know your plants need more phosphorous when they do not grow fast, as they should.
The leaves may also start to show unusual red or pinkish colours, especially around the edges.
If your plants are small and will not grow, even when compost is added, then you almost
certainly have a severe phosphorous deficiency. This can also be caused by acidity in the soil.
We will discuss this a bit later in this pamphlet
2. How can you add phosphorous to your soil?
Most of the soils in Lesotho are poor in phosphorous. It is also a bit difficult to add
phosphorous to the soil in an organic way, as most of the sources of phosphorous are tricky to
work with. They include urine, bones, hair, feathers and blood. Usually we add these as
ingredients to compost.
Natural rock phosphate can be added directly to the soil. This is also not easily available.
Another good source of phosphorous is bonemeal. You can usually buy this from an agricultural
supply store – but it is not cheap.
One other way of adding phosphorous is to place bones in a fire, for a few hours. You can then
grind them into a powder more easily.This powder can be spread on your garden beds or your
compost heap.
The manure from animals grazing in areas where there is not much phosphorous will also
have little phosphorous. You may need to bring in phosphorous in the form of chemical
fertilizer. The usual source is called Superphosphate. Another chemical fertilizer known as DAP
(Di-ammonium Phosphate) can also be used.
IMPROVING YOUR SOIL page 43
POTASSIUM
1. How do you know if your soil needs more potassium?
You will know your plants need potassium when the plants become brittle and the leaf edges
become brown and dry. When fruit do not form properly, you should also suspect a lack of
potassium. Other signs can be hard to distinguish. One of these is a yellowing around the veins
of the leaves. This could also be caused by diseases – so it is difficult to know.
2. How can you add potassium to your soil?
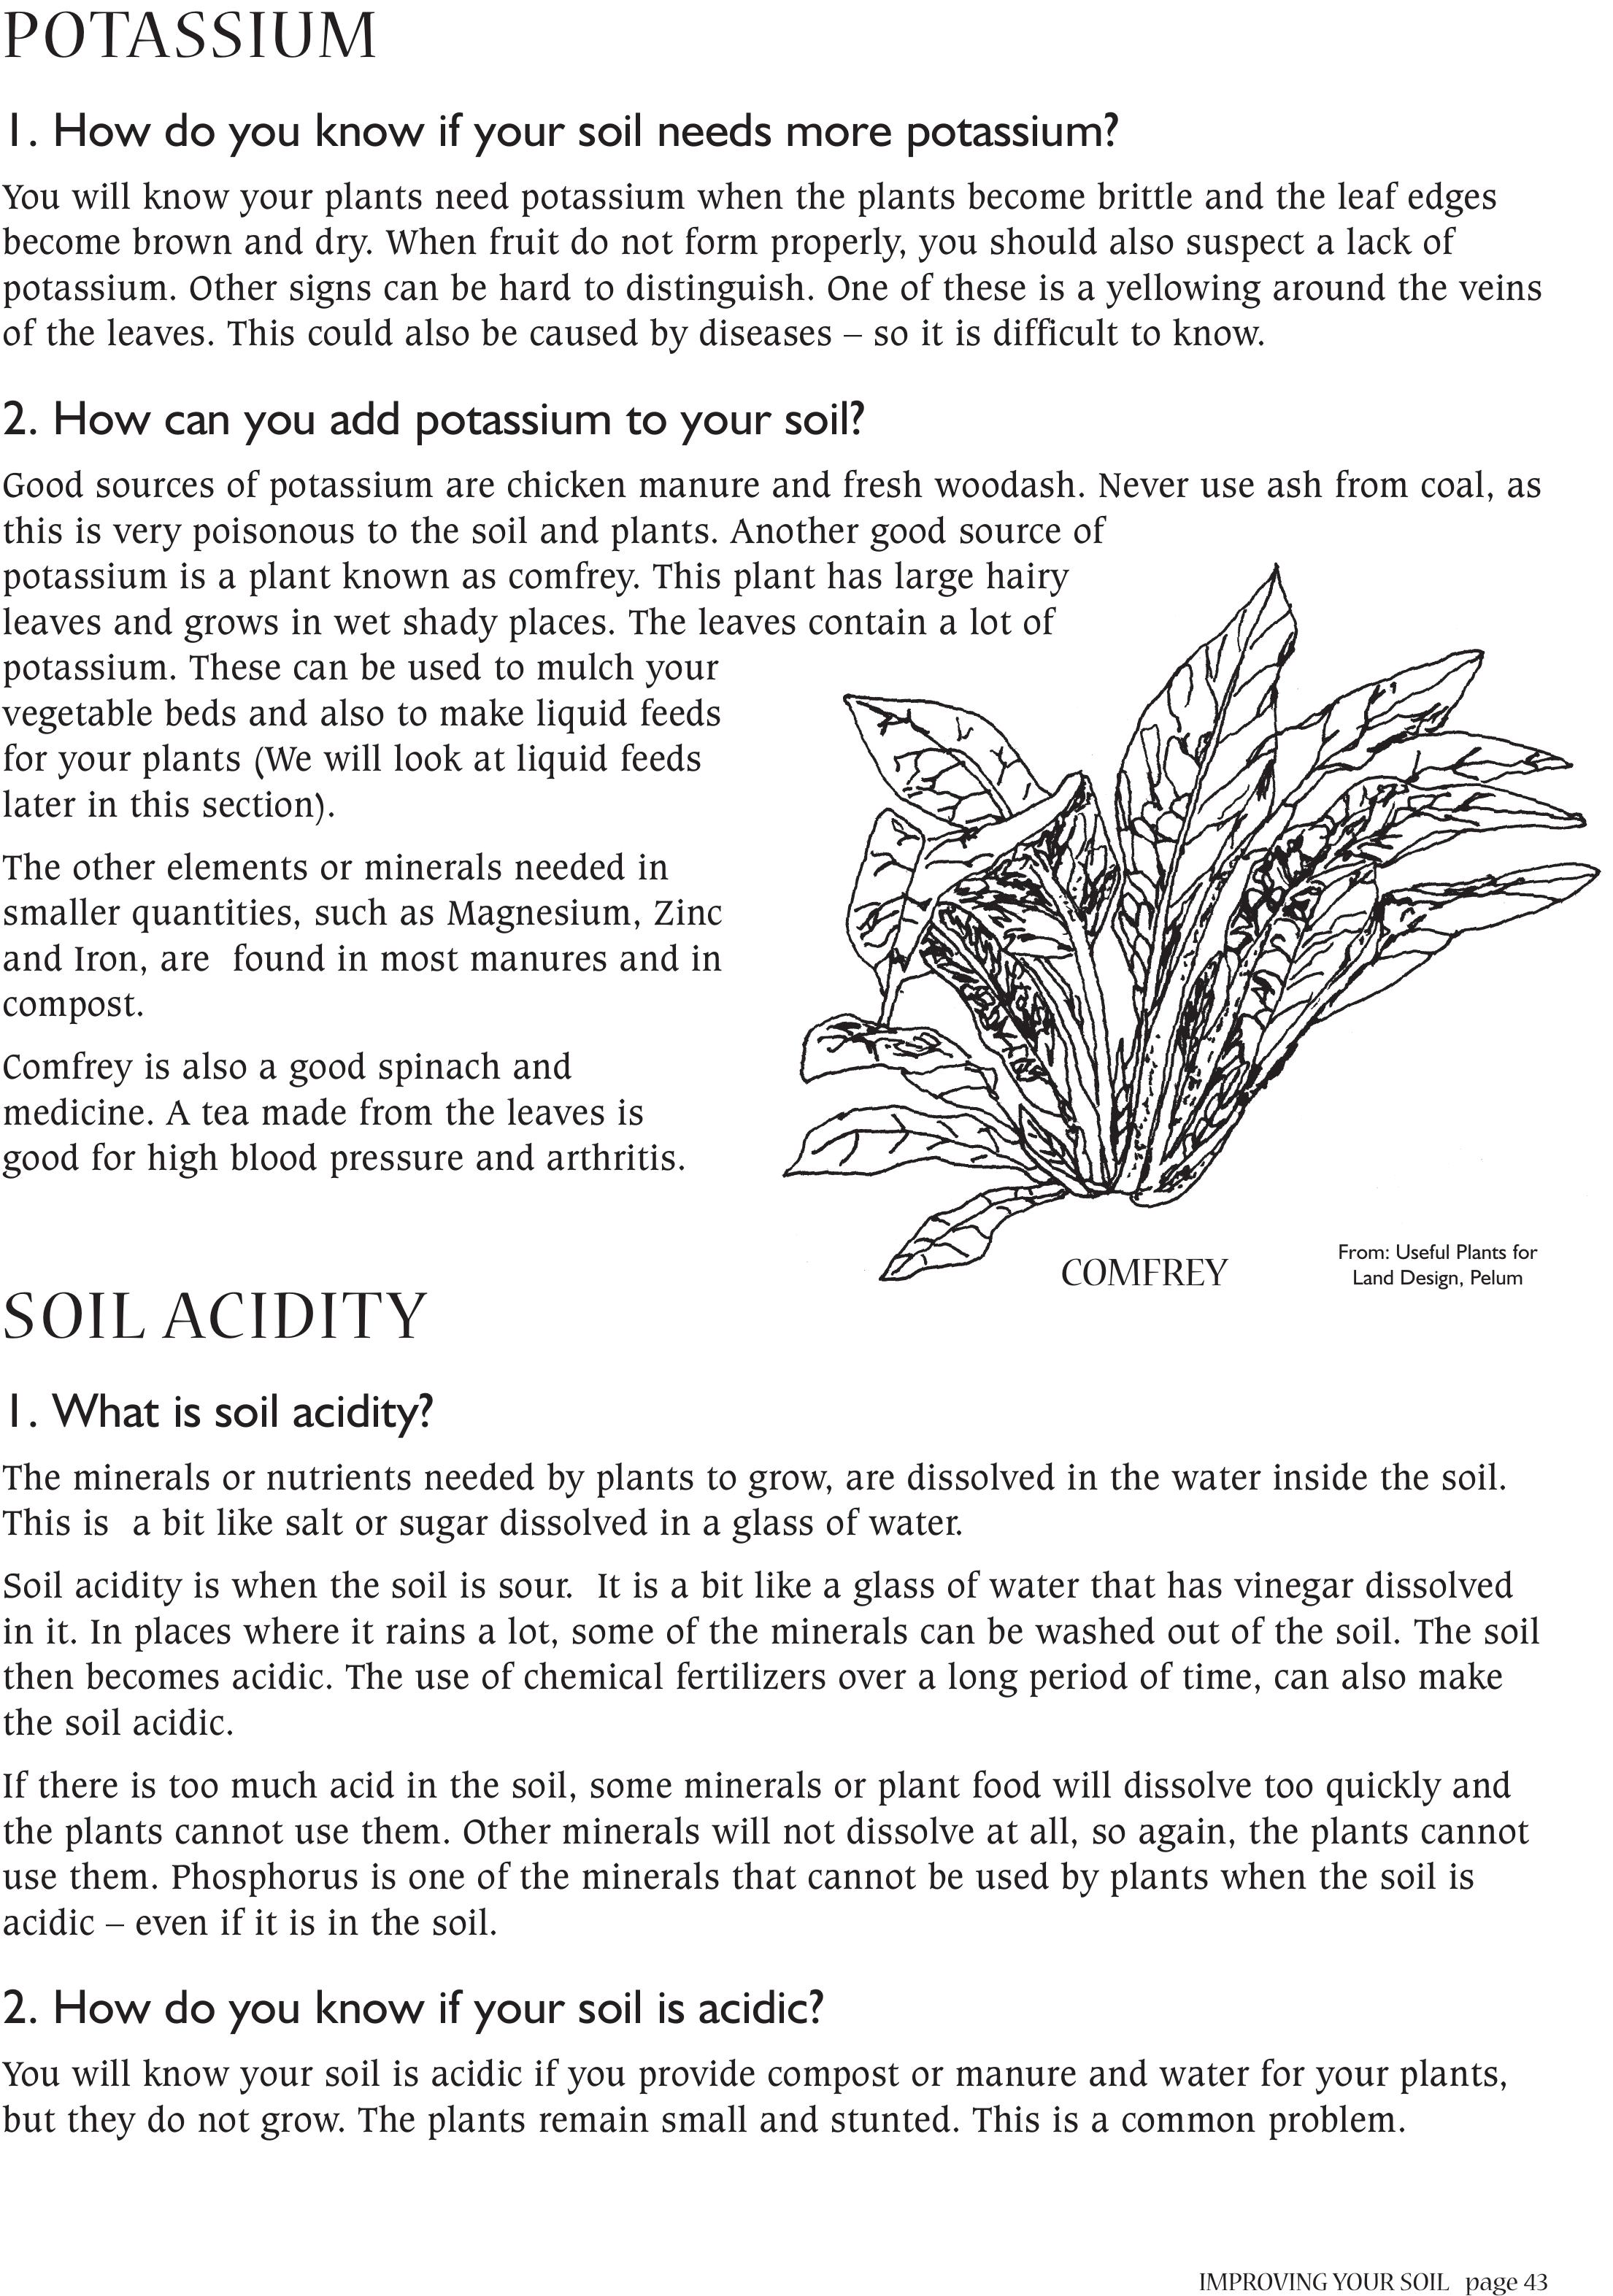
Good sources of potassium are chicken manure and fresh woodash. Never use ash from coal, as
this is very poisonous to the soil and plants. Another good source of
potassium is a plant known as comfrey. This plant has large hairy
leaves and grows in wet shady places. The leaves contain a lot of
potassium. These can be used to mulch your
vegetable beds and also to make liquid feeds
for your plants (We will look at liquid feeds
later in this section).
The other elements or minerals needed in
smaller quantities, such as Magnesium, Zinc
and Iron, are found in most manures and in
compost.
Comfrey is also a good spinach and
medicine. A tea made from the leaves is
good for high blood pressure and arthritis.
SOIL ACIDITY
1. What is soil acidity?
The minerals or nutrients needed by plants to grow, are dissolved in the water inside the soil.
This is a bit like salt or sugar dissolved in a glass of water.
Soil acidity is when the soil is sour. It is a bit like a glass of water that has vinegar dissolved
in it. In places where it rains a lot, some of the minerals can be washed out of the soil. The soil
then becomes acidic. The use of chemical fertilizers over a long period of time, can also make
the soil acidic.
If there is too much acid in the soil, some minerals or plant food will dissolve too quickly and
the plants cannot use them. Other minerals will not dissolve at all, so again, the plants cannot
use them. Phosphorus is one of the minerals that cannot be used by plants when the soil is
acidic – even if it is in the soil.
2. How do you know if your soil is acidic?
You will know your soil is acidic if you provide compost or manure and water for your plants,
but they do not grow. The plants remain small and stunted. This is a common problem.
COMFREY From: Useful Plants for
Land Design, Pelum
page 44 IMPROVING YOUR SOIL
3. How will you solve the problem of acidity?
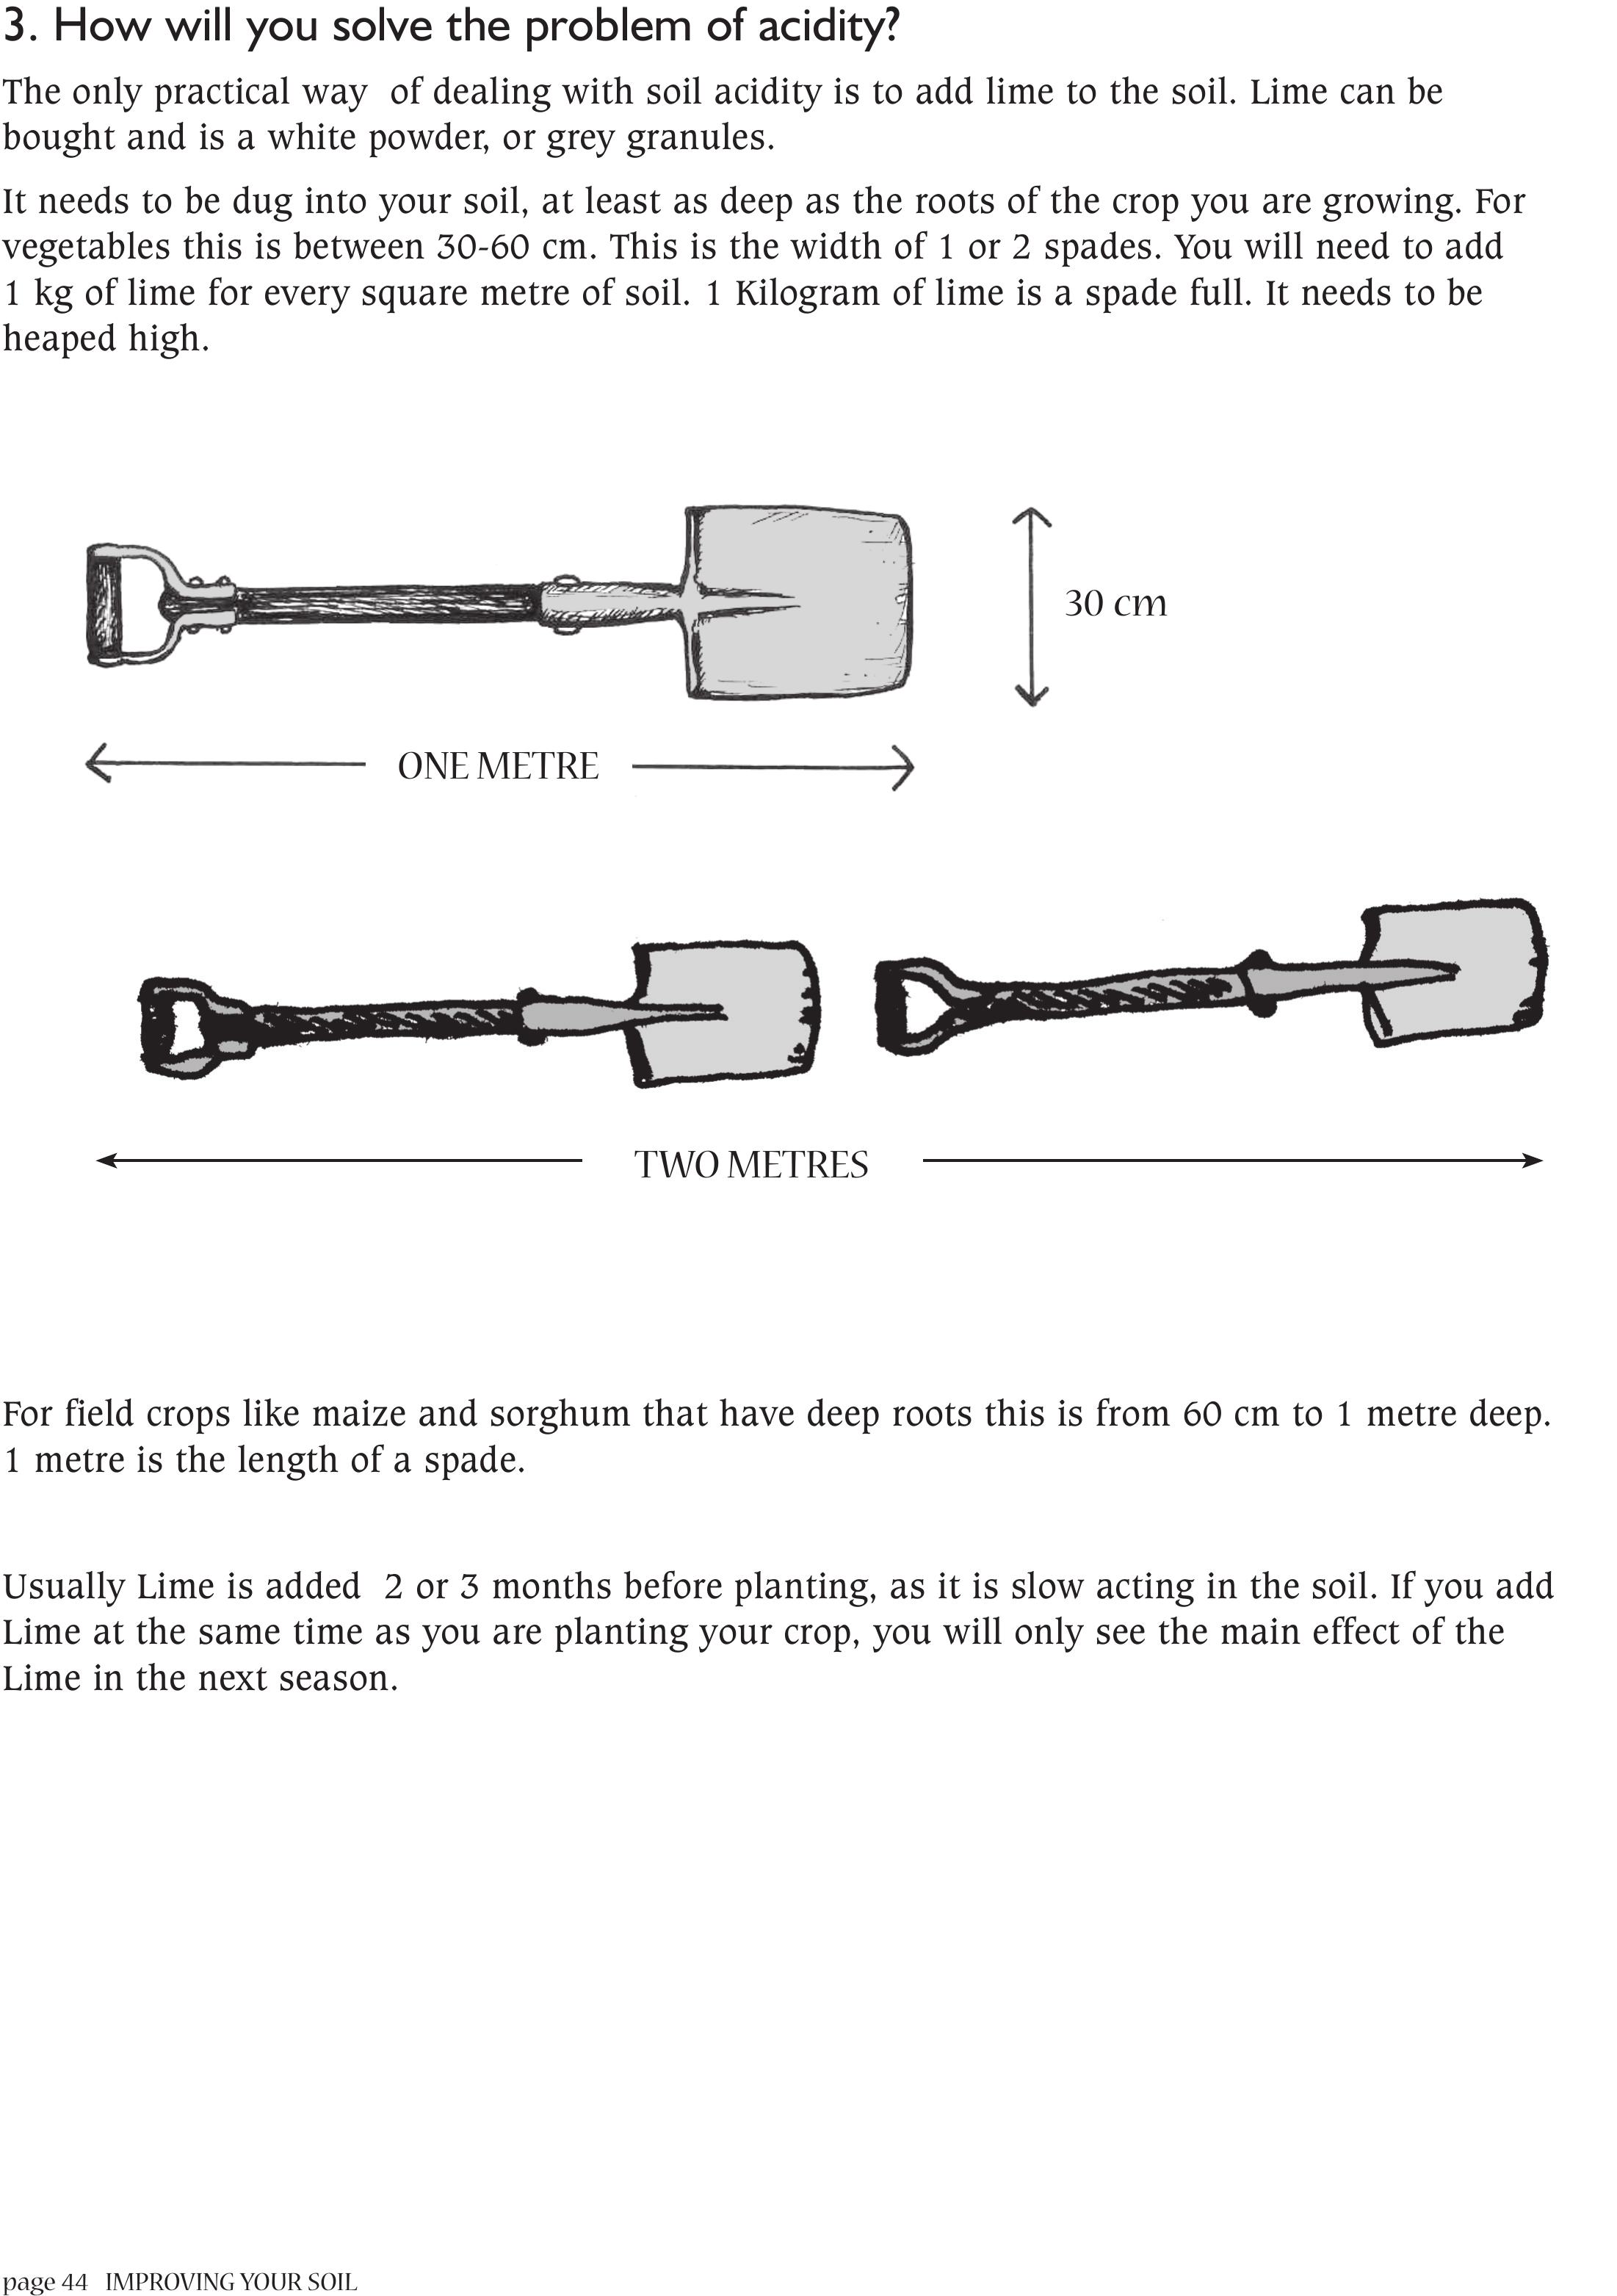
The only practical way of dealing with soil acidity is to add lime to the soil. Lime can be
bought and is a white powder, or grey granules.
It needs to be dug into your soil, at least as deep as the roots of the crop you are growing. For
vegetables this is between 30-60 cm. This is the width of 1 or 2 spades. You will need to add
1 kg of lime for every square metre of soil. 1 Kilogram of lime is a spade full. It needs to be
heaped high.
For field crops like maize and sorghum that have deep roots this is from 60 cm to 1 metre deep.
1 metre is the length of a spade.
Usually Lime is added 2 or 3 months before planting, as it is slow acting in the soil. If you add
Lime at the same time as you are planting your crop, you will only see the main effect of the
Lime in the next season.
ONE METRE
30 cm
TWO METRES
IMPROVING YOUR SOIL page 45
OTHER WAYS OF IMPROVING YOUR SOIL
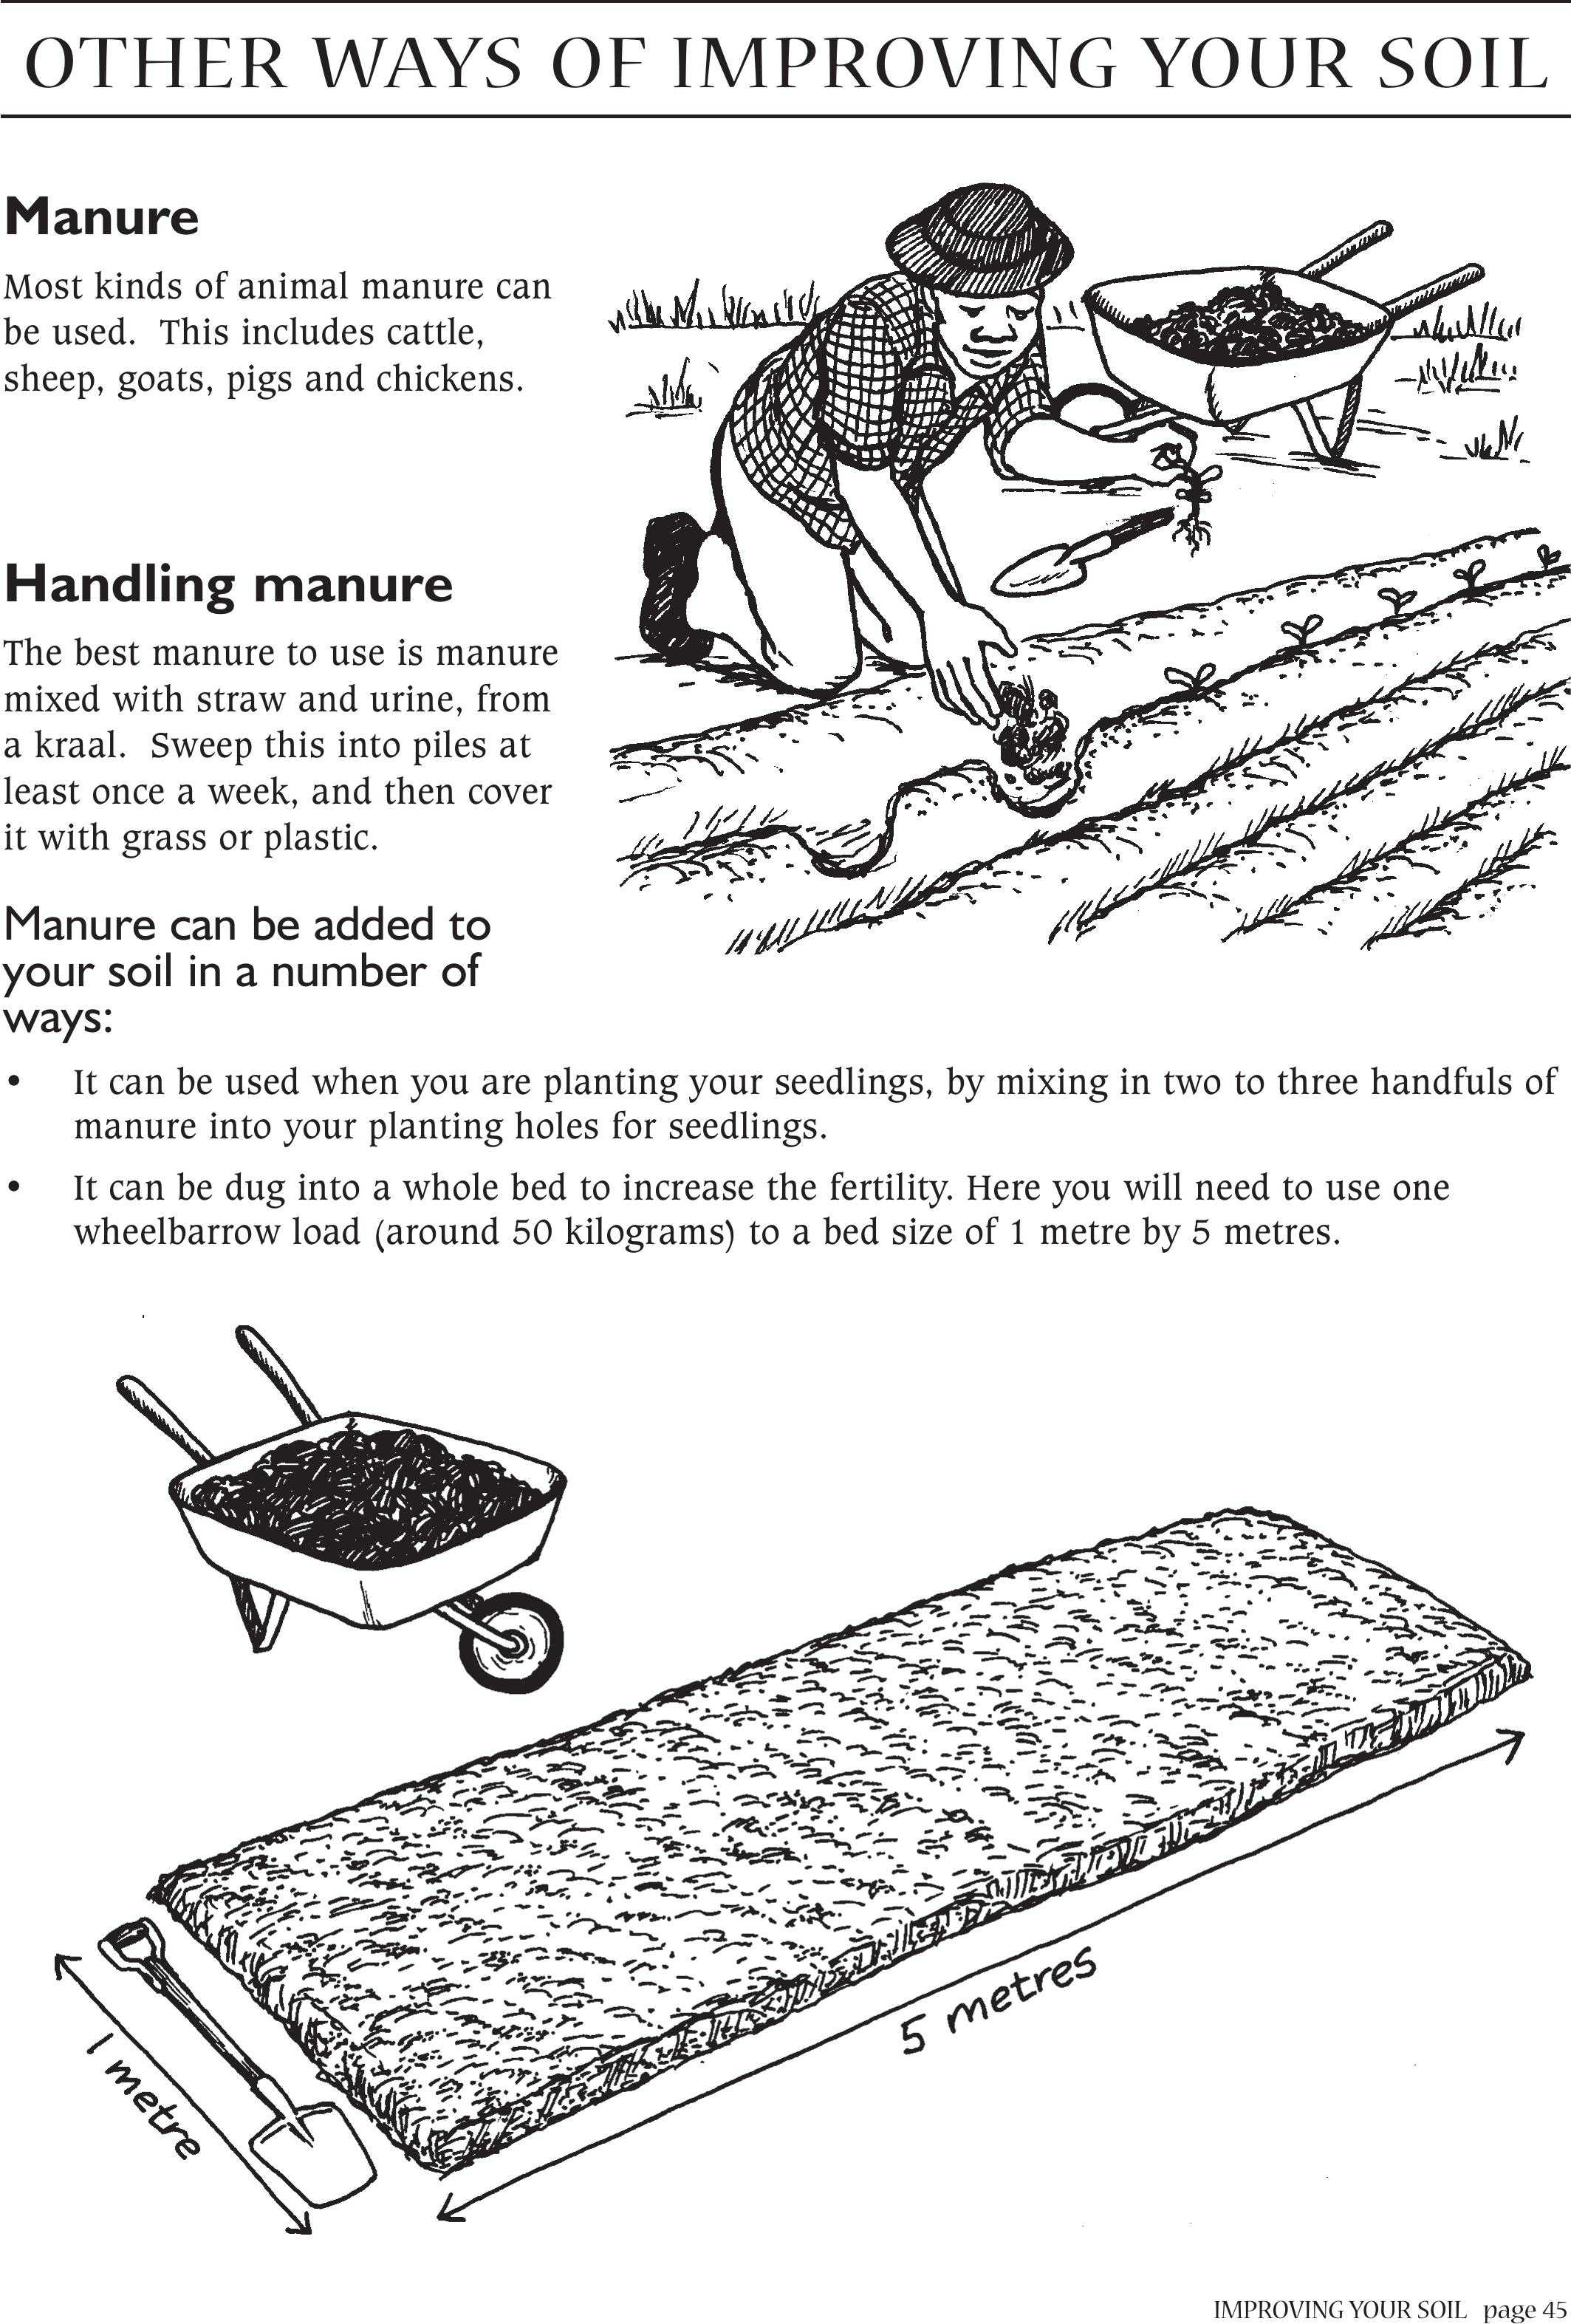
Manure
Most kinds of animal manure can
be used. This includes cattle,
sheep, goats, pigs and chickens.
Handling manure
The best manure to use is manure
mixed with straw and urine, from
a kraal. Sweep this into piles at
least once a week, and then cover
it with grass or plastic.
Manure can be added to
your soil in a number of
ways:
• It can be used when you are planting your seedlings, by mixing in two to three handfuls of
manure into your planting holes for seedlings.
• It can be dug into a whole bed to increase the fertility. Here you will need to use one
wheelbarrow load (around 50 kilograms) to a bed size of 1 metre by 5 metres.
page 46 IMPROVING YOUR SOIL
• It can be used in hotbeds. Here the bed is dug out to a depth of about 30 cm, which is the
width of a spade. It is then filled with a layer of fresh manure about 10 cm deep at the
bottom. This is about the same as the width of your closed hand. Some grass, weeds and
organic matter can be placed on top of this before filling your trench with top soil only.
Some manure or compost can be mixed into this soil before planting.
These are called HOTBEDS because the manure heats up as it decomposes in the ground.
This will heat up the soil in your bed. This is very good for cold winter areas.
• Manure can be spread over the surface of the ground as a mulch. It then has the added
advantage of providing food to plants.
• Manure can be added to compost heaps to make the BEST COMPOST
COMPOST
Compost is a combination of wet and dry plant material and manure that has decomposed
together to form a rich plant food. Compost also helps the soil to hold water and keep plants
free from diseases.
What do you need to make a compost heap?
You need to collect a lot of the following:
• Maize stalks or leftovers from other crops. These are called crop residues;
• Grass (without seeds!) – it can be green or dry;
• Cabbage leaves and weeds (green or dry) with no seeds;
• Animal manure;
• Wood ash.
Some other things that can go into a compost heap are: kitchen waste, washing water, yard
sweepings, dead animals, bones, wool, horns and feathers. It is a very good idea to add
comfrey to compost heaps.
More
advantages
• Compost is ready as plant
food, without the need to be
broken down by soil micro-organisms
first
• Compost does not cause a lot of
weed growth, like most animal
manures do
• You can get good crops without
spending lots of money
on fertilizers.
Some
disadvantages
• Compost requires a lot of
work to prepare and use
• The value of compost depends on
how it is made and what you used. If it
is not made well, it will not be a good
plant food.
• It may be difficult to find the
organic material you need to
make compost.
IMPROVING YOUR SOIL page 47
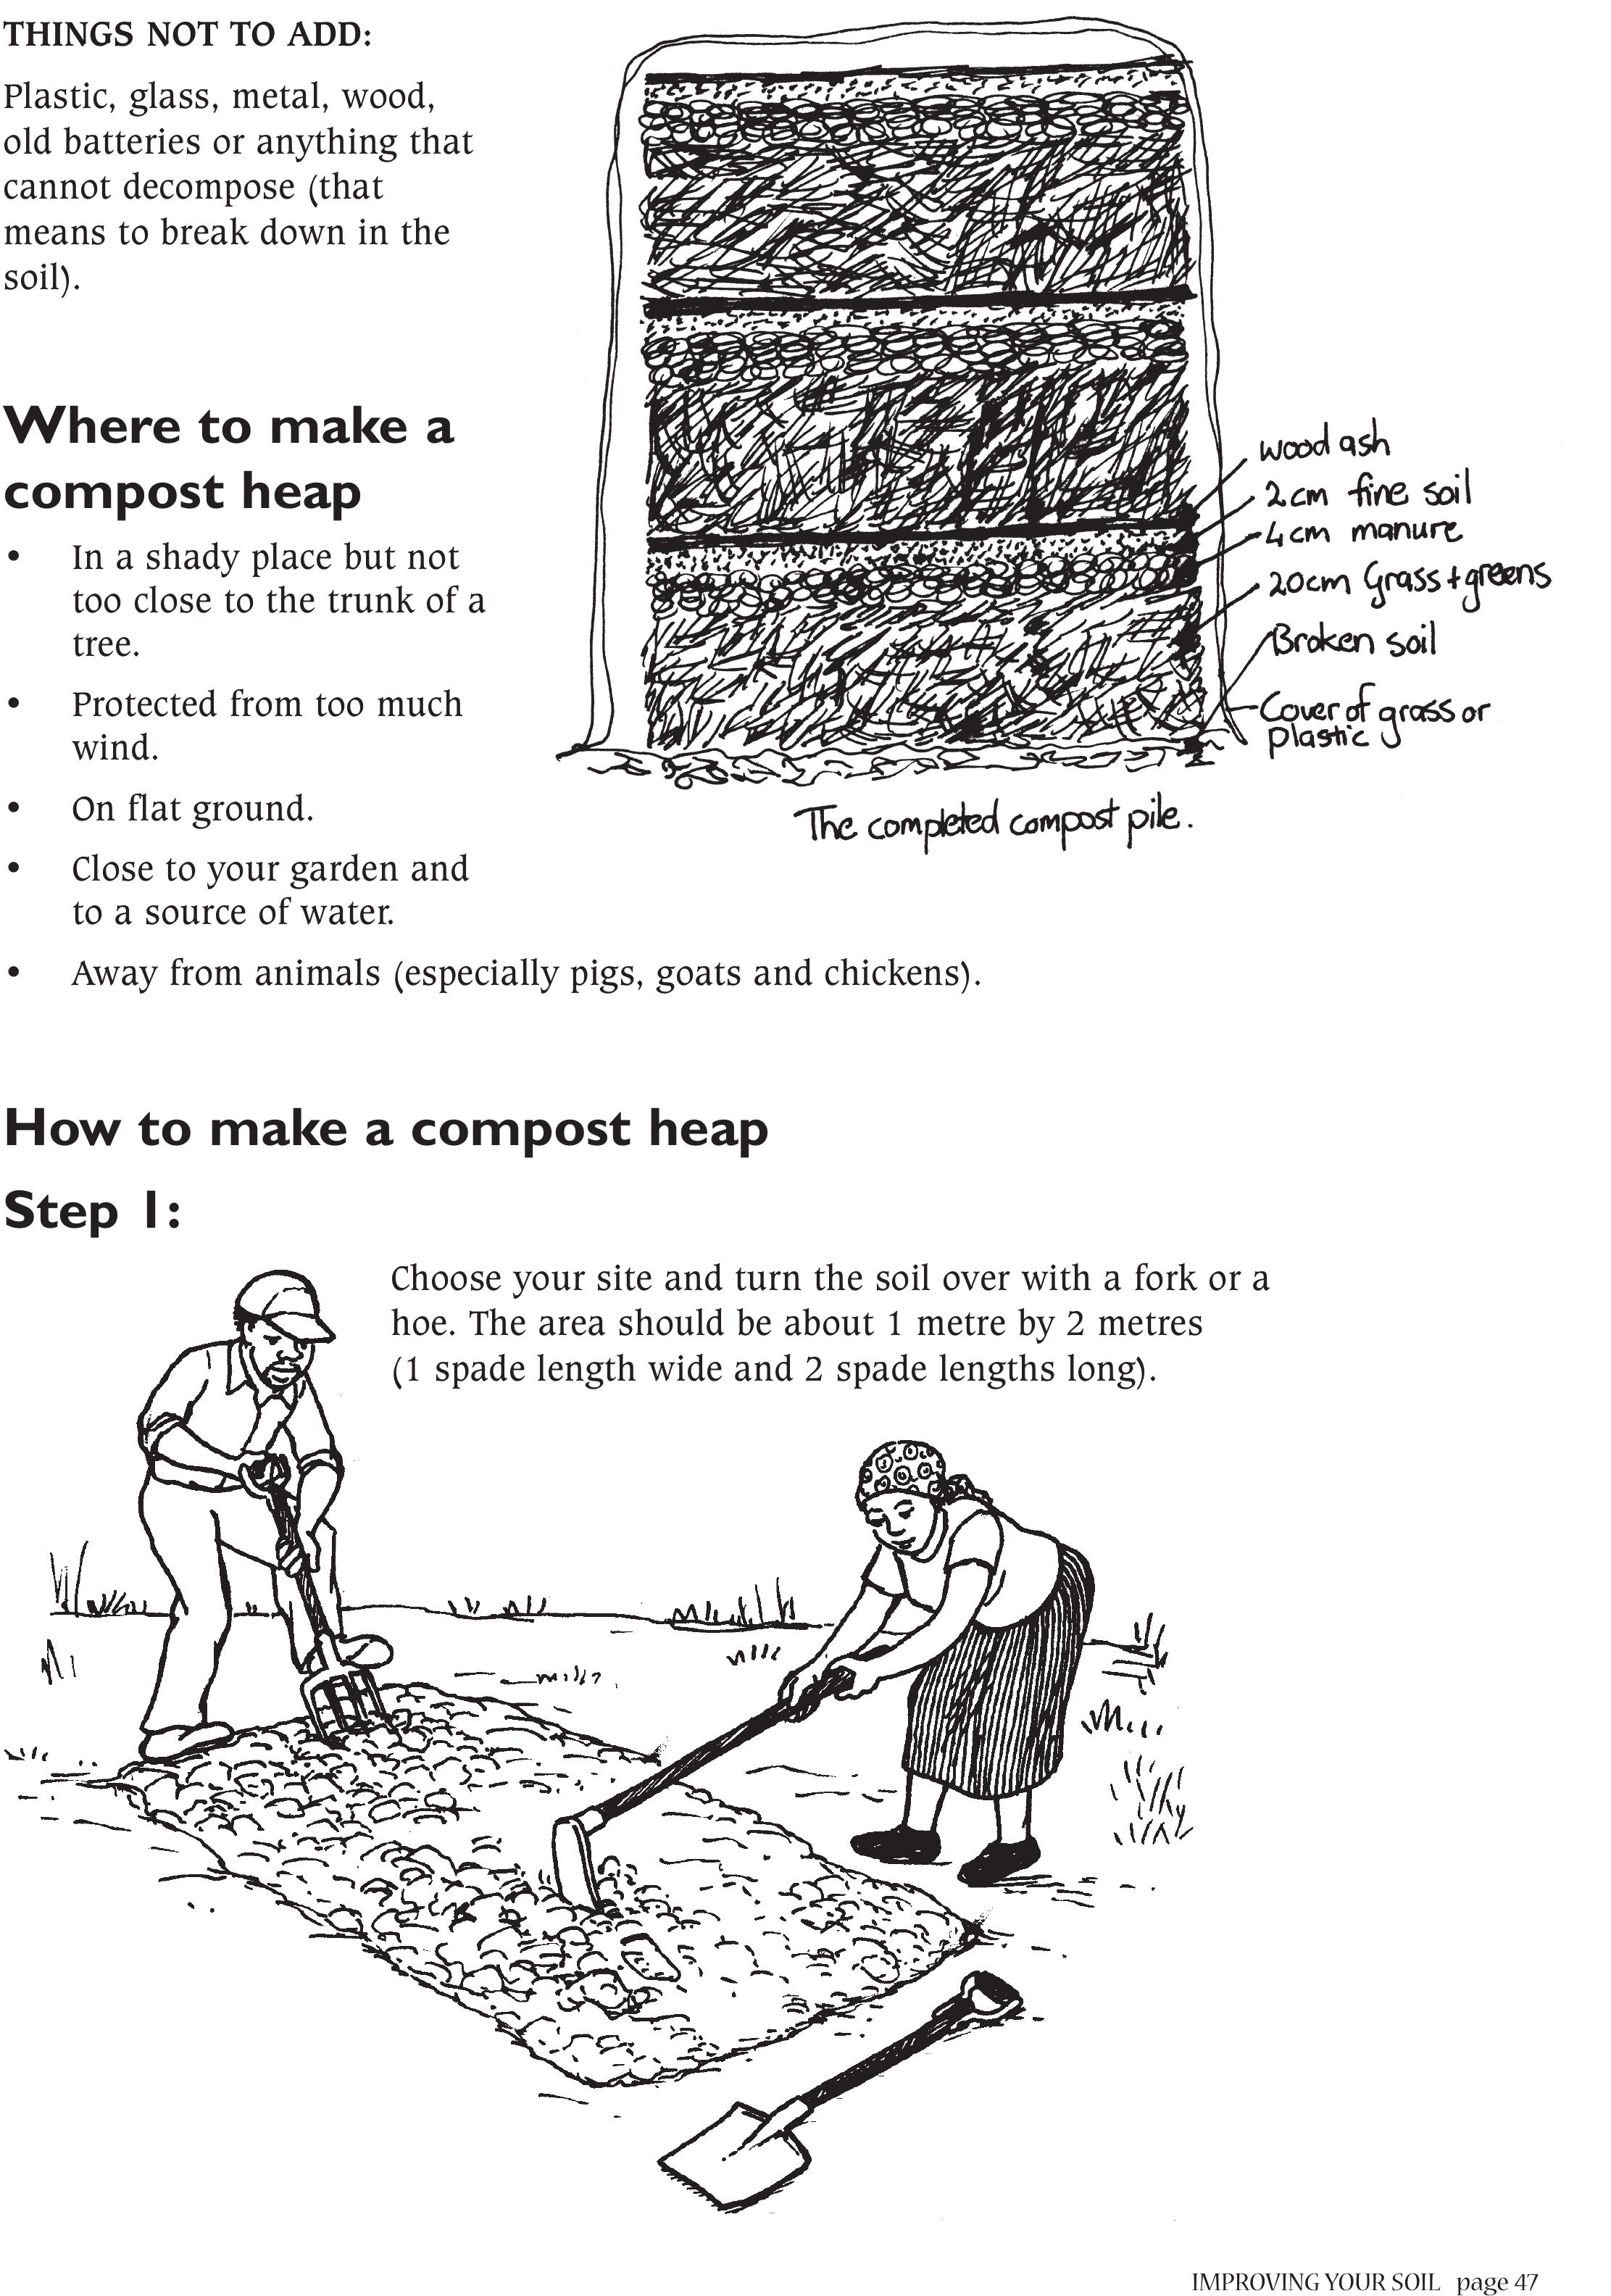
THINGS NOT TO ADD:
Plastic, glass, metal, wood,
old batteries or anything that
cannot decompose (that
means to break down in the
soil).
Where to make a
compost heap
• In a shady place but not
too close to the trunk of a
tree.
• Protected from too much
wind.
• On flat ground.
• Close to your garden and
to a source of water.
• Away from animals (especially pigs, goats and chickens).
How to make a compost heap
Step 1:
Choose your site and turn the soil over with a fork or a
hoe. The area should be about 1 metre by 2 metres
(1 spade length wide and 2 spade lengths long).
page 48 IMPROVING YOUR SOIL
Step 2:
Chop the stalks and leaves of your crop
residues, grass and weeds into small
pieces. This includes comfrey, cabbage
leaves, weeds and maize stalks.
They need to be chopped into
pieces about 10 cm long. This is
the width of your closed hand.
This will make the composting
process go faster.
Step 3:
Lay some small branches and twigs on the soil that you have turned over.
Step 4:
Cover these with a layer of your chopped mixture, about 30 cm deep.
This is one open hand deep. If you have kitchen wastes, they are added
in this layer.
IMPROVING YOUR SOIL page 49
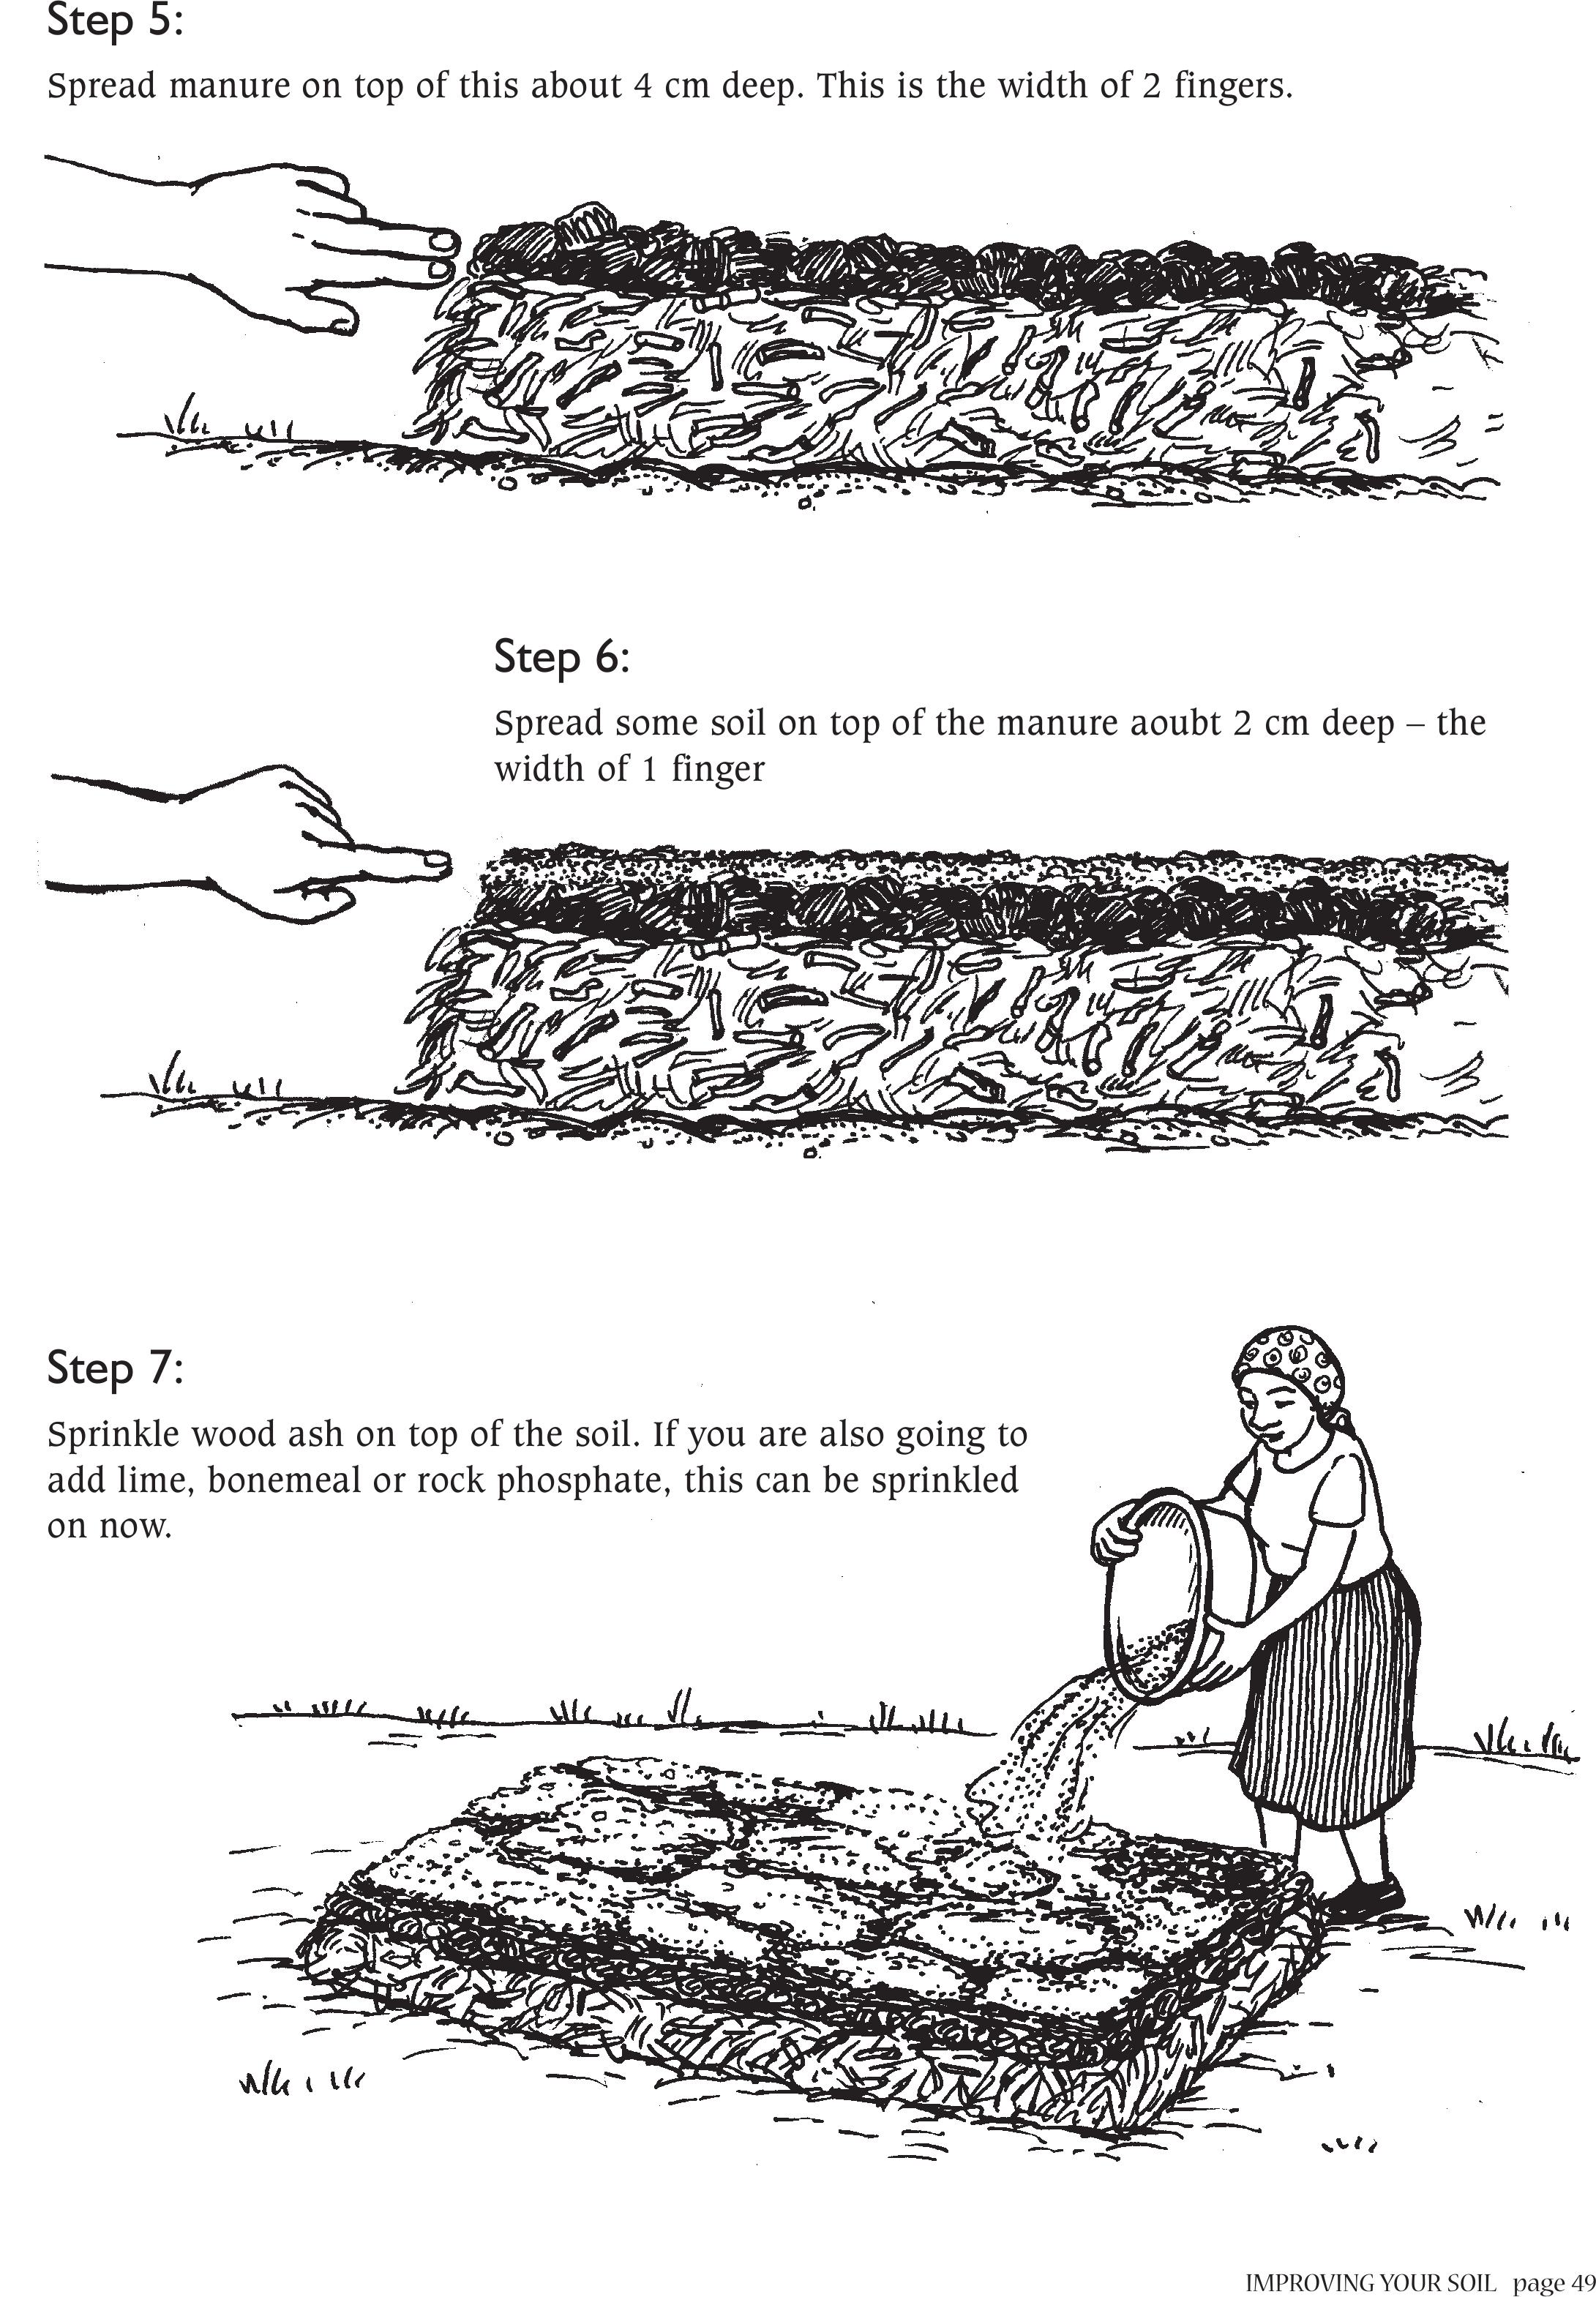
Step 5:
Spread manure on top of this about 4 cm deep. This is the width of 2 fingers.
Step 6:
Spread some soil on top of the manure aoubt 2 cm deep – the
width of 1 finger
Step 7:
Sprinkle wood ash on top of the soil. If you are also going to
add lime, bonemeal or rock phosphate, this can be sprinkled
on now.
page 50 IMPROVING YOUR SOIL
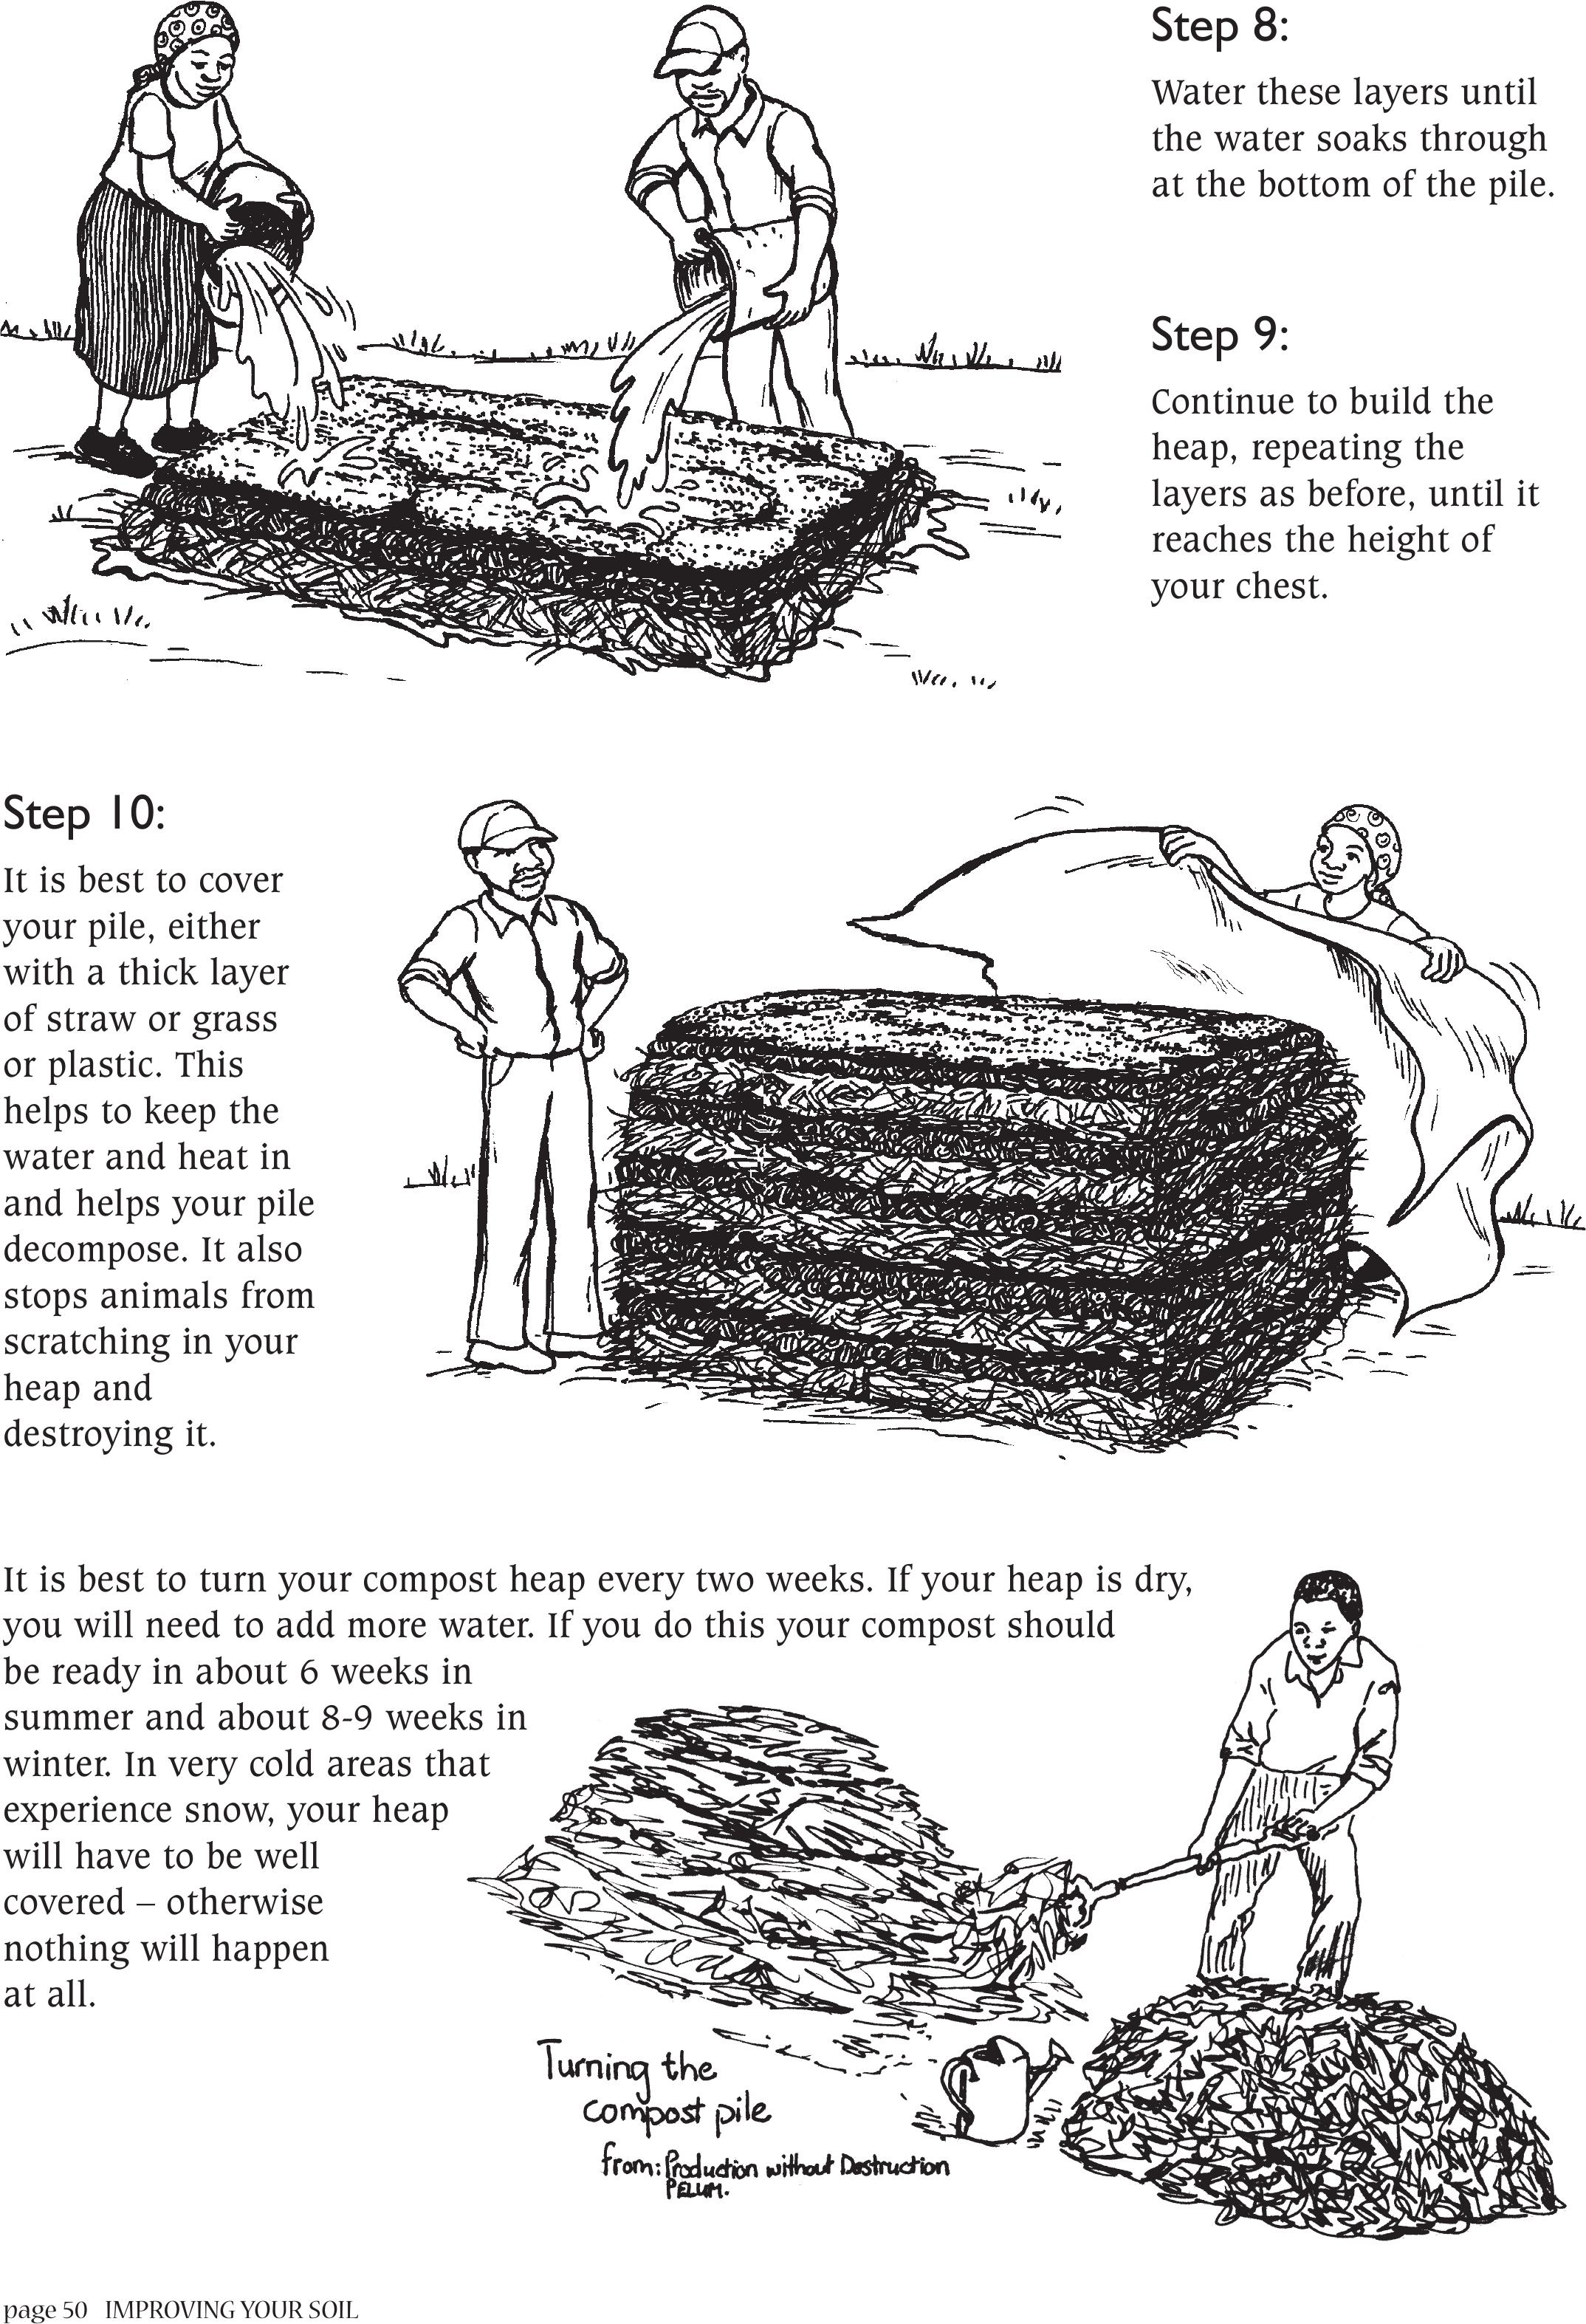
Step 8:
Water these layers until
the water soaks through
at the bottom of the pile.
Step 9:
Continue to build the
heap, repeating the
layers as before, until it
reaches the height of
your chest.
Step 10:
It is best to cover
your pile, either
with a thick layer
of straw or grass
or plastic. This
helps to keep the
water and heat in
and helps your pile
decompose. It also
stops animals from
scratching in your
heap and
destroying it.
It is best to turn your compost heap every two weeks. If your heap is dry,
you will need to add more water. If you do this your compost should
be ready in about 6 weeks in
summer and about 8-9 weeks in
winter. In very cold areas that
experience snow, your heap
will have to be well
covered – otherwise
nothing will happen
at all.
IMPROVING YOUR SOIL page 51
When is compost ready to use
When there is still steam coming out of your heap it is VERY busy decomposing. The compost
will be ready when it has turned blackish in colour and looks like moist soil. It will have almost
no smell. (If it is smelly and warm, it is definitely NOT compost!)
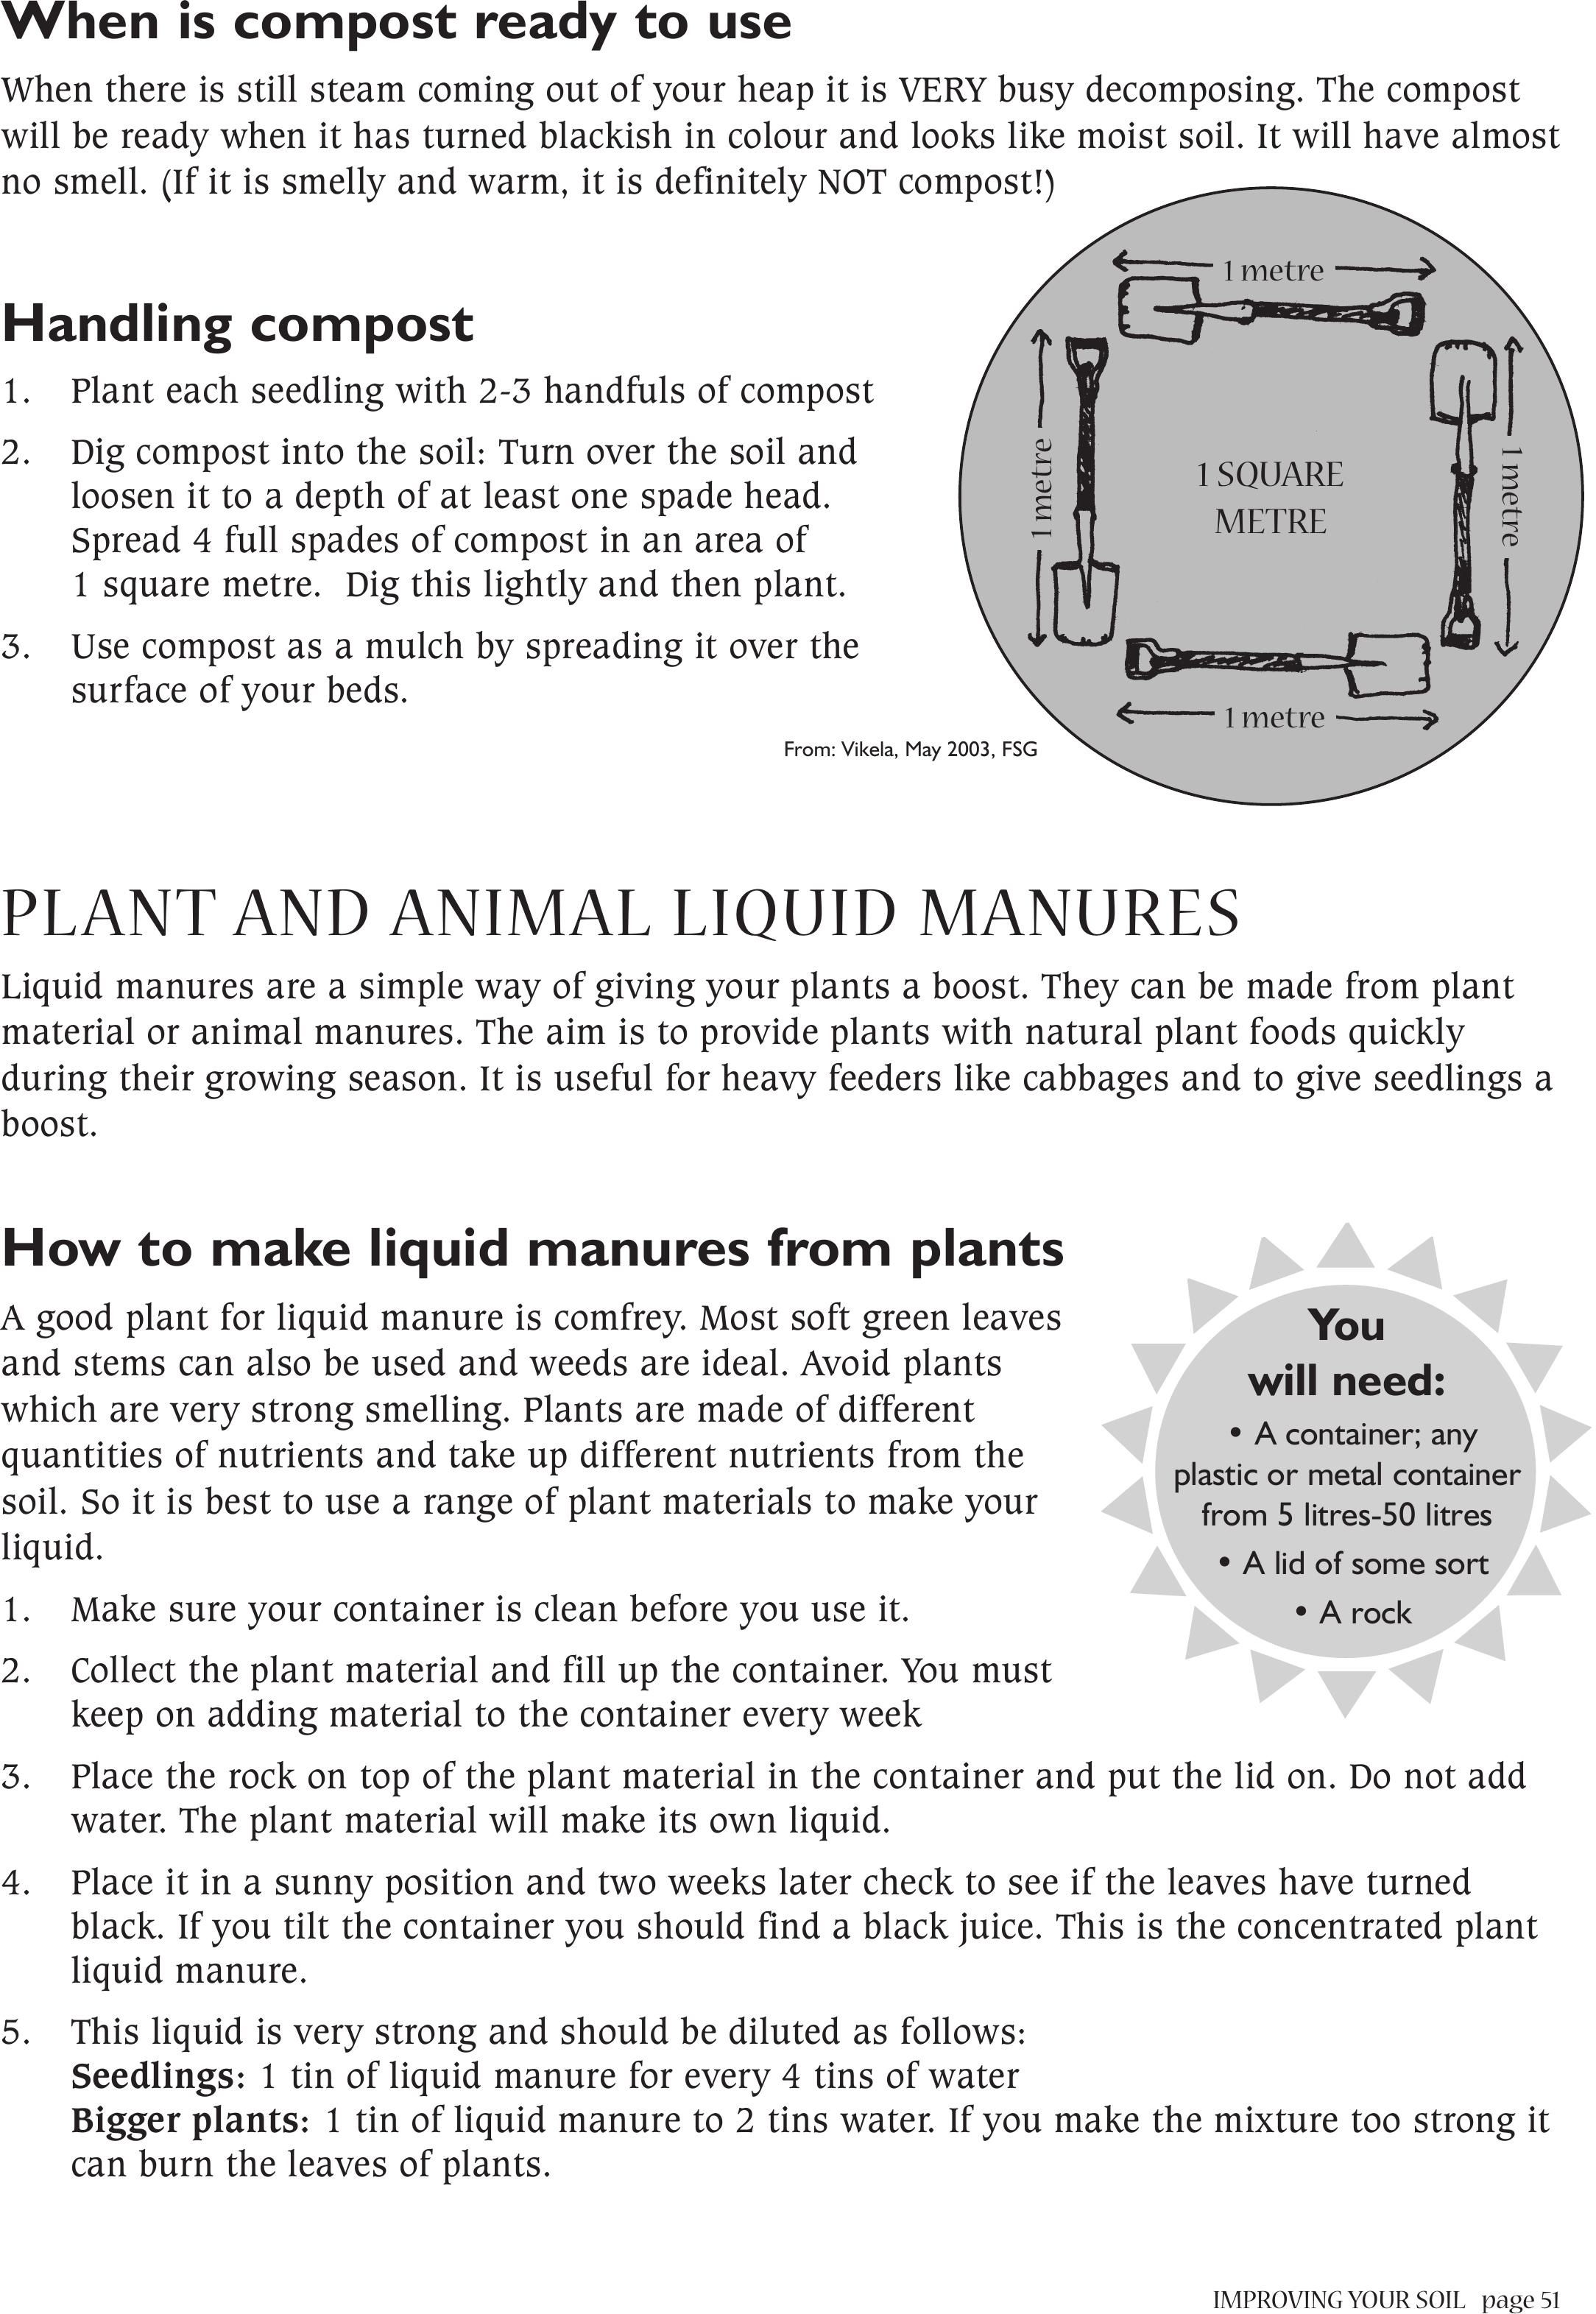
Handling compost
1. Plant each seedling with 2-3 handfuls of compost
2. Dig compost into the soil: Turn over the soil and
loosen it to a depth of at least one spade head.
Spread 4 full spades of compost in an area of
1 square metre. Dig this lightly and then plant.
3. Use compost as a mulch by spreading it over the
surface of your beds.
PLANT AND ANIMALLIQUID MANURES
Liquid manures are a simple way of giving your plants a boost. They can be made from plant
material or animal manures. The aim is to provide plants with natural plant foods quickly
during their growing season. It is useful for heavy feeders like cabbages and to give seedlings a
boost.
How to make liquid manures from plants
A good plant for liquid manure is comfrey. Most soft green leaves
and stems can also be used and weeds are ideal. Avoid plants
which are very strong smelling. Plants are made of different
quantities of nutrients and take up different nutrients from the
soil. So it is best to use a range of plant materials to make your
liquid.
1. Make sure your container is clean before you use it.
2. Collect the plant material and fill up the container. You must
keep on adding material to the container every week
3. Place the rock on top of the plant material in the container and put the lid on. Do not add
water. The plant material will make its own liquid.
4. Place it in a sunny position and two weeks later check to see if the leaves have turned
black. If you tilt the container you should find a black juice. This is the concentrated plant
liquid manure.
5. This liquid is very strong and should be diluted as follows:
Seedlings: 1 tin of liquid manure for every 4 tins of water
Bigger plants: 1 tin of liquid manure to 2 tins water. If you make the mixture too strong it
can burn the leaves of plants.
You
will need:
• A container; any
plastic or metal container
from 5 litres-50 litres
• A lid of some sort
• A rock
1 SQUARE
METRE
1 metre
1 metre
1 metre
1 metre
From: Vikela, May 2003, FSG
page 52 IMPROVING YOUR SOIL
Every two weeks pour the mixture on the soil around your plants, after you have watered them.
You should pour at least one tin of this diluted mixture around each seedling or plant. The tin
should be the size of a big jam tin.
How to make liquid manure from animal manure
Manure can be used from chickens, rabbits, cows, goats and sheep. A mixture of manures is
best.
1. Put your fresh manure mixture into the bag and tie the
top of the bag.
2. Put the bag in the container and attach it to the
stick or the rope. Then fill the container with
water. For every 1kilogram of manure you will
need 10 litres of water. This means an orange
sack full of manure in a large bucket, or half
the bag in a normal sized household bucket.
This is a way of keeping the manure and the
water separate, because you should not put
the wet manure on your plants.
3. Cover the container with a lid. Stir every few
days.
4. After two weeks the mixture will be ready to be
used. It should look like weak tea. Before using the
liquid, stir the mixture well.
5. This liquid will be very strong and should be diluted.
Seedlings: 1 tin of liquid to 8 tins of water (or buckets or bottles)
Bigger plants: 1 tin liquid to 4 tins of water
If you make the mixture too strong it can burn the leaves of plants.
Every two weeks pour the mixture on the
soil around your plants, after you have
watered them
Again, use at least one big jam tin full for
each seedling or plant. Avoid applying
your mixture in the middle of the day or
on very hot days.
You
will need:
• A large container: 10 litre
or bigger
• A bag of some kind; either an
orange sack, a feed bag or a cloth bag
• A strong stick or rope
• Something to tie the bag with
• Some type of lid for the
container, or loose
cover.
EXPERIMENTATION
AN EXPERIMENT TO TESTWHETHER YOUR SOIL
HAS ENOUGH LIME AND PHOSPHATE
In this experiment, you will need to measure out 4 plots of the same size. Make these plots
about 1 metre long and 1 metre wide. This is the length of one spade.
Be sure to mark your plots out with sticks, so that you will know throughout the season where
your plots are. You will then be able to do your experiment.
Plot 1:
Prepare and plant in your normal way
Plot 2:
Prepare the soil in your normal way and then add 2 big spoon fulls of Superphosphate. This is
spread evenly over your soil and then dug into the soil. Then plant in your normal way.
Plot 3:
Prepare the soil in your normal way and then add one big tin (jam tin) full of Lime. This is
spread evenly over the soil and then dug into the soil. Then plant in your normal way
Plot 4:
Prepare the soil in your normal way and then add 2 big spoon fulls of Superphosphate and one
big tin of Lime. This is spread evenly over your soil and then dug into the soil. Then plant in
your normal way. Below is picture of what your experiment could look like.
Now you will monitor or look
at this experiment. Every
week you will check and write
down which plants look
better. You will look at the
plants’ growth, their colour
(whether they are green or
yellowish), and their health
(whether they are healthy or
diseased).
Here is an example of how you can record your results: You can start with this table and write
in your results from week 3 onwards. Or use this table to draw your own table on a piece of
paper.
Experimental plot
Garden planted with cabbages
IMPROVING YOUR SOIL page 53
Control
1
Phosphate
2
Lime
3
Lime and
Phosphate
4

Plot 1 Plot 2 Plot 3 Plot 4
Control Phosphate Lime Lime +
Phosphate
Week 1
Seedlings look Seedlings look Seedlings look Seedlings look
good good good good
Week 2
Seedlings growing,Seedlings growing;Seedlings growing Seedlings
but yellowish. No not yellow. No well. No disease growing well;
disease disease dark green. No
disease
Week 3
Week 4
Week 5
Week 6
Week 7
Week 8
Week 9
Week 10
Week 11
Week 12
Final result
Growth
Colour
Health
Number of
plants that
look good
Let’s go to the Small Scale Experimentation Plan that is in the Farmer Experimentation leaflet.
You can use this plan to think about how the phosphorous and lime experiment will help you
improve your soil fertility.
page 54 IMPROVING YOUR SOIL
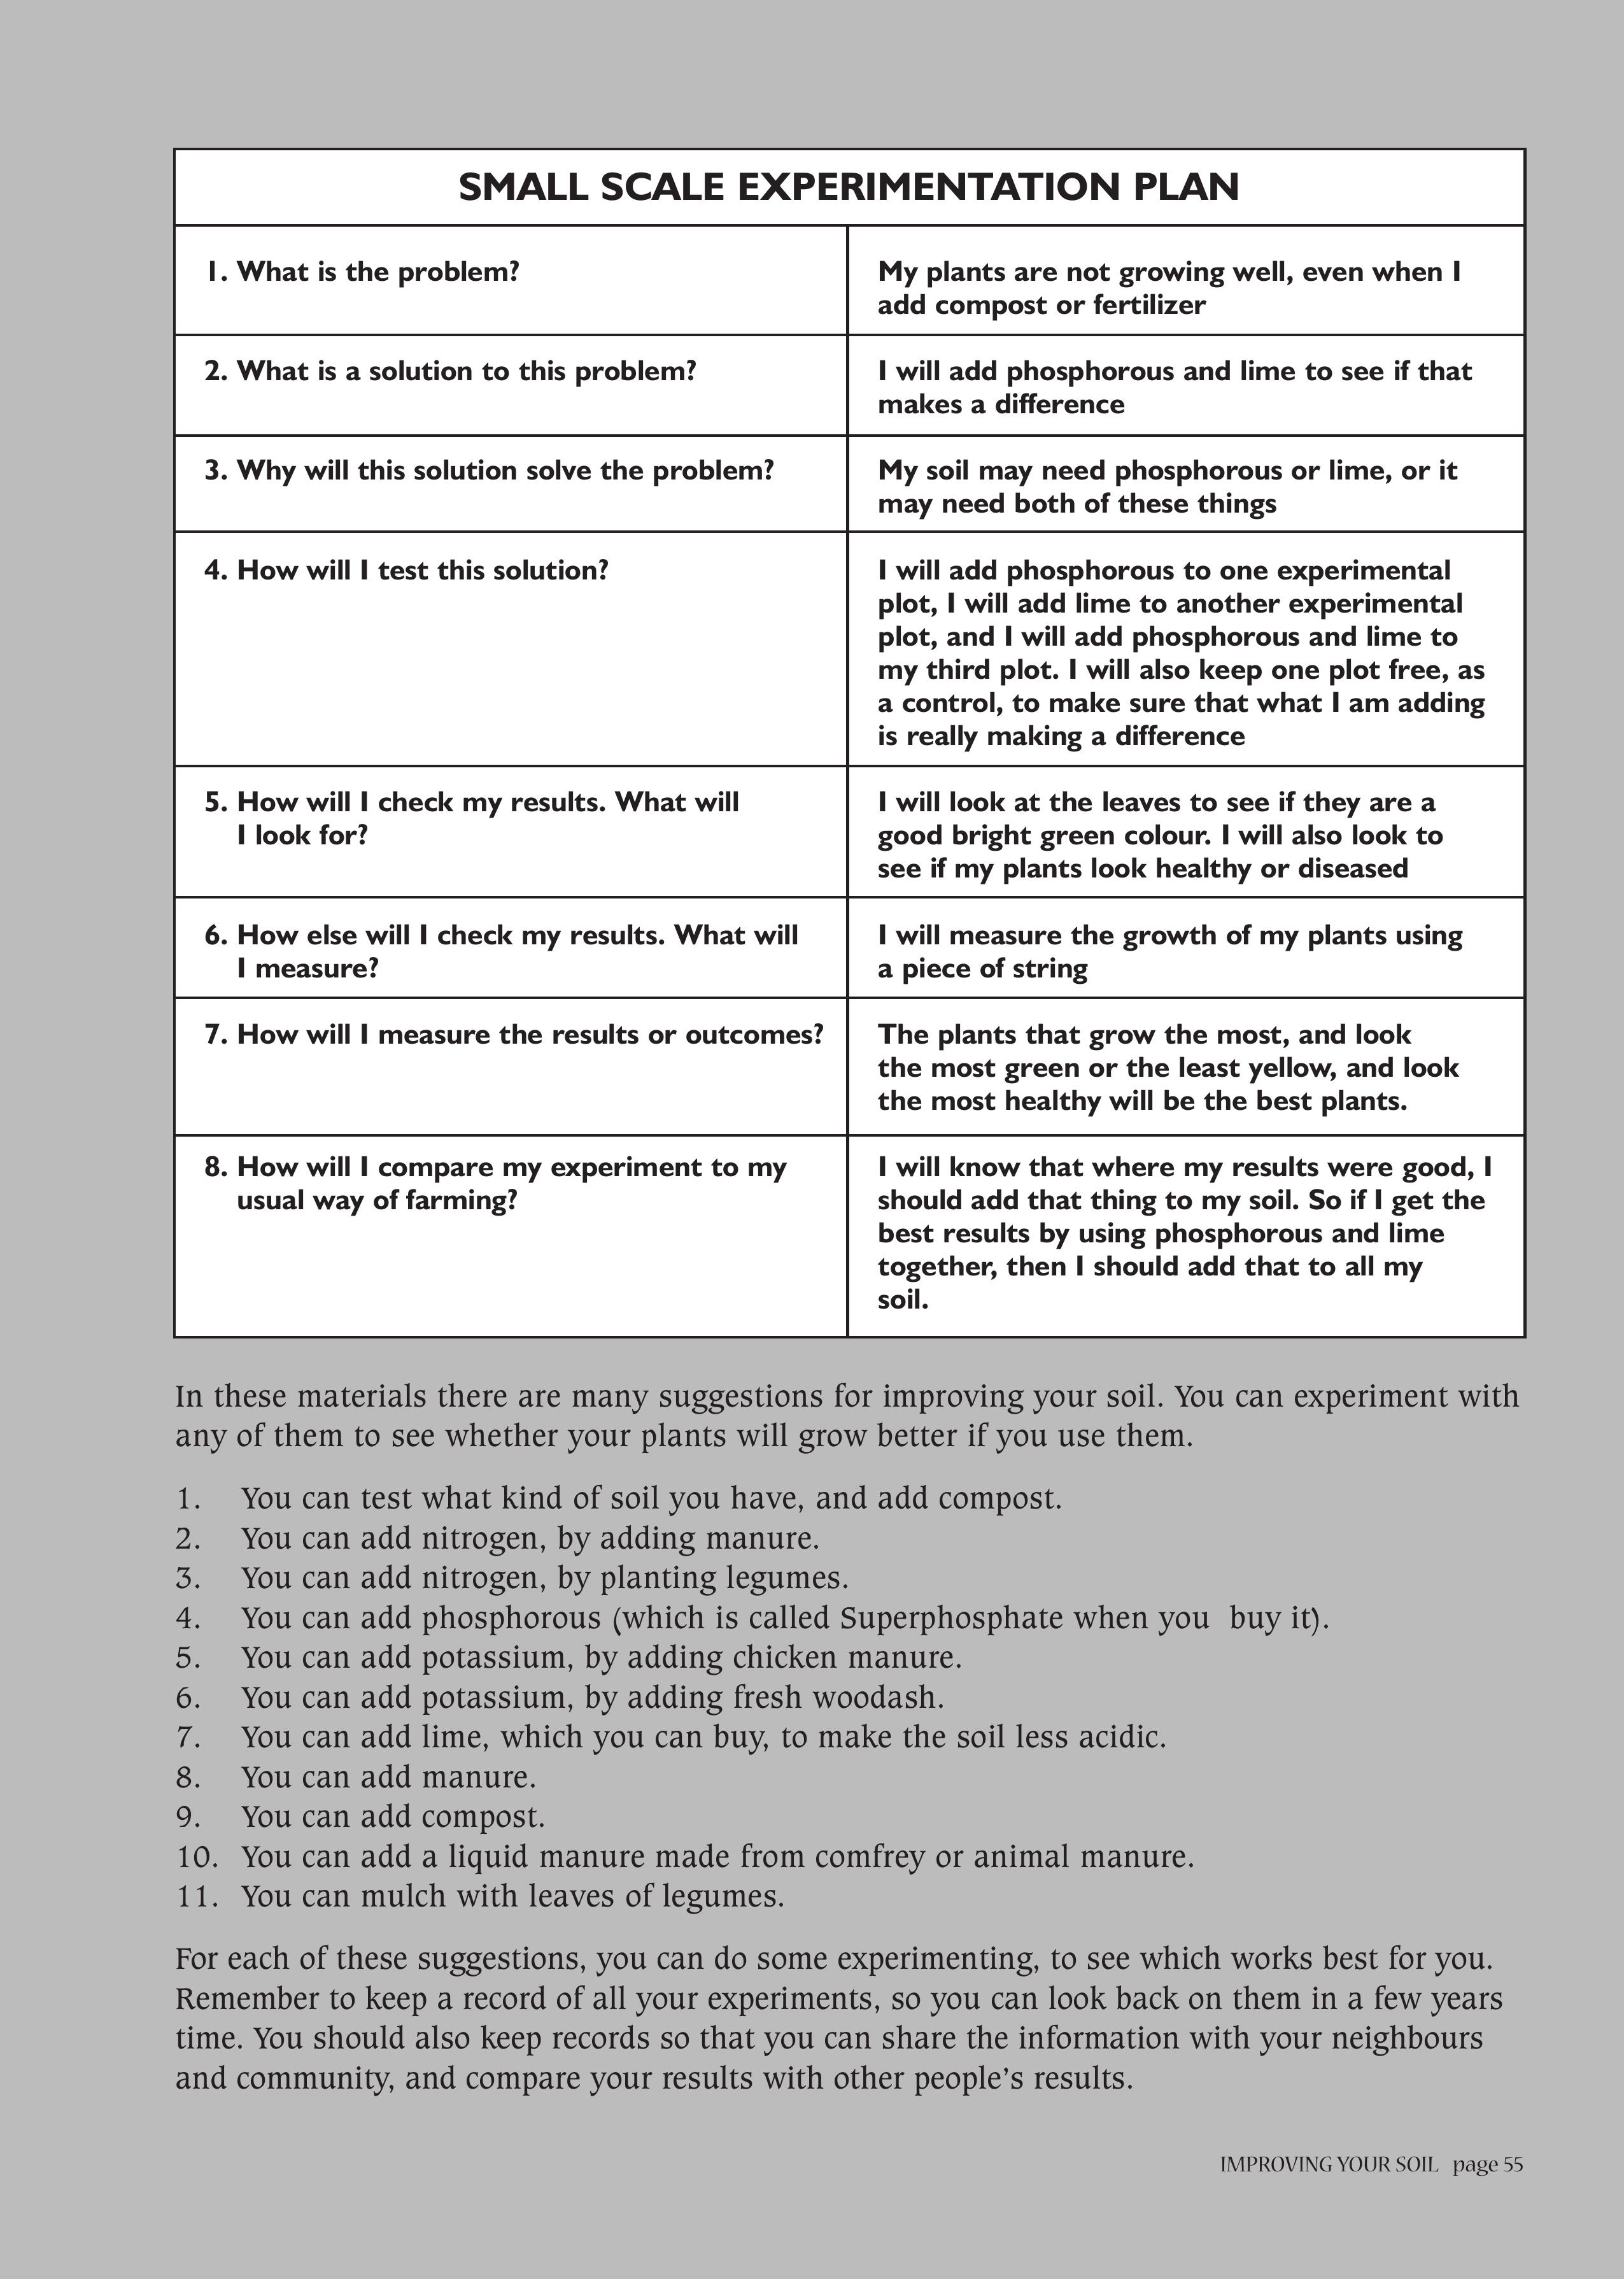
SMALL SCALE EXPERIMENTATION PLAN
1. What is the problem? My plants are not growing well, even when I
add compost or fertilizer
2. What is a solution to this problem? I will add phosphorous and lime to see if that
makes a difference
3. Why will this solution solve the problem? My soil may need phosphorous or lime, or it
may need both of these things
4. How will I test this solution? I will add phosphorous to one experimental
plot, I will add lime to another experimental
plot, and I will add phosphorous and lime to
my third plot. I will also keep one plot free, as
a control, to make sure that what I am adding
is really making a difference
5. How will I check my results. What will I will look at the leaves to see if they are a
I look for? good bright green colour. I will also look to
see if my plants look healthy or diseased
6. How else will I check my results. What will I will measure the growth of my plants using
I measure? a piece of string
7. How will I measure the results or outcomes? The plants that grow the most, and look
the most green or the least yellow, and look
the most healthy will be the best plants.
8. How will I compare my experiment to my I will know that where my results were good, I
usual way of farming? should add that thing to my soil. So if I get the
best results by using phosphorous and lime
together, then I should add that to all my
soil.
In these materials there are many suggestions for improving your soil. You can experiment with
any of them to see whether your plants will grow better if you use them.
1. You can test what kind of soil you have, and add compost.
2. You can add nitrogen, by adding manure.
3. You can add nitrogen, by planting legumes.
4. You can add phosphorous (which is called Superphosphate when you buy it).
5. You can add potassium, by adding chicken manure.
6. You can add potassium, by adding fresh woodash.
7. You can add lime, which you can buy, to make the soil less acidic.
8. You can add manure.
9. You can add compost.
10. You can add a liquid manure made from comfrey or animal manure.
11. You can mulch with leaves of legumes.
For each of these suggestions, you can do some experimenting, to see which works best for you.
Remember to keep a record of all your experiments, so you can look back on them in a few years
time. You should also keep records so that you can share the information with your neighbours
and community, and compare your results with other people’s results.
IMPROVING YOUR SOIL page 55

page 56
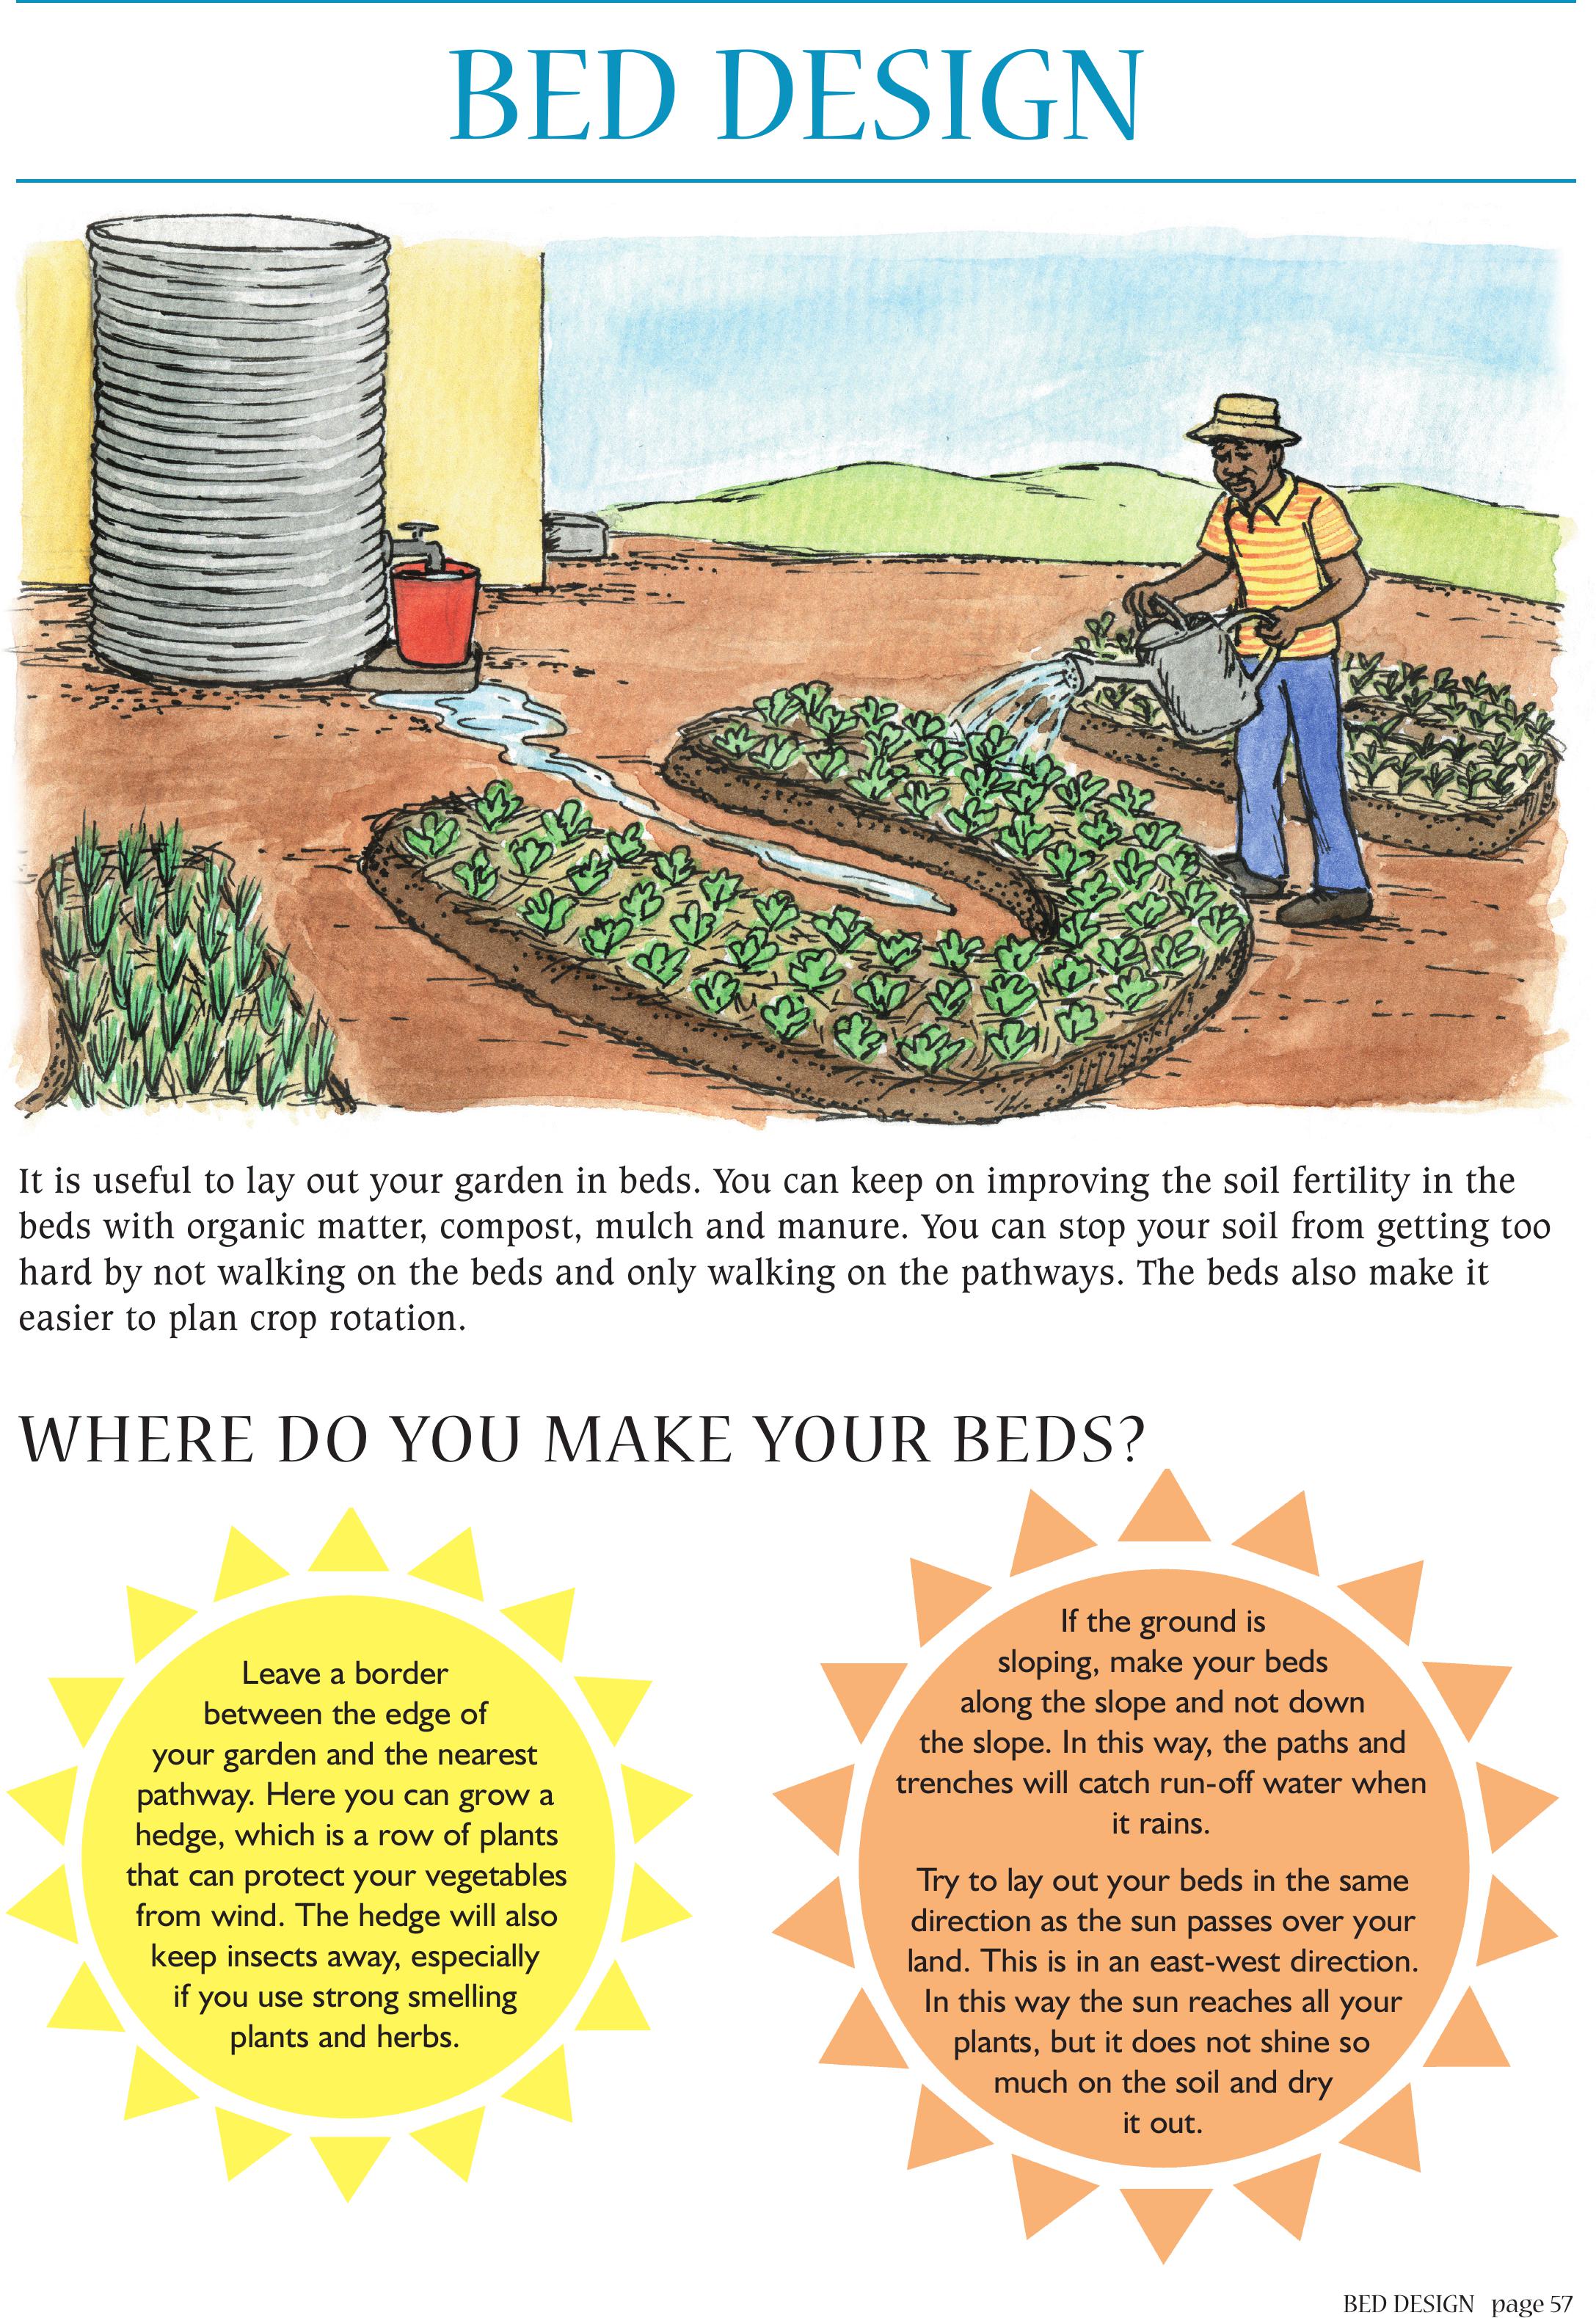
BED DESIGN page 57
BED DESIGN
It is useful to lay out your garden in beds. You can keep on improving the soil fertility in the
beds with organic matter, compost, mulch and manure. You can stop your soil from getting too
hard by not walking on the beds and only walking on the pathways. The beds also make it
easier to plan crop rotation.
WHERE DO YOU MAKE YOUR BEDS?
If the ground is
sloping, make your beds
along the slope and not down
the slope. In this way, the paths and
trenches will catch run-off water when
it rains.
Try to lay out your beds in the same
direction as the sun passes over your
land. This is in an east-west direction.
In this way the sun reaches all your
plants, but it does not shine so
much on the soil and dry
it out.
Leave a border
between the edge of
your garden and the nearest
pathway. Here you can grow a
hedge, which is a row of plants
that can protect your vegetables
from wind. The hedge will also
keep insects away, especially
if you use strong smelling
plants and herbs.
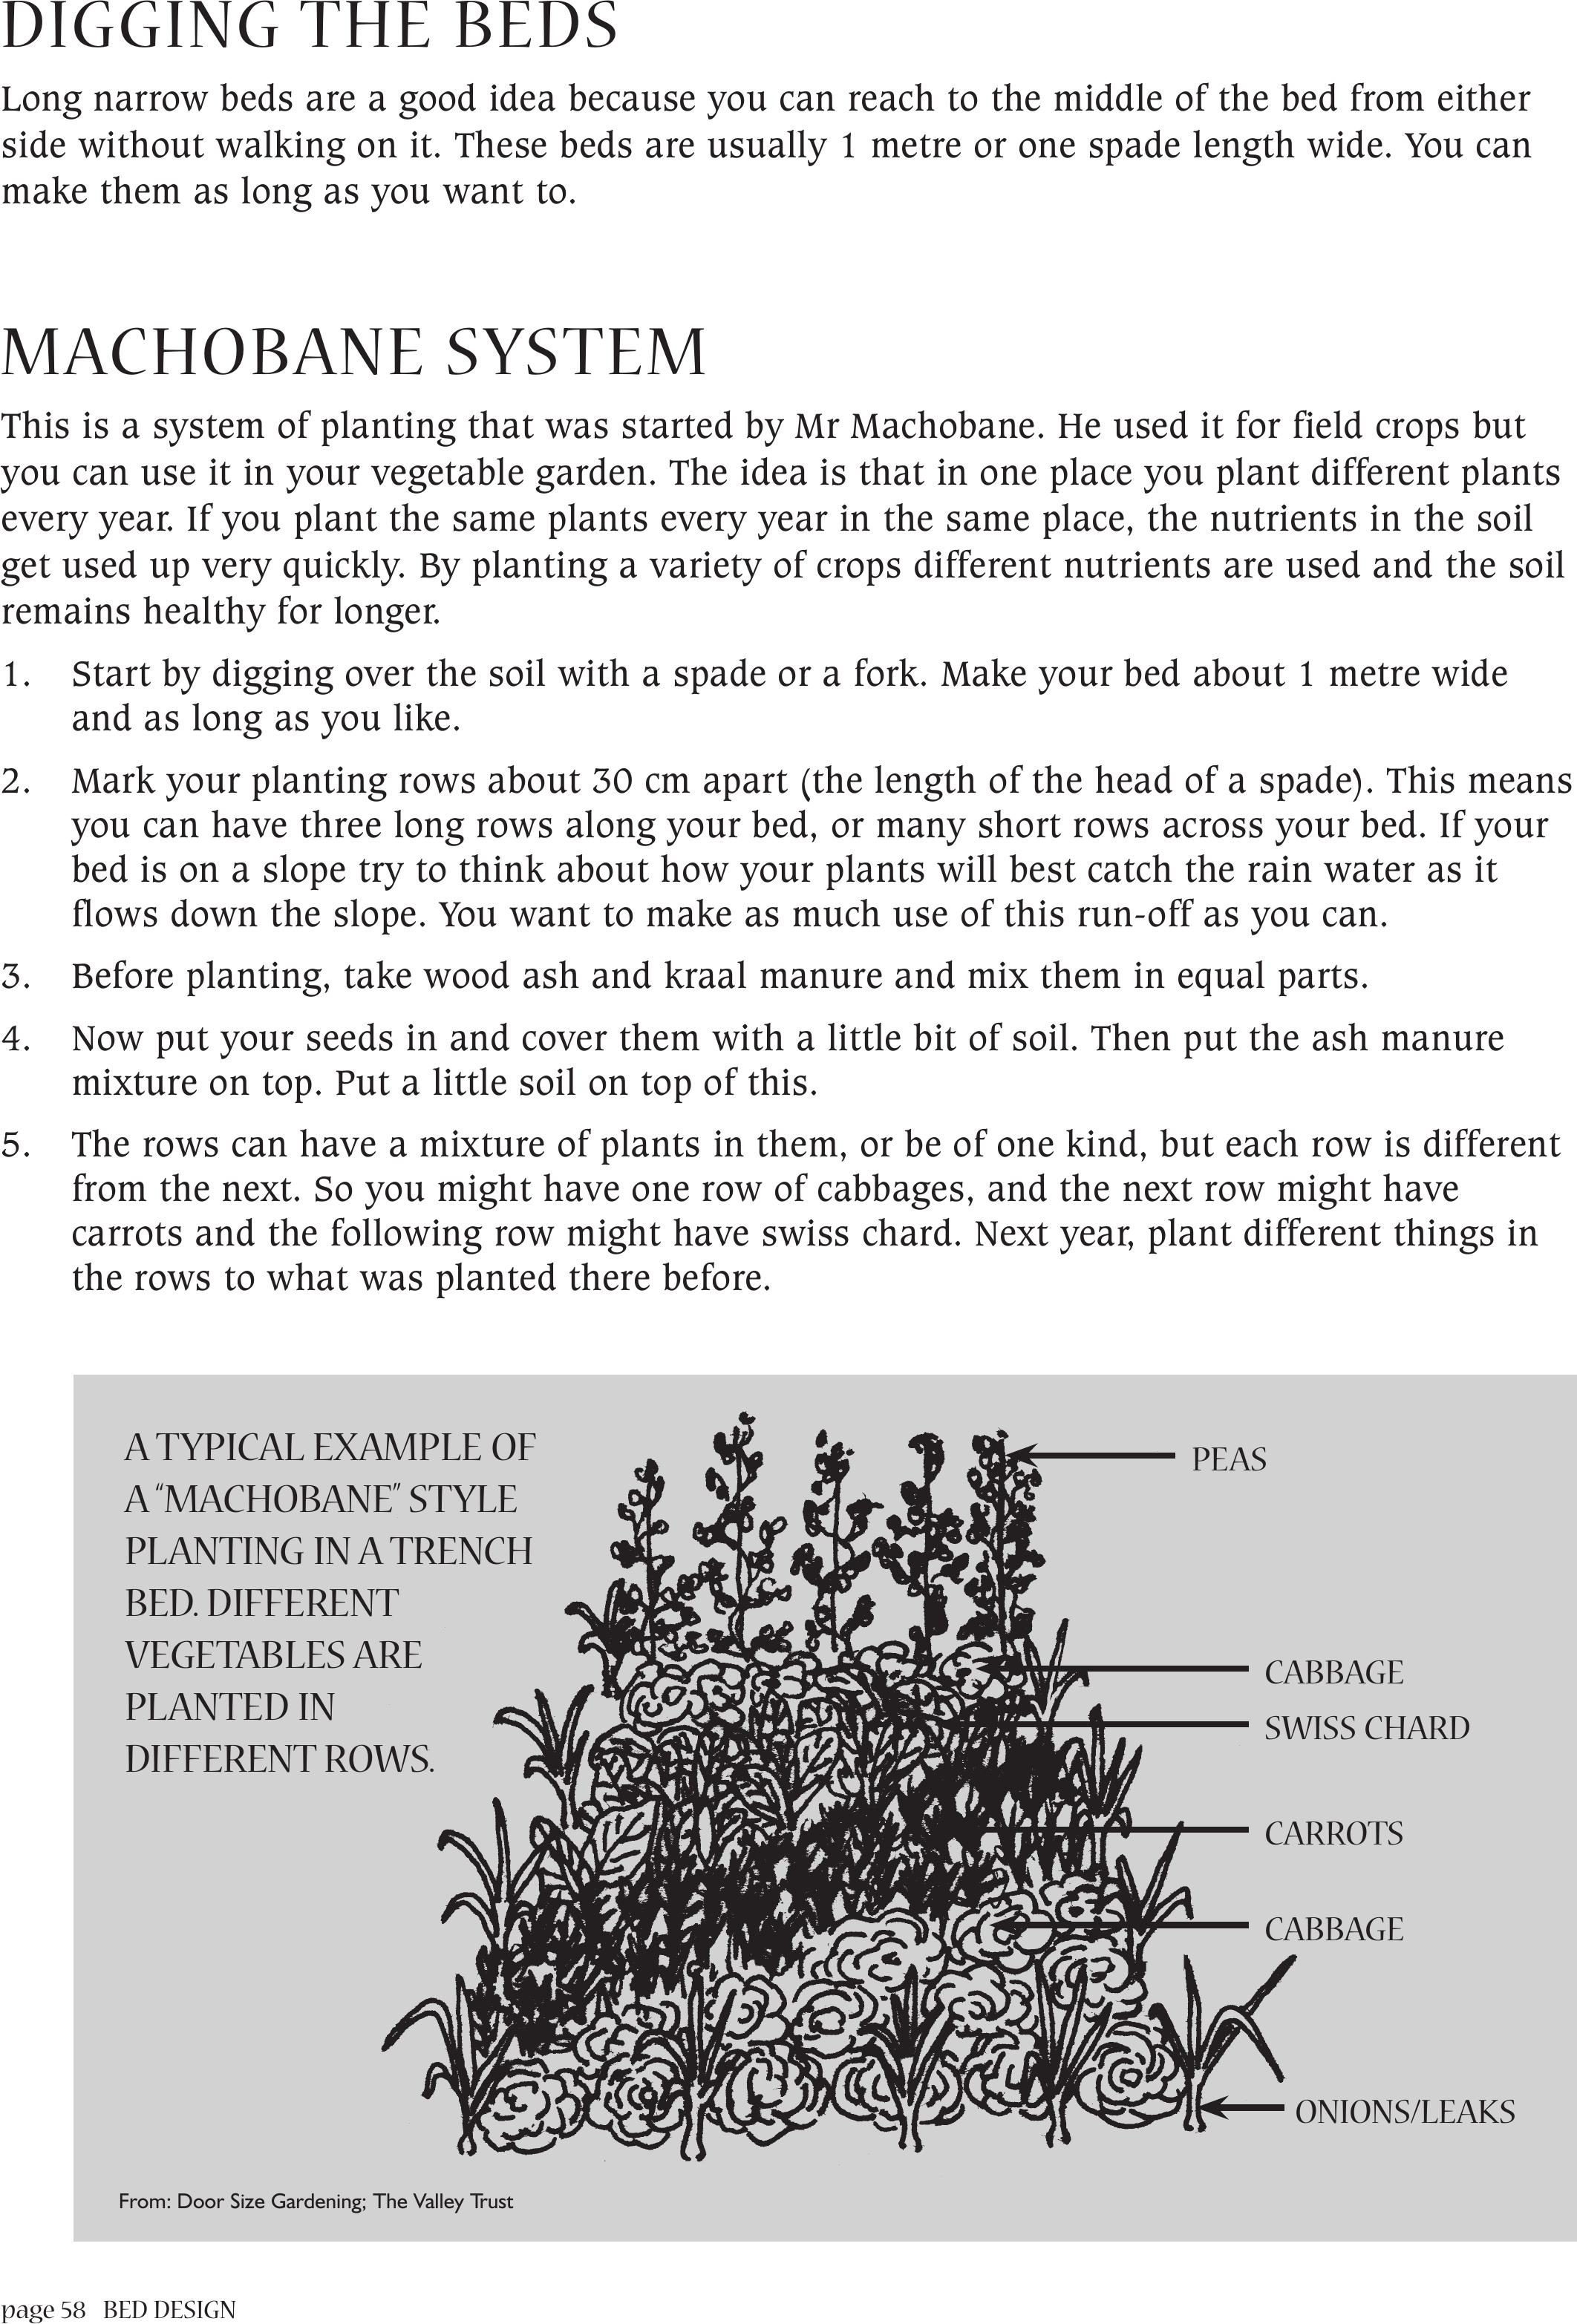
page 58 BED DESIGN
DIGGING THE BEDS
Long narrow beds are a good idea because you can reach to the middle of the bed from either
side without walking on it. These beds are usually 1 metre or one spade length wide. You can
make them as long as you want to.
MACHOBANE SYSTEM
This is a system of planting that was started by Mr Machobane. He used it for field crops but
you can use it in your vegetable garden. The idea is that in one place you plant different plants
every year. If you plant the same plants every year in the same place, the nutrients in the soil
get used up very quickly. By planting a variety of crops different nutrients are used and the soil
remains healthy for longer.
1. Start by digging over the soil with a spade or a fork. Make your bed about 1 metre wide
and as long as you like.
2. Mark your planting rows about 30 cm apart (the length of the head of a spade). This means
you can have three long rows along your bed, or many short rows across your bed. If your
bed is on a slope try to think about how your plants will best catch the rain water as it
flows down the slope. You want to make as much use of this run-off as you can.
3. Before planting, take wood ash and kraal manure and mix them in equal parts.
4. Now put your seeds in and cover them with a little bit of soil. Then put the ash manure
mixture on top. Put a little soil on top of this.
5. The rows can have a mixture of plants in them, or be of one kind, but each row is different
from the next. So you might have one row of cabbages, and the next row might have
carrots and the following row might have swiss chard. Next year, plant different things in
the rows to what was planted there before.
A TYPICAL EXAMPLE OF
A “MACHOBANE”STYLE
PLANTING IN A TRENCH
BED. DIFFERENT
VEGETABLES ARE
PLANTED IN
DIFFERENT ROWS.
PEAS
CABBAGE
CABBAGE
ONIONS/LEAKS
SWISS CHARD
CARROTS
From: Door Size Gardening; The Valley Trust
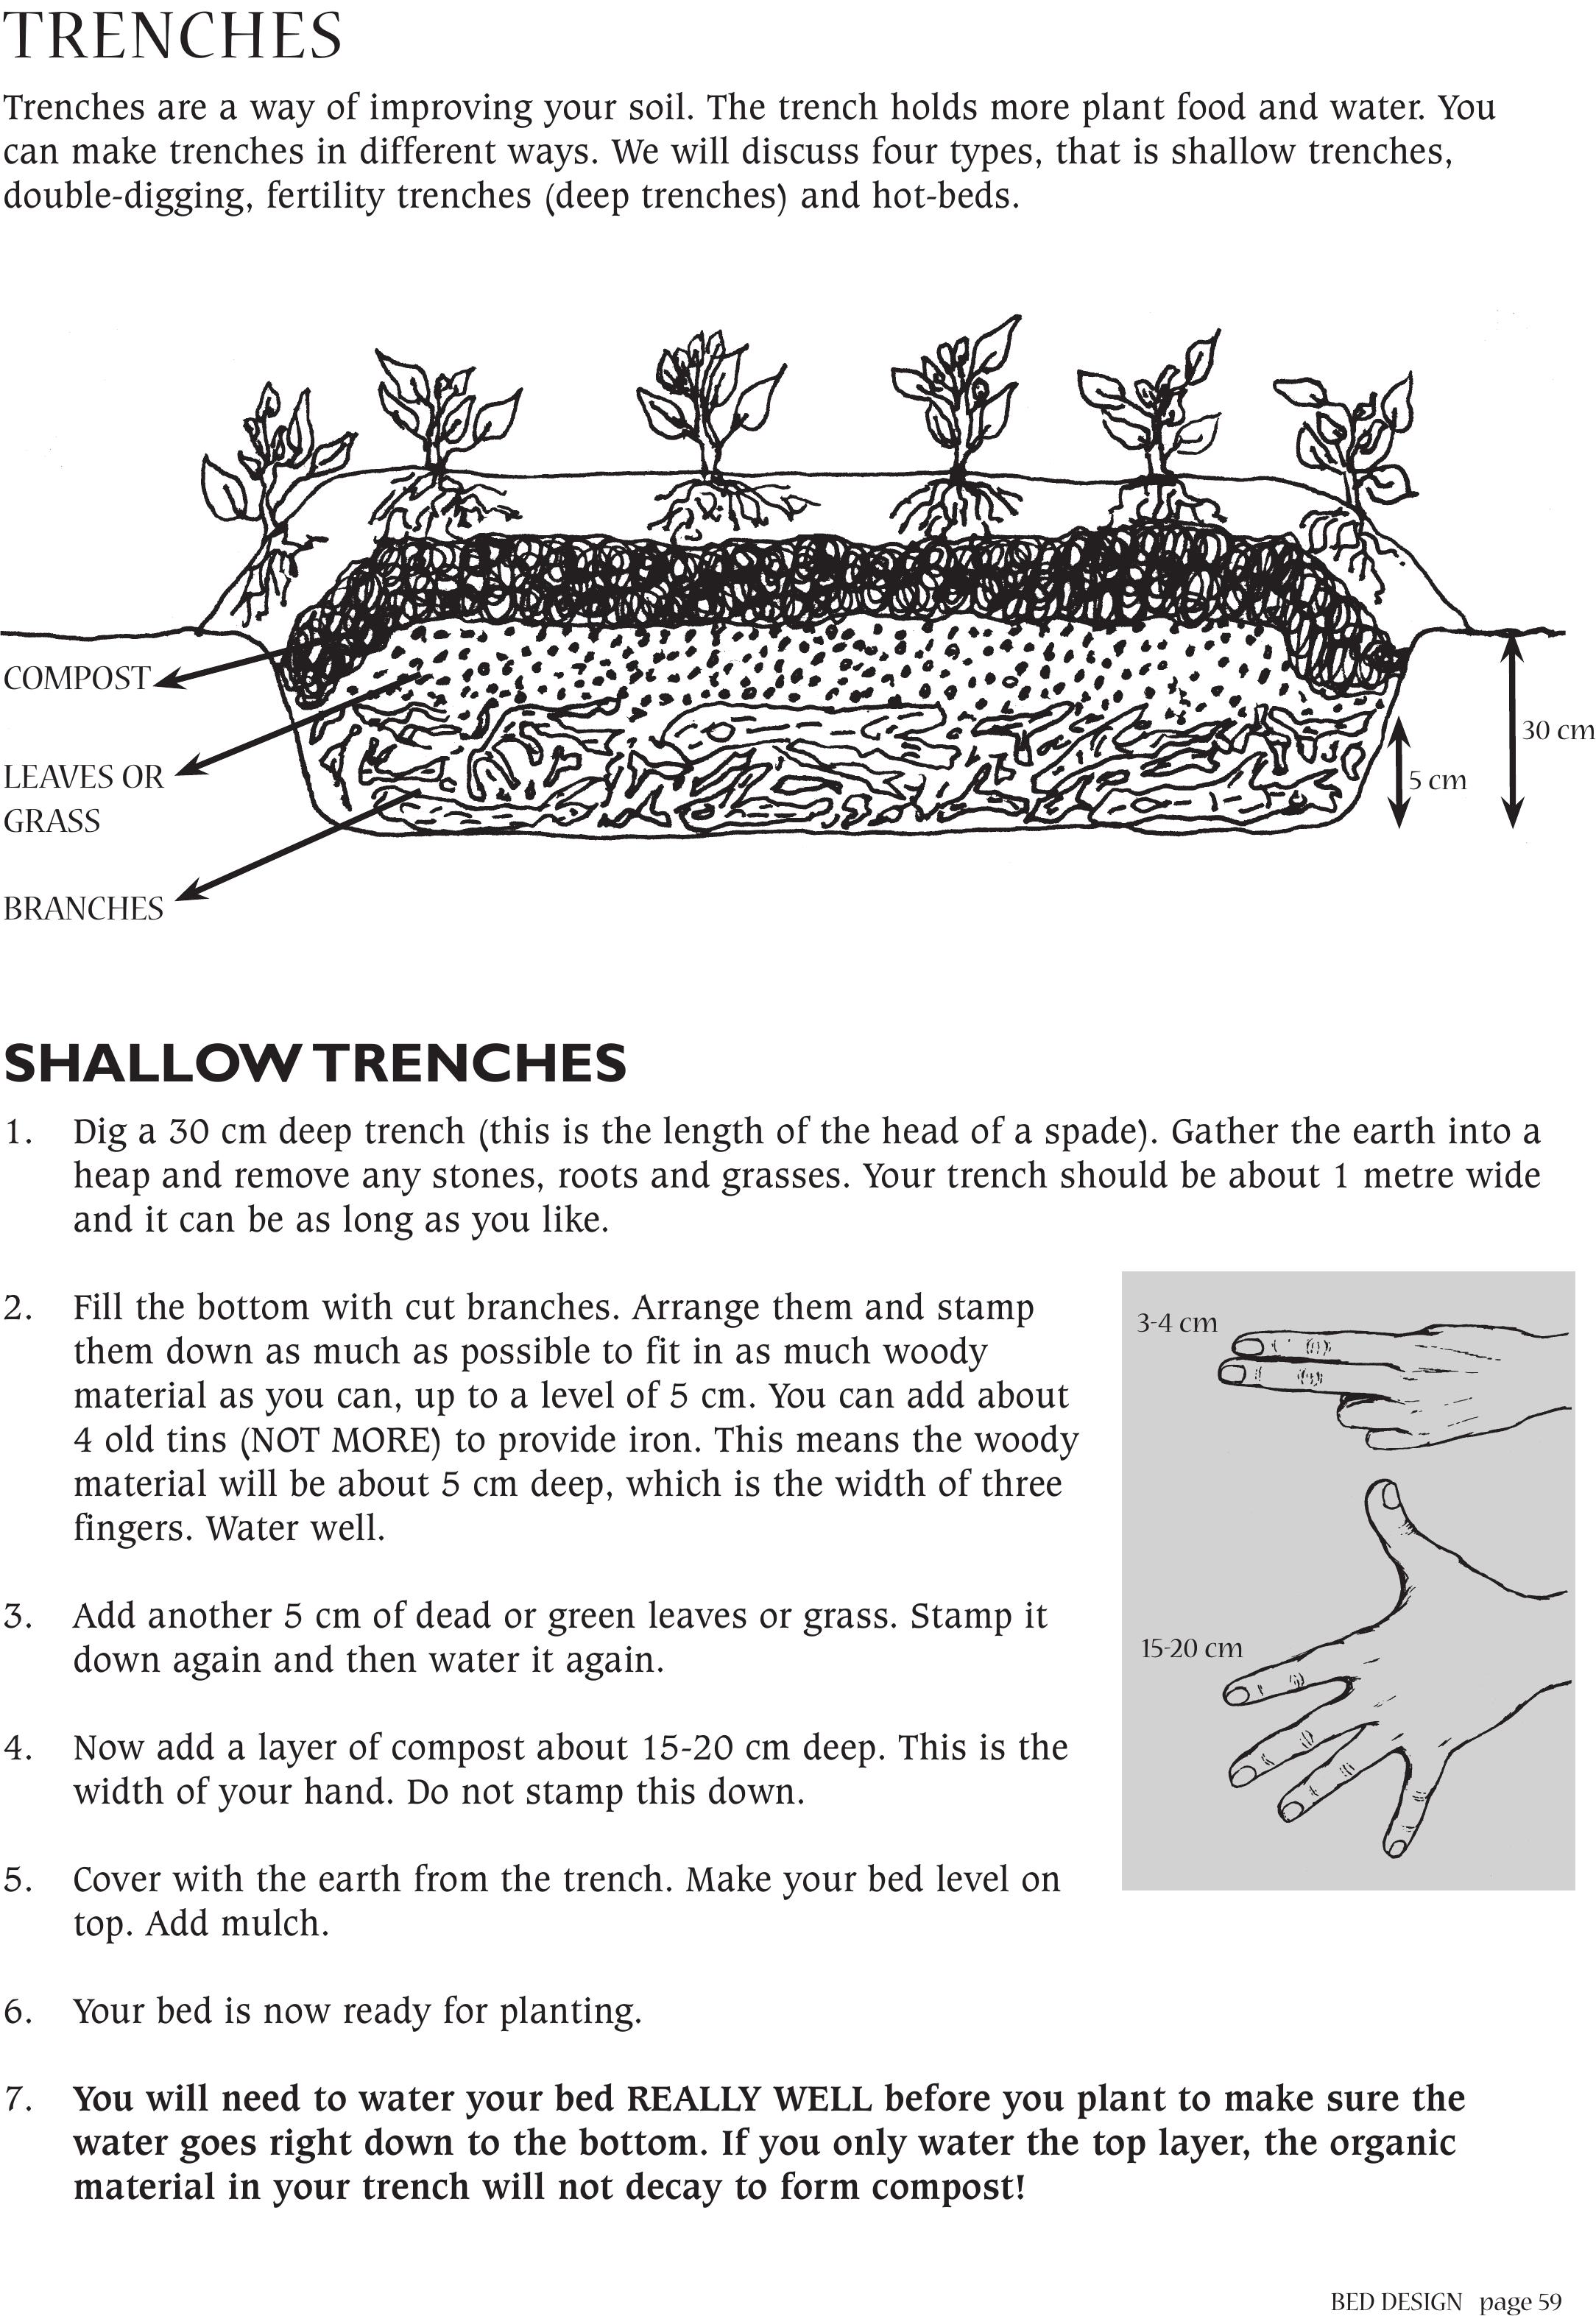
BED DESIGN page 59
TRENCHES
Trenches are a way of improving your soil. The trench holds more plant food and water. You
can make trenches in different ways. We will discuss four types, that is shallow trenches,
double-digging, fertility trenches (deep trenches) and hot-beds.
SHALLOW TRENCHES
1. Dig a 30 cm deep trench (this is the length of the head of a spade). Gather the earth into a
heap and remove any stones, roots and grasses. Your trench should be about 1 metre wide
and it can be as long as you like.
2. Fill the bottom with cut branches. Arrange them and stamp
them down as much as possible to fit in as much woody
material as you can, up to a level of 5 cm. You can add about
4 old tins (NOT MORE) to provide iron. This means the woody
material will be about 5 cm deep, which is the width of three
fingers. Water well.
3. Add another 5 cm of dead or green leaves or grass. Stamp it
down again and then water it again.
4. Now add a layer of compost about 15-20 cm deep. This is the
width of your hand. Do not stamp this down.
5. Cover with the earth from the trench. Make your bed level on
top. Add mulch.
6. Your bed is now ready for planting.
7. You will need to water your bed REALLY WELL before you plant to make sure the
water goes right down to the bottom. If you only water the top layer, the organic
material in your trench will not decay to form compost!
COMPOST
LEAVES OR
GRASS
BRANCHES
5 cm
30 cm
3-4 cm
15-20 cm
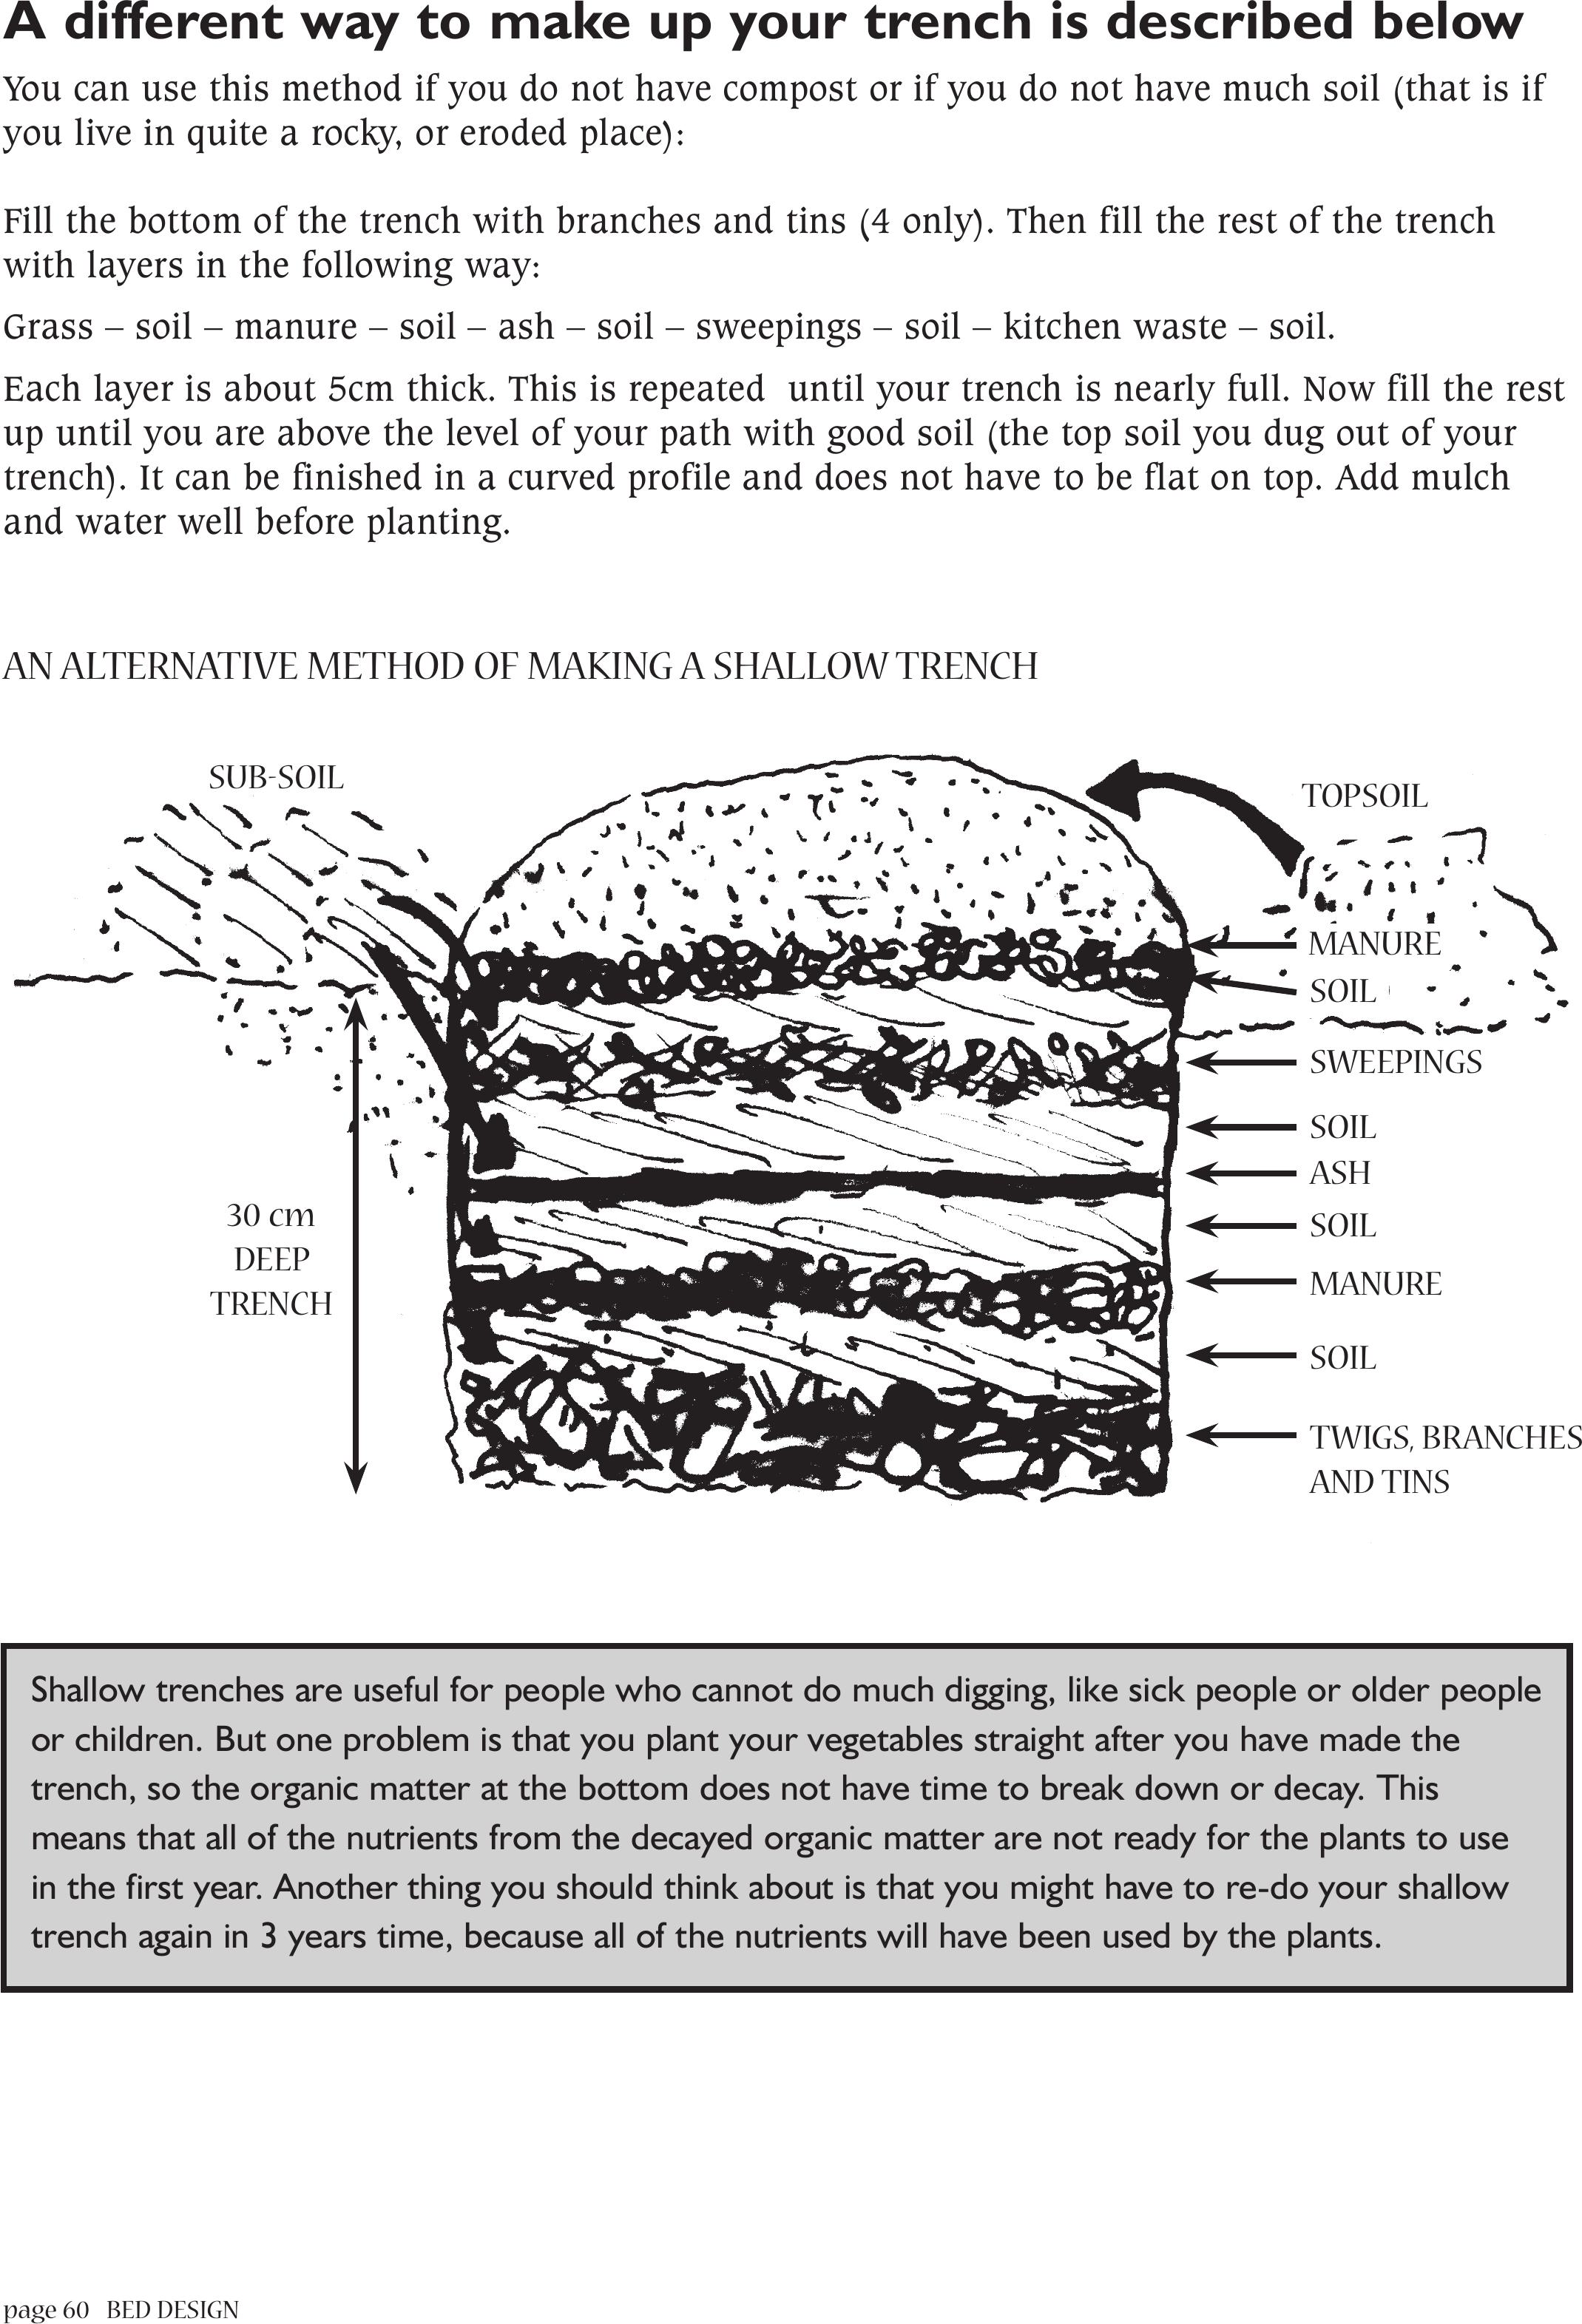
page 60 BED DESIGN
A different way to make up your trench is described below
You can use this method if you do not have compost or if you do not have much soil (that is if
you live in quite a rocky, or eroded place):
Fill the bottom of the trench with branches and tins (4 only). Then fill the rest of the trench
with layers in the following way:
Grass – soil – manure – soil – ash – soil – sweepings – soil – kitchen waste – soil.
Each layer is about 5cm thick. This is repeated until your trench is nearly full. Now fill the rest
up until you are above the level of your path with good soil (the top soil you dug out of your
trench). It can be finished in a curved profile and does not have to be flat on top. Add mulch
and water well before planting.
Shallow trenches are useful for people who cannot do much digging, like sick people or older people
or children. But one problem is that you plant your vegetables straight after you have made the
trench, so the organic matter at the bottom does not have time to break down or decay. This
means that all of the nutrients from the decayed organic matter are not ready for the plants to use
in the first year. Another thing you should think about is that you might have to re-do your shallow
trench again in 3 years time, because all of the nutrients will have been used by the plants.
TOPSOIL
30 cm
DEEP
TRENCH
MANURE
SOIL
SWEEPINGS
SOIL
ASH
SOIL
MANURE
SOIL
TWIGS, BRANCHES
AND TINS
SUB-SOIL
AN ALTERNATIVE METHOD OF MAKING A SHALLOW TRENCH
BED DESIGN page 61
DOUBLE-DIGGING
Double digging is another way
to increase the fertility of your
soil. These beds are ready to
use once made.
1. Mark out your bed, about
1 metre wide and as long
as you like. Divide the bed
into sections of about
50 cm wide, which is half
a spade length.
2. Starting with the first section, dig
out the top soil (the darker, richer
looking soil) and place it to one
side.
3. Turn over the soil at the bottom of
the trench, but leave it in place. Now
add half a wheelbarrow of compost
or manure to this sub-soil and dig it
in.
4. Move to the next section. Dig out
the top soil, and put it onto the sub
soil and compost mixture of the
first section. Turn over the sub soil
of the second section and again dig
in compost or manure.
page 62 BED DESIGN
5. Move to the third section. Repeat the whole process of moving the top soil and then
turning and composting or manuring the sub-soil. Do this until you reach the end of the
bed.
6. When you get to the last
section, use the top soil
from the very first
section to cover the sub
soil of the last section.
7. Place a layer of compost
or manure over the whole
bed and lightly fork this
into the top soil. Your bed
will be quite a lot higher
than the path.
8. Now your bed is ready to plant.
9. Mulch the whole bed.
10. Make sure you water the bed REALLY WELL
before planting so that the whole depth of
the bed is wet and not only the top.
FERTILITY TRENCHES
(also known as Deep Trenches)
Making deep trenches is the hardest work, but the
result is also likely to be the best.
1. Mark out your bed, about 1 metre wide and as
long as you like.
2. Remove the top soil to a depth of 30 cm (the length of the head of a spade). Place the soil
next to the bed on the long side.
3. Now dig out the sub soil to a depth of 30 cm again, and make it in to a separate pile.
TOPSOIL
SUBSOIL
USE ON PATHS, AROUND
FRUIT TREES, ETC.
TOPSOIL 1 m
30 cm
30 cm
You should use
this double digging
method if your soil gets very
hard and compacted. It is also
good if you do have some manure
or compost, but not very much
other organic matter. But you
should not use it if you have
sandy soil, because the effect
of it is not very good in
sandy soils.
BED DESIGN page 63
4. Fill the bottom of the trench with organic matter (like branches, leaves, grass, manure,
maize stalks, cabbage leaves, sweepings from your homestead, kitchen waste). This does
not need to be composted, but make sure you have a good mix of different things such as
twigs, grass, leaves, kitchen wastes and manure. The more organic matter you put in the
bed, the better your harvest will be and the longer it will last. If there is a lot of grass and
manure, the garden will be rich. If all you have is sticks, tins and newspaper, it will not be
so fertile. Do not use glass or plastic.
5. Make sure you stamp down your layer of
organic matter until it is quite firm.
6. Then place the top soil back on top of the
organic layer. You can fork some manure
or compost into this layer. If you do not
have enough, you can plant your seeds or
seedlings with manure.
7. Your bed is now ready to plant.
8. Mulch your bed.
9. The sub soil that you have left can be
spread around fruit trees or along the
paths.
HOT BEDS
These are shallow trenches. The bottom of the trench is filled
with some rough organic material like small twigs and grass.
Then you place a layer of about 20 cm (the width of your open
hand) of fresh cow manure on top of this. This layer is covered
with the topsoil that you have dug out. Plant your seedlings with
old manure or compost. Make sure you water this bed really
well, so that all the soil and manure is wet through. Then
mulch the bed. It you do not have grass, use plastic or paper.
If the manure does not get wet, it will not decompose and heat
up and the whole idea of having a hot bed will be lost!
Now wait for the bed to heat up.
Fertility
trenches are good
if you have sandy soils that
loose nutrients quickly. Making a
deep trench is lots of work, and you
need to have all the organic matters
and compost. But once you have done
it, it will last for 5 years, and all you
need to do when you are planting is
add one handful of compost to your
seedlings. It also holds a lot more
water than a shallow trench
or double-digging.
This is
a very good
idea if you are
planting in winter in a
very cold place. Your
seedlings will love
the warmth.
TOPSOIL
ROUGH ORGANIC
MATTER
TOPSOIL
50 cm
1 m
page 64 BED DESIGN
DIFFERENT SHAPED BEDS
KEYHOLE BEDS or
PIT BEDS
These beds are made in the
shape of a keyhole or a
horse-shoe. They are very
good if you live in a dry area
and your ground is sloping.
The beds are placed so that
the hole faces up the slope.
This helps to catch rainwater
as it runs over the ground.
You can also place these beds
below a tap (if you have
one), so that the extra water
can run into the keyhole.
This helps to water the bed.
1. Loosen the soil of a
circular area about 2.5 m
wide with a pick or a
fork. This is the length
of 2 and a half spades.
2. Dig a round pit about
60 cm wide and 60 cm
deep (the length of
2 spade heads) in the
middle of this area. Then
dig a pathway leading to
the pit. This path must
point up the slope.
You can make it about
10-20 cm deep (the
width of your hand).
3. Spread the top soil you
have dug out evenly
around the pit. You will
end up with a raised bed.
Add compost or manure
to this and fork it in.
4. Fill the pit with organic vegetable material (grass, kitchen wastes, leaves, manure and
ash). This is just like a small compost heap.
KEYHOLE PITBED
SIDE VIEW
KEYHOLE PITBED TOP VIEW
From: Pitbeds For Home Production; The Valley Trust
ORGANIC
MATTER
MULCH
CIRCULAR
BED FOR
PLANTING
VEGETABLES
PIT WITH
ORGANIC
MATTER
MULCH
POLES FOR
CLIMBING BEANS
LOWER GROUND
HIGHER GROUNDPATH

BED DESIGN page 65
5. Cover the pit and the bed with a thick layer of mulch.
6. Pour any spare water or waste water from the kitchen into the pit. You can also direct
water from a slope, road or a roof into the pit. The water keeps the soil around the pit
moist. It also helps to decompose the organic matter and improves the surrounding soil
fertility.
7. Once the organic matter has broken down, you can dig this out of the pit and use it for
planting seedlings.
8. The space for planting can be increased by building a frame of poles above the pit, which
will help to shade the compost heap in the middle. Climbing vegetables such as runner
beans, pumpkins, tomatoes and cucumbers can grow up the poles.
RAISED KEYHOLE
BEDS
These beds are good in places
where you have very little
soil or rocky ground.
1. Build a circular or round
rock wall straight onto
the ground, about one
arm's span all around.
This means that you hold
your arms out straight
from your sides. This
wall is built about
1 metre high (the length
of a spade). The wall has a notch or keyhole in it, into which a person can walk to pour
water or more manure into the basket in the middle.
2. Make a basket or column of sticks (black wattle
is good) in the middle and we fill this up as we
are filling up the inside of the rock wall. Fill the
basket with manure and ash in layers.
3. Fill the inside of the rock wall with layers of soil
– ash – leaves or grass and manure. These
layers should each be about 5 cm thick. Repeat
the process until your bed is full, ending with
the addition of soil on top. Mulch the bed and
water well before planting.
The idea is that
waste water from the
house can be poured onto
the basket of manure and ash.
This water seeps out of the
basket into your bed. These
beds, being raised so high are
extremely easy to maintain
by the elderly
or sick.

page 66
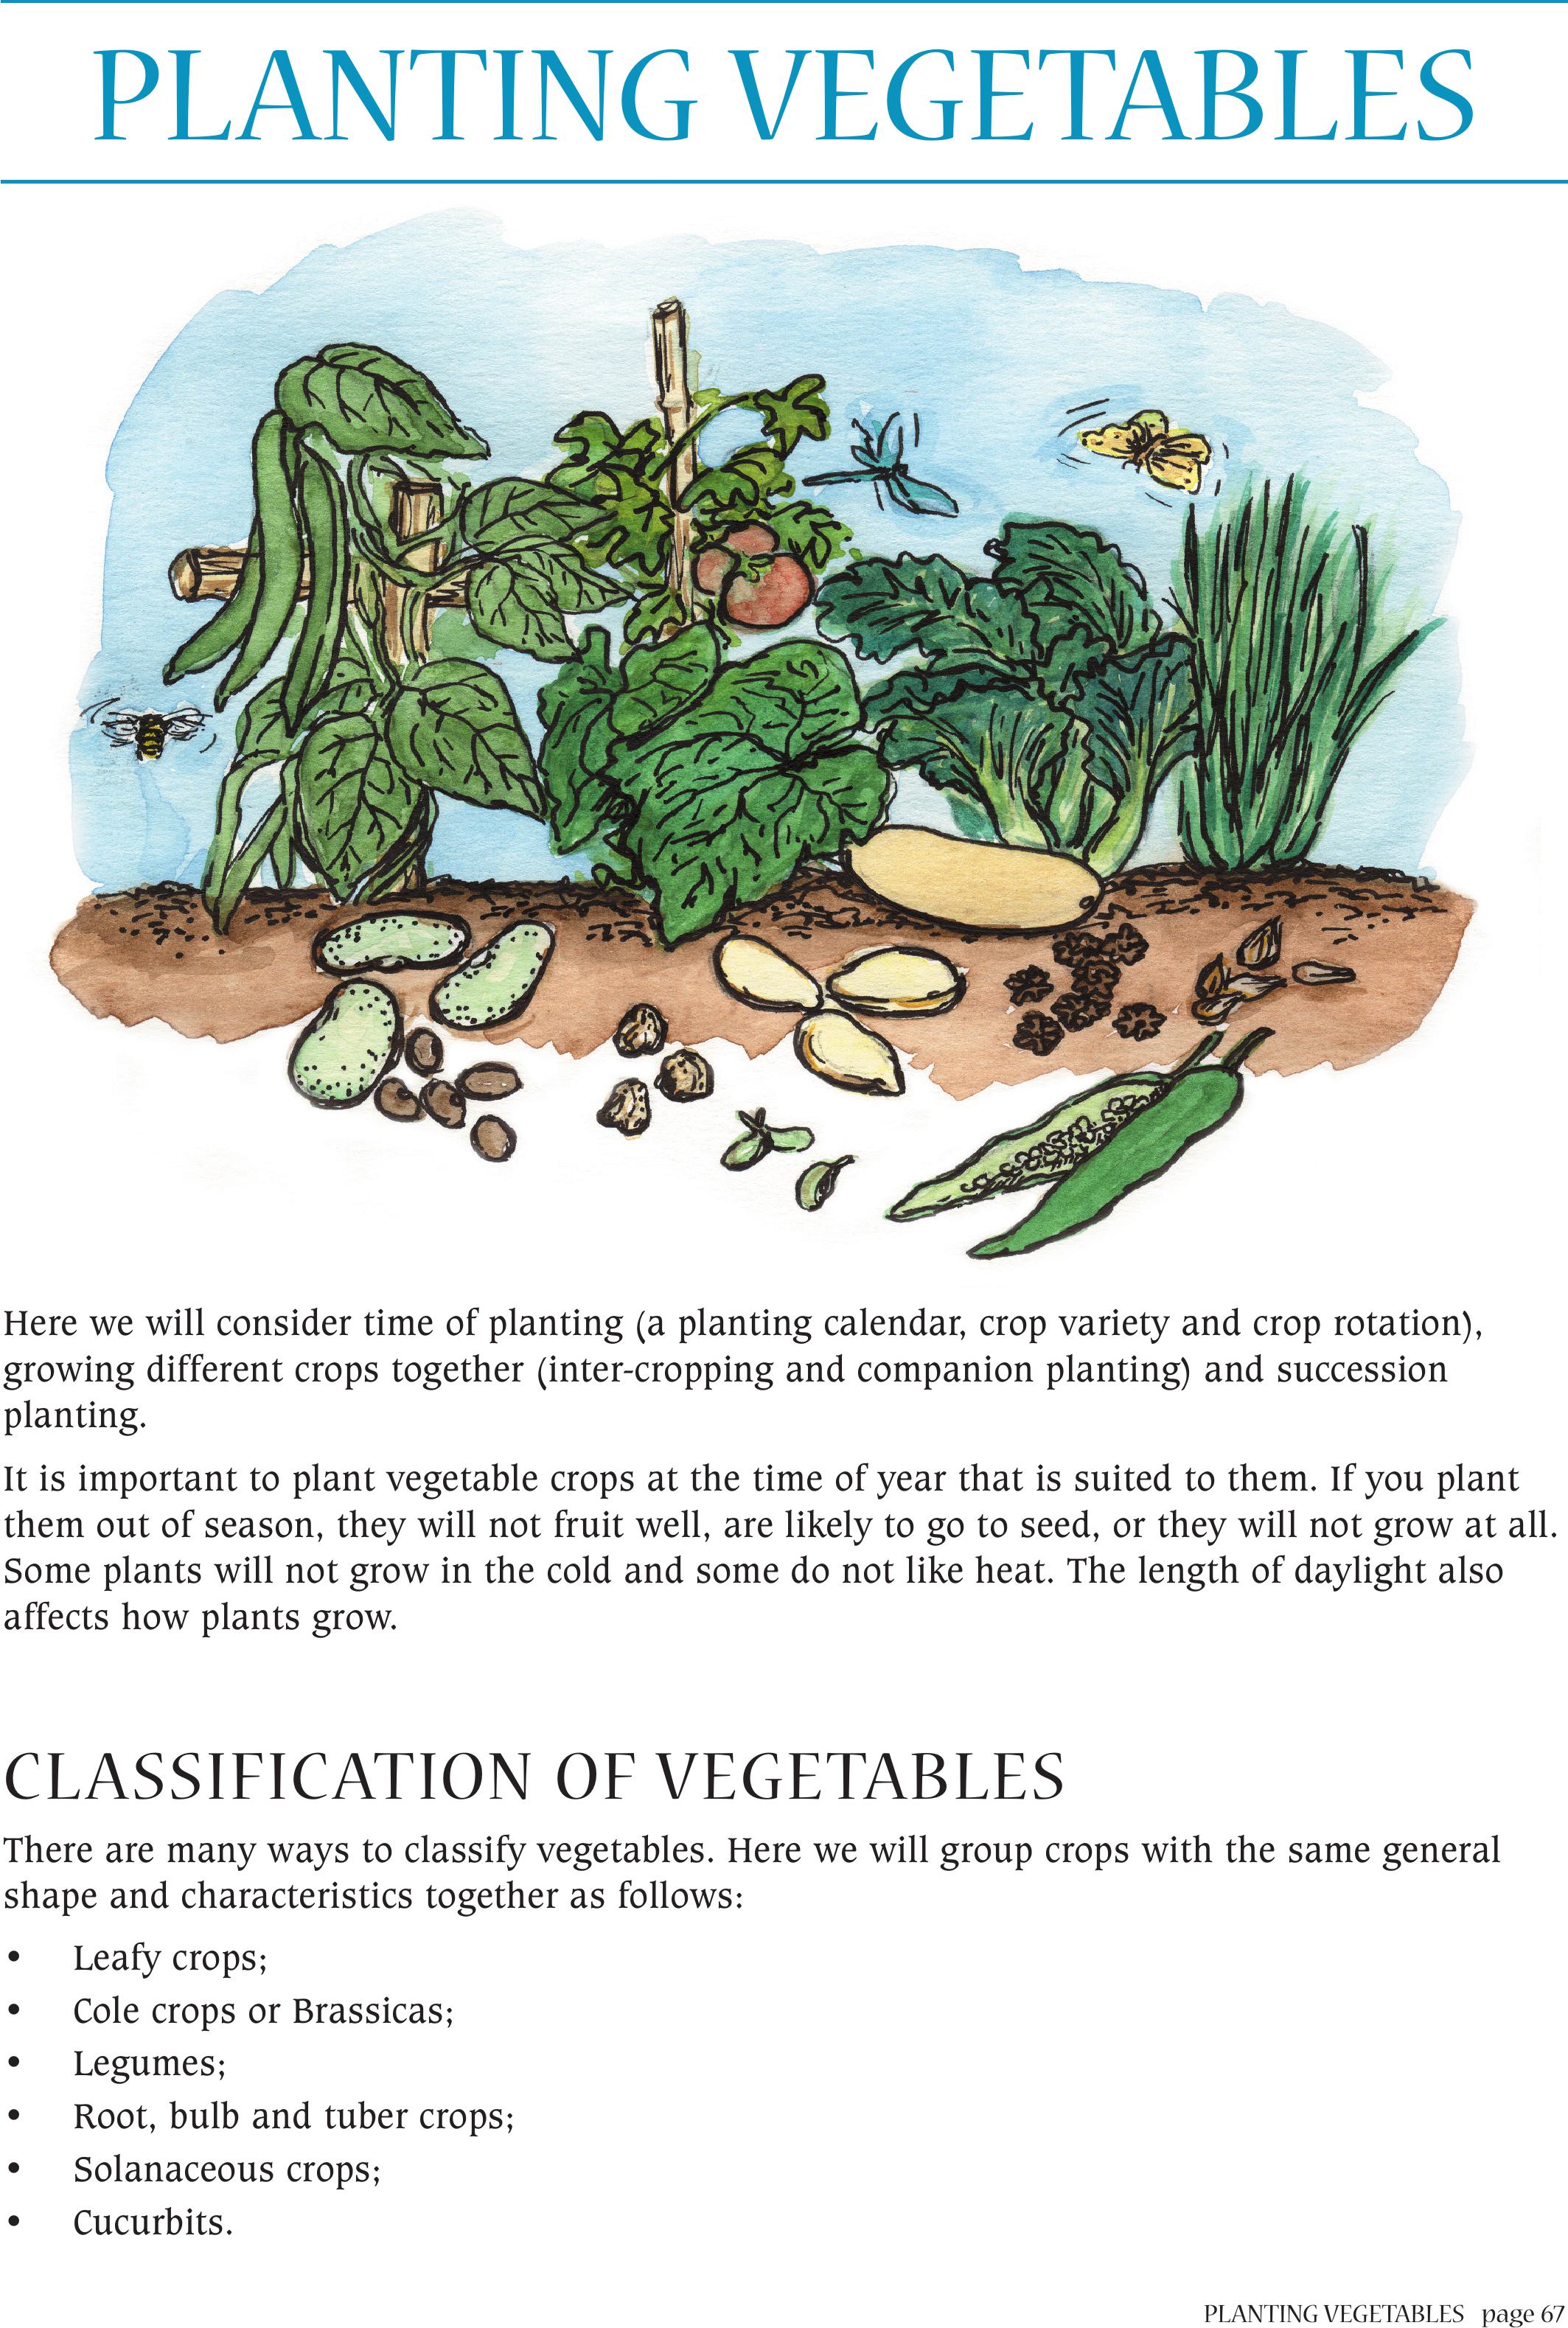
PLANTING VEGETABLES page 67
Here we will consider time of planting (a planting calendar, crop variety and crop rotation),
growing different crops together (inter-cropping and companion planting) and succession
planting.
It is important to plant vegetable crops at the time of year that is suited to them. If you plant
them out of season, they will not fruit well, are likely to go to seed, or they will not grow at all.
Some plants will not grow in the cold and some do not like heat. The length of daylight also
affects how plants grow.
CLASSIFICATION OFVEGETABLES
There are many ways to classify vegetables. Here we will group crops with the same general
shape and characteristics together as follows:
• Leafy crops;
• Cole crops or Brassicas;
• Legumes;
• Root, bulb and tuber crops;
• Solanaceous crops;
• Cucurbits.
PLANTING VEGETABLES
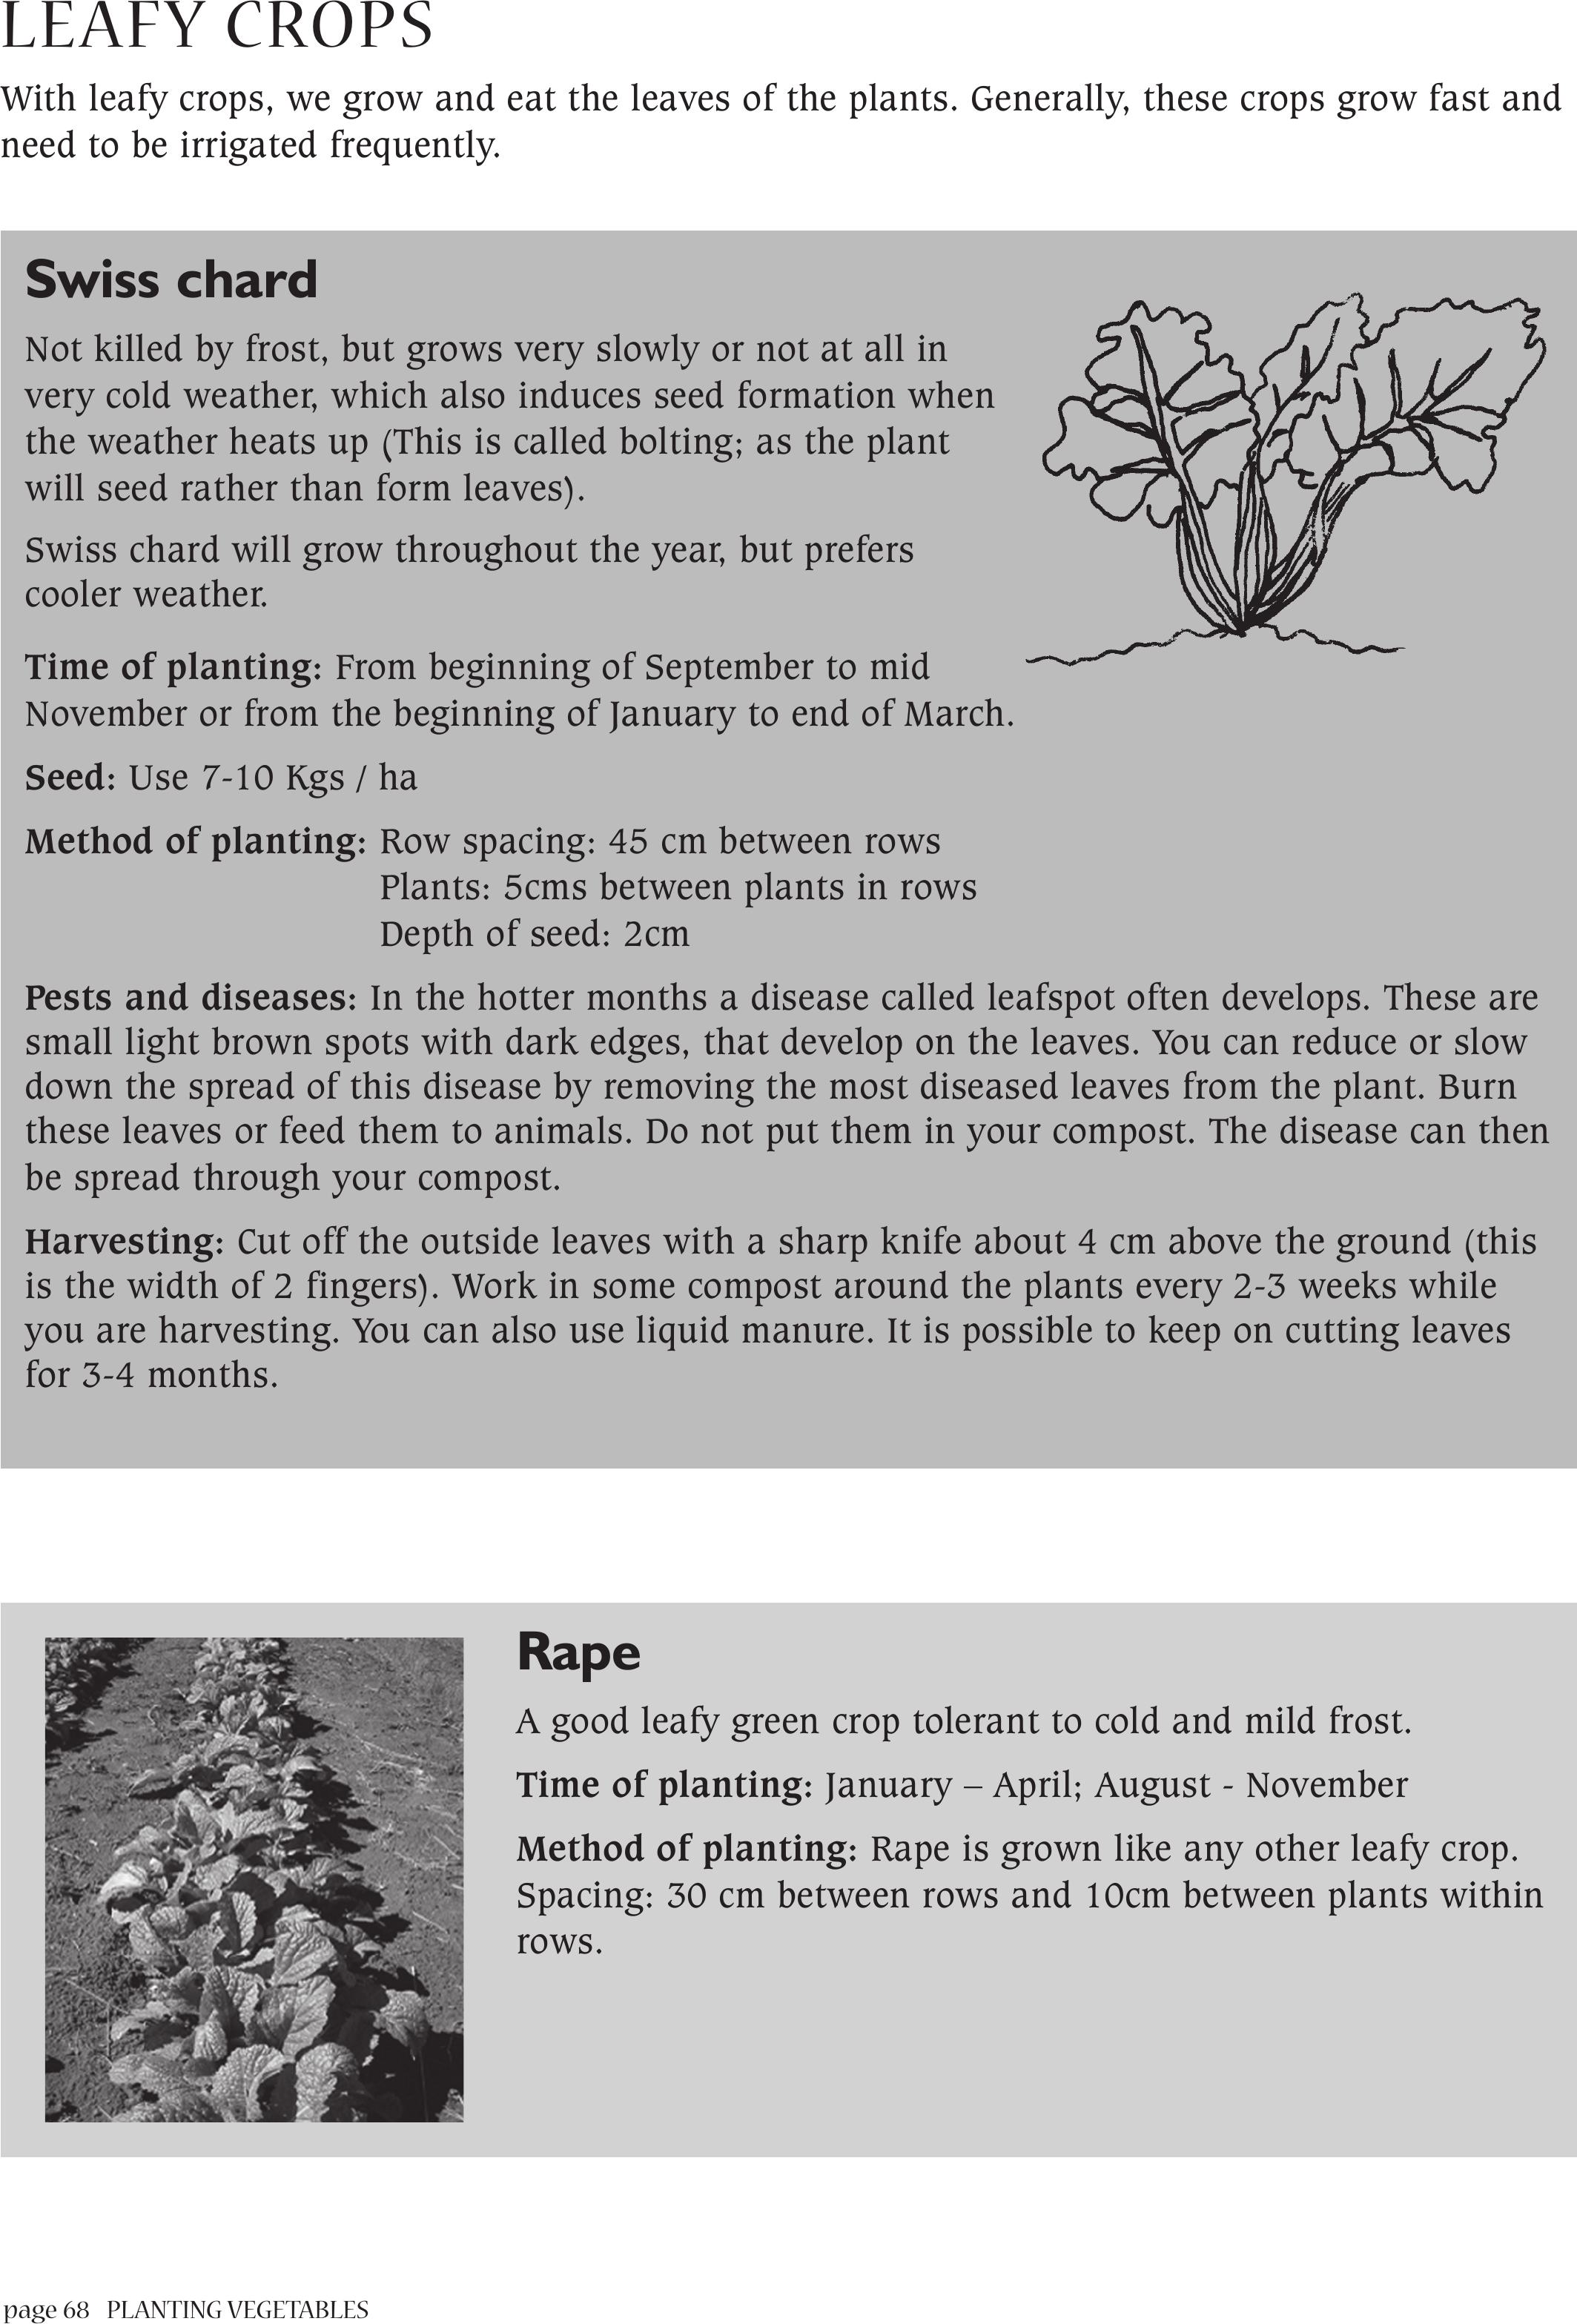
page 68PLANTING VEGETABLES
LEAFY CROPS
With leafy crops, we grow and eat the leaves of the plants. Generally, these crops grow fast and
need to be irrigated frequently.
Swiss chard
Not killed by frost, but grows very slowly or not at all in
very cold weather, which also induces seed formation when
the weather heats up (This is called bolting; as the plant
will seed rather than form leaves).
Swiss chard will grow throughout the year, but prefers
cooler weather.
Time of planting: From beginning of September to mid
November or from the beginning of January to end of March.
Seed: Use 7-10 Kgs / ha
Method of planting: Row spacing: 45 cm between rows
Plants: 5cms between plants in rows
Depth of seed: 2cm
Pests and diseases: In the hotter months a disease called leafspot often develops. These are
small light brown spots with dark edges, that develop on the leaves. You can reduce or slow
down the spread of this disease by removing the most diseased leaves from the plant. Burn
these leaves or feed them to animals. Do not put them in your compost. The disease can then
be spread through your compost.
Harvesting: Cut off the outside leaves with a sharp knife about 4 cm above the ground (this
is the width of 2 fingers). Work in some compost around the plants every 2-3 weeks while
you are harvesting. You can also use liquid manure. It is possible to keep on cutting leaves
for 3-4 months.
Rape
A good leafy green crop tolerant to cold and mild frost.
Time of planting: January – April; August - November
Method of planting: Rape is grown like any other leafy crop.
Spacing: 30 cm between rows and 10cm between plants within
rows.
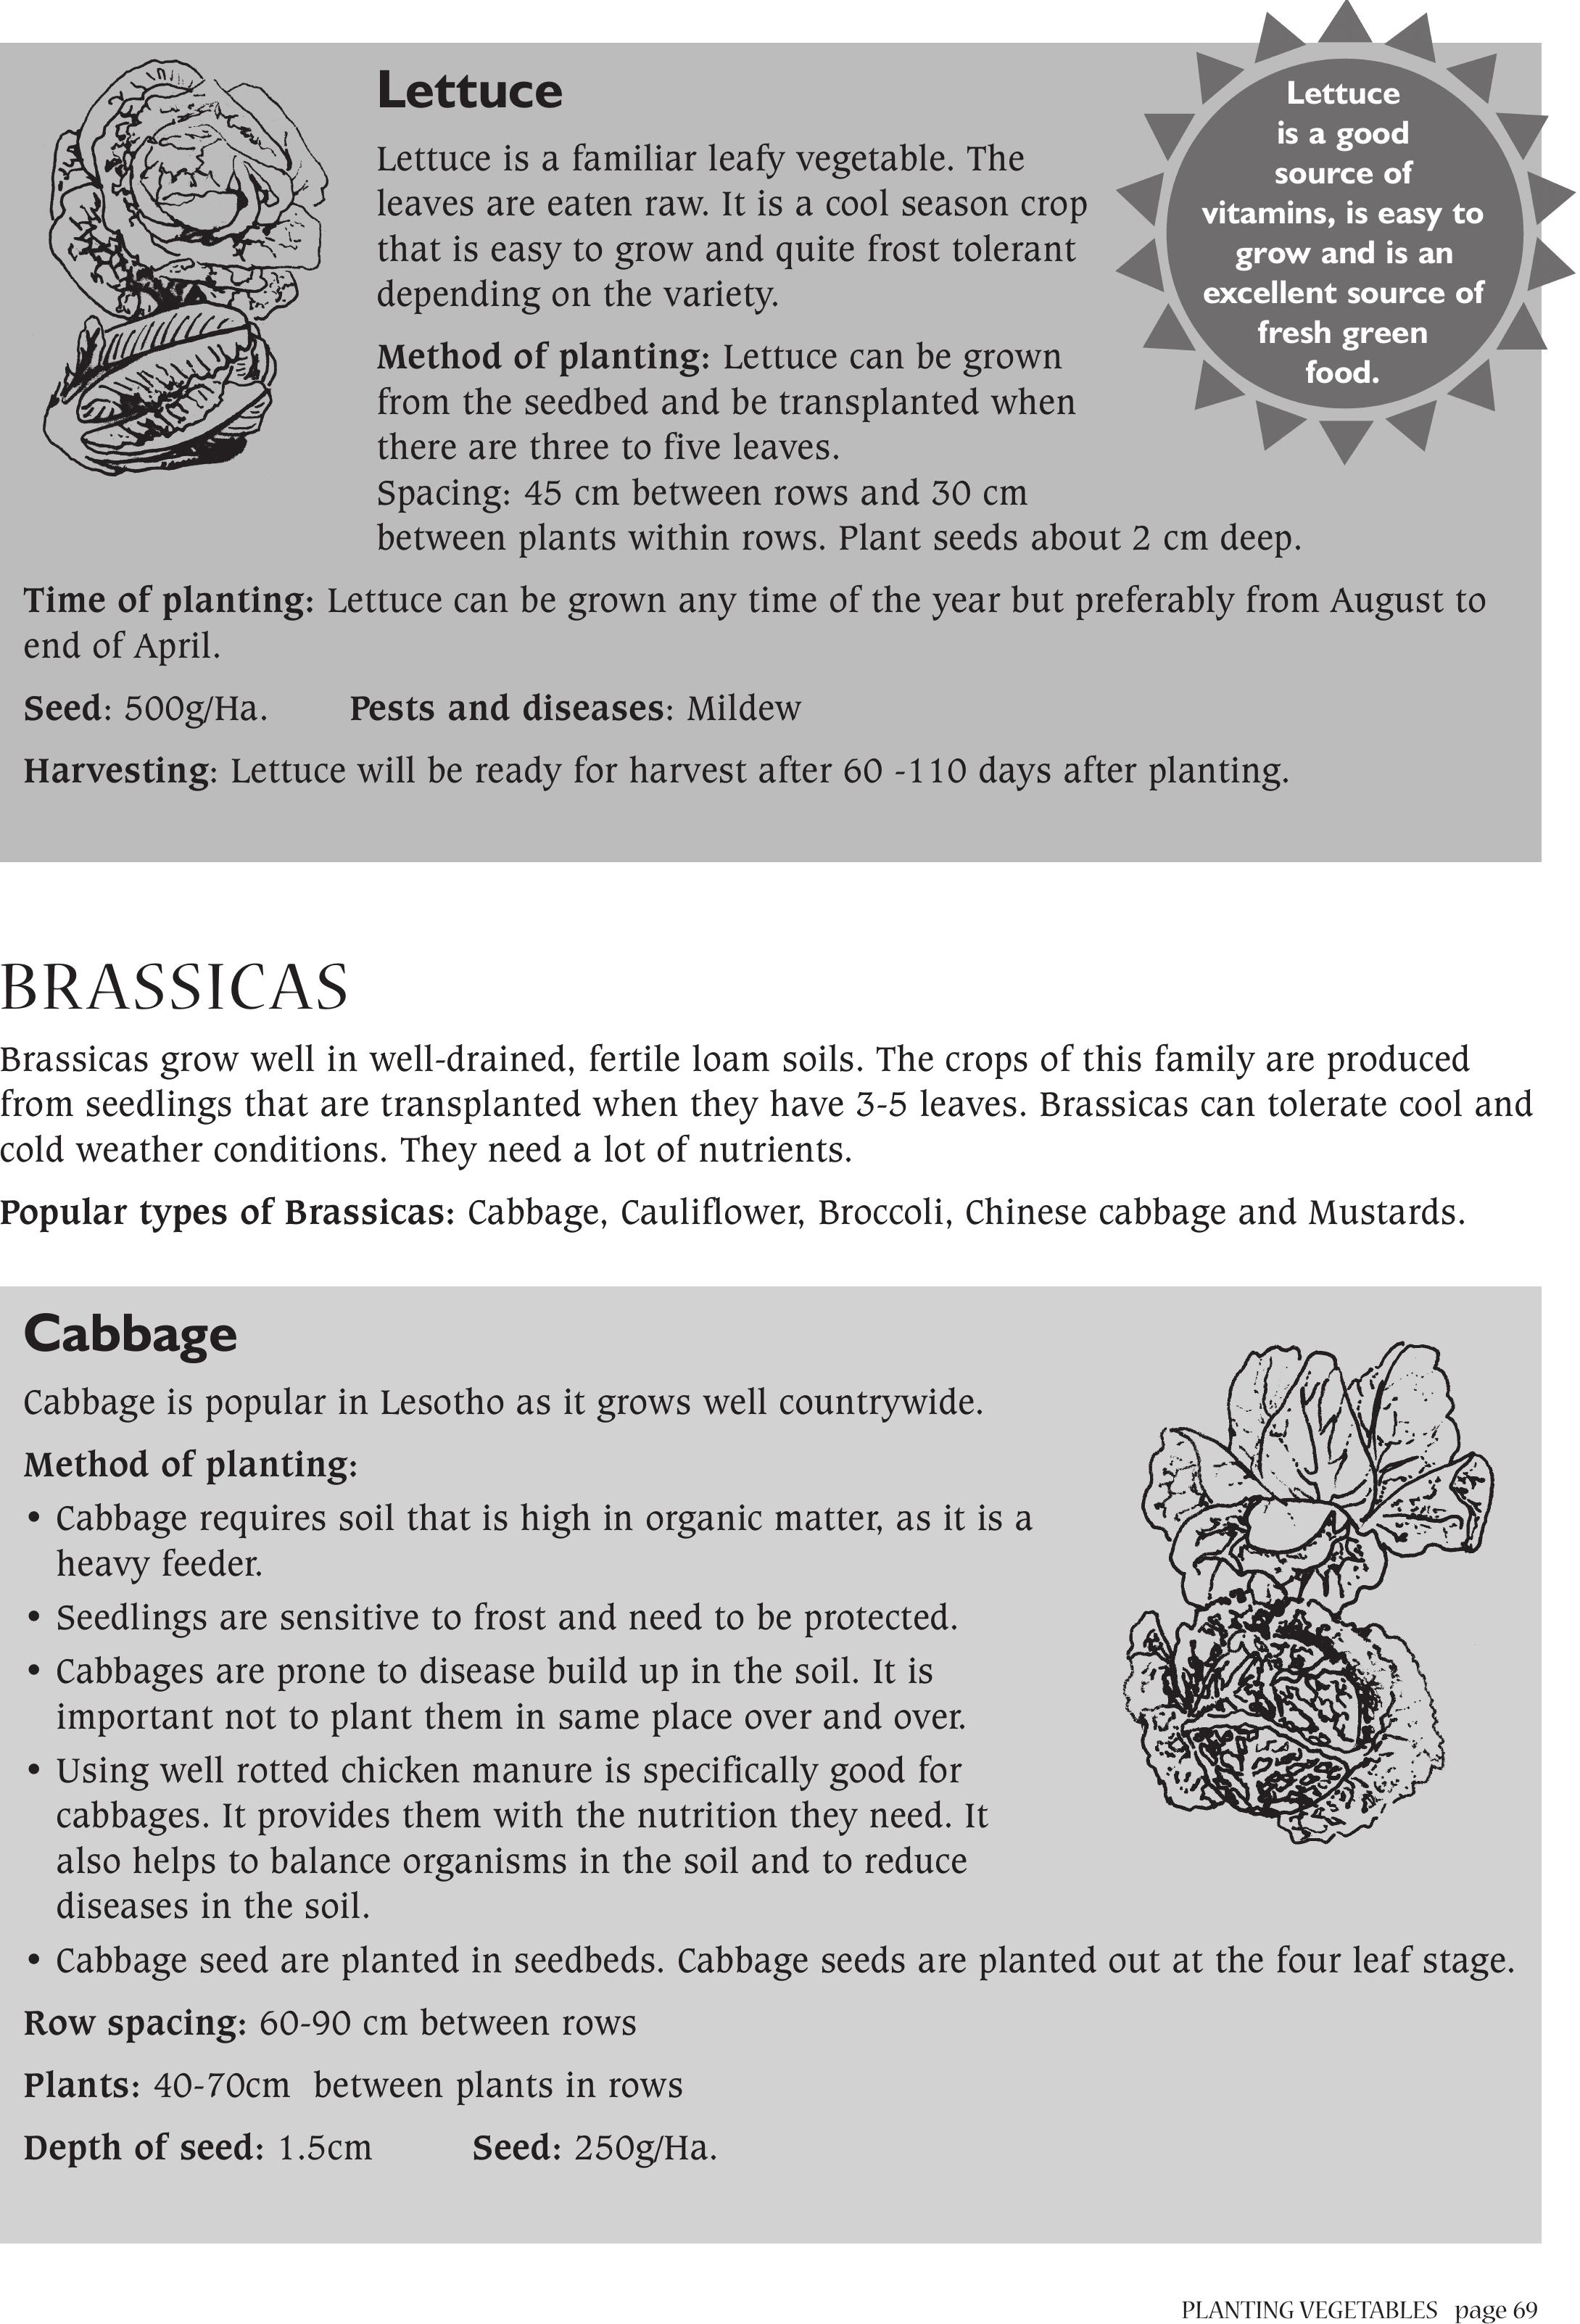
PLANTING VEGETABLES page 69
Cabbage
Cabbage is popular in Lesotho as it grows well countrywide.
Method of planting:
• Cabbage requires soil that is high in organic matter, as it is a
heavy feeder.
• Seedlings are sensitive to frost and need to be protected.
• Cabbages are prone to disease build up in the soil. It is
important not to plant them in same place over and over.
• Using well rotted chicken manure is specifically good for
cabbages. It provides them with the nutrition they need. It
also helps to balance organisms in the soil and to reduce
diseases in the soil.
• Cabbage seed are planted in seedbeds. Cabbage seeds are planted out at the four leaf stage.
Row spacing: 60-90 cm between rows
Plants: 40-70cm between plants in rows
Depth of seed: 1.5cm Seed: 250g/Ha.
Lettuce
Lettuce is a familiar leafy vegetable. The
leaves are eaten raw. It is a cool season crop
that is easy to grow and quite frost tolerant
depending on the variety.
Method of planting: Lettuce can be grown
from the seedbed and be transplanted when
there are three to five leaves.
Spacing: 45 cm between rows and 30 cm
between plants within rows. Plant seeds about 2 cm deep.
Time of planting: Lettuce can be grown any time of the year but preferably from August to
end of April.
Seed: 500g/Ha. Pests and diseases: Mildew
Harvesting: Lettuce will be ready for harvest after 60 -110 days after planting.
Lettuce
is a good
source of
vitamins, is easy to
grow and is an
excellent source of
fresh green
food.
BRASSICAS
Brassicas grow well in well-drained, fertile loam soils. The crops of this family are produced
from seedlings that are transplanted when they have 3-5 leaves. Brassicas can tolerate cool and
cold weather conditions. They need a lot of nutrients.
Popular types of Brassicas: Cabbage, Cauliflower, Broccoli, Chinese cabbage and Mustards.
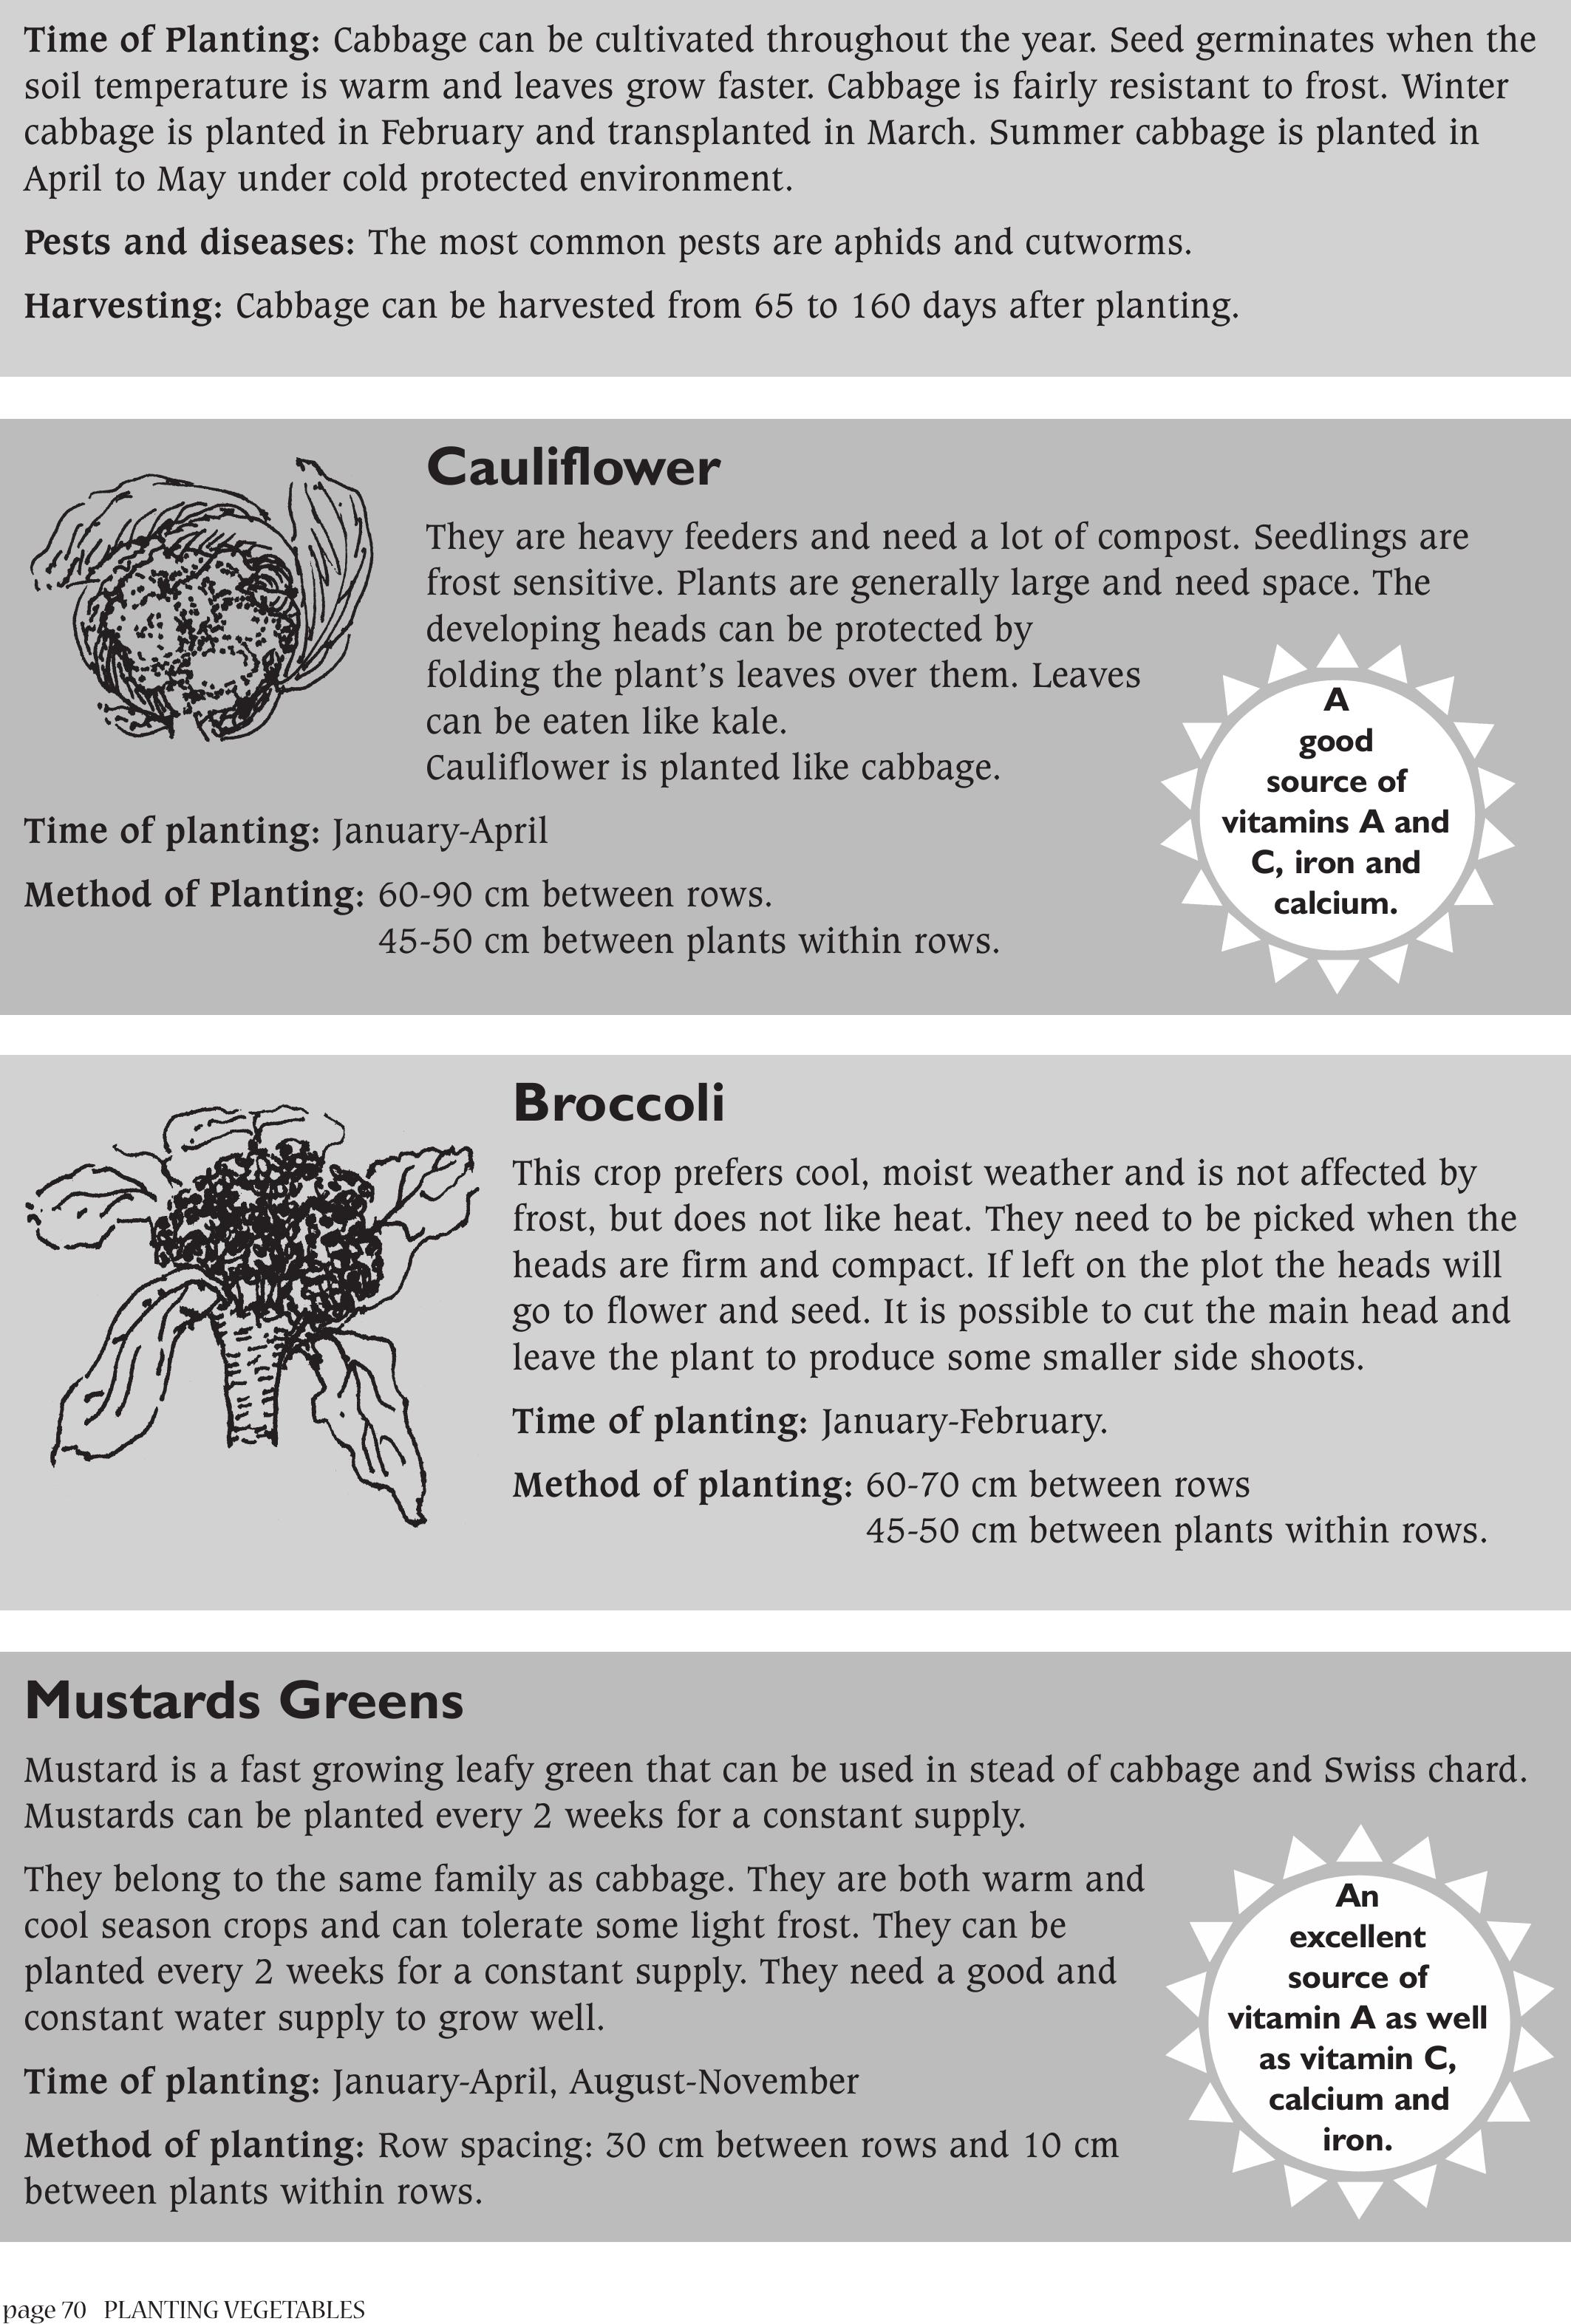
page 70PLANTING VEGETABLES
Mustards Greens
Mustard is a fast growing leafy green that can be used in stead of cabbage and Swiss chard.
Mustards can be planted every 2 weeks for a constant supply.
They belong to the same family as cabbage. They are both warm and
cool season crops and can tolerate some light frost. They can be
planted every 2 weeks for a constant supply. They need a good and
constant water supply to grow well.
Time of planting: January-April, August-November
Method of planting: Row spacing: 30 cm between rows and 10 cm
between plants within rows.
Cauliflower
They are heavy feeders and need a lot of compost. Seedlings are
frost sensitive. Plants are generally large and need space. The
developing heads can be protected by
folding the plant’s leaves over them. Leaves
can be eaten like kale.
Cauliflower is planted like cabbage.
Time of planting: January-April
Method of Planting: 60-90 cm between rows.
45-50 cm between plants within rows.
Broccoli
This crop prefers cool, moist weather and is not affected by
frost, but does not like heat. They need to be picked when the
heads are firm and compact. If left on the plot the heads will
go to flower and seed. It is possible to cut the main head and
leave the plant to produce some smaller side shoots.
Time of planting: January-February.
Method of planting:60-70 cm between rows
45-50 cm between plants within rows.
Time of Planting: Cabbage can be cultivated throughout the year. Seed germinates when the
soil temperature is warm and leaves grow faster. Cabbage is fairly resistant to frost. Winter
cabbage is planted in February and transplanted in March. Summer cabbage is planted in
April to May under cold protected environment.
Pests and diseases: The most common pests are aphids and cutworms.
Harvesting: Cabbage can be harvested from 65 to 160 days after planting.
A
good
source of
vitamins A and
C, iron and
calcium.
An
excellent
source of
vitamin A as well
as vitamin C,
calcium and
iron.
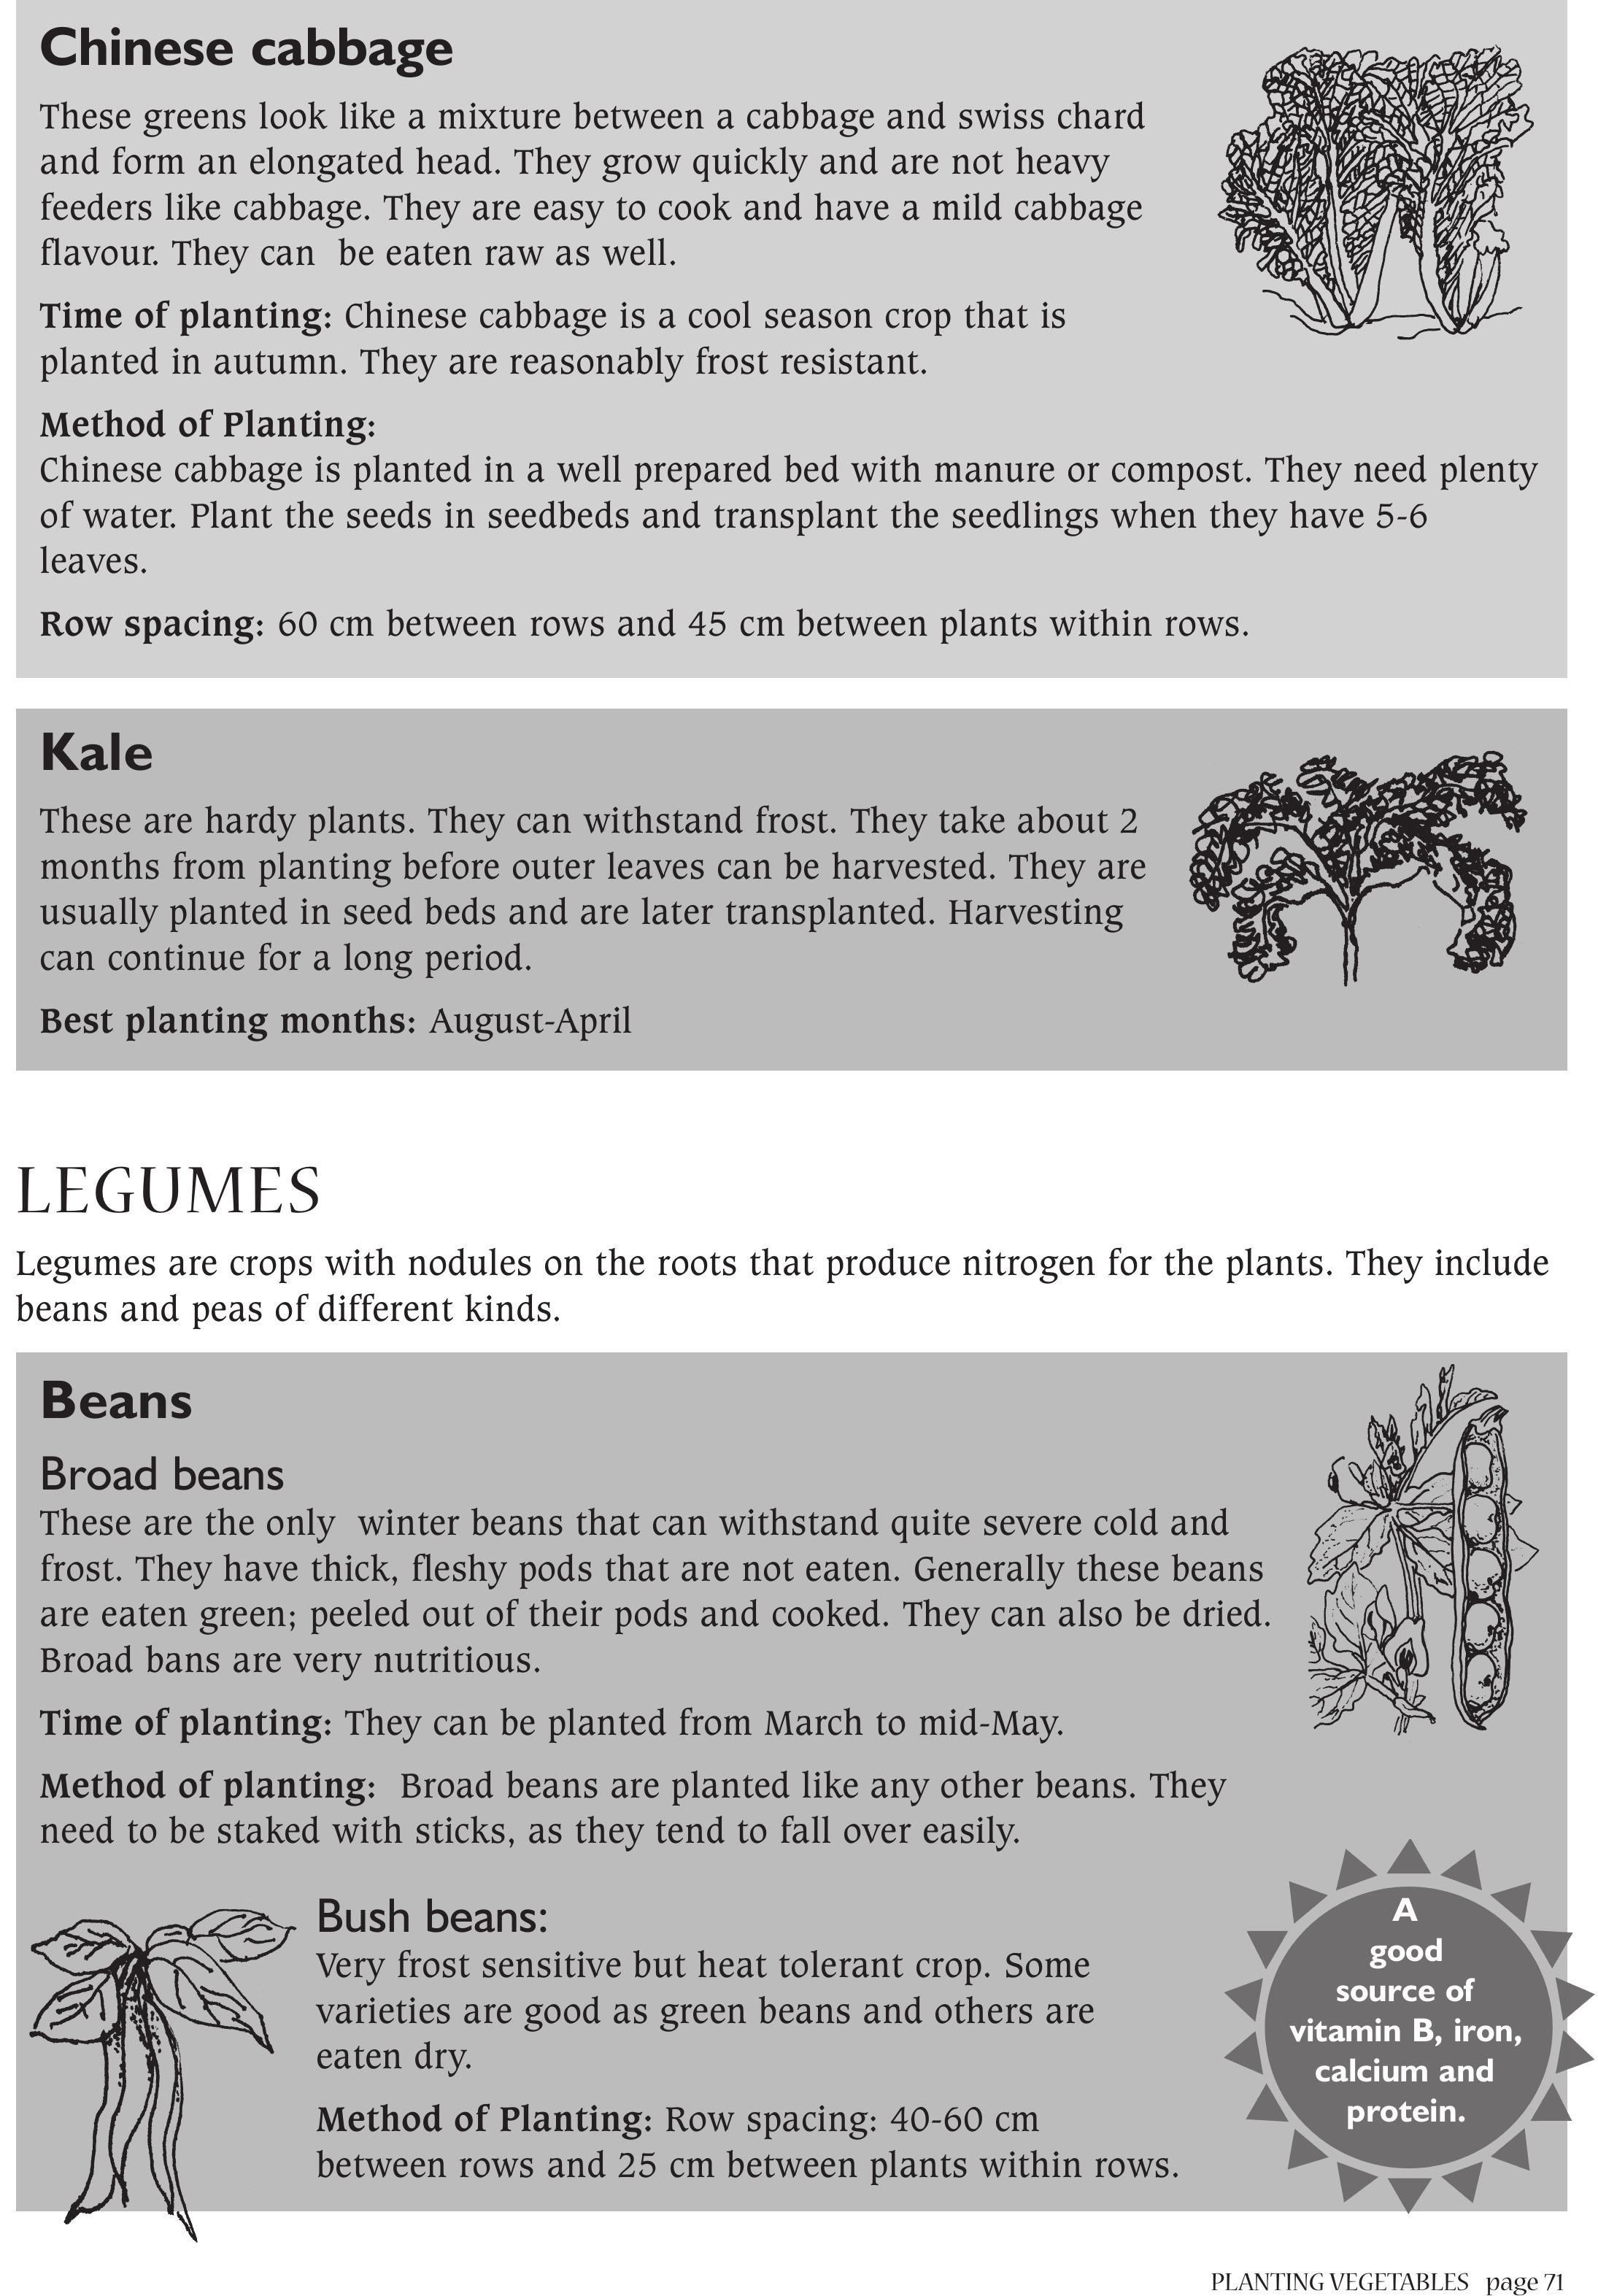
PLANTING VEGETABLES page 71
Beans
Broad beans
These are the only winter beans that can withstand quite severe cold and
frost. They have thick, fleshy pods that are not eaten. Generally these beans
are eaten green; peeled out of their pods and cooked. They can also be dried.
Broad bans are very nutritious.
Time of planting: They can be planted from March to mid-May.
Method of planting: Broad beans are planted like any other beans. They
need to be staked with sticks, as they tend to fall over easily.
Bush beans:
Very frost sensitive but heat tolerant crop. Some
varieties are good as green beans and others are
eaten dry.
Method of Planting: Row spacing: 40-60 cm
between rows and 25 cm between plants within rows.
Chinese cabbage
These greens look like a mixture between a cabbage and swiss chard
and form an elongated head. They grow quickly and are not heavy
feeders like cabbage. They are easy to cook and have a mild cabbage
flavour. They can be eaten raw as well.
Time of planting: Chinese cabbage is a cool season crop that is
planted in autumn. They are reasonably frost resistant.
Method of Planting:
Chinese cabbage is planted in a well prepared bed with manure or compost. They need plenty
of water. Plant the seeds in seedbeds and transplant the seedlings when they have 5-6
leaves.
Row spacing: 60 cm between rows and 45 cm between plants within rows.
LEGUMES
Legumes are crops with nodules on the roots that produce nitrogen for the plants. They include
beans and peas of different kinds.
A
good
source of
vitamin B, iron,
calcium and
protein.
Kale
These are hardy plants. They can withstand frost. They take about 2
months from planting before outer leaves can be harvested. They are
usually planted in seed beds and are later transplanted. Harvesting
can continue for a long period.
Best planting months: August-April
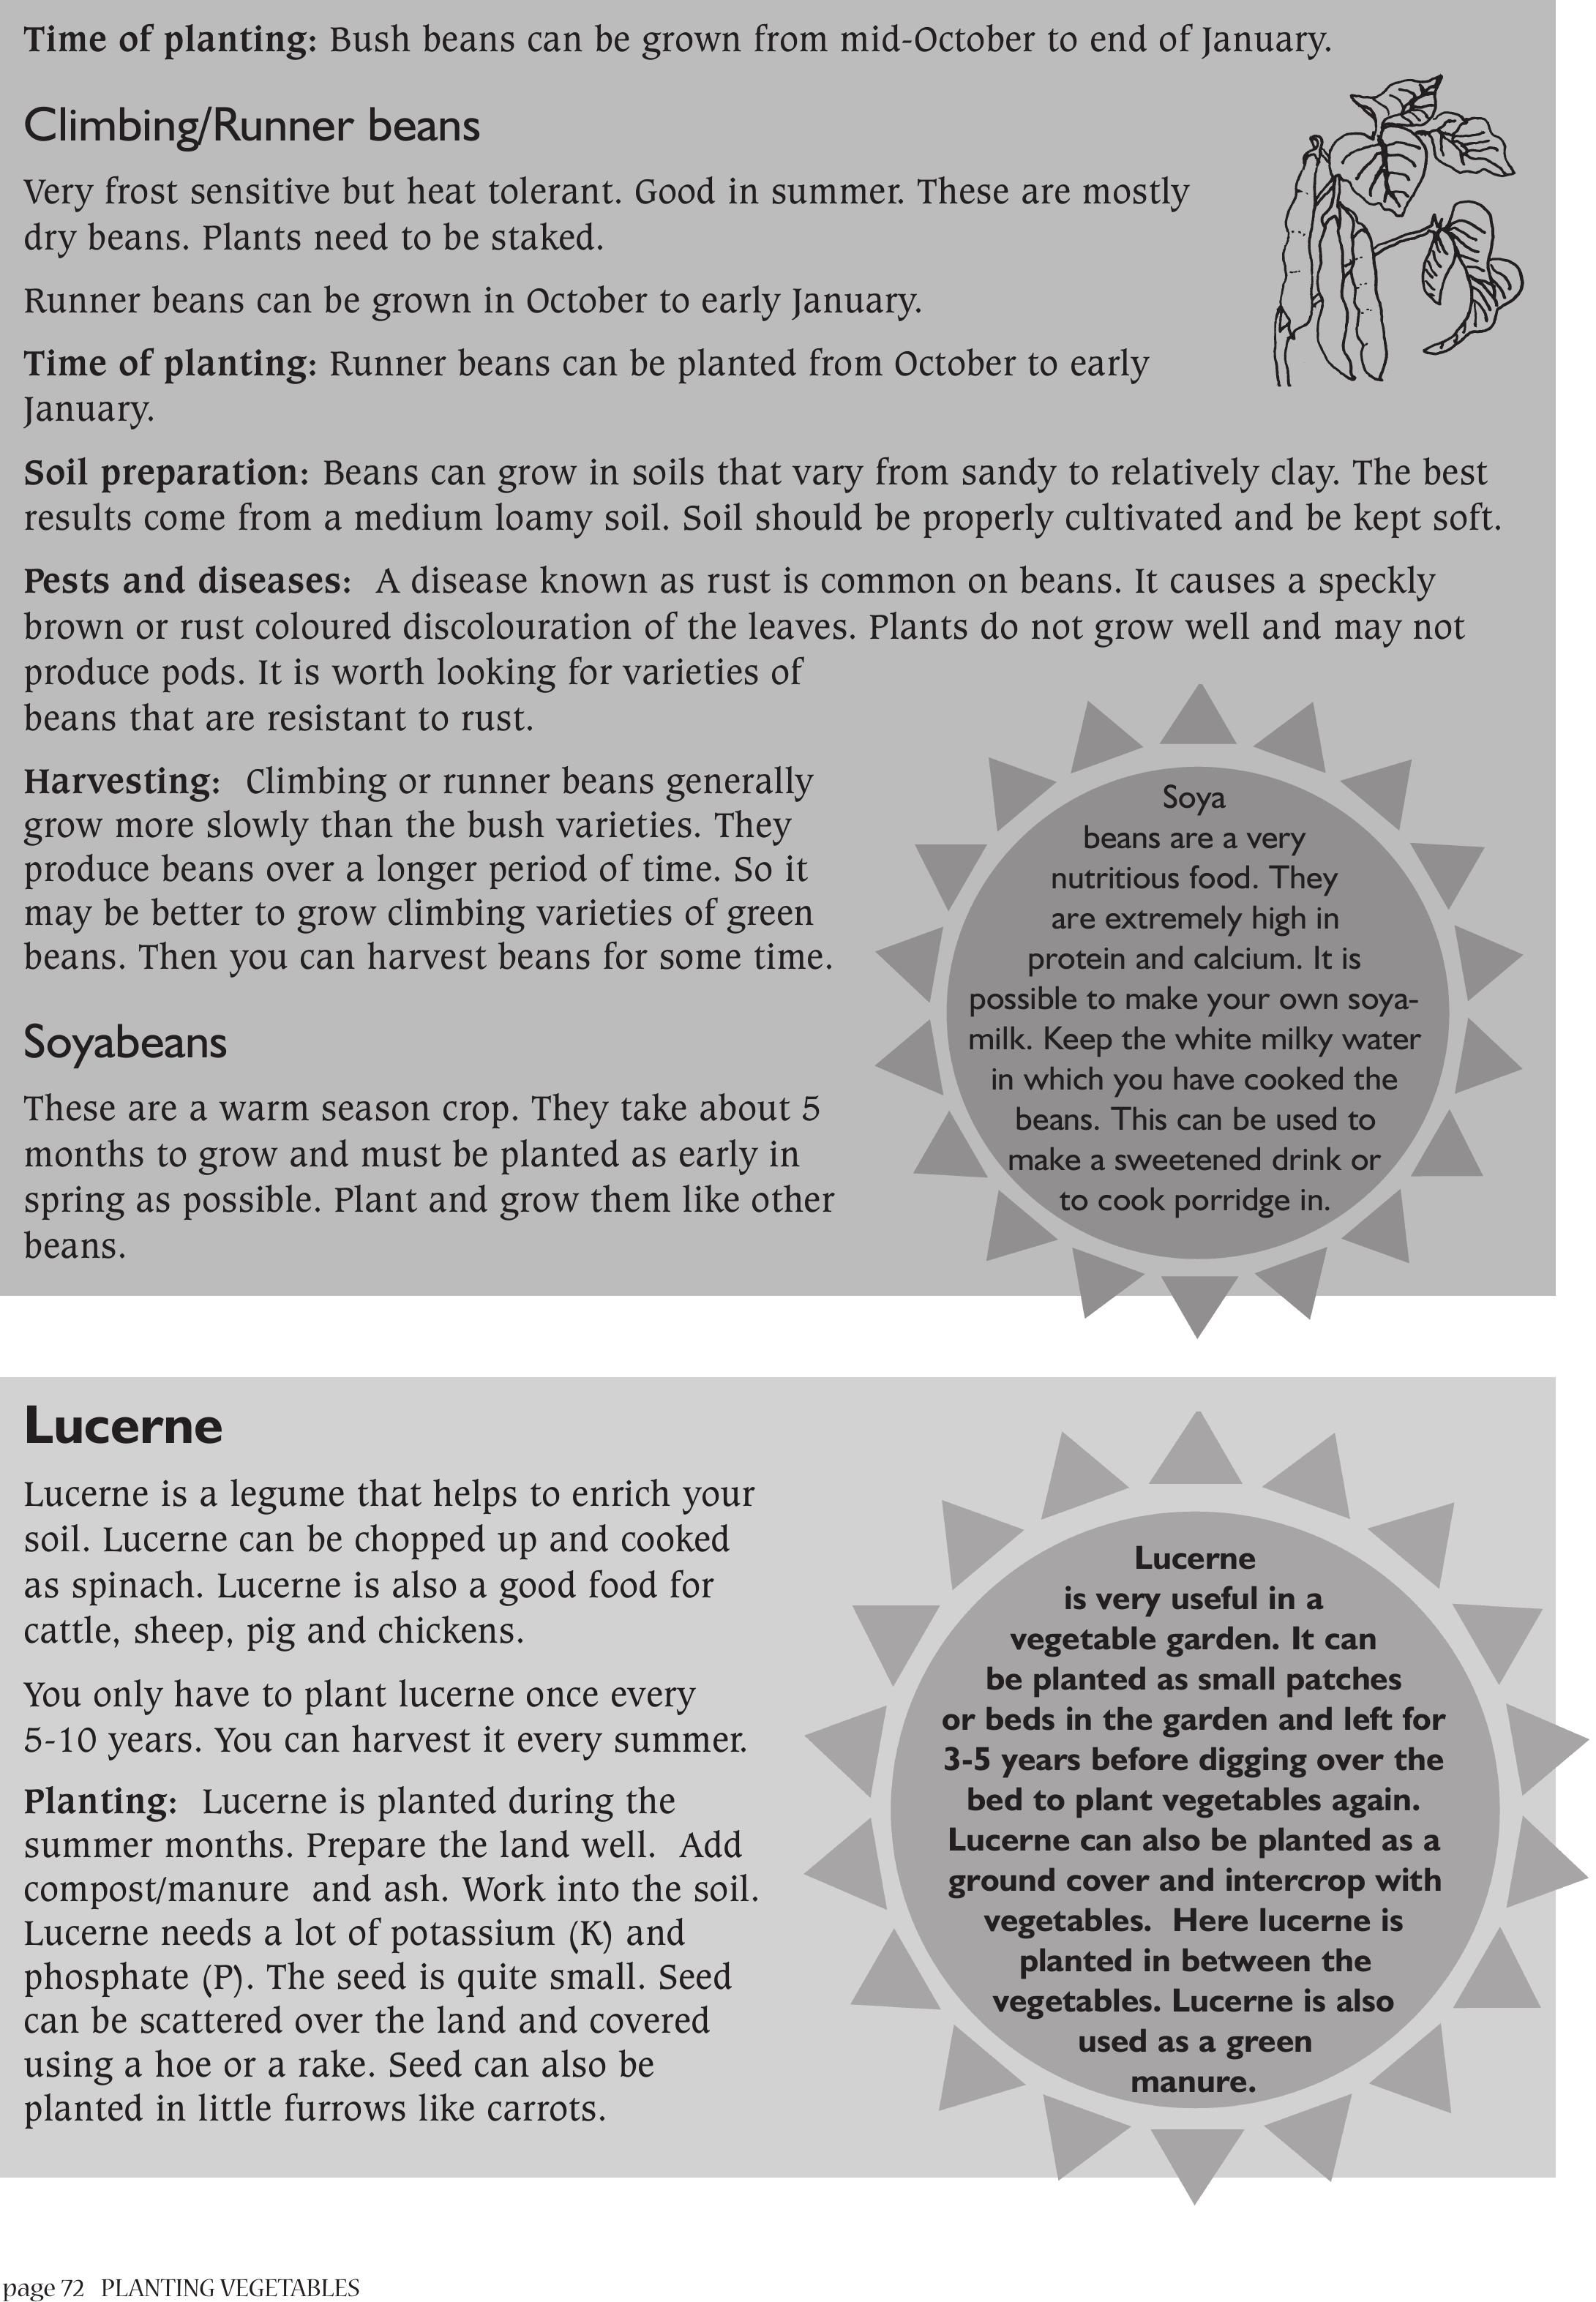
page 72PLANTING VEGETABLES
Time of planting: Bush beans can be grown from mid-October to end of January.
Climbing/Runner beans
Very frost sensitive but heat tolerant. Good in summer. These are mostly
dry beans. Plants need to be staked.
Runner beans can be grown in October to early January.
Time of planting: Runner beans can be planted from October to early
January.
Soil preparation: Beans can grow in soils that vary from sandy to relatively clay. The best
results come from a medium loamy soil. Soil should be properly cultivated and be kept soft.
Pests and diseases: A disease known as rust is common on beans. It causes a speckly
brown or rust coloured discolouration of the leaves. Plants do not grow well and may not
produce pods. It is worth looking for varieties of
beans that are resistant to rust.
Harvesting: Climbing or runner beans generally
grow more slowly than the bush varieties. They
produce beans over a longer period of time. So it
may be better to grow climbing varieties of green
beans. Then you can harvest beans for some time.
Soyabeans
These are a warm season crop. They take about 5
months to grow and must be planted as early in
spring as possible. Plant and grow them like other
beans.
Lucerne
Lucerne is a legume that helps to enrich your
soil. Lucerne can be chopped up and cooked
as spinach. Lucerne is also a good food for
cattle, sheep, pig and chickens.
You only have to plant lucerne once every
5-10 years. You can harvest it every summer.
Planting: Lucerne is planted during the
summer months. Prepare the land well. Add
compost/manure and ash. Work into the soil.
Lucerne needs a lot of potassium (K) and
phosphate (P). The seed is quite small. Seed
can be scattered over the land and covered
using a hoe or a rake. Seed can also be
planted in little furrows like carrots.
Soya
beans are a very
nutritious food. They
are extremely high in
protein and calcium. It is
possible to make your own soya-
milk. Keep the white milky water
in which you have cooked the
beans. This can be used to
make a sweetened drink or
to cook porridge in.
Lucerne
is very useful in a
vegetable garden. It can
be planted as small patches
or beds in the garden and left for
3-5 years before digging over the
bed to plant vegetables again.
Lucerne can also be planted as a
ground cover and intercrop with
vegetables. Here lucerne is
planted in between the
vegetables. Lucerne is also
used as a green
manure.

PLANTING VEGETABLES page 73
Harvesting: Lucerne can be cut and used green.
Lucerne can also be dried to be stored as winter food
for animals. Dry lucerne in flat piles in the sun.
Keep on turning these piles over. Otherwise the hay
at the bottom may rot. Drying takes about 3 days.
Peas
Peas can be divided into two main groups of
green and dry peas. They are a cool season
crop although sensitive to low minimum
temperatures. Peas generally need to be staked
to ensure a healthy plant and good podding.
They may be protected against birds.
Time of planting: Peas harvested in winter are
planted in January and peas to be harvested in summer are planted
during mid winter.
Method of planting: Peas need deep, well drained, fertile soil. Row spacing recommended is
30-40 cm and plants 10 cm.
A
good
source of
vitamin B, C,
iron and
protein.
ROOT VEGETABLES
These are vegetables that mostly produce underground and the roots or bulbous stems are
eaten. They are produced differently.
Carrots
It is a crop which is not susceptible to winter cold and frost.
Although frost can severely scorch the leaves, they usually regrow.
Soil preparation: Carrot seeds are small and are sown directly in
beds. Carrots need well prepared soil with enough moisture. They
thrive best in deep, loose, well-drained sandy loam soils. Carrots
should be irrigated so that the soil will never dry out.
Time of planting: Carrots are planted from August to end of
November or from January to end of April. In late summer, such as
February, the soil can be too hot for carrot seeds to germinate. It is
also too cold in mid winter. The best planting times are spring and autumn.
LUCERNE HAS DEEP ROOTS
DO NOT CUT
SHORTER THAN 10 cm
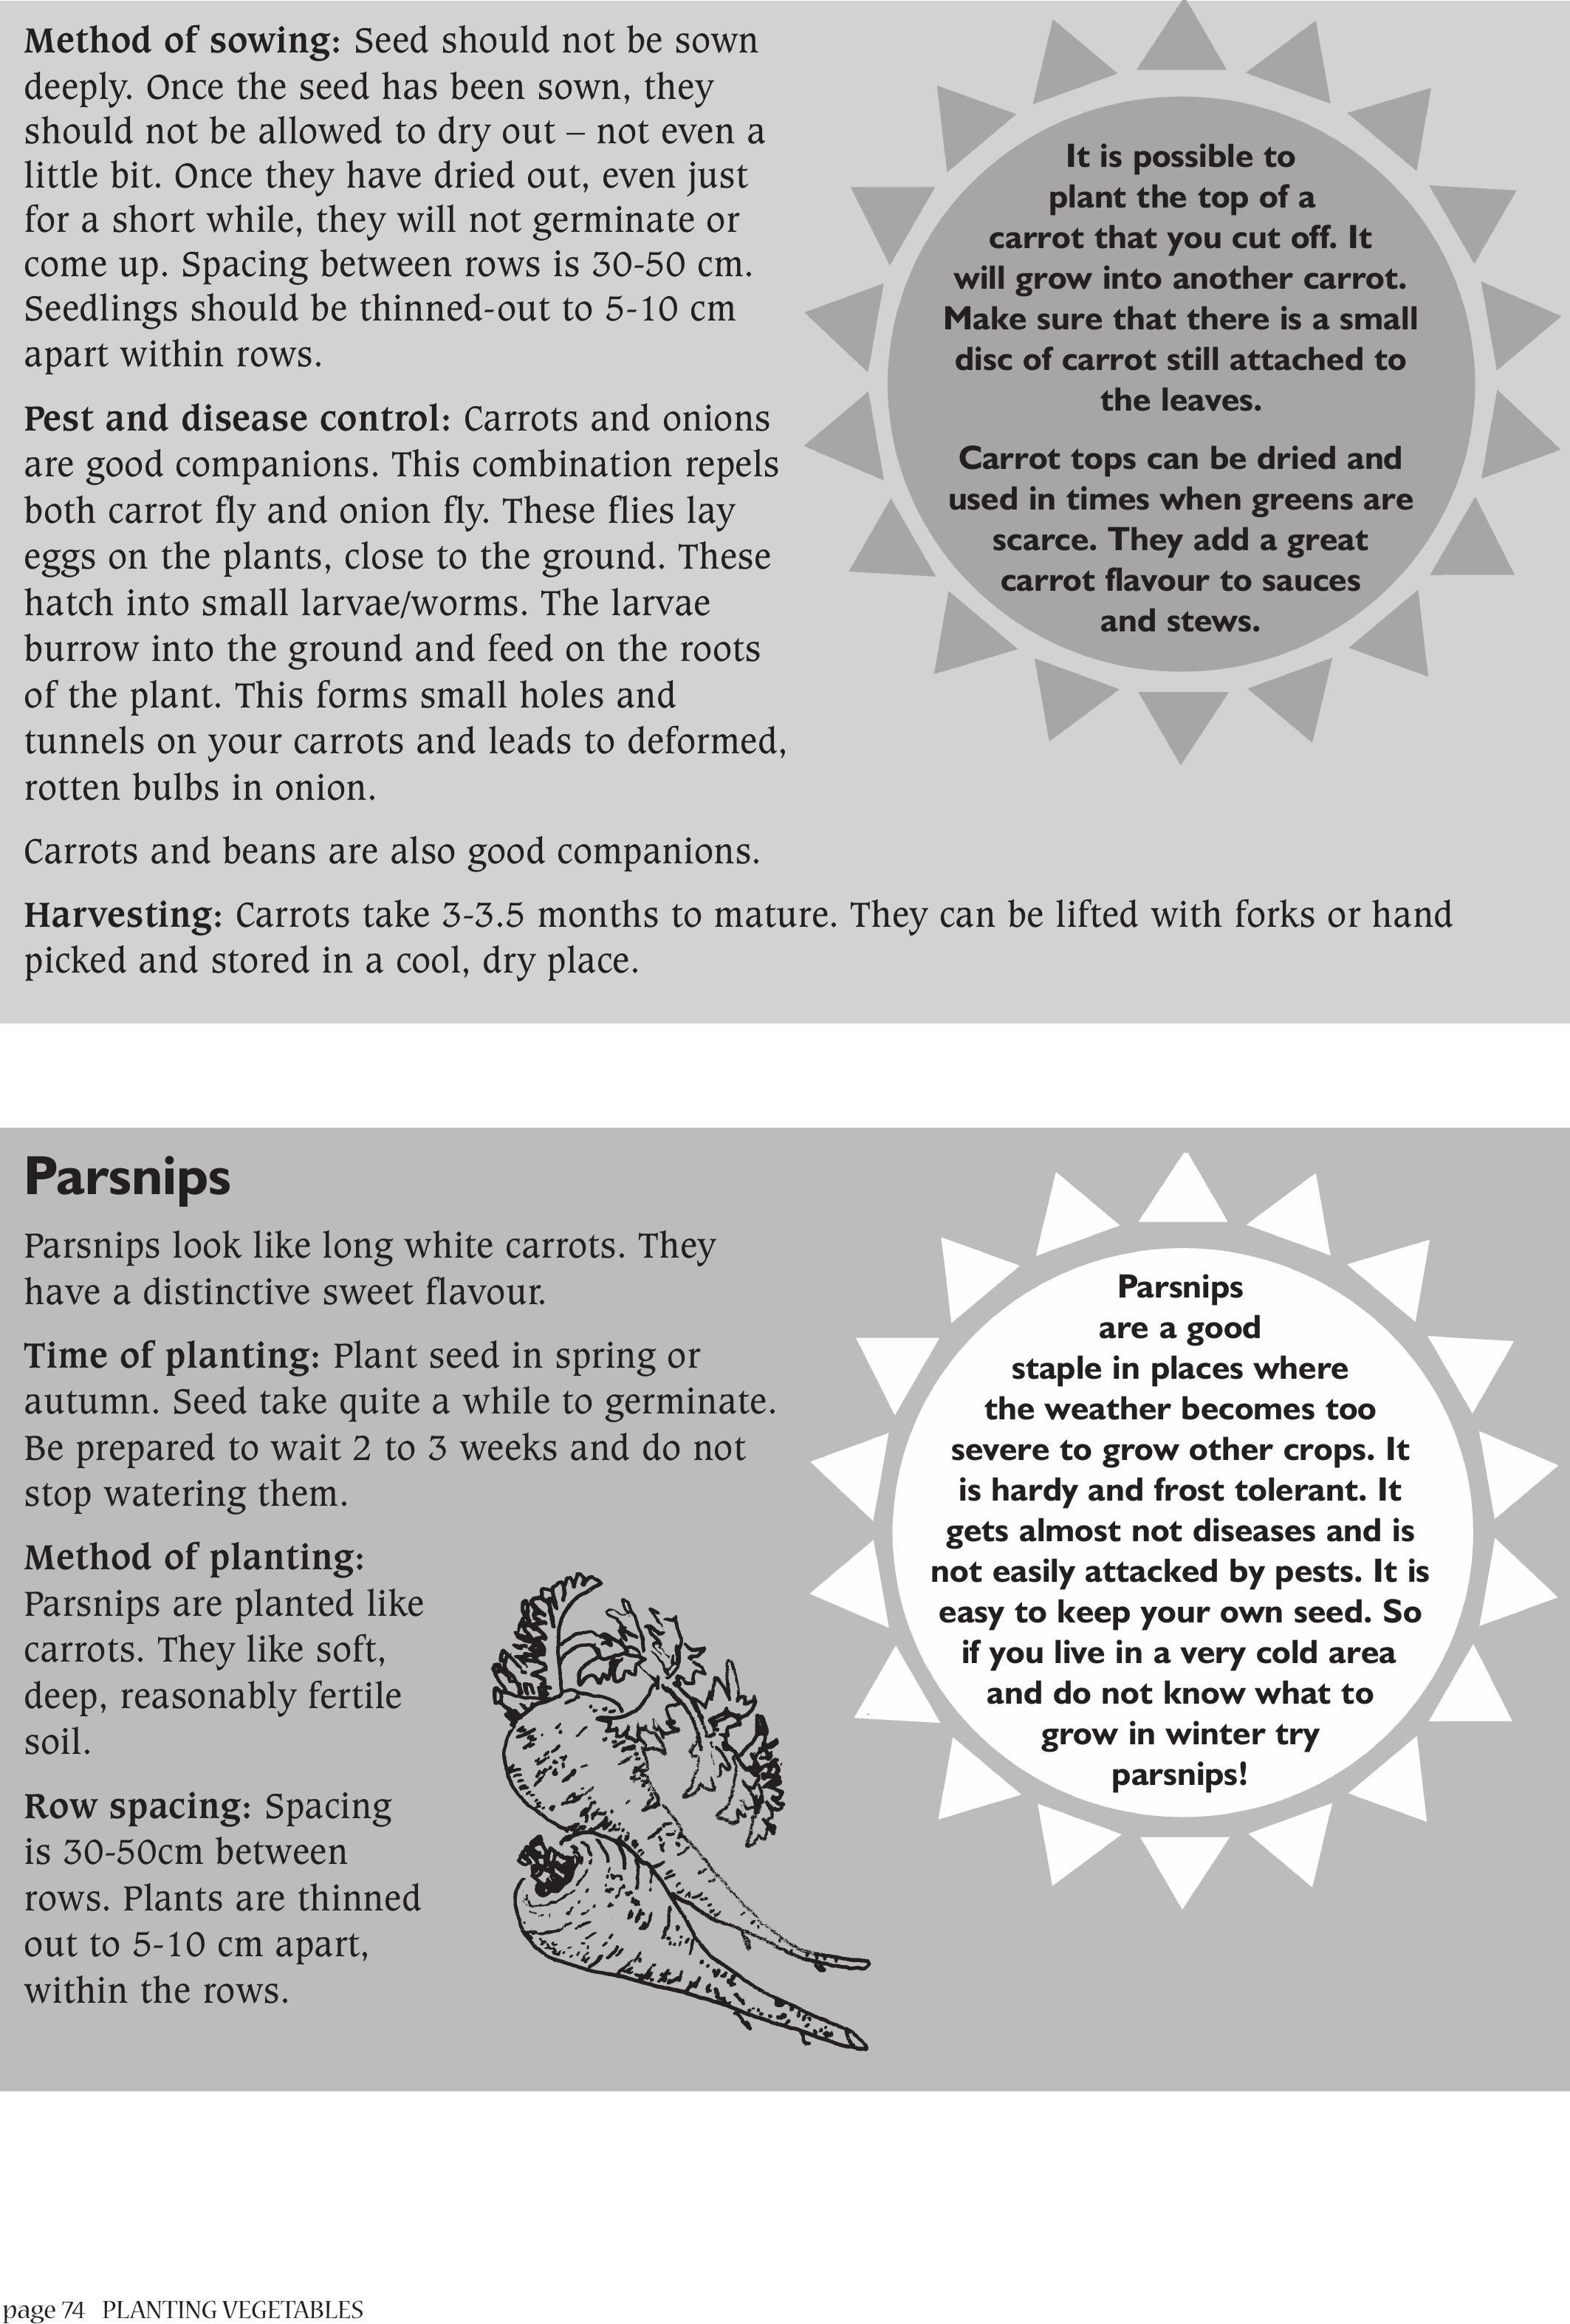
page 74PLANTING VEGETABLES
Parsnips
Parsnips look like long white carrots. They
have a distinctive sweet flavour.
Time of planting: Plant seed in spring or
autumn. Seed take quite a while to germinate.
Be prepared to wait 2 to 3 weeks and do not
stop watering them.
Method of planting:
Parsnips are planted like
carrots. They like soft,
deep, reasonably fertile
soil.
Row spacing: Spacing
is 30-50cm between
rows. Plants are thinned
out to 5-10 cm apart,
within the rows.
Parsnips
are a good
staple in places where
the weather becomes too
severe to grow other crops. It
is hardy and frost tolerant. It
gets almost not diseases and is
not easily attacked by pests. It is
easy to keep your own seed. So
if you live in a very cold area
and do not know what to
grow in winter try
parsnips!
Method of sowing: Seed should not be sown
deeply. Once the seed has been sown, they
should not be allowed to dry out – not even a
little bit. Once they have dried out, even just
for a short while, they will not germinate or
come up. Spacing between rows is 30-50 cm.
Seedlings should be thinned-out to 5-10 cm
apart within rows.
Pest and disease control: Carrots and onions
are good companions. This combination repels
both carrot fly and onion fly. These flies lay
eggs on the plants, close to the ground. These
hatch into small larvae/worms. The larvae
burrow into the ground and feed on the roots
of the plant. This forms small holes and
tunnels on your carrots and leads to deformed,
rotten bulbs in onion.
Carrots and beans are also good companions.
Harvesting: Carrots take 3-3.5 months to mature. They can be lifted with forks or hand
picked and stored in a cool, dry place.
It is possible to
plant the top of a
carrot that you cut off. It
will grow into another carrot.
Make sure that there is a small
disc of carrot still attached to
the leaves.
Carrot tops can be dried and
used in times when greens are
scarce. They add a great
carrot flavour to sauces
and stews.
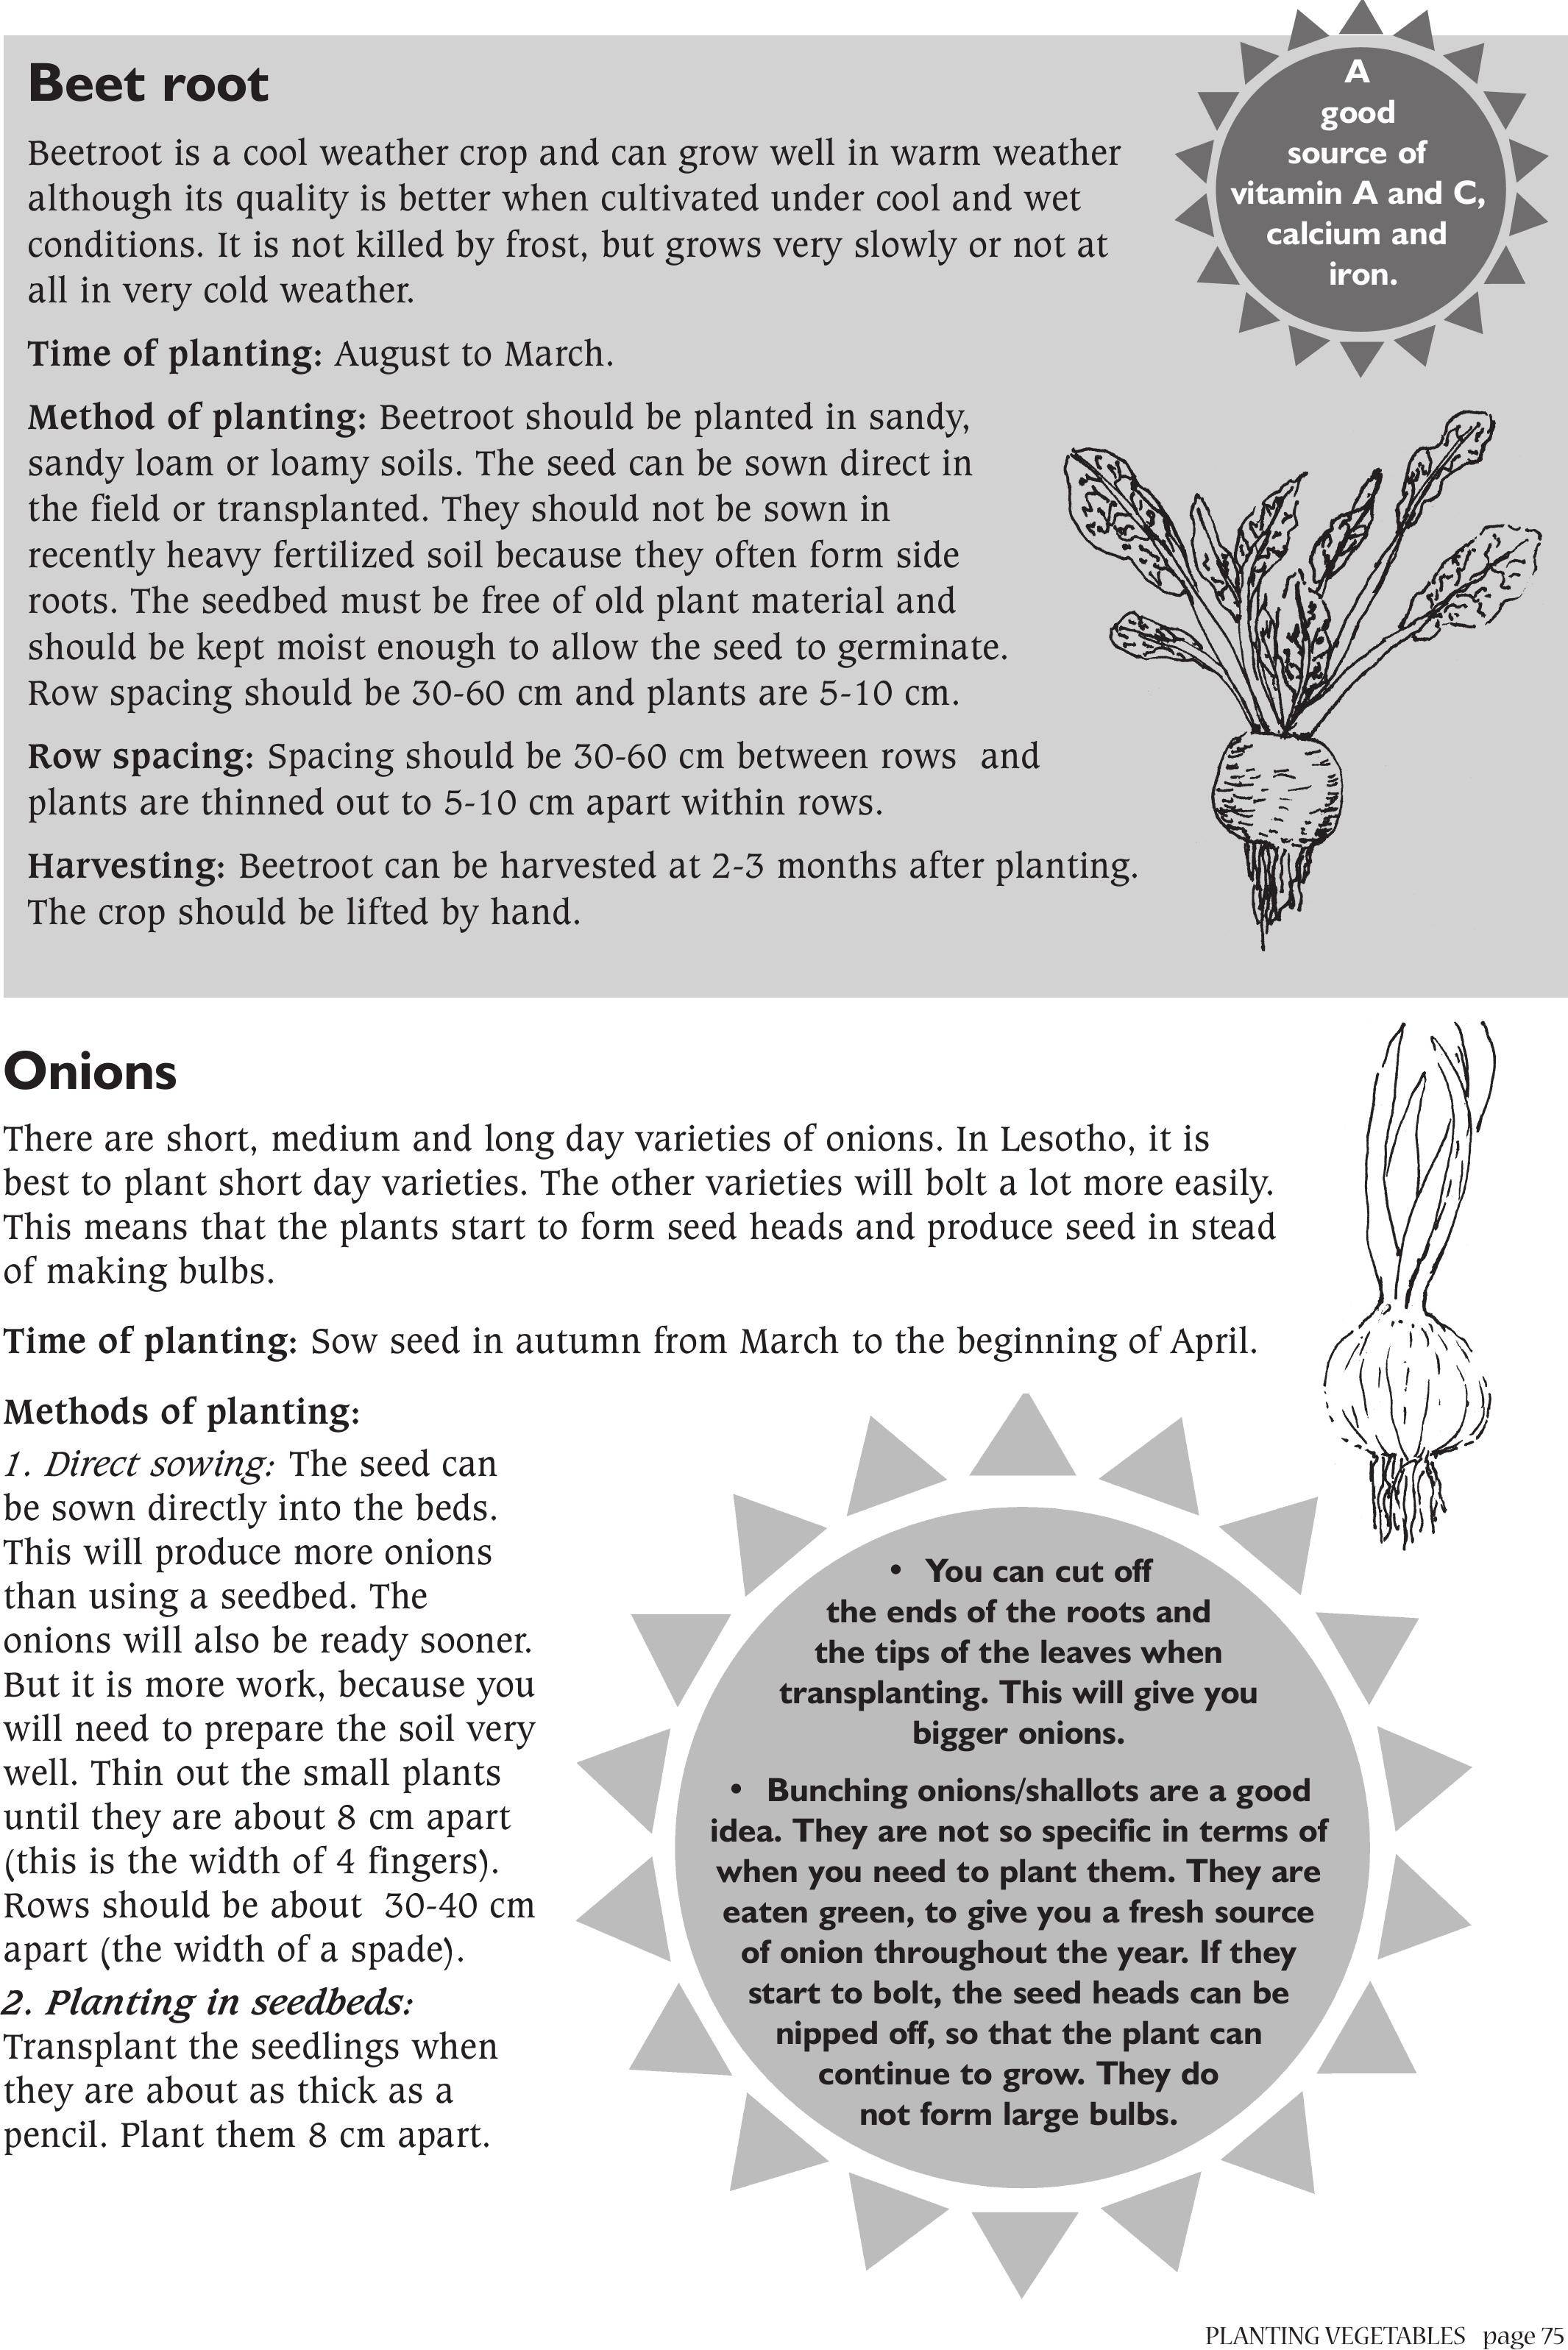
PLANTING VEGETABLES page 75
Onions
There are short, medium and long day varieties of onions. In Lesotho, it is
best to plant short day varieties. The other varieties will bolt a lot more easily.
This means that the plants start to form seed heads and produce seed in stead
of making bulbs.
Time of planting: Sow seed in autumn from March to the beginning of April.
Methods of planting:
1. Direct sowing: The seed can
be sown directly into the beds.
This will produce more onions
than using a seedbed. The
onions will also be ready sooner.
But it is more work, because you
will need to prepare the soil very
well. Thin out the small plants
until they are about 8 cm apart
(this is the width of 4 fingers).
Rows should be about 30-40 cm
apart (the width of a spade).
2. Planting in seedbeds:
Transplant the seedlings when
they are about as thick as a
pencil. Plant them 8 cm apart.
Beet root
Beetroot is a cool weather crop and can grow well in warm weather
although its quality is better when cultivated under cool and wet
conditions. It is not killed by frost, but grows very slowly or not at
all in very cold weather.
Time of planting: August to March.
Method of planting: Beetroot should be planted in sandy,
sandy loam or loamy soils. The seed can be sown direct in
the field or transplanted. They should not be sown in
recently heavy fertilized soil because they often form side
roots. The seedbed must be free of old plant material and
should be kept moist enough to allow the seed to germinate.
Row spacing should be 30-60 cm and plants are 5-10 cm.
Row spacing: Spacing should be 30-60 cm between rows and
plants are thinned out to 5-10 cm apart within rows.
Harvesting: Beetroot can be harvested at 2-3 months after planting.
The crop should be lifted by hand.
A
good
source of
vitamin A and C,
calcium and
iron.
• You can cut off
the ends of the roots and
the tips of the leaves when
transplanting. This will give you
bigger onions.
• Bunching onions/shallots are a good
idea. They are not so specific in terms of
when you need to plant them. They are
eaten green, to give you a fresh source
of onion throughout the year. If they
start to bolt, the seed heads can be
nipped off, so that the plant can
continue to grow. They do
not form large bulbs.
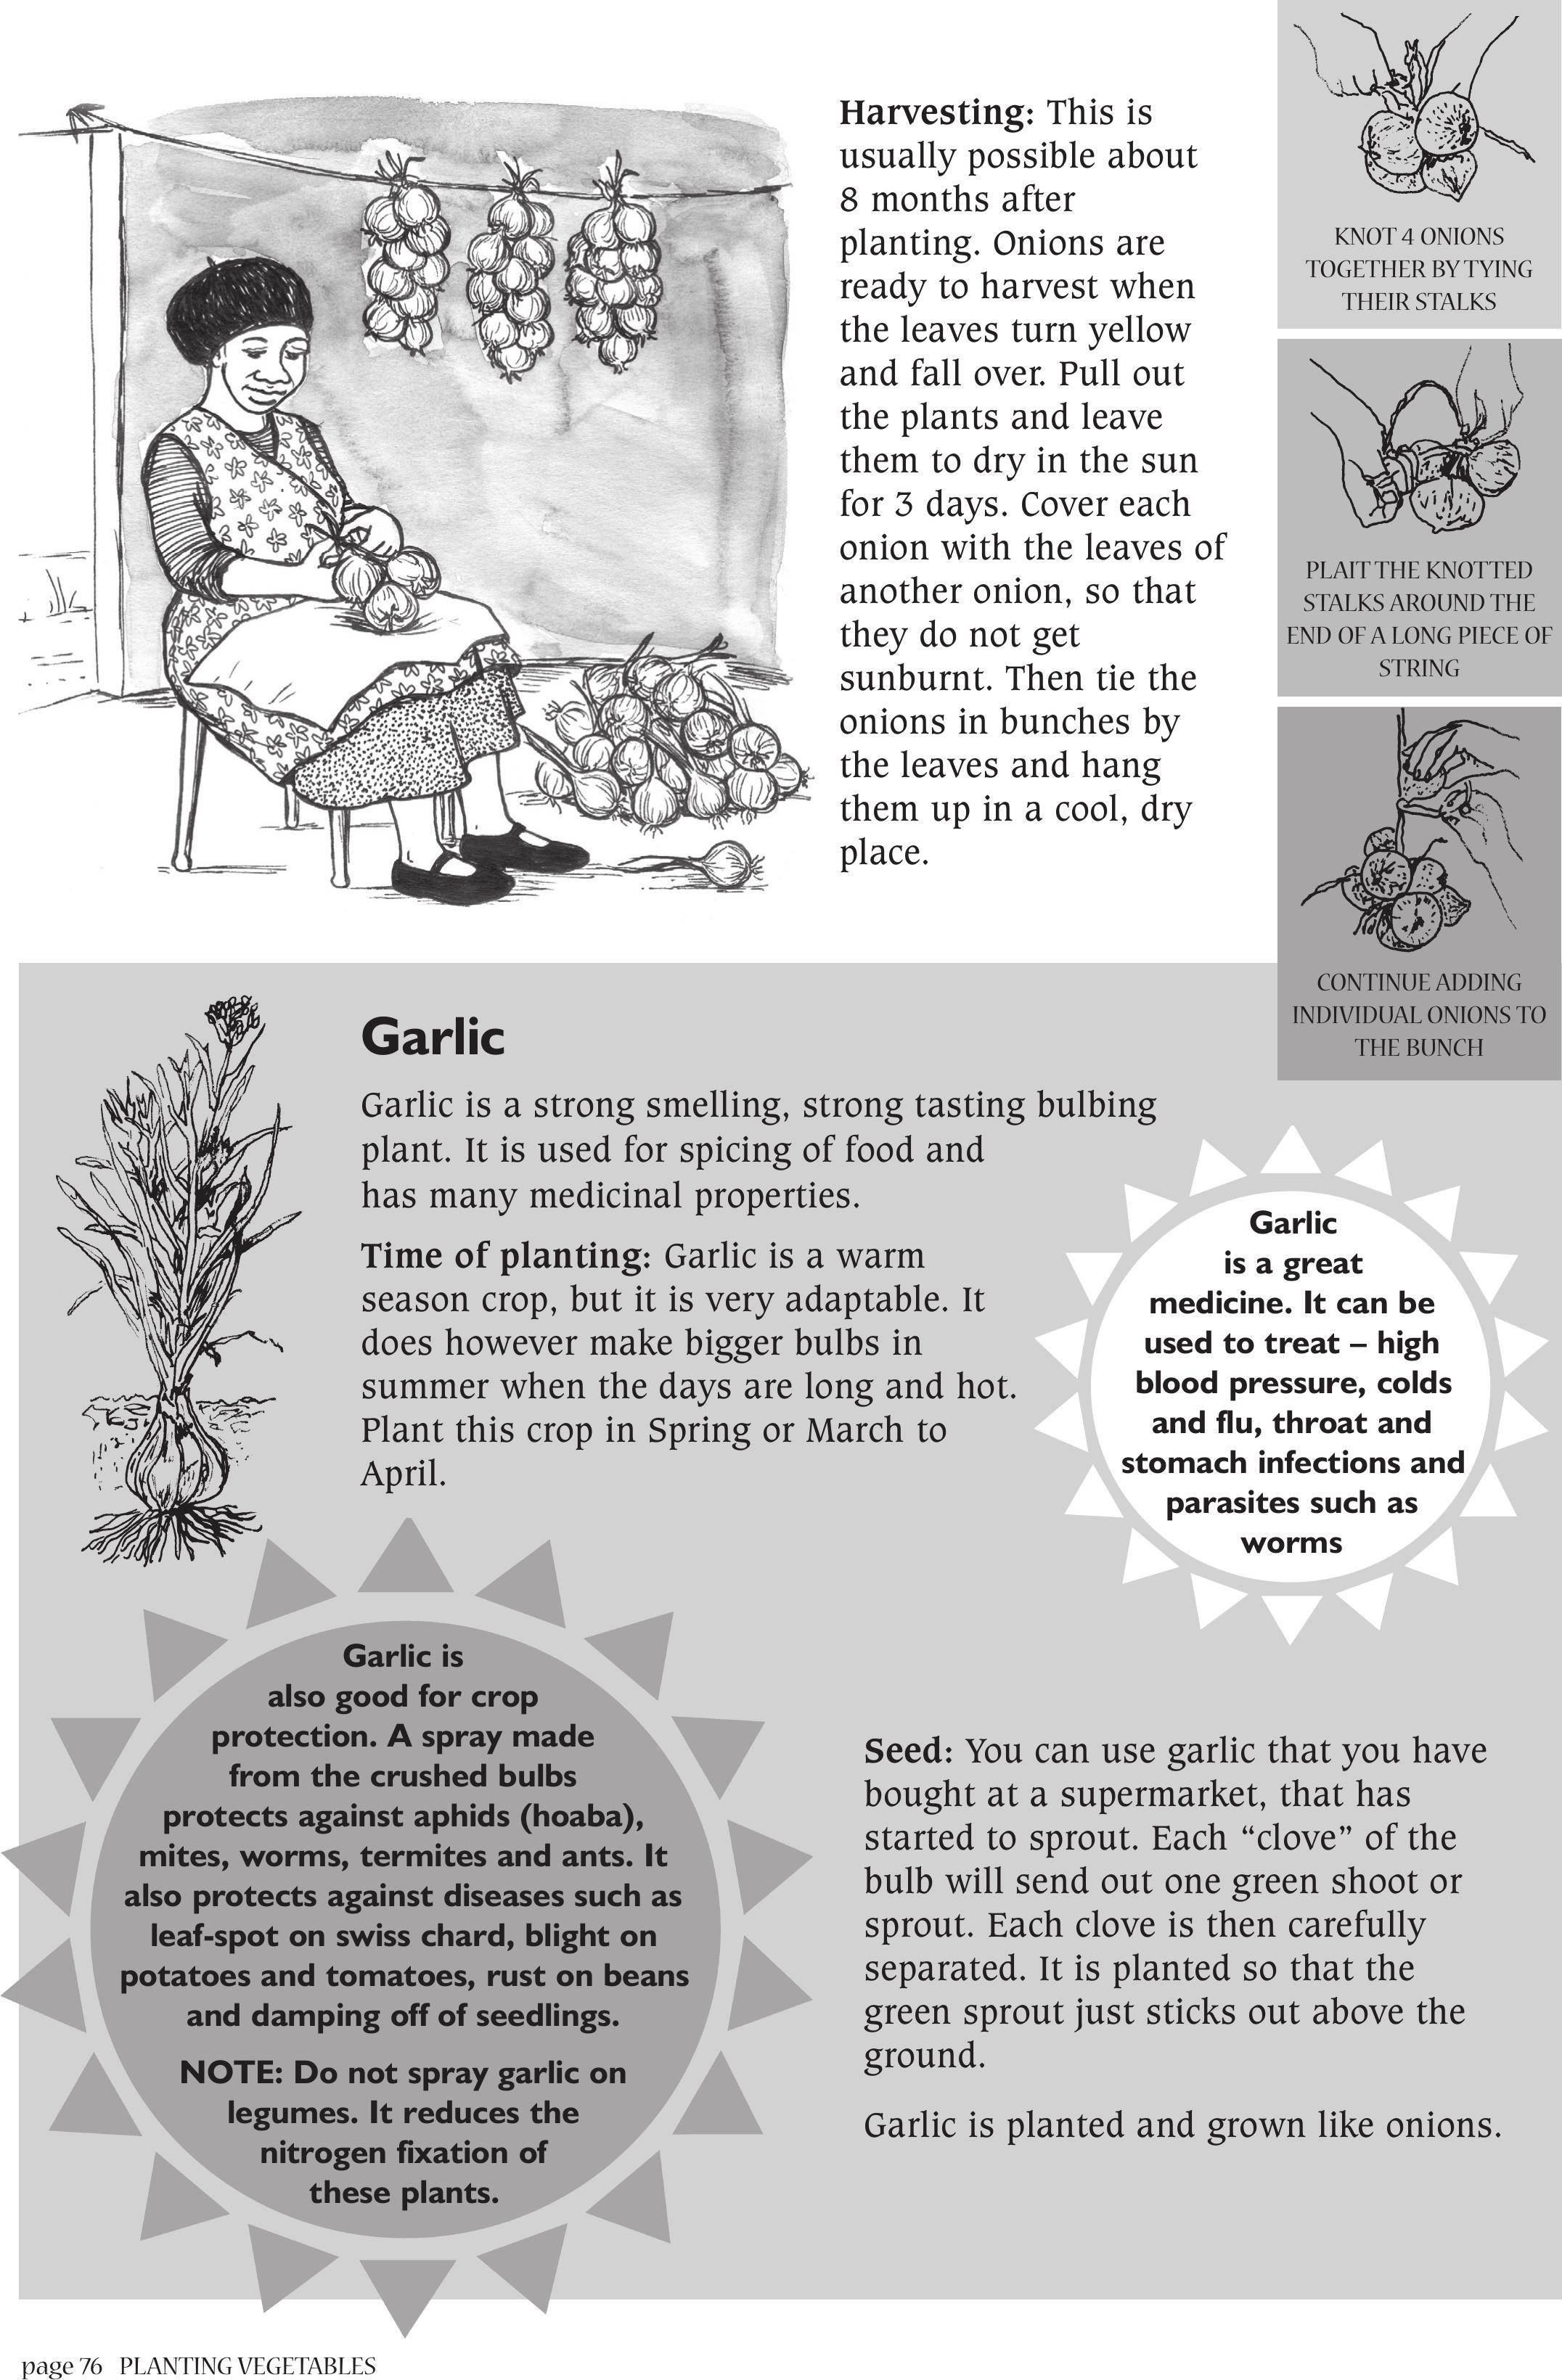
page 76PLANTING VEGETABLES
Garlic
Garlic is a strong smelling, strong tasting bulbing
plant. It is used for spicing of food and
has many medicinal properties.
Time of planting: Garlic is a warm
season crop, but it is very adaptable. It
does however make bigger bulbs in
summer when the days are long and hot.
Plant this crop in Spring or March to
April.
Seed: You can use garlic that you have
bought at a supermarket, that has
started to sprout. Each “clove” of the
bulb will send out one green shoot or
sprout. Each clove is then carefully
separated. It is planted so that the
green sprout just sticks out above the
ground.
Garlic is planted and grown like onions.
Harvesting: This is
usually possible about
8 months after
planting. Onions are
ready to harvest when
the leaves turn yellow
and fall over. Pull out
the plants and leave
them to dry in the sun
for 3 days. Cover each
onion with the leaves of
another onion, so that
they do not get
sunburnt. Then tie the
onions in bunches by
the leaves and hang
them up in a cool, dry
place.
KNOT 4 ONIONS
TOGETHER BY TYING
THEIR STALKS
PLAIT THE KNOTTED
STALKS AROUND THE
END OF A LONG PIECE OF
STRING
Garlic
is a great
medicine. It can be
used to treat – high
blood pressure, colds
and flu, throat and
stomach infections and
parasites such as
worms
Garlic is
also good for crop
protection. A spray made
from the crushed bulbs
protects against aphids (hoaba),
mites, worms, termites and ants. It
also protects against diseases such as
leaf-spot on swiss chard, blight on
potatoes and tomatoes, rust on beans
and damping off of seedlings.
NOTE: Do not spray garlic on
legumes. It reduces the
nitrogen fixation of
these plants.
CONTINUE ADDING
INDIVIDUAL ONIONS TO
THE BUNCH
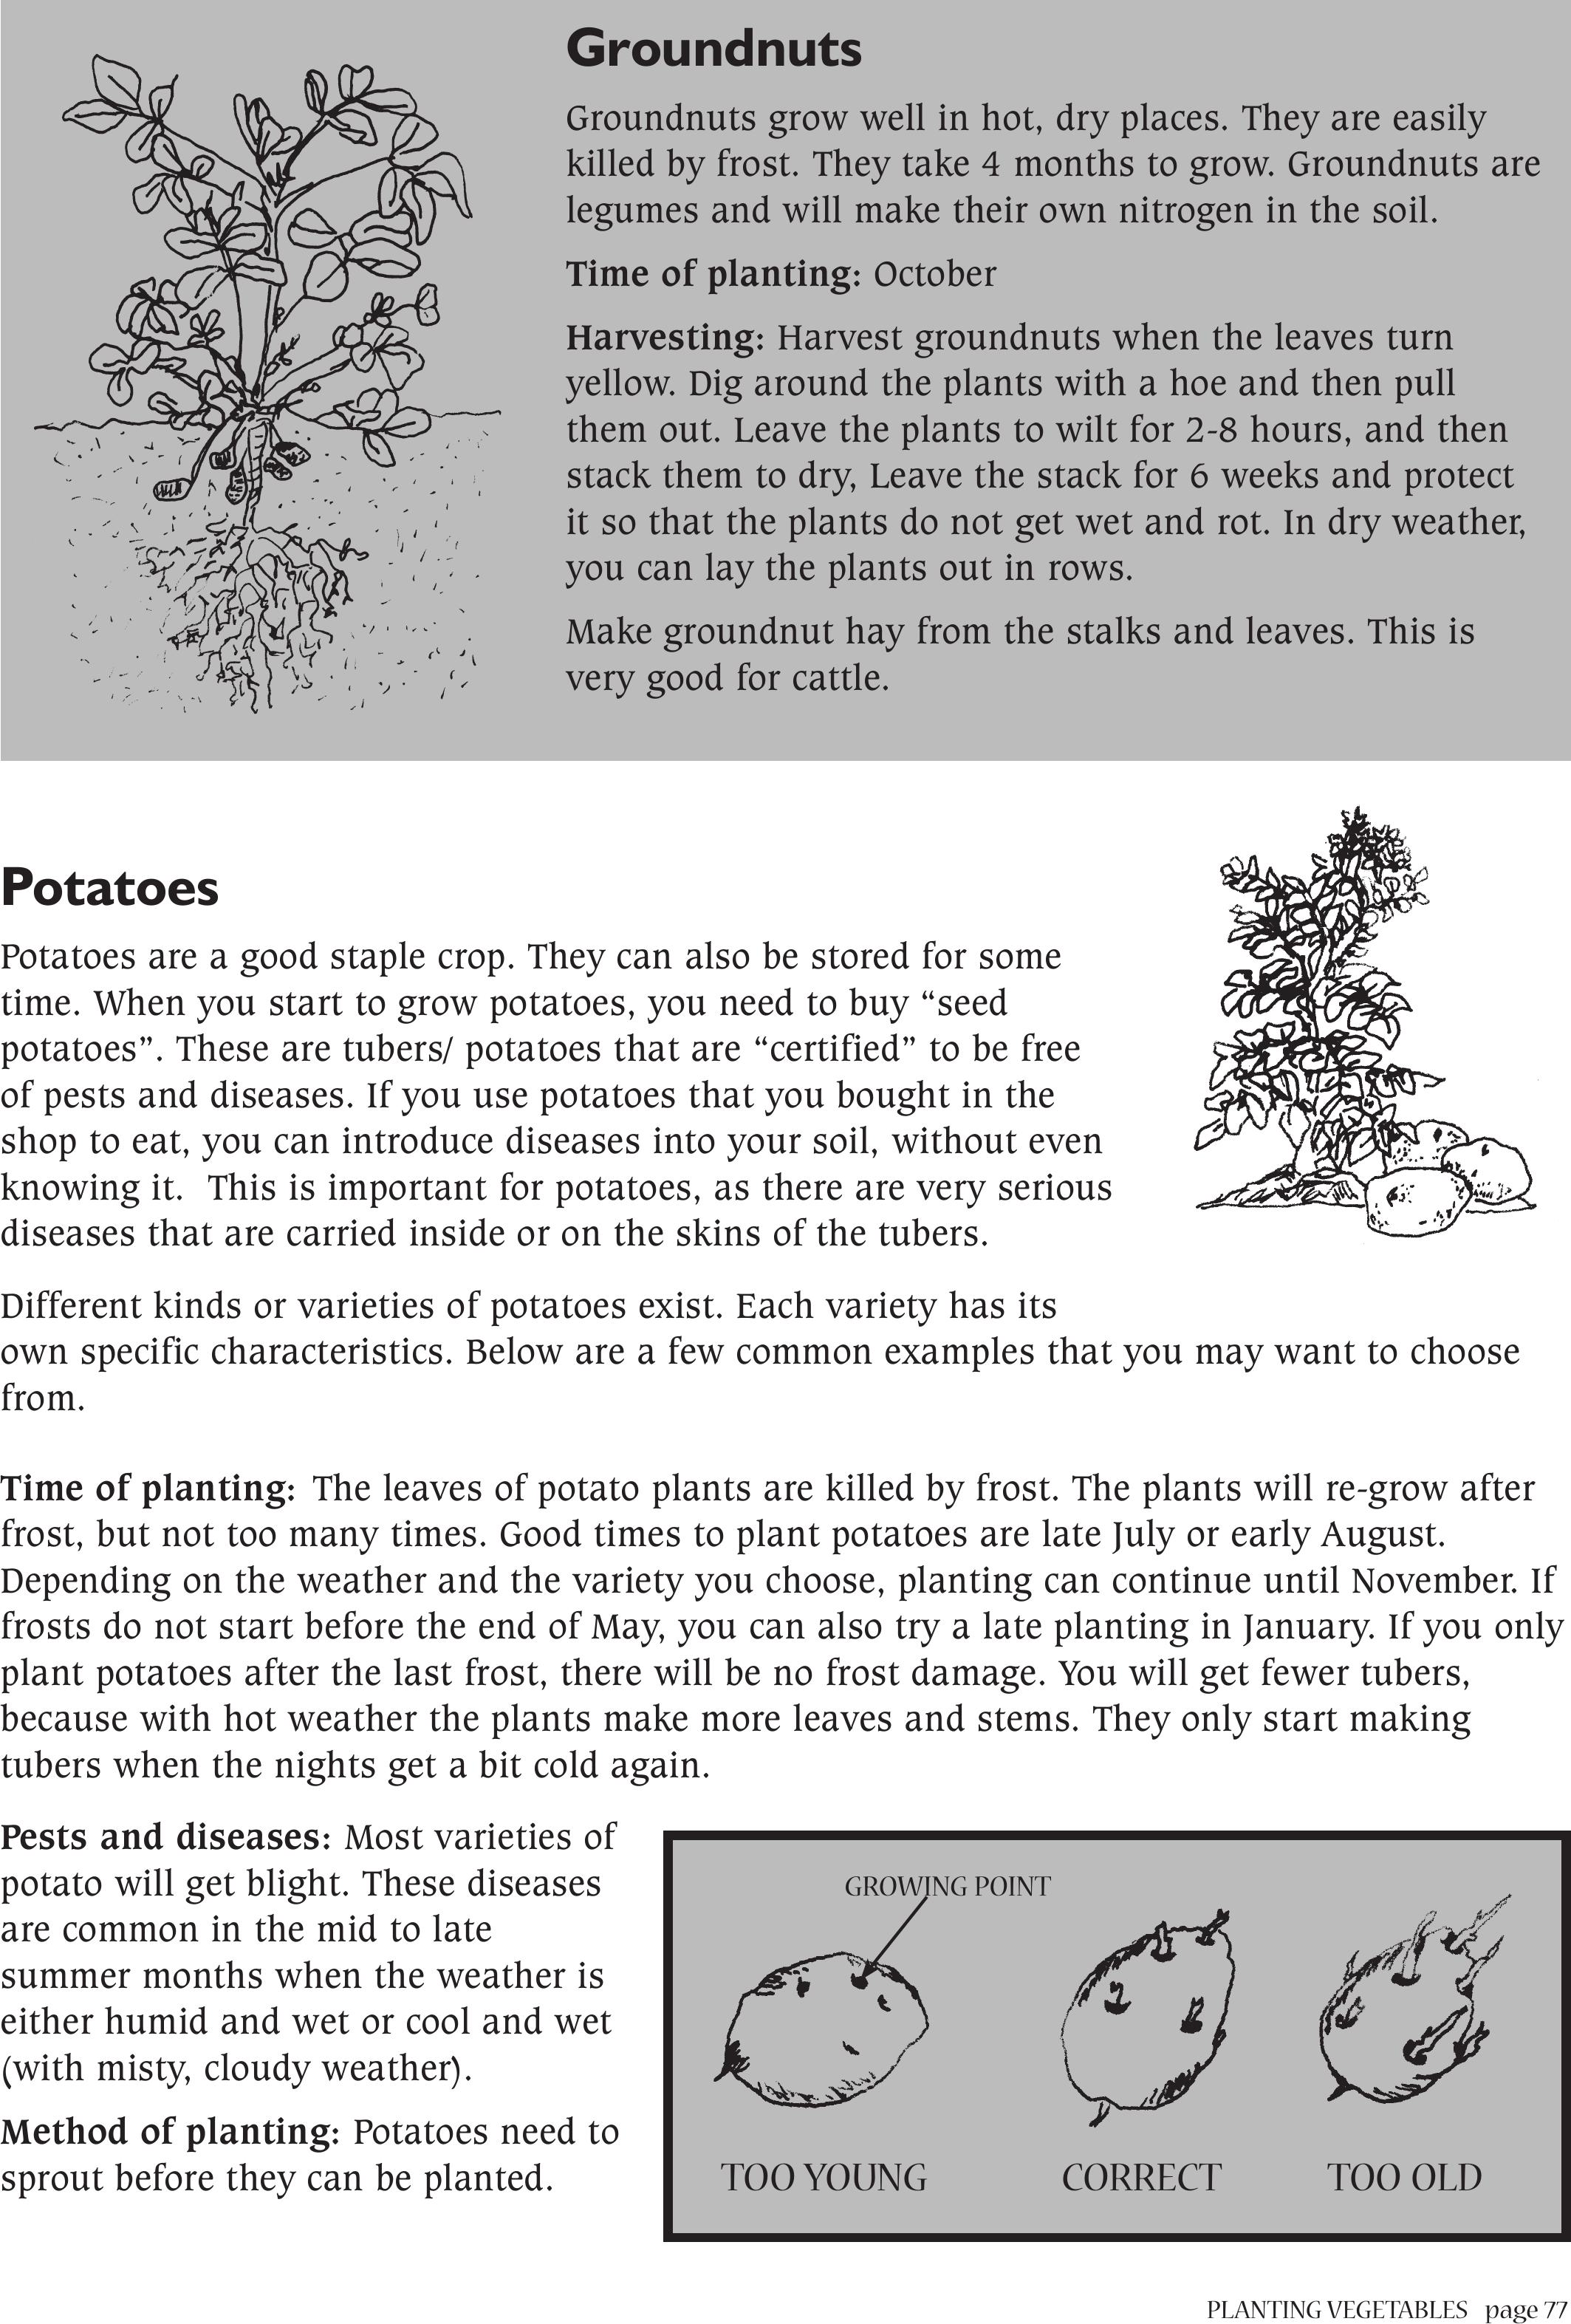
PLANTING VEGETABLES page 77
Groundnuts
Groundnuts grow well in hot, dry places. They are easily
killed by frost. They take 4 months to grow. Groundnuts are
legumes and will make their own nitrogen in the soil.
Time of planting: October
Harvesting: Harvest groundnuts when the leaves turn
yellow. Dig around the plants with a hoe and then pull
them out. Leave the plants to wilt for 2-8 hours, and then
stack them to dry, Leave the stack for 6 weeks and protect
it so that the plants do not get wet and rot. In dry weather,
you can lay the plants out in rows.
Make groundnut hay from the stalks and leaves. This is
very good for cattle.
Potatoes
Potatoes are a good staple crop. They can also be stored for some
time. When you start to grow potatoes, you need to buy “seed
potatoes”. These are tubers/ potatoes that are “certified” to be free
of pests and diseases. If you use potatoes that you bought in the
shop to eat, you can introduce diseases into your soil, without even
knowing it. This is important for potatoes, as there are very serious
diseases that are carried inside or on the skins of the tubers.
Different kinds or varieties of potatoes exist. Each variety has its
own specific characteristics. Below are a few common examples that you may want to choose
from.
Time of planting:The leaves of potato plants are killed by frost. The plants will re-grow after
frost, but not too many times. Good times to plant potatoes are late July or early August.
Depending on the weather and the variety you choose, planting can continue until November. If
frosts do not start before the end of May, you can also try a late planting in January. If you only
plant potatoes after the last frost, there will be no frost damage. You will get fewer tubers,
because with hot weather the plants make more leaves and stems. They only start making
tubers when the nights get a bit cold again.
Pests and diseases: Most varieties of
potato will get blight. These diseases
are common in the mid to late
summer months when the weather is
either humid and wet or cool and wet
(with misty, cloudy weather).
Method of planting: Potatoes need to
sprout before they can be planted. TOO YOUNGCORRECTTOO OLD
GROWING POINT
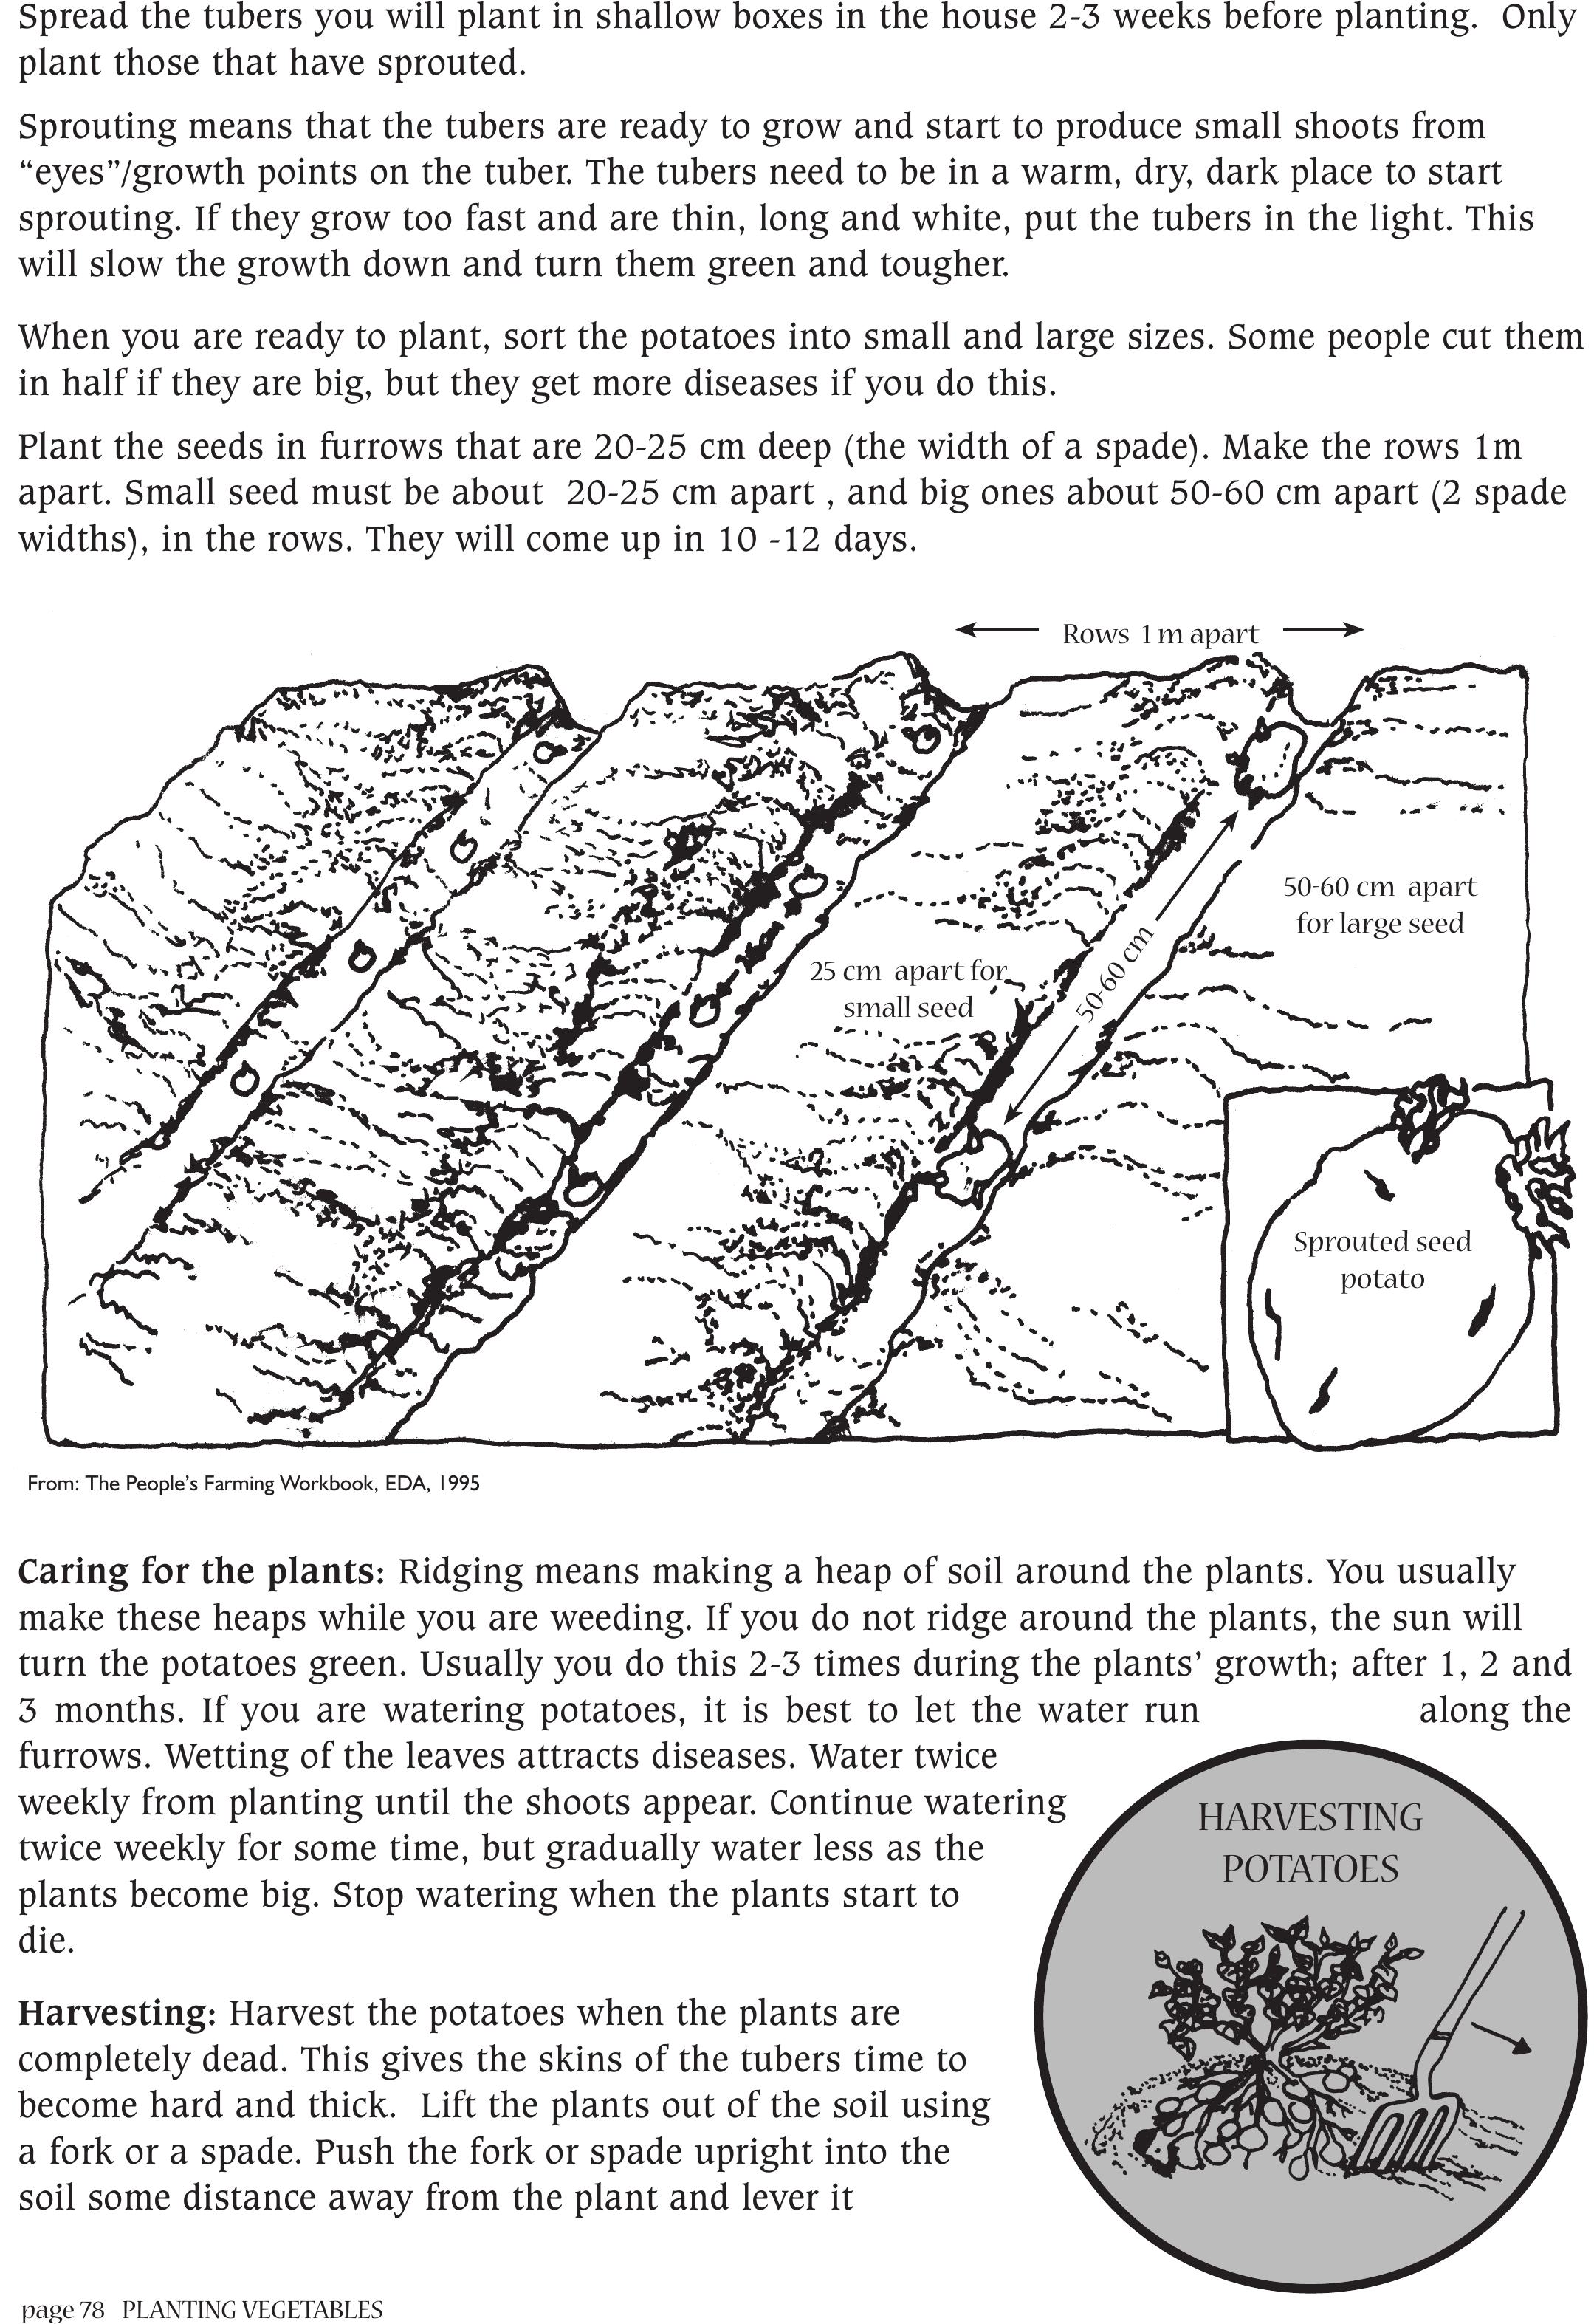
page 78PLANTING VEGETABLES
Spread the tubers you will plant in shallow boxes in the house 2-3 weeks before planting. Only
plant those that have sprouted.
Sprouting means that the tubers are ready to grow and start to produce small shoots from
“eyes”/growth points on the tuber. The tubers need to be in a warm, dry, dark place to start
sprouting. If they grow too fast and are thin, long and white, put the tubers in the light. This
will slow the growth down and turn them green and tougher.
When you are ready to plant, sort the potatoes into small and large sizes. Some people cut them
in half if they are big, but they get more diseases if you do this.
Plant the seeds in furrows that are 20-25 cm deep (the width of a spade). Make the rows 1m
apart. Small seed must be about 20-25 cm apart , and big ones about 50-60 cm apart (2 spade
widths), in the rows. They will come up in 10 -12 days.
Caring for the plants: Ridging means making a heap of soil around the plants. You usually
make these heaps while you are weeding. If you do not ridge around the plants, the sun will
turn the potatoes green. Usually you do this 2-3 times during the plants’ growth; after 1, 2 and
3 months. If you are watering potatoes, it is best to let the water run along the
furrows. Wetting of the leaves attracts diseases. Water twice
weekly from planting until the shoots appear. Continue watering
twice weekly for some time, but gradually water less as the
plants become big. Stop watering when the plants start to
die.
Harvesting: Harvest the potatoes when the plants are
completely dead. This gives the skins of the tubers time to
become hard and thick. Lift the plants out of the soil using
a fork or a spade. Push the fork or spade upright into the
soil some distance away from the plant and lever it
From: The People’s Farming Workbook, EDA, 1995
Rows 1 m apart
25 cm apart for
small seed
50-60 cm
50-60 cm apart
for large seed
Sprouted seed
potato
HARVESTING
POTATOES
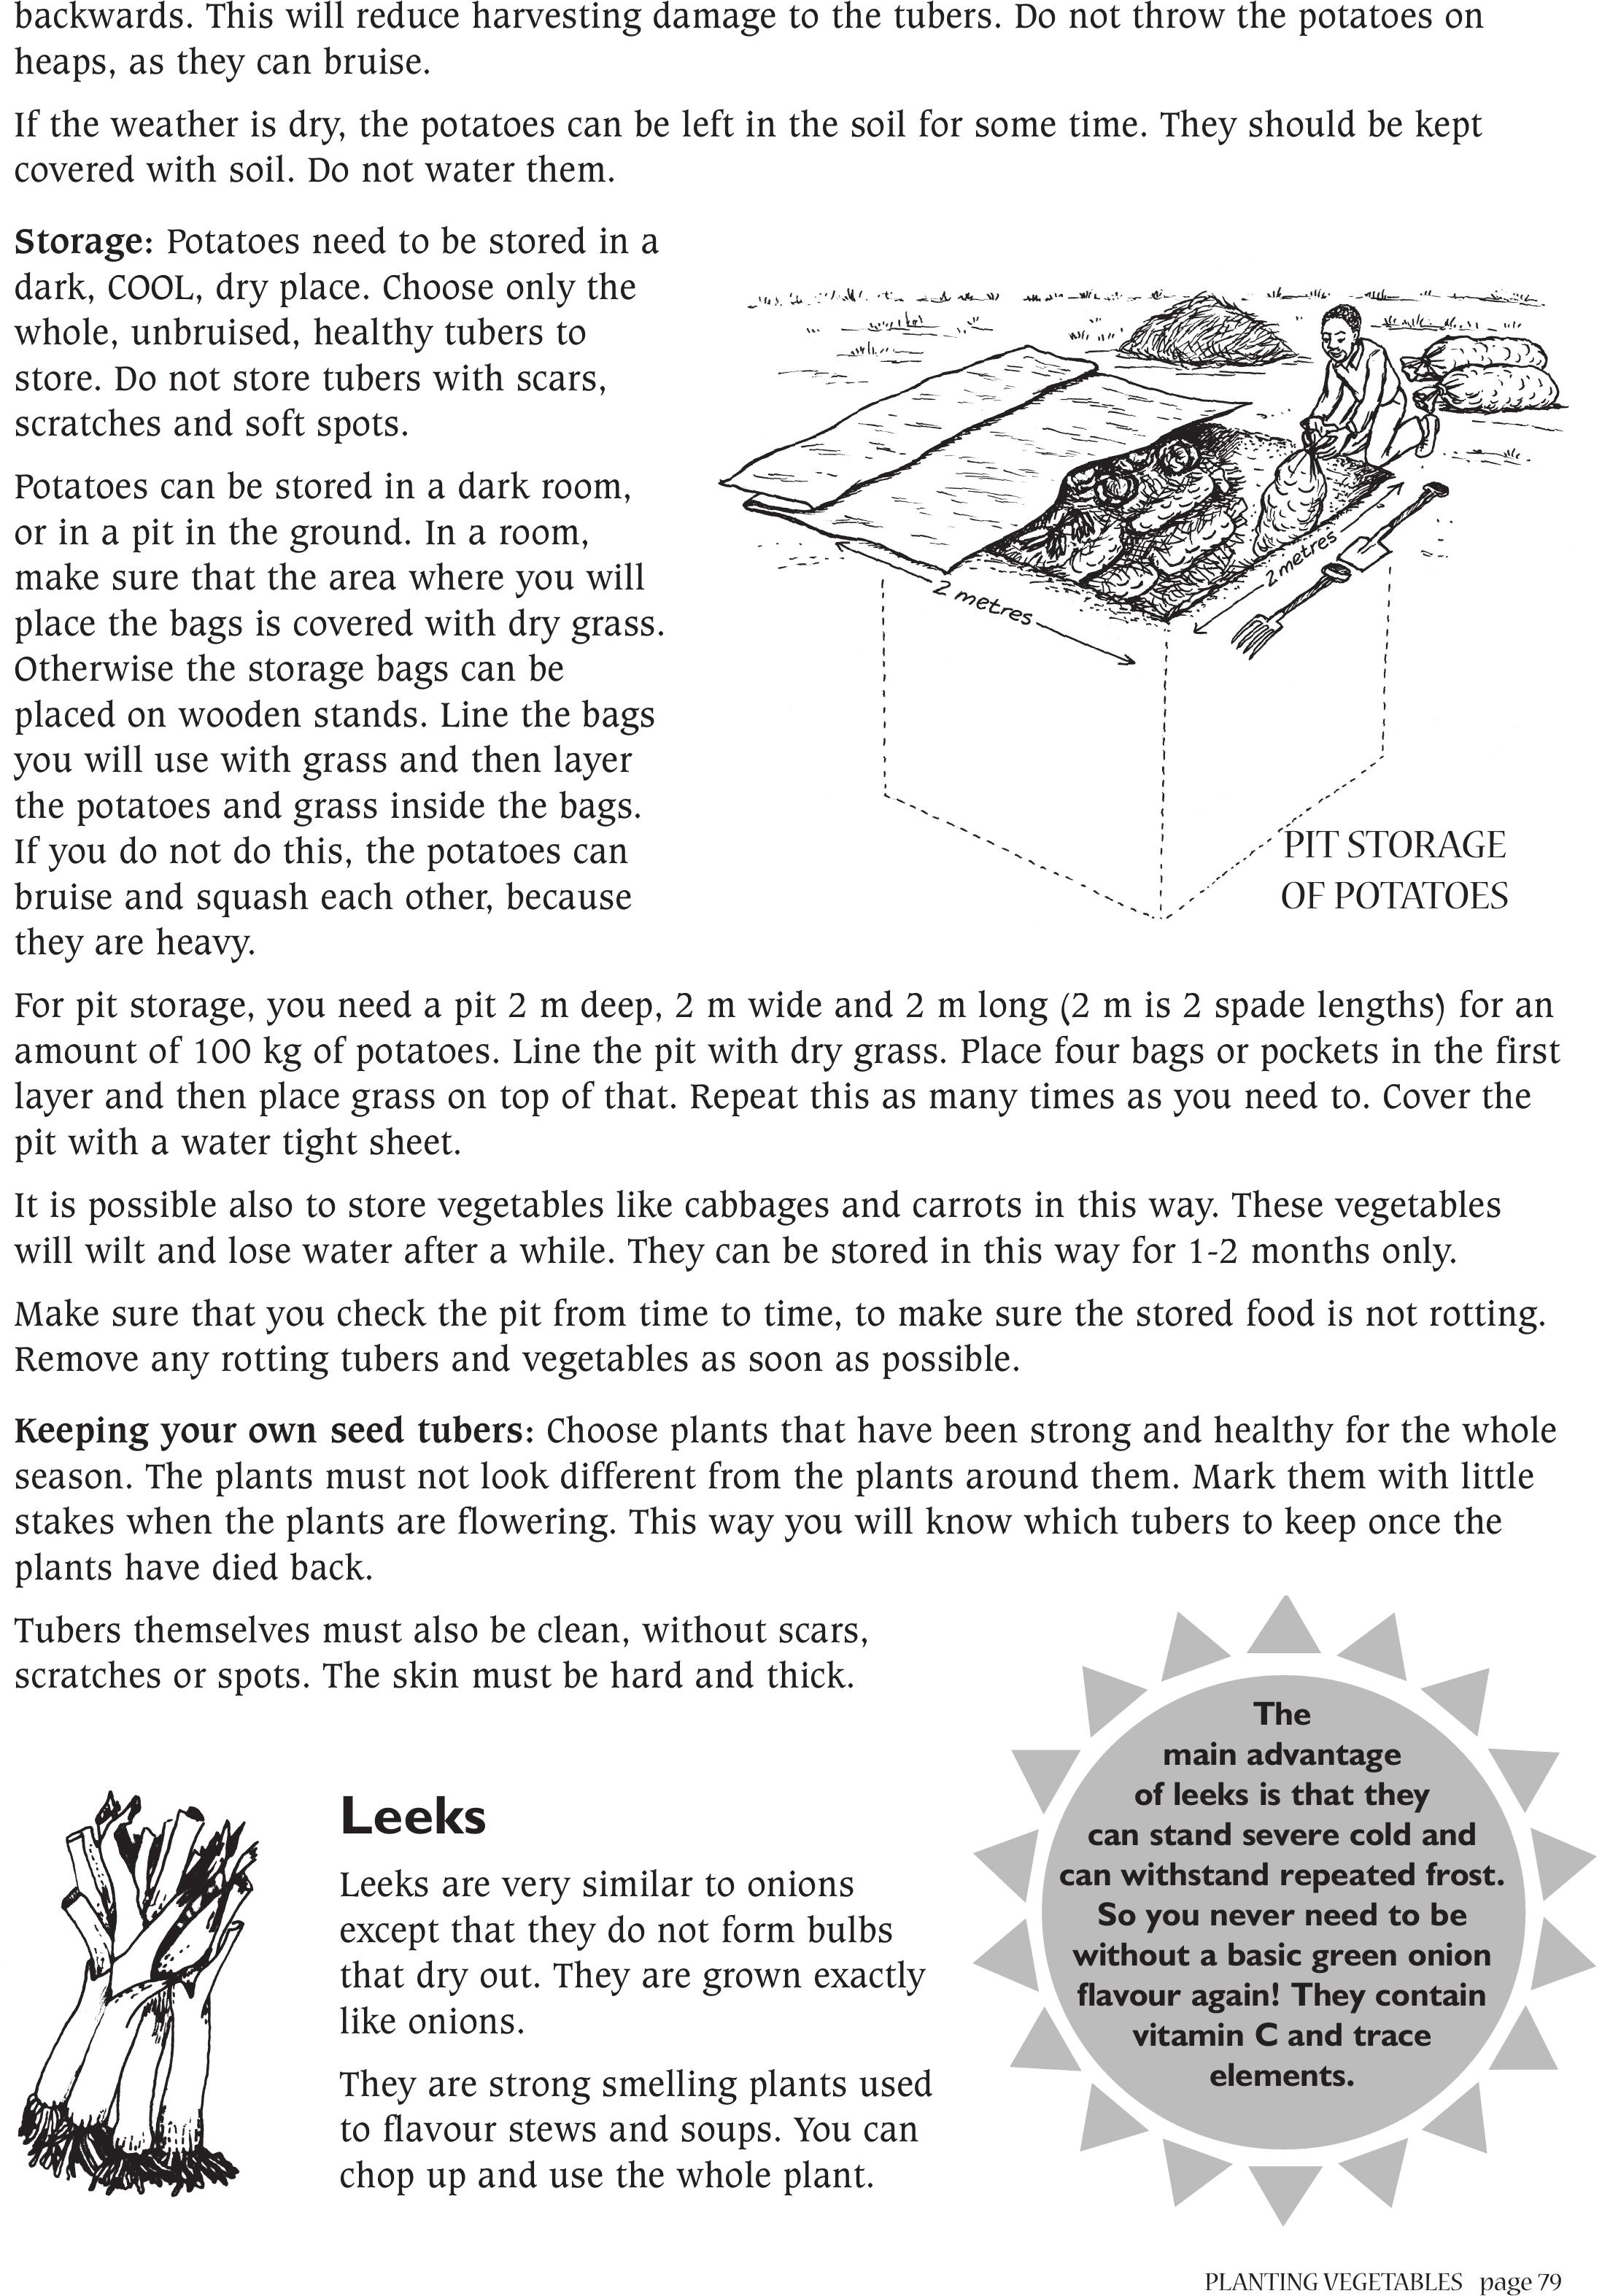
PLANTING VEGETABLES page 79
backwards. This will reduce harvesting damage to the tubers. Do not throw the potatoes on
heaps, as they can bruise.
If the weather is dry, the potatoes can be left in the soil for some time. They should be kept
covered with soil. Do not water them.
Storage: Potatoes need to be stored in a
dark, COOL, dry place. Choose only the
whole, unbruised, healthy tubers to
store. Do not store tubers with scars,
scratches and soft spots.
Potatoes can be stored in a dark room,
or in a pit in the ground. In a room,
make sure that the area where you will
place the bags is covered with dry grass.
Otherwise the storage bags can be
placed on wooden stands. Line the bags
you will use with grass and then layer
the potatoes and grass inside the bags.
If you do not do this, the potatoes can
bruise and squash each other, because
they are heavy.
For pit storage, you need a pit 2 m deep, 2 m wide and 2 m long (2 m is 2 spade lengths) for an
amount of 100 kg of potatoes. Line the pit with dry grass. Place four bags or pockets in the first
layer and then place grass on top of that. Repeat this as many times as you need to. Cover the
pit with a water tight sheet.
It is possible also to store vegetables like cabbages and carrots in this way. These vegetables
will wilt and lose water after a while. They can be stored in this way for 1-2 months only.
Make sure that you check the pit from time to time, to make sure the stored food is not rotting.
Remove any rotting tubers and vegetables as soon as possible.
Keeping your own seed tubers: Choose plants that have been strong and healthy for the whole
season. The plants must not look different from the plants around them. Mark them with little
stakes when the plants are flowering. This way you will know which tubers to keep once the
plants have died back.
Tubers themselves must also be clean, without scars,
scratches or spots. The skin must be hard and thick.
Leeks
Leeks are very similar to onions
except that they do not form bulbs
that dry out. They are grown exactly
like onions.
They are strong smelling plants used
to flavour stews and soups. You can
chop up and use the whole plant.
PIT STORAGE
OF POTATOES
The
main advantage
of leeks is that they
can stand severe cold and
can withstand repeated frost.
So you never need to be
without a basic green onion
flavour again! They contain
vitamin C and trace
elements.
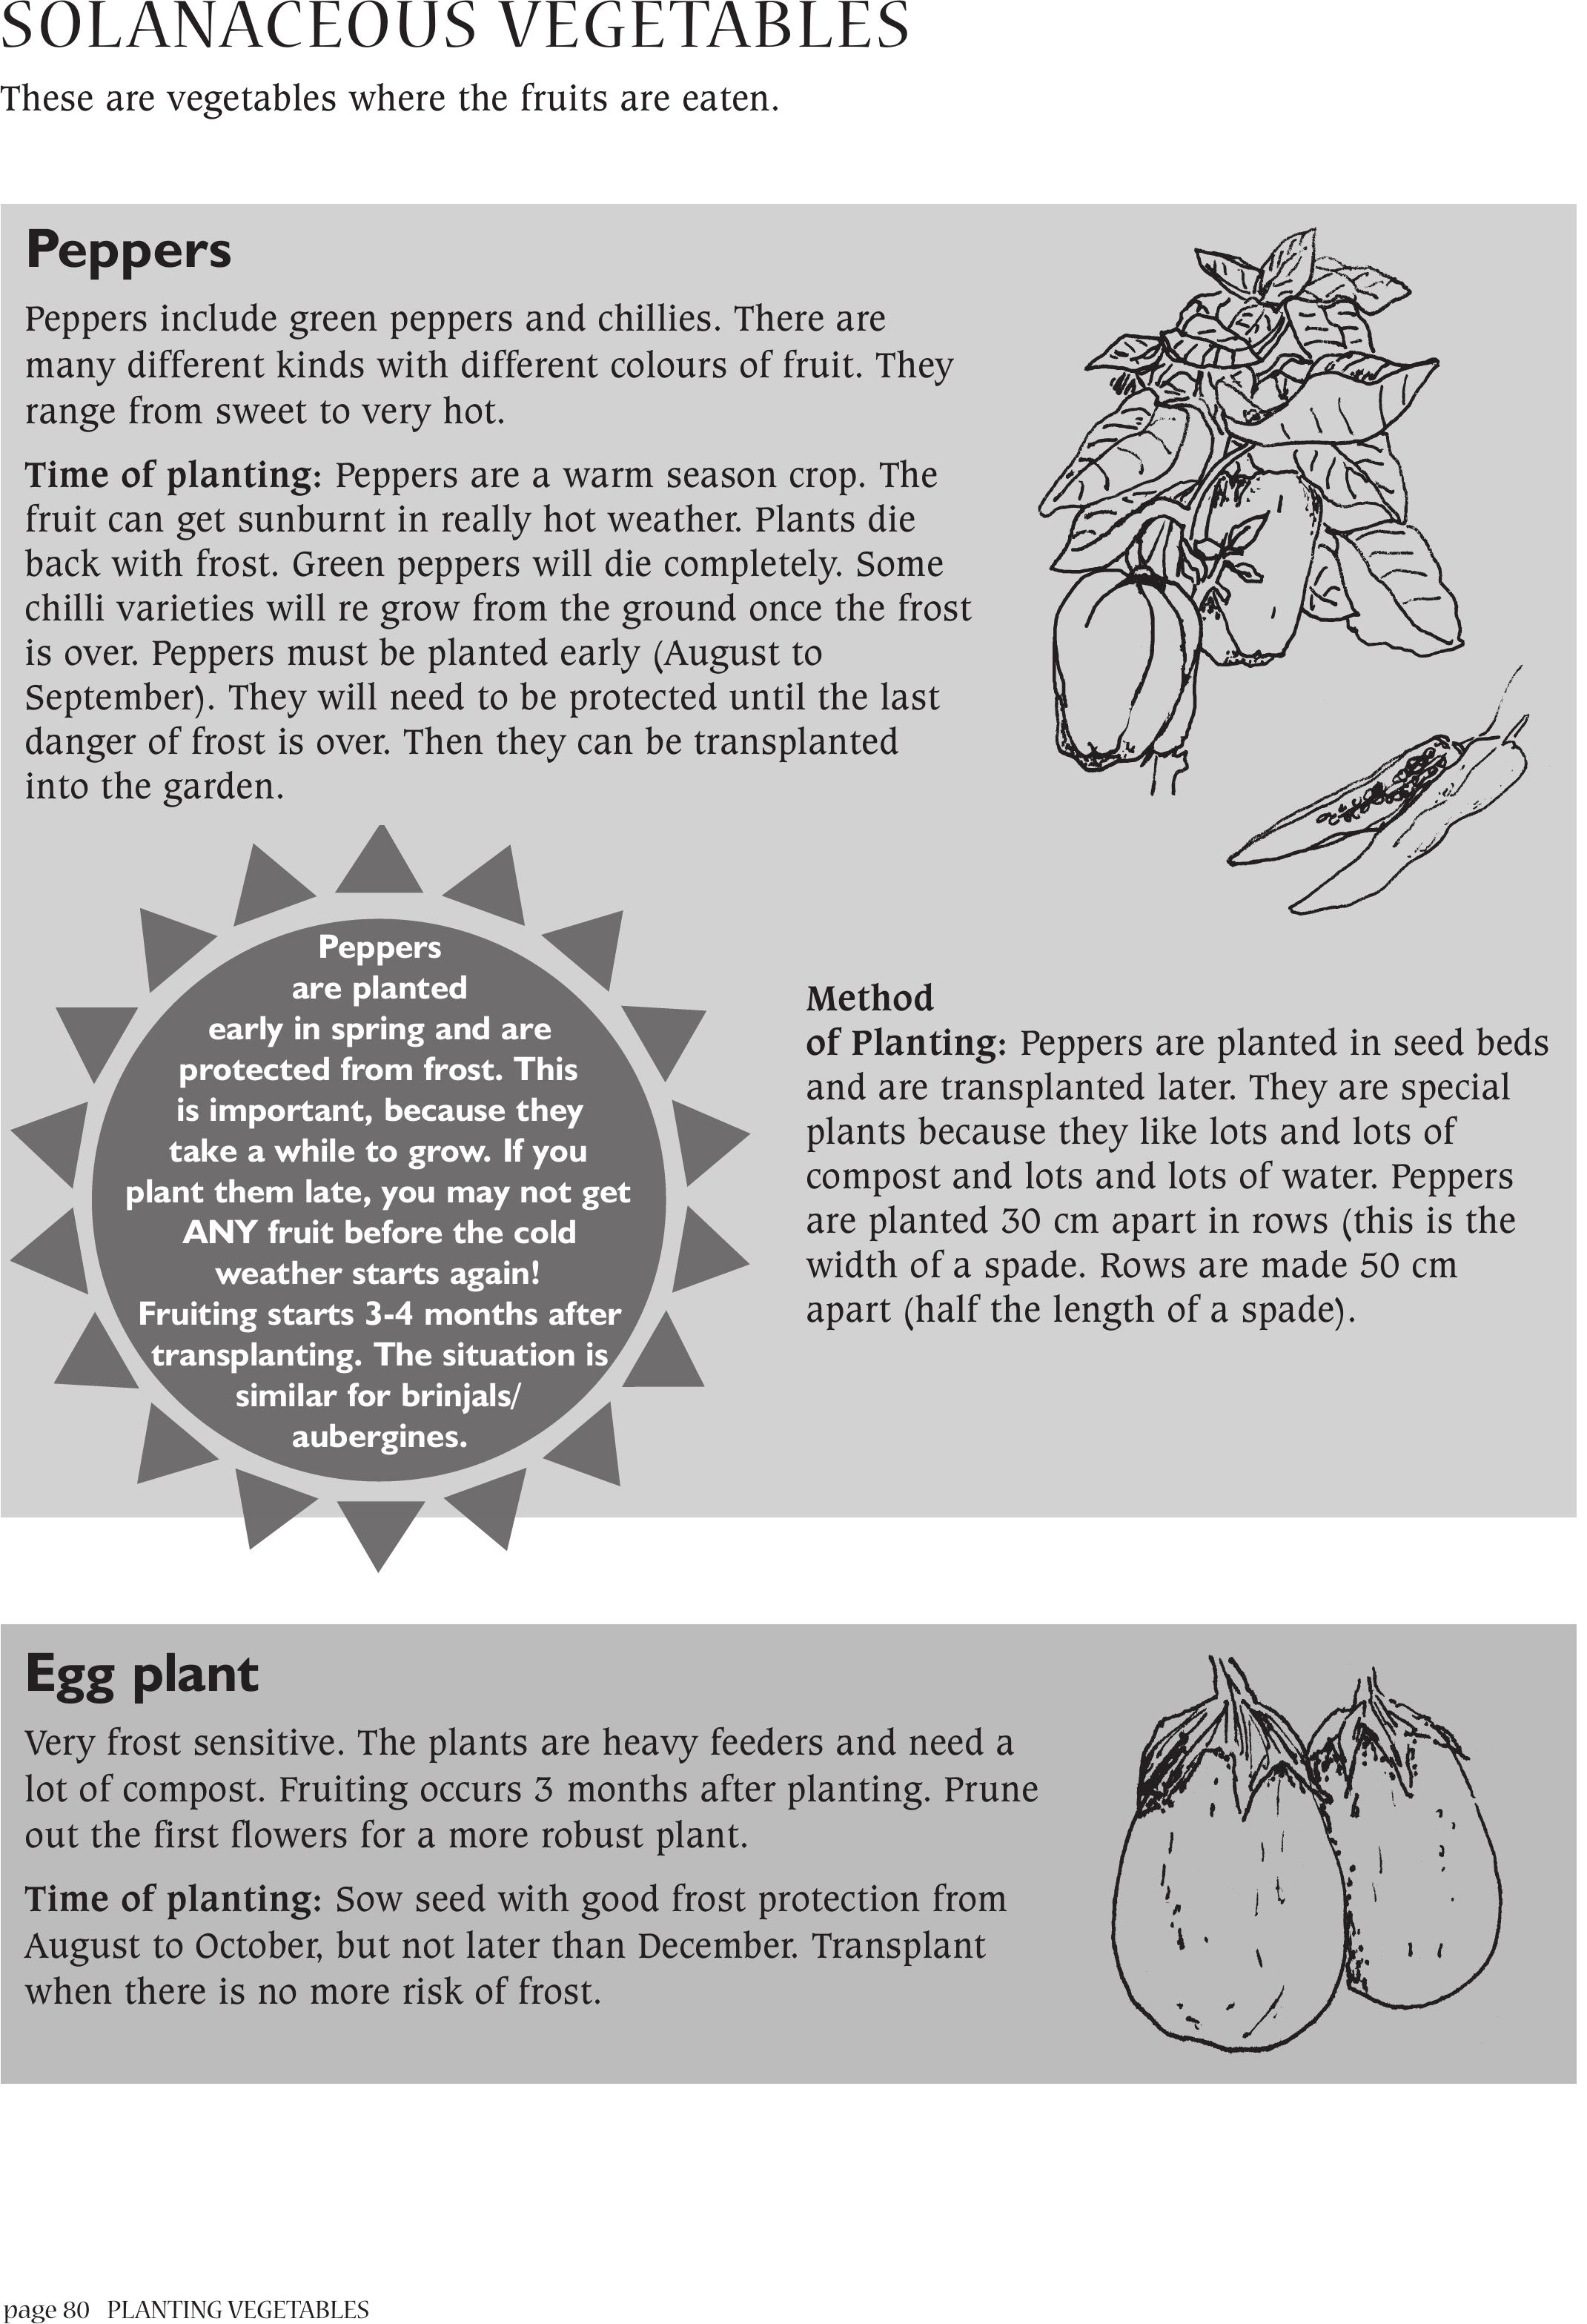
page 80PLANTING VEGETABLES
SOLANACEOUS VEGETABLES
These are vegetables where the fruits are eaten.
Peppers
Peppers include green peppers and chillies. There are
many different kinds with different colours of fruit. They
range from sweet to very hot.
Time of planting: Peppers are a warm season crop. The
fruit can get sunburnt in really hot weather. Plants die
back with frost. Green peppers will die completely. Some
chilli varieties will re grow from the ground once the frost
is over. Peppers must be planted early (August to
September). They will need to be protected until the last
danger of frost is over. Then they can be transplanted
into the garden.
Method
of Planting: Peppers are planted in seed beds
and are transplanted later. They are special
plants because they like lots and lots of
compost and lots and lots of water. Peppers
are planted 30 cm apart in rows (this is the
width of a spade. Rows are made 50 cm
apart (half the length of a spade).
Peppers
are planted
early in spring and are
protected from frost. This
is important, because they
take a while to grow. If you
plant them late, you may not get
ANY fruit before the cold
weather starts again!
Fruiting starts 3-4 months after
transplanting. The situation is
similar for brinjals/
aubergines.
Egg plant
Very frost sensitive. The plants are heavy feeders and need a
lot of compost. Fruiting occurs 3 months after planting. Prune
out the first flowers for a more robust plant.
Time of planting: Sow seed with good frost protection from
August to October, but not later than December. Transplant
when there is no more risk of frost.
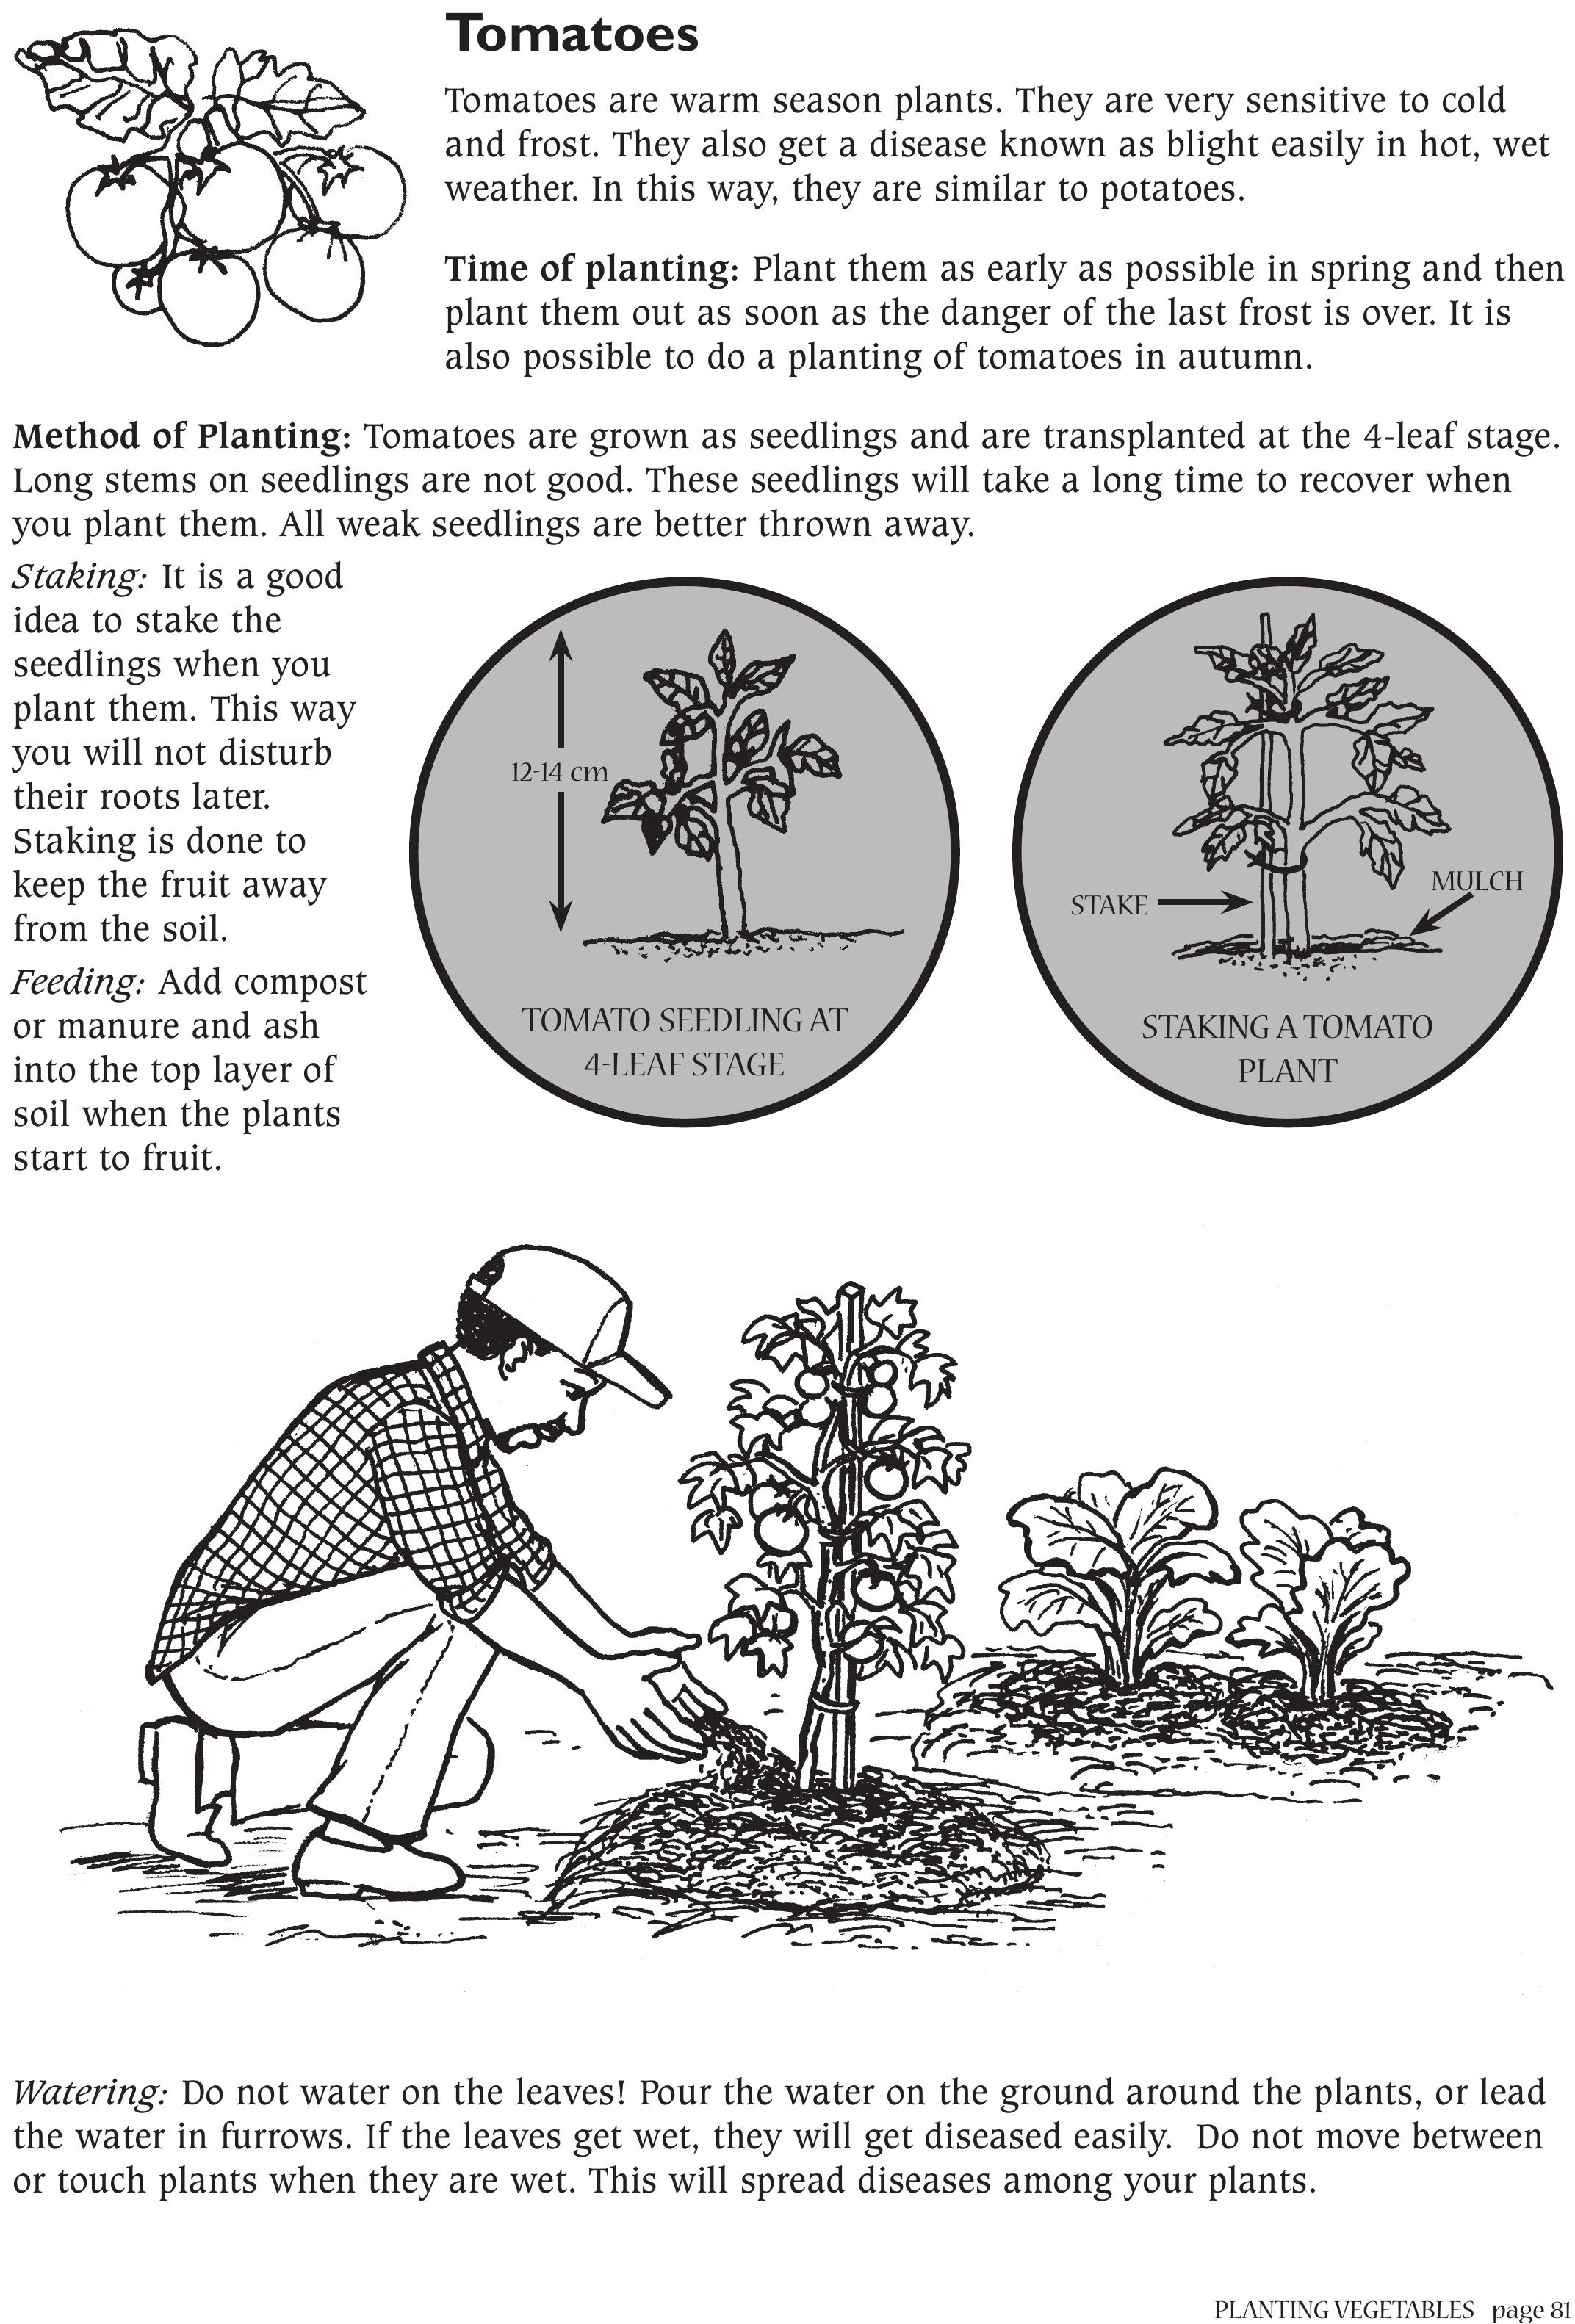
PLANTING VEGETABLES page 81
Tomatoes
Tomatoes are warm season plants. They are very sensitive to cold
and frost. They also get a disease known as blight easily in hot, wet
weather. In this way, they are similar to potatoes.
Time of planting: Plant them as early as possible in spring and then
plant them out as soon as the danger of the last frost is over. It is
also possible to do a planting of tomatoes in autumn.
Method of Planting: Tomatoes are grown as seedlings and are transplanted at the 4-leaf stage.
Long stems on seedlings are not good. These seedlings will take a long time to recover when
you plant them. All weak seedlings are better thrown away.
Staking:It is a good
idea to stake the
seedlings when you
plant them. This way
you will not disturb
their roots later.
Staking is done to
keep the fruit away
from the soil.
Feeding: Add compost
or manure and ash
into the top layer of
soil when the plants
start to fruit.
Watering: Do not water on the leaves! Pour the water on the ground around the plants, or lead
the water in furrows. If the leaves get wet, they will get diseased easily. Do not move between
or touch plants when they are wet. This will spread diseases among your plants.
12-14 cm
TOMATO SEEDLING AT
4-LEAF STAGE
STAKE
STAKING A TOMATO
PLANT
MULCH
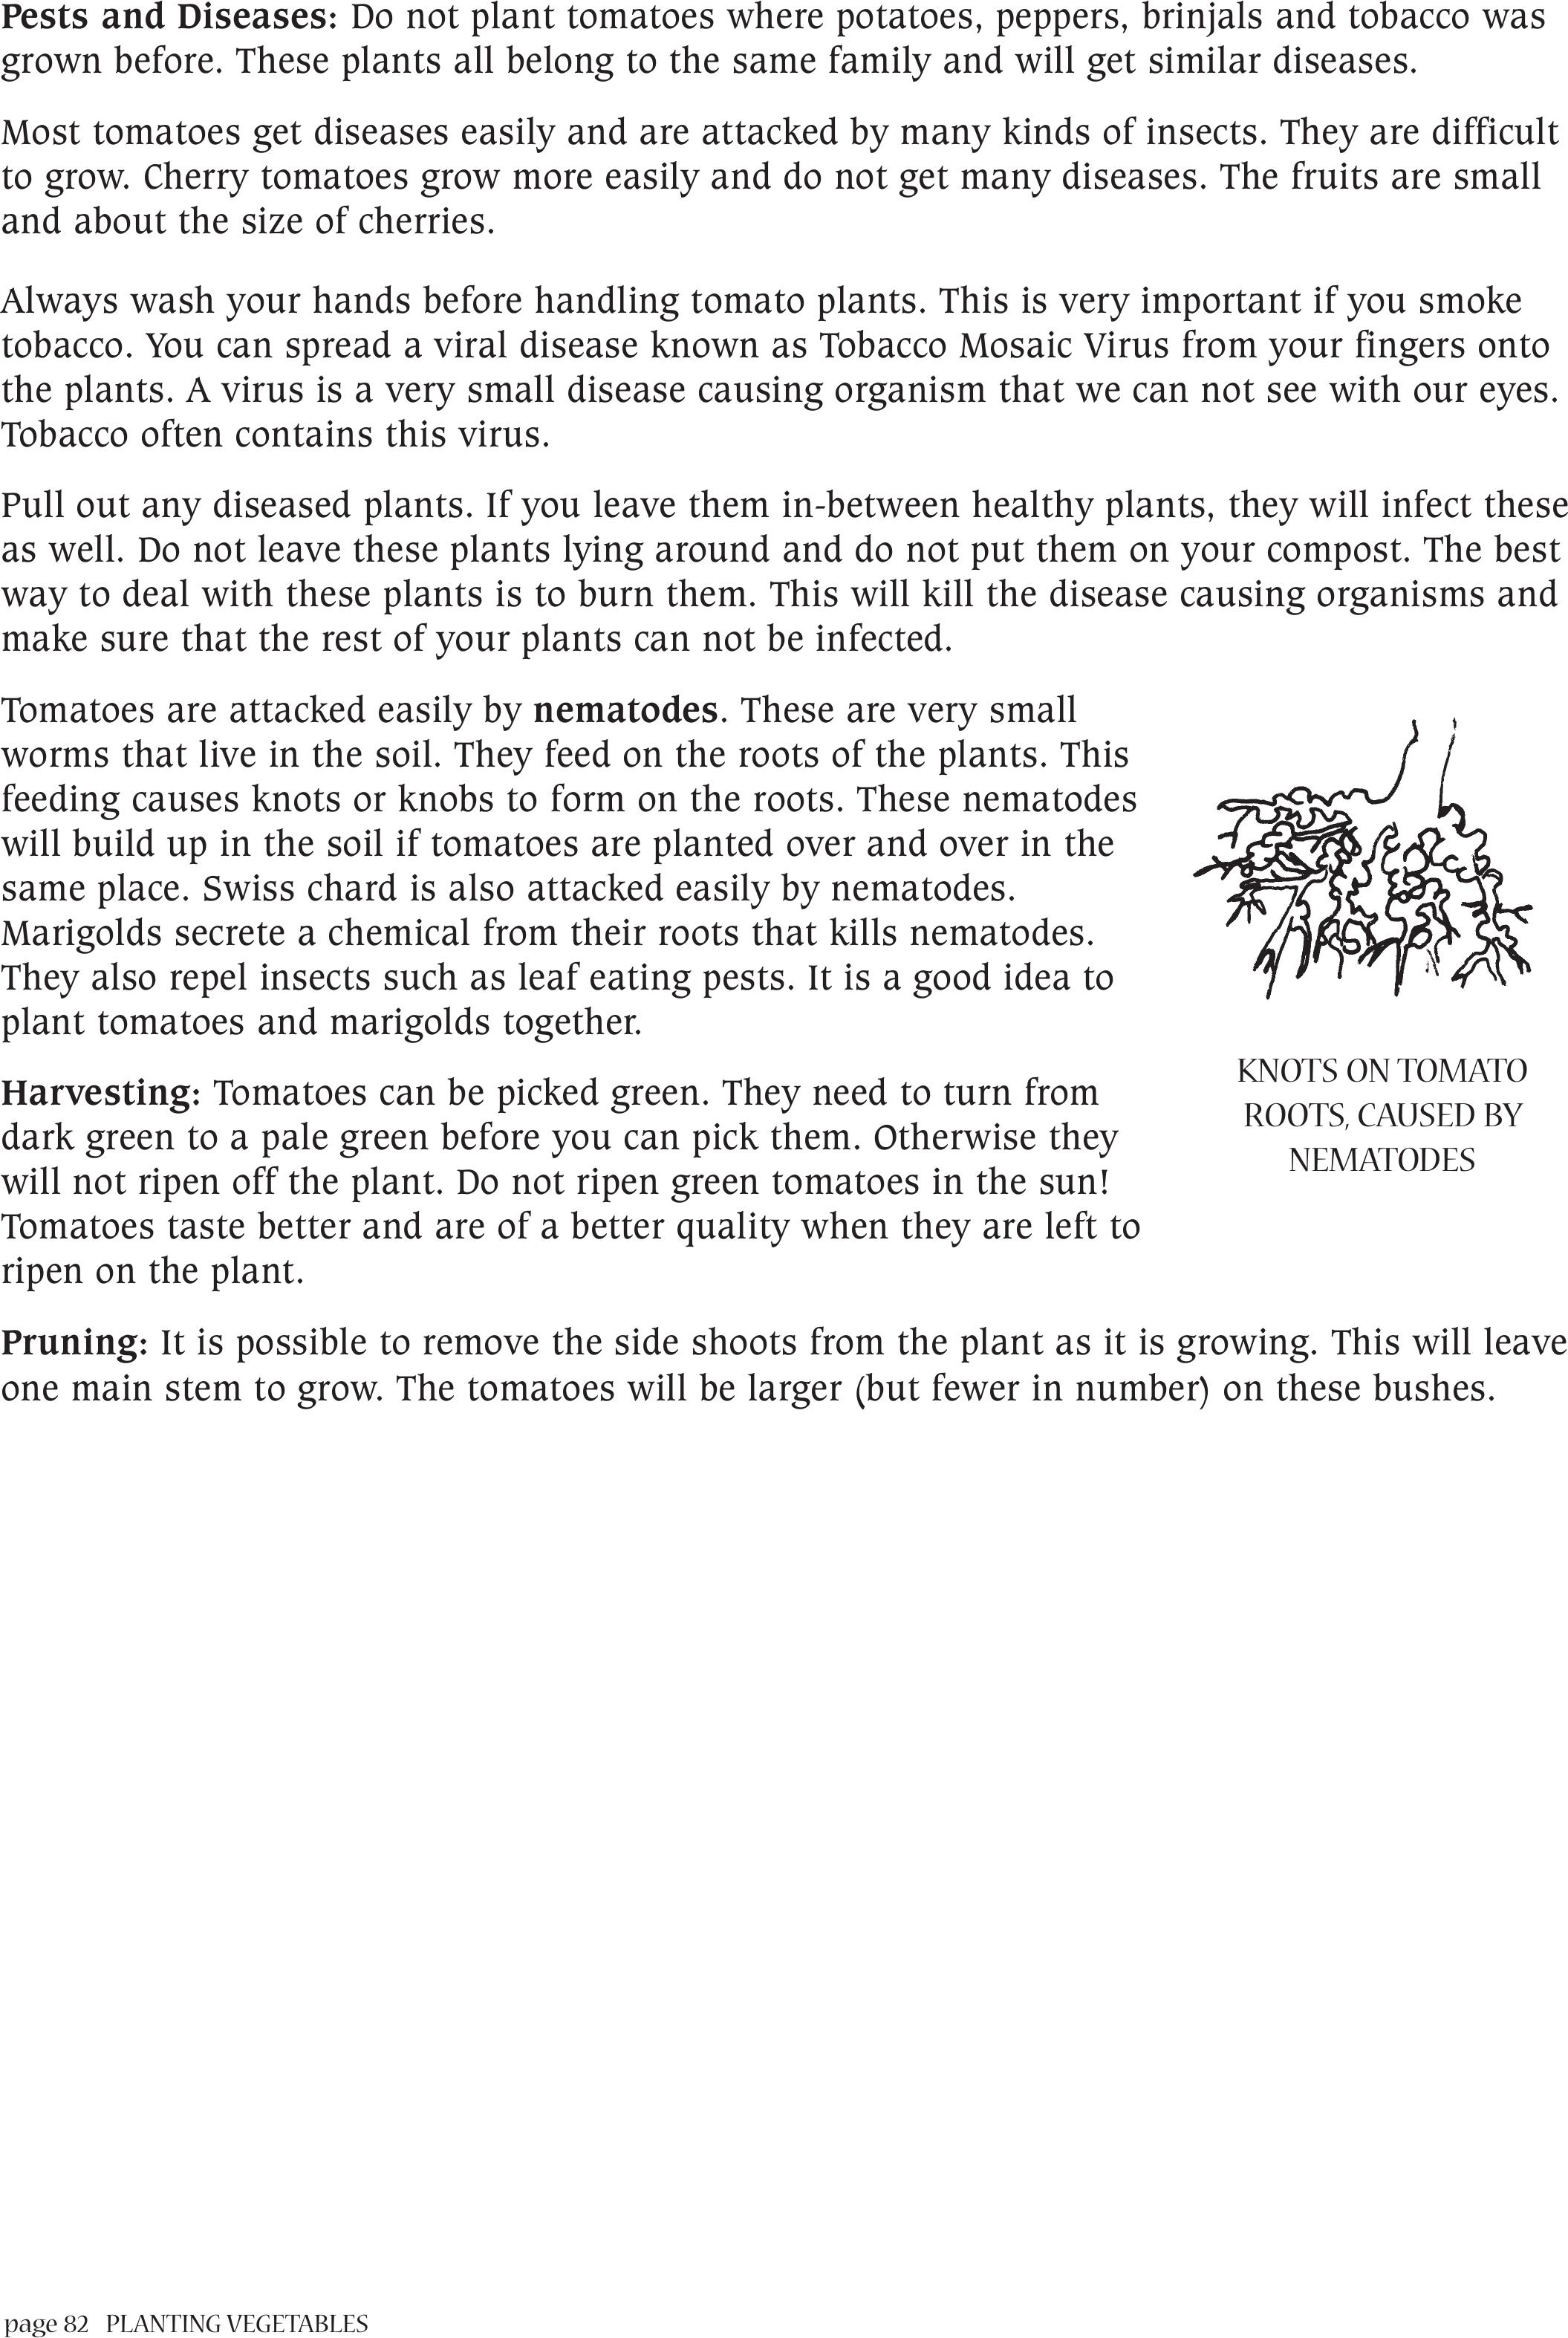
page 82PLANTING VEGETABLES
Pests and Diseases: Do not plant tomatoes where potatoes, peppers, brinjals and tobacco was
grown before. These plants all belong to the same family and will get similar diseases.
Most tomatoes get diseases easily and are attacked by many kinds of insects. They are difficult
to grow. Cherry tomatoes grow more easily and do not get many diseases. The fruits are small
and about the size of cherries.
Always wash your hands before handling tomato plants. This is very important if you smoke
tobacco. You can spread a viral disease known as Tobacco Mosaic Virus from your fingers onto
the plants. A virus is a very small disease causing organism that we can not see with our eyes.
Tobacco often contains this virus.
Pull out any diseased plants. If you leave them in-between healthy plants, they will infect these
as well. Do not leave these plants lying around and do not put them on your compost. The best
way to deal with these plants is to burn them. This will kill the disease causing organisms and
make sure that the rest of your plants can not be infected.
Tomatoes are attacked easily by nematodes. These are very small
worms that live in the soil. They feed on the roots of the plants. This
feeding causes knots or knobs to form on the roots. These nematodes
will build up in the soil if tomatoes are planted over and over in the
same place. Swiss chard is also attacked easily by nematodes.
Marigolds secrete a chemical from their roots that kills nematodes.
They also repel insects such as leaf eating pests. It is a good idea to
plant tomatoes and marigolds together.
Harvesting: Tomatoes can be picked green. They need to turn from
dark green to a pale green before you can pick them. Otherwise they
will not ripen off the plant. Do not ripen green tomatoes in the sun!
Tomatoes taste better and are of a better quality when they are left to
ripen on the plant.
Pruning: It is possible to remove the side shoots from the plant as it is growing. This will leave
one main stem to grow. The tomatoes will be larger (but fewer in number) on these bushes.
KNOTS ON TOMATO
ROOTS, CAUSED BY
NEMATODES
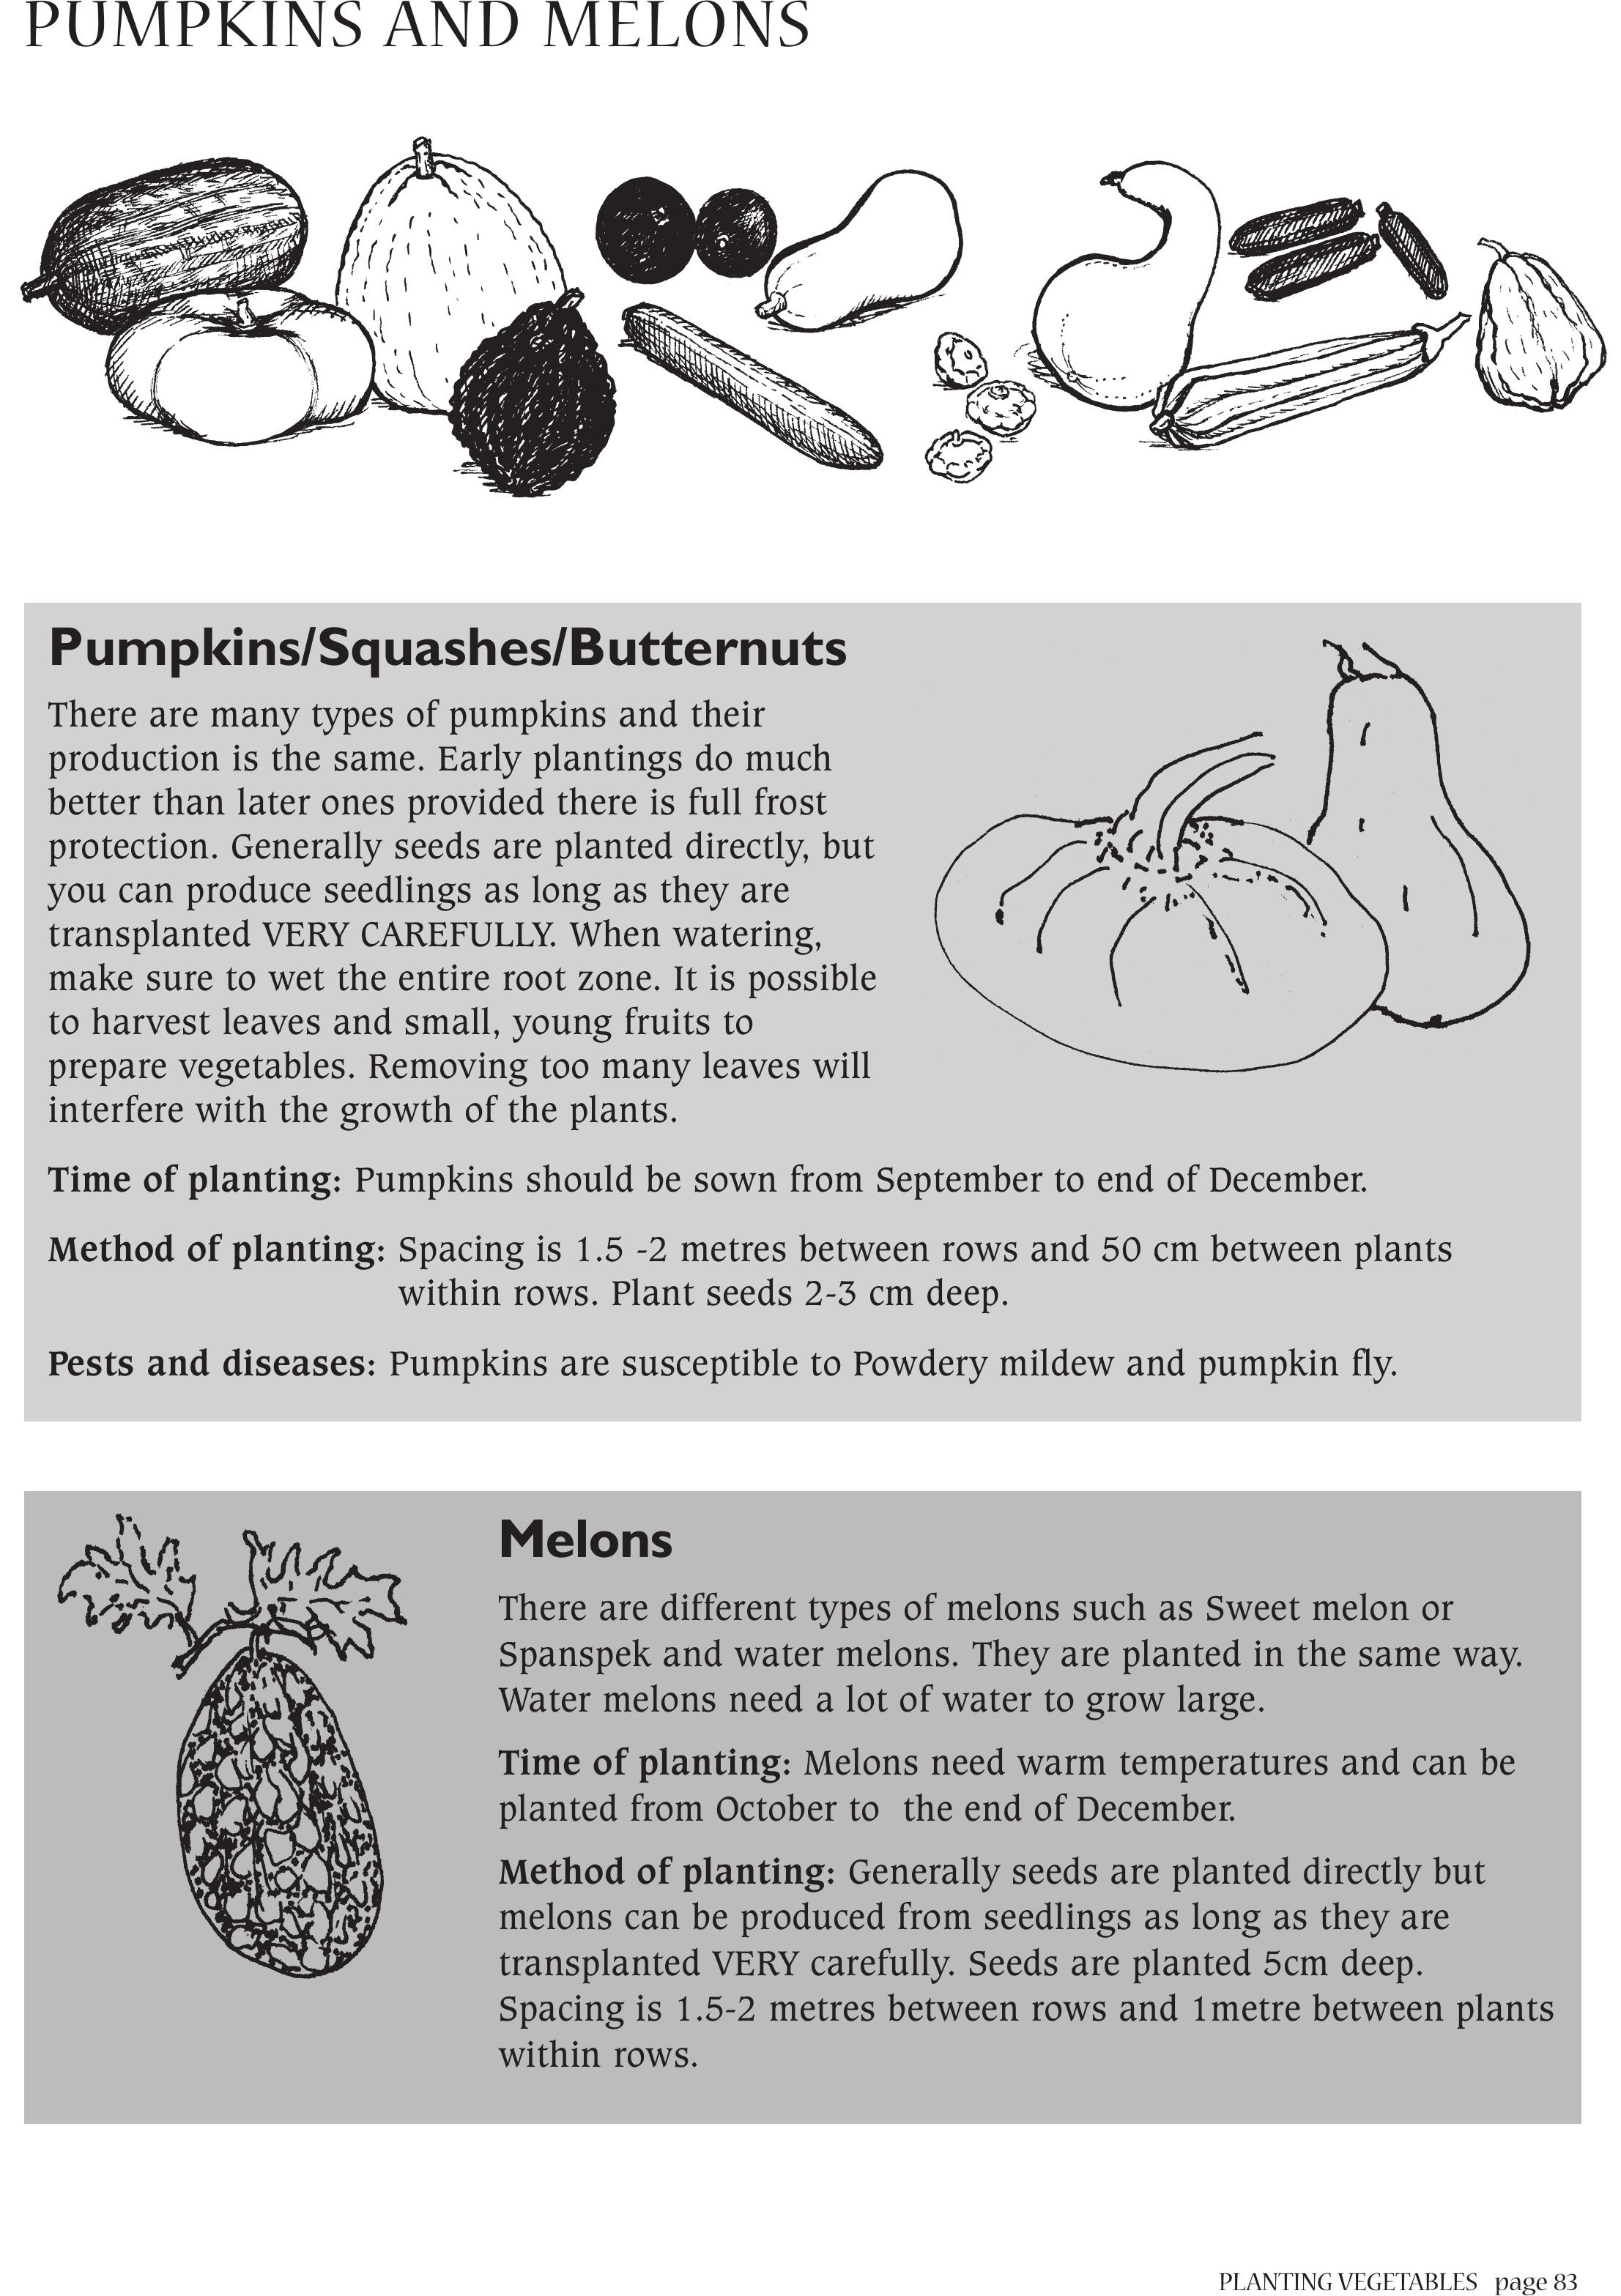
PLANTING VEGETABLES page 83
PUMPKINS AND MELONS
Pumpkins/Squashes/Butternuts
There are many types of pumpkins and their
production is the same. Early plantings do much
better than later ones provided there is full frost
protection. Generally seeds are planted directly, but
you can produce seedlings as long as they are
transplanted VERY CAREFULLY. When watering,
make sure to wet the entire root zone. It is possible
to harvest leaves and small, young fruits to
prepare vegetables. Removing too many leaves will
interfere with the growth of the plants.
Time of planting: Pumpkins should be sown from September to end of December.
Method of planting:Spacing is 1.5 -2 metres between rows and 50 cm between plants
within rows. Plant seeds 2-3 cm deep.
Pests and diseases: Pumpkins are susceptible to Powdery mildew and pumpkin fly.
Melons
There are different types of melons such as Sweet melon or
Spanspek and water melons. They are planted in the same way.
Water melons need a lot of water to grow large.
Time of planting: Melons need warm temperatures and can be
planted from October to the end of December.
Method of planting: Generally seeds are planted directly but
melons can be produced from seedlings as long as they are
transplanted VERY carefully. Seeds are planted 5cm deep.
Spacing is 1.5-2 metres between rows and 1metre between plants
within rows.
page 84PLANTING VEGETABLES
INTER CROPPING/COMPANION PLANTING
Intercropping is the growing of different crops for different reasons on the same piece of land. It
can also be called companion planting.
We mix plants that help each other to grow together. We can also mix plants that help to
improve the soil fertility, with other plants. These plants improve the soil through fixing of
nitrogen in the soil.
Some examples are:
• Nitrogen fixers with other plants.
• Fast growing plants with slow growing plants.
• Tall, thin plants with short or wide plants.
There are different ways in which intercropping can be done;
Some examples are:
• MIXED CROPPING: Here for example you can broadcast (sow together in a mixture)
mustard, rape, onions and peas. They will all grow together in one bed.
• RELAY CROPPING: Here one crop is planted first and another crop is planted in- between
later. An example is to plant garlic in a bed and wait until it has grown about 15- 20cm.
This is about the width of your open hand. Then sow mustard and carrots in rows in
between the rows of garlic.
• MULTI-CROPPING: This is like the Machobane system, where different rows of for example
onions, carrots, peas, lettuce and swiss chard can be planted.
There are many different ways in which to plant crops together. A lot will depend on your
specific situation. So, it will be good to experiment. Plant different combinations of crops
together and keep records of how they grow.
You may want to monitor (or look at) the following things:
• Size of plants.
• How well are they growing
• What pests and diseases are present
• Are they fruiting well or better.
Remember you will need a control. Here your control will be a
patch of one crop only, not mixed or inter cropped.
Below are some ideas of plants that grow well together and plants that do not grow well
together.
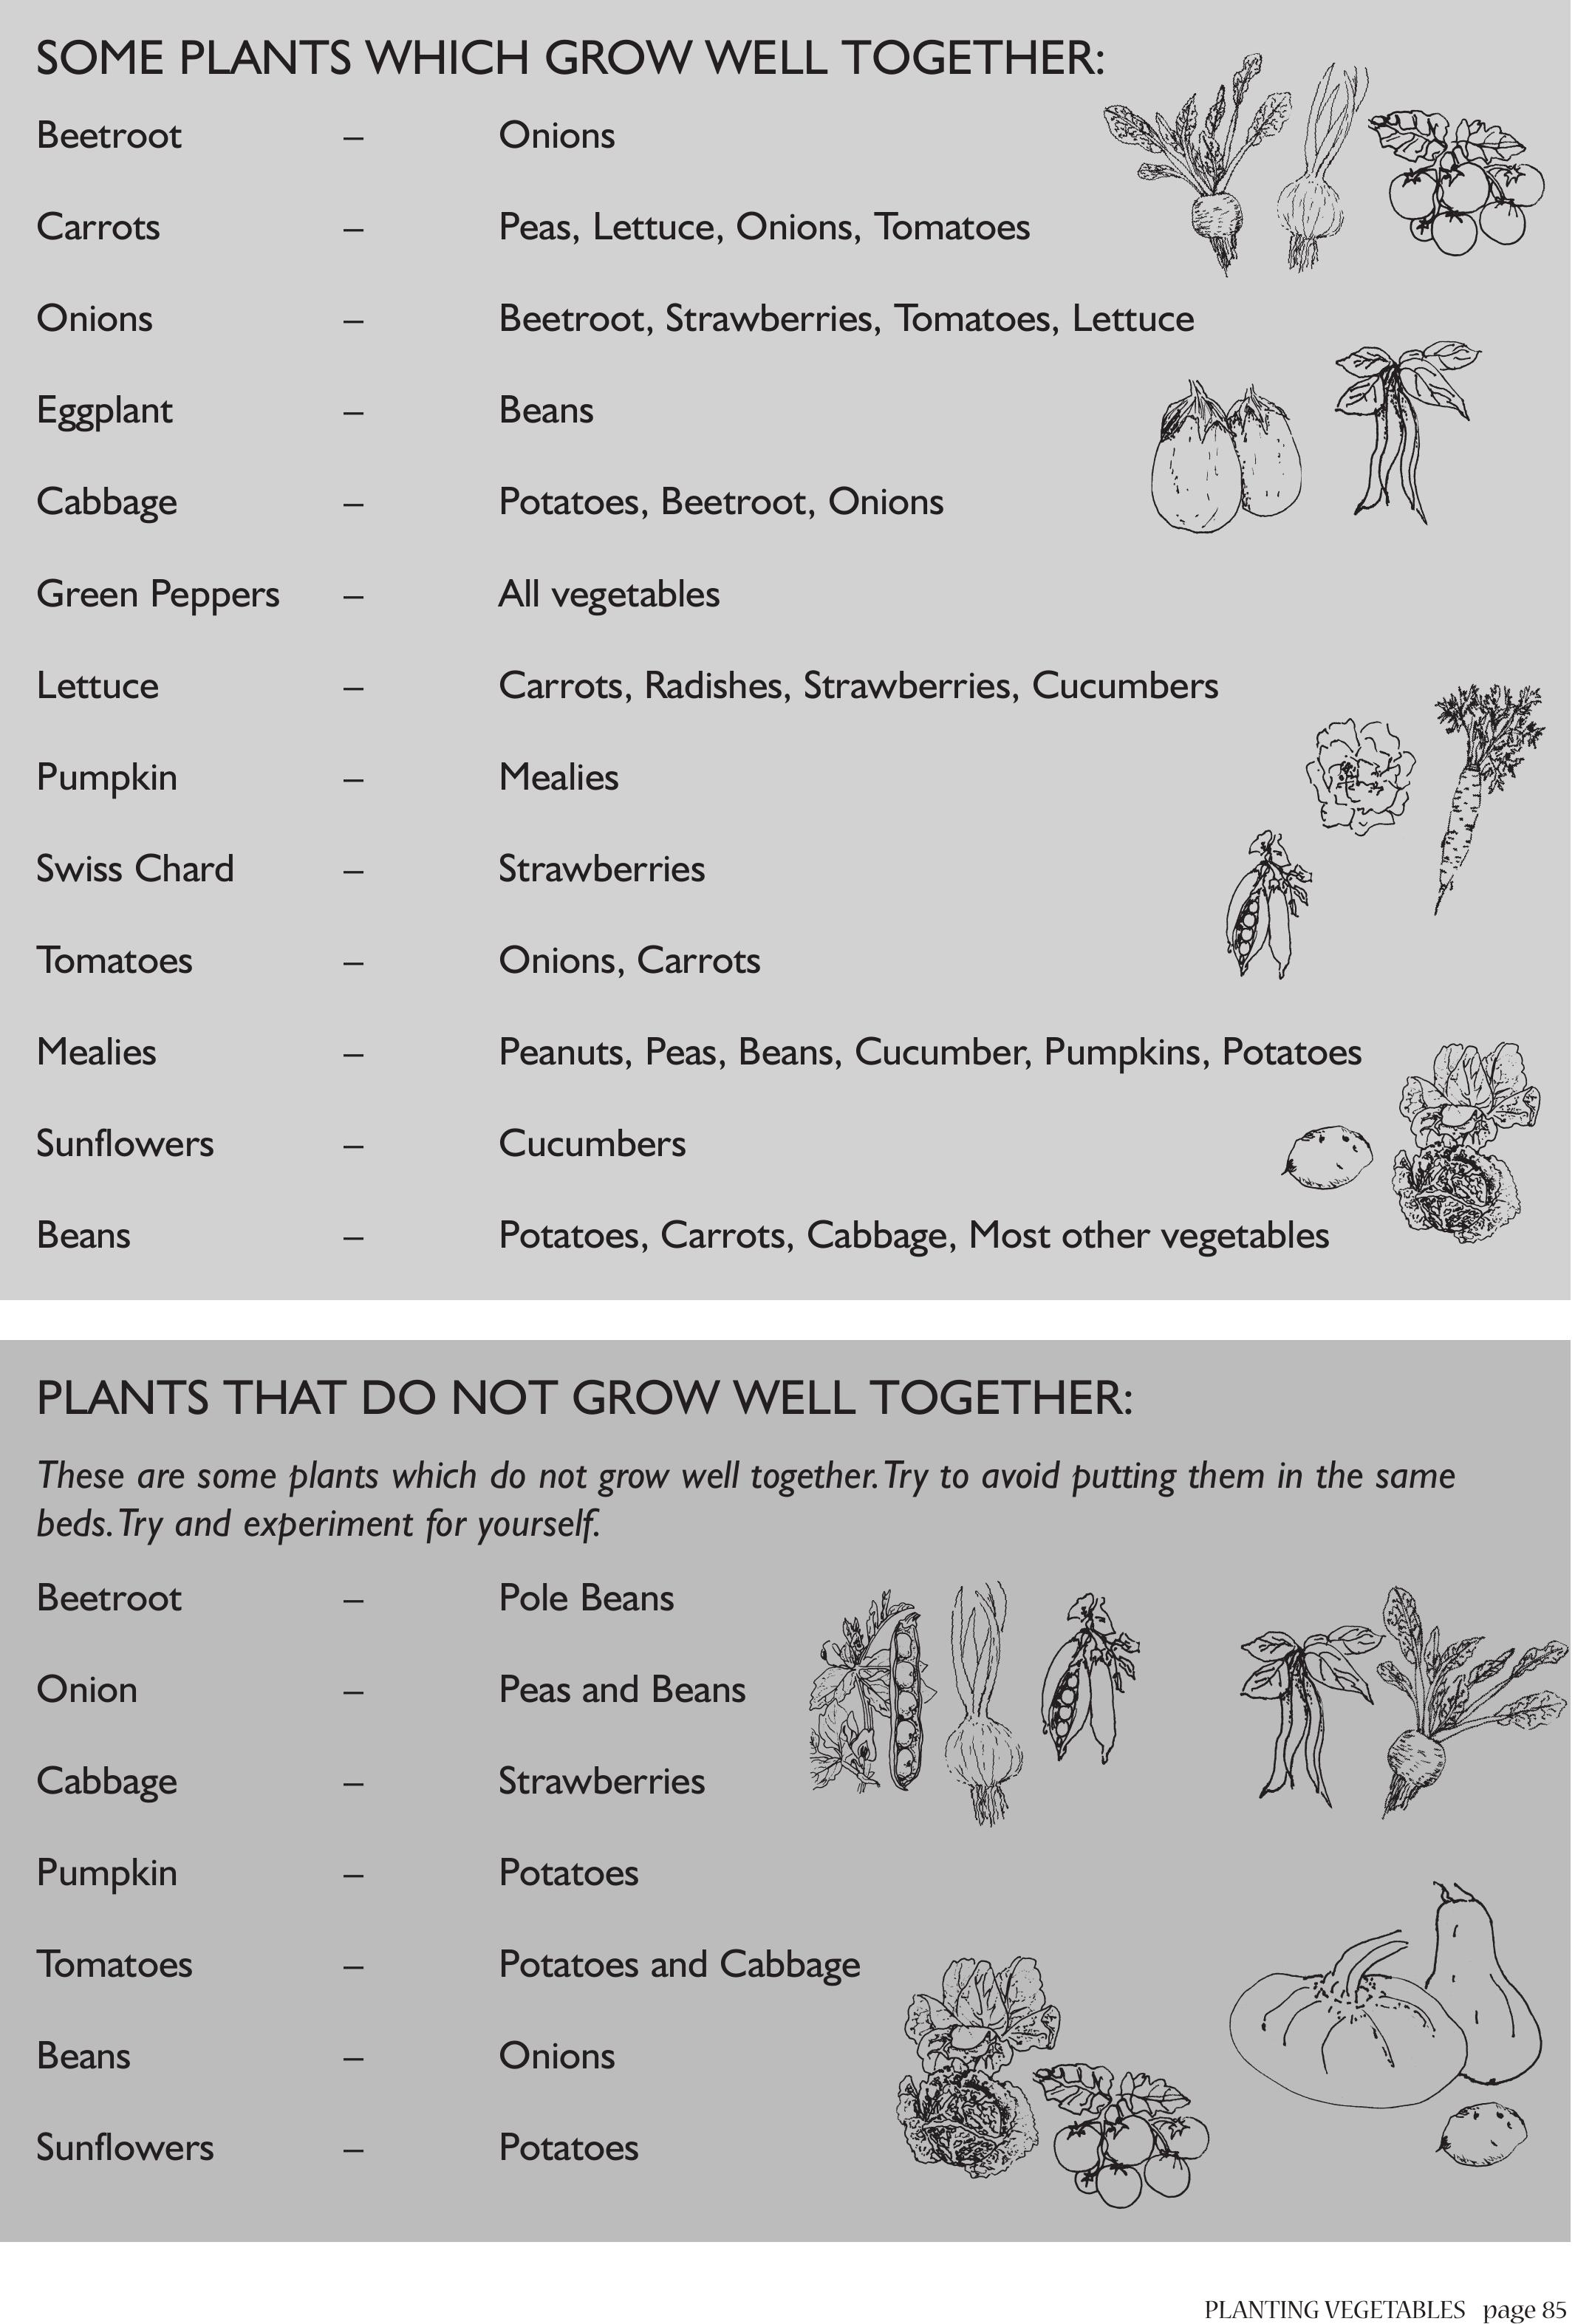
PLANTING VEGETABLES page 85
SOME PLANTS WHICH GROW WELL TOGETHER:
Beetroot – Onions
Carrots – Peas, Lettuce, Onions, Tomatoes
Onions – Beetroot, Strawberries, Tomatoes, Lettuce
Eggplant – Beans
Cabbage – Potatoes, Beetroot, Onions
Green Peppers – All vegetables
Lettuce – Carrots, Radishes, Strawberries, Cucumbers
Pumpkin – Mealies
Swiss Chard – Strawberries
Tomatoes – Onions, Carrots
Mealies – Peanuts, Peas, Beans, Cucumber, Pumpkins, Potatoes
Sunflowers – Cucumbers
Beans – Potatoes, Carrots, Cabbage, Most other vegetables
PLANTS THAT DO NOT GROW WELL TOGETHER:
These are some plants which do not grow well together.Try to avoid putting them in the same
beds.Try and experiment for yourself.
Beetroot – Pole Beans
Onion – Peas and Beans
Cabbage – Strawberries
Pumpkin – Potatoes
Tomatoes – Potatoes and Cabbage
Beans – Onions
Sunflowers – Potatoes
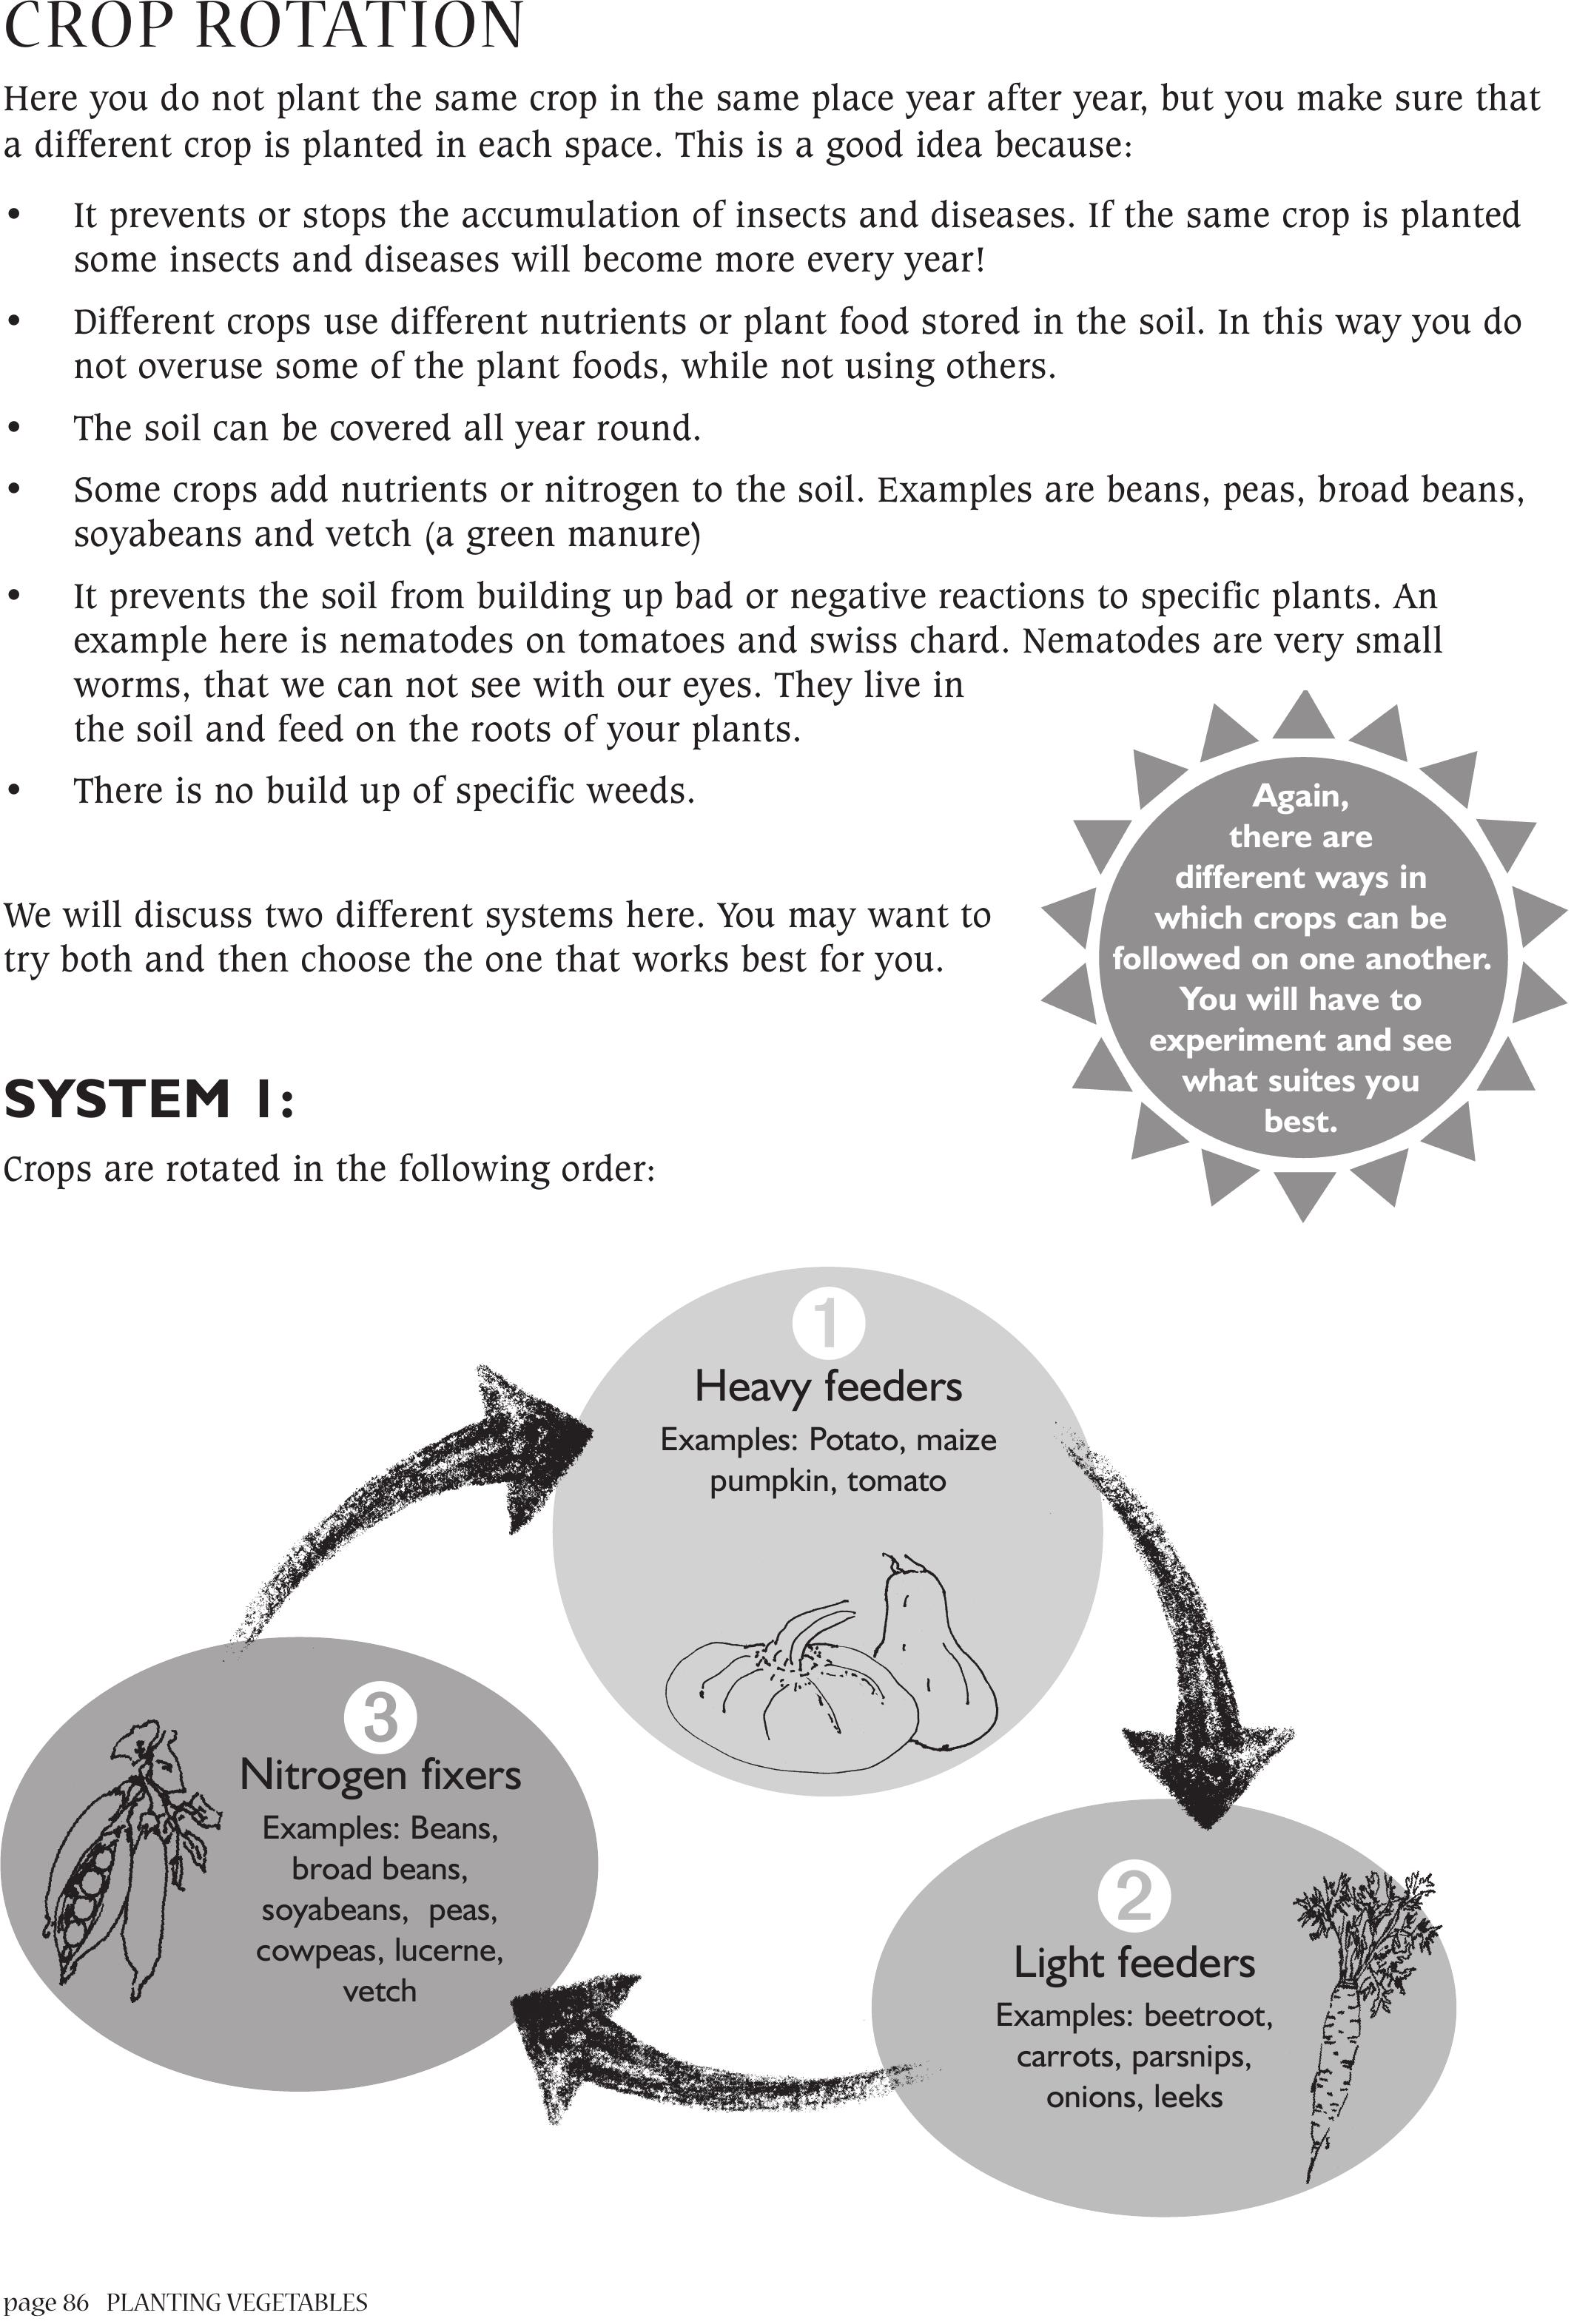
page 86PLANTING VEGETABLES
CROP ROTATION
Here you do not plant the same crop in the same place year after year, but you make sure that
a different crop is planted in each space. This is a good idea because:
• It prevents or stops the accumulation of insects and diseases. If the same crop is planted
some insects and diseases will become more every year!
• Different crops use different nutrients or plant food stored in the soil. In this way you do
not overuse some of the plant foods, while not using others.
• The soil can be covered all year round.
• Some crops add nutrients or nitrogen to the soil. Examples are beans, peas, broad beans,
soyabeans and vetch (a green manure)
• It prevents the soil from building up bad or negative reactions to specific plants. An
example here is nematodes on tomatoes and swiss chard. Nematodes are very small
worms, that we can not see with our eyes. They live in
the soil and feed on the roots of your plants.
• There is no build up of specific weeds.
We will discuss two different systems here. You may want to
try both and then choose the one that works best for you.
SYSTEM 1:
Crops are rotated in the following order:
Again,
there are
different ways in
which crops can be
followed on one another.
You will have to
experiment and see
what suites you
best.
➊
Heavy feeders
Examples: Potato, maize
pumpkin, tomato
➌
Nitrogen fixers
Examples: Beans,
broad beans,
soyabeans, peas,
cowpeas, lucerne,
vetch
➋
Light feeders
Examples: beetroot,
carrots, parsnips,
onions, leeks
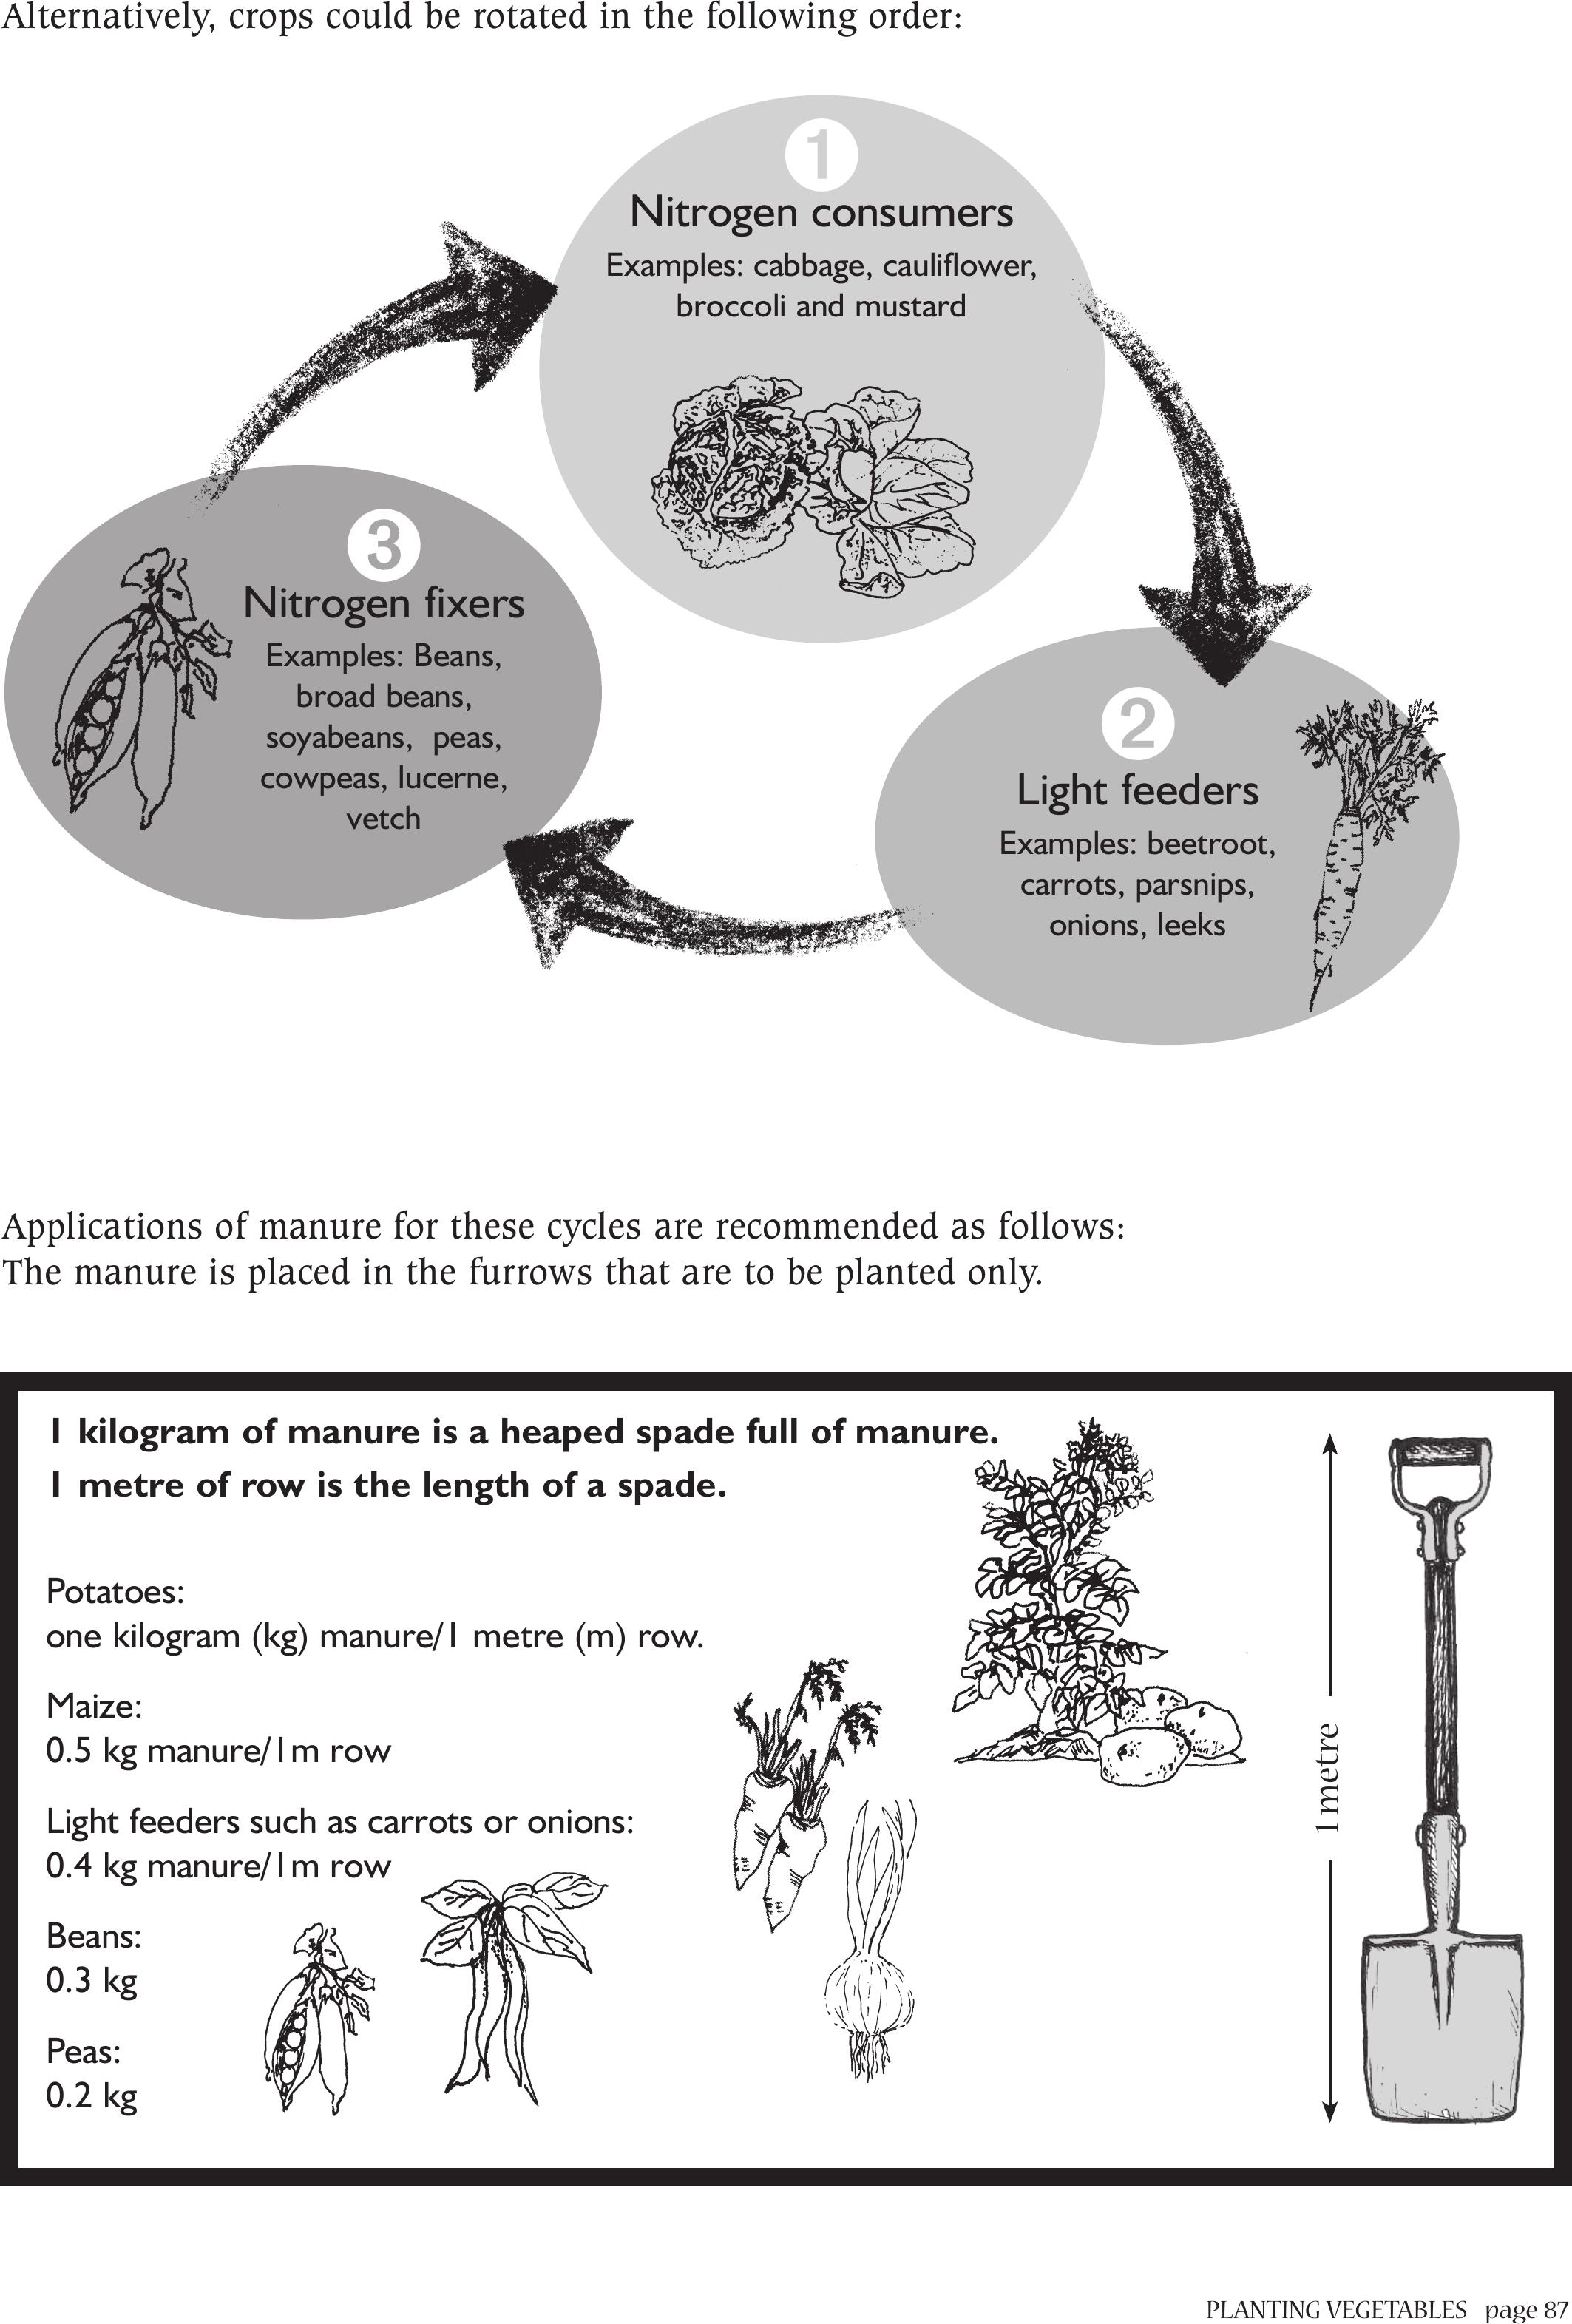
PLANTING VEGETABLES page 87
Alternatively, crops could be rotated in the following order:
Applications of manure for these cycles are recommended as follows:
The manure is placed in the furrows that are to be planted only.
1 kilogram of manure is a heaped spade full of manure.
1 metre of row is the length of a spade.
Potatoes:
one kilogram (kg) manure/1 metre (m) row.
Maize:
0.5 kg manure/1m row
Light feeders such as carrots or onions:
0.4 kg manure/1m row
Beans:
0.3 kg
Peas:
0.2 kg
➊
Nitrogen consumers
Examples: cabbage, cauliflower,
broccoli and mustard
➌
Nitrogen fixers
Examples: Beans,
broad beans,
soyabeans, peas,
cowpeas, lucerne,
vetch
➋
Light feeders
Examples: beetroot,
carrots, parsnips,
onions, leeks
1 metre
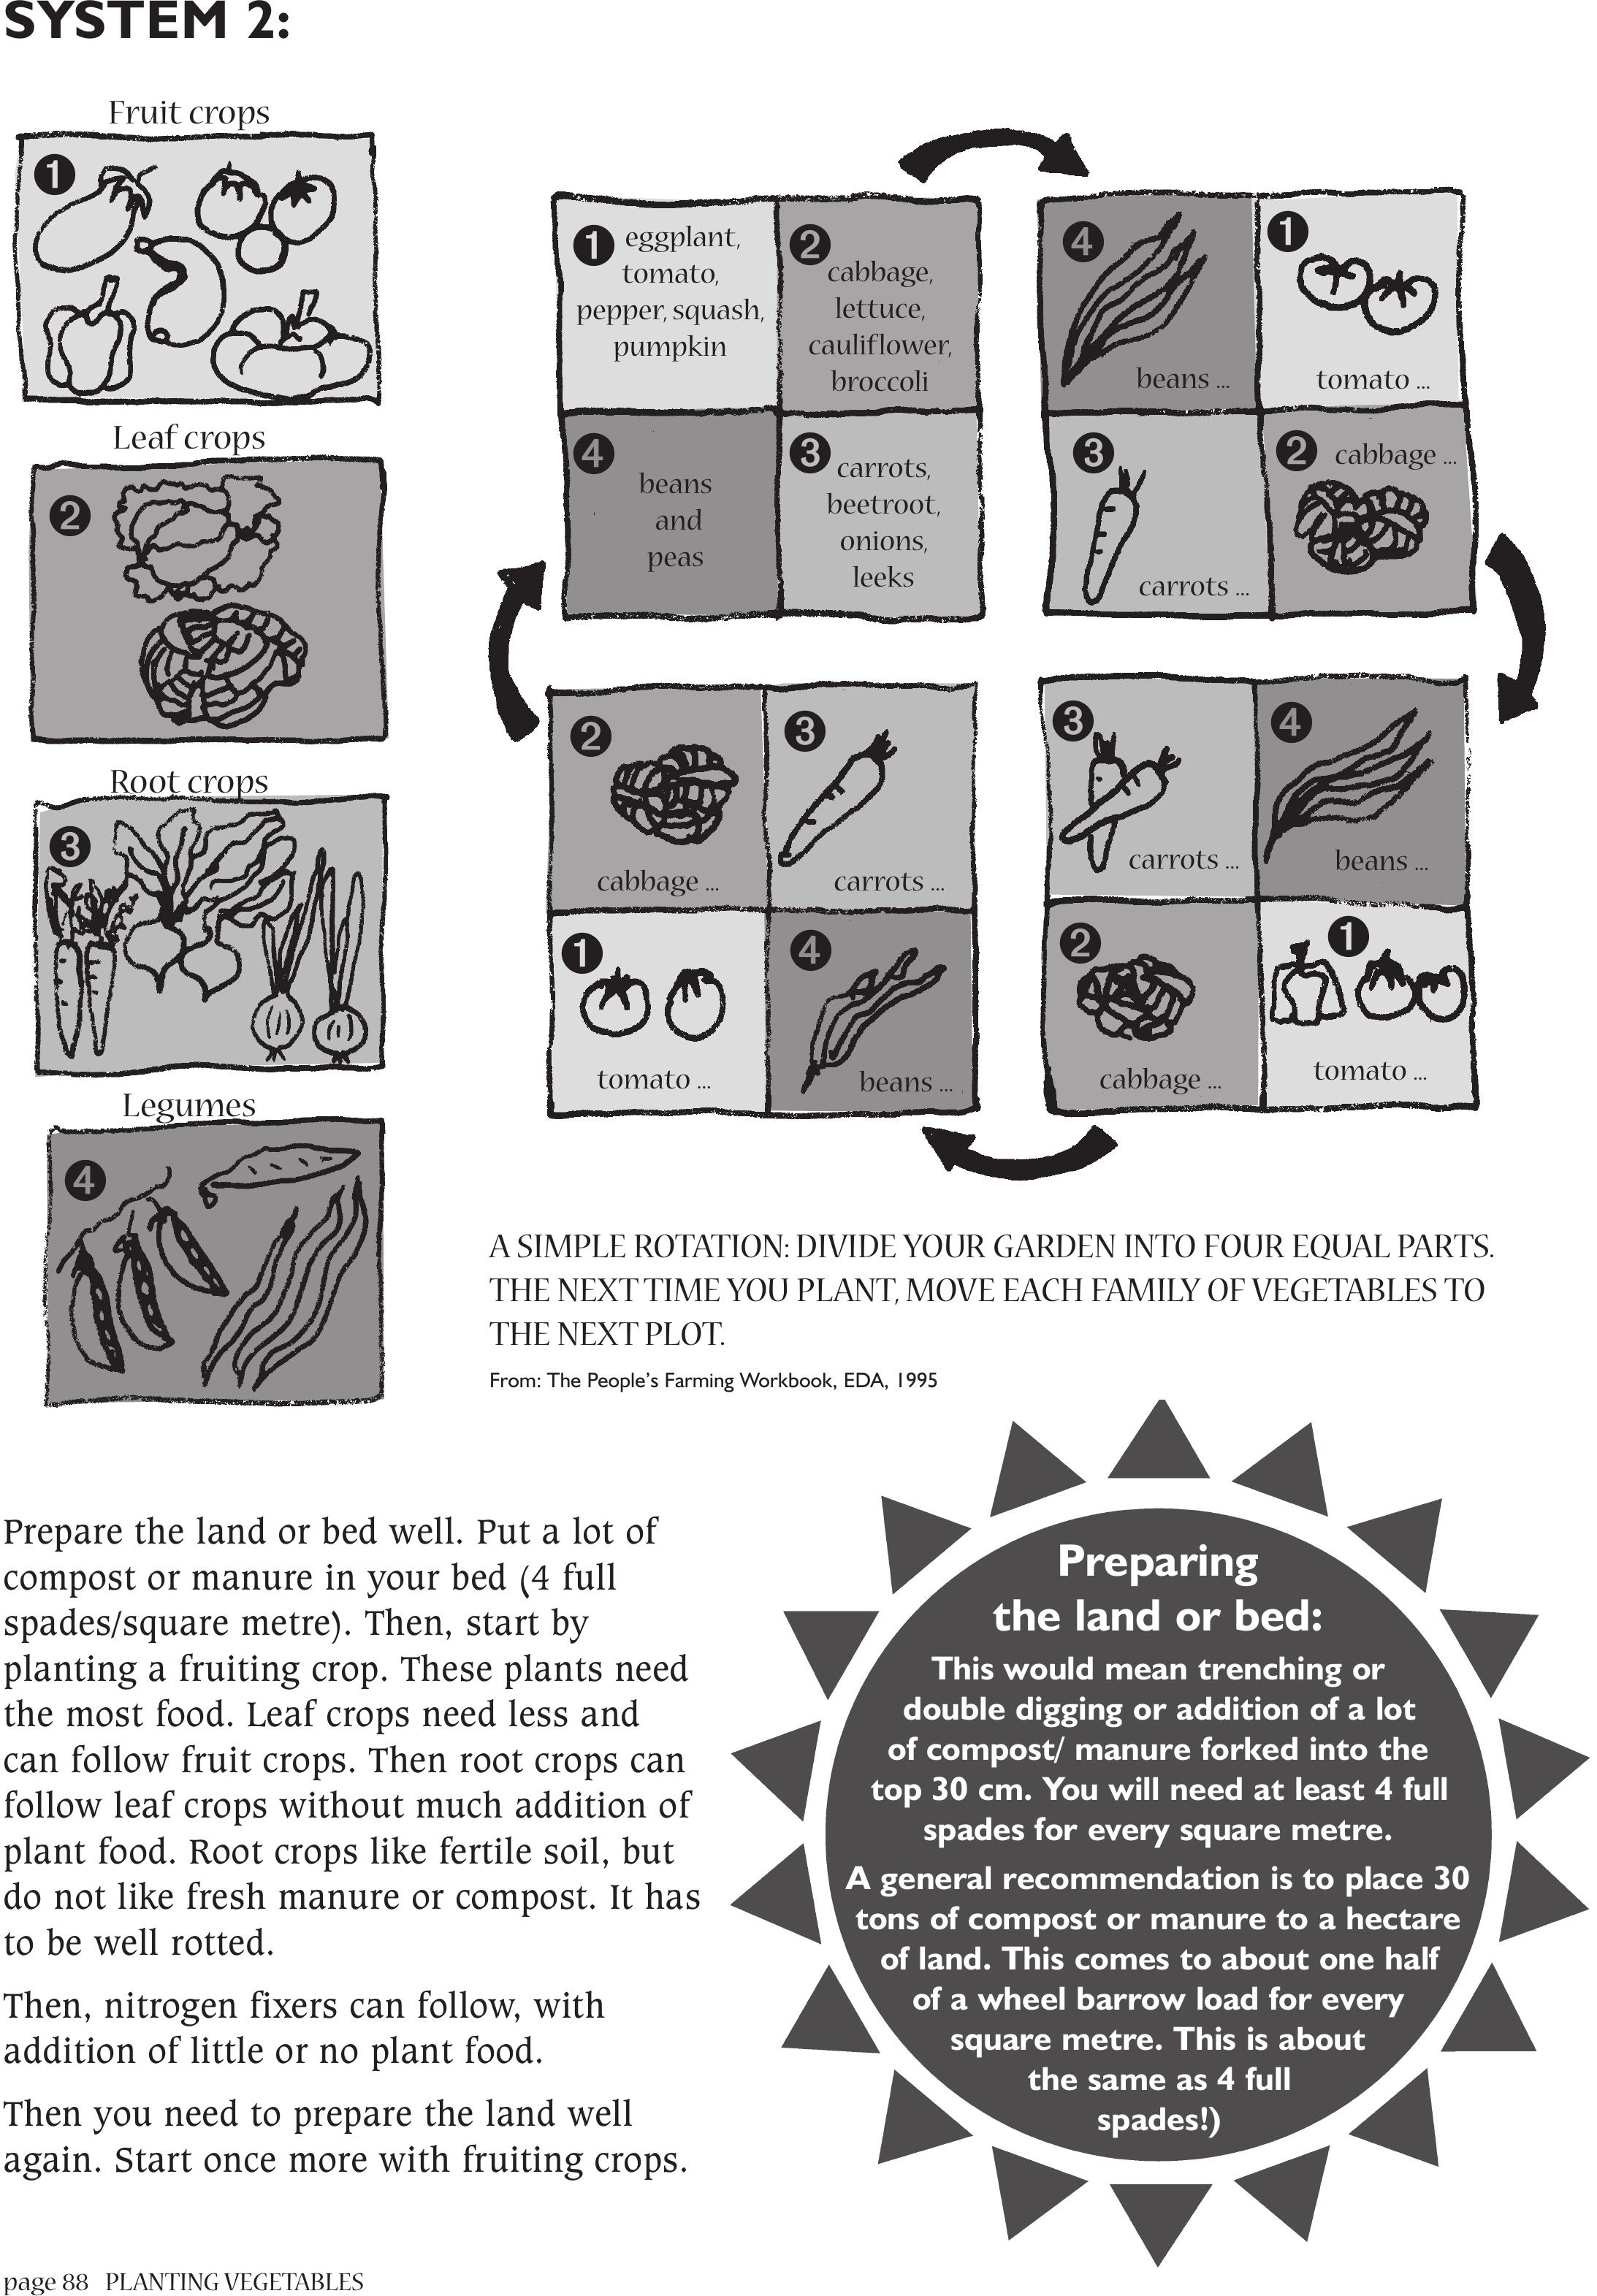
page 88PLANTING VEGETABLES
SYSTEM 2:
➊
➋
➌
➍
Fruit crops
Leaf crops
Root crops
Legumes
➊
eggplant,
tomato,
pepper, squash,
pumpkin
➍
beans
and
peas
➋
cabbage,
lettuce,
cauliflower,
broccoli
➌
carrots,
beetroot,
onions,
leeks
➍
➍
➍
beans ...
beans ...
beans ...
➌
➌
➌
carrots ...
carrots ...
carrots ...
➋
➋
➋
cabbage ...
cabbage ...
cabbage ...
➊
➊
➊
tomato ...
tomato ...
tomato ...
Prepare the land or bed well. Put a lot of
compost or manure in your bed (4 full
spades/square metre). Then, start by
planting a fruiting crop. These plants need
the most food. Leaf crops need less and
can follow fruit crops. Then root crops can
follow leaf crops without much addition of
plant food. Root crops like fertile soil, but
do not like fresh manure or compost. It has
to be well rotted.
Then, nitrogen fixers can follow, with
addition of little or no plant food.
Then you need to prepare the land well
again. Start once more with fruiting crops.
A SIMPLE ROTATION: DIVIDE YOUR GARDEN INTO FOUR EQUAL PARTS.
THE NEXT TIME YOU PLANT, MOVE EACH FAMILY OF VEGETABLES TO
THE NEXT PLOT.
From: The People’s Farming Workbook, EDA, 1995
Preparing
the land or bed:
This would mean trenching or
double digging or addition of a lot
of compost/ manure forked into the
top 30 cm. You will need at least 4 full
spades for every square metre.
A general recommendation is to place 30
tons of compost or manure to a hectare
of land. This comes to about one half
of a wheel barrow load for every
square metre. This is about
the same as 4 full
spades!)
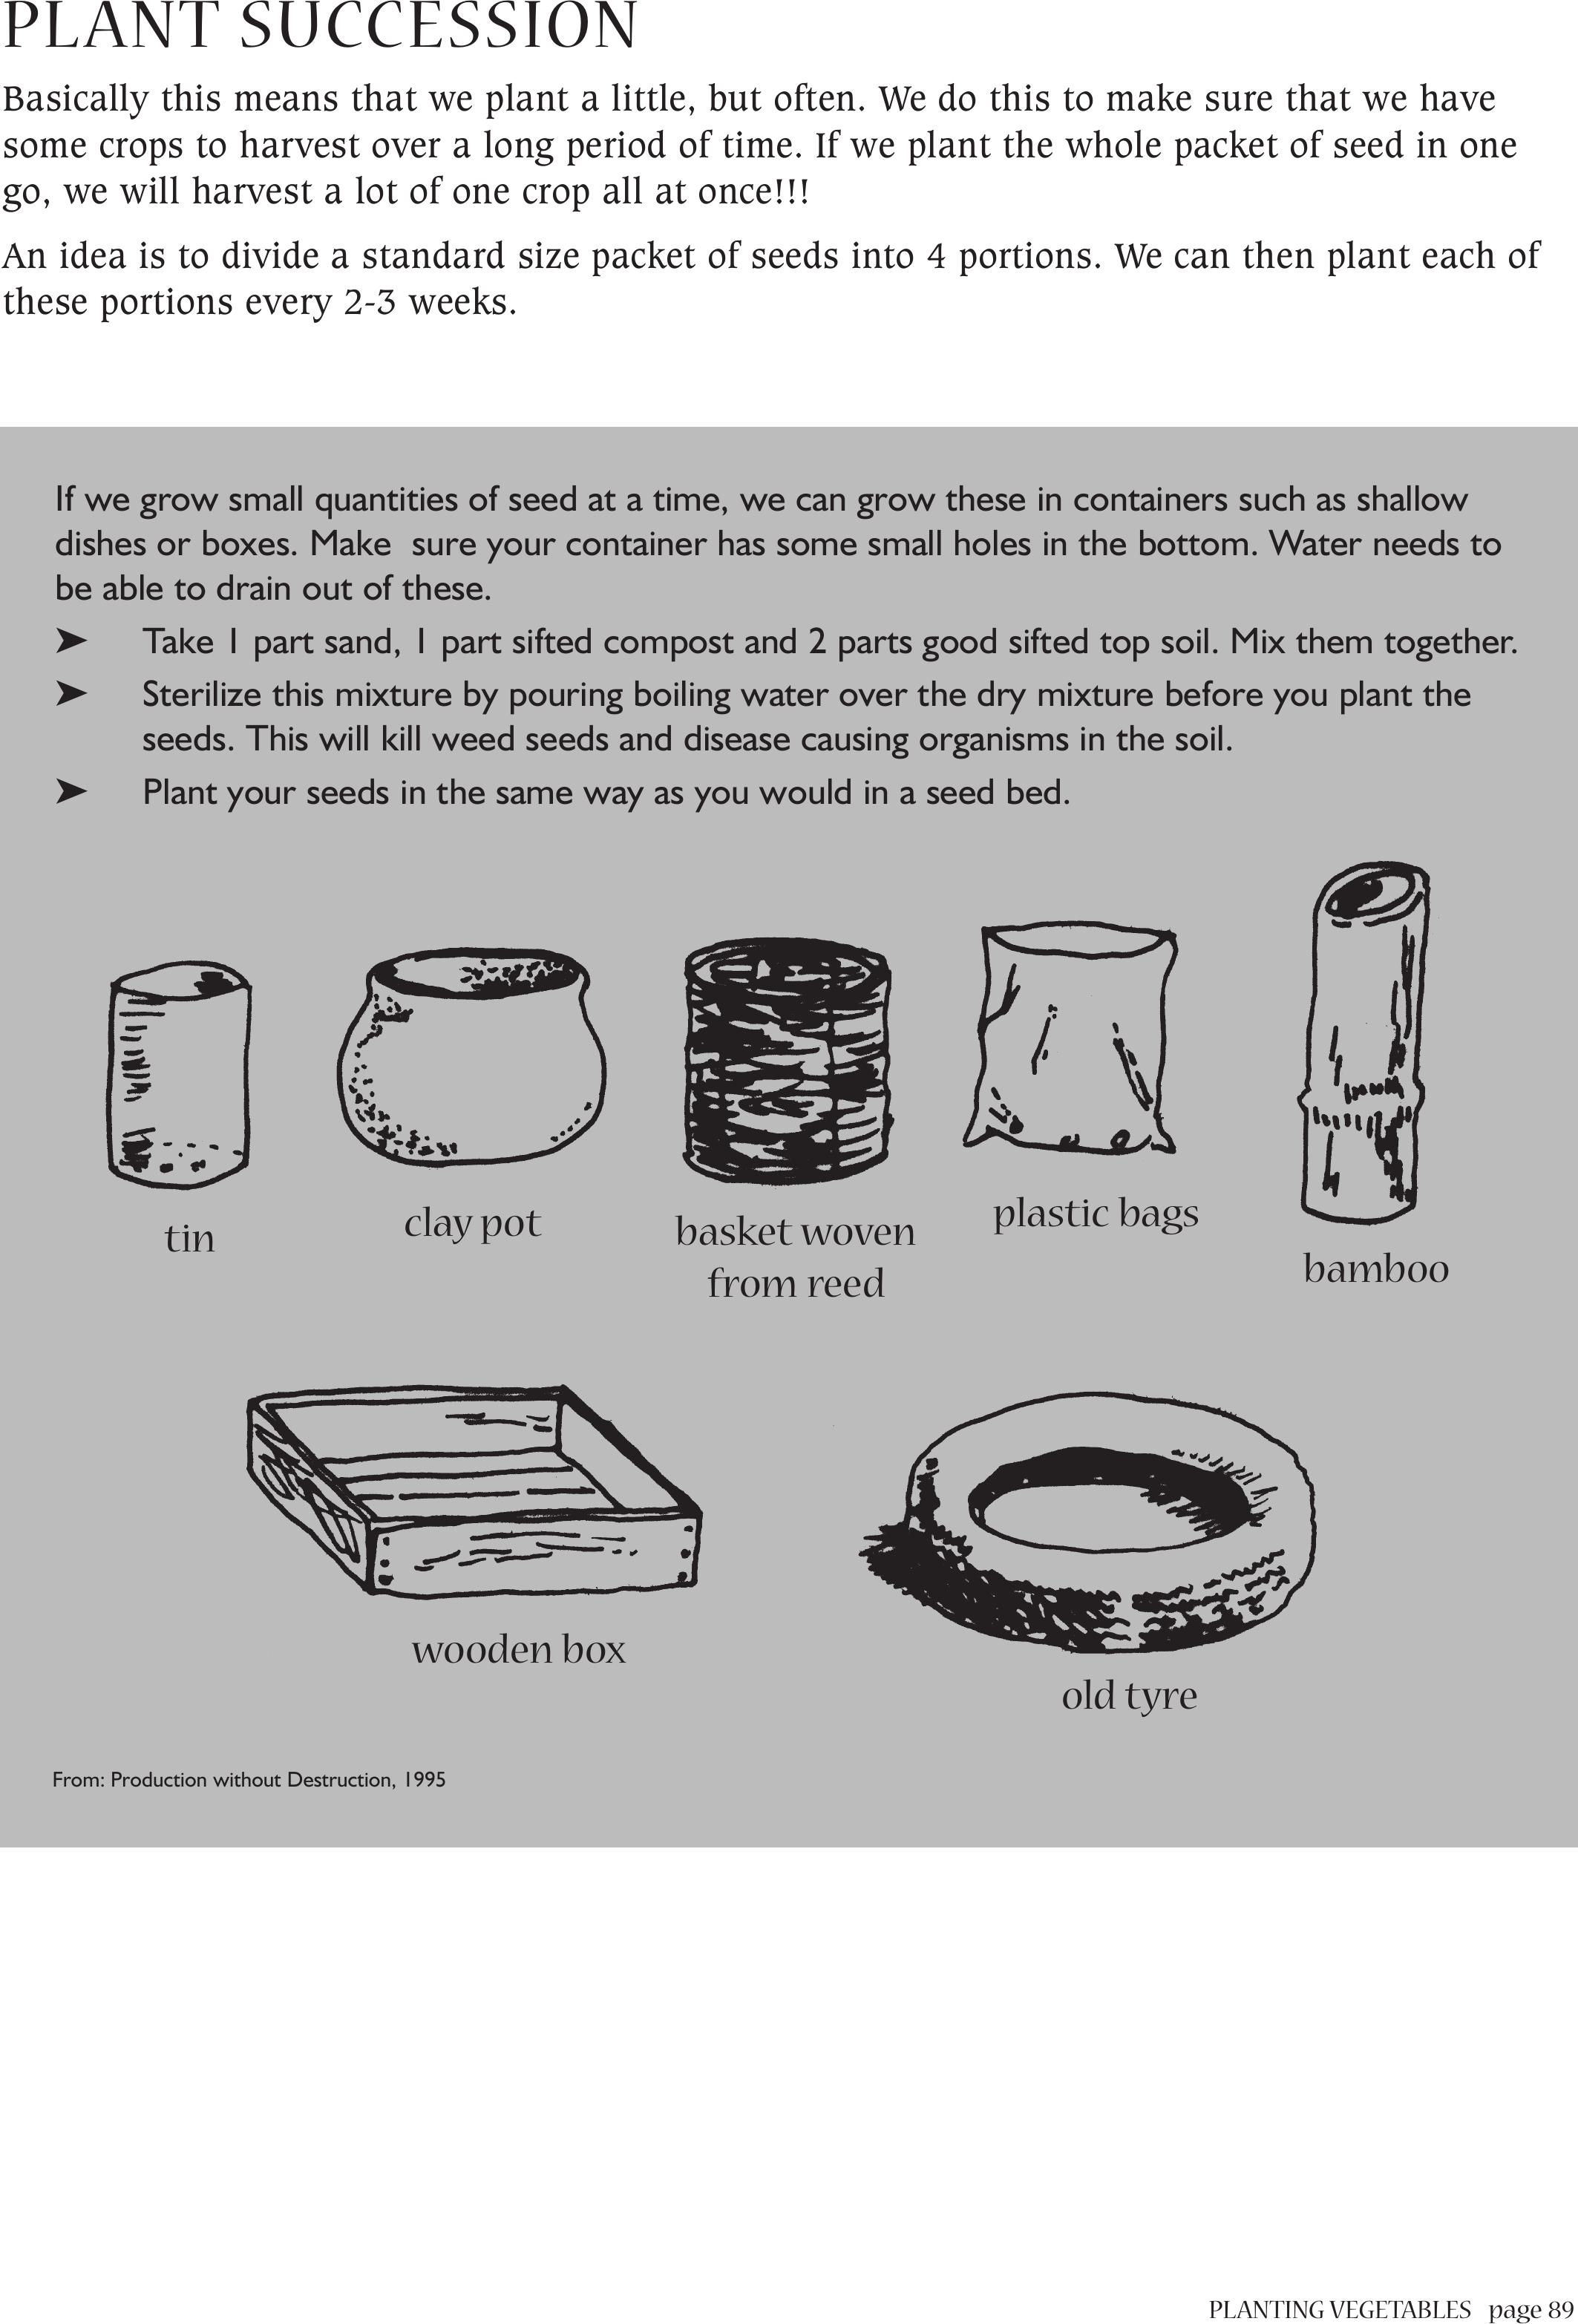
PLANTING VEGETABLES page 89
PLANT SUCCESSION
Basically this means that we plant a little, but often. We do this to make sure that we have
some crops to harvest over a long period of time. If we plant the whole packet of seed in one
go, we will harvest a lot of one crop all at once!!!
An idea is to divide a standard size packet of seeds into 4 portions. We can then plant each of
these portions every 2-3 weeks.
If we grow small quantities of seed at a time, we can grow these in containers such as shallow
dishes or boxes. Make sure your container has some small holes in the bottom. Water needs to
be able to drain out of these.
➤Take 1 part sand, 1 part sifted compost and 2 parts good sifted top soil. Mix them together.
➤Sterilize this mixture by pouring boiling water over the dry mixture before you plant the
seeds. This will kill weed seeds and disease causing organisms in the soil.
➤Plant your seeds in the same way as you would in a seed bed.
tin clay pot
wooden box
old tyre
basket woven
from reed
plastic bags
bamboo
From: Production without Destruction, 1995

page 90
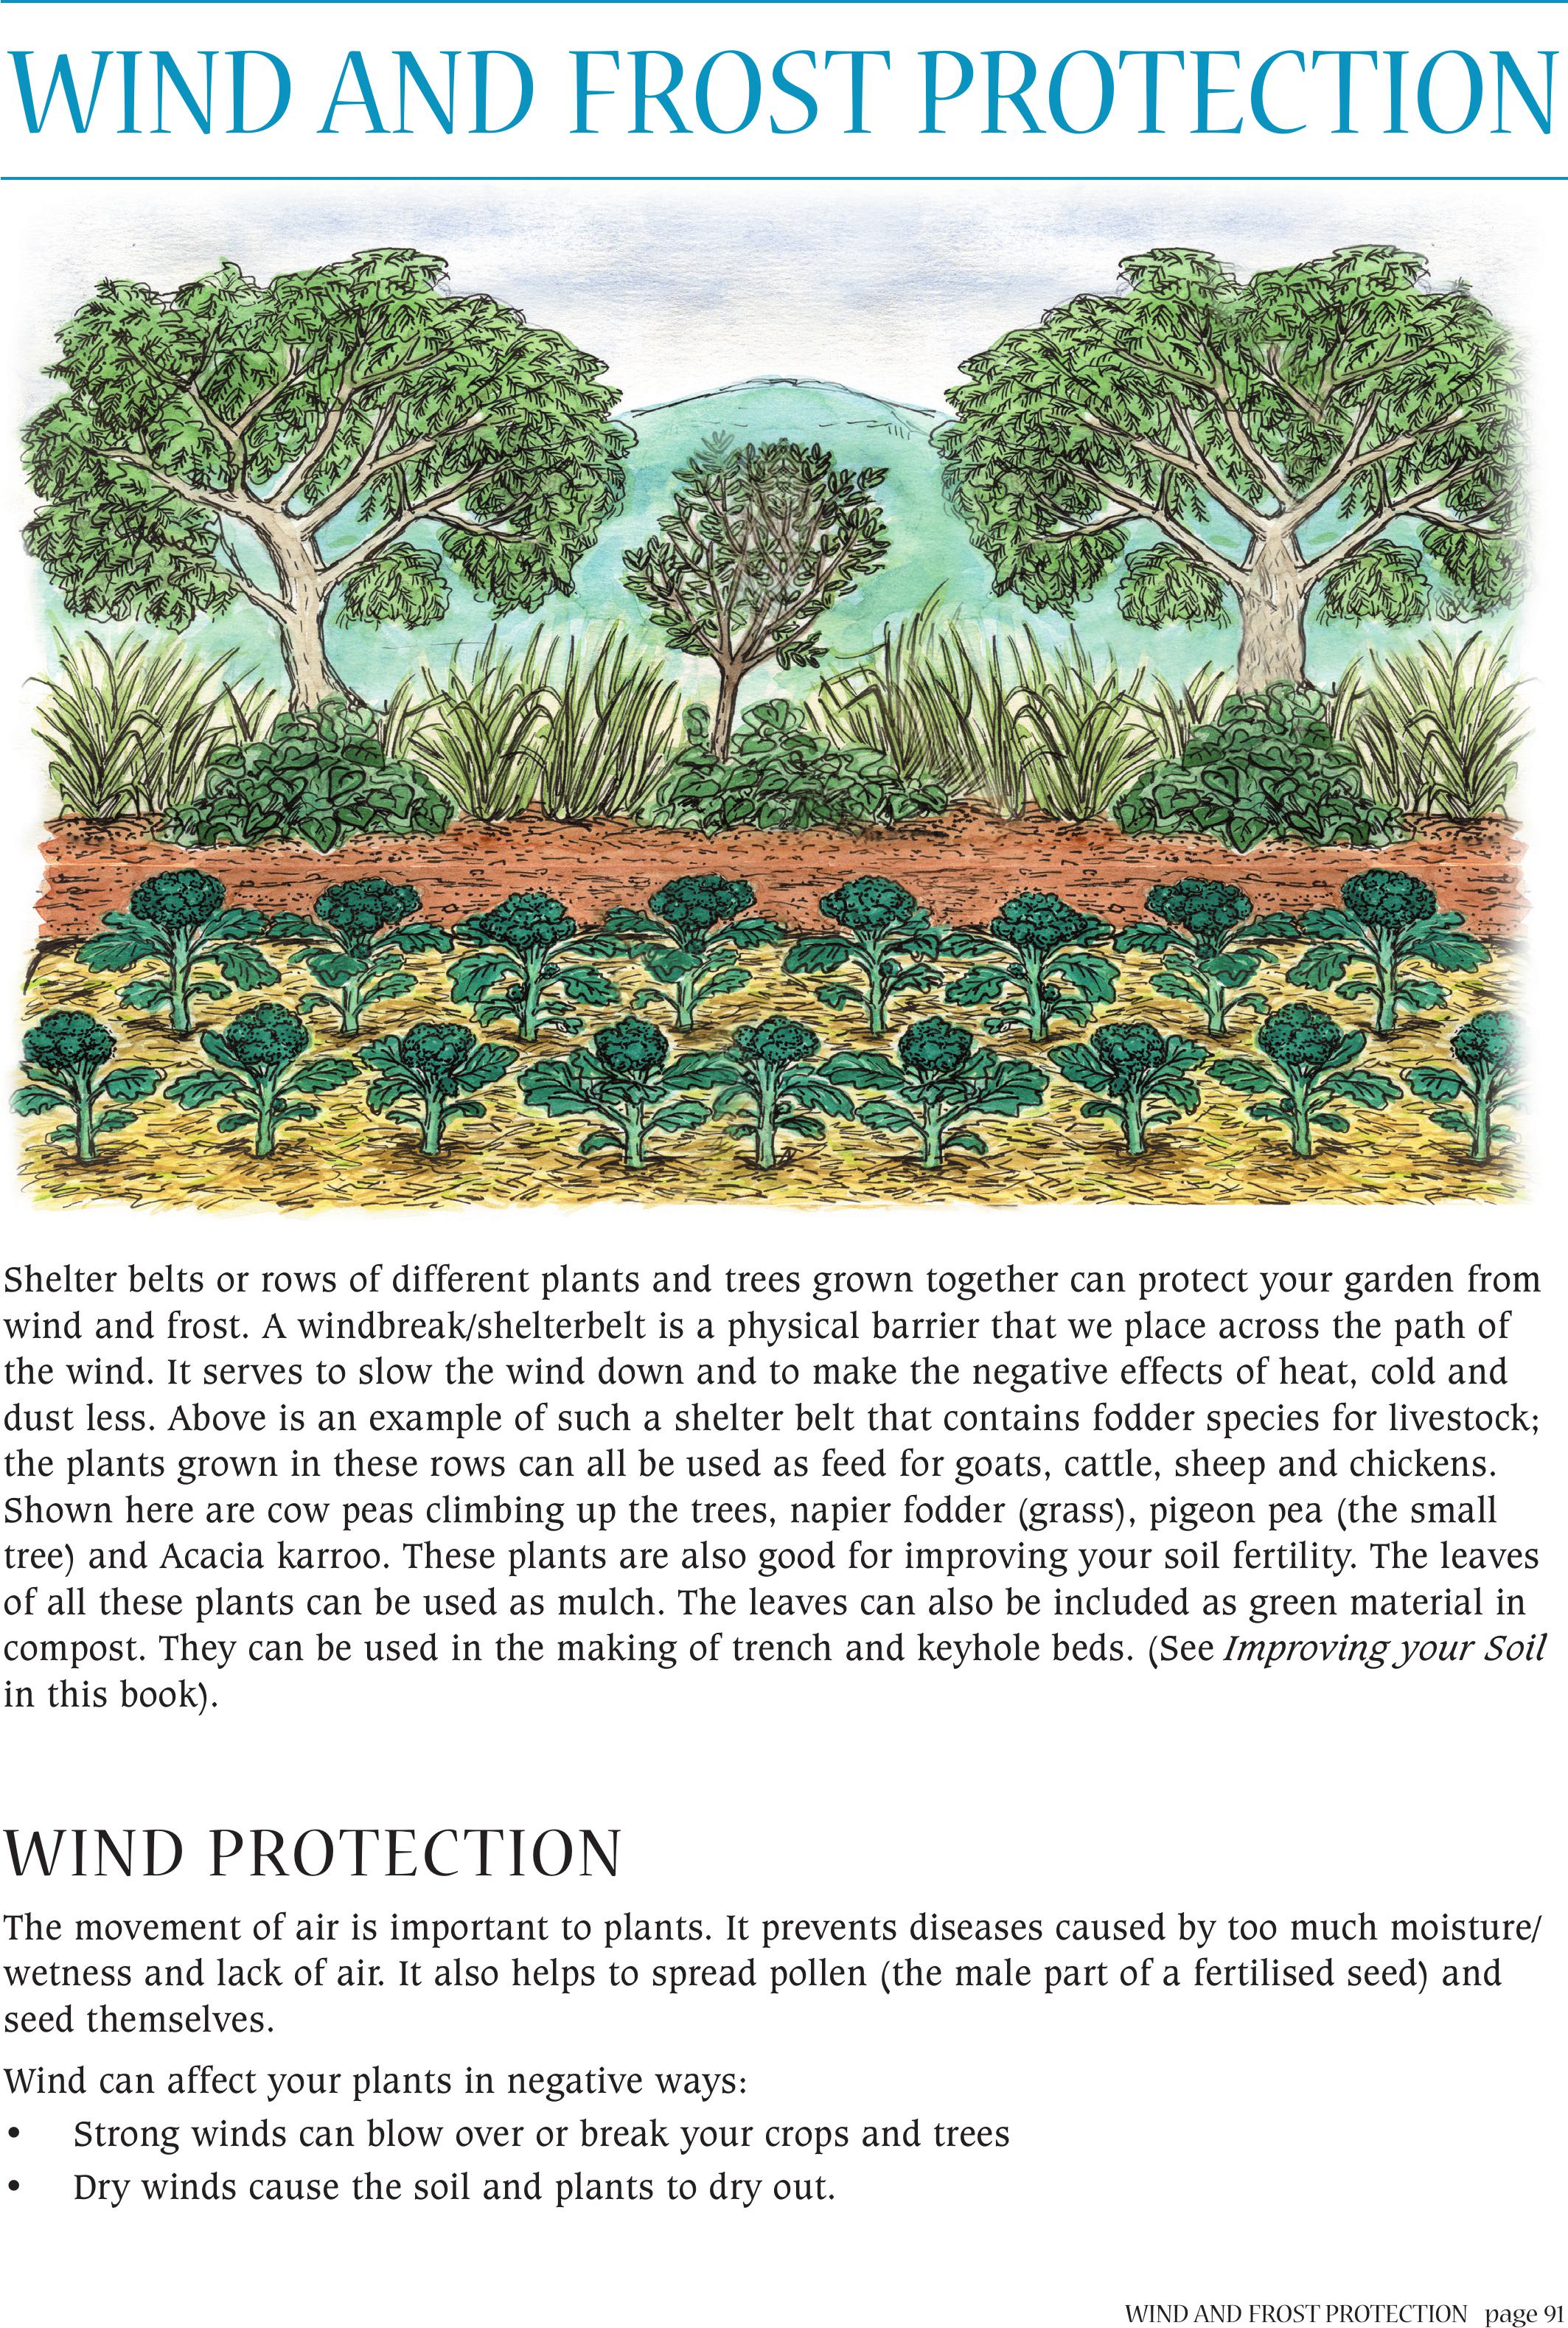
WIND AND FROST PROTECTION page 91
WIND AND FROST PROTECTION
Shelter belts or rows of different plants and trees grown together can protect your garden from
wind and frost. A windbreak/shelterbelt is a physical barrier that we place across the path of
the wind. It serves to slow the wind down and to make the negative effects of heat, cold and
dust less. Above is an example of such a shelter belt that contains fodder species for livestock;
the plants grown in these rows can all be used as feed for goats, cattle, sheep and chickens.
Shown here are cow peas climbing up the trees, napier fodder (grass), pigeon pea (the small
tree) and Acacia karroo. These plants are also good for improving your soil fertility. The leaves
of all these plants can be used as mulch. The leaves can also be included as green material in
compost. They can be used in the making of trench and keyhole beds. (See Improving your Soil
in this book).
WIND PROTECTION
The movement of air is important to plants. It prevents diseases caused by too much moisture/
wetness and lack of air. It also helps to spread pollen (the male part of a fertilised seed) and
seed themselves.
Wind can affect your plants in negative ways:
• Strong winds can blow over or break your crops and trees
• Dry winds cause the soil and plants to dry out.

page 92 WIND AND FROST PROTECTION
• Very hot or cold winds can destroy crops.
• Dust carried by the wind scratches plants
like sandpaper.
• Wind can also cause soil erosion, especially
in the dry months. Your top soil can be
blown away by the wind, leaving you with
the less fertile sub soil.
WHERE TO PLACE A
WINDBREAK
Windbreaks are planted across the path of the
main hot, cold and dry winds in your area.
Windbreaks are good around homesteads. They can also be planted along roads and paths and
also as boundaries around your fields and gardens.
HOW TO MAKE AWINDBREAK
It consists of rows of trees and shrubs, usually of various kinds and heights. They are planted
as a semi-solid barrier. This means that some air can still move through the windbreak, but it
will be slowed down. The best windbreaks consist of at least three rows of shrubs and trees of
different heights.
The trees and shrubs can also be planted in 1 or 2 rows, if you can make sure that branches
and leaves still grow close to the ground. With tall trees only, the lower branches die back over
time. The wind will then “tunnel” past these bare stems and damage your crops.
The shorter shrubs and plants can be planted on the side the wind is coming from as well.
Some extra
advantages of
windbreaks
• Can provide firewood
• Can provide fruit
• Can be thorny for protection
• Can provide fodder of animals
• Can provide medicine
From: Production without Destruction.
Natural Farming Network, Zimbabwe
WIND BREAKHEDGEHEDGECROP CROP
STRONG WIND

WIND AND FROST PROTECTION page 93
Here are some examples of plants, shrubs and trees that you can use! Small plants
• Aloes
• Comfrey
• Wormwood
• Herbs such as
rosemary, thyme,
lavender, ….
• Marigolds
• Fennel
• Runner beans
• Vines such as grapes
and passion fruit
Shrubs
• Napier fodder
• Pigeon pea
• Buddleja or Sagewood
• Halleria or Tree
Fuchsia
• Dovyalis or Kei-Apple
• Carrissa or Num-Num
• Euclea or Blue Guarri
Trees
• Casuarina or
Beefwood
• Acacia or Sweet thorn
• Mulberry
More about some of the suggested small
plants, shrubs and trees
Aloe
These are good for protection as they often are thorny. They also
provide some protection against fire, as the leaves are fleshy and
hold a lot of water. They can be used for medicine. A good kind to
use, is Aloe maculata. This is a low growing aloe with white
speckles on the leaves. The gel in the leaves is very good as a
medicine for constipation and contains a trace element known as
selenium. Selenium is a very important supplement for your
immune system.
The aloe often grown around homesteads, Aloe striatula, which has
long, thin leaves, can be a bit invasive.
Marigolds and Fennel
These are small strong smelling plants that
help to protect your garden from insect
attack. The white umbrella like flowers of
fennel help to attract insects (predatory
wasps) that eat the pests in your garden
(worms and aphids). Marigolds can be used
to make a poison that will kill small worms
(nematodes) in your soil.
SMALL, DENSE
PLANTS
SHRUB CROPTALL, LEAFY
TREE
From: The People’s Farming Workbook, EDA, 1995
T
H
E
W
I
N
D
I
S
F
O
R
C
E
D
U
P
A
N
D
O
V
E
R
Y
O
U
R
L
A
N
D
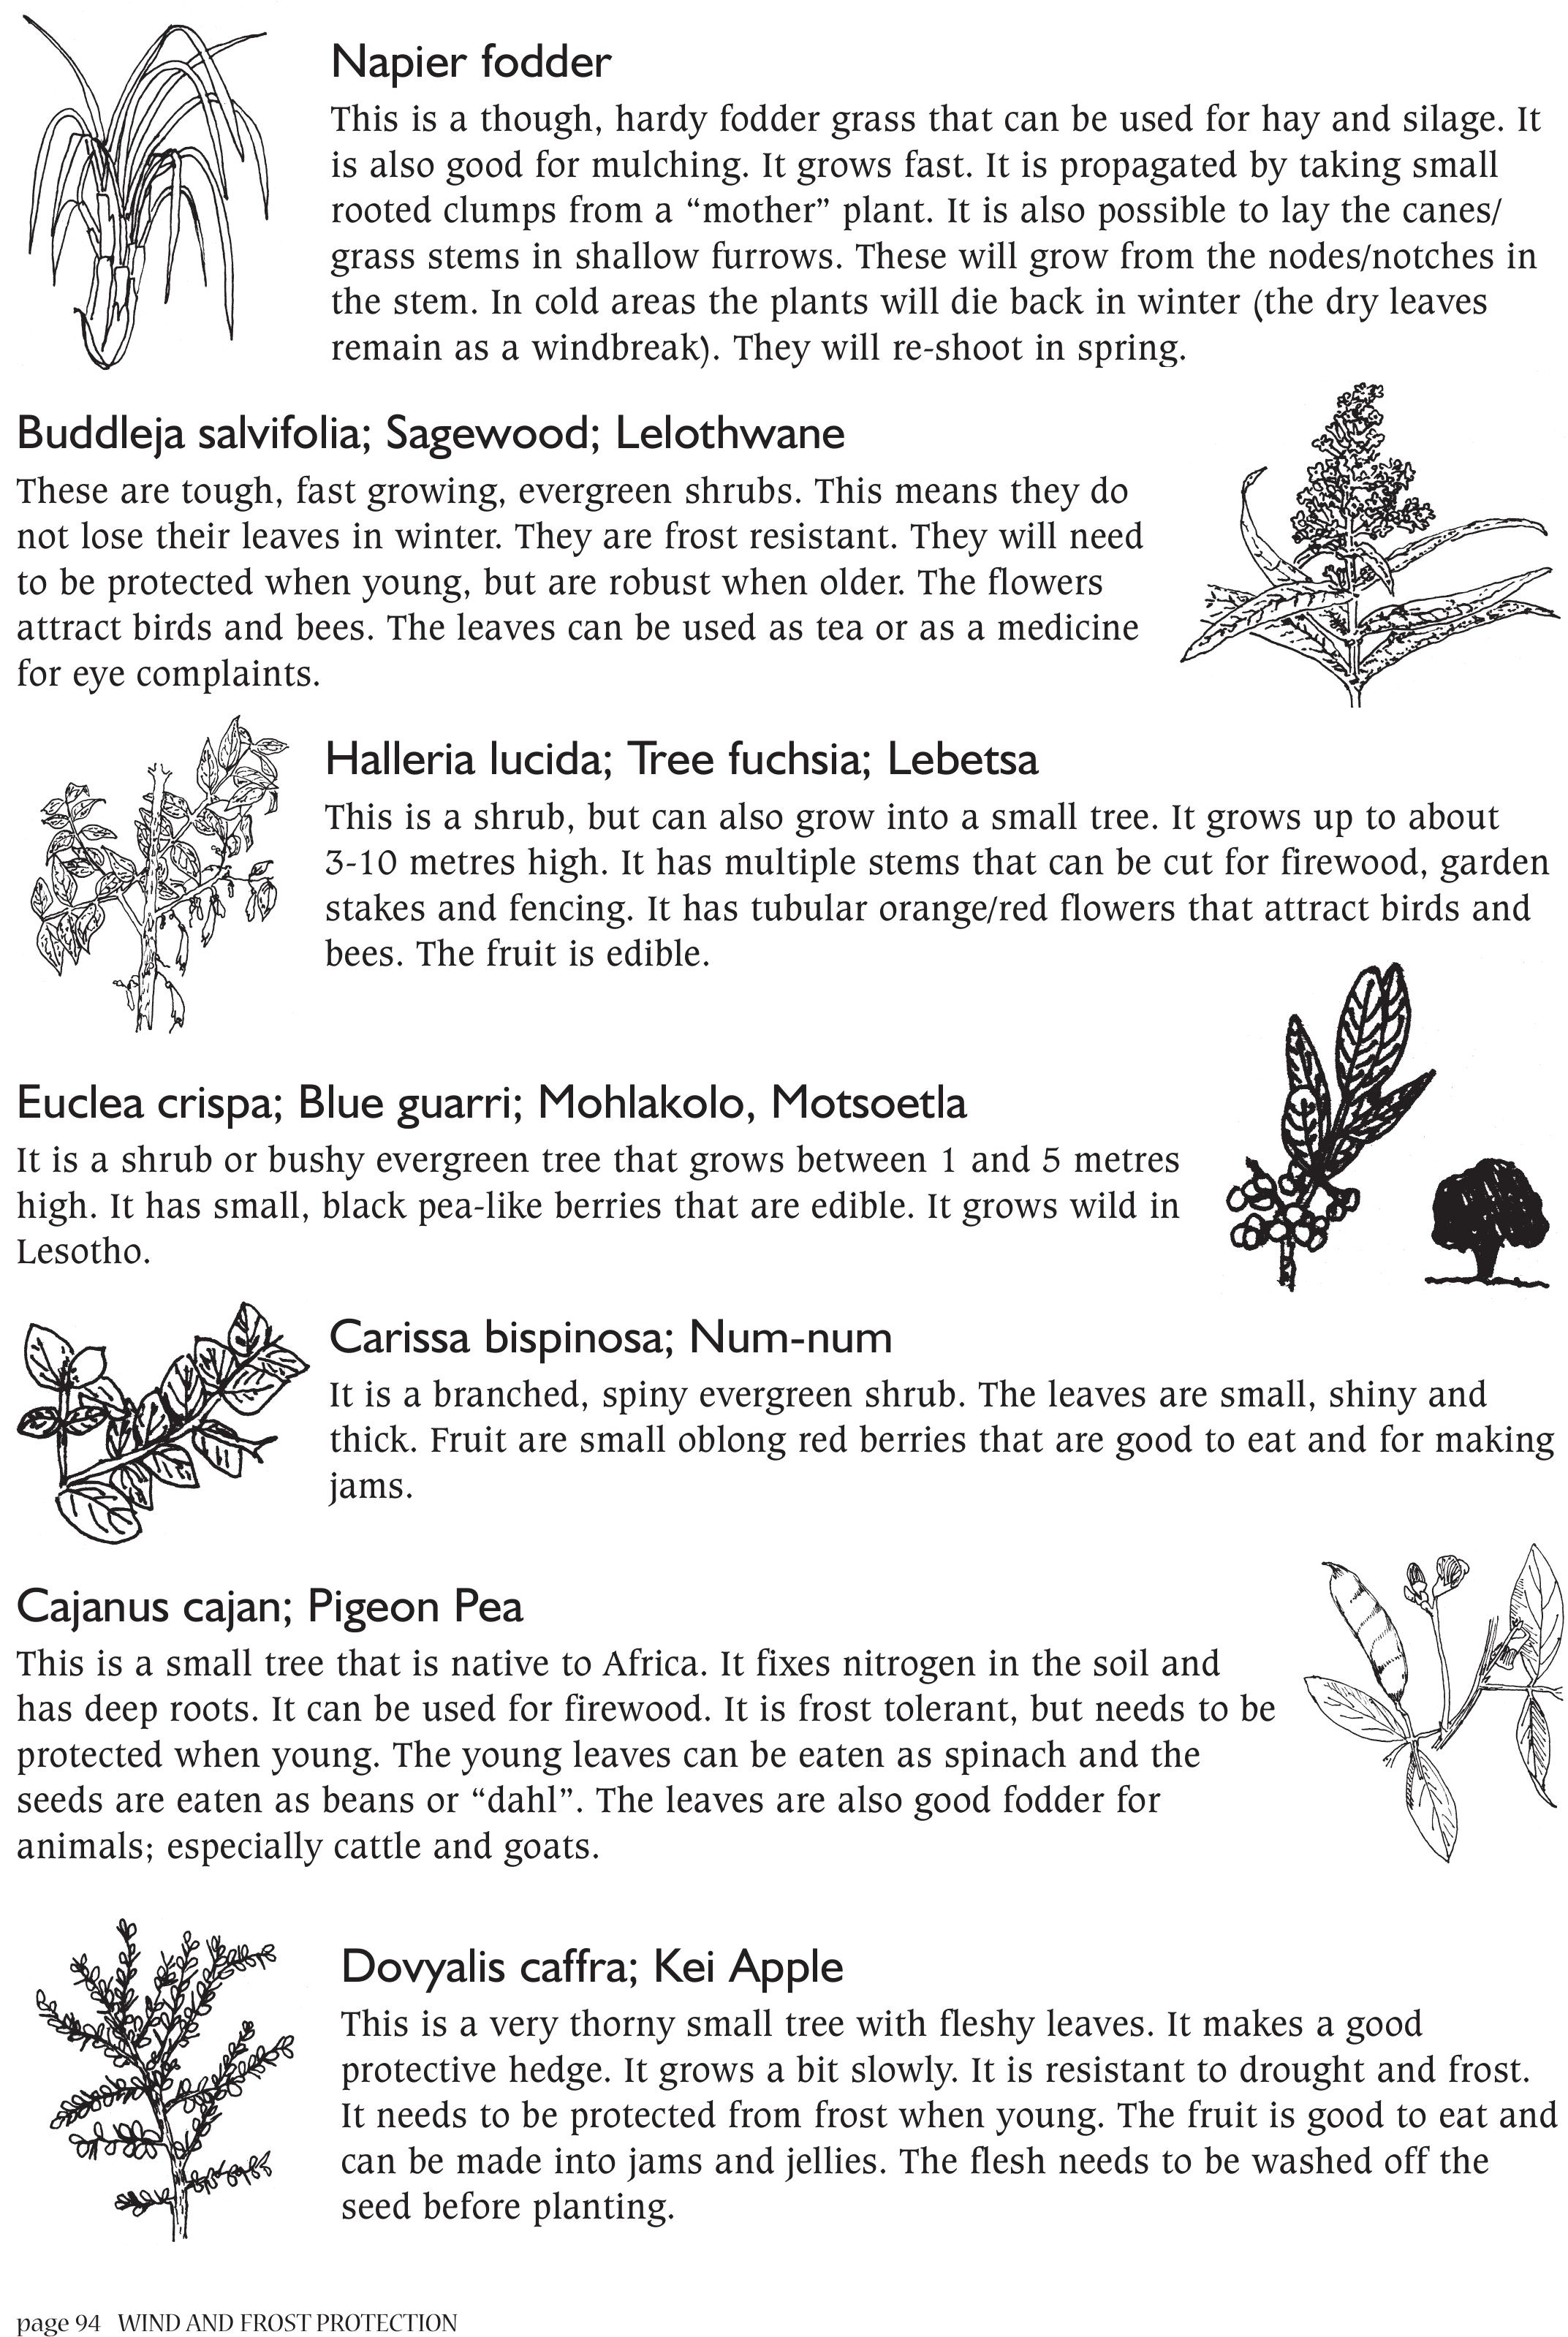
page 94 WIND AND FROST PROTECTION
Napier fodder
This is a though, hardy fodder grass that can be used for hay and silage. It
is also good for mulching. It grows fast. It is propagated by taking small
rooted clumps from a “mother” plant. It is also possible to lay the canes/
grass stems in shallow furrows. These will grow from the nodes/notches in
the stem. In cold areas the plants will die back in winter (the dry leaves
remain as a windbreak). They will re-shoot in spring.
Buddleja salvifolia; Sagewood; Lelothwane
These are tough, fast growing, evergreen shrubs. This means they do
not lose their leaves in winter. They are frost resistant. They will need
to be protected when young, but are robust when older. The flowers
attract birds and bees. The leaves can be used as tea or as a medicine
for eye complaints.
Halleria lucida; Tree fuchsia; Lebetsa
This is a shrub, but can also grow into a small tree. It grows up to about
3-10 metres high. It has multiple stems that can be cut for firewood, garden
stakes and fencing. It has tubular orange/red flowers that attract birds and
bees. The fruit is edible.
Euclea crispa; Blue guarri; Mohlakolo, Motsoetla
It is a shrub or bushy evergreen tree that grows between 1 and 5 metres
high. It has small, black pea-like berries that are edible. It grows wild in
Lesotho.
Carissa bispinosa; Num-num
It is a branched, spiny evergreen shrub. The leaves are small, shiny and
thick. Fruit are small oblong red berries that are good to eat and for making
jams.
Cajanus cajan; Pigeon Pea
This is a small tree that is native to Africa. It fixes nitrogen in the soil and
has deep roots. It can be used for firewood. It is frost tolerant, but needs to be
protected when young. The young leaves can be eaten as spinach and the
seeds are eaten as beans or “dahl”. The leaves are also good fodder for
animals; especially cattle and goats.
Dovyalis caffra; Kei Apple
This is a very thorny small tree with fleshy leaves. It makes a good
protective hedge. It grows a bit slowly. It is resistant to drought and frost.
It needs to be protected from frost when young. The fruit is good to eat and
can be made into jams and jellies. The flesh needs to be washed off the
seed before planting.

WIND AND FROST PROTECTION page 95
Mulberry
These are large deciduous trees. This means they lose their leaves in
winter. The leaves are good animal fodder. The small black berries are
very sweet and can also be used for making jam. Mulberries are easy to
grow from cuttings. They can be pruned and these branches can be used
for fences, stakes and firewood.
It is possible to plant fruit trees
together with some of the trees
and plants mentioned here.
This helps to protect your fruit
from pest attack and wind and
frost damage. On the left is an
example of a peach tree
planted with runner beans,
marigolds, fennel and Pigeon
Peas. Different combinations of
plants can be used.
Casuarina Cunningham; Beefwood
This tree originally comes from Asia and Australia. It is a large shady
tree with leaves that look like pine needles. It grows very fast and can
grow in poor soil. It provides good timber and firewood. It can be
planted easily from seed. It is moderately frost resistant and should be
protected when young.
Acacia karroo; Sweet Thorn
These are very hardy, fast growing, very
thorny trees. They are frost and drought
resistant. They fix nitrogen into the soil.
The tree provides good firewood. Leaves,
flowers and pods are good animal
fodder.
RUNNER BEANS
MARIGOLD
FENNEL
PEACH
PIGEON PEA
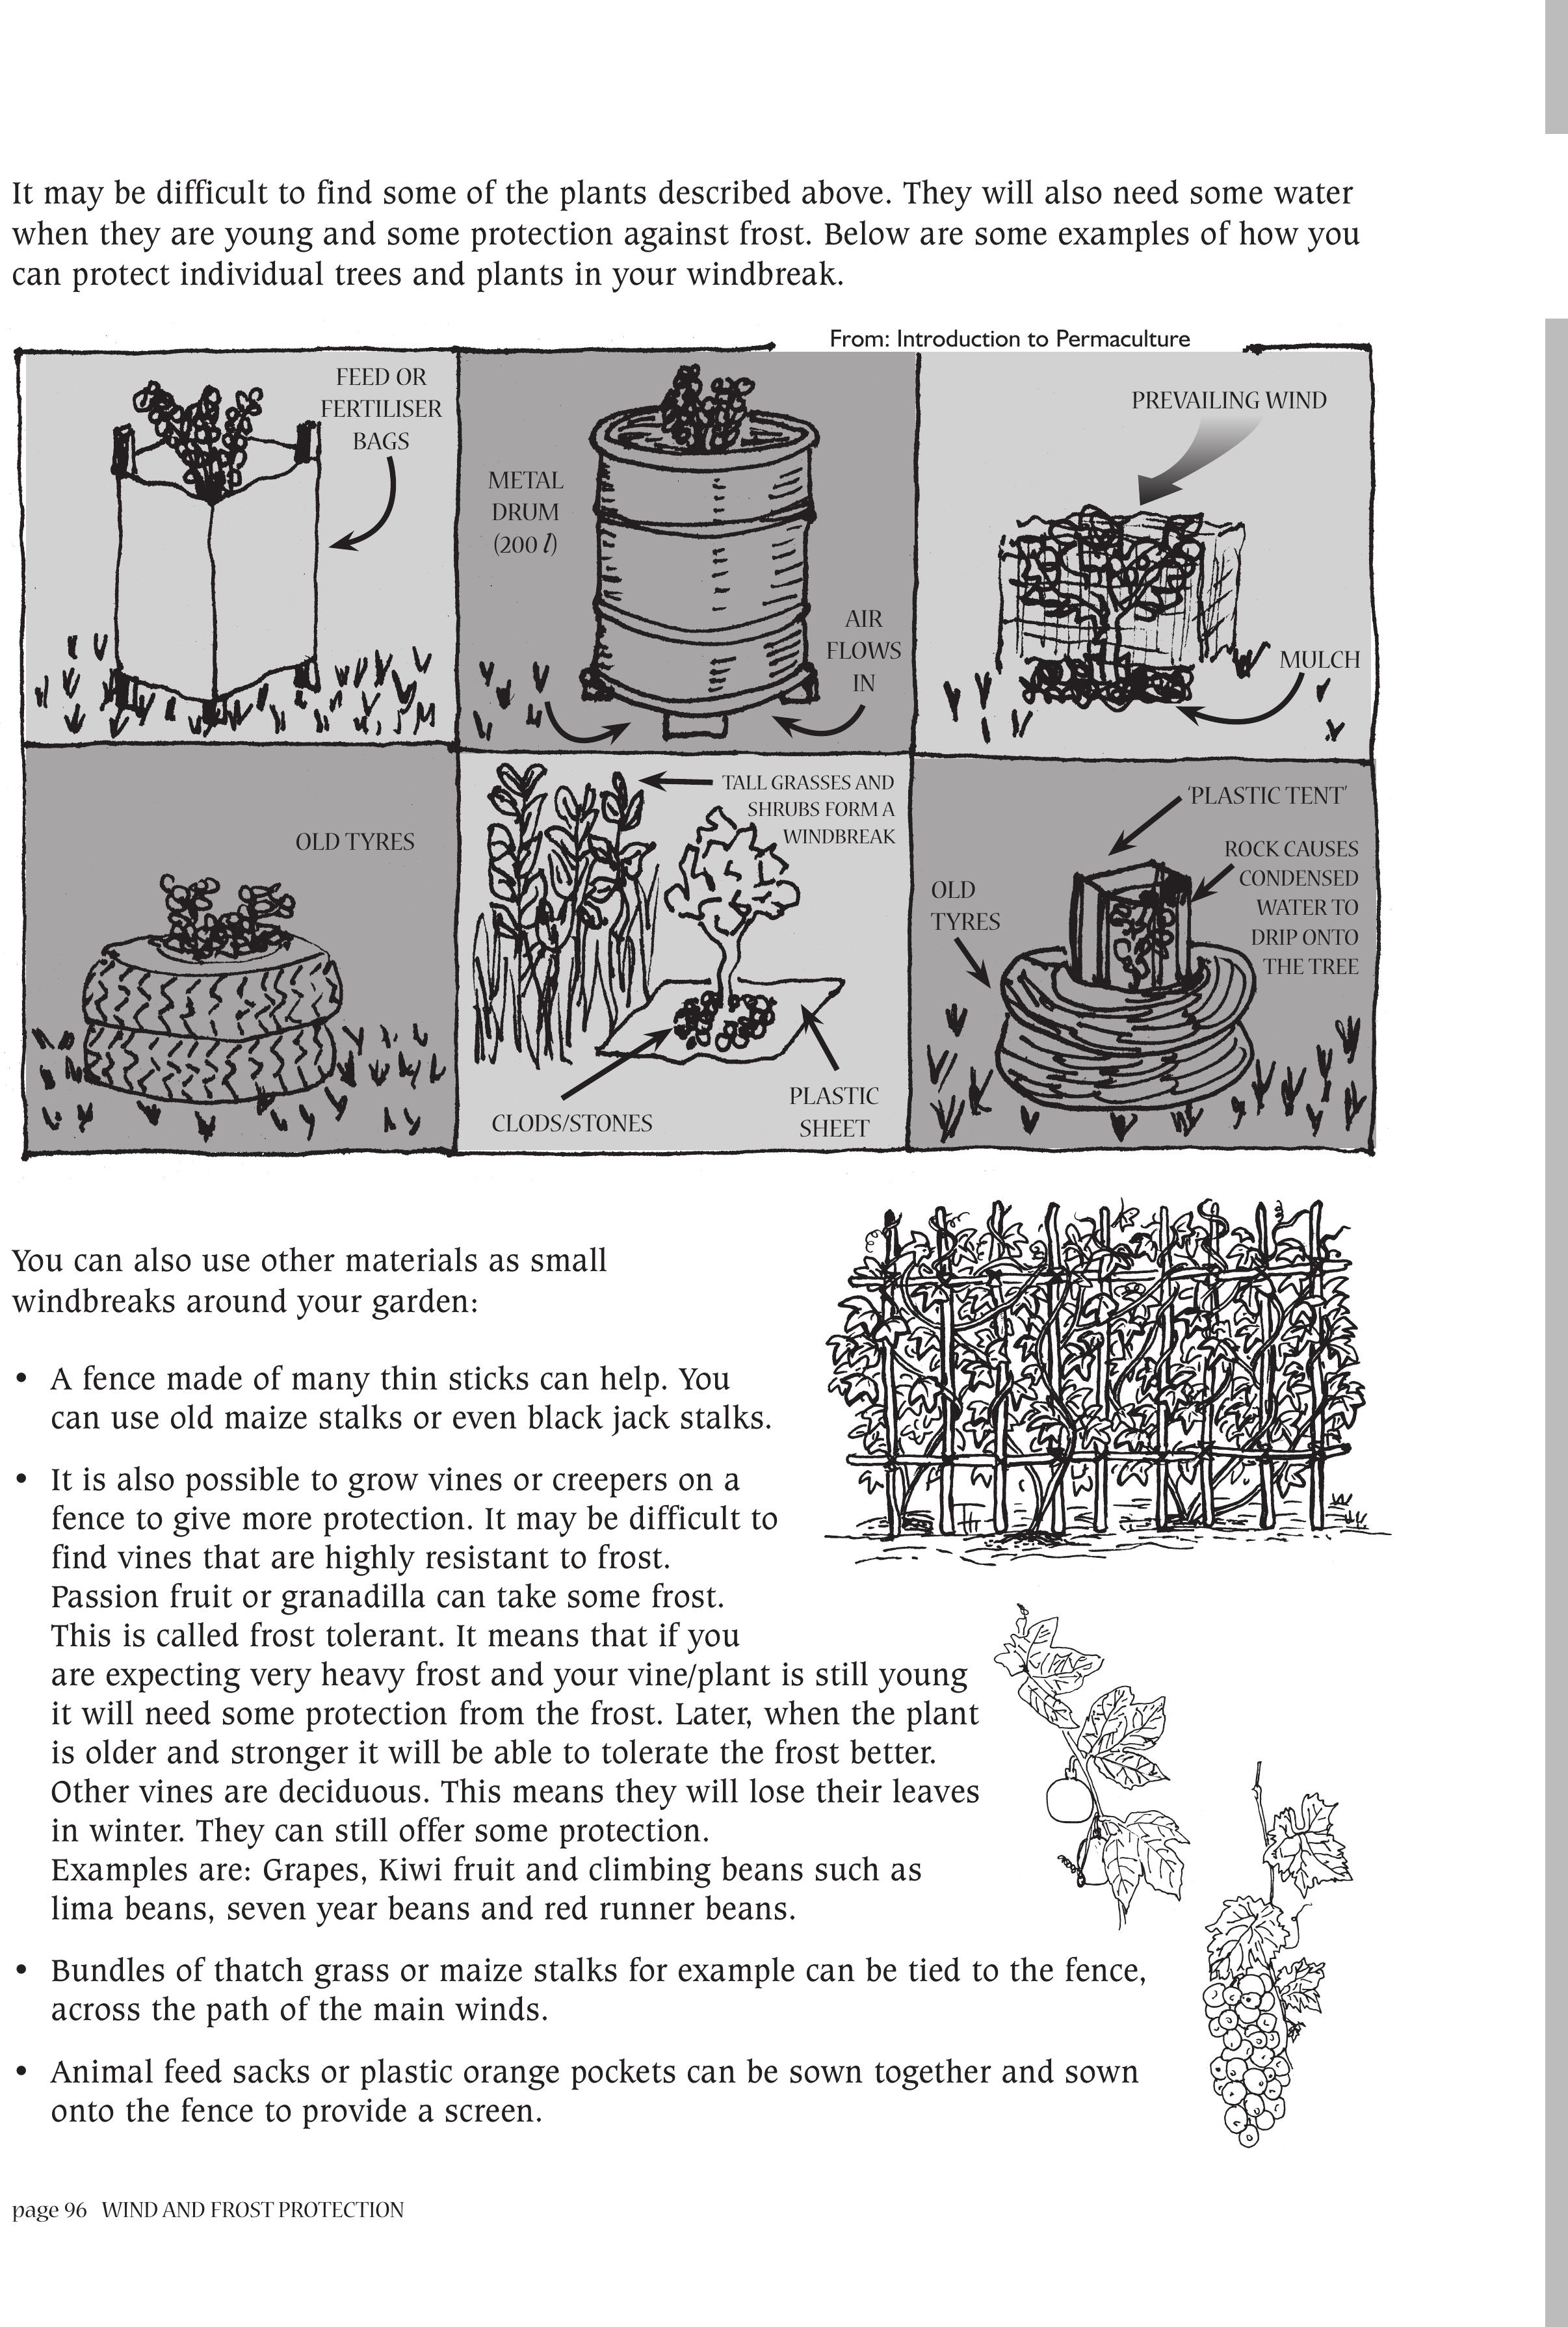
page 96 WIND AND FROST PROTECTION
You can also use other materials as small
windbreaks around your garden:
• A fence made of many thin sticks can help. You
can use old maize stalks or even black jack stalks.
• It is also possible to grow vines or creepers on a
fence to give more protection. It may be difficult to
find vines that are highly resistant to frost.
Passion fruit or granadilla can take some frost.
This is called frost tolerant. It means that if you
are expecting very heavy frost and your vine/plant is still young
it will need some protection from the frost. Later, when the plant
is older and stronger it will be able to tolerate the frost better.
Other vines are deciduous. This means they will lose their leaves
in winter. They can still offer some protection.
Examples are: Grapes, Kiwi fruit and climbing beans such as
lima beans, seven year beans and red runner beans.
• Bundles of thatch grass or maize stalks for example can be tied to the fence,
across the path of the main winds.
• Animal feed sacks or plastic orange pockets can be sown together and sown
onto the fence to provide a screen.
FEED OR
FERTILISER
BAGS
METAL
DRUM
(200 l)
AIR
FLOWS
IN
From: Introduction to Permaculture
PREVAILING WIND
MULCH
OLD TYRES
TALL GRASSES AND
SHRUBS FORM A
WINDBREAK
CLODS/STONES
PLASTIC
SHEET
‘PLASTIC TENT’
ROCK CAUSES
CONDENSED
WATER TO
DRIP ONTO
THE TREE
OLD
TYRES
It may be difficult to find some of the plants described above. They will also need some water
when they are young and some protection against frost. Below are some examples of how you
can protect individual trees and plants in your windbreak.
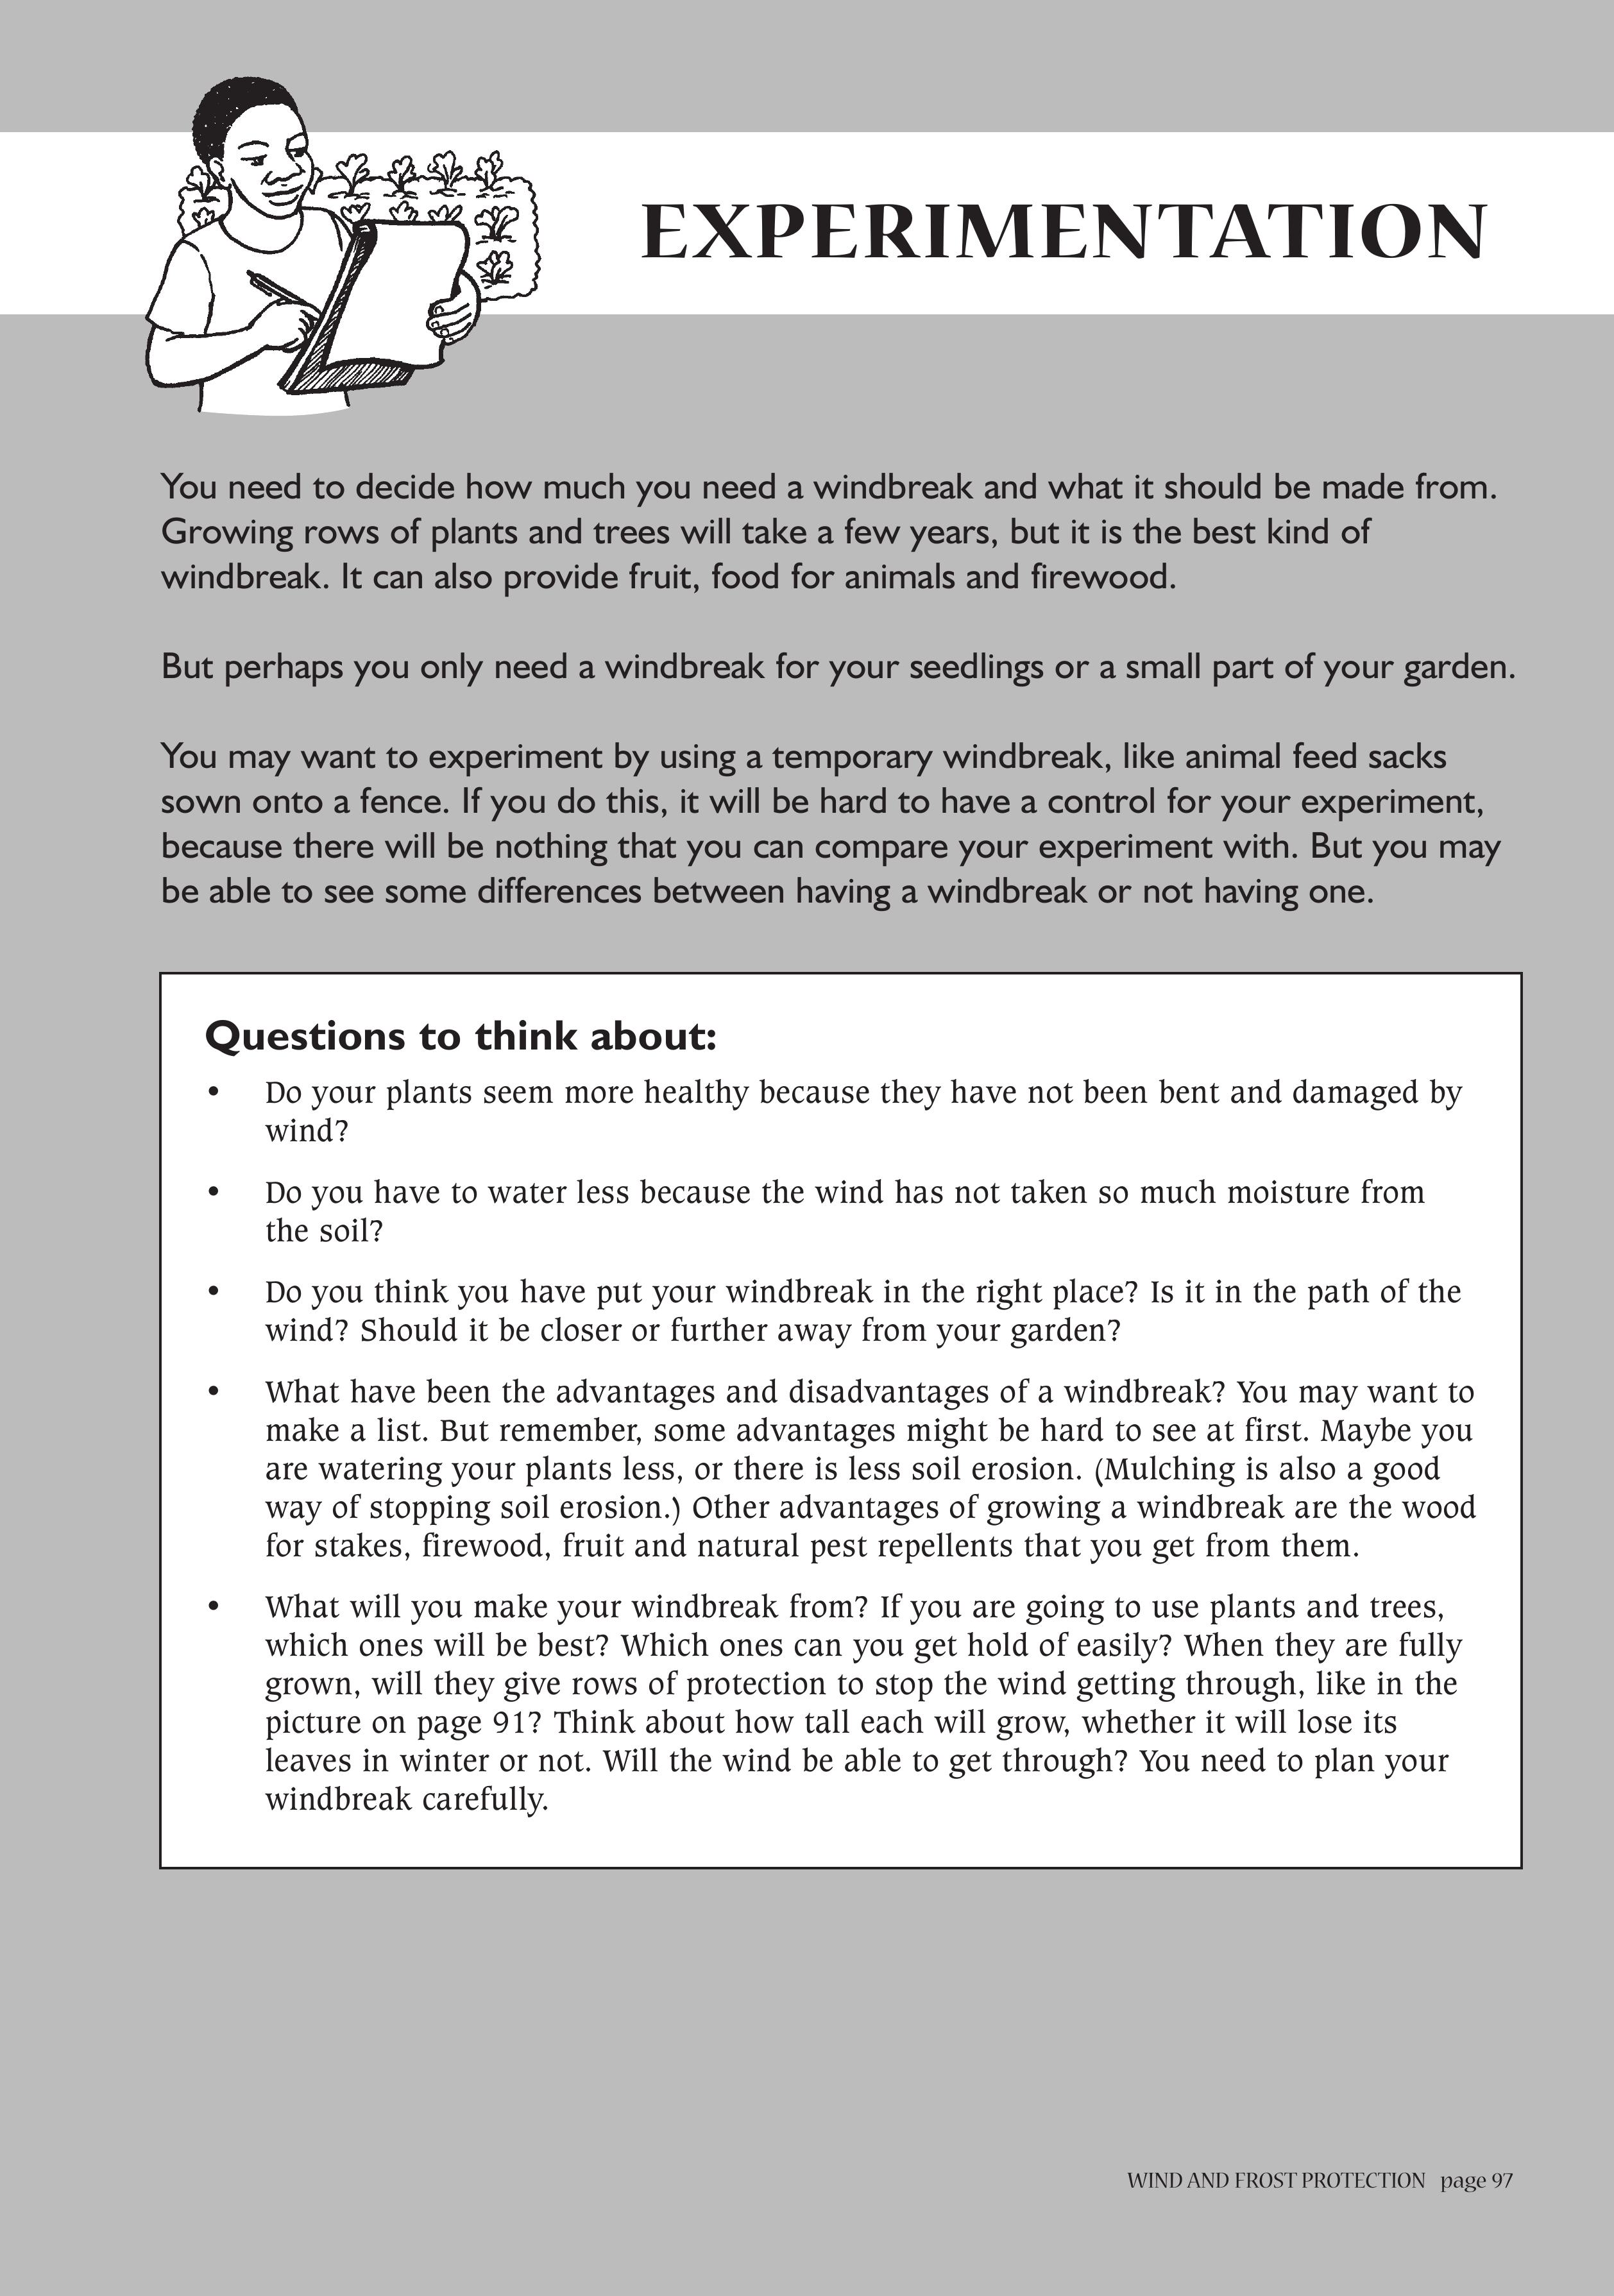
Questions to think about:
• Do your plants seem more healthy because they have not been bent and damaged by
wind?
• Do you have to water less because the wind has not taken so much moisture from
the soil?
• Do you think you have put your windbreak in the right place? Is it in the path of the
wind? Should it be closer or further away from your garden?
• What have been the advantages and disadvantages of a windbreak? You may want to
make a list. But remember, some advantages might be hard to see at first. Maybe you
are watering your plants less, or there is less soil erosion. (Mulching is also a good
way of stopping soil erosion.) Other advantages of growing a windbreak are the wood
for stakes, firewood, fruit and natural pest repellents that you get from them.
• What will you make your windbreak from? If you are going to use plants and trees,
which ones will be best? Which ones can you get hold of easily? When they are fully
grown, will they give rows of protection to stop the wind getting through, like in the
picture on page 91? Think about how tall each will grow, whether it will lose its
leaves in winter or not. Will the wind be able to get through? You need to plan your
windbreak carefully.
You need to decide how much you need a windbreak and what it should be made from.
Growing rows of plants and trees will take a few years, but it is the best kind of
windbreak. It can also provide fruit, food for animals and firewood.
But perhaps you only need a windbreak for your seedlings or a small part of your garden.
You may want to experiment by using a temporary windbreak, like animal feed sacks
sown onto a fence. If you do this, it will be hard to have a control for your experiment,
because there will be nothing that you can compare your experiment with. But you may
be able to see some differences between having a windbreak or not having one.
EXPERIMENTATION
WIND AND FROST PROTECTION page 97
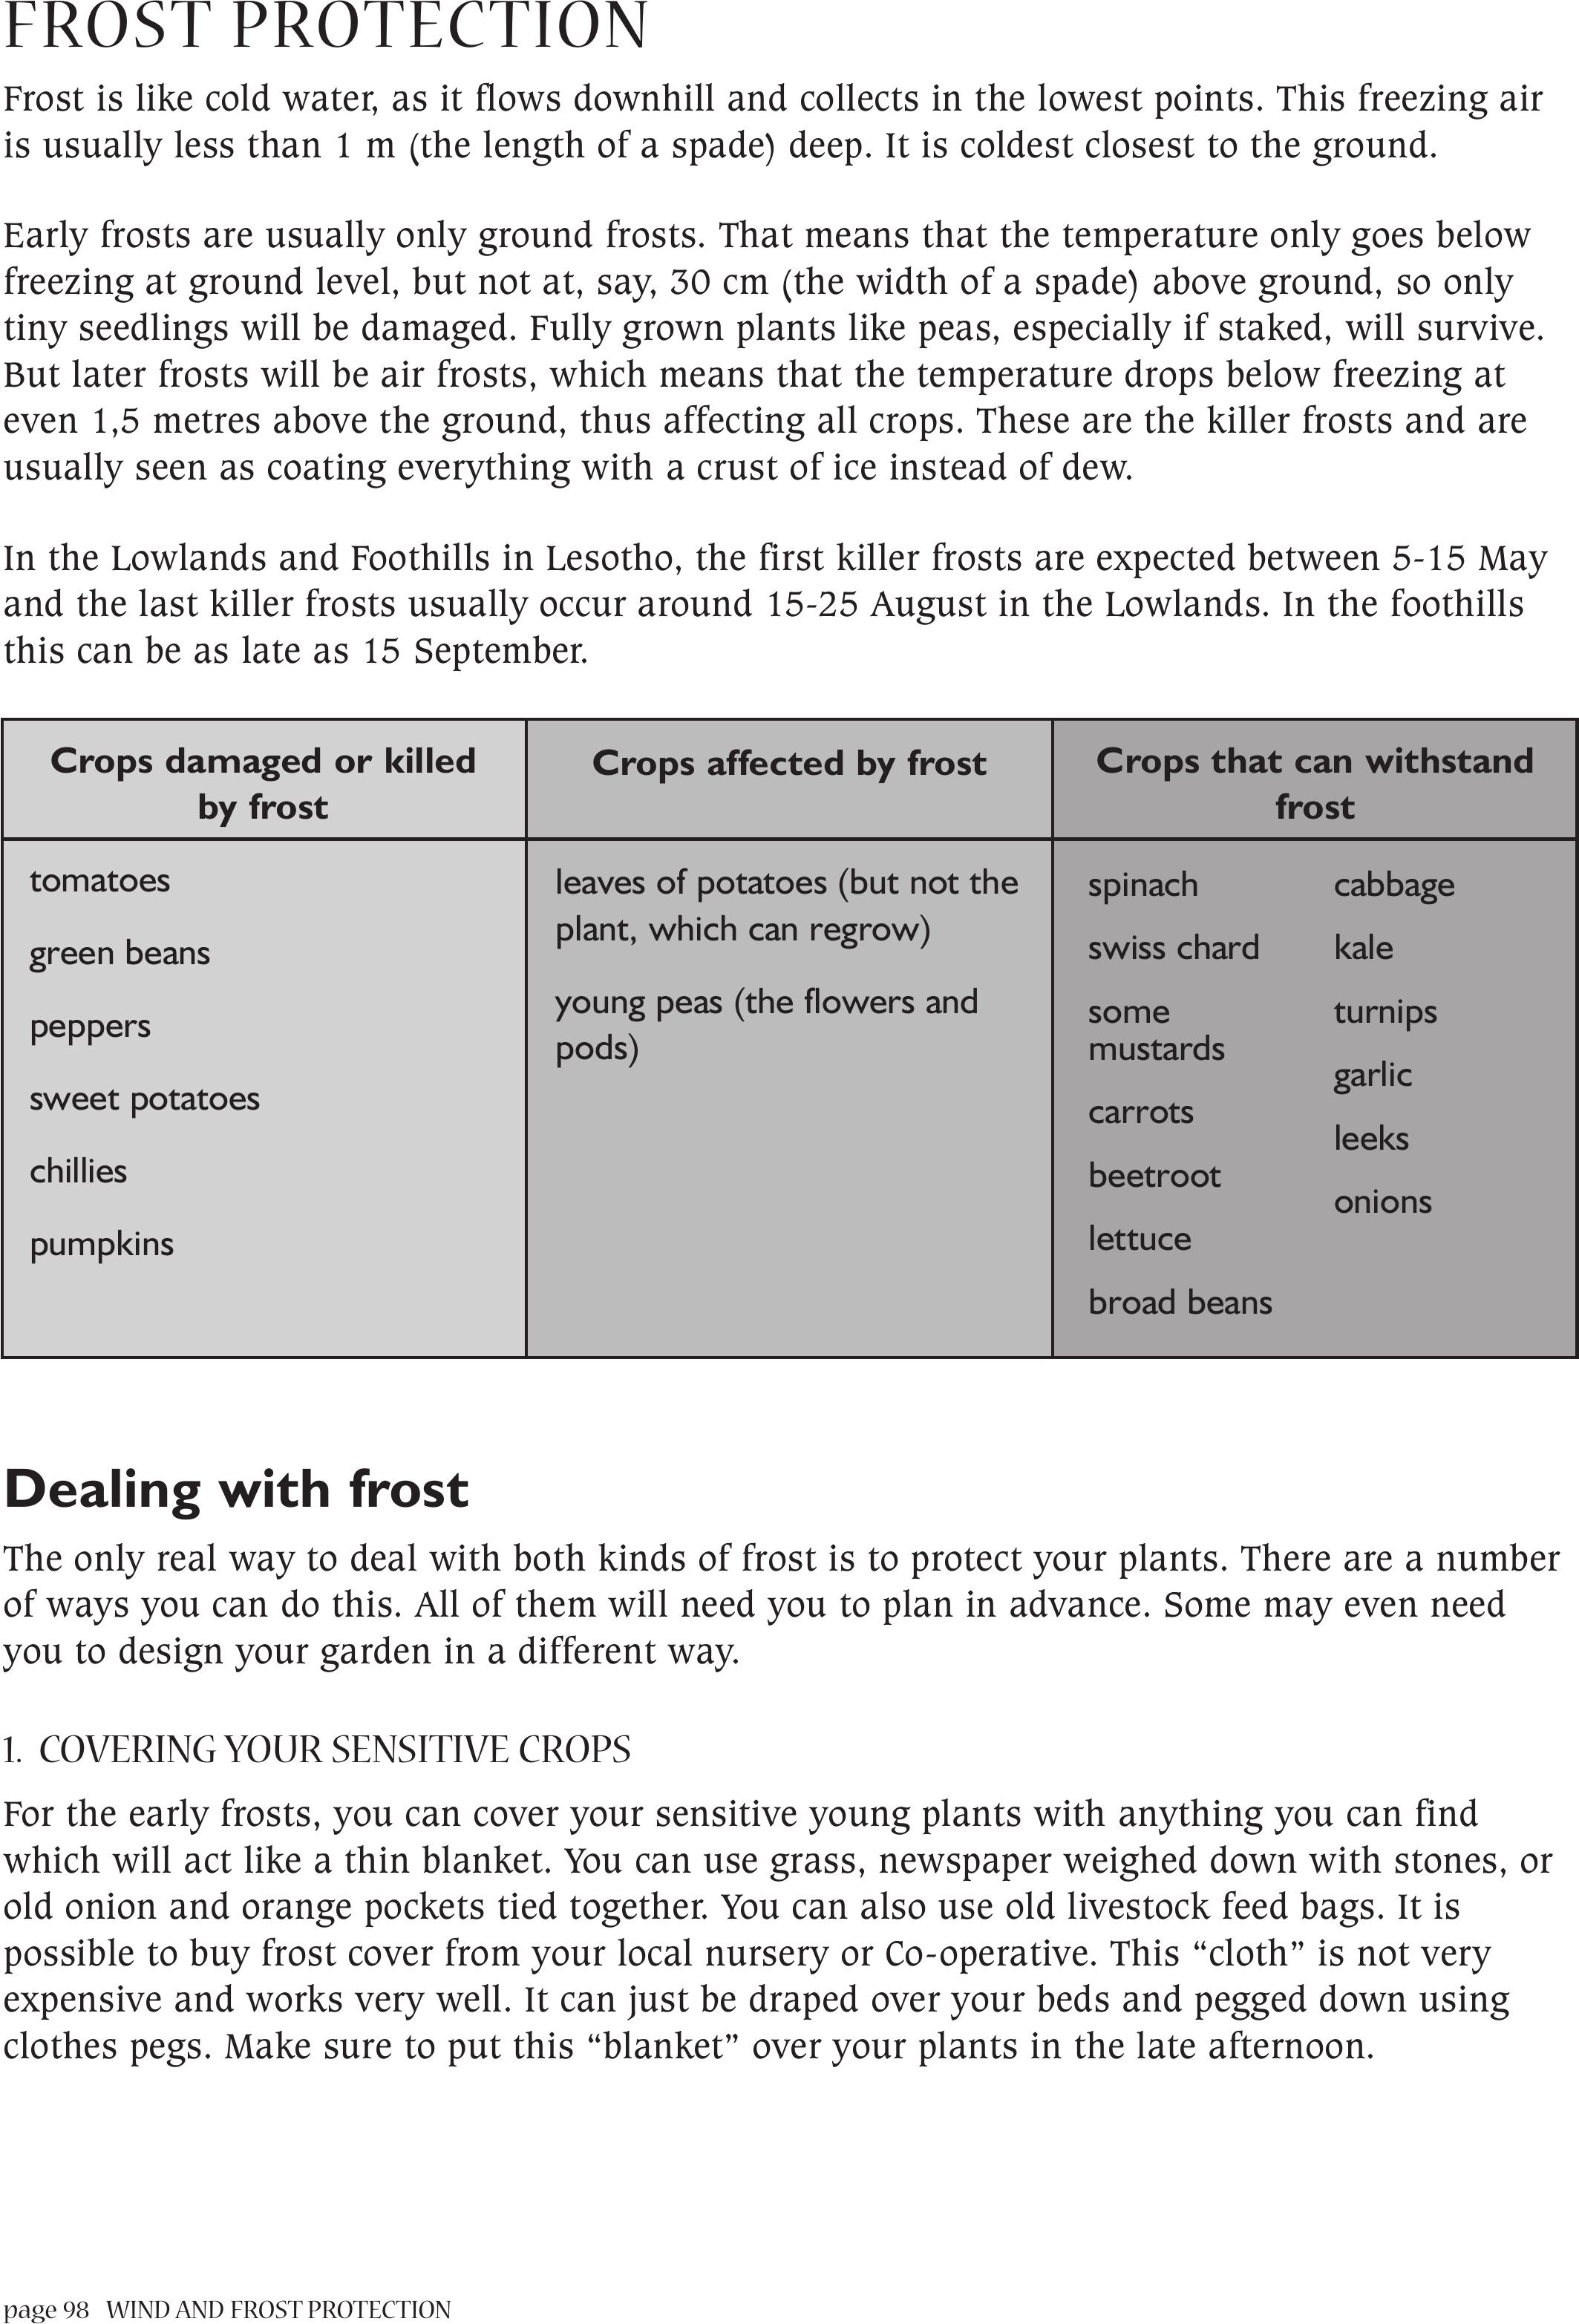
page 98 WIND AND FROST PROTECTION
FROST PROTECTION
Frost is like cold water, as it flows downhill and collects in the lowest points. This freezing air
is usually less than 1 m (the length of a spade) deep. It is coldest closest to the ground.
Early frosts are usually only ground frosts. That means that the temperature only goes below
freezing at ground level, but not at, say, 30 cm (the width of a spade) above ground, so only
tiny seedlings will be damaged. Fully grown plants like peas, especially if staked, will survive.
But later frosts will be air frosts, which means that the temperature drops below freezing at
even 1,5 metres above the ground, thus affecting all crops. These are the killer frosts and are
usually seen as coating everything with a crust of ice instead of dew.
In the Lowlands and Foothills in Lesotho, the first killer frosts are expected between 5-15 May
and the last killer frosts usually occur around 15-25 August in the Lowlands. In the foothills
this can be as late as 15 September.
Dealing with frost
The only real way to deal with both kinds of frost is to protect your plants. There are a number
of ways you can do this. All of them will need you to plan in advance. Some may even need
you to design your garden in a different way.
1. COVERING YOUR SENSITIVE CROPS
For the early frosts, you can cover your sensitive young plants with anything you can find
which will act like a thin blanket. You can use grass, newspaper weighed down with stones, or
old onion and orange pockets tied together. You can also use old livestock feed bags. It is
possible to buy frost cover from your local nursery or Co-operative. This “cloth” is not very
expensive and works very well. It can just be draped over your beds and pegged down using
clothes pegs. Make sure to put this “blanket” over your plants in the late afternoon.
Crops damaged or killed
by frost
tomatoes
green beans
peppers
sweet potatoes
chillies
pumpkins
Crops affected by frost
leaves of potatoes (but not the
plant, which can regrow)
young peas (the flowers and
pods)
Crops that can withstand
frost
spinach
swiss chard
some
mustards
carrots
beetroot
lettuce
broad beans
cabbage
kale
turnips
garlic
leeks
onions
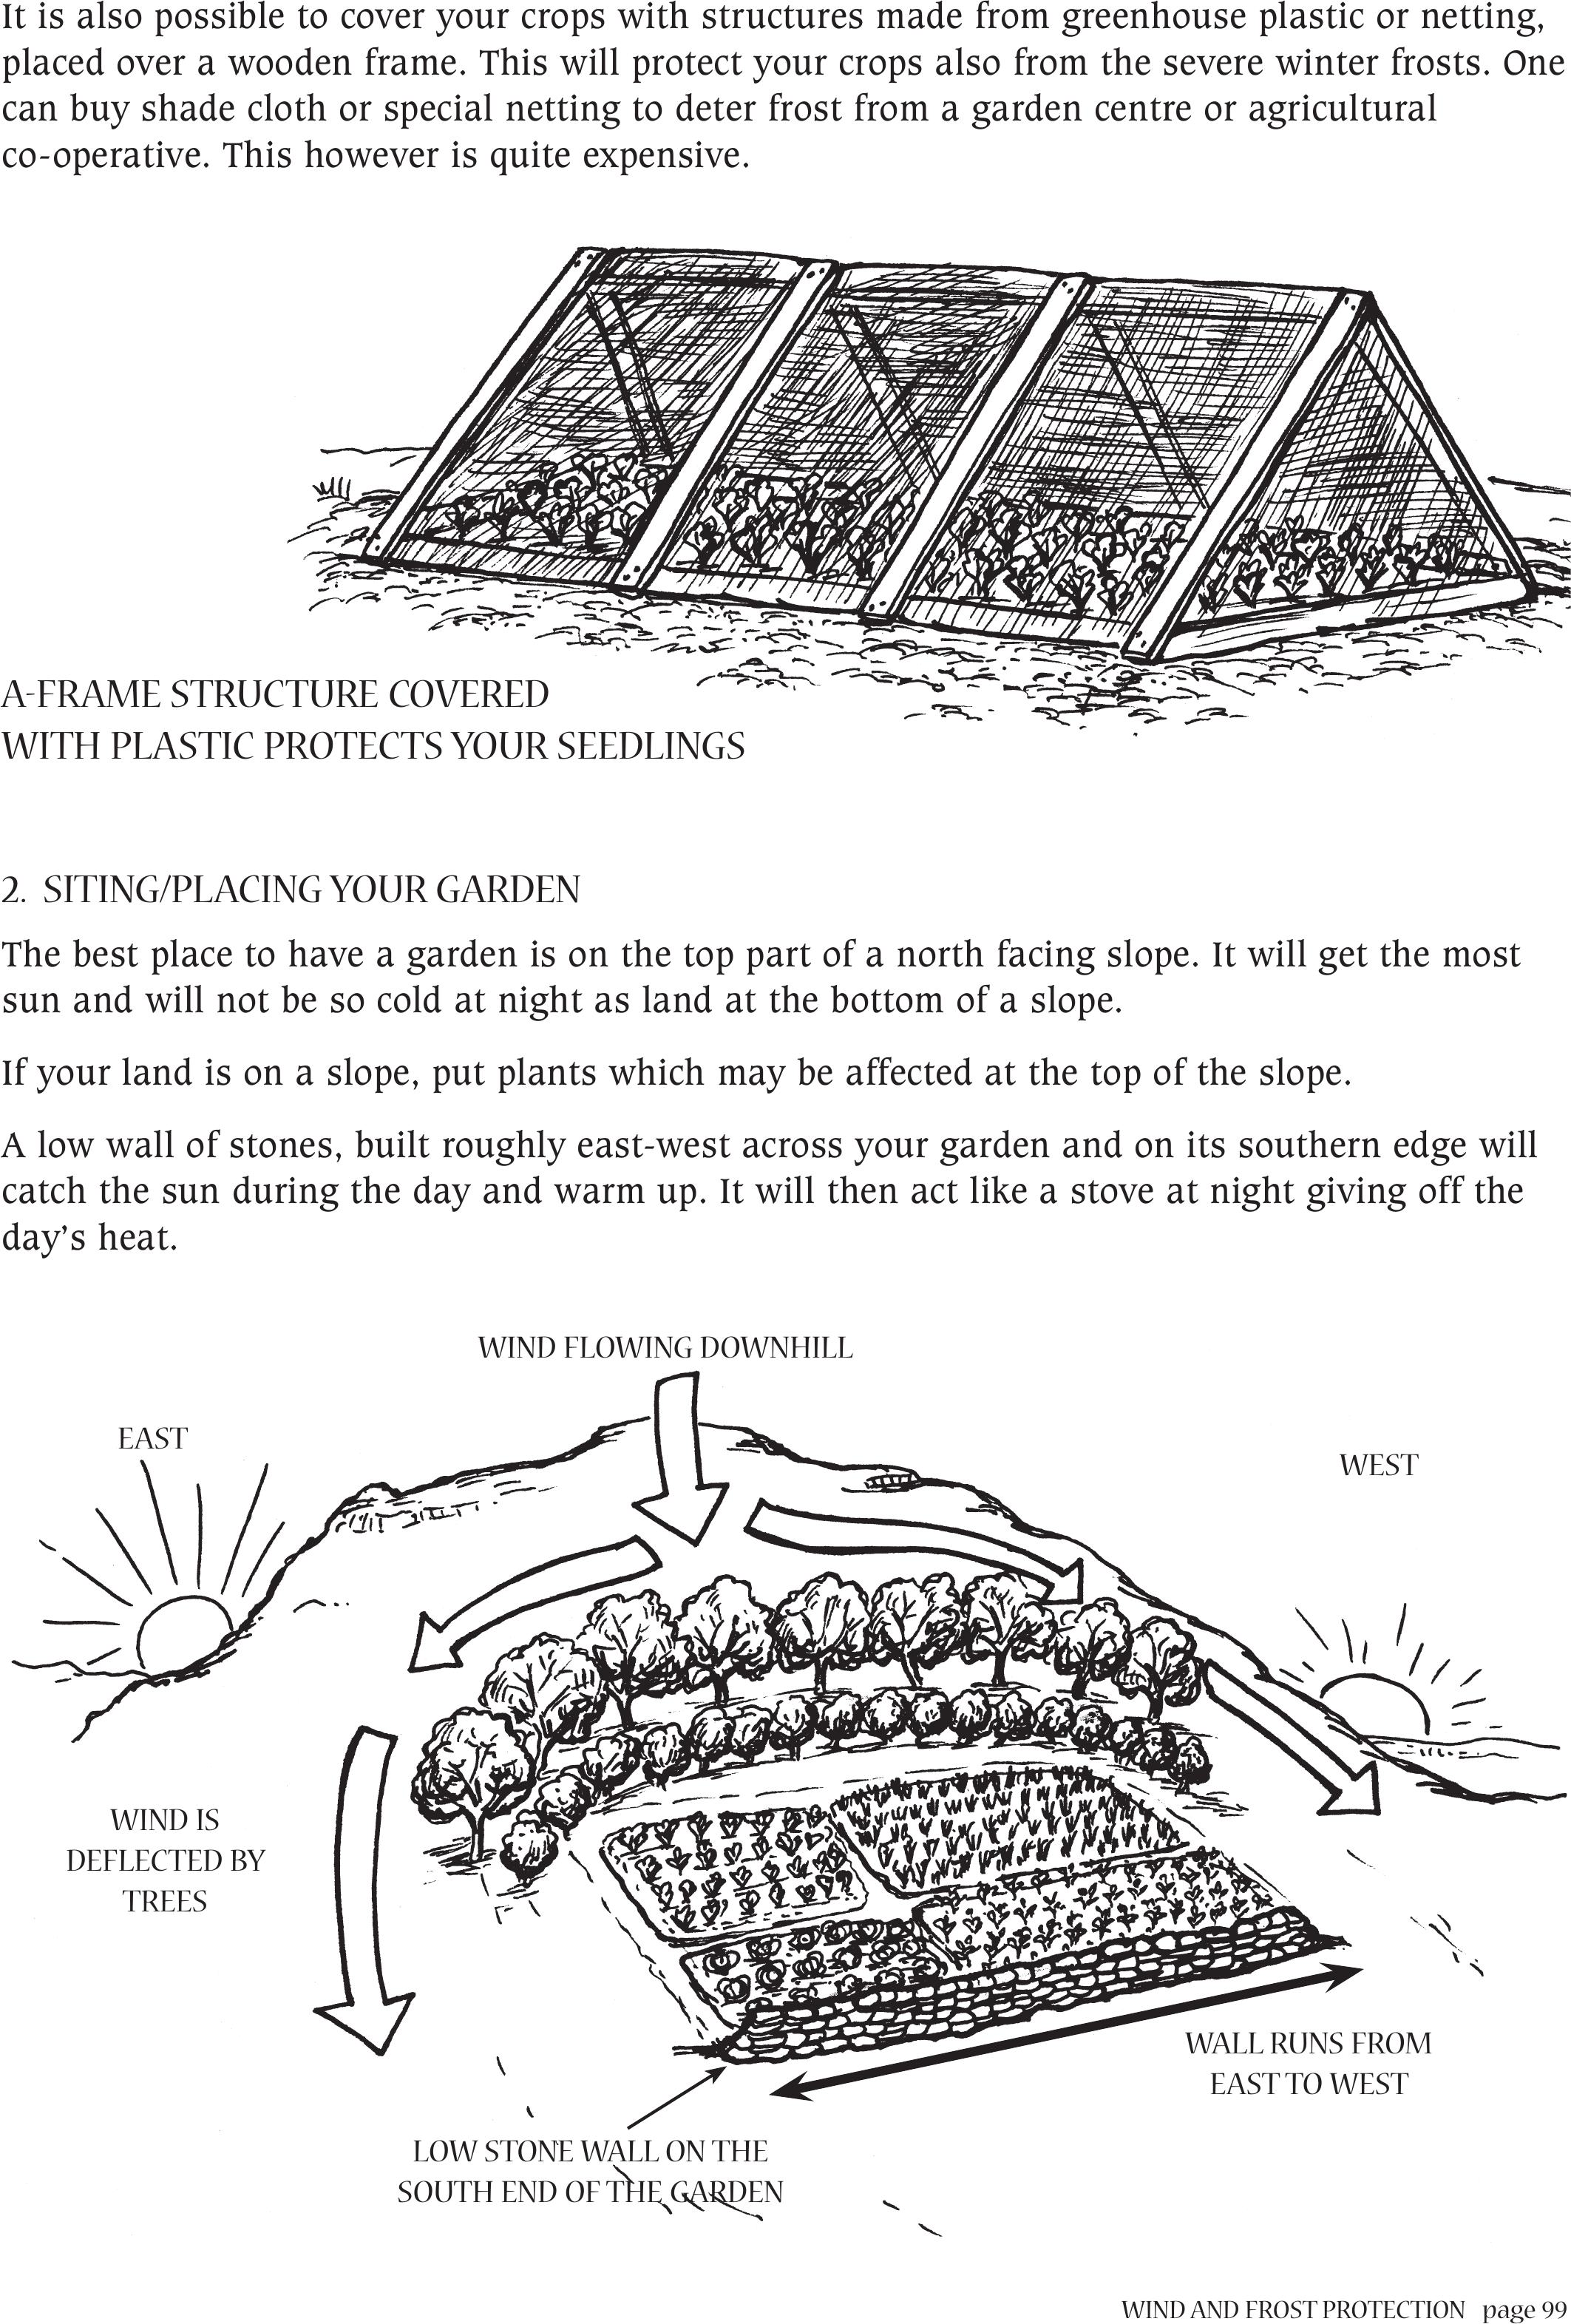
WIND AND FROST PROTECTION page 99
It is also possible to cover your crops with structures made from greenhouse plastic or netting,
placed over a wooden frame. This will protect your crops also from the severe winter frosts. One
can buy shade cloth or special netting to deter frost from a garden centre or agricultural
co-operative. This however is quite expensive.
2. SITING/PLACING YOUR GARDEN
The best place to have a garden is on the top part of a north facing slope. It will get the most
sun and will not be so cold at night as land at the bottom of a slope.
If your land is on a slope, put plants which may be affected at the top of the slope.
A low wall of stones, built roughly east-west across your garden and on its southern edge will
catch the sun during the day and warm up. It will then act like a stove at night giving off the
day’s heat.
WIND FLOWING DOWNHILL
WIND IS
DEFLECTED BY
TREES
LOW STONE WALL ON THE
SOUTH END OF THE GARDEN
WALL RUNS FROM
EAST TO WEST
EAST WEST
A-FRAME STRUCTURE COVERED
WITH PLASTIC PROTECTS YOUR SEEDLINGS
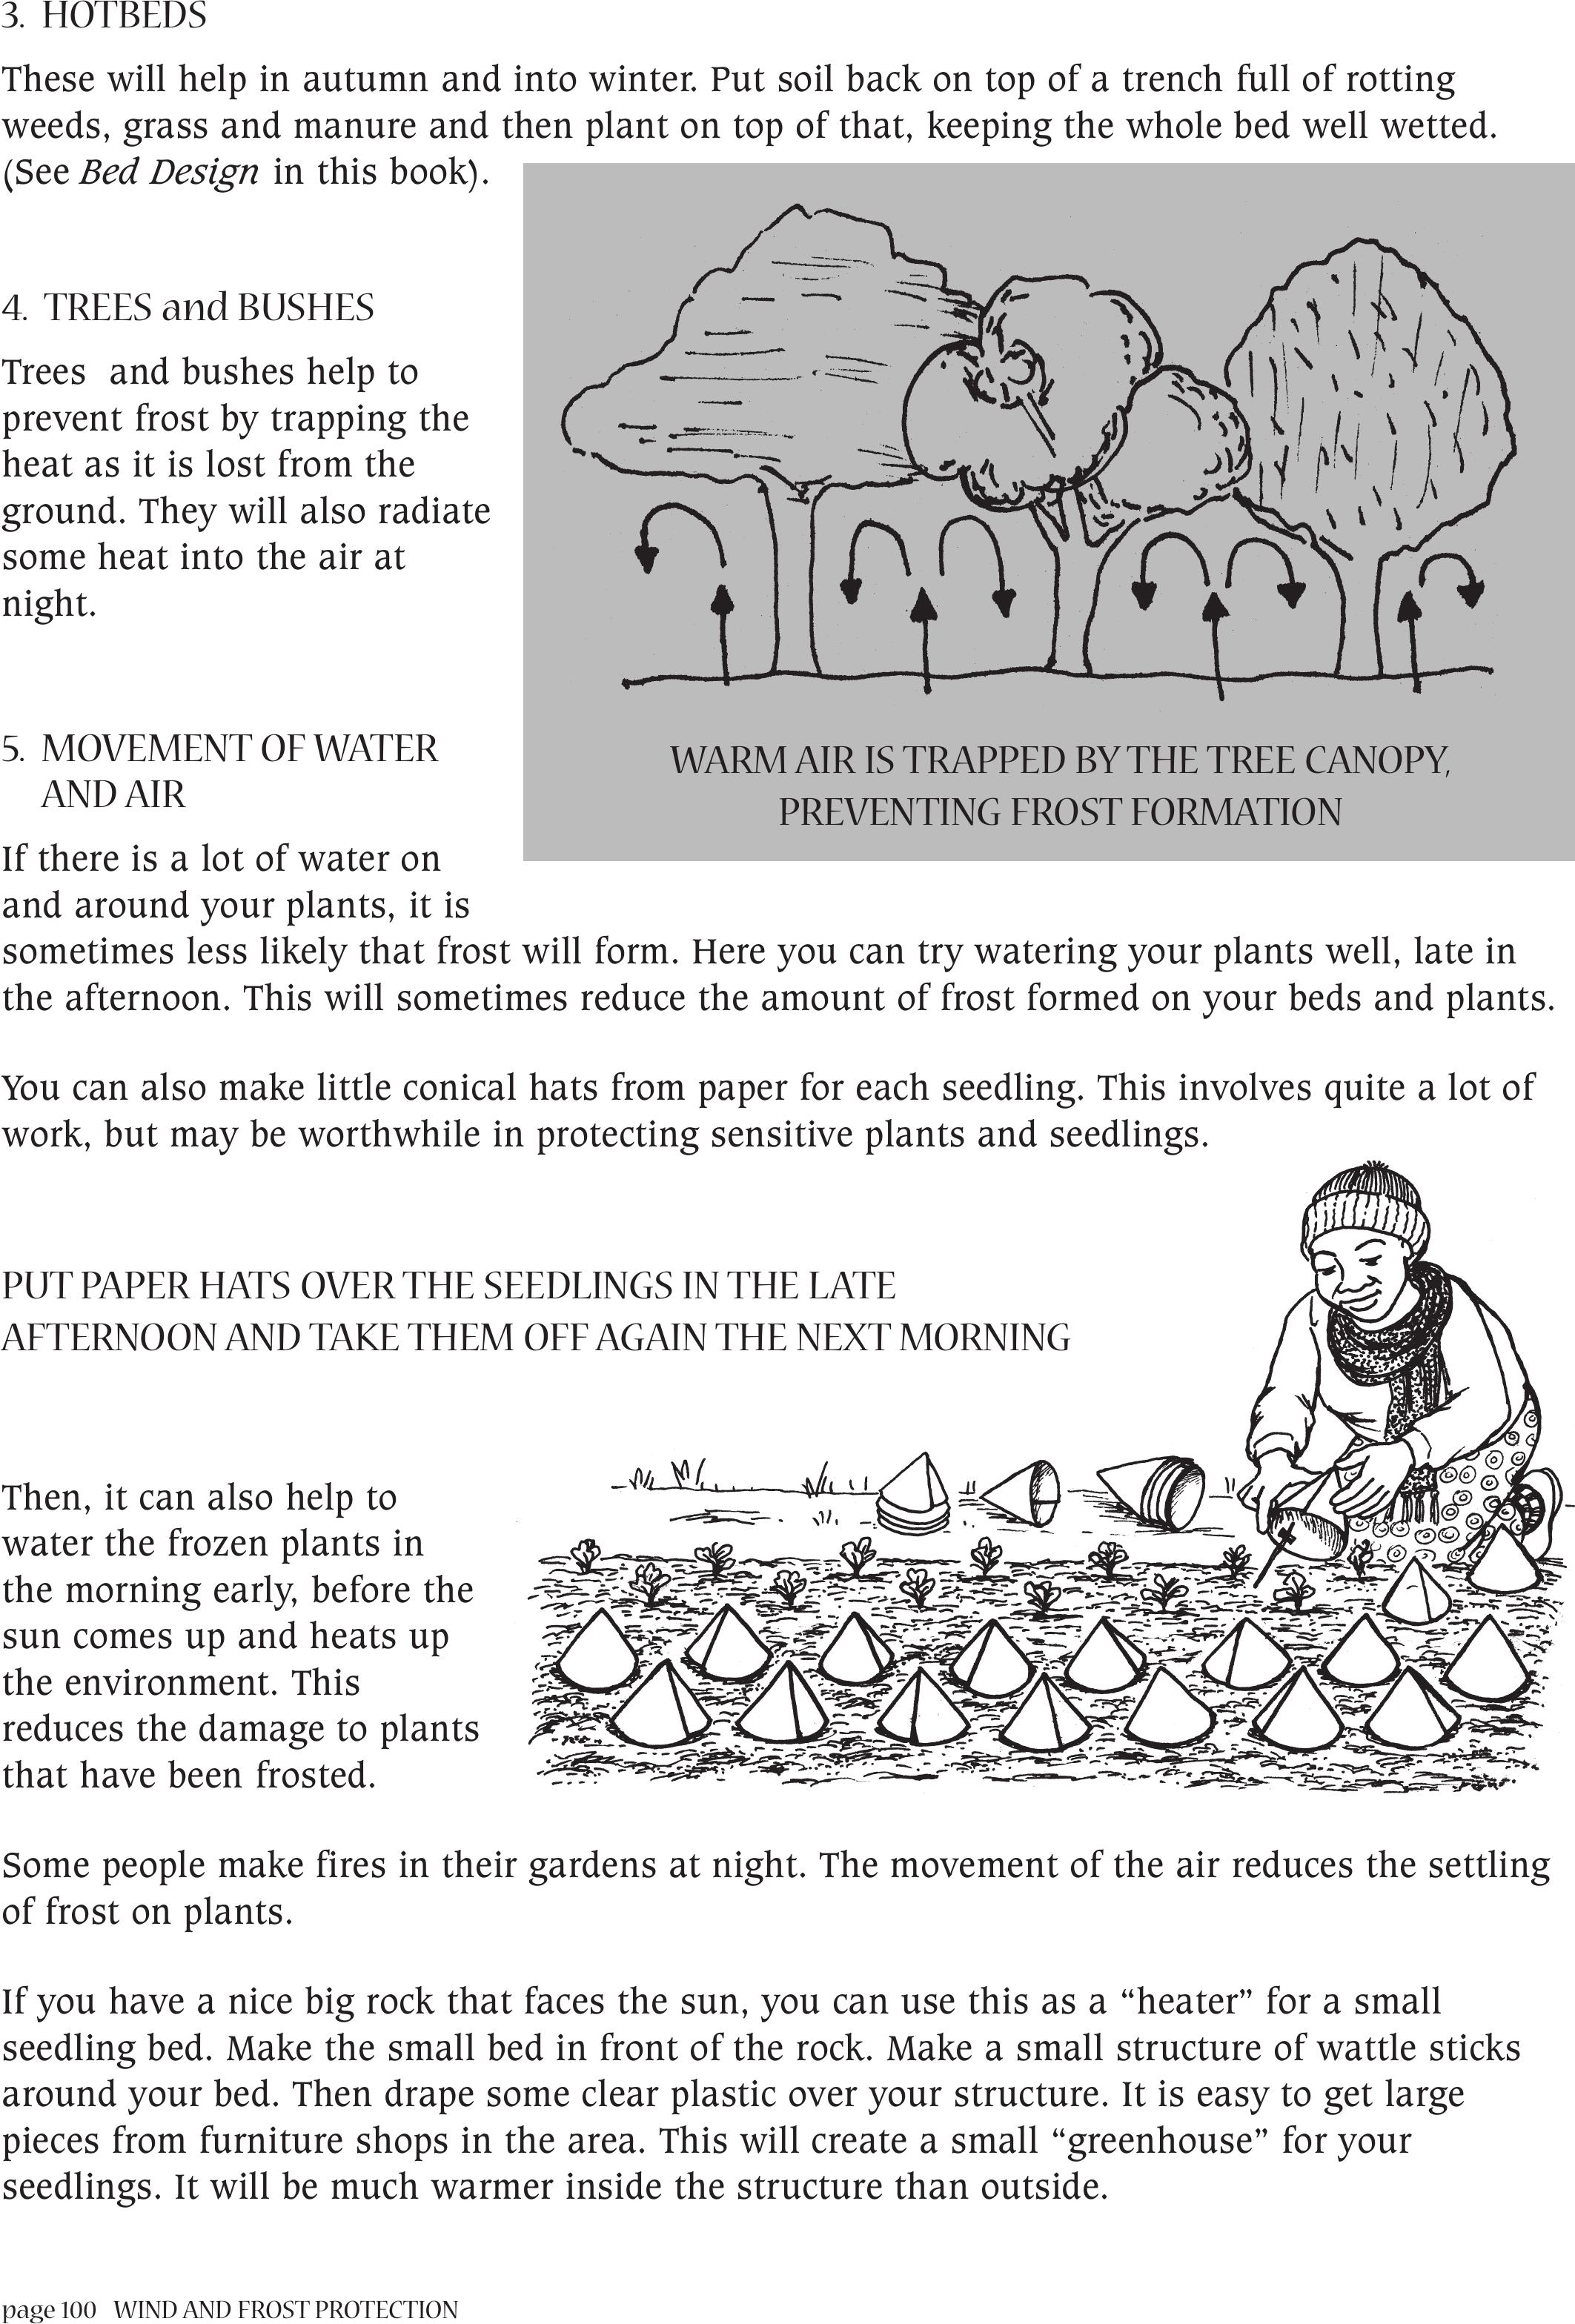
page 100 WIND AND FROST PROTECTION
3. HOTBEDS
These will help in autumn and into winter. Put soil back on top of a trench full of rotting
weeds, grass and manure and then plant on top of that, keeping the whole bed well wetted.
(See Bed Design in this book).
4. TREES and BUSHES
Trees and bushes help to
prevent frost by trapping the
heat as it is lost from the
ground. They will also radiate
some heat into the air at
night.
5.MOVEMENT OF WATER
AND AIR
If there is a lot of water on
and around your plants, it is
sometimes less likely that frost will form. Here you can try watering your plants well, late in
the afternoon. This will sometimes reduce the amount of frost formed on your beds and plants.
You can also make little conical hats from paper for each seedling. This involves quite a lot of
work, but may be worthwhile in protecting sensitive plants and seedlings.
Then, it can also help to
water the frozen plants in
the morning early, before the
sun comes up and heats up
the environment. This
reduces the damage to plants
that have been frosted.
Some people make fires in their gardens at night. The movement of the air reduces the settling
of frost on plants.
If you have a nice big rock that faces the sun, you can use this as a “heater” for a small
seedling bed. Make the small bed in front of the rock. Make a small structure of wattle sticks
around your bed. Then drape some clear plastic over your structure. It is easy to get large
pieces from furniture shops in the area. This will create a small “greenhouse” for your
seedlings. It will be much warmer inside the structure than outside.
WARM AIR IS TRAPPED BY THE TREE CANOPY,
PREVENTING FROST FORMATION
PUT PAPER HATS OVER THE SEEDLINGS IN THE LATE
AFTERNOON AND TAKE THEM OFF AGAIN THE NEXT MORNING
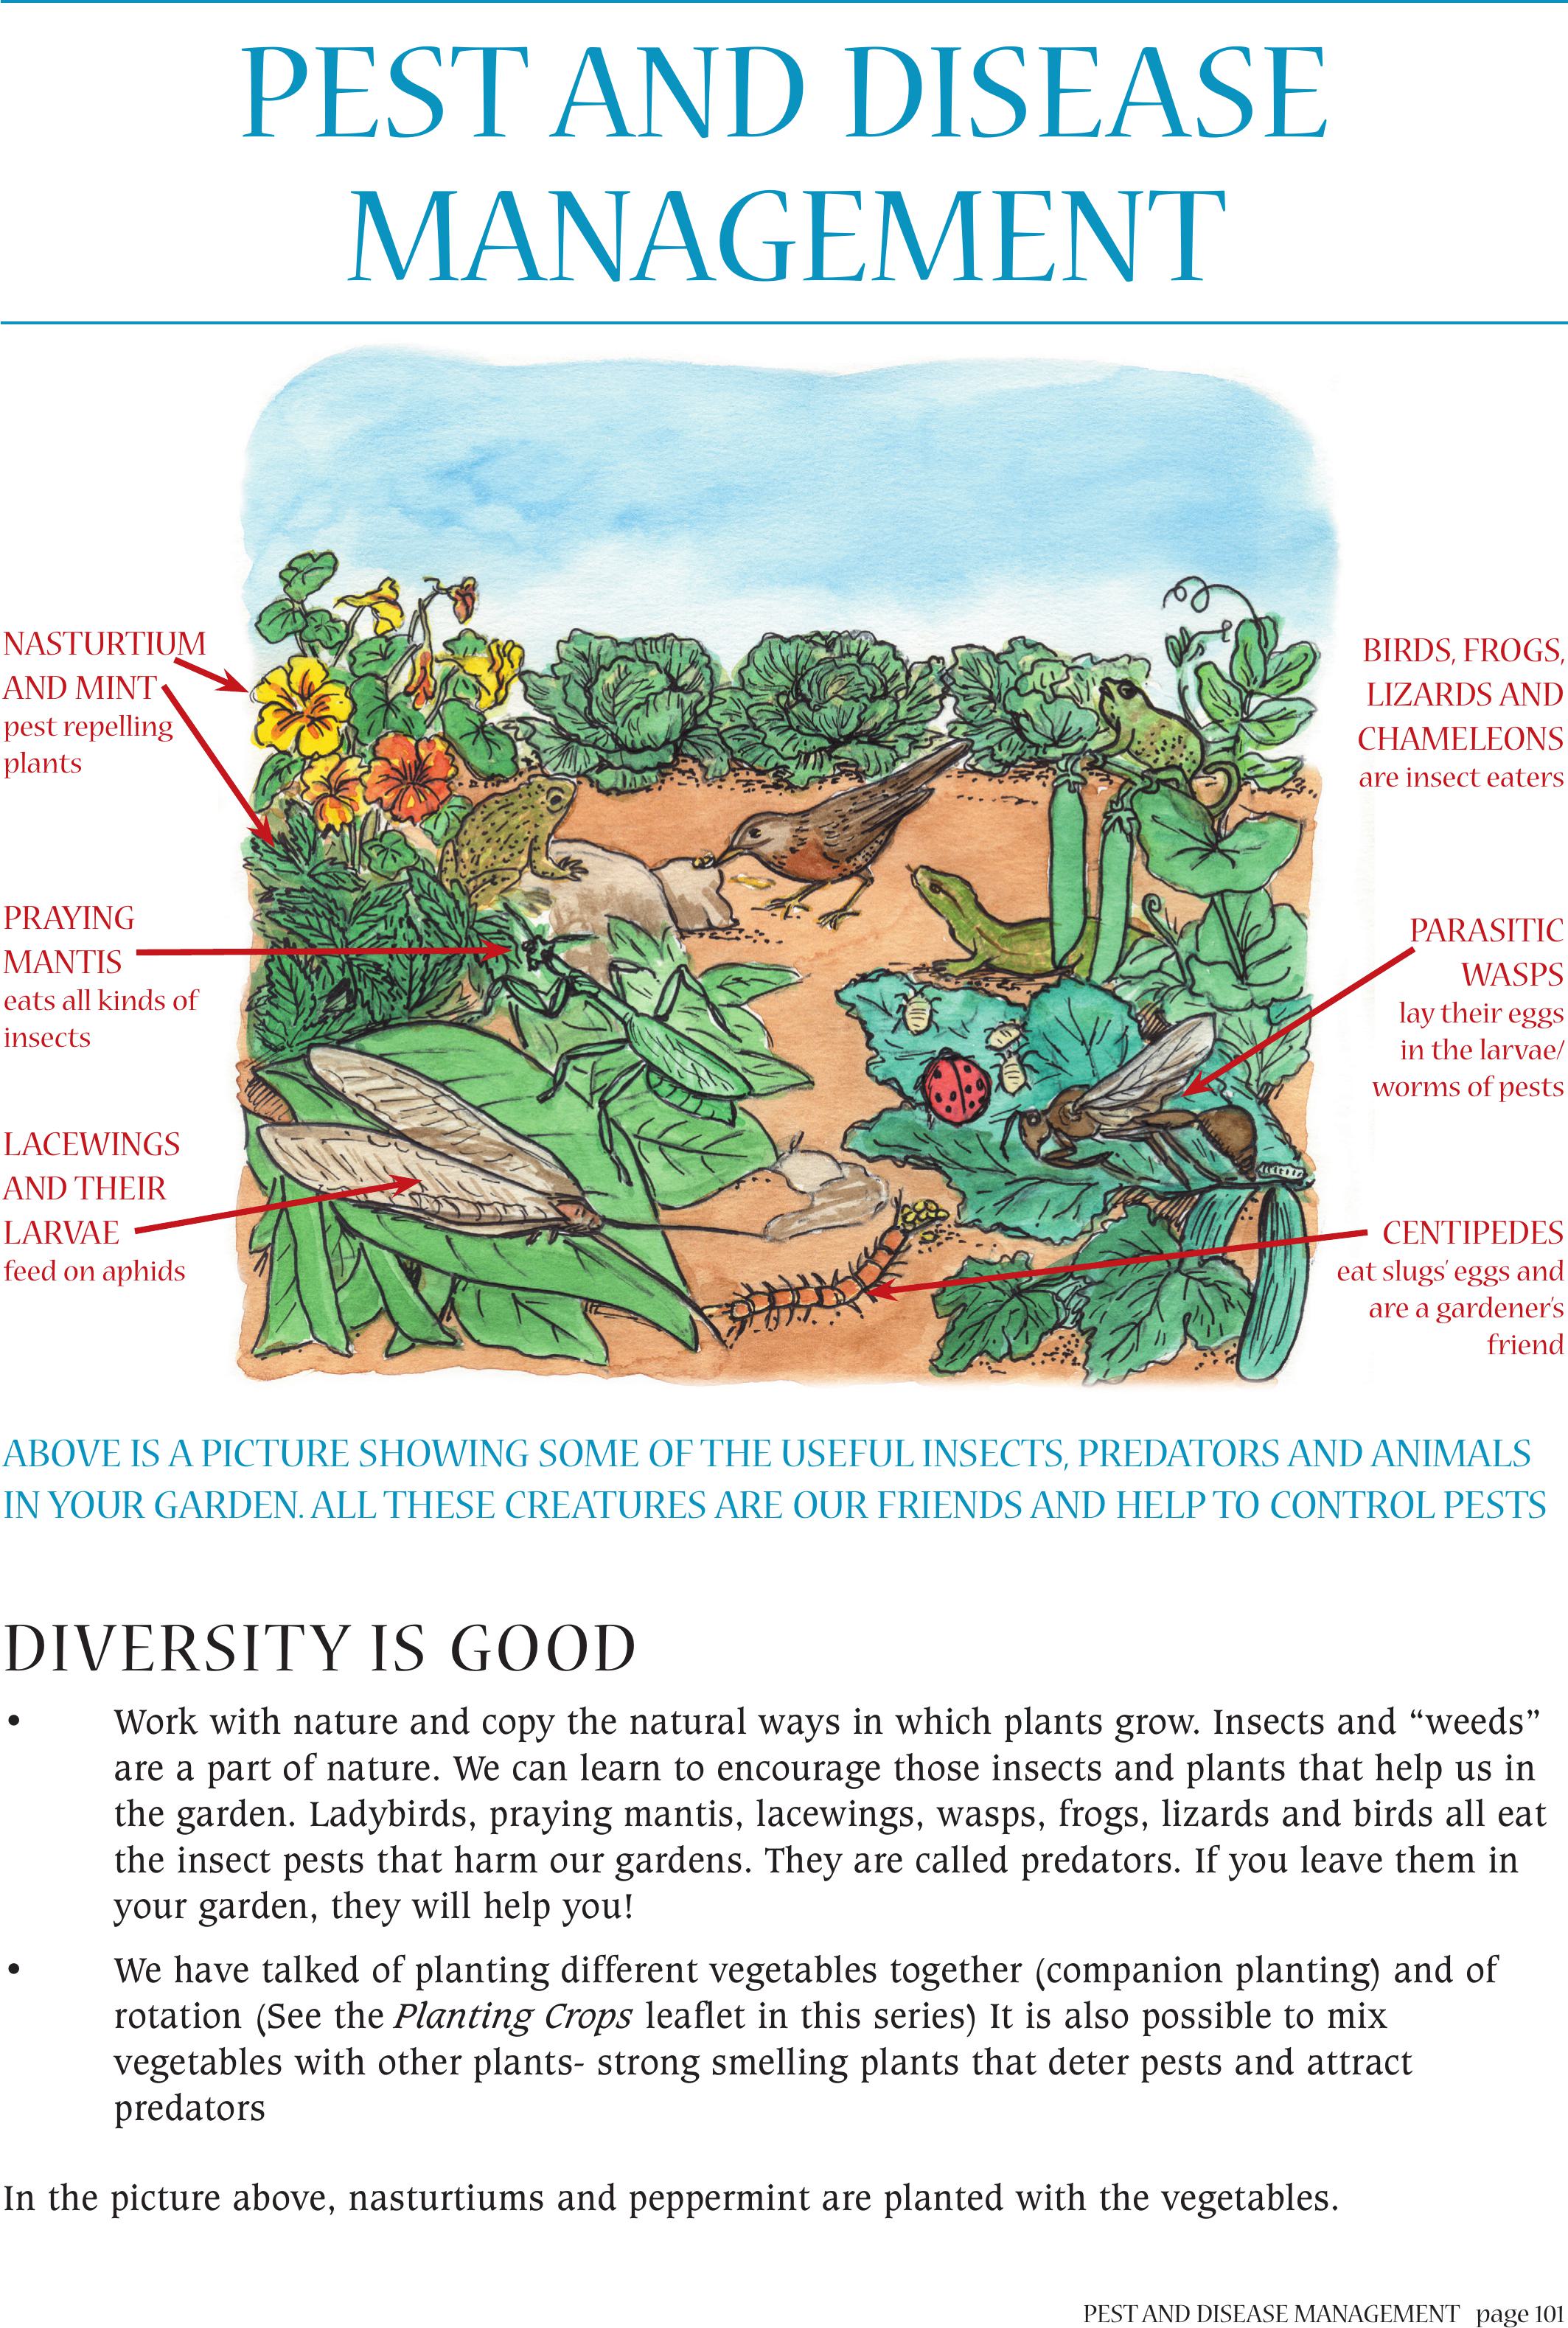
PEST AND DISEASE MANAGEMENTpage 101
DIVERSITY IS GOOD
• Work with nature and copy the natural ways in which plants grow. Insects and “weeds”
are a part of nature. We can learn to encourage those insects and plants that help us in
the garden. Ladybirds, praying mantis, lacewings, wasps, frogs, lizards and birds all eat
the insect pests that harm our gardens. They are called predators. If you leave them in
your garden, they will help you!
• We have talked of planting different vegetables together (companion planting) and of
rotation (See the Planting Crops leaflet in this series) It is also possible to mix
vegetables with other plants- strong smelling plants that deter pests and attract
predators
In the picture above, nasturtiums and peppermint are planted with the vegetables.
PEST AND DISEASE
MANAGEMENT
ABOVE IS A PICTURE SHOWING SOME OF THE USEFUL INSECTS, PREDATORS AND ANIMALS
IN YOUR GARDEN. ALL THESE CREATURES ARE OUR FRIENDS AND HELP TO CONTROL PESTS
NASTURTIUM
AND MINT
pest repelling
plants
PAR ASITIC
WASPS
lay their eggs
in the larvae/
worms of pests
CENTIPEDES
eat slugs’ eggs and
are a gardener’s
friend
BIRDS, FROGS,
LIZARDS AND
CHAMELEONS
are insect eaters
PRAYING
MANTIS
eats all kinds of
insects
LACEWINGS
AND THEIR
LARVAE
feed on aphids
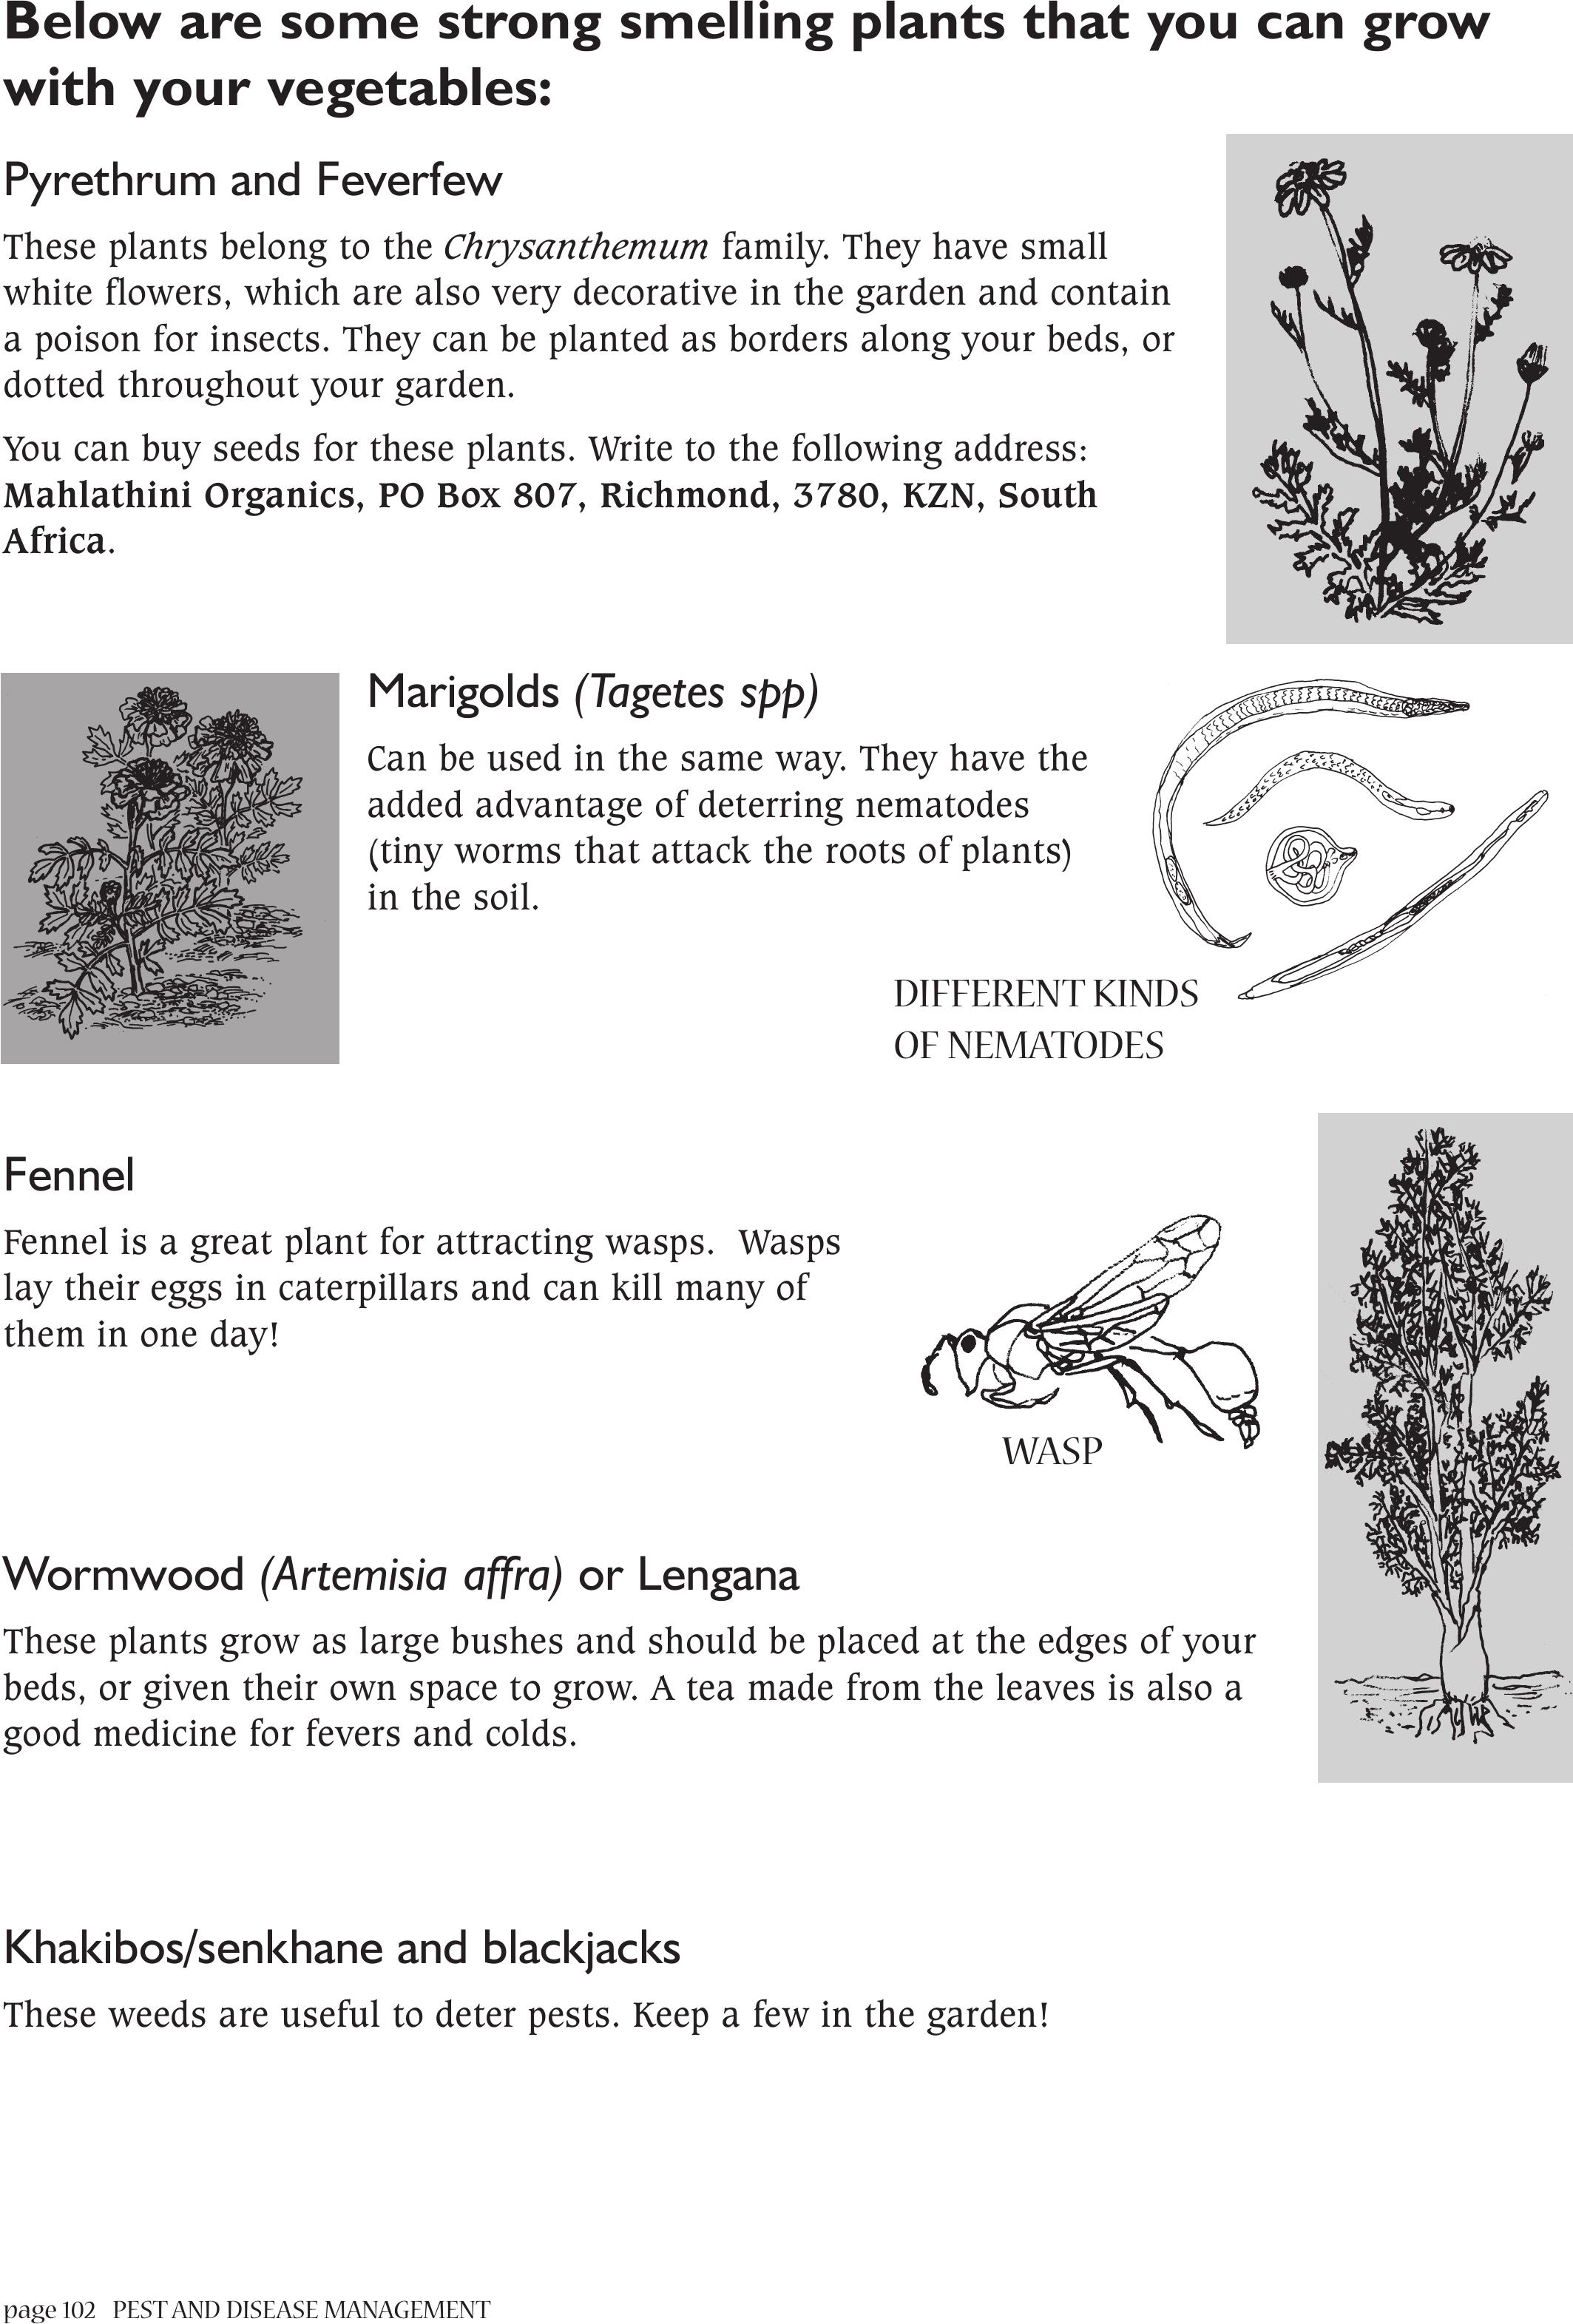
page 102 PEST AND DISEASE MANAGEMENT
Below are some strong smelling plants that you can grow
with your vegetables:
Pyrethrum and Feverfew
These plants belong to the Chrysanthemum family. They have small
white flowers, which are also very decorative in the garden and contain
a poison for insects. They can be planted as borders along your beds, or
dotted throughout your garden.
You can buy seeds for these plants. Write to the following address:
Mahlathini Organics, PO Box 807, Richmond, 3780, KZN, South
Africa.
Marigolds (Tagetes spp)
Can be used in the same way. They have the
added advantage of deterring nematodes
(tiny worms that attack the roots of plants)
in the soil.
Fennel
Fennel is a great plant for attracting wasps. Wasps
lay their eggs in caterpillars and can kill many of
them in one day!
Wormwood (Artemisia affra) or Lengana
These plants grow as large bushes and should be placed at the edges of your
beds, or given their own space to grow. A tea made from the leaves is also a
good medicine for fevers and colds.
Khakibos/senkhane and blackjacks
These weeds are useful to deter pests. Keep a few in the garden!
DIFFERENT KINDS
OF NEMATODES
WASP
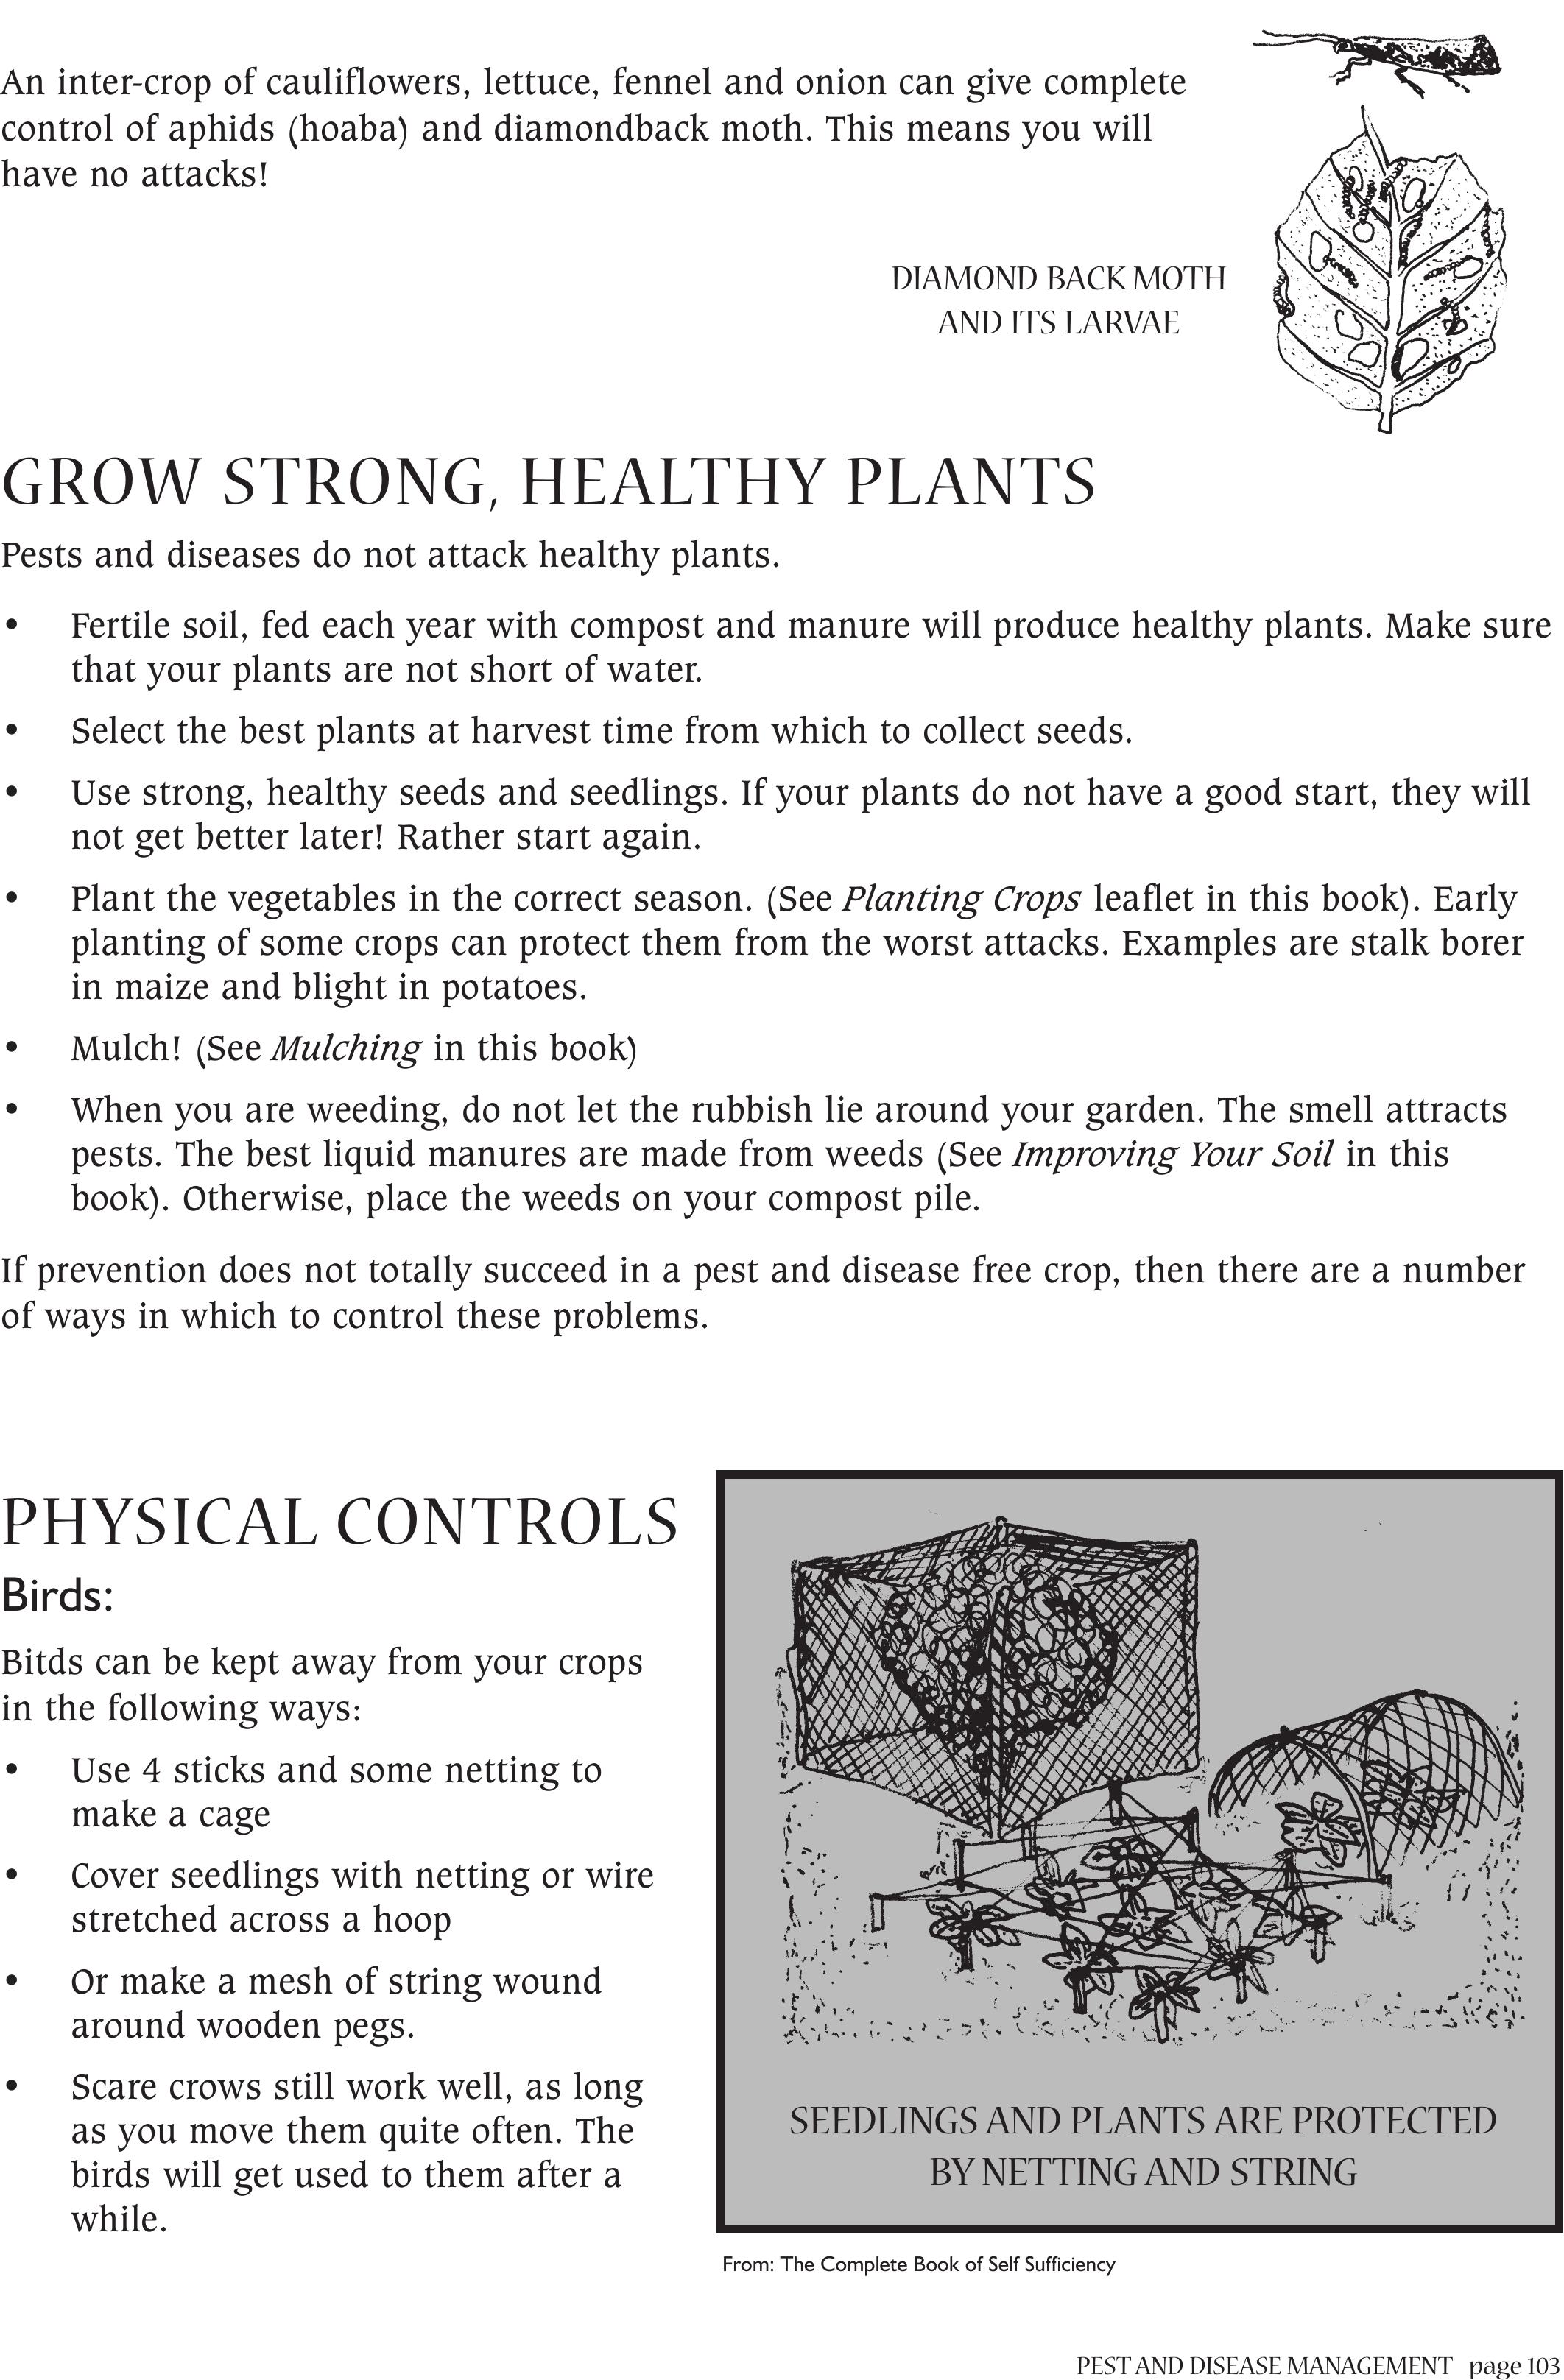
PEST AND DISEASE MANAGEMENTpage 103
An inter-crop of cauliflowers, lettuce, fennel and onion can give complete
control of aphids (hoaba) and diamondback moth. This means you will
have no attacks!
GROW STRONG, HEALTHY PLANTS
Pests and diseases do not attack healthy plants.
• Fertile soil, fed each year with compost and manure will produce healthy plants. Make sure
that your plants are not short of water.
• Select the best plants at harvest time from which to collect seeds.
• Use strong, healthy seeds and seedlings. If your plants do not have a good start, they will
not get better later! Rather start again.
• Plant the vegetables in the correct season. (See Planting Crops leaflet in this book). Early
planting of some crops can protect them from the worst attacks. Examples are stalk borer
in maize and blight in potatoes.
• Mulch! (See Mulching in this book)
• When you are weeding, do not let the rubbish lie around your garden. The smell attracts
pests. The best liquid manures are made from weeds (See Improving Your Soil in this
book). Otherwise, place the weeds on your compost pile.
If prevention does not totally succeed in a pest and disease free crop, then there are a number
of ways in which to control these problems.
PHYSICAL CONTROLS
Birds:
Bitds can be kept away from your crops
in the following ways:
• Use 4 sticks and some netting to
make a cage
• Cover seedlings with netting or wire
stretched across a hoop
• Or make a mesh of string wound
around wooden pegs.
• Scare crows still work well, as long
as you move them quite often. The
birds will get used to them after a
while.
SEEDLINGS AND PLANTS ARE PROTECTED
BY NETTING AND STRING
From: The Complete Book of Self Sufficiency
DIAMOND BACK MOTH
AND ITS LARVAE
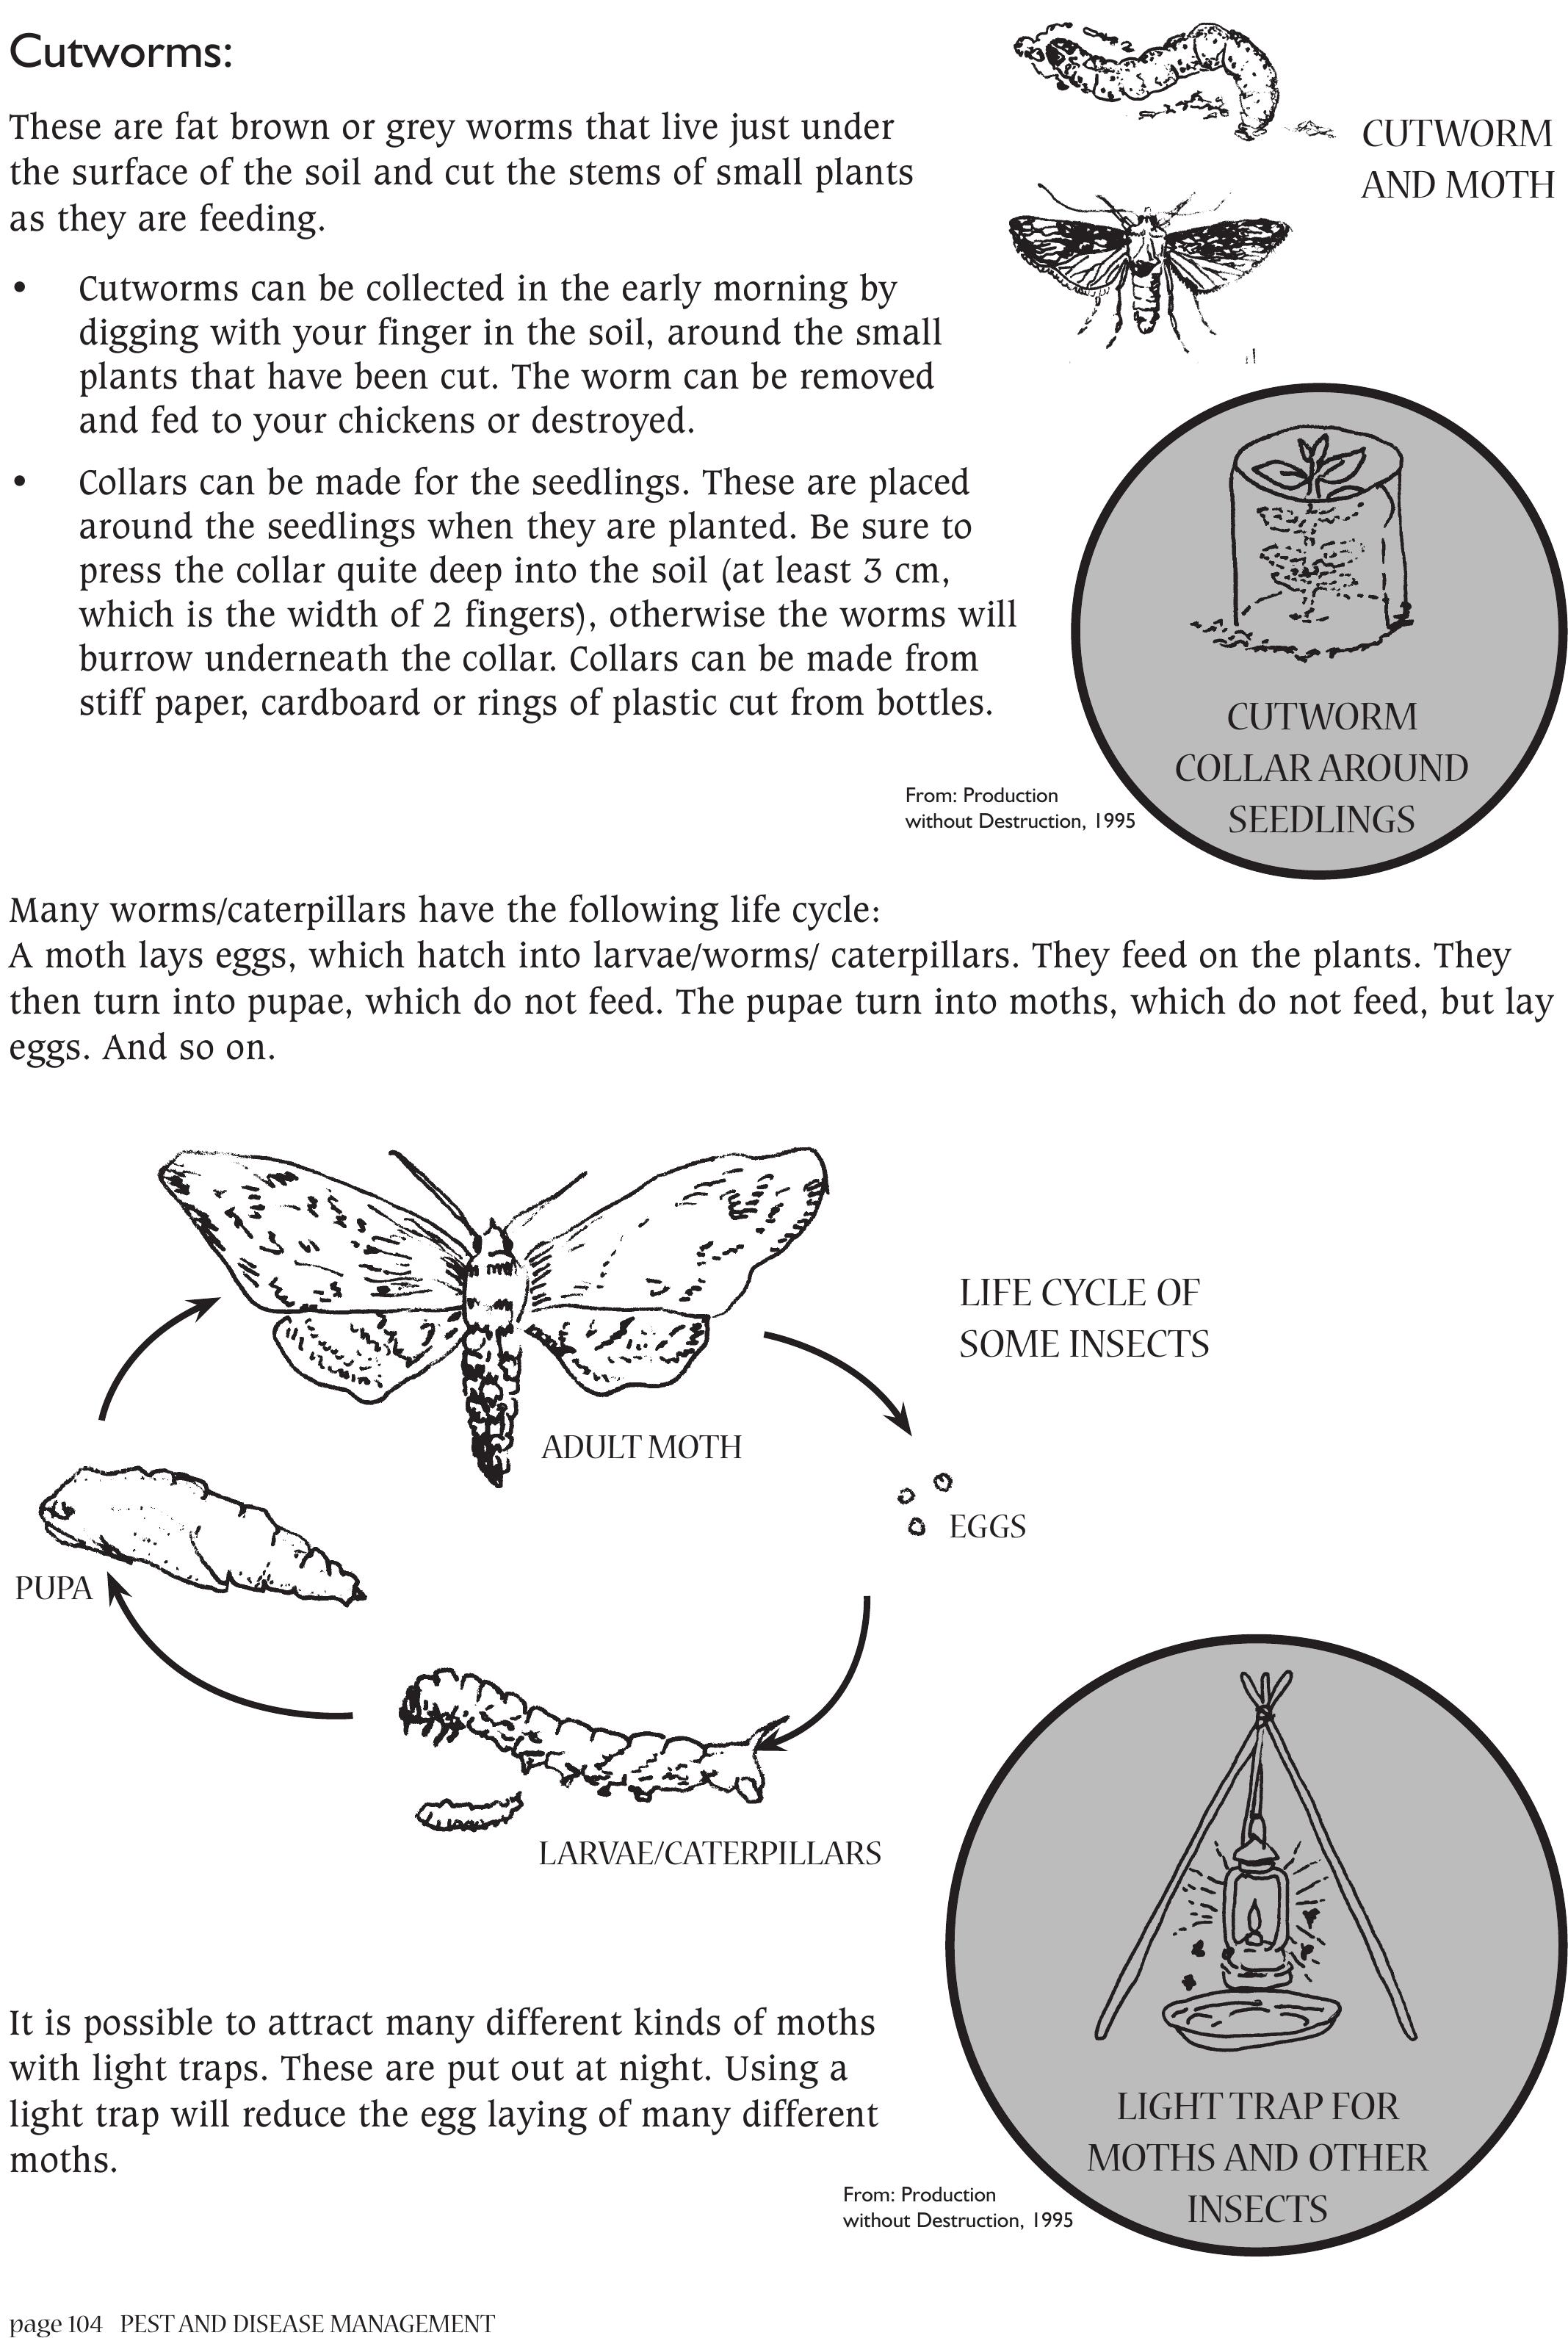
page 104 PEST AND DISEASE MANAGEMENT
Cutworms:
These are fat brown or grey worms that live just under
the surface of the soil and cut the stems of small plants
as they are feeding.
• Cutworms can be collected in the early morning by
digging with your finger in the soil, around the small
plants that have been cut. The worm can be removed
and fed to your chickens or destroyed.
• Collars can be made for the seedlings. These are placed
around the seedlings when they are planted. Be sure to
press the collar quite deep into the soil (at least 3 cm,
which is the width of 2 fingers), otherwise the worms will
burrow underneath the collar. Collars can be made from
stiff paper, cardboard or rings of plastic cut from bottles.
Many worms/caterpillars have the following life cycle:
A moth lays eggs, which hatch into larvae/worms/ caterpillars. They feed on the plants. They
then turn into pupae, which do not feed. The pupae turn into moths, which do not feed, but lay
eggs. And so on.
It is possible to attract many different kinds of moths
with light traps. These are put out at night. Using a
light trap will reduce the egg laying of many different
moths.
CUTWORM
AND MOTH
CUTWORM
COLLAR AROUND
SEEDLINGS
ADULT MOTH
EGGS
LARVAE/CATERPILLARS
PUPA
From: Production
without Destruction, 1995
LIGHT TRAP FOR
MOTHS AND OTHER
INSECTS
From: Production
without Destruction, 1995
LIFE CYCLE OF
SOME INSECTS
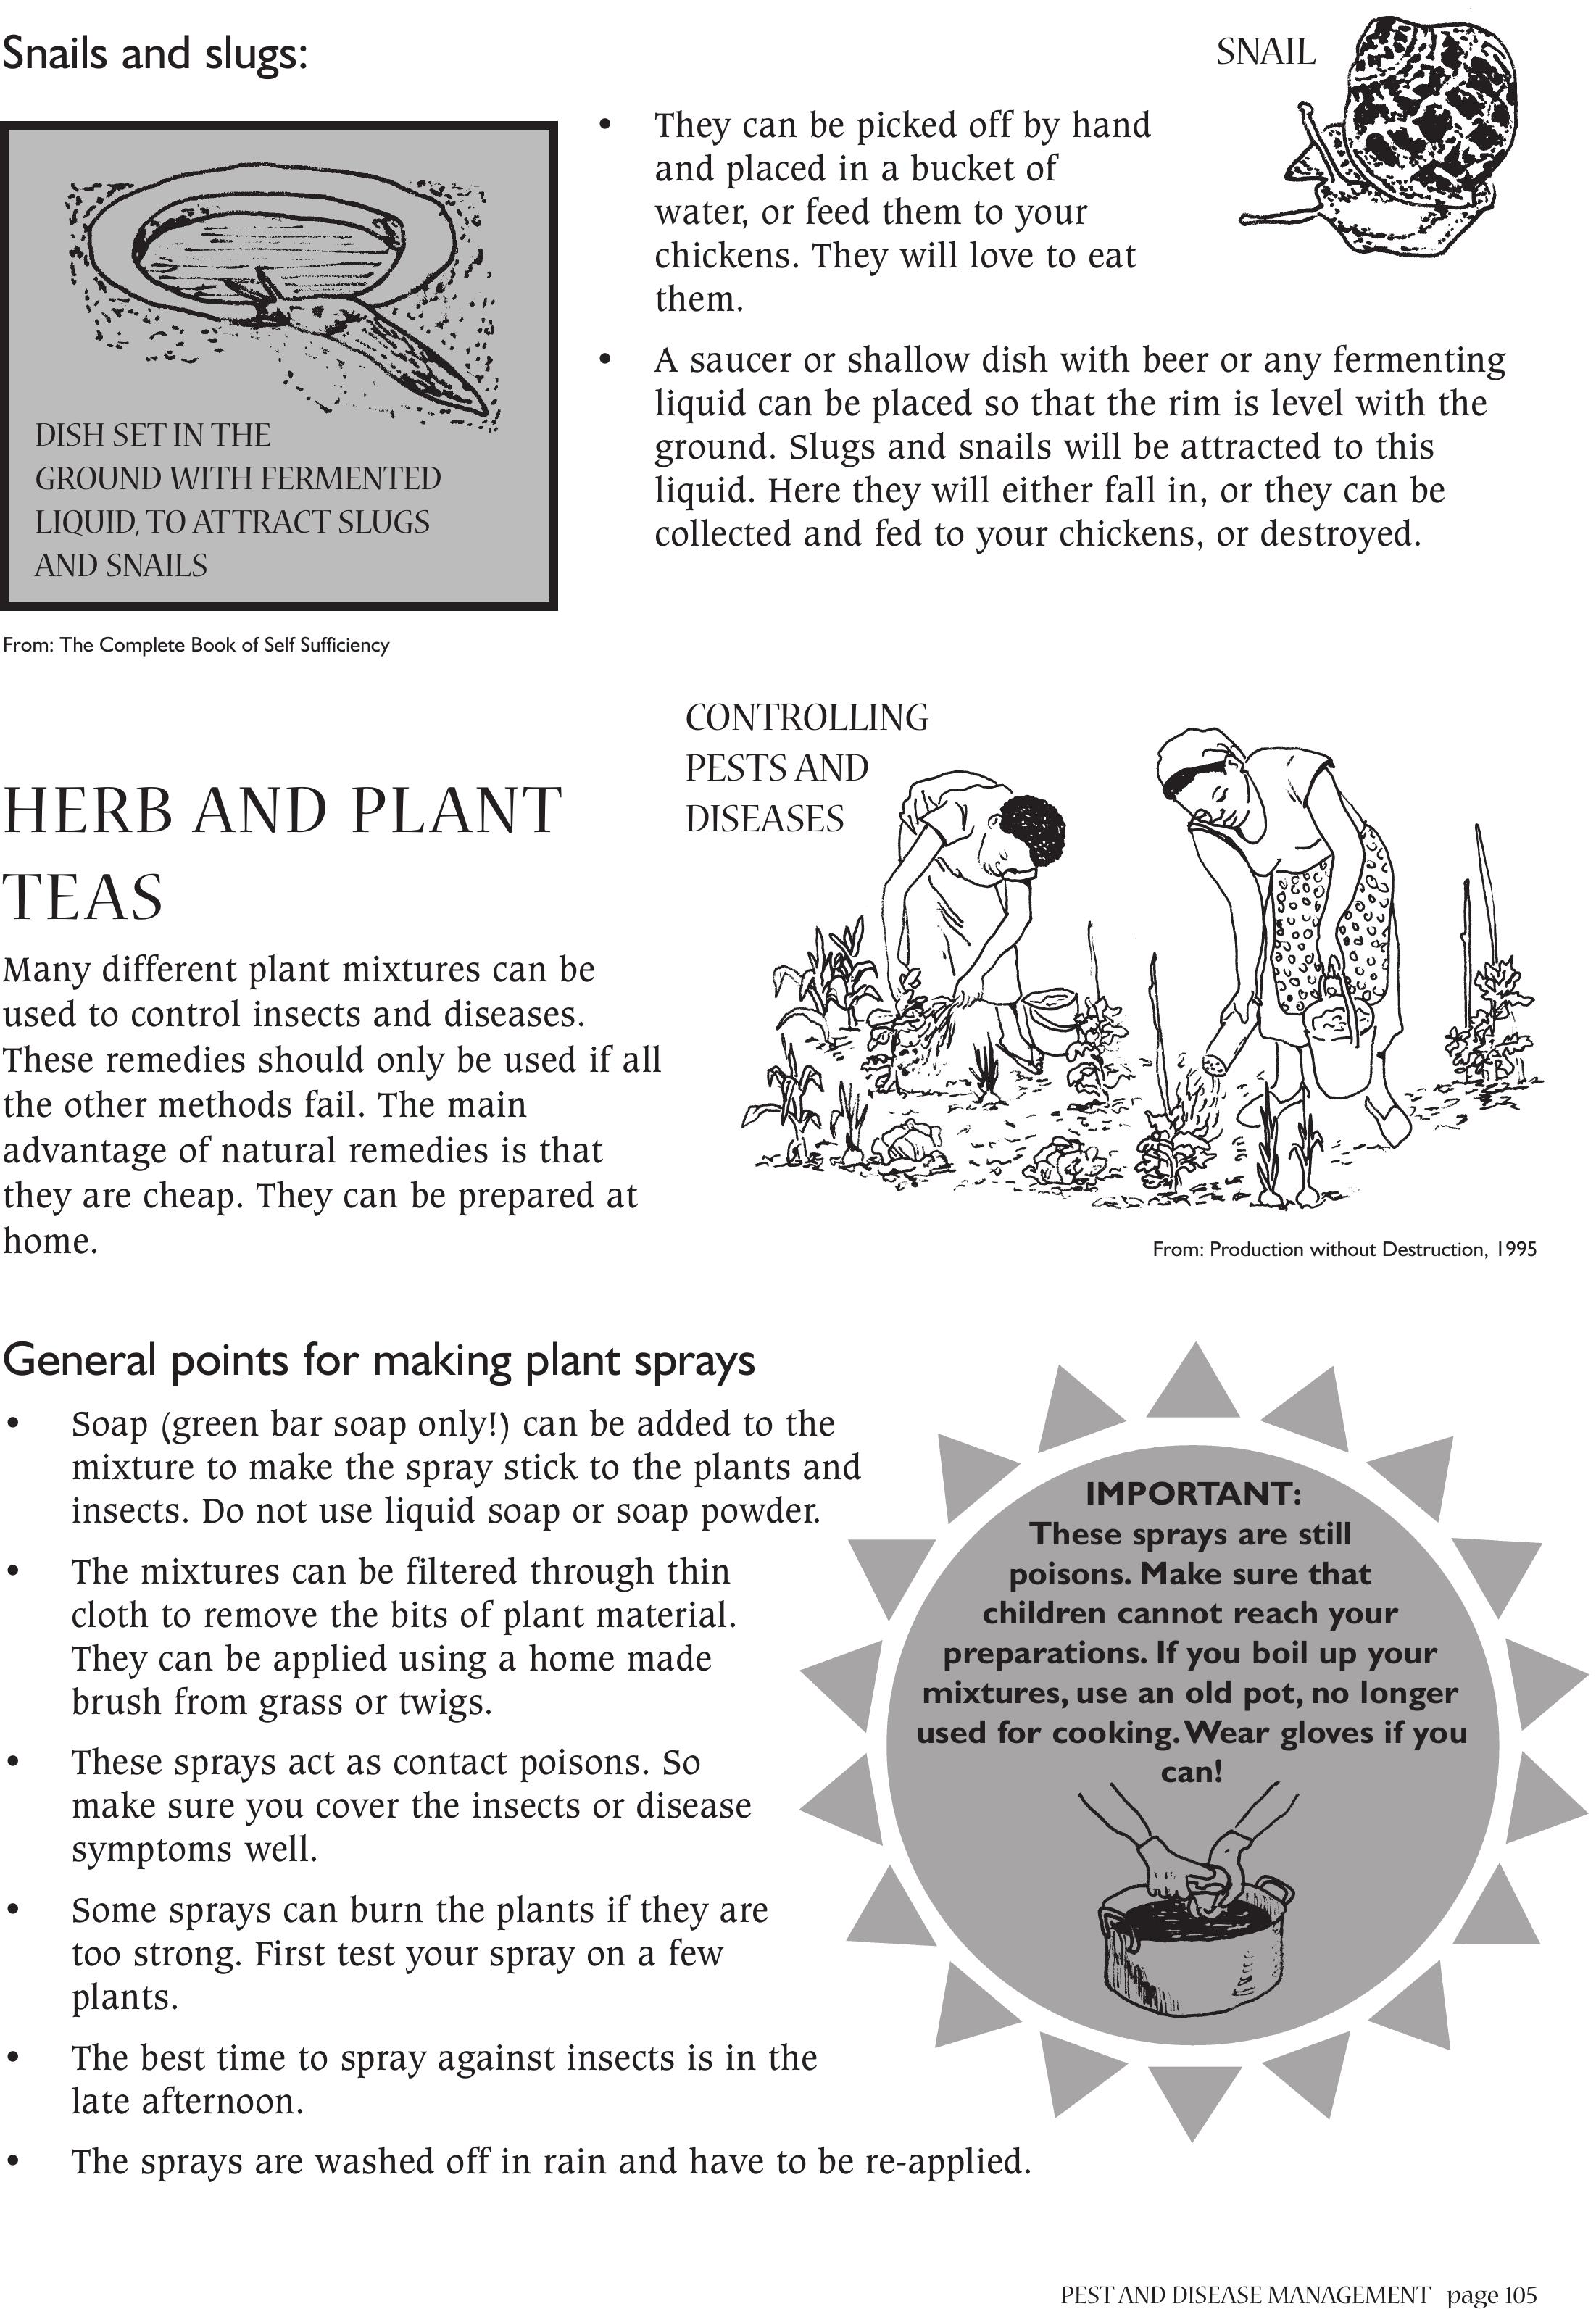
PEST AND DISEASE MANAGEMENTpage 105
Snails and slugs:
• They can be picked off by hand
and placed in a bucket of
water, or feed them to your
chickens. They will love to eat
them.
• A saucer or shallow dish with beer or any fermenting
liquid can be placed so that the rim is level with the
ground. Slugs and snails will be attracted to this
liquid. Here they will either fall in, or they can be
collected and fed to your chickens, or destroyed.
HERB AND PLANT
TEAS
Many different plant mixtures can be
used to control insects and diseases.
These remedies should only be used if all
the other methods fail. The main
advantage of natural remedies is that
they are cheap. They can be prepared at
home.
General points for making plant sprays
• Soap (green bar soap only!) can be added to the
mixture to make the spray stick to the plants and
insects. Do not use liquid soap or soap powder.
• The mixtures can be filtered through thin
cloth to remove the bits of plant material.
They can be applied using a home made
brush from grass or twigs.
• These sprays act as contact poisons. So
make sure you cover the insects or disease
symptoms well.
• Some sprays can burn the plants if they are
too strong. First test your spray on a few
plants.
• The best time to spray against insects is in the
late afternoon.
• The sprays are washed off in rain and have to be re-applied.
SNAIL
DISH SET IN THE
GROUND WITH FERMENTED
LIQUID, TO ATTRACT SLUGS
AND SNAILS
CONTROLLING
PESTS AND
DISEASES
IMPORTANT:
These sprays are still
poisons. Make sure that
children cannot reach your
preparations. If you boil up your
mixtures, use an old pot, no longer
used for cooking.Wear gloves if you
can!
From: The Complete Book of Self Sufficiency
From: Production without Destruction, 1995

page 106 PEST AND DISEASE MANAGEMENT
Below is a listing of some of the plants, how the remedy is
prepared and what it is used for:
Aloe
Any kind of aloe can be used.
• Crush the leaves in water (1:5). This means use 5 times as much
water as you use leaf material. Filter through a fine cloth and use
as a spray.
• OR Dry the leaves and grind them into a powder. This can be dusted
onto seeds and plants.
CONTROL:
• Insects in general; grasshoppers, aphids, caterpillars;
• Pests in stored grains such as maize, wheat and sorghum;
• Termites and ants.
Wormwood (Lengana)
Cut up the leaves into water (1:4) and stand for 2-7 days before
using. Add some soap to the mixture.
CONTROL:
Insects in general and snails.
Amaranthus
Extract the juice from 1kg of leaves (1 kg is about one plastic shopping
bag full of leaves). This can be done by cutting the leaves and then
pounding them with a stone. Then mix this juice with 3 litres of soapy
water and spray.
CONTROL:
Various spotty diseases caused by fungi such as leaf spot and blight.
APHIDSANTS TERMITEGRASSHOPPER
SNAIL
Blackjack
Cover a cupful of seeds with water and boil for 10 minutes, or let
it stand overnight. Add 1 litre of soapy water and spray.
CONTROL:
Insects in general; aphids, ants, beetles, caterpillars, cutworms,
mites, termites and whitefly.
WHITEFLY
MITES
TERMITE
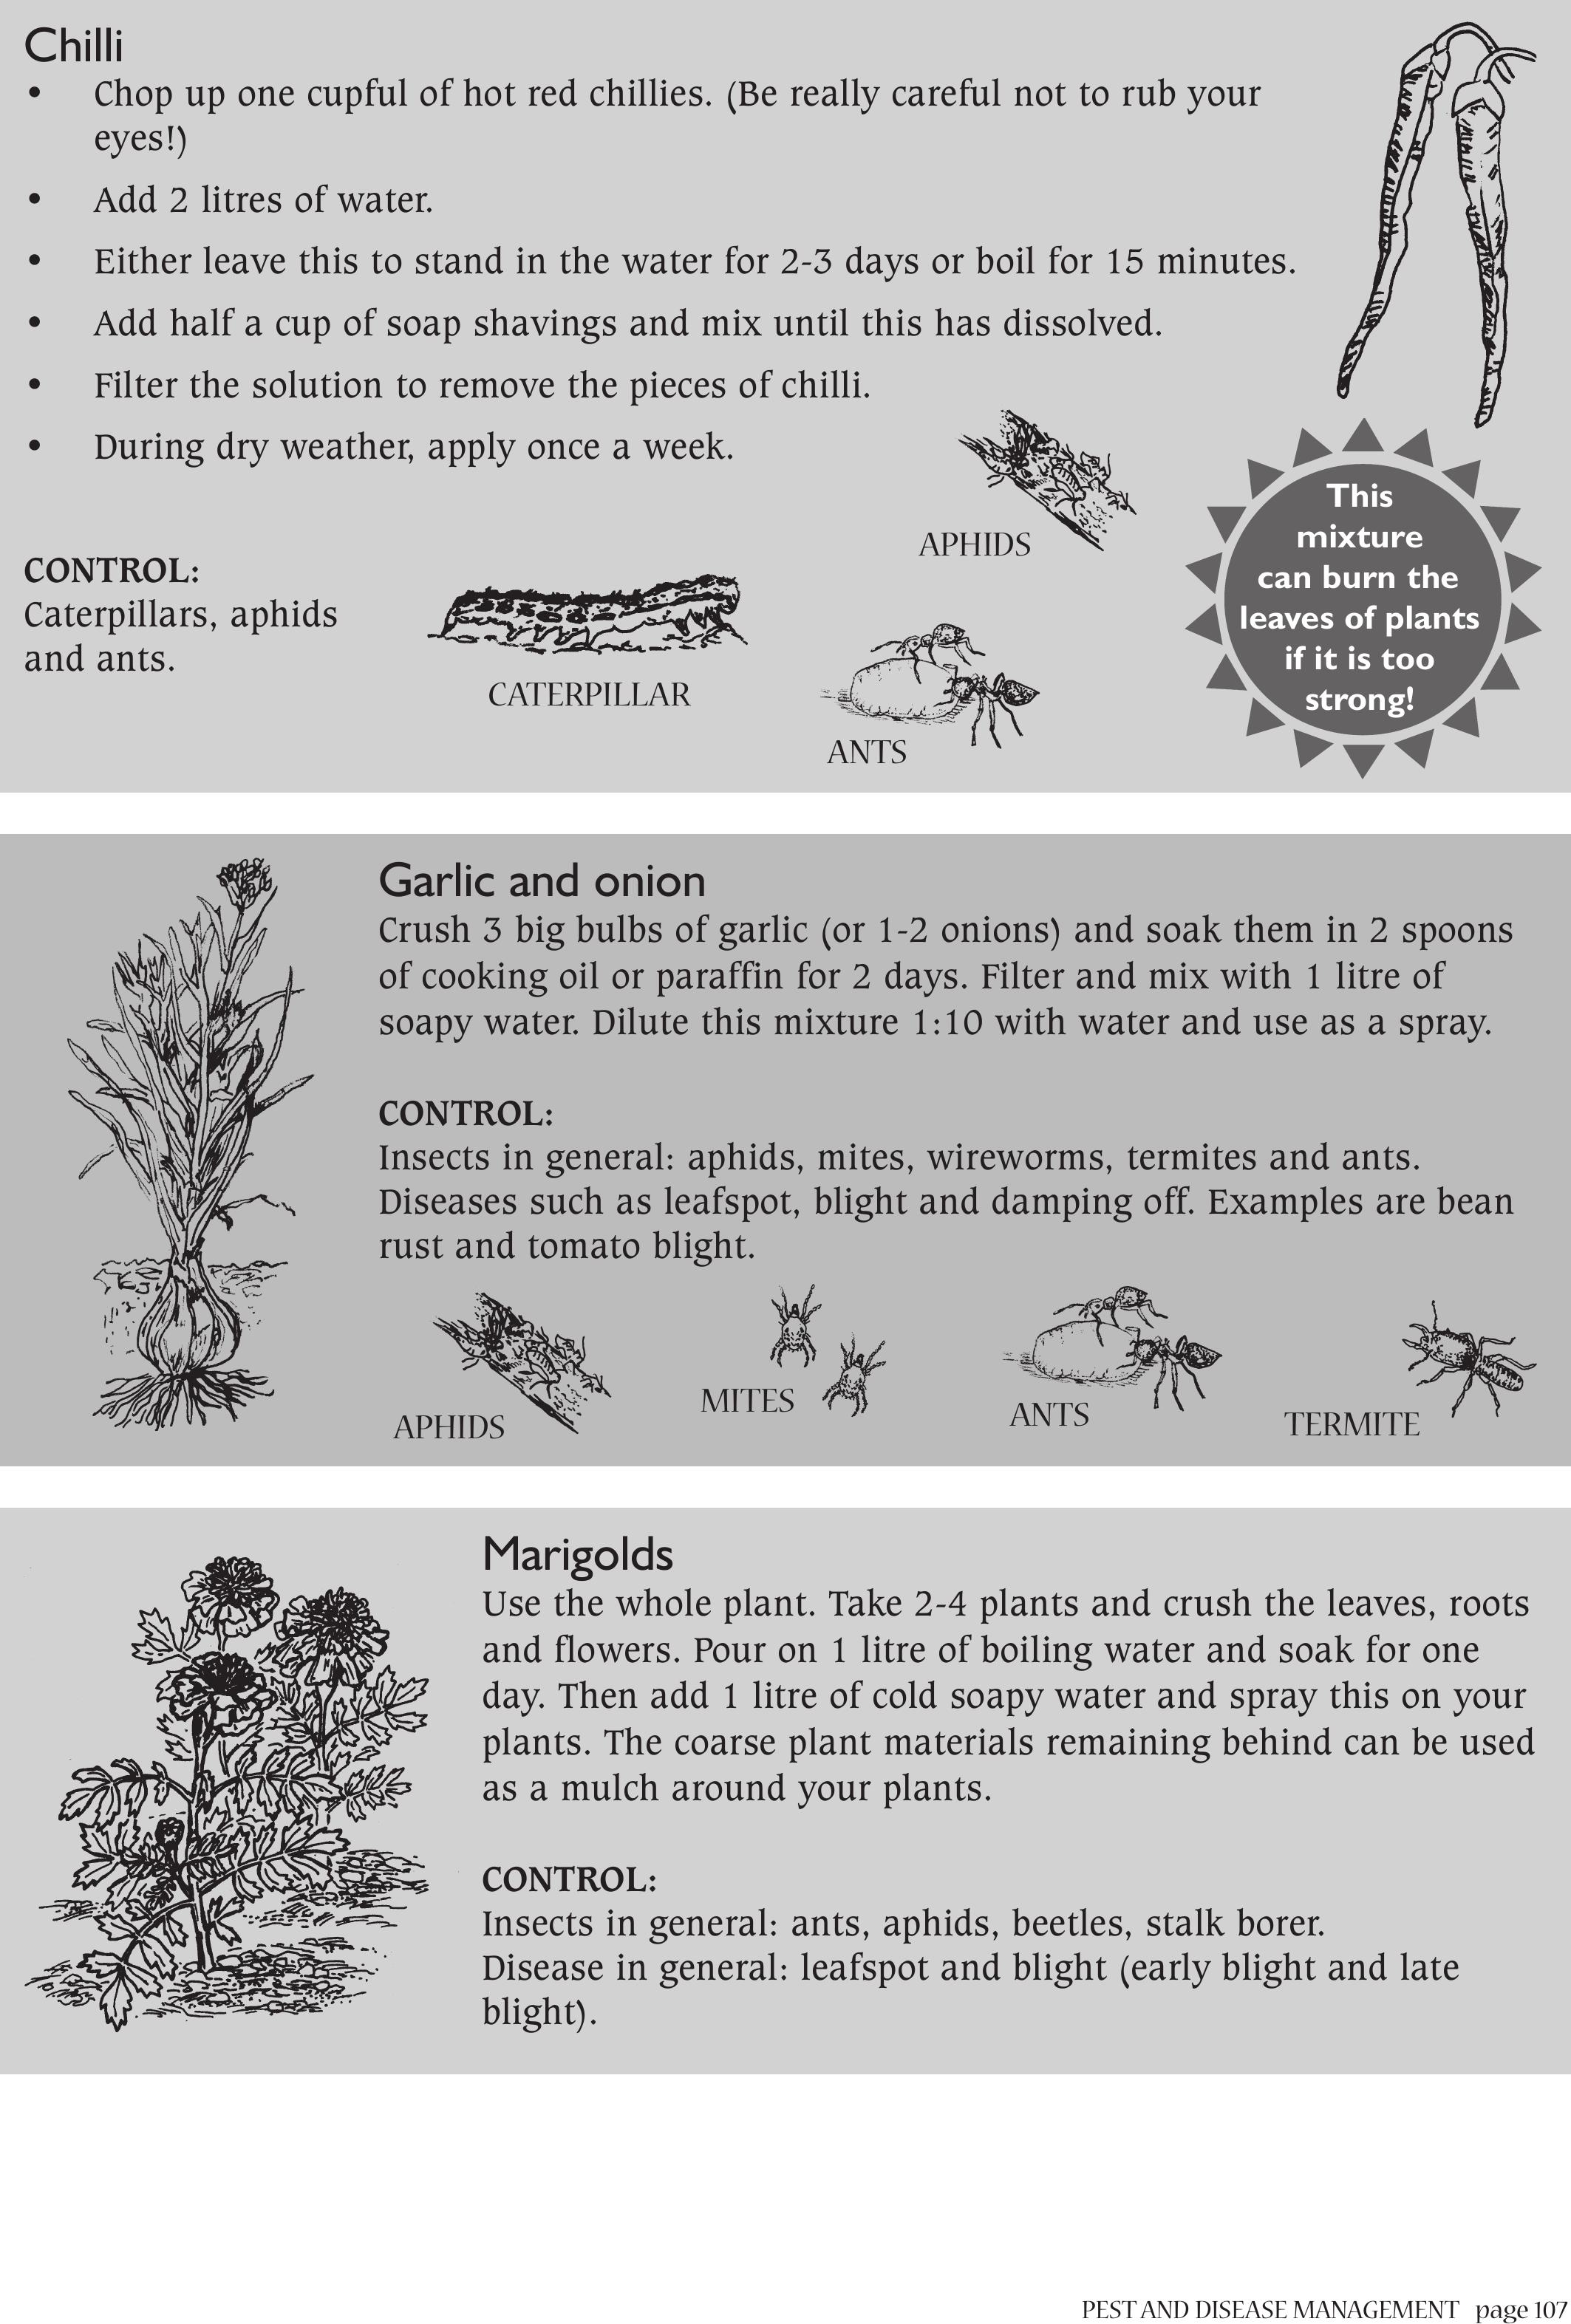
PEST AND DISEASE MANAGEMENTpage 107
Chilli
• Chop up one cupful of hot red chillies. (Be really careful not to rub your
eyes!)
• Add 2 litres of water.
• Either leave this to stand in the water for 2-3 days or boil for 15 minutes.
• Add half a cup of soap shavings and mix until this has dissolved.
• Filter the solution to remove the pieces of chilli.
• During dry weather, apply once a week.
CONTROL:
Caterpillars, aphids
and ants.
This
mixture
can burn the
leaves of plants
if it is too
strong!
APHIDS
ANTS
CATERPILLAR
Garlic and onion
Crush 3 big bulbs of garlic (or 1-2 onions) and soak them in 2 spoons
of cooking oil or paraffin for 2 days. Filter and mix with 1 litre of
soapy water. Dilute this mixture 1:10 with water and use as a spray.
CONTROL:
Insects in general: aphids, mites, wireworms, termites and ants.
Diseases such as leafspot, blight and damping off. Examples are bean
rust and tomato blight.
Marigolds
Use the whole plant. Take 2-4 plants and crush the leaves, roots
and flowers. Pour on 1 litre of boiling water and soak for one
day. Then add 1 litre of cold soapy water and spray this on your
plants. The coarse plant materials remaining behind can be used
as a mulch around your plants.
CONTROL:
Insects in general: ants, aphids, beetles, stalk borer.
Disease in general: leafspot and blight (early blight and late
blight).
APHIDS MITES ANTS TERMITE

page 108 PEST AND DISEASE MANAGEMENT
Wood ash
• Mix one heaped spoon of
wood ash in 1 litre of soapy
water. Leave it overnight.
Spray against insects in
general
• Mix one heaped spoon of
wood ash in 1 litre of soapy
water. Mix in one cup of sour milk and add 3 litres of water.
CONTROL: Mildew on plants and most insects.
• Spread the wood ash in a circle around the base of your
plants and water it into the soil a bit.
CONTROL: Snails, slugs and cutworms
ORGANIC REMEDIES
These remedies are made from organic materials, not from plants. Some examples are given
below:
Tobacco
WARNING:
Tobacco is very poisonous to
all insects and to people. Be
very careful with these
preparations.
• Take 2 handfuls of dry leaves or cigarette
ends. This is the same as one cup full.
• Add 5 litres of water and boil for 30
minutes. Filter. Then add soap, mix and let
your remedy cool. Apply once a week.
CONTROL:
Cutworms, caterpillars,
aphids, flies and weevils.
1 CUP CIGARETTE
ENDS
5 LITRES OF WATER
BOIL FOR
30 MINUTES
STRAIN AND ADD SOAP
Poison
Green
soap
BEAN AND
MAIZE
WEAVILS
Larva
CUTWORM
WOOD
ASH
APHIDS
POWDERY MILDEW:
Fine, white floury powder
mostly on the uper
surface
Greyish-white mould
Yellow spots and dead tissue
PEST AND DISEASE MANAGEMENTpage 109
Flour
Mix one big spoon of flour into 1 litre of water. Brush
this on the underside of leaves where mites and aphids
are. Apply in the morning of a sunny day.
CONTROL:
Spider mites, caterpillars and aphids.
MITES
CATERPILLAR
APHIDS
Milk
Spray a mixture of 1 litre of milk and 10 litres of water to control spider mites and diseases
such as mildew on pumpkins, blight on tomatoes and potatoes and mosaic virus on peppers.
Do this every 10 days.
Liquid manures/compost teas
See the Improving Your Soil leaflet in this series. This explains how to make liquid manures.
• Mix one spade full of compost or manure in 10 litres of water.
• Let this mixture stand for 10-14 days.
• Dilute animal manures 1:4. Use compost tea as is.
• Spray these onto your plants every 7-10 days.
CONTROL:
Generally protects against insect and disease attacks. Can repel aphids, caterpillars,
grasshoppers, beetles, mites and cutworms.
CATERPILLAR
APHIDS
MITES
GRASSHOPPER
CUTWORM

page 110

GROWING FRUIT TREESpage 111
It is possible to grow many different types of fruit trees around your homestead. You can
acquire your trees by growing them from seeds or cuttings or buying grafted trees from
nurseries.
CHOOSING A SITE
Different trees grow better in different climates. The table below will give you some ideas of
which trees will grow in your area.
GROWING FRUITTREES
VERY COLD AREAS:
Has frost often in winter and sometimes snow
NOT SO COLD AREAS:
Has frost sometimes in winter and rarely snow
Apples, pears, peaches, nectarines, plums, almonds,
grapes, cherries, apricots, pecan nuts and walnuts
Apples, pears, peaches, nectarines, plums, almonds,
grapes, cherries, apricots, pecan nuts and walnuts
Also; figs, granadillas and citrus fruit (lemons,
oranges, naartjies and grapefruit)
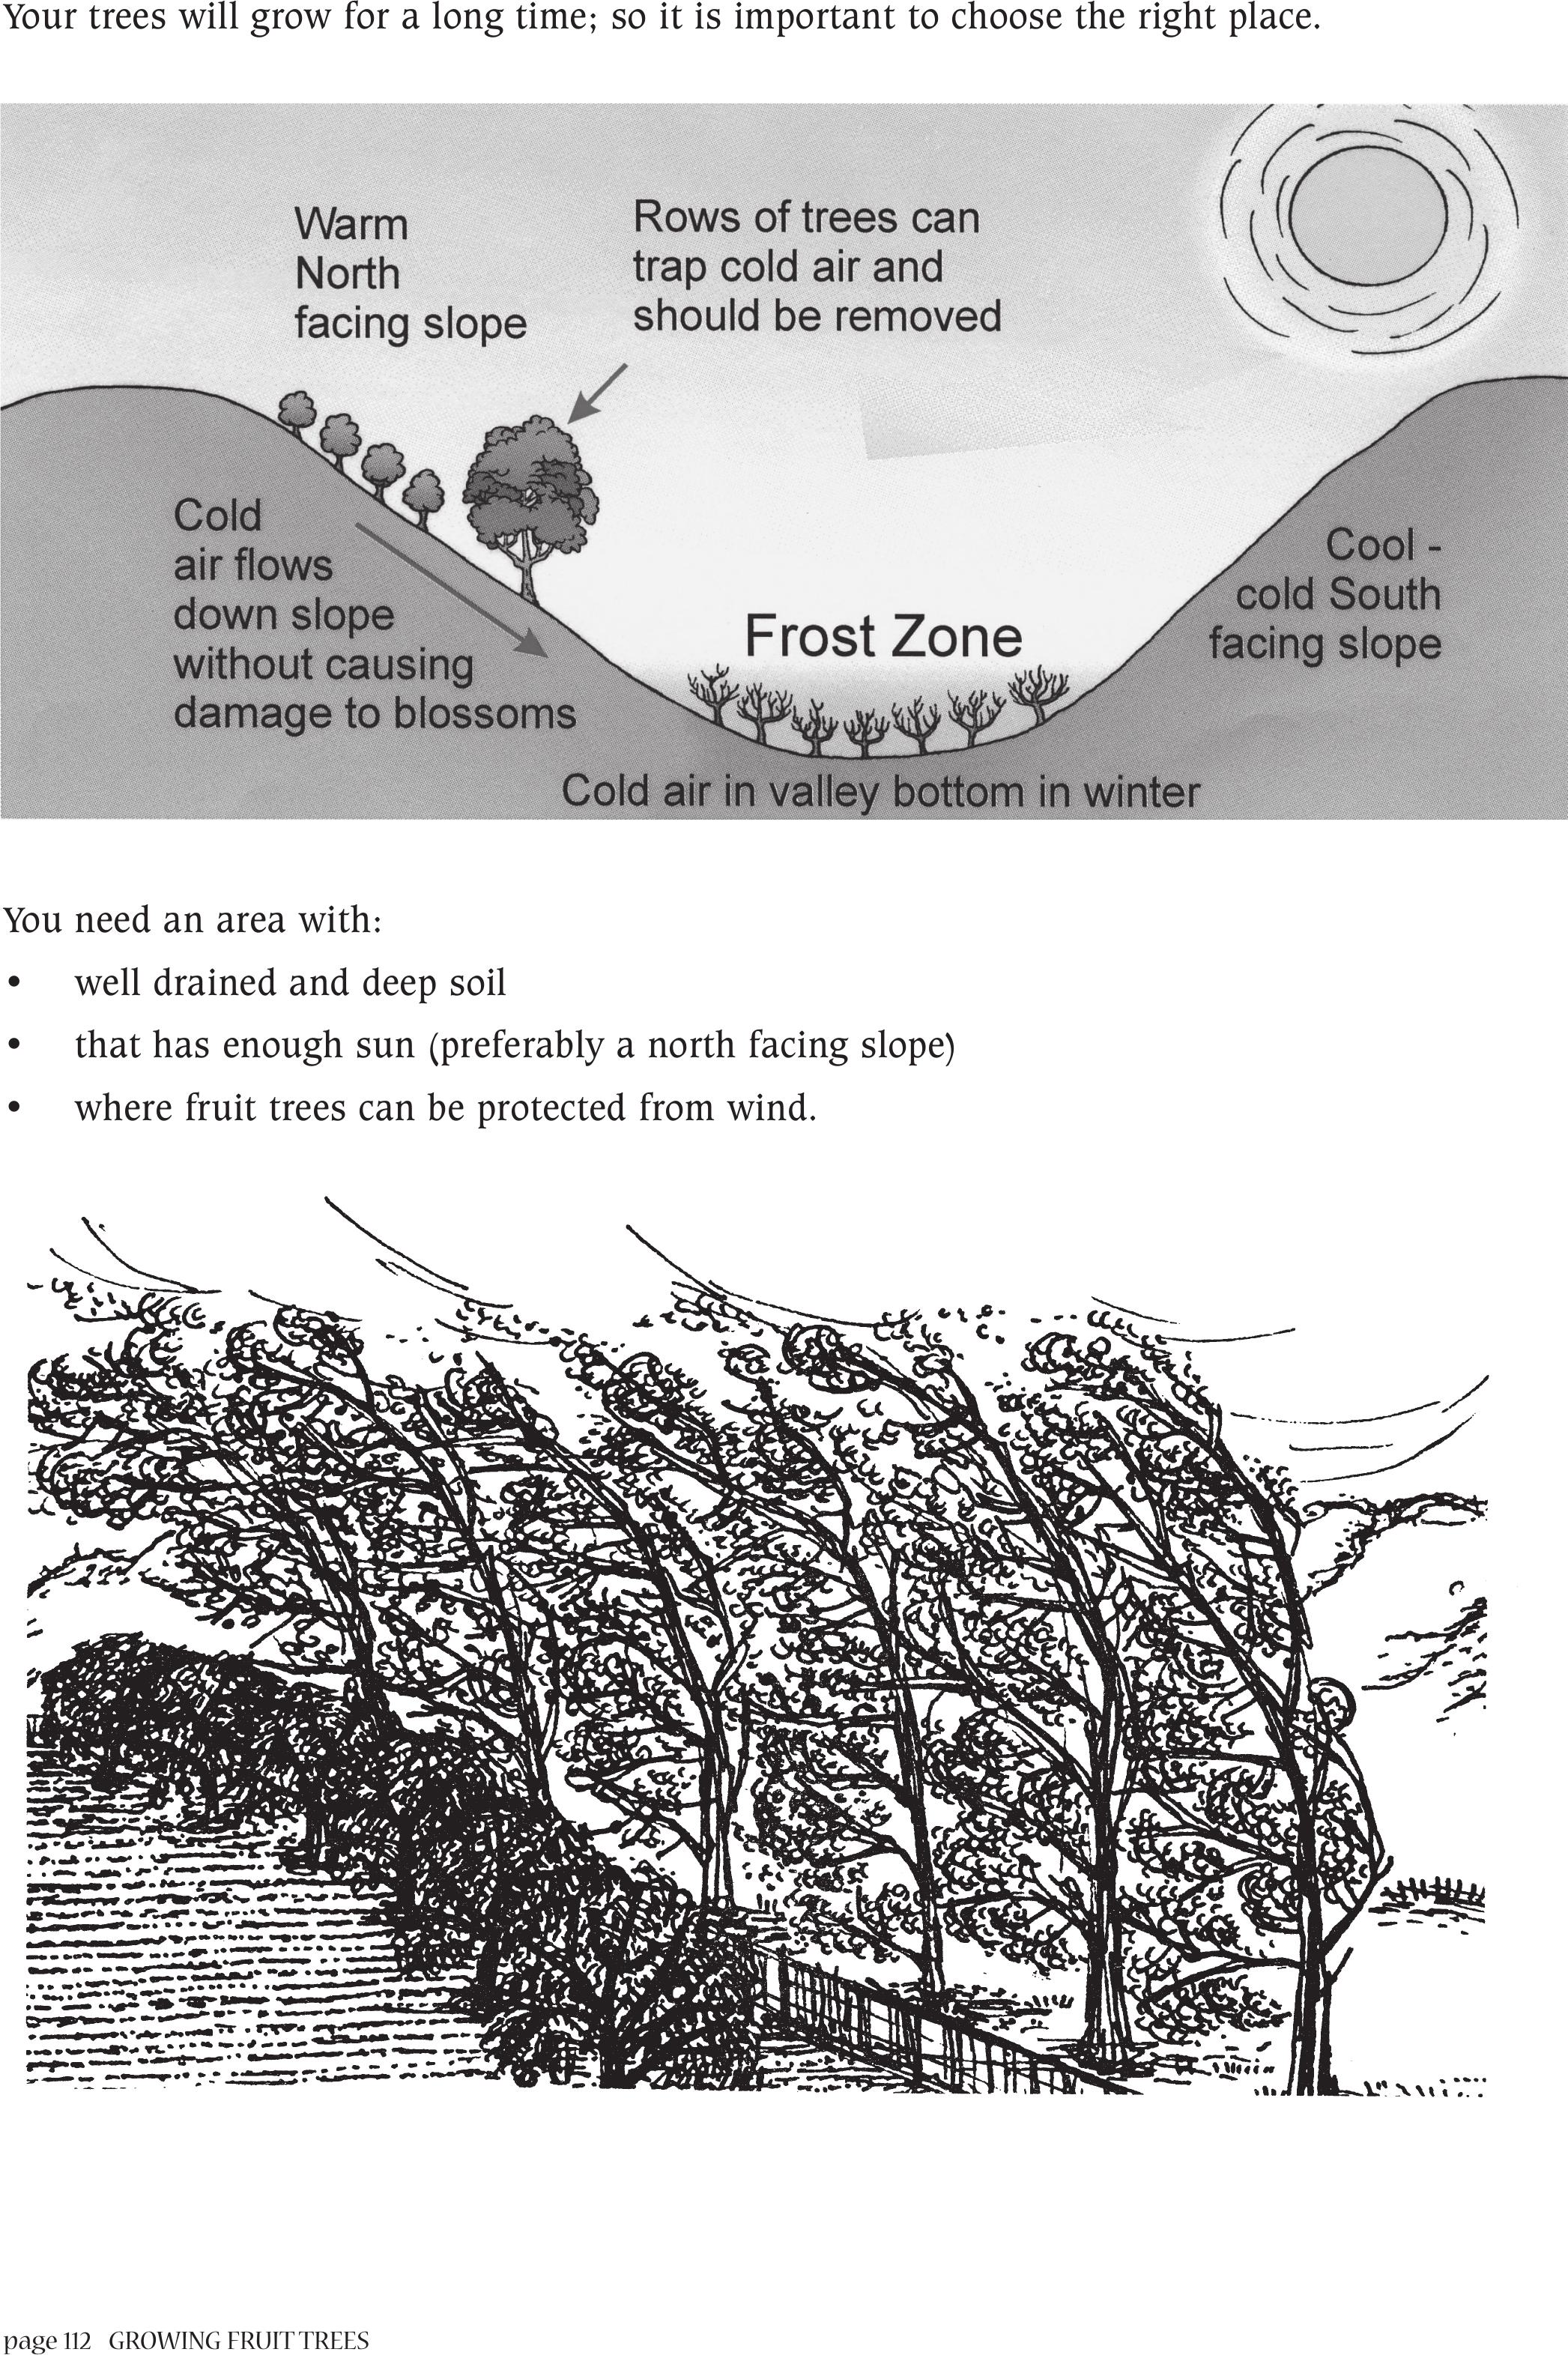
page 112 GROWING FRUIT TREES
Your trees will grow for a long time; so it is important to choose the right place.
You need an area with:
• well drained and deep soil
• that has enough sun (preferably a north facing slope)
• where fruit trees can be protected from wind.
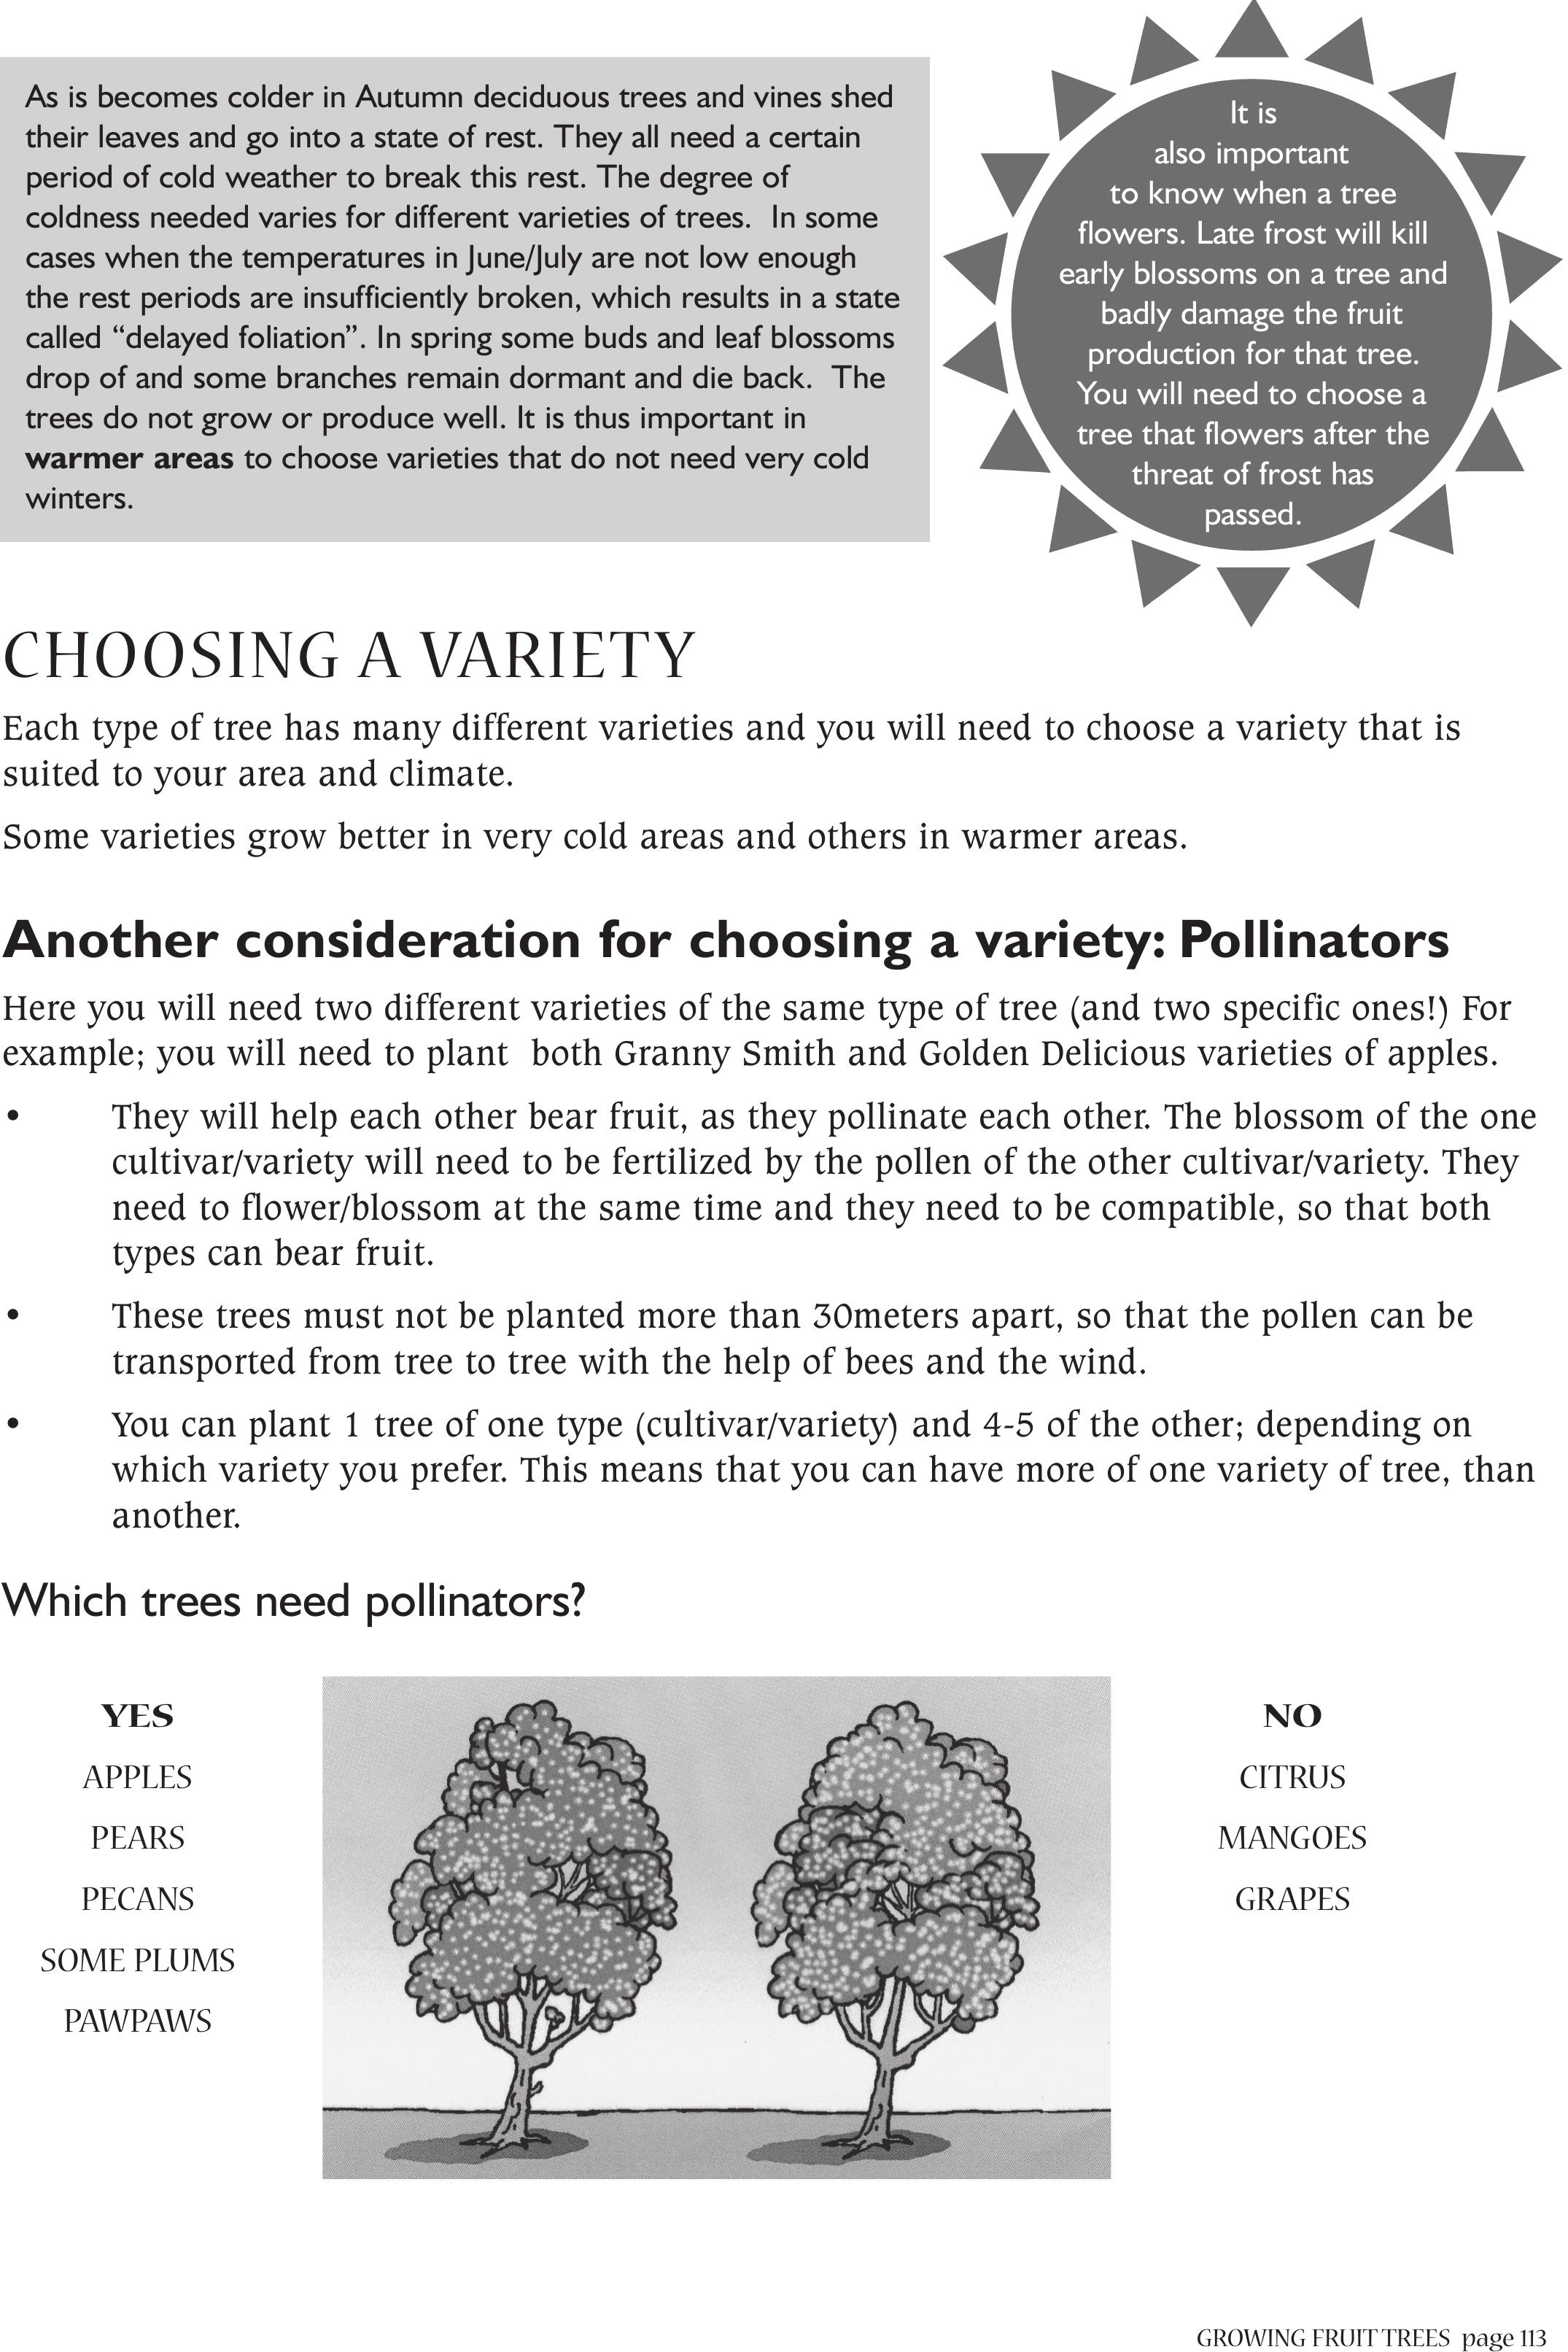
GROWING FRUIT TREESpage 113
As is becomes colder in Autumn deciduous trees and vines shed
their leaves and go into a state of rest. They all need a certain
period of cold weather to break this rest. The degree of
coldness needed varies for different varieties of trees. In some
cases when the temperatures in June/July are not low enough
the rest periods are insufficiently broken, which results in a state
called “delayed foliation”. In spring some buds and leaf blossoms
drop of and some branches remain dormant and die back. The
trees do not grow or produce well. It is thus important in
warmer areas to choose varieties that do not need very cold
winters.
CHOOSING A VARIETY
Each type of tree has many different varieties and you will need to choose a variety that is
suited to your area and climate.
Some varieties grow better in very cold areas and others in warmer areas.
Another consideration for choosing a variety: Pollinators
Here you will need two different varieties of the same type of tree (and two specific ones!) For
example; you will need to plant both Granny Smith and Golden Delicious varieties of apples.
• They will help each other bear fruit, as they pollinate each other. The blossom of the one
cultivar/variety will need to be fertilized by the pollen of the other cultivar/variety. They
need to flower/blossom at the same time and they need to be compatible, so that both
types can bear fruit.
• These trees must not be planted more than 30meters apart, so that the pollen can be
transported from tree to tree with the help of bees and the wind.
• You can plant 1 tree of one type (cultivar/variety) and 4-5 of the other; depending on
which variety you prefer. This means that you can have more of one variety of tree, than
another.
Which trees need pollinators?
It is
also important
to know when a tree
flowers. Late frost will kill
early blossoms on a tree and
badly damage the fruit
production for that tree.
You will need to choose a
tree that flowers after the
threat of frost has
passed.
YES
APPLES
PEARS
PECANS
SOME PLUMS
PAWPAWS
NO
CITRUS
MANGOES
GRAPES
page 114 GROWING FRUIT TREES
Different varieties/cultivars you can choose from
There are many, many varieties and cultivars and new ones are always being produced. It may
help to ask the nurseries in your area which varieties are suitable. In the table below some
varieties are mentioned to give you an idea.
CULTIVARS FOR VERY COLD AREASCULTIVARS FOR NOT SO COLD AREA
NAMEPOLLINATORFRUIT
RIPENS
NAMEPOLLINATORFRUIT RIPENS
APPLES
Granny
Smith;
green apple
Yes: Golden Delicious or
Starking /Top Red
April Granny
Smith;
green apple
Yes: Golden
Delicious or
Starking /Top
Red
April
Golden
Delicious;
yellow
Yes: Granny Smith or
Starking /Top Red
15 FebruaryGolden
Delicious;
yellow
Yes: Granny
Smith or
Starking /Top
Red
15 February
Starking/
Top Red:
Red
Yes; Golden Delicious or
Granny Smith
March Starking/
Top Red:
Red
Yes; Golden
Delicious or
Granny Smith
March
PEARS
Packhams;
Light green
Bon Chretion and
Forelle
Mid
February
Packhams;
Light green
Clapp's
Favourite
Mid February
Bon
Chretion;
yellow
Self pollinatorMarch
Forelle;
yellow with
red blush
Packhams and Bon
Chretion
Early April
PLUMS
Santa Rosa:
red skin and
flesh
Self pollinating15
December
– Begin
January
Pioneer;
red skin and
flesh
Self pollinating20 November
Songold:
yellow skin
and flesh
Santa Rosa, Laetitia15 FebruarySongold:
yellow skin
and flesh
Santa Rosa,
Laetitia
15 February
Laetitia; red
skin and
flesh
Songold30 JanuaryLaetitia;
red skin and
flesh
Songold30 January
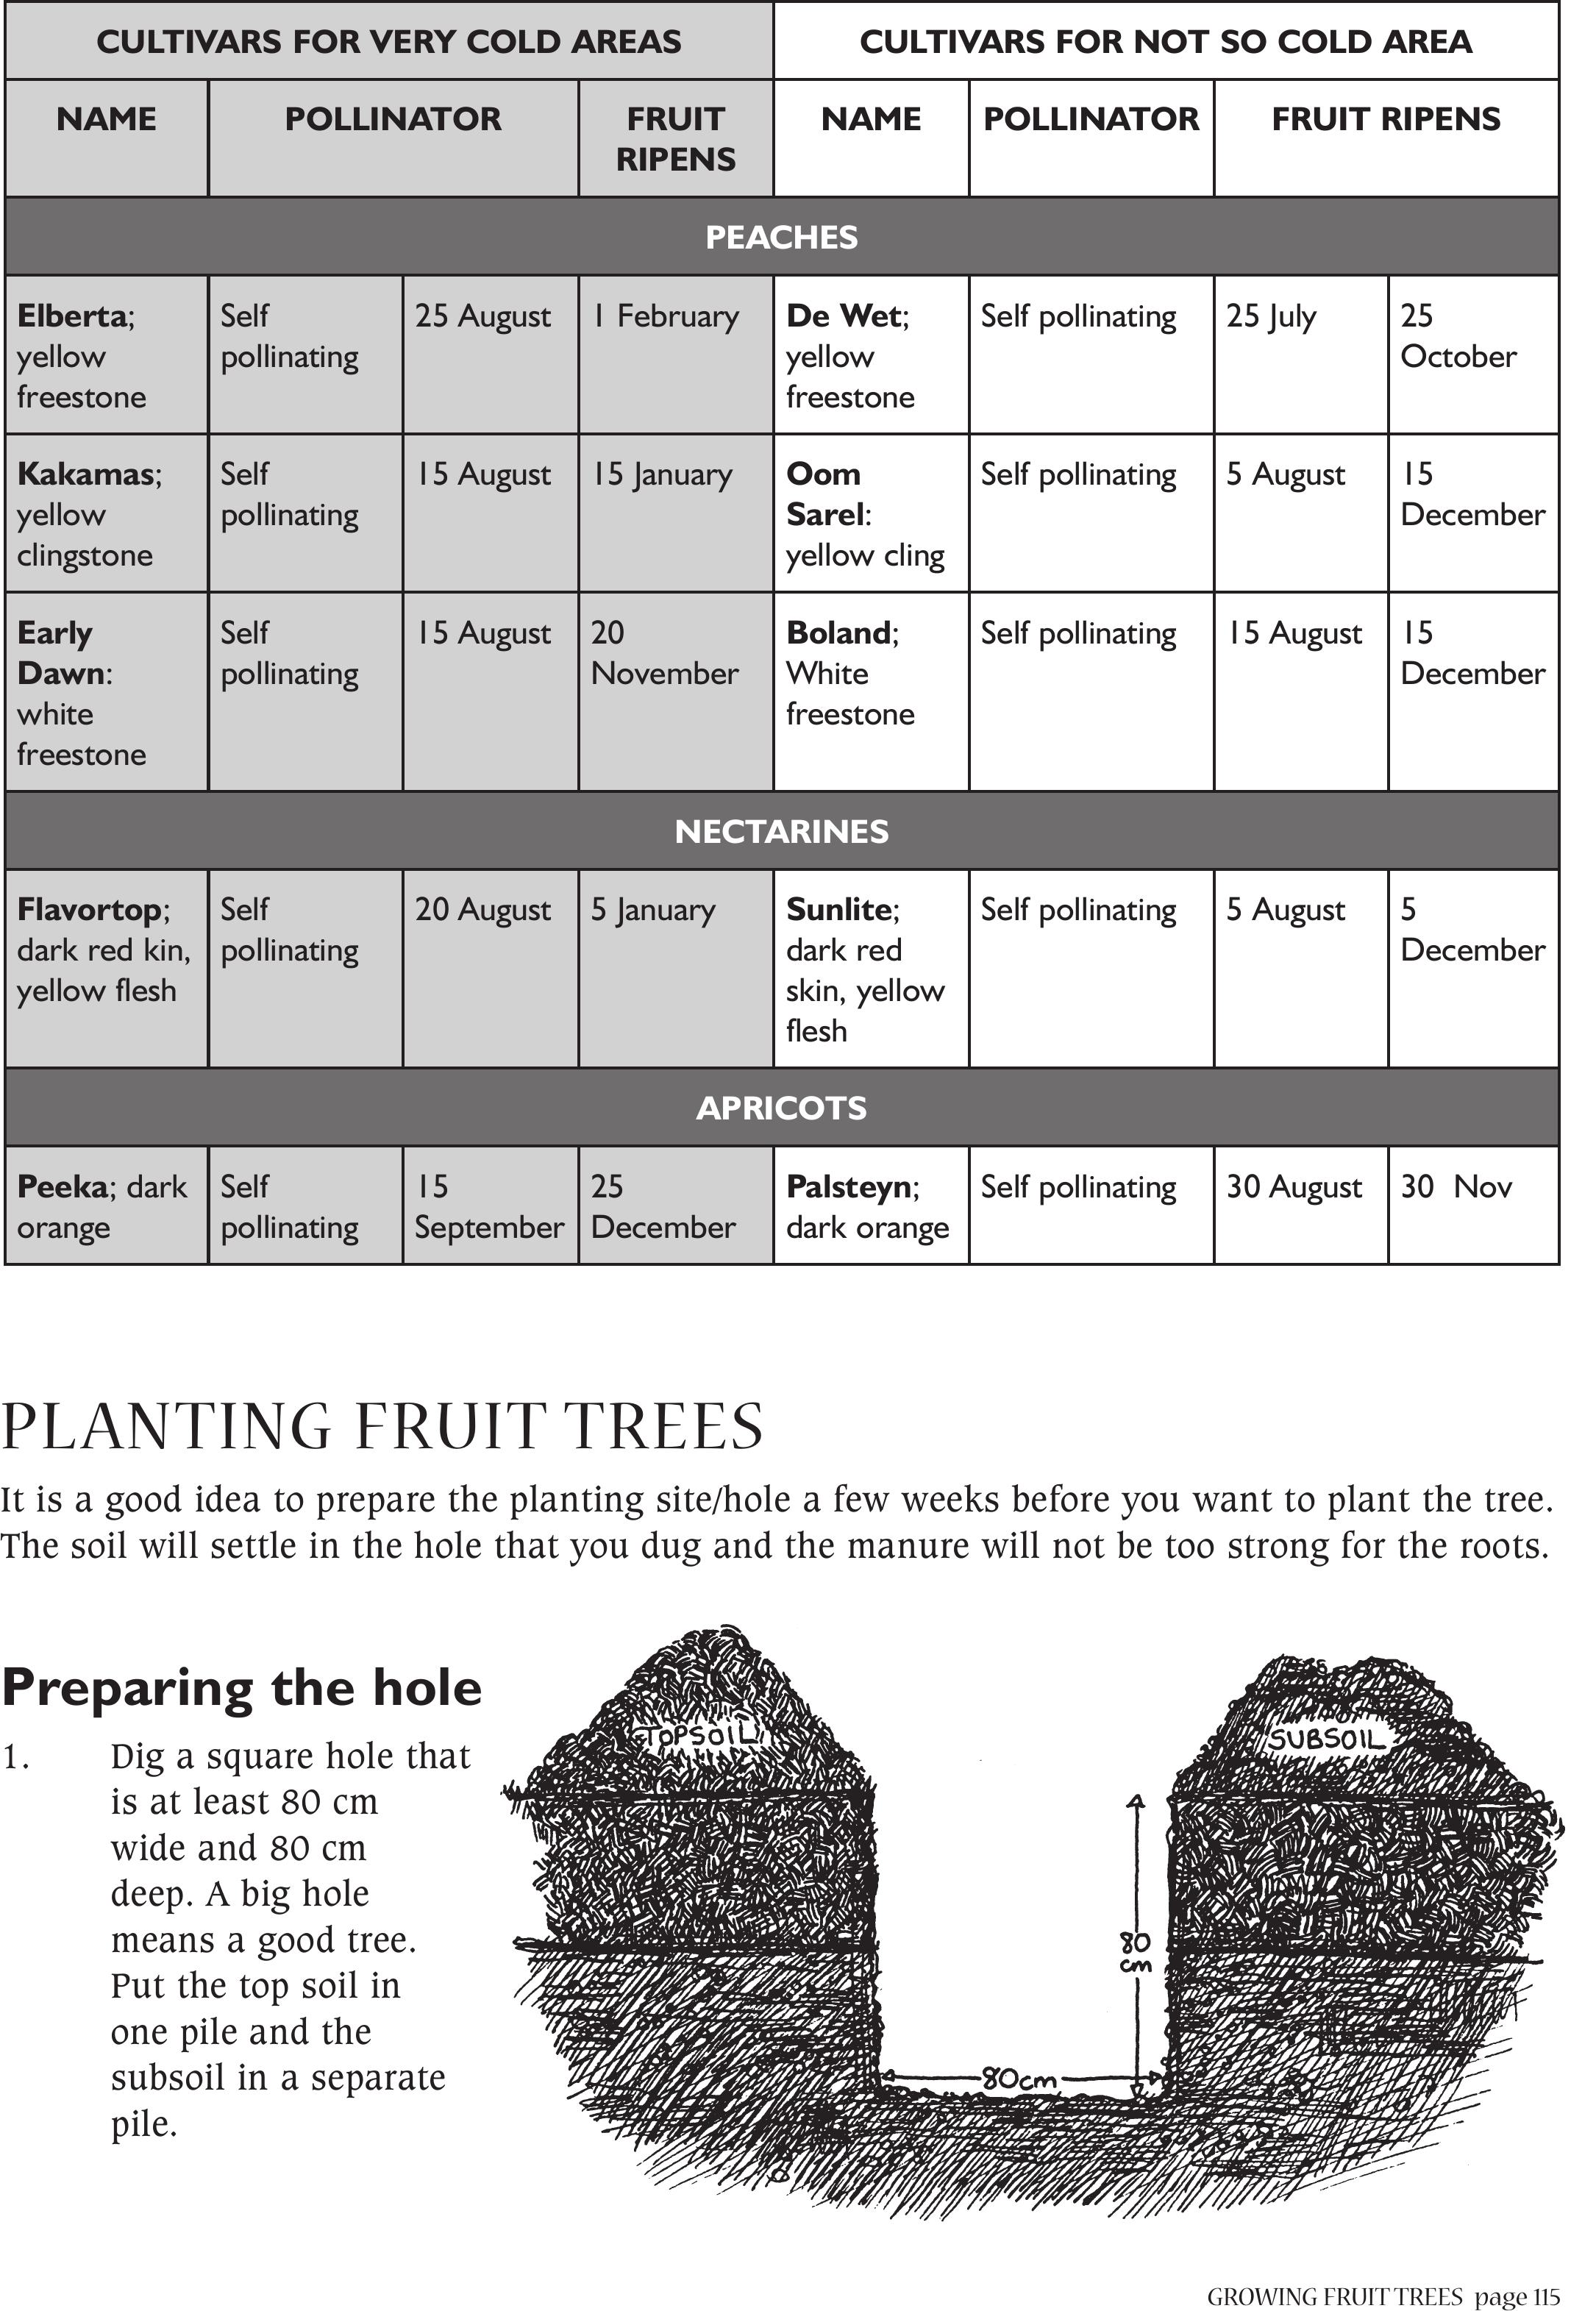
GROWING FRUIT TREESpage 115
CULTIVARS FOR VERY COLD AREASCULTIVARS FOR NOT SO COLD AREA
NAMEPOLLINATORFRUIT
RIPENS
NAMEPOLLINATORFRUIT RIPENS
PEACHES
Elberta;
yellow
freestone
Self
pollinating
25 August1 FebruaryDe Wet;
yellow
freestone
Self pollinating25 July25
October
Kakamas;
yellow
clingstone
Self
pollinating
15 August15 JanuaryOom
Sarel:
yellow cling
Self pollinating5 August15
December
Early
Dawn:
white
freestone
Self
pollinating
15 August20
November
Boland;
White
freestone
Self pollinating15 August15
December
NECTARINES
Flavortop;
dark red kin,
yellow flesh
Self
pollinating
20 August5 JanuarySunlite;
dark red
skin, yellow
flesh
Self pollinating5 August5
December
APRICOTS
Peeka; dark
orange
Self
pollinating
15
September
25
December
Palsteyn;
dark orange
Self pollinating30 August30 Nov
PLANTING FRUITTREES
It is a good idea to prepare the planting site/hole a few weeks before you want to plant the tree.
The soil will settle in the hole that you dug and the manure will not be too strong for the roots.
Preparing the hole
1. Dig a square hole that
is at least 80 cm
wide and 80 cm
deep. A big hole
means a good tree.
Put the top soil in
one pile and the
subsoil in a separate
pile.
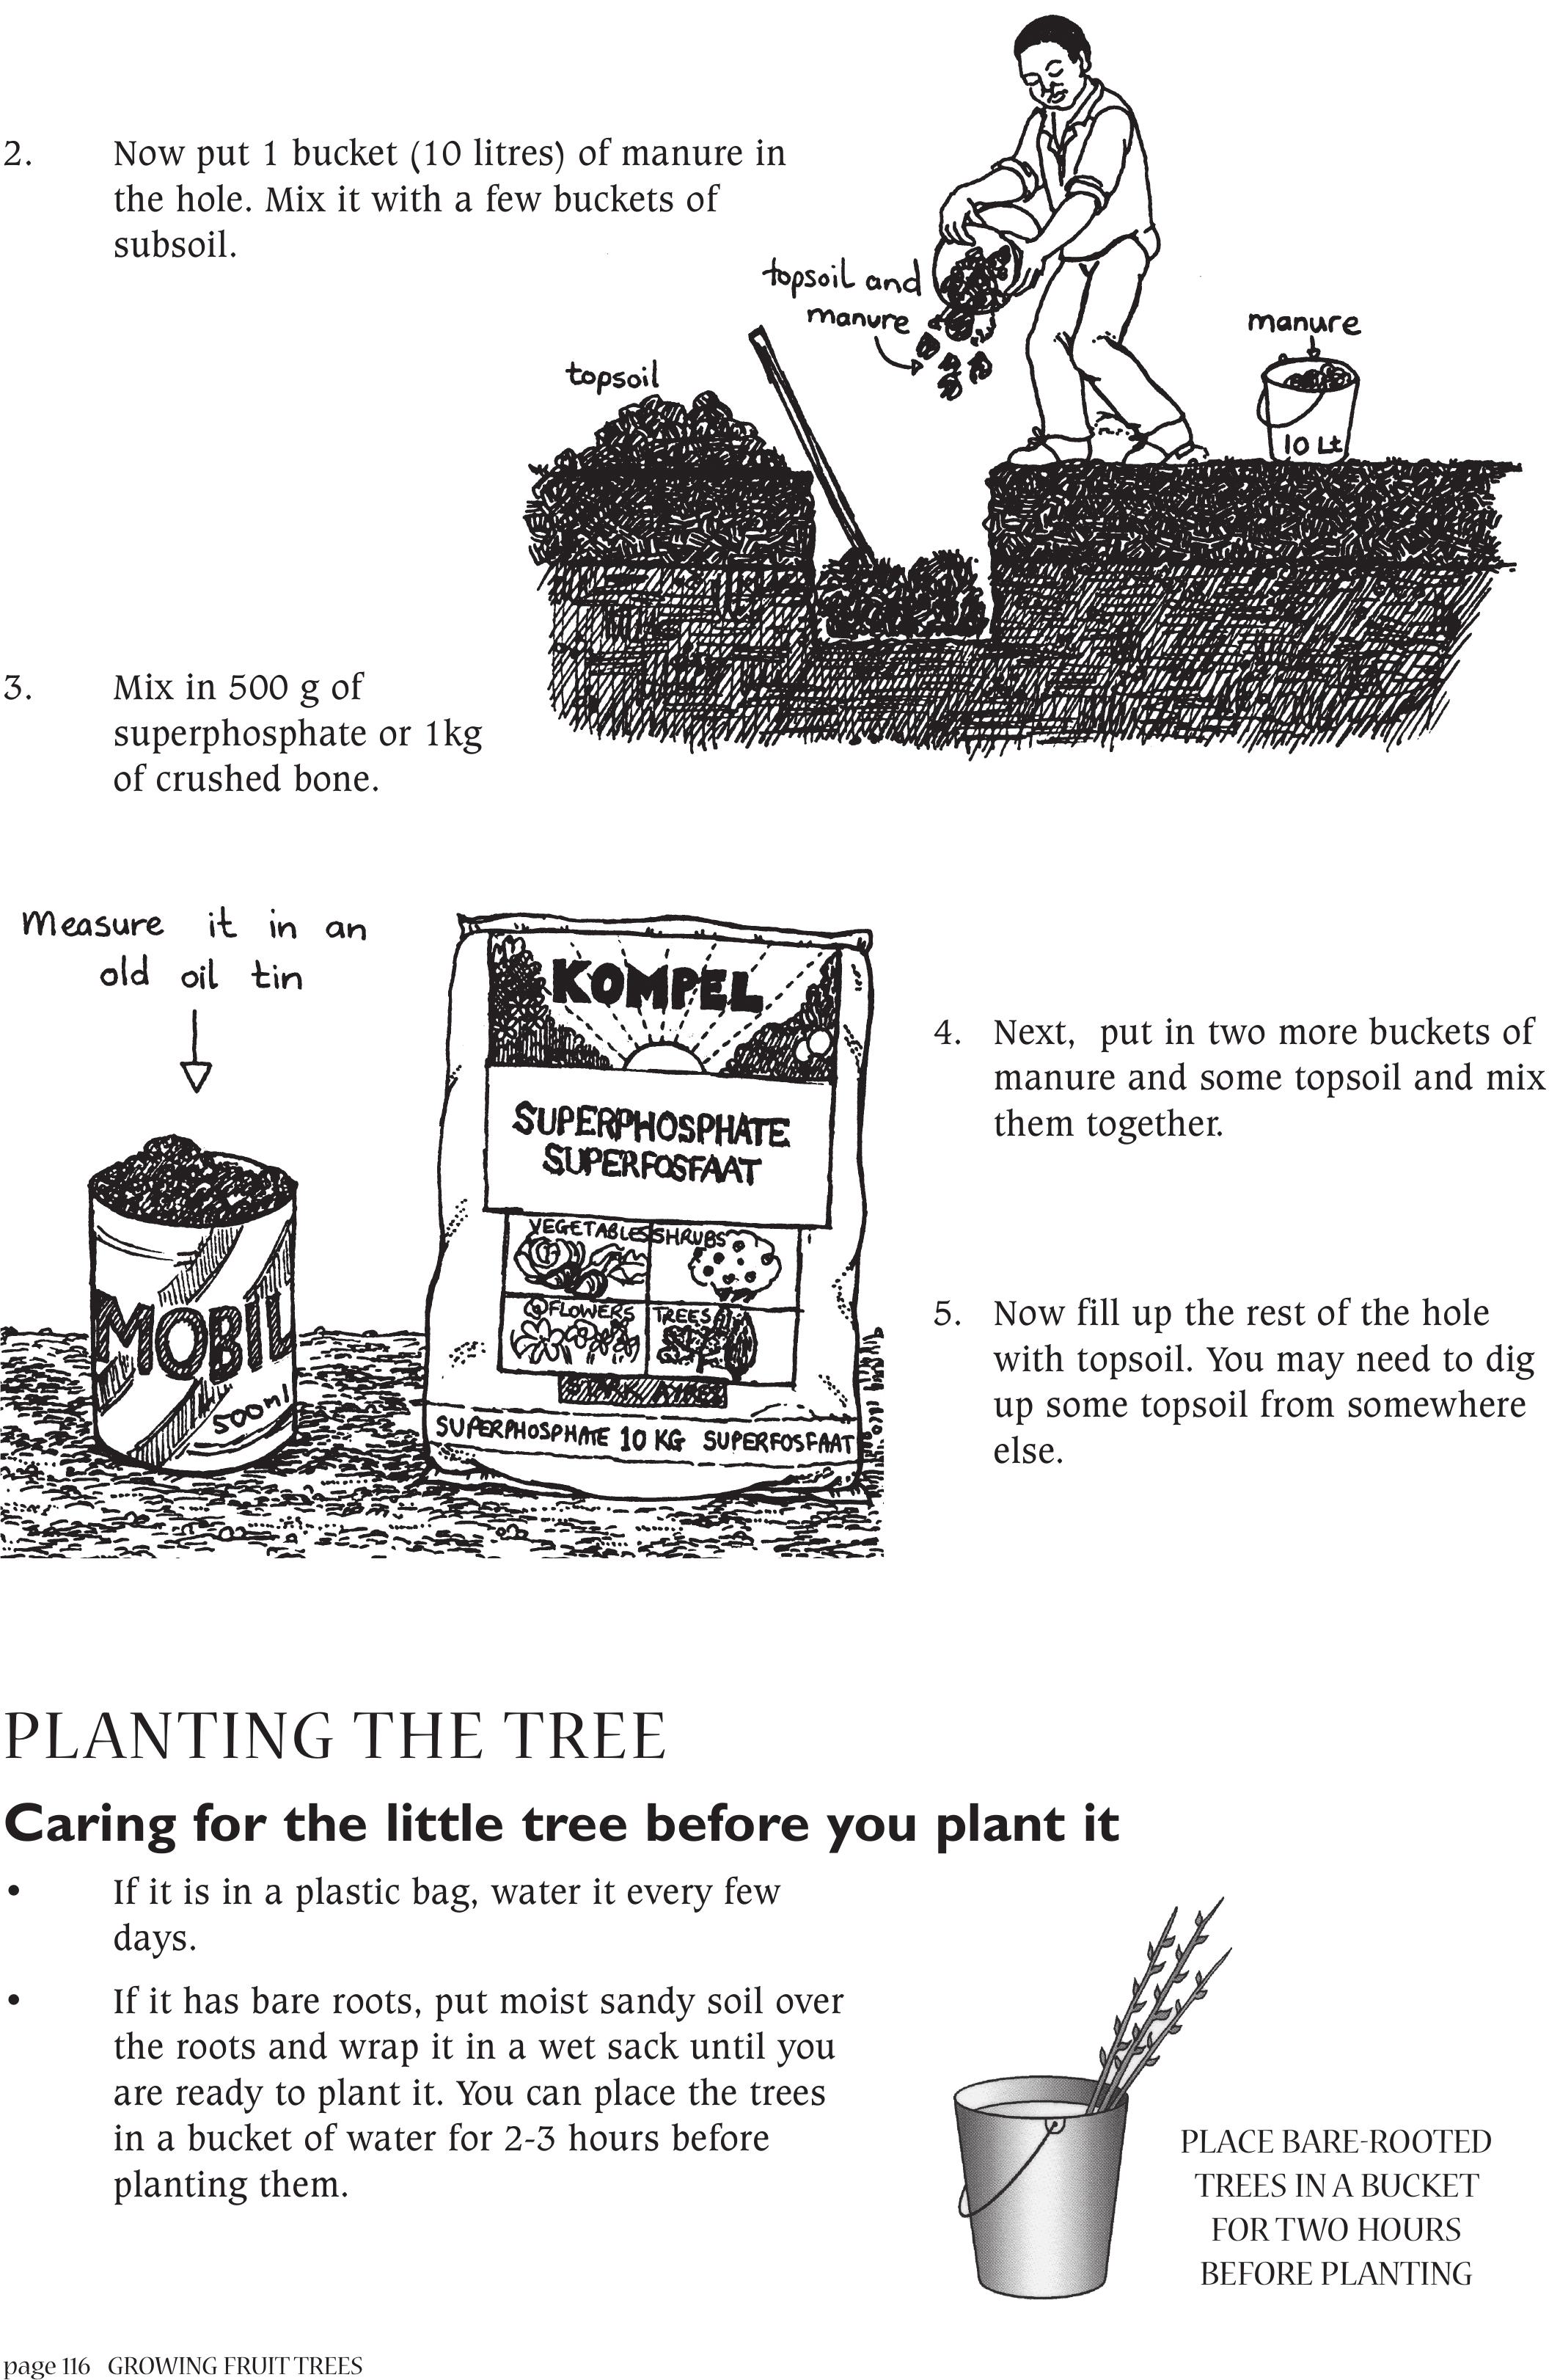
page 116 GROWING FRUIT TREES
2. Now put 1 bucket (10 litres) of manure in
the hole. Mix it with a few buckets of
subsoil.
3. Mix in 500 g of
superphosphate or 1kg
of crushed bone.
4. Next, put in two more buckets of
manure and some topsoil and mix
them together.
5. Now fill up the rest of the hole
with topsoil. You may need to dig
up some topsoil from somewhere
else.
PLANTING THE TREE
Caring for the little tree before you plant it
• If it is in a plastic bag, water it every few
days.
• If it has bare roots, put moist sandy soil over
the roots and wrap it in a wet sack until you
are ready to plant it. You can place the trees
in a bucket of water for 2-3 hours before
planting them.
PLACE BARE-ROOTED
TREES IN A BUCKET
FOR TWO HOURS
BEFORE PLANTING
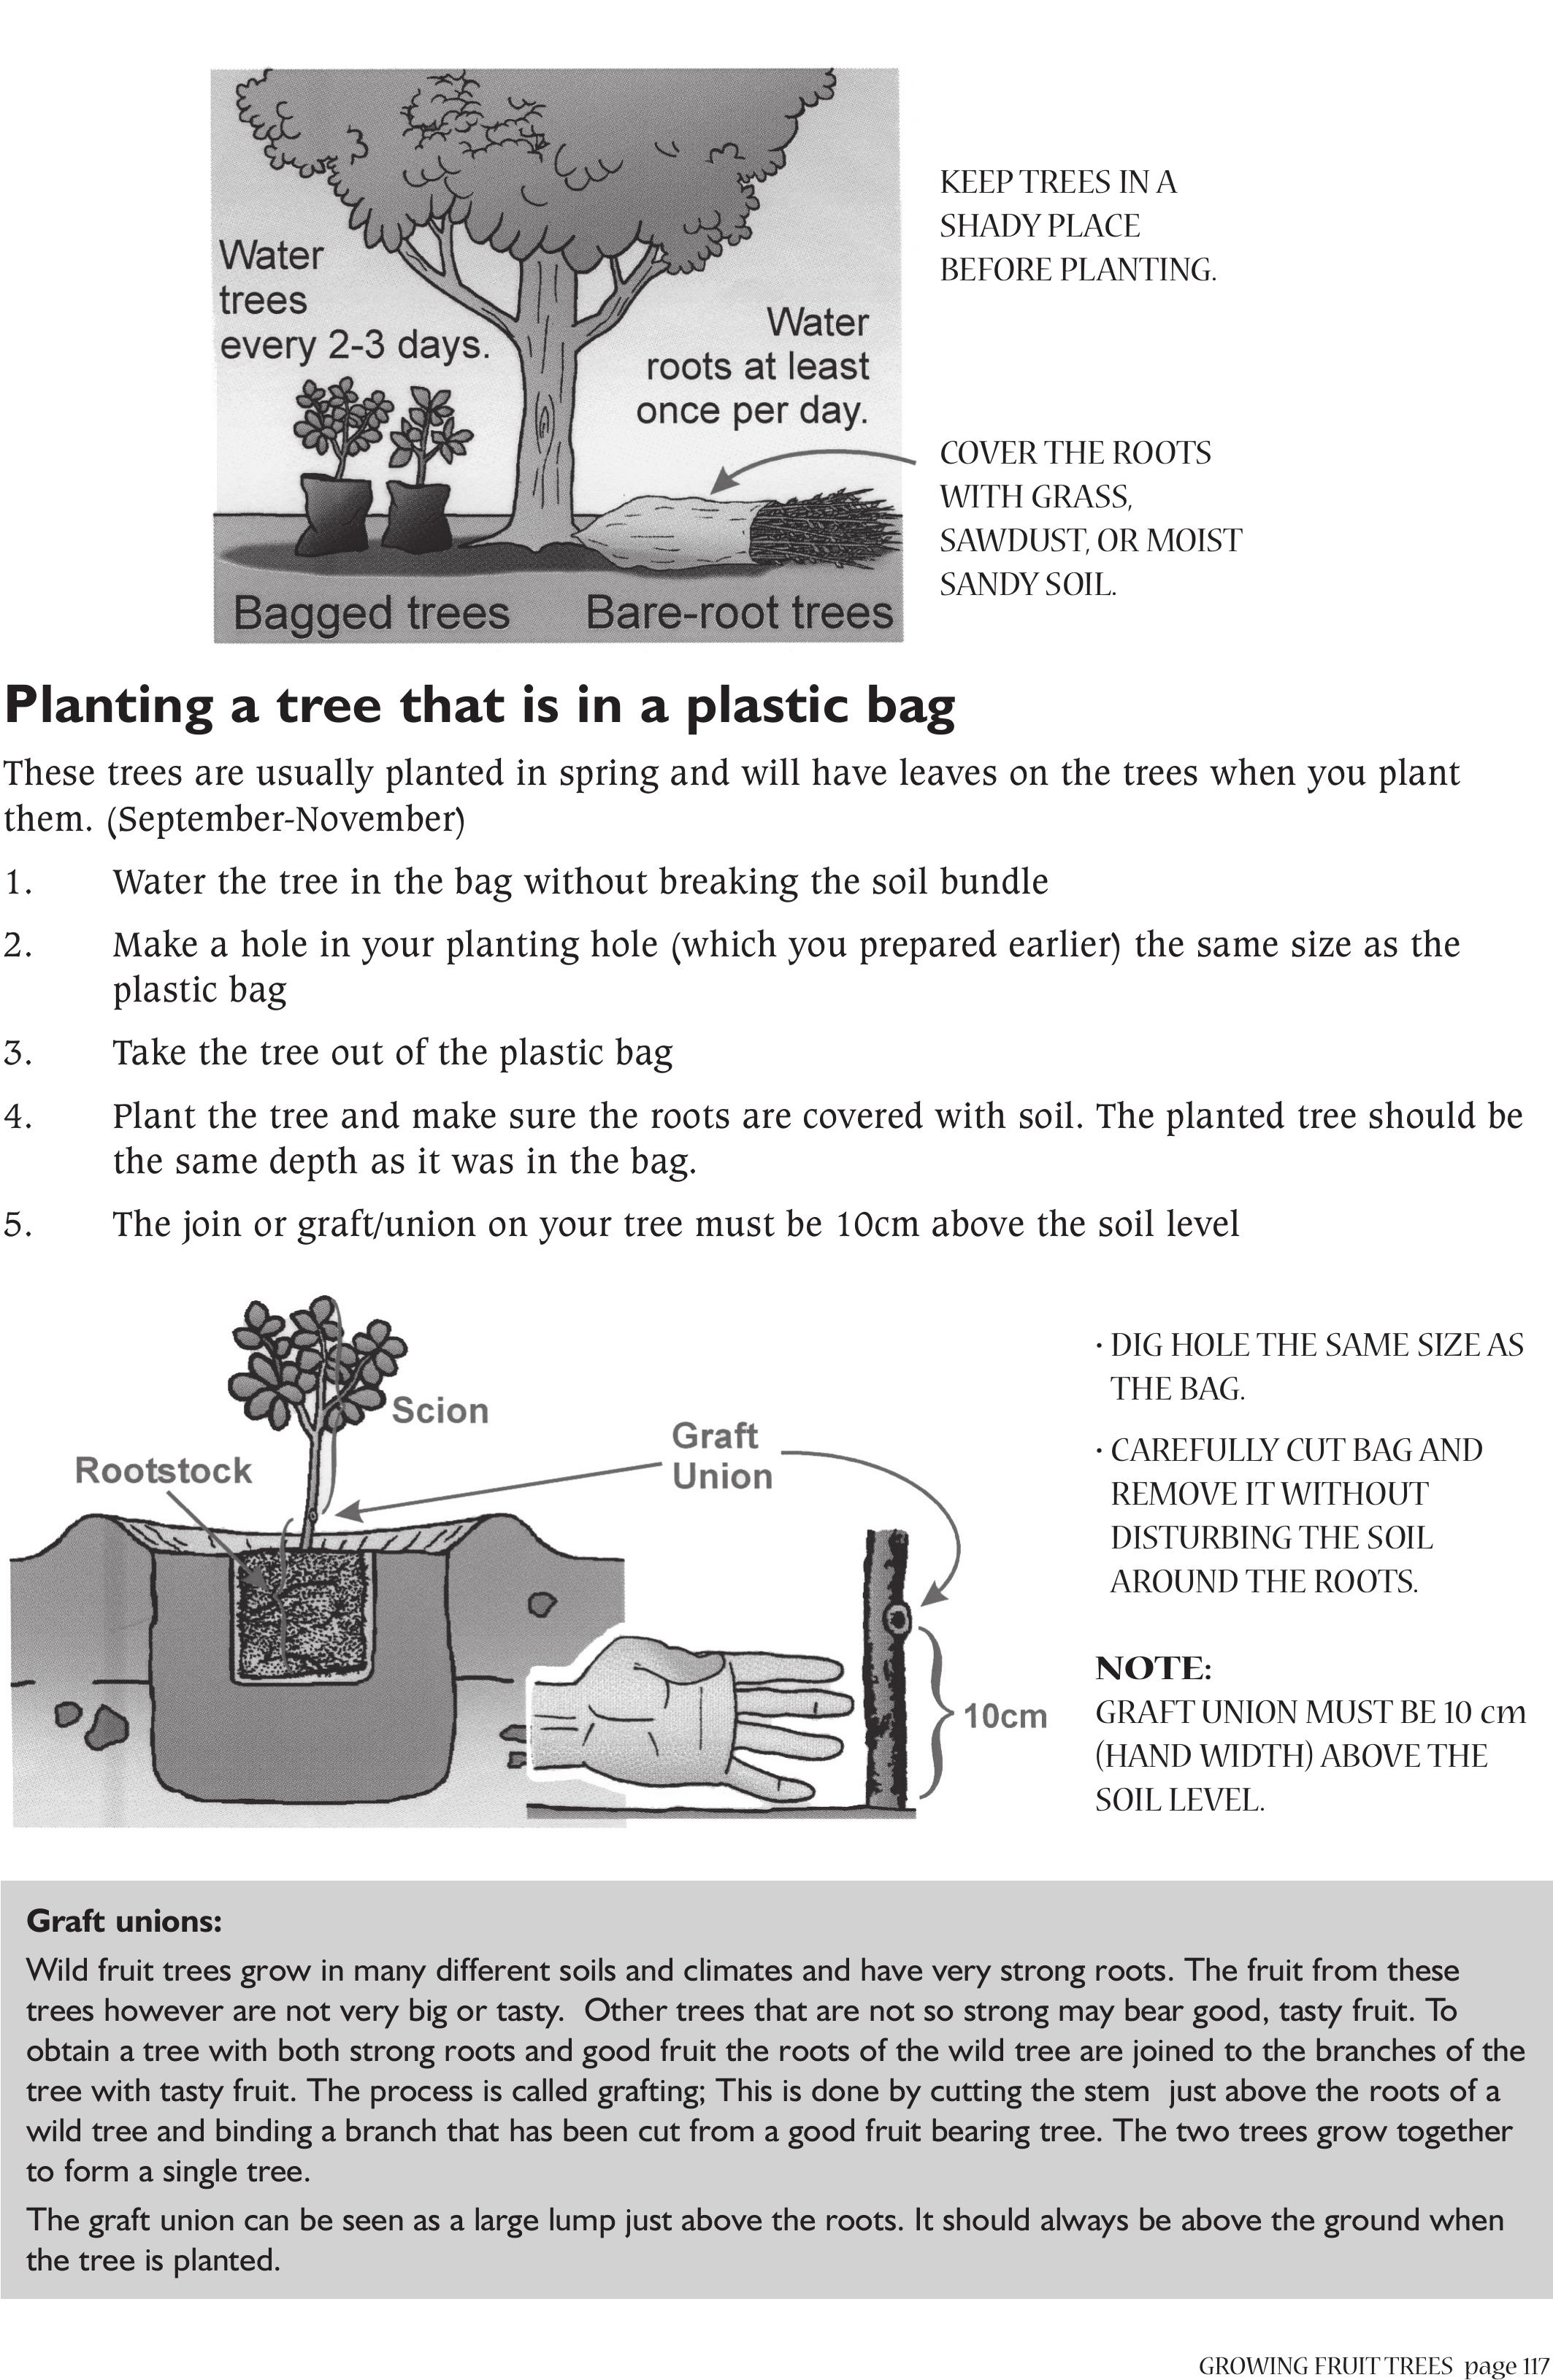
GROWING FRUIT TREESpage 117
Planting a tree that is in a plastic bag
These trees are usually planted in spring and will have leaves on the trees when you plant
them. (September-November)
1. Water the tree in the bag without breaking the soil bundle
2. Make a hole in your planting hole (which you prepared earlier) the same size as the
plastic bag
3. Take the tree out of the plastic bag
4. Plant the tree and make sure the roots are covered with soil. The planted tree should be
the same depth as it was in the bag.
5. The join or graft/union on your tree must be 10cm above the soil level
• DIG HOLE THE SAME SIZE AS
THE BAG.
• CAREFULLY CUT BAG AND
REMOVE IT WITHOUT
DISTURBING THE SOIL
AROUND THE ROOTS.
NOTE:
GRAFT UNION MUST BE 10 cm
(HAND WIDTH) ABOVE THE
SOIL LEVEL.
KEEP TREES IN A
SHADY PLACE
BEFORE PLANTING.
COVER THE ROOTS
WITH GRASS,
SAWDUST, OR MOIST
SANDY SOIL.
Graft unions:
Wild fruit trees grow in many different soils and climates and have very strong roots. The fruit from these
trees however are not very big or tasty. Other trees that are not so strong may bear good, tasty fruit. To
obtain a tree with both strong roots and good fruit the roots of the wild tree are joined to the branches of the
tree with tasty fruit. The process is called grafting; This is done by cutting the stem just above the roots of a
wild tree and binding a branch that has been cut from a good fruit bearing tree. The two trees grow together
to form a single tree.
The graft union can be seen as a large lump just above the roots. It should always be above the ground when
the tree is planted.
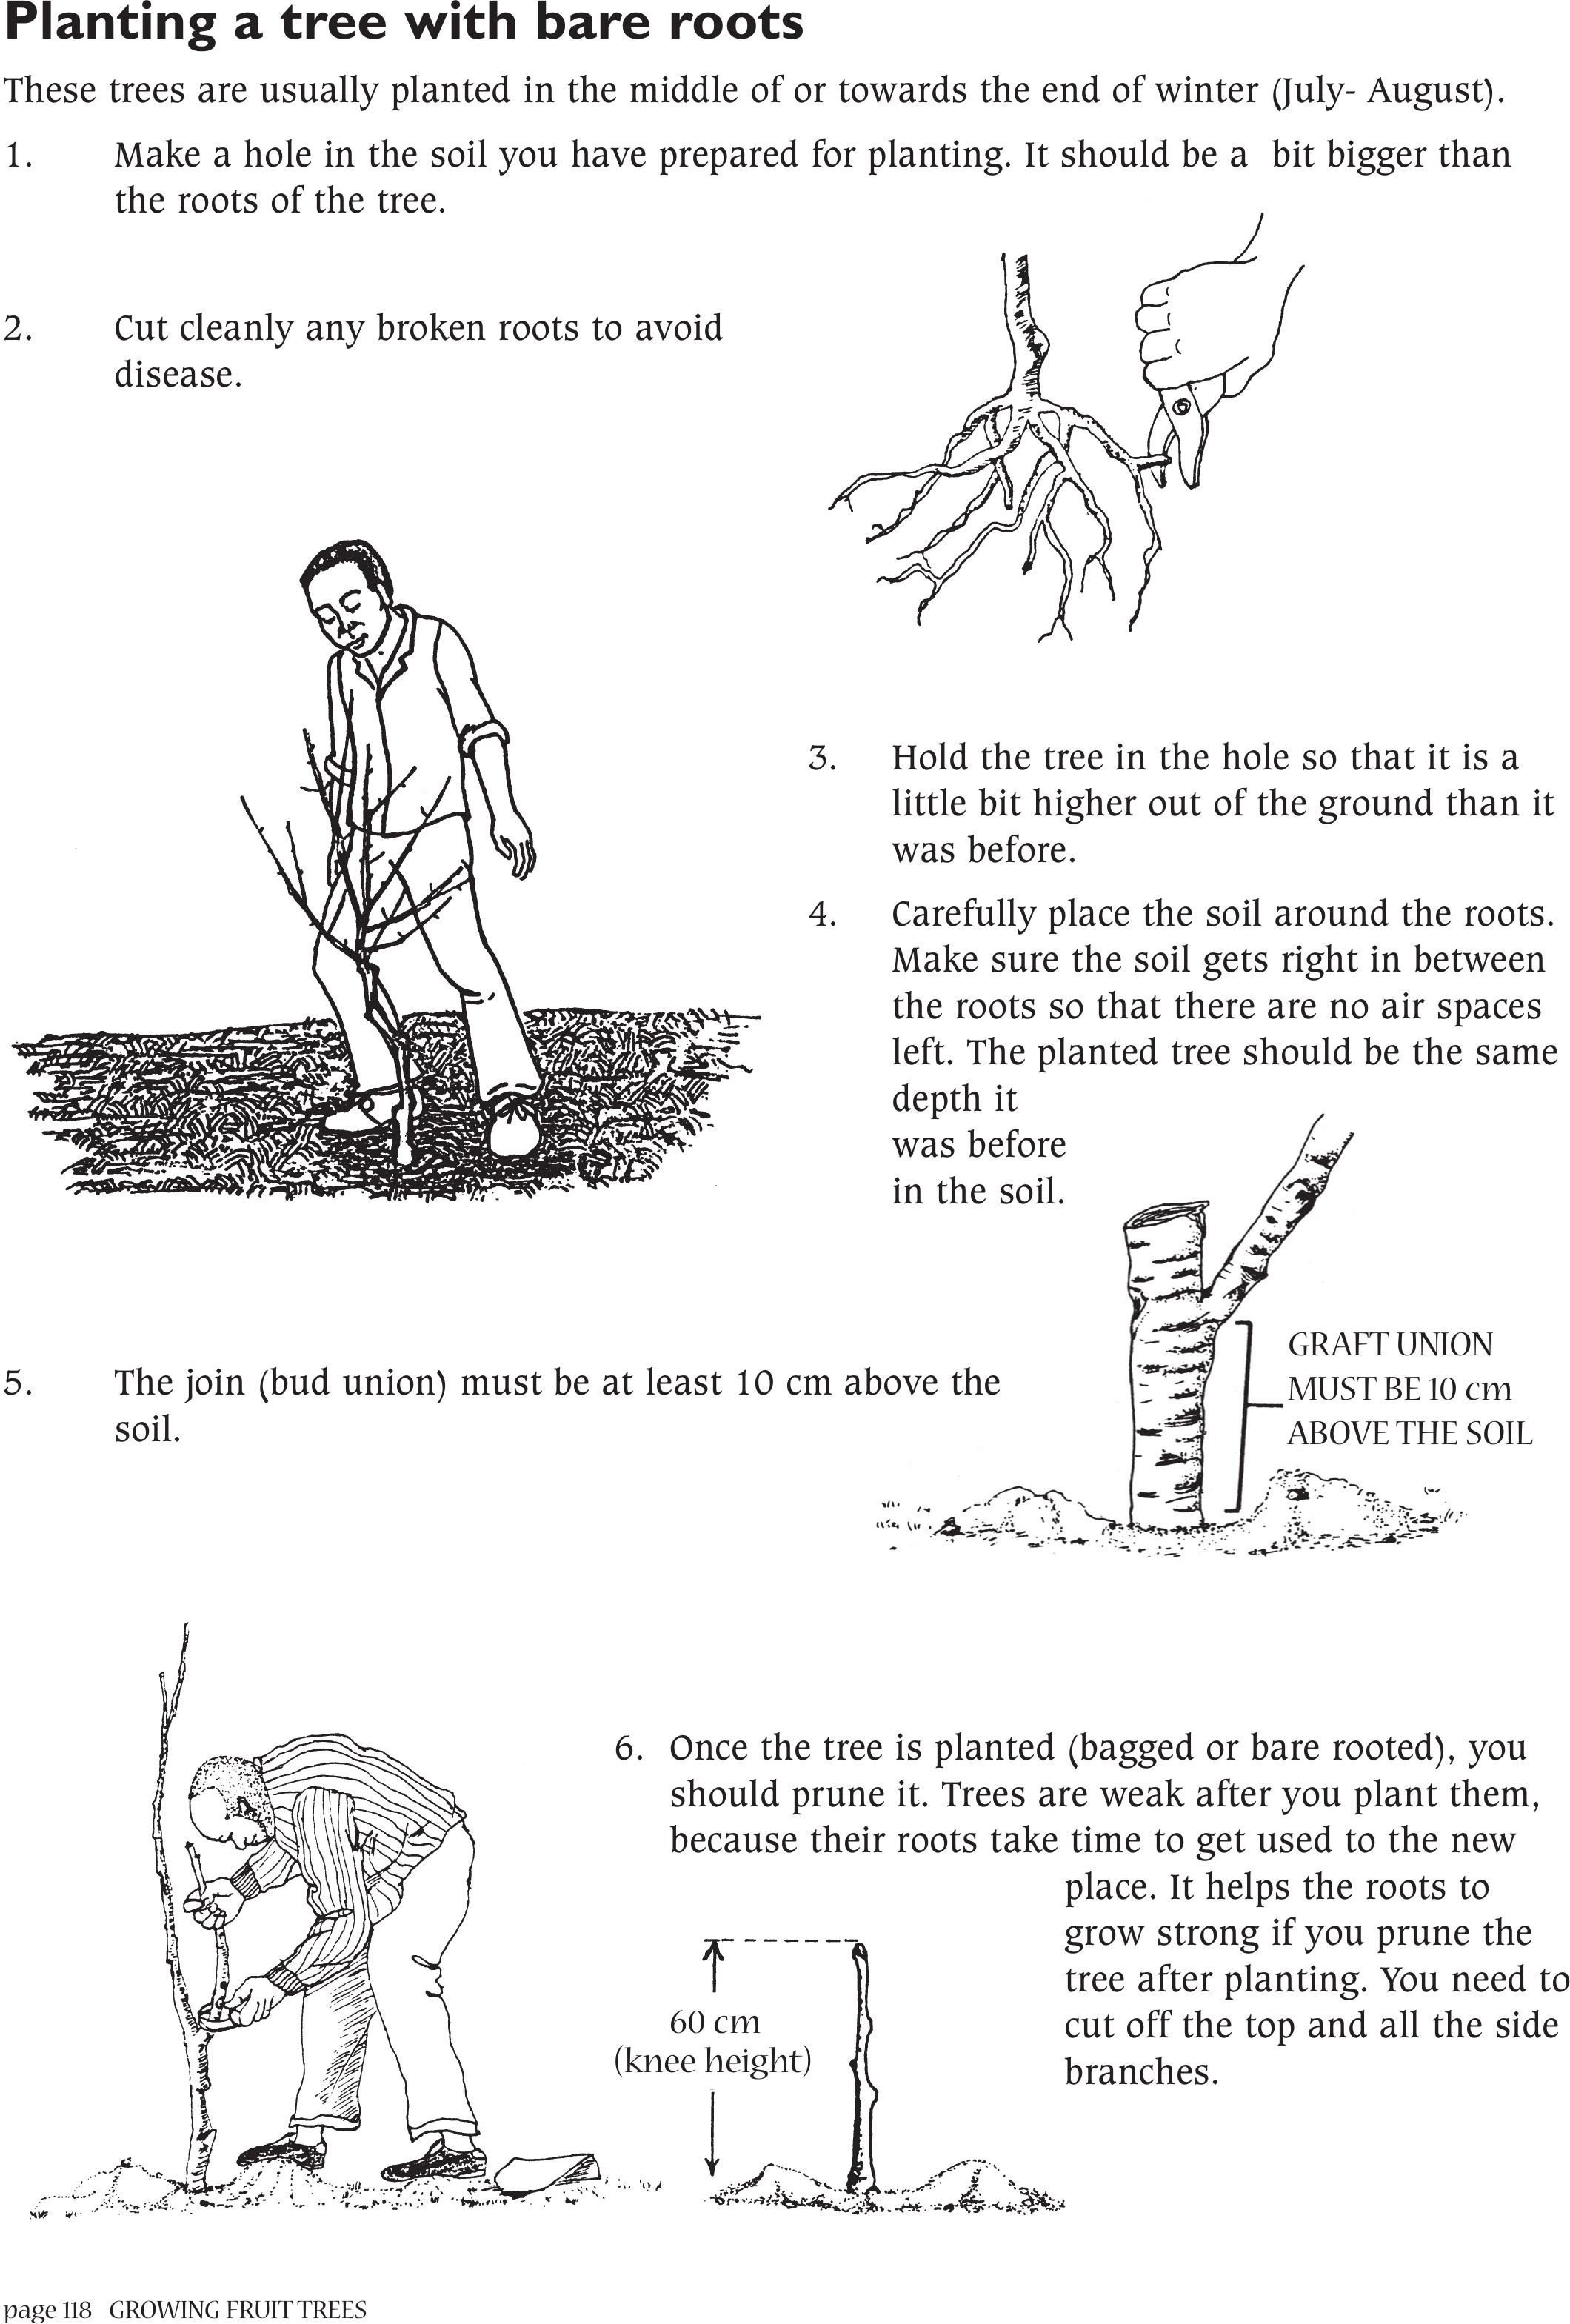
page 118 GROWING FRUIT TREES
Planting a tree with bare roots
These trees are usually planted in the middle of or towards the end of winter (July- August).
1. Make a hole in the soil you have prepared for planting. It should be a bit bigger than
the roots of the tree.
2. Cut cleanly any broken roots to avoid
disease.
3. Hold the tree in the hole so that it is a
little bit higher out of the ground than it
was before.
4. Carefully place the soil around the roots.
Make sure the soil gets right in between
the roots so that there are no air spaces
left. The planted tree should be the same
depth it
was before
in the soil.
5. The join (bud union) must be at least 10 cm above the
soil.
6. Once the tree is planted (bagged or bare rooted), you
should prune it. Trees are weak after you plant them,
because their roots take time to get used to the new
place. It helps the roots to
grow strong if you prune the
tree after planting. You need to
cut off the top and all the side
branches.
GRAFT UNION
MUST BE 10 cm
ABOVE THE SOIL
60 cm
(knee height)
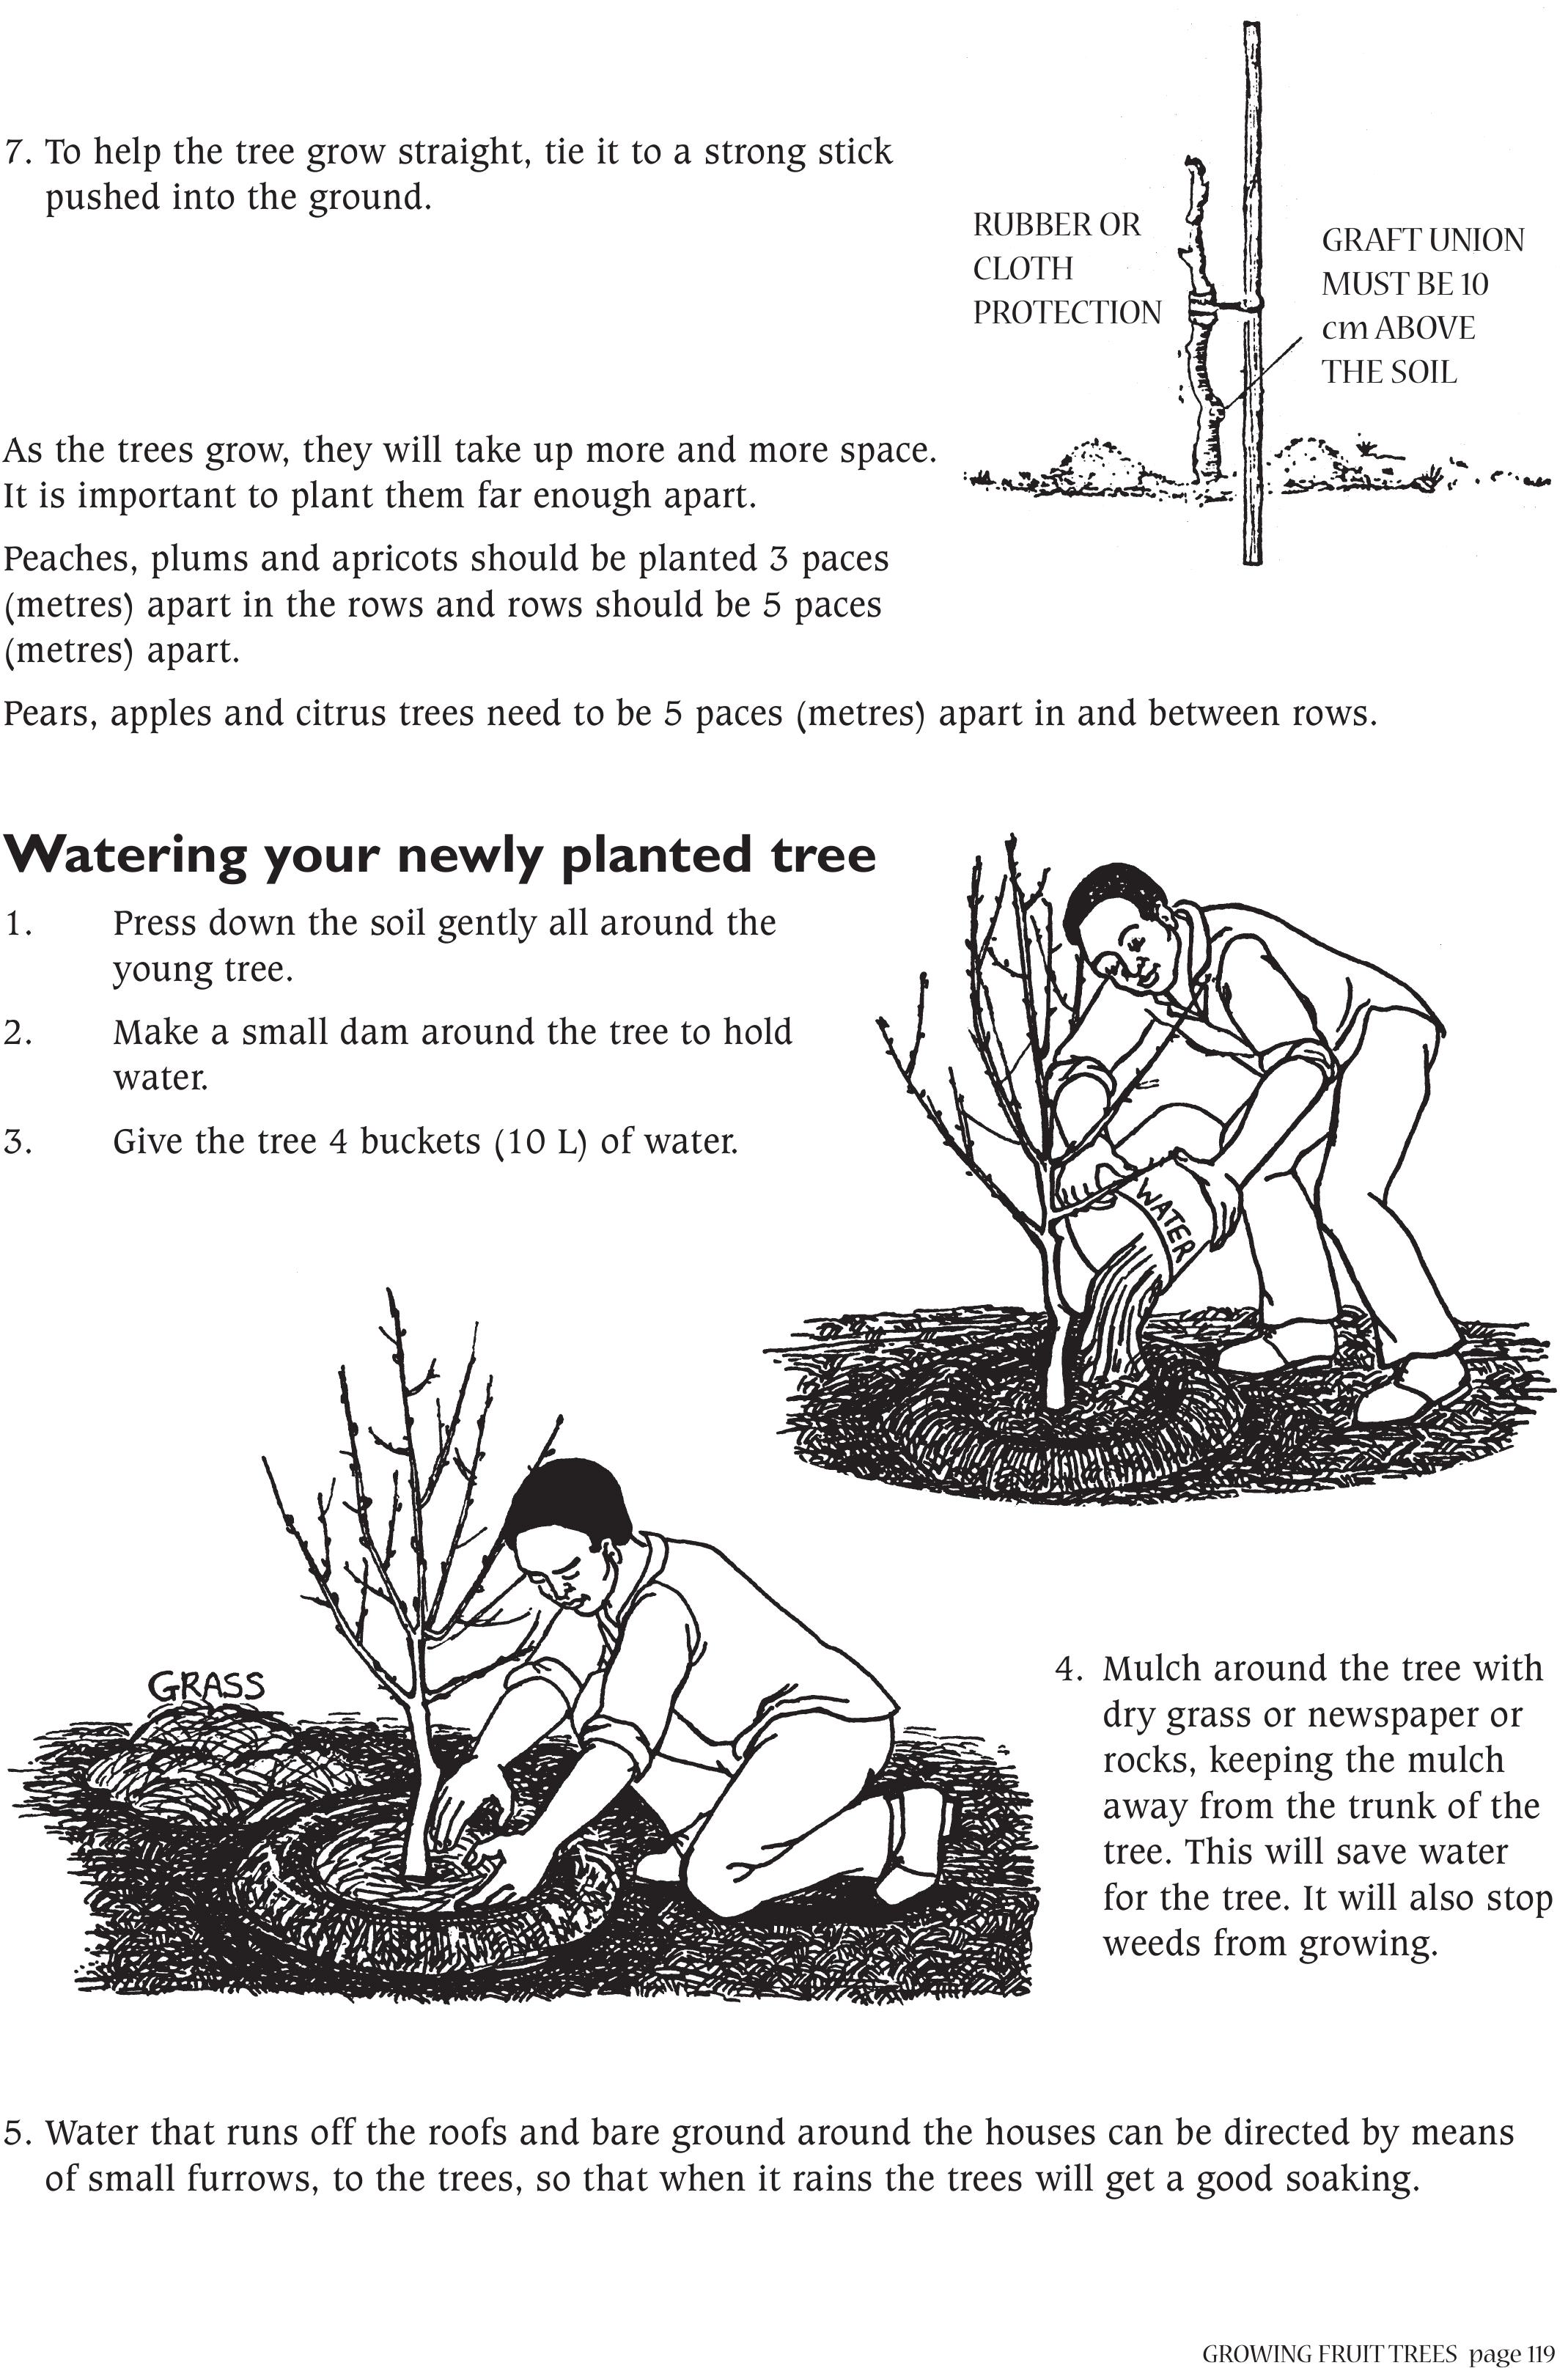
GROWING FRUIT TREESpage 119
7. To help the tree grow straight, tie it to a strong stick
pushed into the ground.
As the trees grow, they will take up more and more space.
It is important to plant them far enough apart.
Peaches, plums and apricots should be planted 3 paces
(metres) apart in the rows and rows should be 5 paces
(metres) apart.
Pears, apples and citrus trees need to be 5 paces (metres) apart in and between rows.
Watering your newly planted tree
1. Press down the soil gently all around the
young tree.
2. Make a small dam around the tree to hold
water.
3. Give the tree 4 buckets (10 L) of water.
4. Mulch around the tree with
dry grass or newspaper or
rocks, keeping the mulch
away from the trunk of the
tree. This will save water
for the tree. It will also stop
weeds from growing.
5. Water that runs off the roofs and bare ground around the houses can be directed by means
of small furrows, to the trees, so that when it rains the trees will get a good soaking.
GRAFT UNION
MUST BE 10
cm ABOVE
THE SOIL
RUBBER OR
CLOTH
PROTECTION
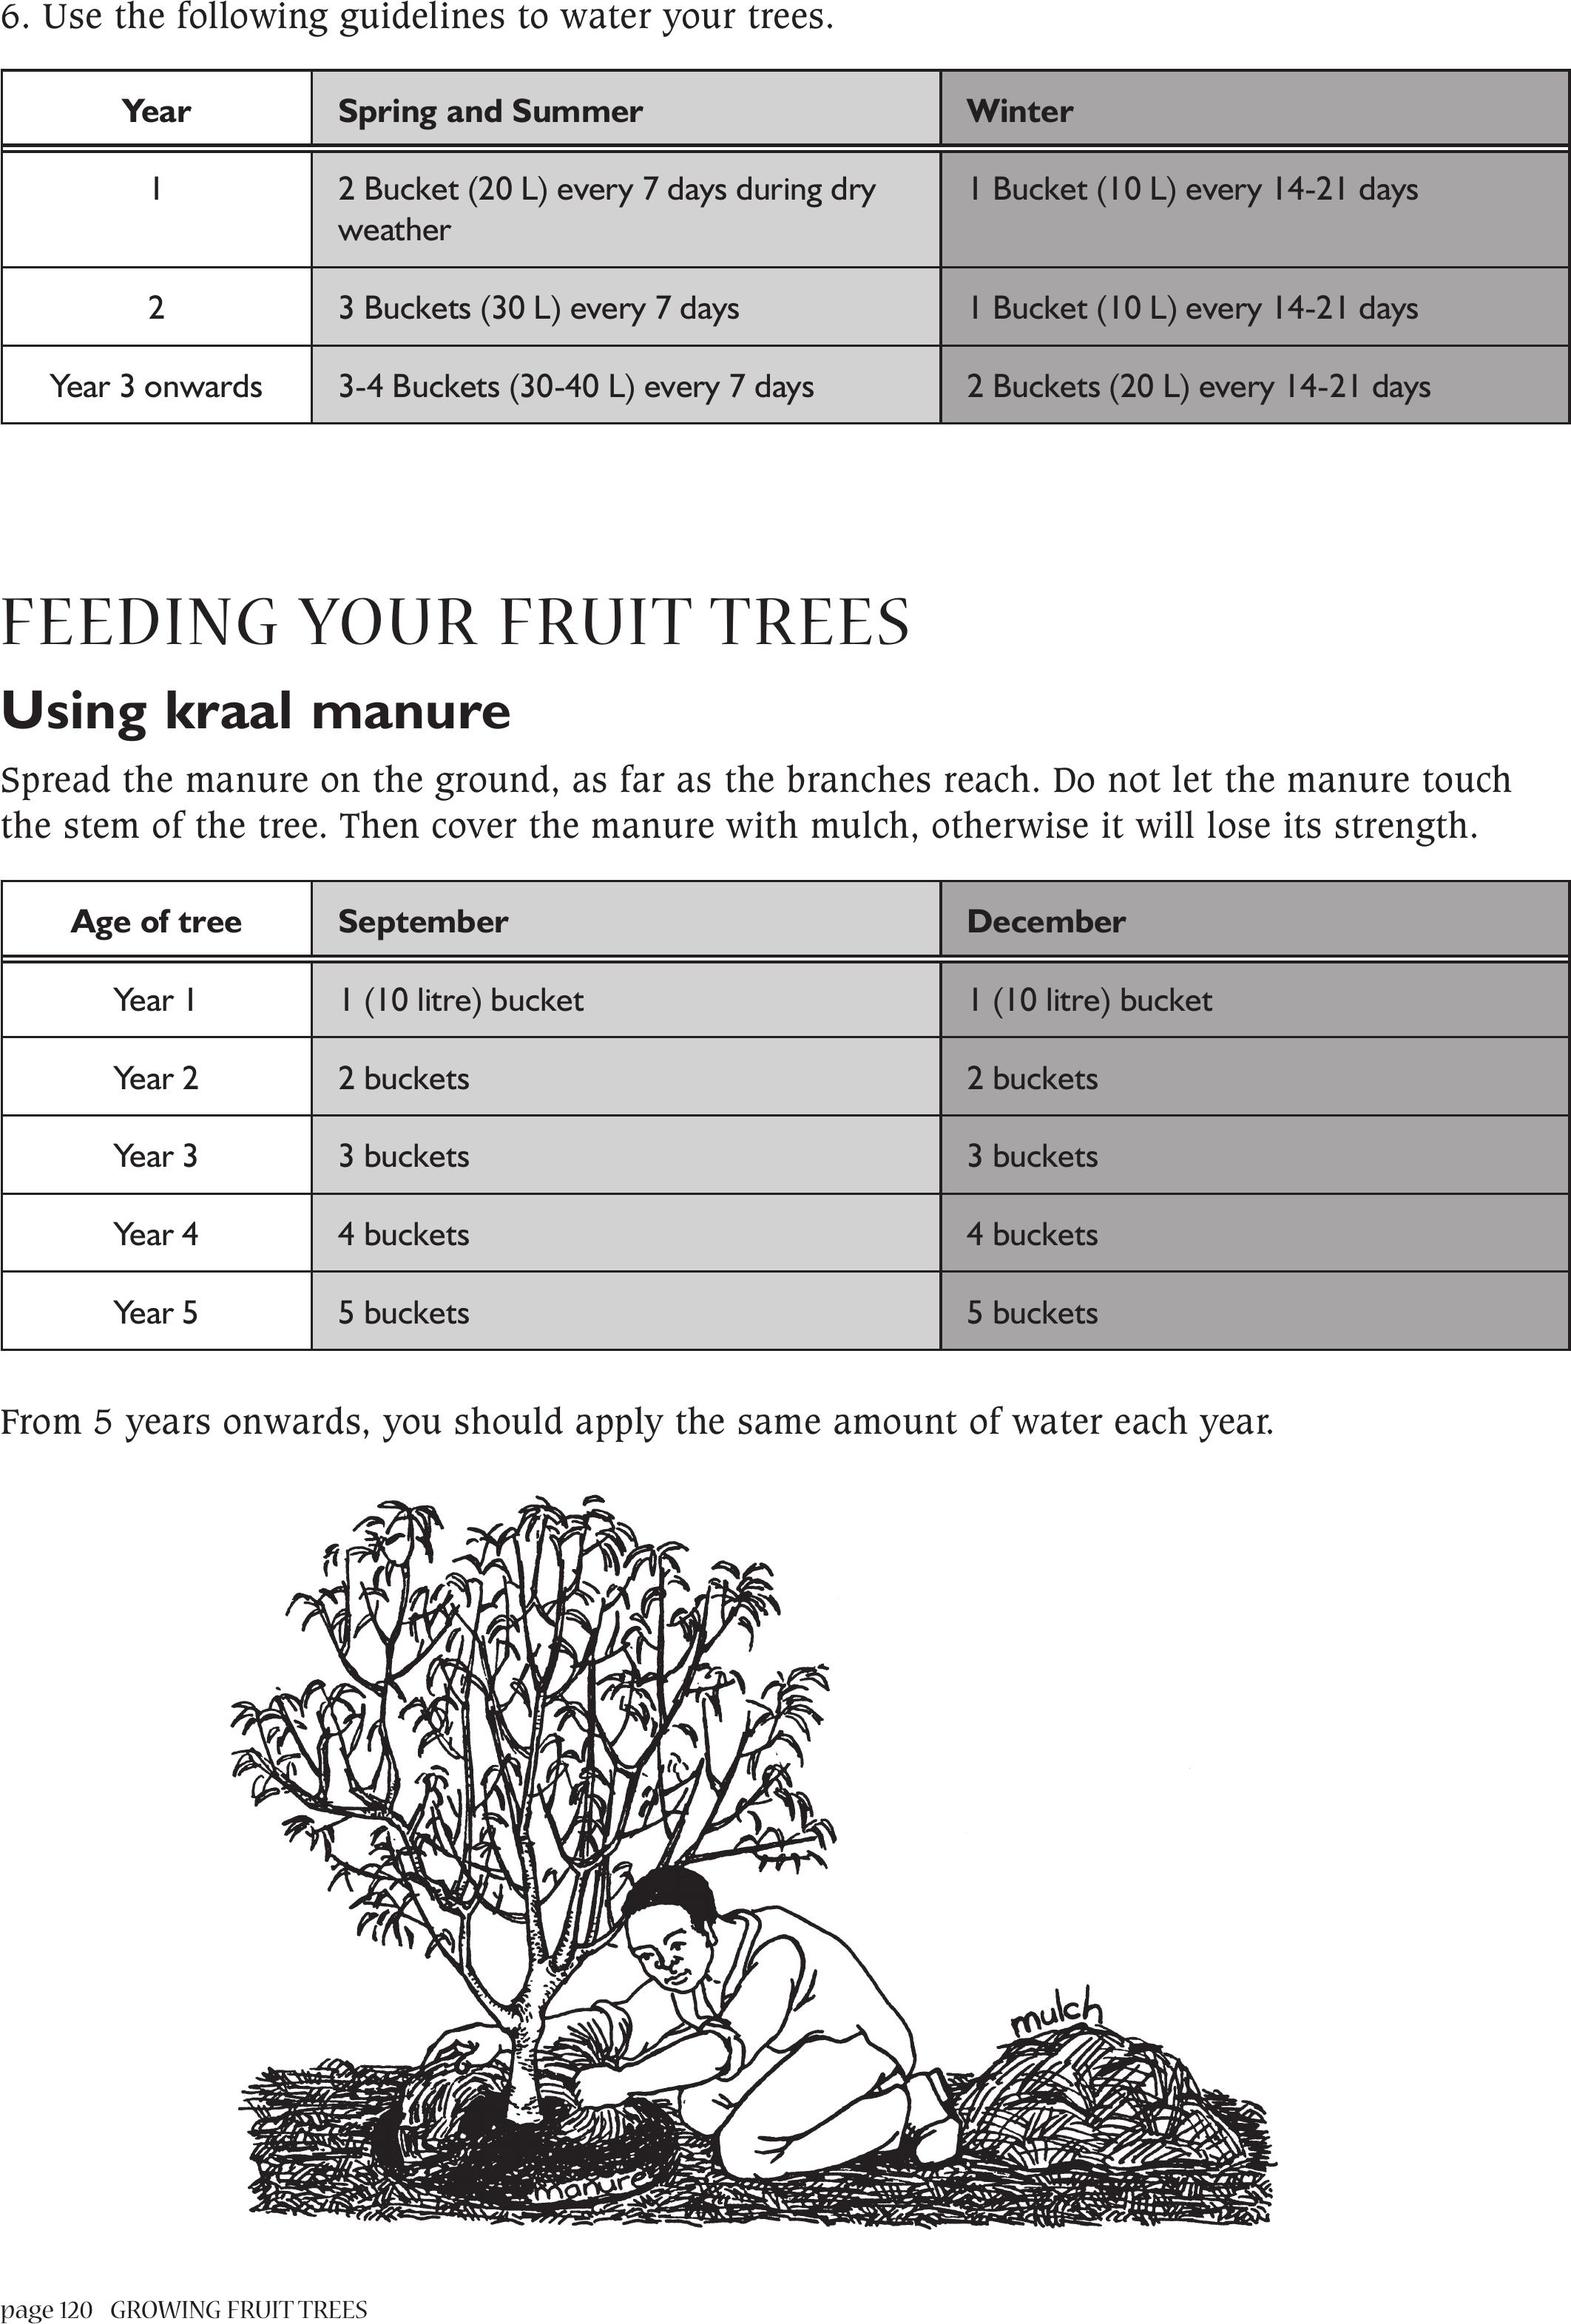
page 120 GROWING FRUIT TREES
6. Use the following guidelines to water your trees.
YearSpring and SummerWinter
12 Bucket (20 L) every 7 days during dry
weather
1 Bucket (10 L) every 14-21 days
23 Buckets (30 L) every 7 days1 Bucket (10 L) every 14-21 days
Year 3 onwards3-4 Buckets (30-40 L) every 7 days2 Buckets (20 L) every 14-21 days
FEEDING YOUR FRUIT TREES
Using kraal manure
Spread the manure on the ground, as far as the branches reach. Do not let the manure touch
the stem of the tree. Then cover the manure with mulch, otherwise it will lose its strength.
Age of treeSeptemberDecember
Year 11 (10 litre) bucket1 (10 litre) bucket
Year 22 buckets2 buckets
Year 33 buckets3 buckets
Year 44 buckets4 buckets
Year 55 buckets5 buckets
From 5 years onwards, you should apply the same amount of water each year.
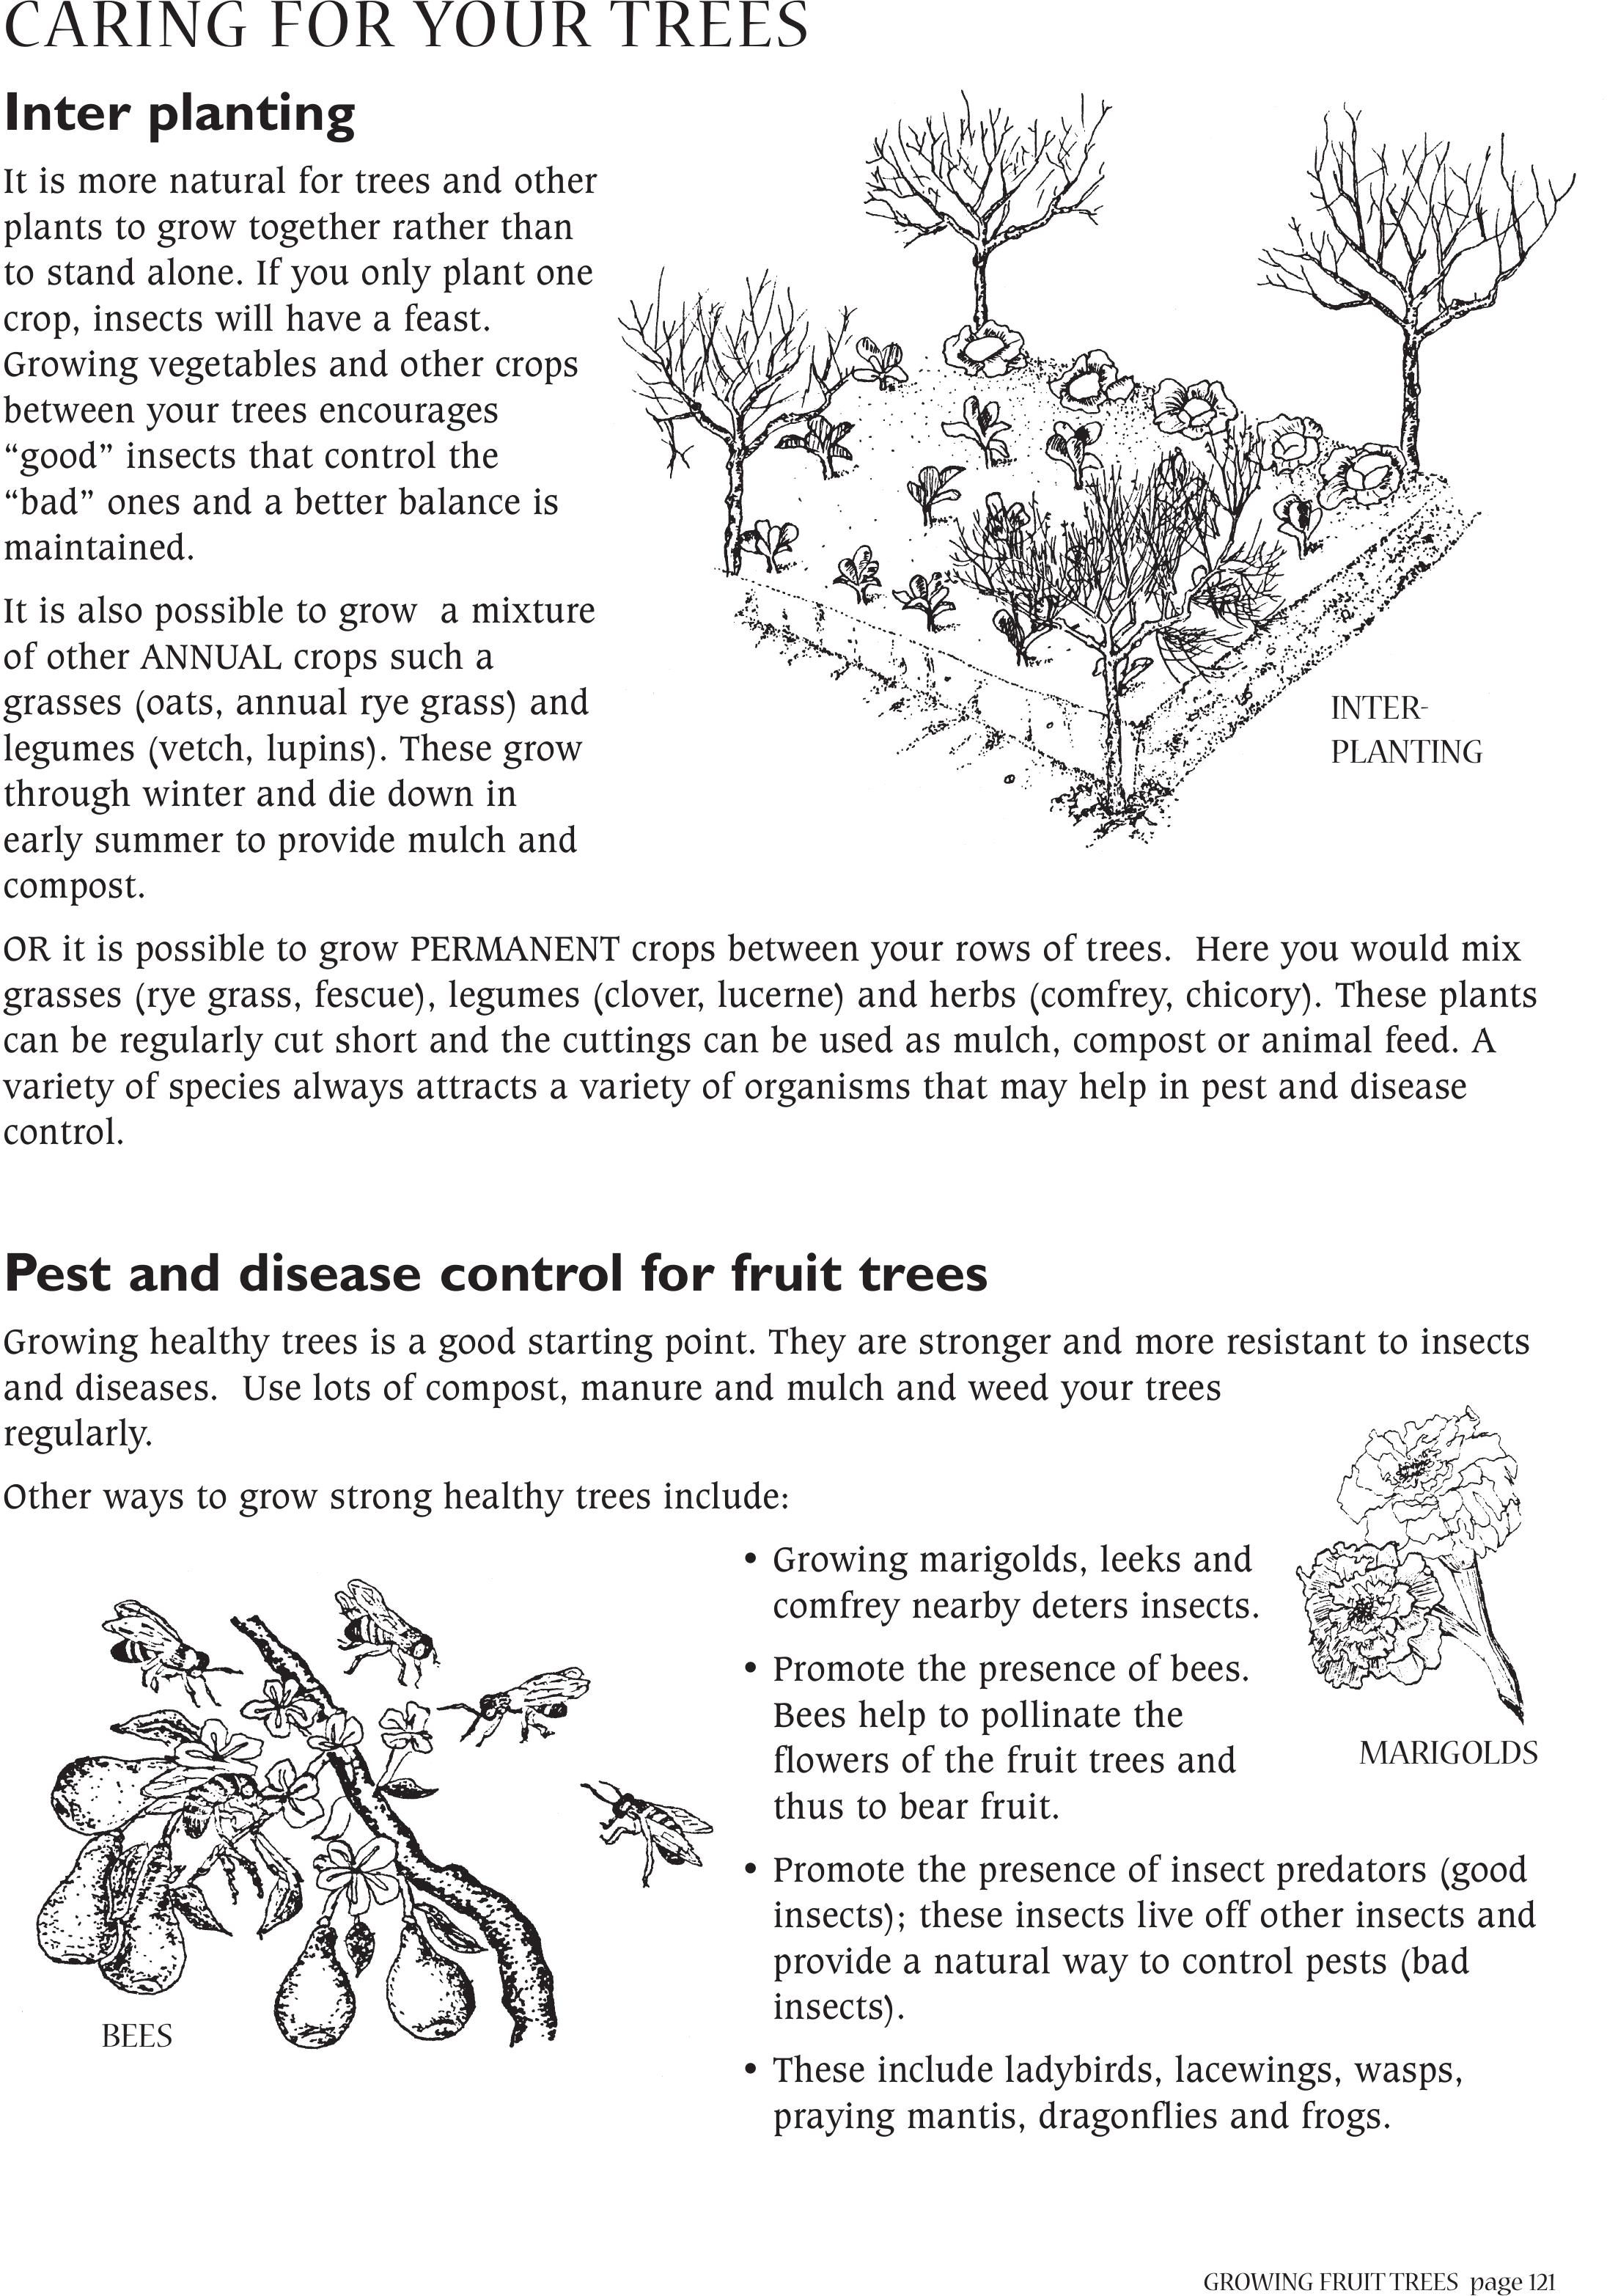
GROWING FRUIT TREESpage 121
CARING FOR YOUR TREES
Inter planting
It is more natural for trees and other
plants to grow together rather than
to stand alone. If you only plant one
crop, insects will have a feast.
Growing vegetables and other crops
between your trees encourages
“good” insects that control the
“bad” ones and a better balance is
maintained.
It is also possible to grow a mixture
of other ANNUAL crops such a
grasses (oats, annual rye grass) and
legumes (vetch, lupins). These grow
through winter and die down in
early summer to provide mulch and
compost.
OR it is possible to grow PERMANENT crops between your rows of trees. Here you would mix
grasses (rye grass, fescue), legumes (clover, lucerne) and herbs (comfrey, chicory). These plants
can be regularly cut short and the cuttings can be used as mulch, compost or animal feed. A
variety of species always attracts a variety of organisms that may help in pest and disease
control.
Pest and disease control for fruit trees
Growing healthy trees is a good starting point. They are stronger and more resistant to insects
and diseases. Use lots of compost, manure and mulch and weed your trees
regularly.
Other ways to grow strong healthy trees include:
• Growing marigolds, leeks and
comfrey nearby deters insects.
• Promote the presence of bees.
Bees help to pollinate the
flowers of the fruit trees and
thus to bear fruit.
• Promote the presence of insect predators (good
insects); these insects live off other insects and
provide a natural way to control pests (bad
insects).
• These include ladybirds, lacewings, wasps,
praying mantis, dragonflies and frogs.
INTER-
PLANTING
MARIGOLDS
BEES
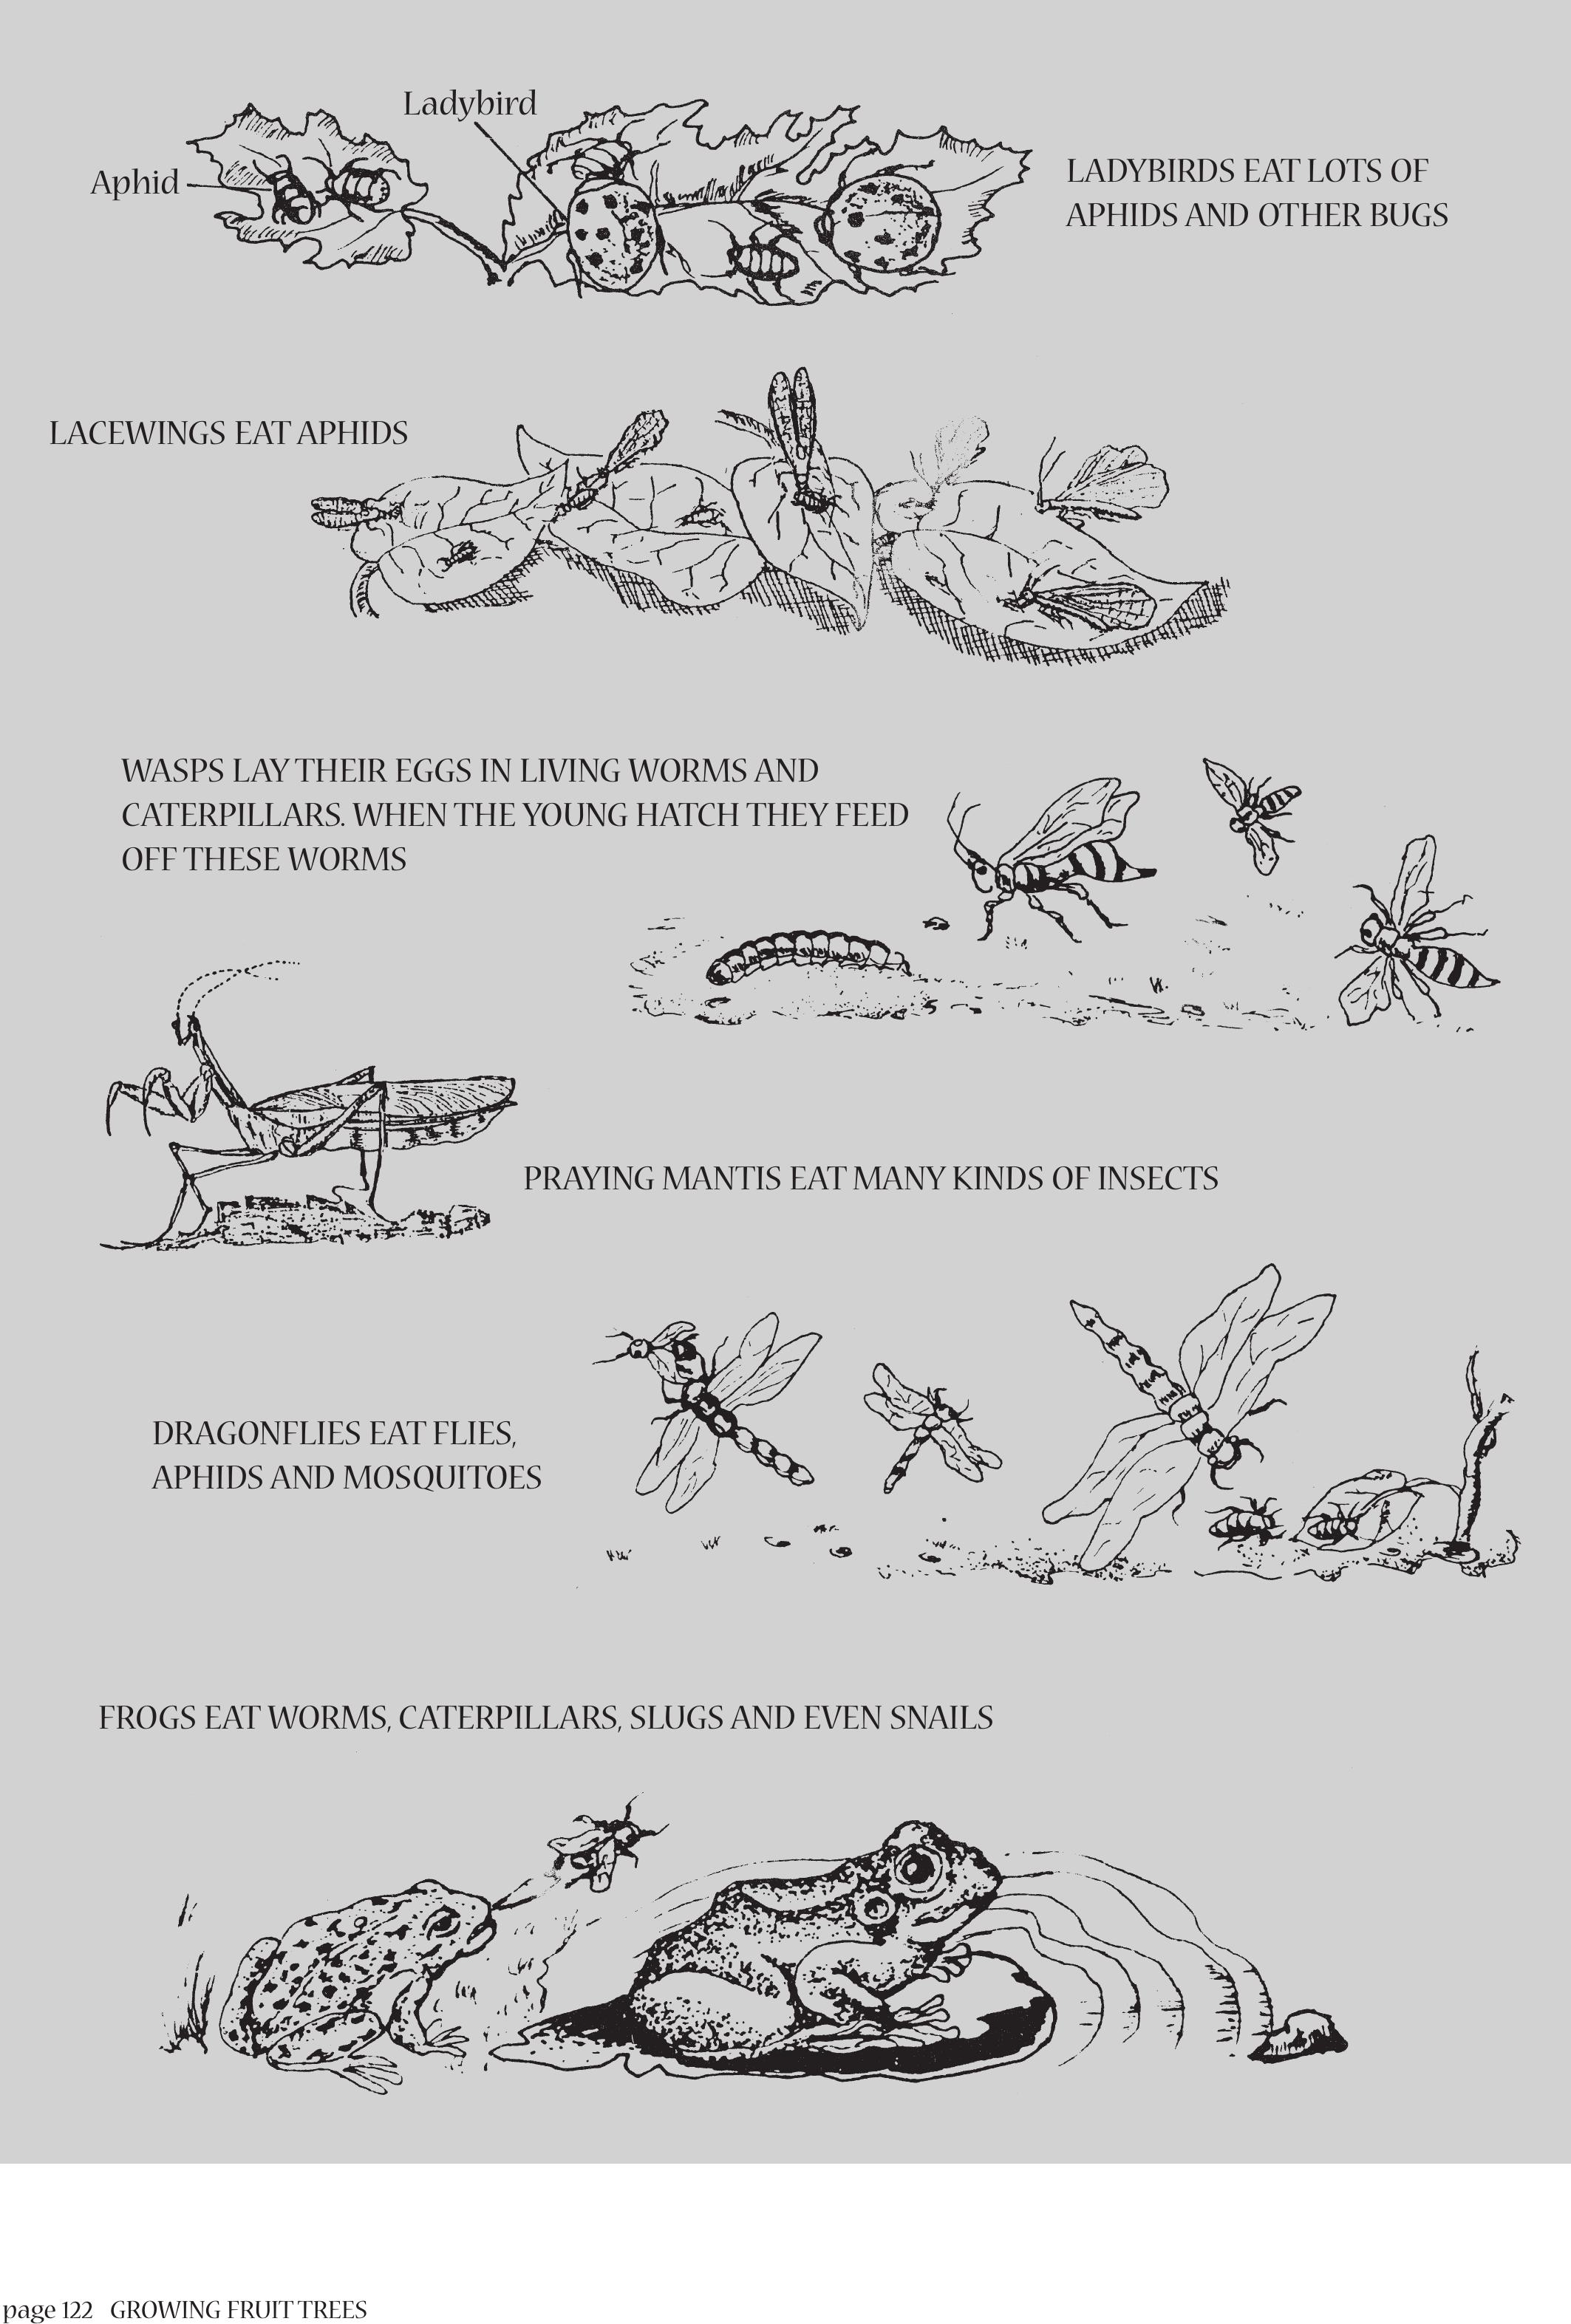
page 122 GROWING FRUIT TREES
Aphid
Ladybird
LADYBIRDS EAT LOTS OF
APHIDS AND OTHER BUGS
LACEWINGS EAT APHIDS
PRAYING MANTIS EAT MANY KINDS OF INSECTS
WASPS LAY THEIR EGGS IN LIVING WORMS AND
CATERPILLARS.WHEN THE YOUNG HATCH THEYFEED
OFF THESE WORMS
DRAGONFLIES EAT FLIES,
APHIDS AND MOSQUITOES
FROGS EAT WORMS, CATERPILLARS, SLUGS AND EVEN SNAILS
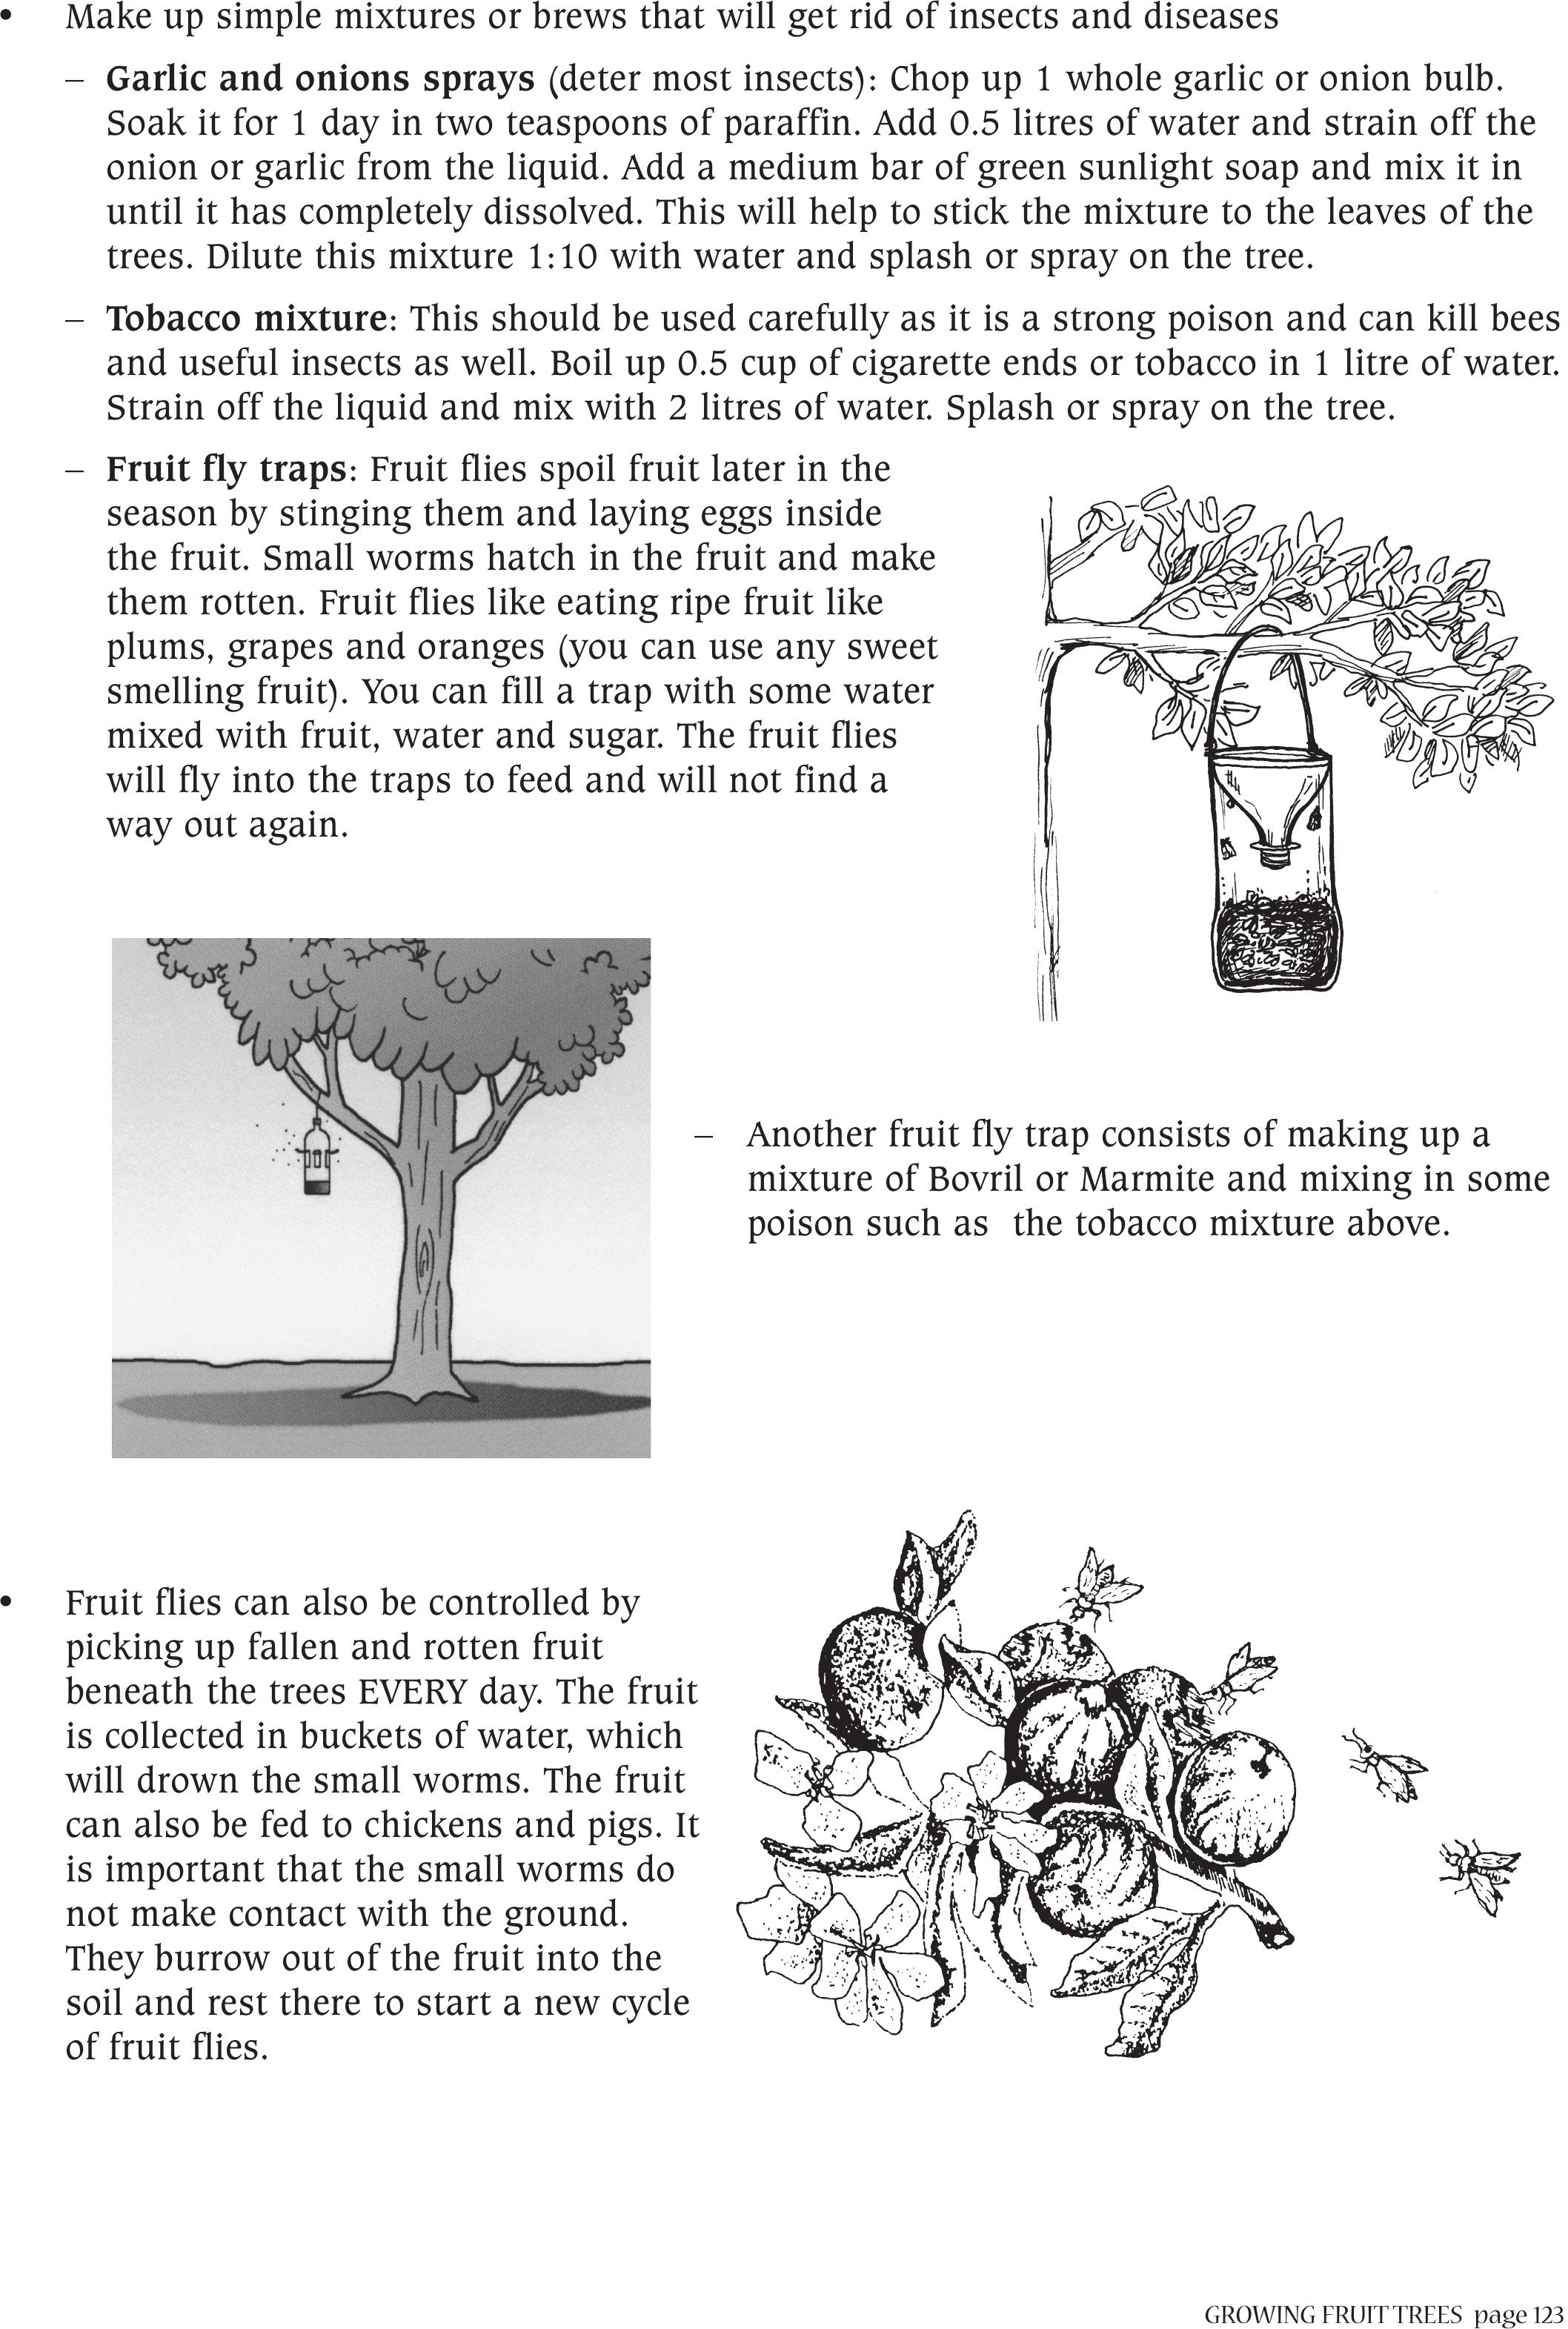
GROWING FRUIT TREESpage 123
• Make up simple mixtures or brews that will get rid of insects and diseases
– Garlic and onions sprays (deter most insects): Chop up 1 whole garlic or onion bulb.
Soak it for 1 day in two teaspoons of paraffin. Add 0.5 litres of water and strain off the
onion or garlic from the liquid. Add a medium bar of green sunlight soap and mix it in
until it has completely dissolved. This will help to stick the mixture to the leaves of the
trees. Dilute this mixture 1:10 with water and splash or spray on the tree.
– Tobacco mixture: This should be used carefully as it is a strong poison and can kill bees
and useful insects as well. Boil up 0.5 cup of cigarette ends or tobacco in 1 litre of water.
Strain off the liquid and mix with 2 litres of water. Splash or spray on the tree.
– Fruit fly traps: Fruit flies spoil fruit later in the
season by stinging them and laying eggs inside
the fruit. Small worms hatch in the fruit and make
them rotten. Fruit flies like eating ripe fruit like
plums, grapes and oranges (you can use any sweet
smelling fruit). You can fill a trap with some water
mixed with fruit, water and sugar. The fruit flies
will fly into the traps to feed and will not find a
way out again.
– Another fruit fly trap consists of making up a
mixture of Bovril or Marmite and mixing in some
poison such as the tobacco mixture above.
• Fruit flies can also be controlled by
picking up fallen and rotten fruit
beneath the trees EVERY day. The fruit
is collected in buckets of water, which
will drown the small worms. The fruit
can also be fed to chickens and pigs. It
is important that the small worms do
not make contact with the ground.
They burrow out of the fruit into the
soil and rest there to start a new cycle
of fruit flies.
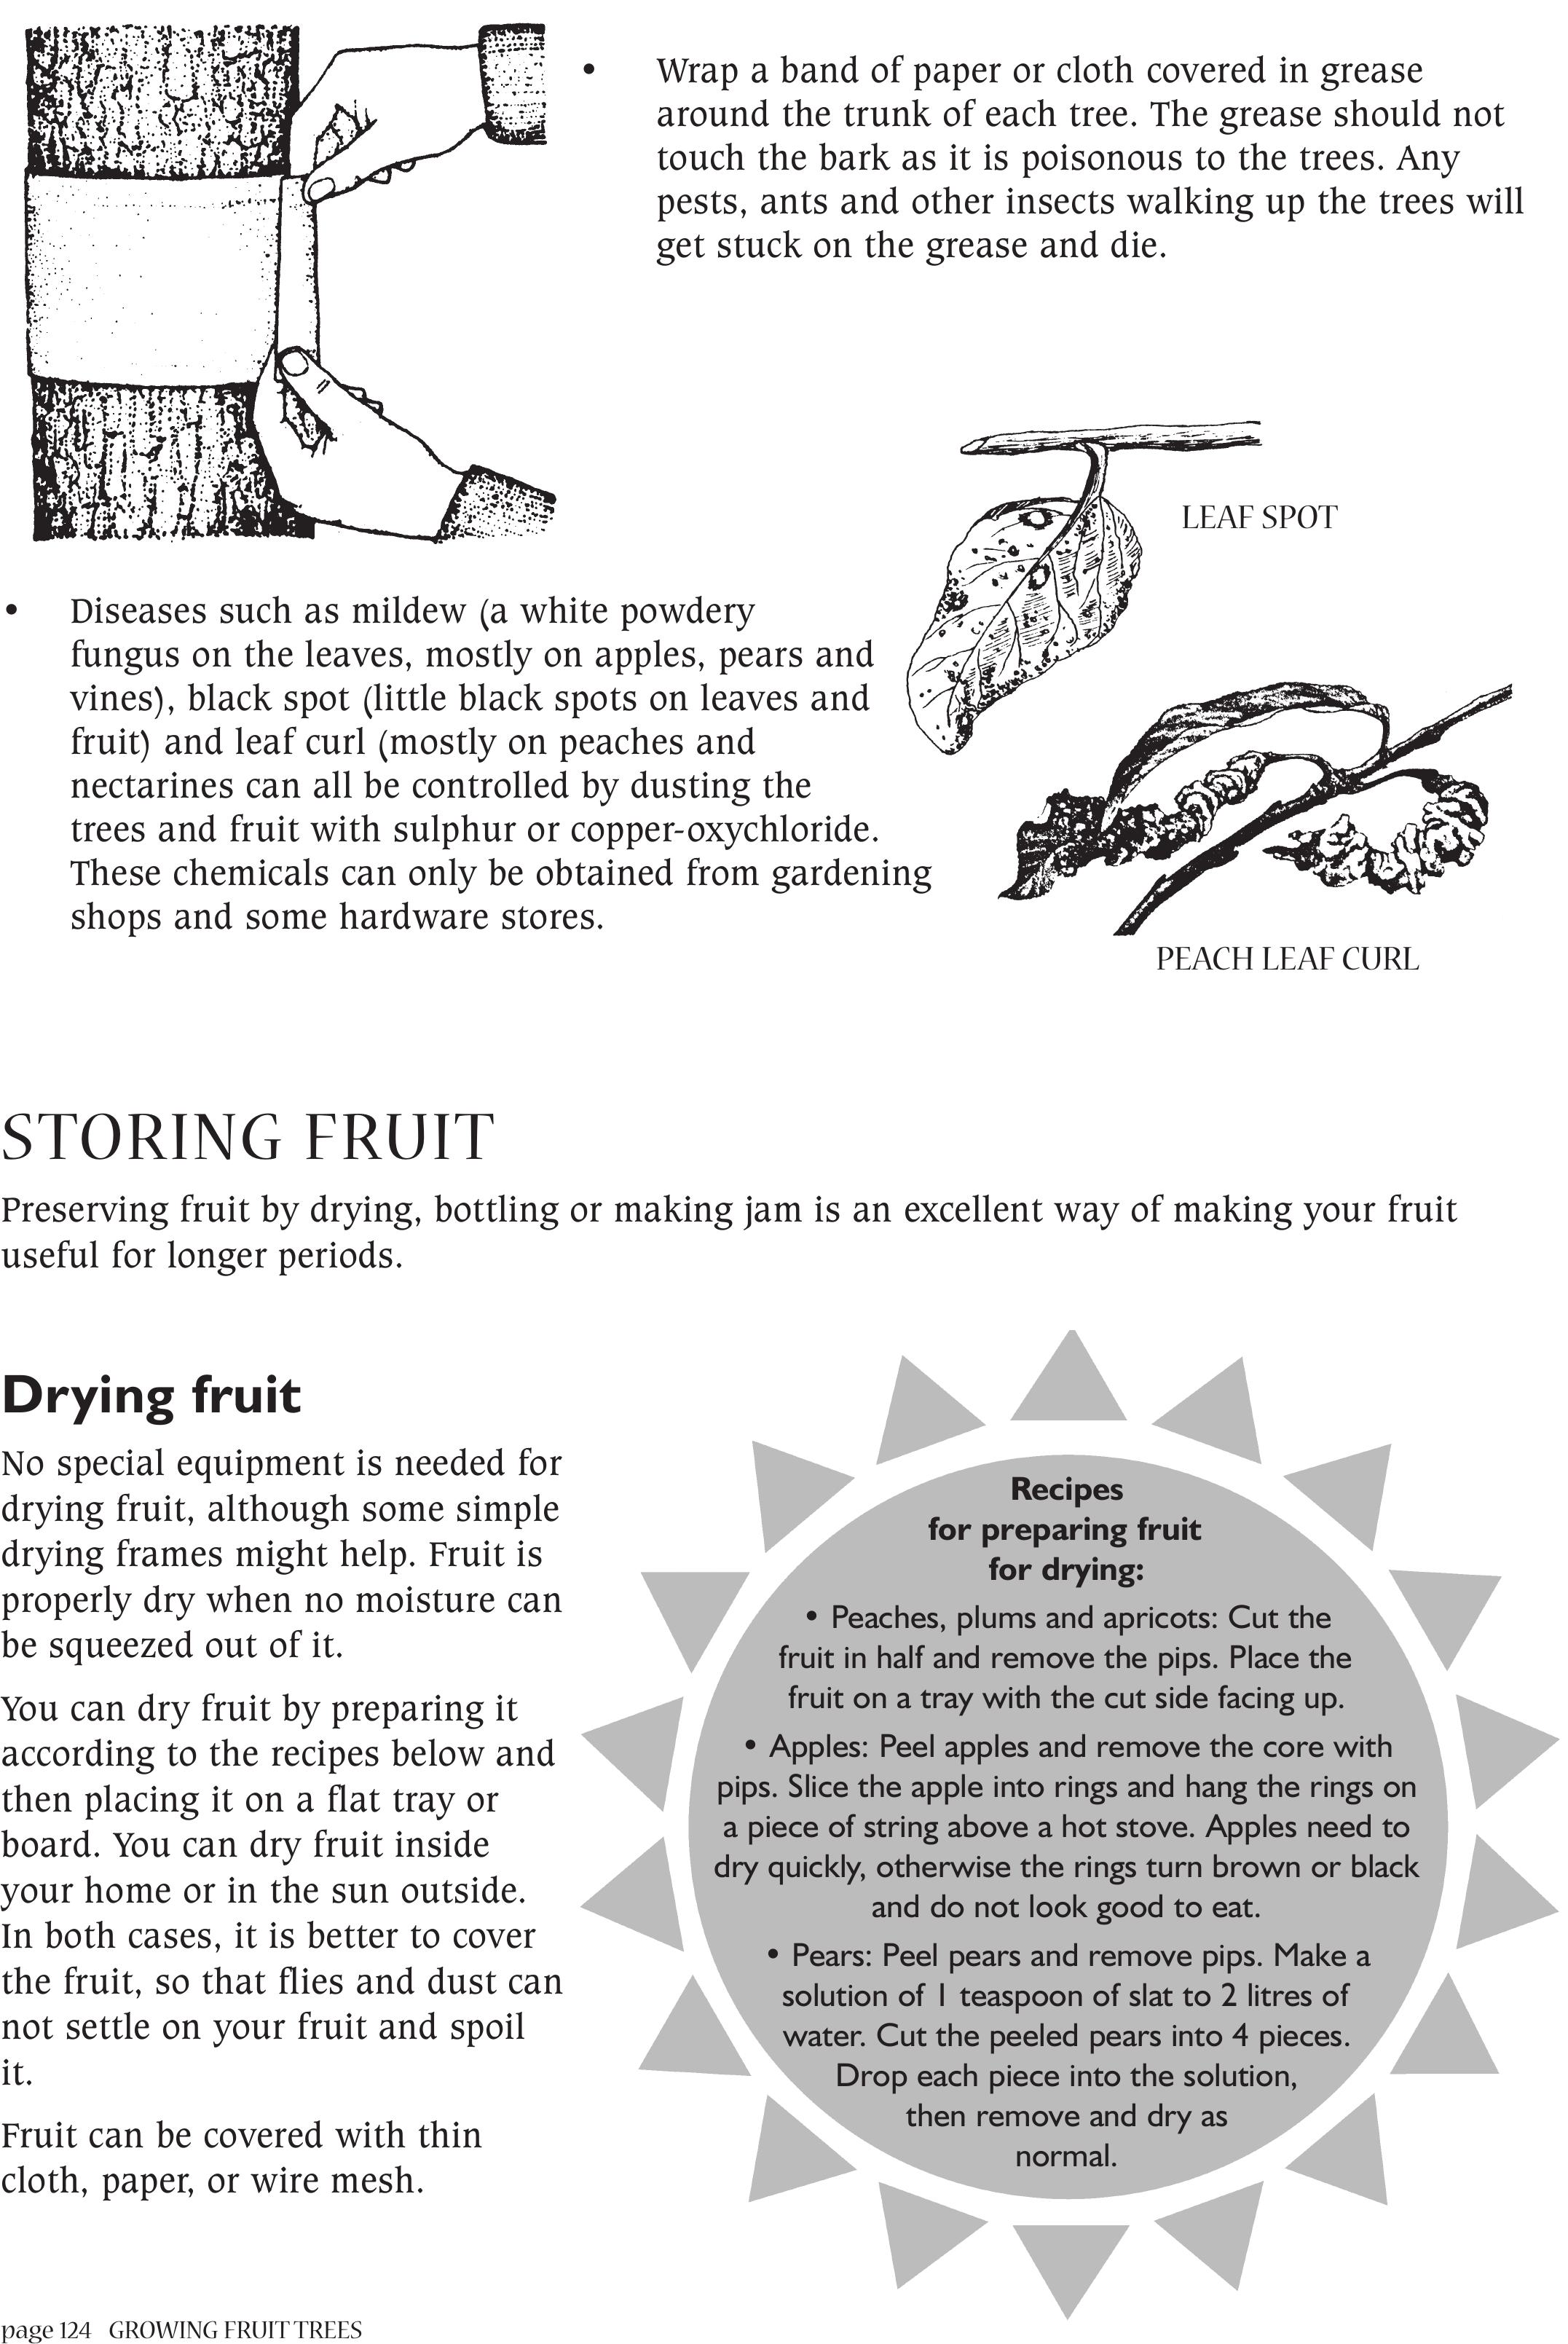
page 124 GROWING FRUIT TREES
• Wrap a band of paper or cloth covered in grease
around the trunk of each tree. The grease should not
touch the bark as it is poisonous to the trees. Any
pests, ants and other insects walking up the trees will
get stuck on the grease and die.
• Diseases such as mildew (a white powdery
fungus on the leaves, mostly on apples, pears and
vines), black spot (little black spots on leaves and
fruit) and leaf curl (mostly on peaches and
nectarines can all be controlled by dusting the
trees and fruit with sulphur or copper-oxychloride.
These chemicals can only be obtained from gardening
shops and some hardware stores.
STORING FRUIT
Preserving fruit by drying, bottling or making jam is an excellent way of making your fruit
useful for longer periods.
Drying fruit
No special equipment is needed for
drying fruit, although some simple
drying frames might help. Fruit is
properly dry when no moisture can
be squeezed out of it.
You can dry fruit by preparing it
according to the recipes below and
then placing it on a flat tray or
board. You can dry fruit inside
your home or in the sun outside.
In both cases, it is better to cover
the fruit, so that flies and dust can
not settle on your fruit and spoil
it.
Fruit can be covered with thin
cloth, paper, or wire mesh.
PEACH LEAF CURL
LEAF SPOT
Recipes
for preparing fruit
for drying:
• Peaches, plums and apricots: Cut the
fruit in half and remove the pips. Place the
fruit on a tray with the cut side facing up.
• Apples: Peel apples and remove the core with
pips. Slice the apple into rings and hang the rings on
a piece of string above a hot stove. Apples need to
dry quickly, otherwise the rings turn brown or black
and do not look good to eat.
• Pears: Peel pears and remove pips. Make a
solution of 1 teaspoon of slat to 2 litres of
water. Cut the peeled pears into 4 pieces.
Drop each piece into the solution,
then remove and dry as
normal.
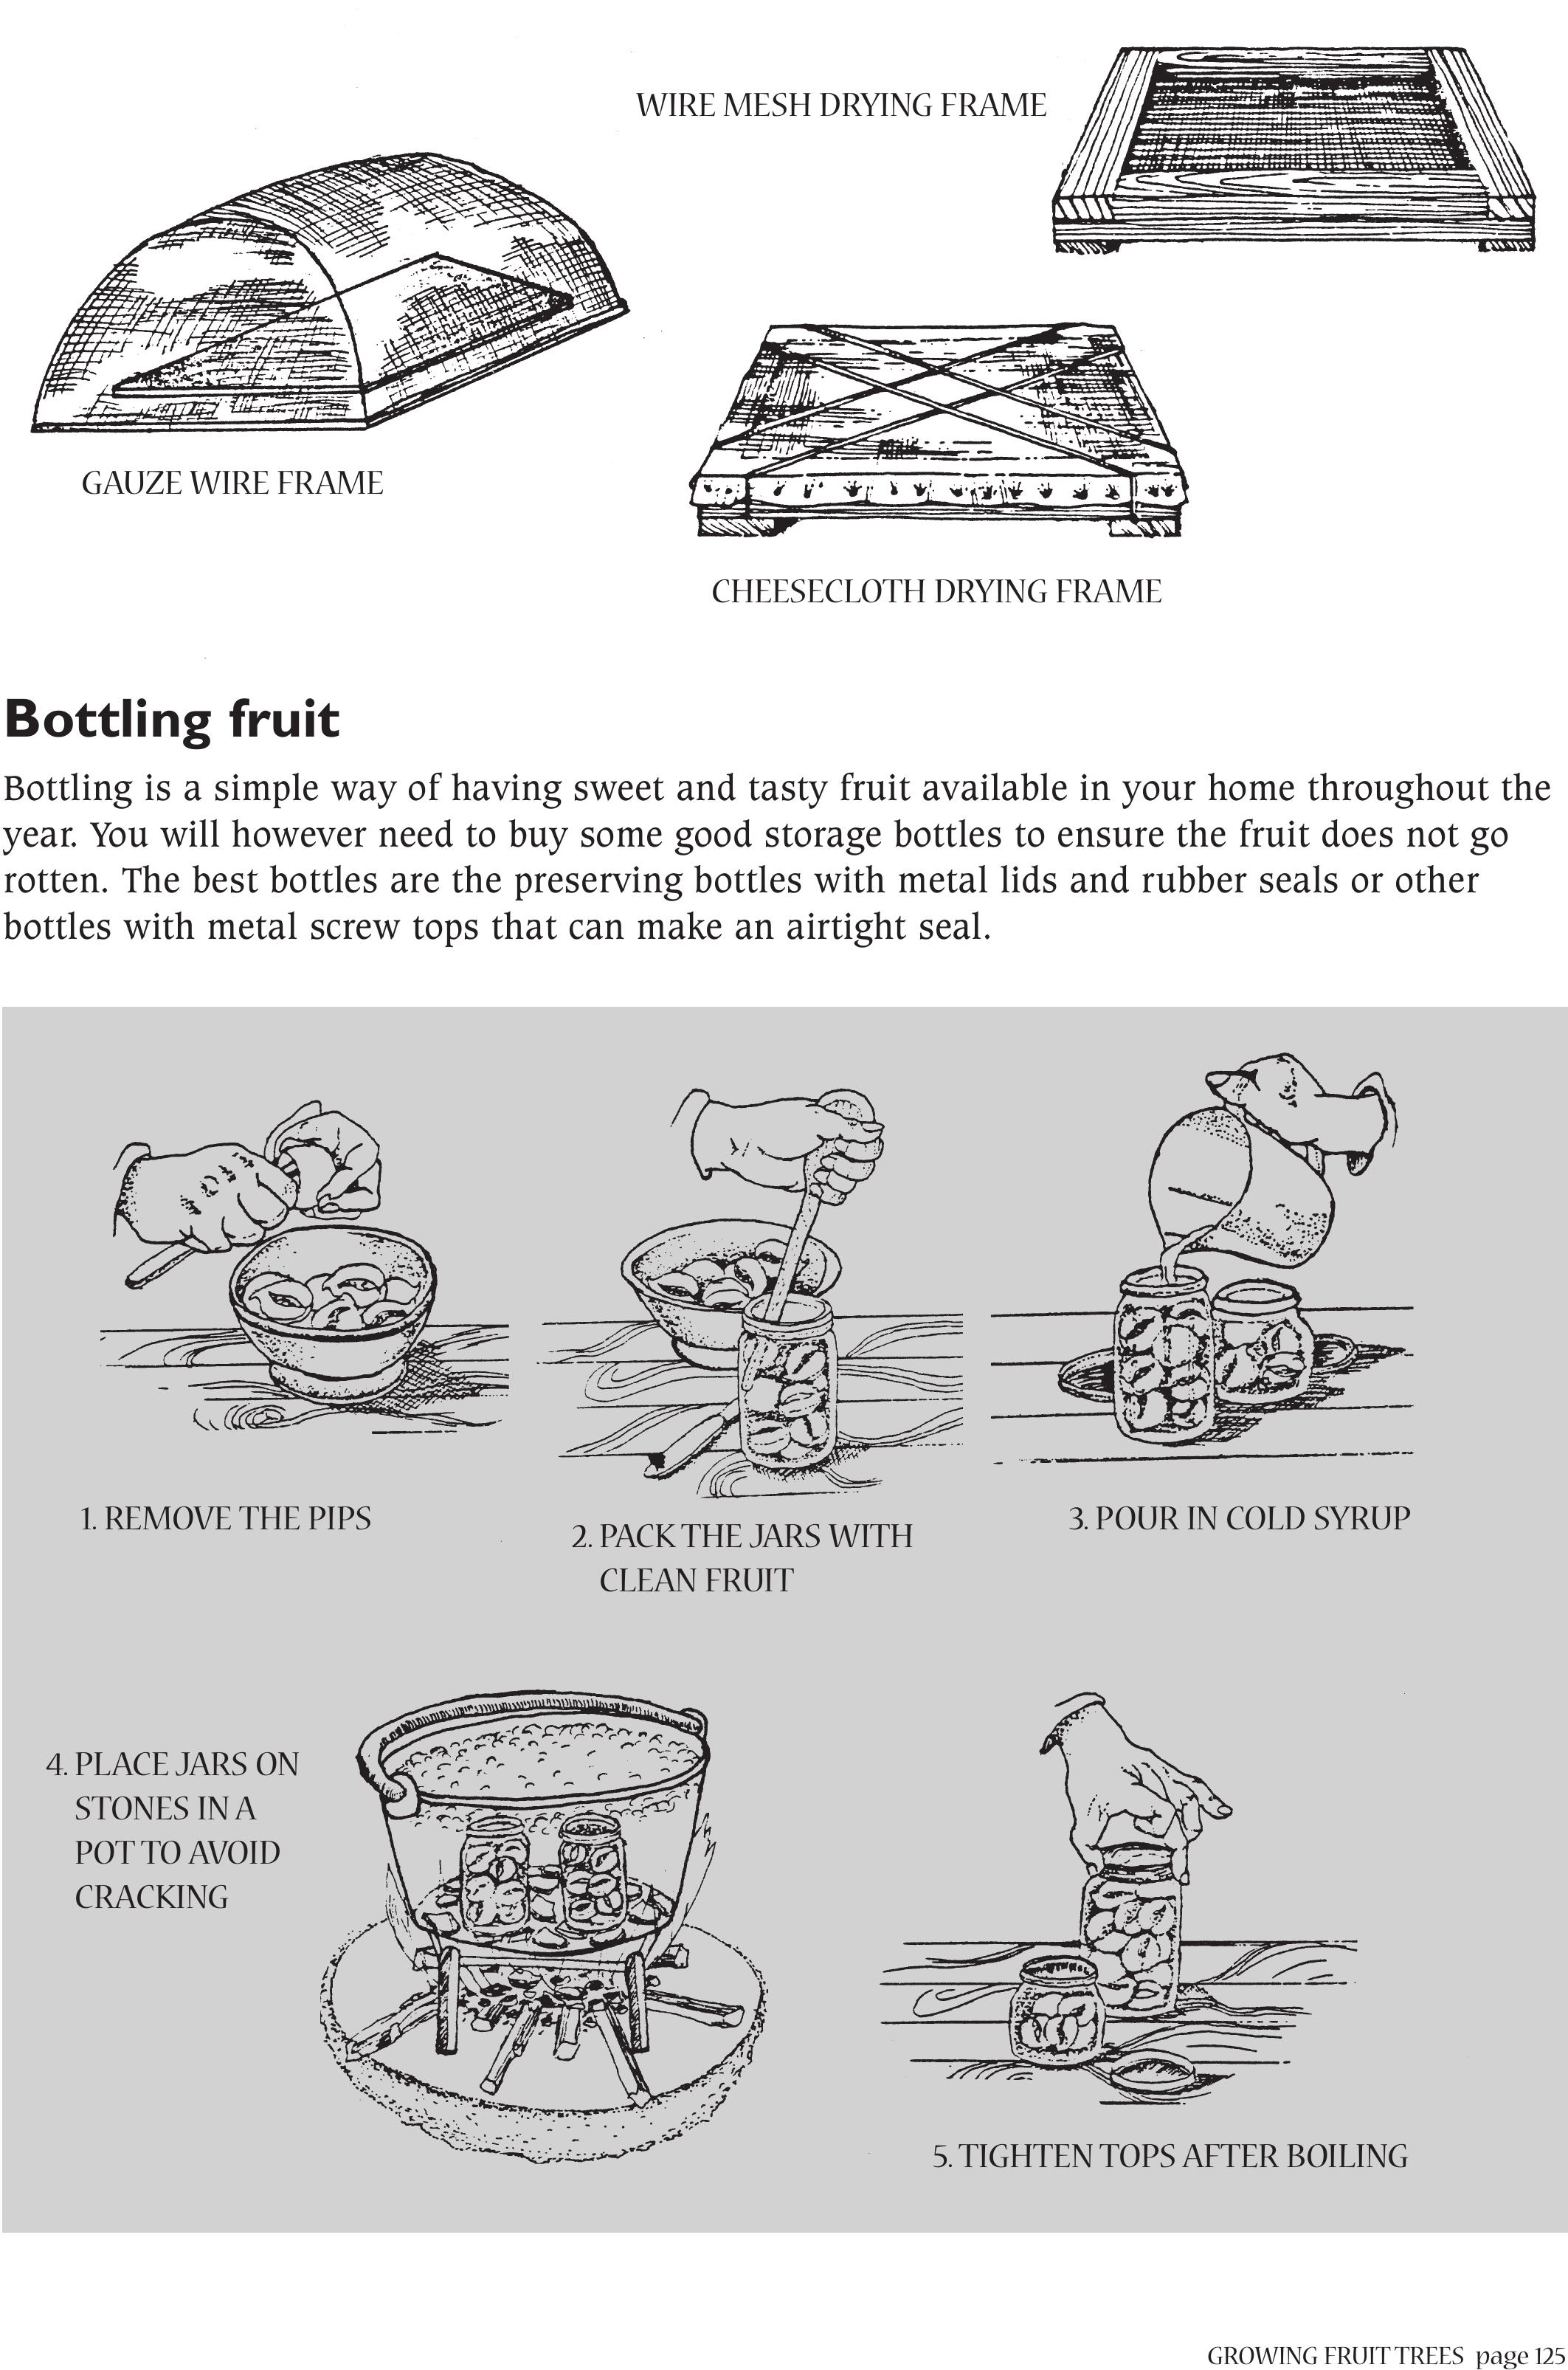
GROWING FRUIT TREESpage 125
Bottling fruit
Bottling is a simple way of having sweet and tasty fruit available in your home throughout the
year. You will however need to buy some good storage bottles to ensure the fruit does not go
rotten. The best bottles are the preserving bottles with metal lids and rubber seals or other
bottles with metal screw tops that can make an airtight seal.
GAUZE WIRE FRAME
CHEESECLOTH DRYING FRAME
WIRE MESH DRYING FRAME
1. REMOVE THE PIPS3. POUR IN COLD SYRUP
2.PACKTHE JARS WITH
CLEAN FRUIT
4. PLACE JARS ON
STONES IN A
POT TO AVOID
CRACKING
5.TIGHTEN TOPS AFTER BOILING
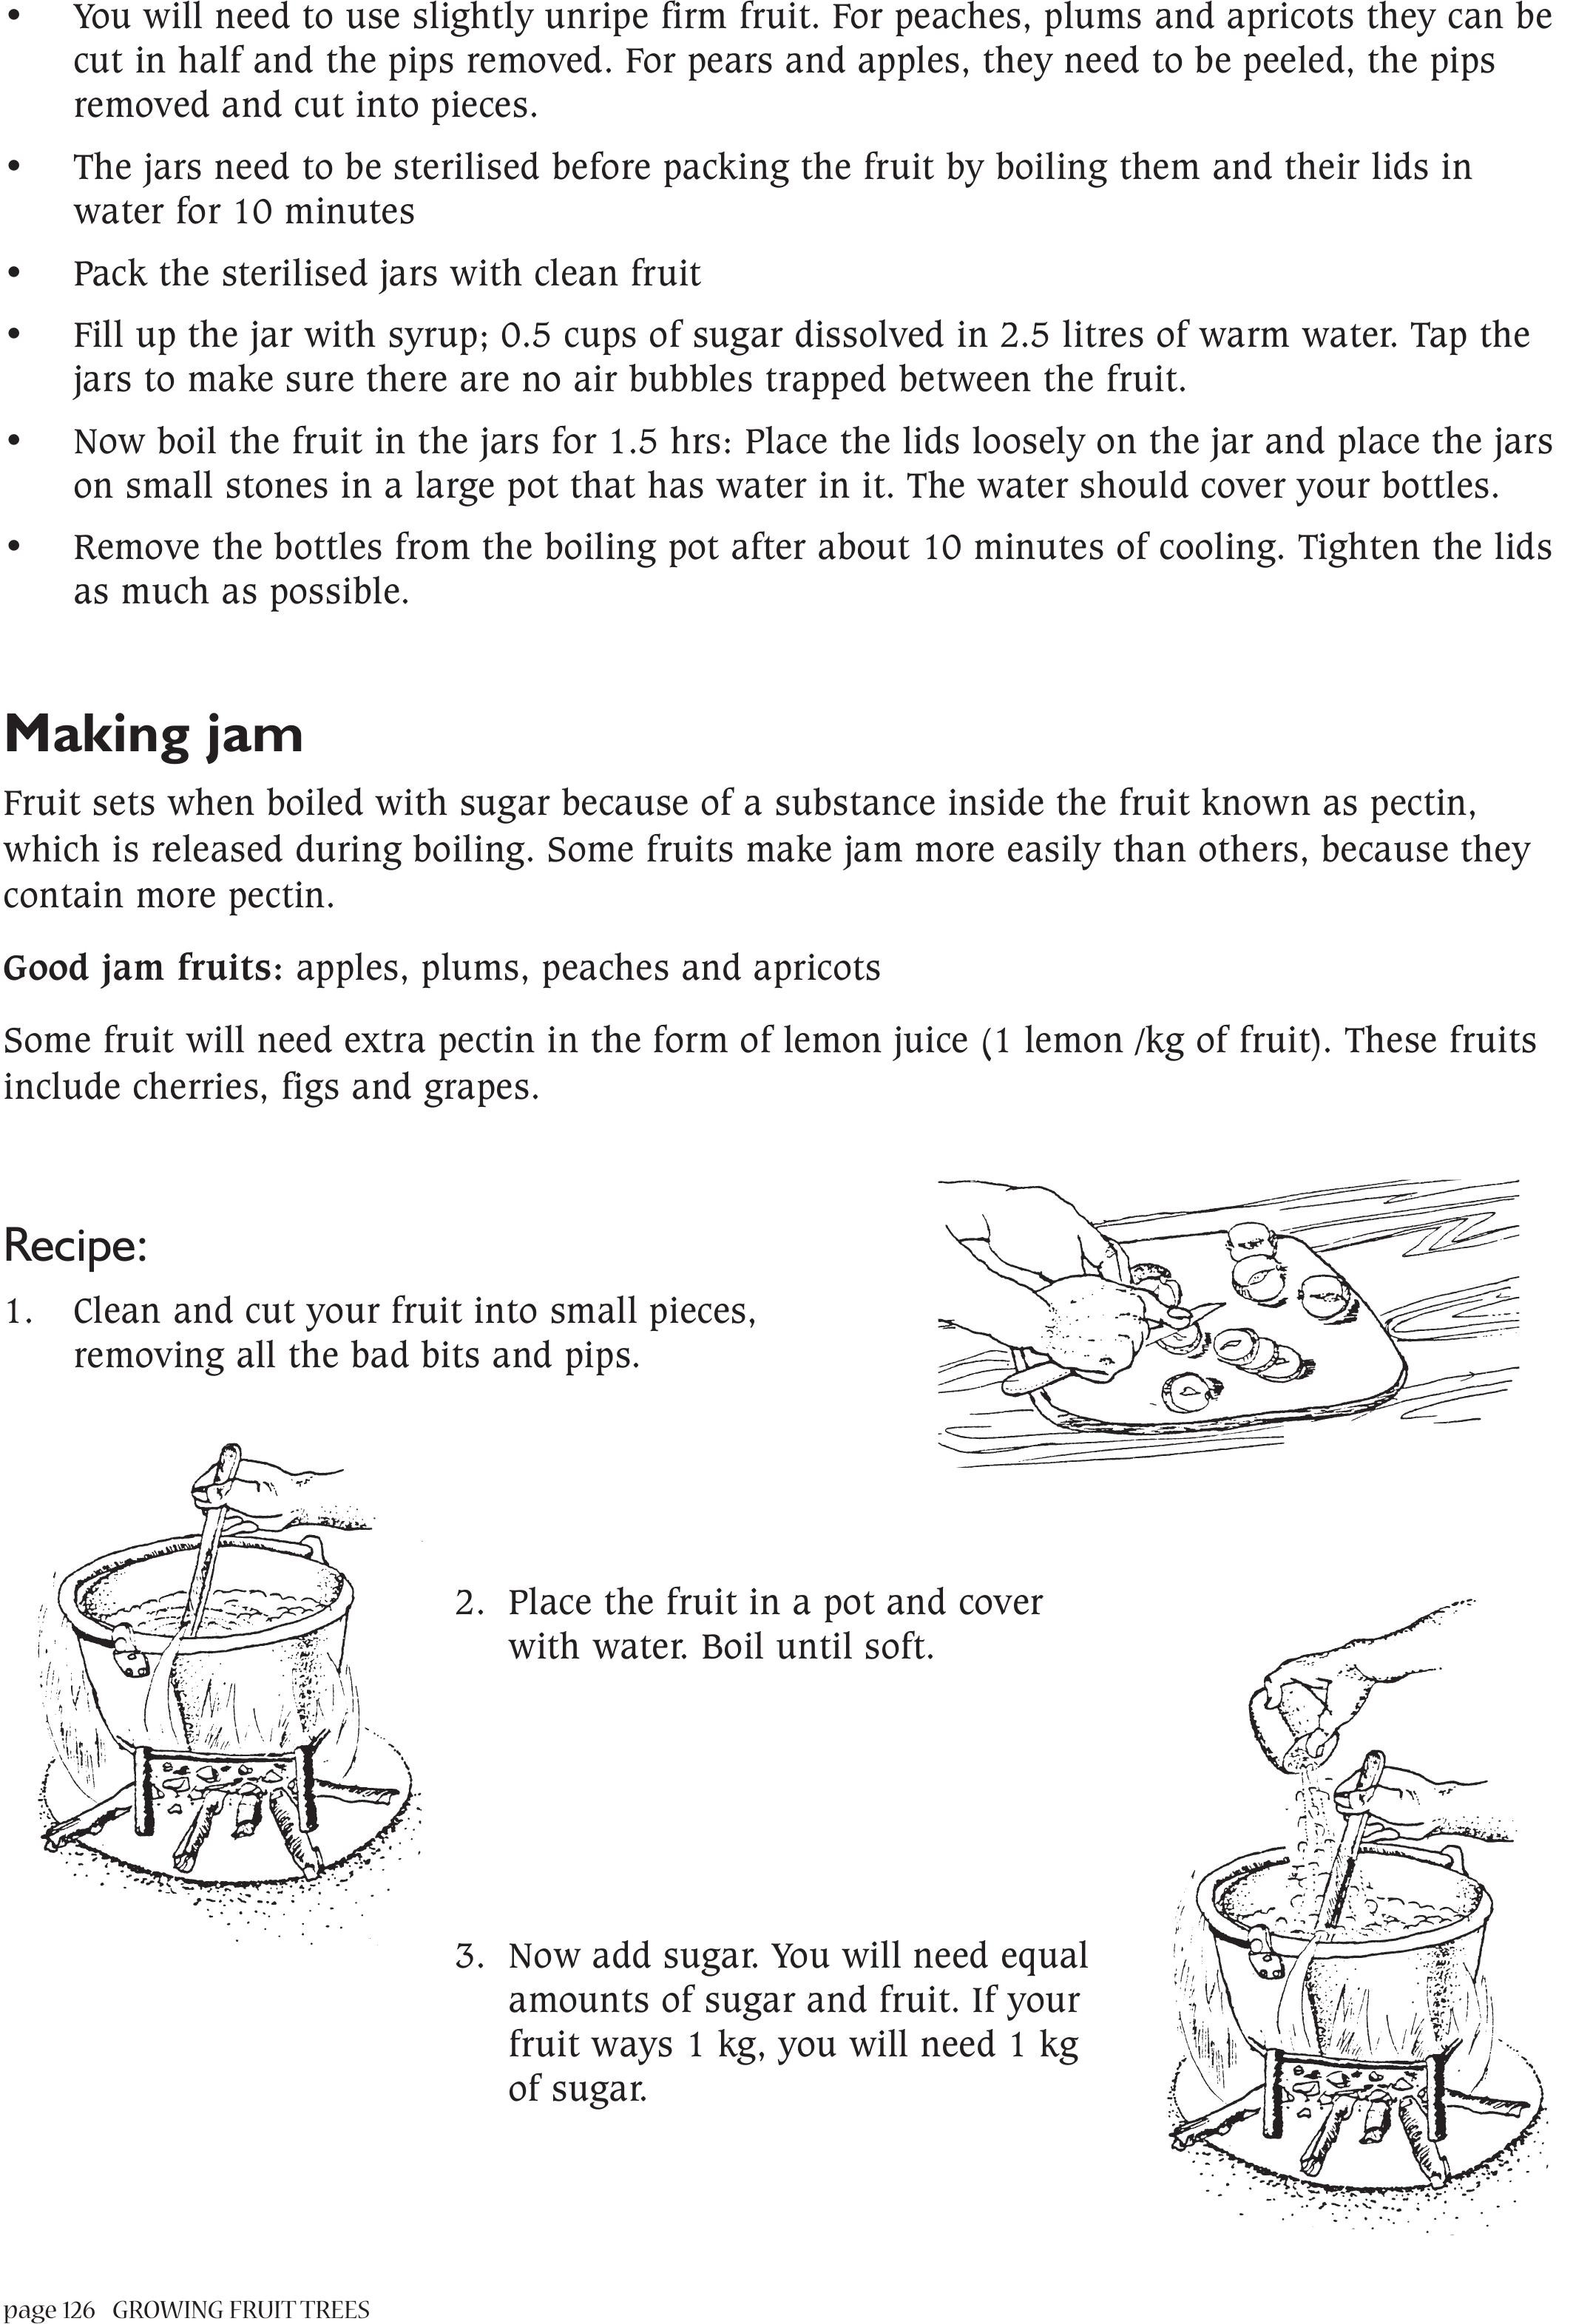
page 126 GROWING FRUIT TREES
• You will need to use slightly unripe firm fruit. For peaches, plums and apricots they can be
cut in half and the pips removed. For pears and apples, they need to be peeled, the pips
removed and cut into pieces.
• The jars need to be sterilised before packing the fruit by boiling them and their lids in
water for 10 minutes
• Pack the sterilised jars with clean fruit
• Fill up the jar with syrup; 0.5 cups of sugar dissolved in 2.5 litres of warm water. Tap the
jars to make sure there are no air bubbles trapped between the fruit.
• Now boil the fruit in the jars for 1.5 hrs: Place the lids loosely on the jar and place the jars
on small stones in a large pot that has water in it. The water should cover your bottles.
• Remove the bottles from the boiling pot after about 10 minutes of cooling. Tighten the lids
as much as possible.
Making jam
Fruit sets when boiled with sugar because of a substance inside the fruit known as pectin,
which is released during boiling. Some fruits make jam more easily than others, because they
contain more pectin.
Good jam fruits: apples, plums, peaches and apricots
Some fruit will need extra pectin in the form of lemon juice (1 lemon /kg of fruit). These fruits
include cherries, figs and grapes.
Recipe:
1. Clean and cut your fruit into small pieces,
removing all the bad bits and pips.
2. Place the fruit in a pot and cover
with water. Boil until soft.
3. Now add sugar. You will need equal
amounts of sugar and fruit. If your
fruit ways 1 kg, you will need 1 kg
of sugar.

GROWING FRUIT TREESpage 127
4. Add also the lemon juice if you are using low pectin fruit.
5. Boil this slowly for 10-60 minutes until the jam is ready
to set. To test this, put a little bit of your jam onto a
saucer and leave it to cool. If the surface becomes stiff
like jelly the jam has set and it is ready for bottling.
6. Sterilise your jars/bottles by boiling them for 10 minutes.
Fill these jars to the top with jam, while they are still
hot. Screw the lids on tightly and allow to cool.
SEAL BOTTLED FRUIT
WITH WAX PAPER
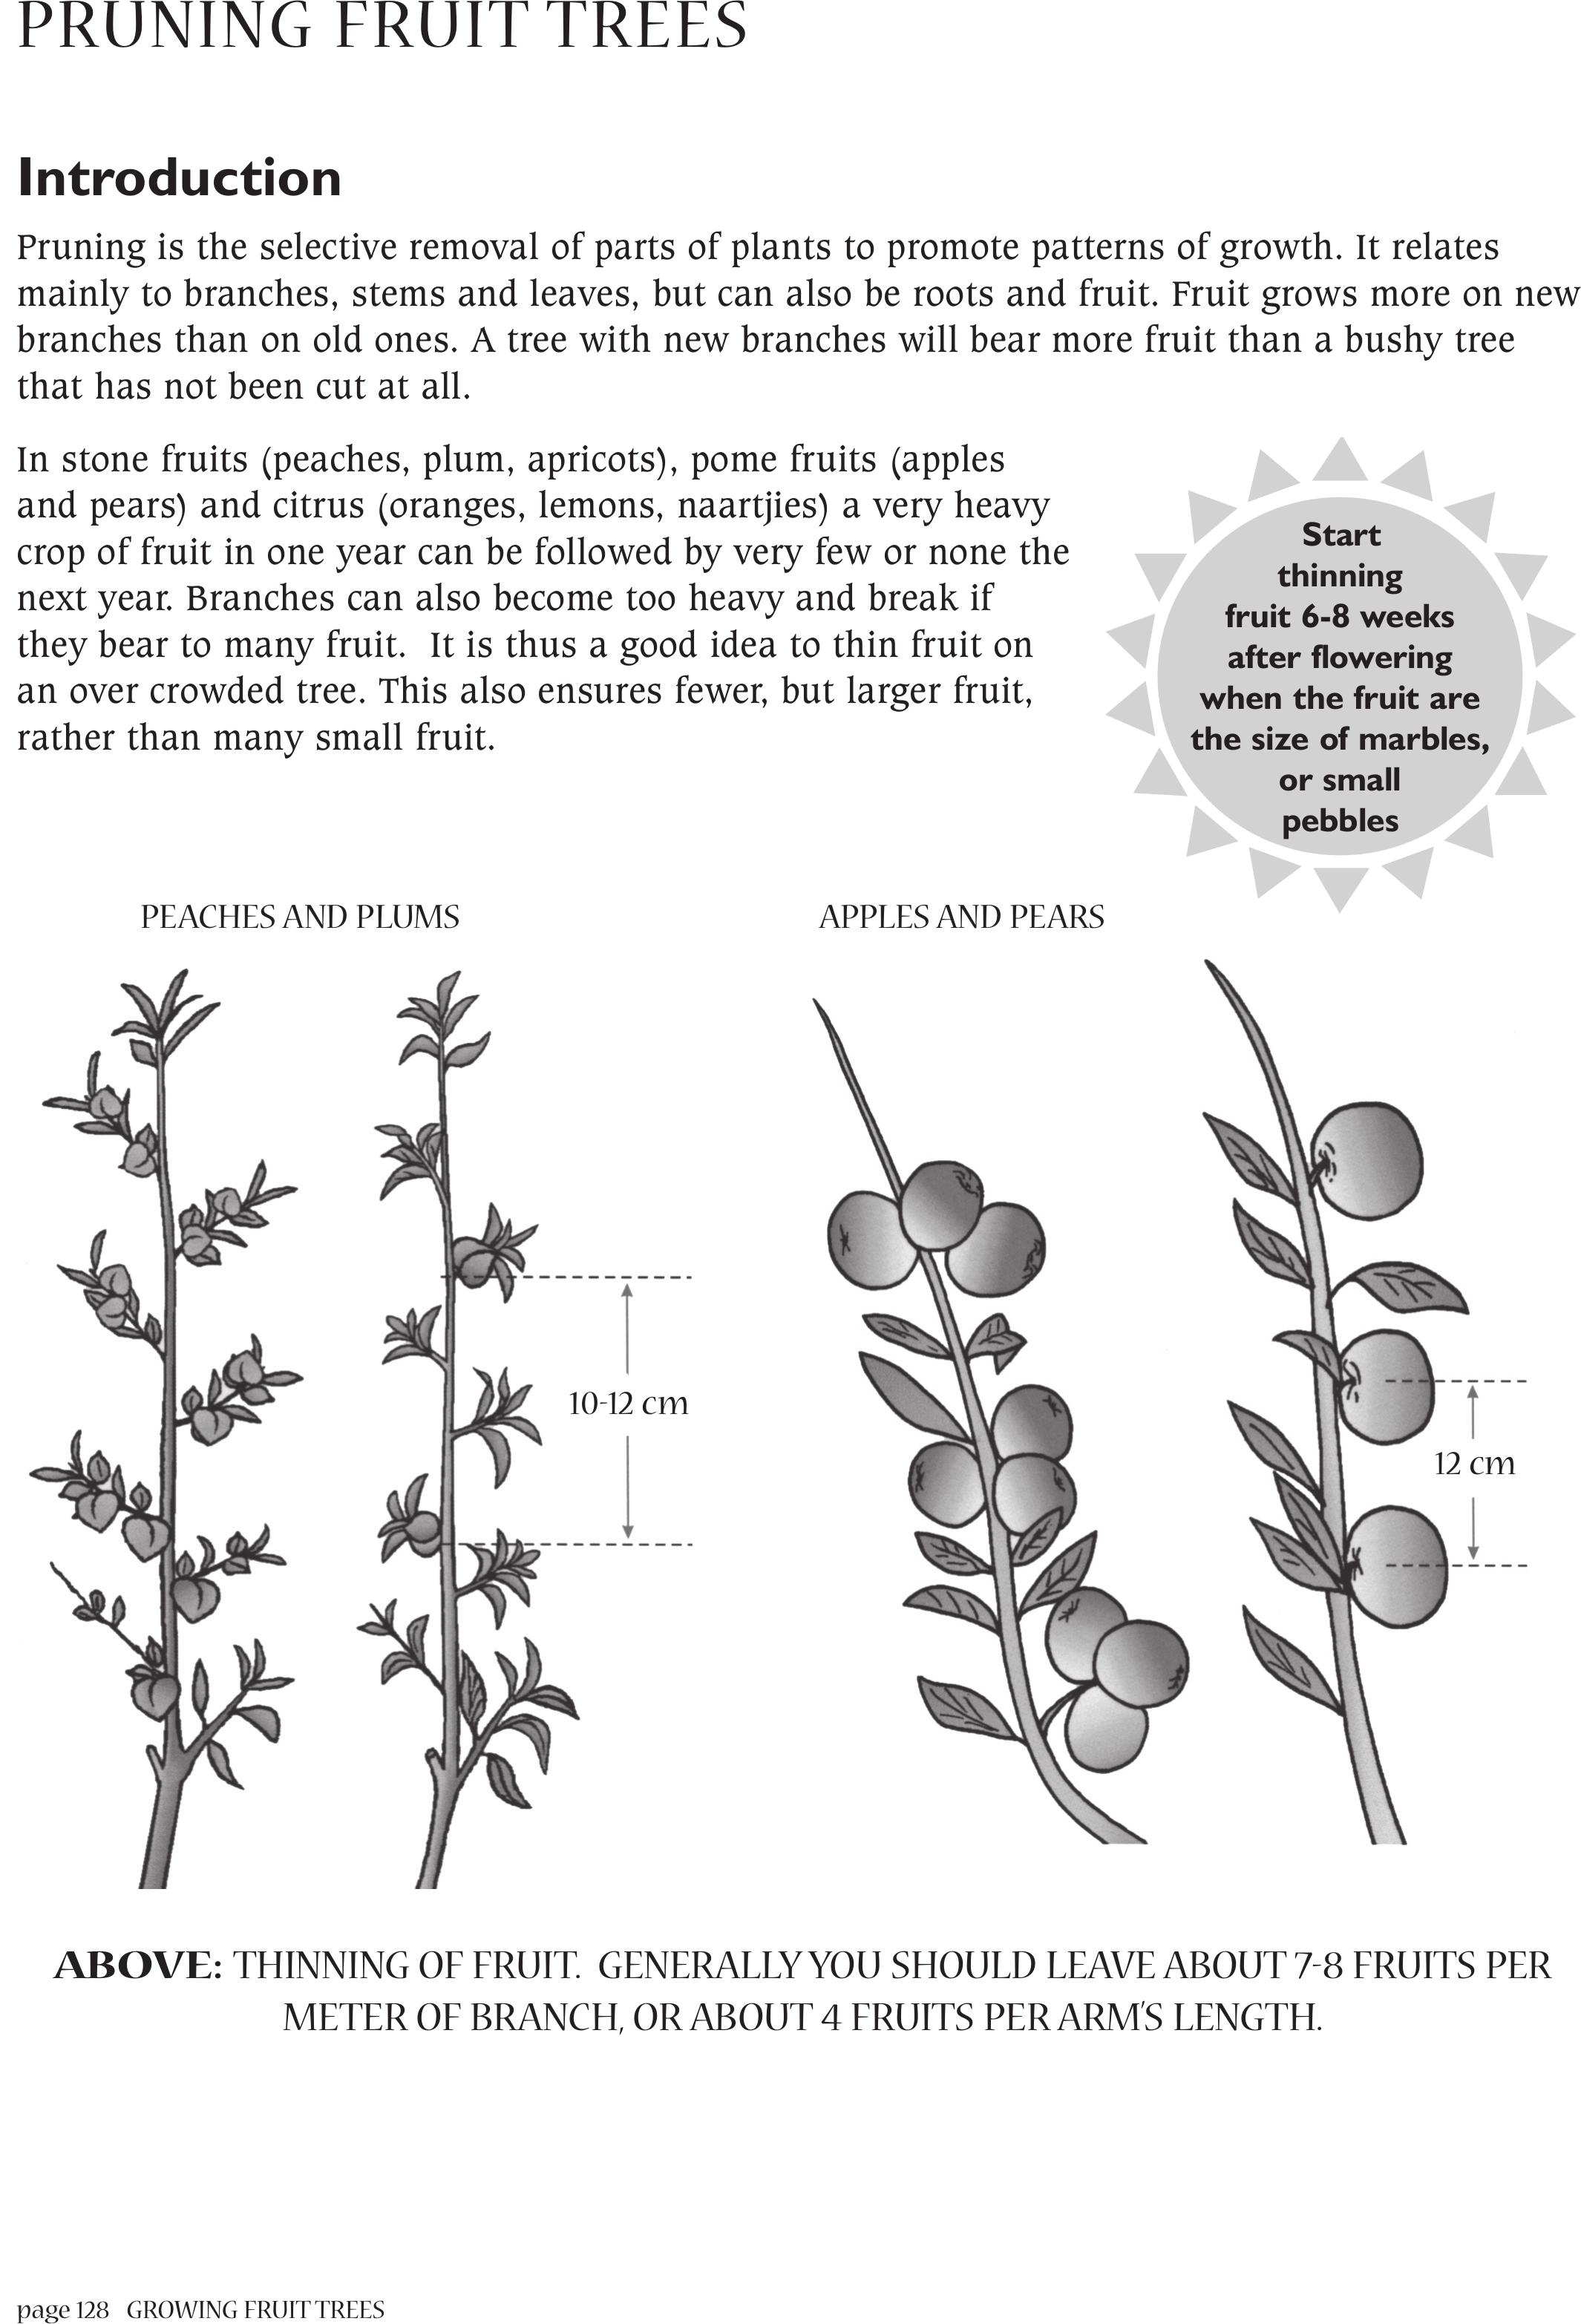
page 128 GROWING FRUIT TREES
PRUNING FRUITTREES
Introduction
Pruning is the selective removal of parts of plants to promote patterns of growth. It relates
mainly to branches, stems and leaves, but can also be roots and fruit. Fruit grows more on new
branches than on old ones. A tree with new branches will bear more fruit than a bushy tree
that has not been cut at all.
In stone fruits (peaches, plum, apricots), pome fruits (apples
and pears) and citrus (oranges, lemons, naartjies) a very heavy
crop of fruit in one year can be followed by very few or none the
next year. Branches can also become too heavy and break if
they bear to many fruit. It is thus a good idea to thin fruit on
an over crowded tree. This also ensures fewer, but larger fruit,
rather than many small fruit.
ABOVE:THINNING OF FRUIT. GENERALLY YOU SHOULD LEAVE ABOUT 7-8 FRUITS PER
METER OF BRANCH, OR ABOUT 4 FRUITS PER ARM’S LENGTH.
PEACHES AND PLUMS
10-12 cm
12 cm
Start
thinning
fruit 6-8 weeks
after flowering
when the fruit are
the size of marbles,
or small
pebbles
APPLES AND PEARS
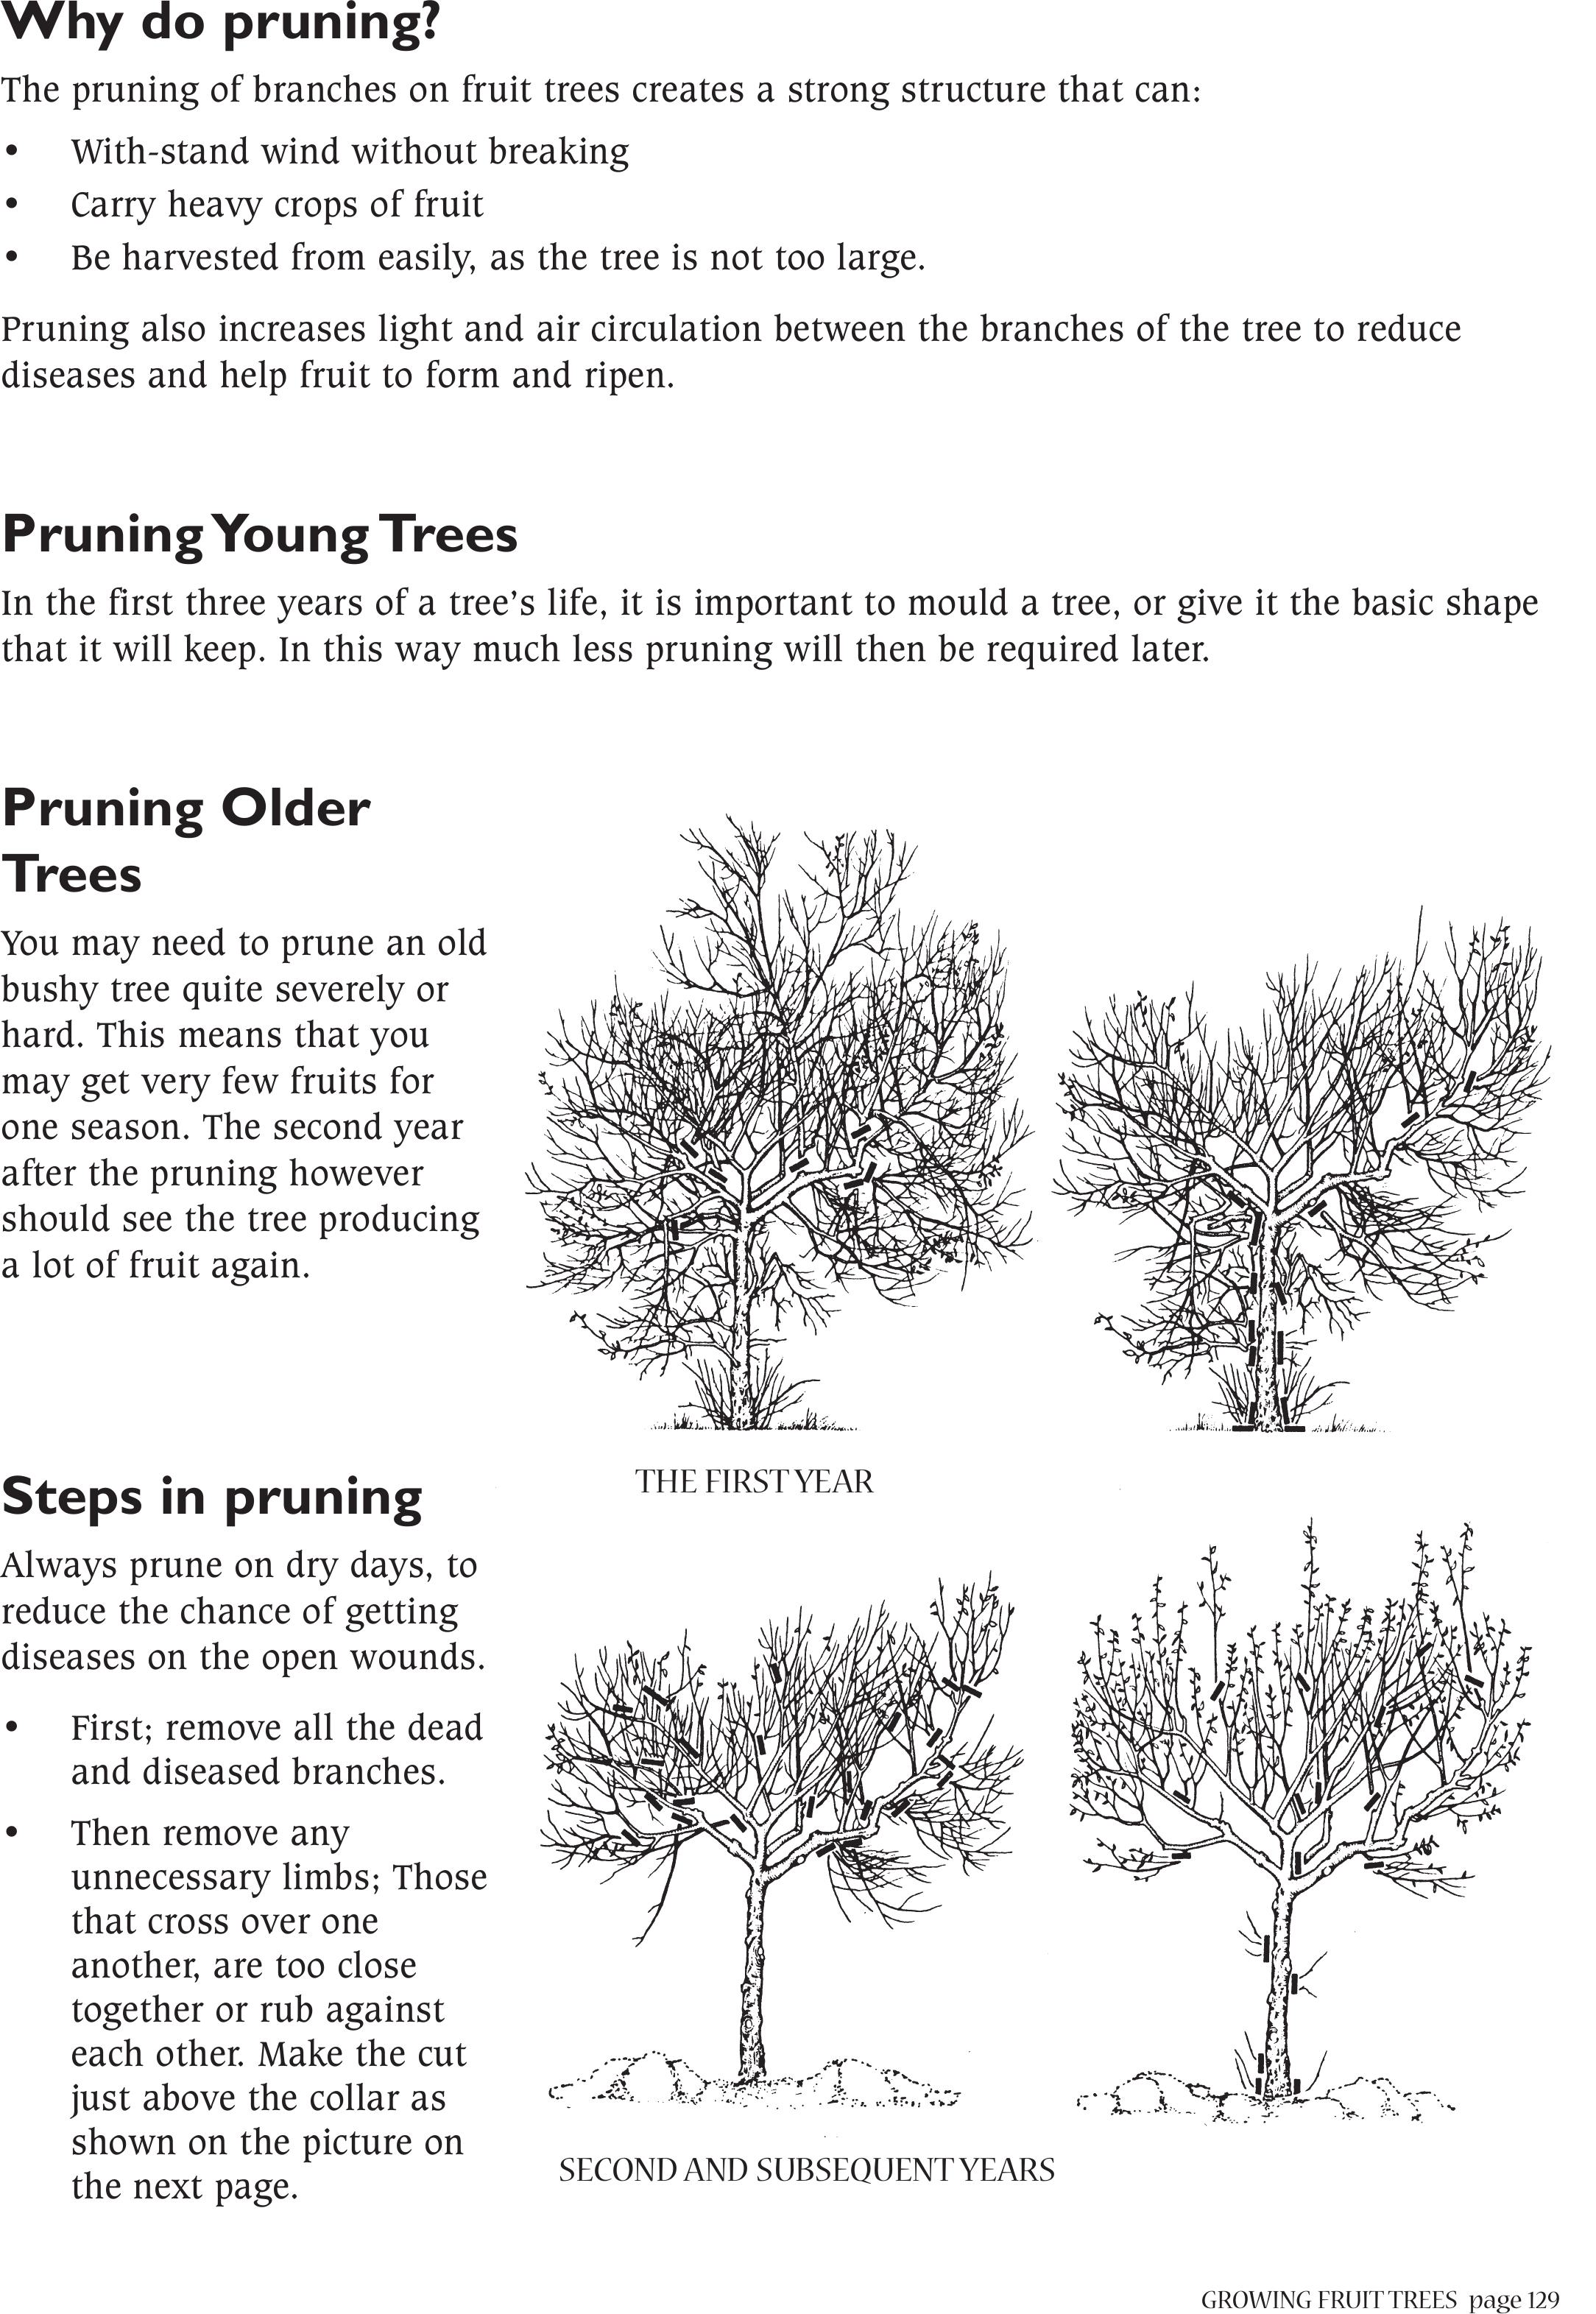
GROWING FRUIT TREESpage 129
Why do pruning?
The pruning of branches on fruit trees creates a strong structure that can:
• With-stand wind without breaking
• Carry heavy crops of fruit
• Be harvested from easily, as the tree is not too large.
Pruning also increases light and air circulation between the branches of the tree to reduce
diseases and help fruit to form and ripen.
Pruning Young Trees
In the first three years of a tree’s life, it is important to mould a tree, or give it the basic shape
that it will keep. In this way much less pruning will then be required later.
Pruning Older
Trees
You may need to prune an old
bushy tree quite severely or
hard. This means that you
may get very few fruits for
one season. The second year
after the pruning however
should see the tree producing
a lot of fruit again.
Steps in pruning
Always prune on dry days, to
reduce the chance of getting
diseases on the open wounds.
• First; remove all the dead
and diseased branches.
• Then remove any
unnecessary limbs; Those
that cross over one
another, are too close
together or rub against
each other. Make the cut
just above the collar as
shown on the picture on
the next page.
THE FIRST YEAR
SECOND AND SUBSEQUENT YEARS
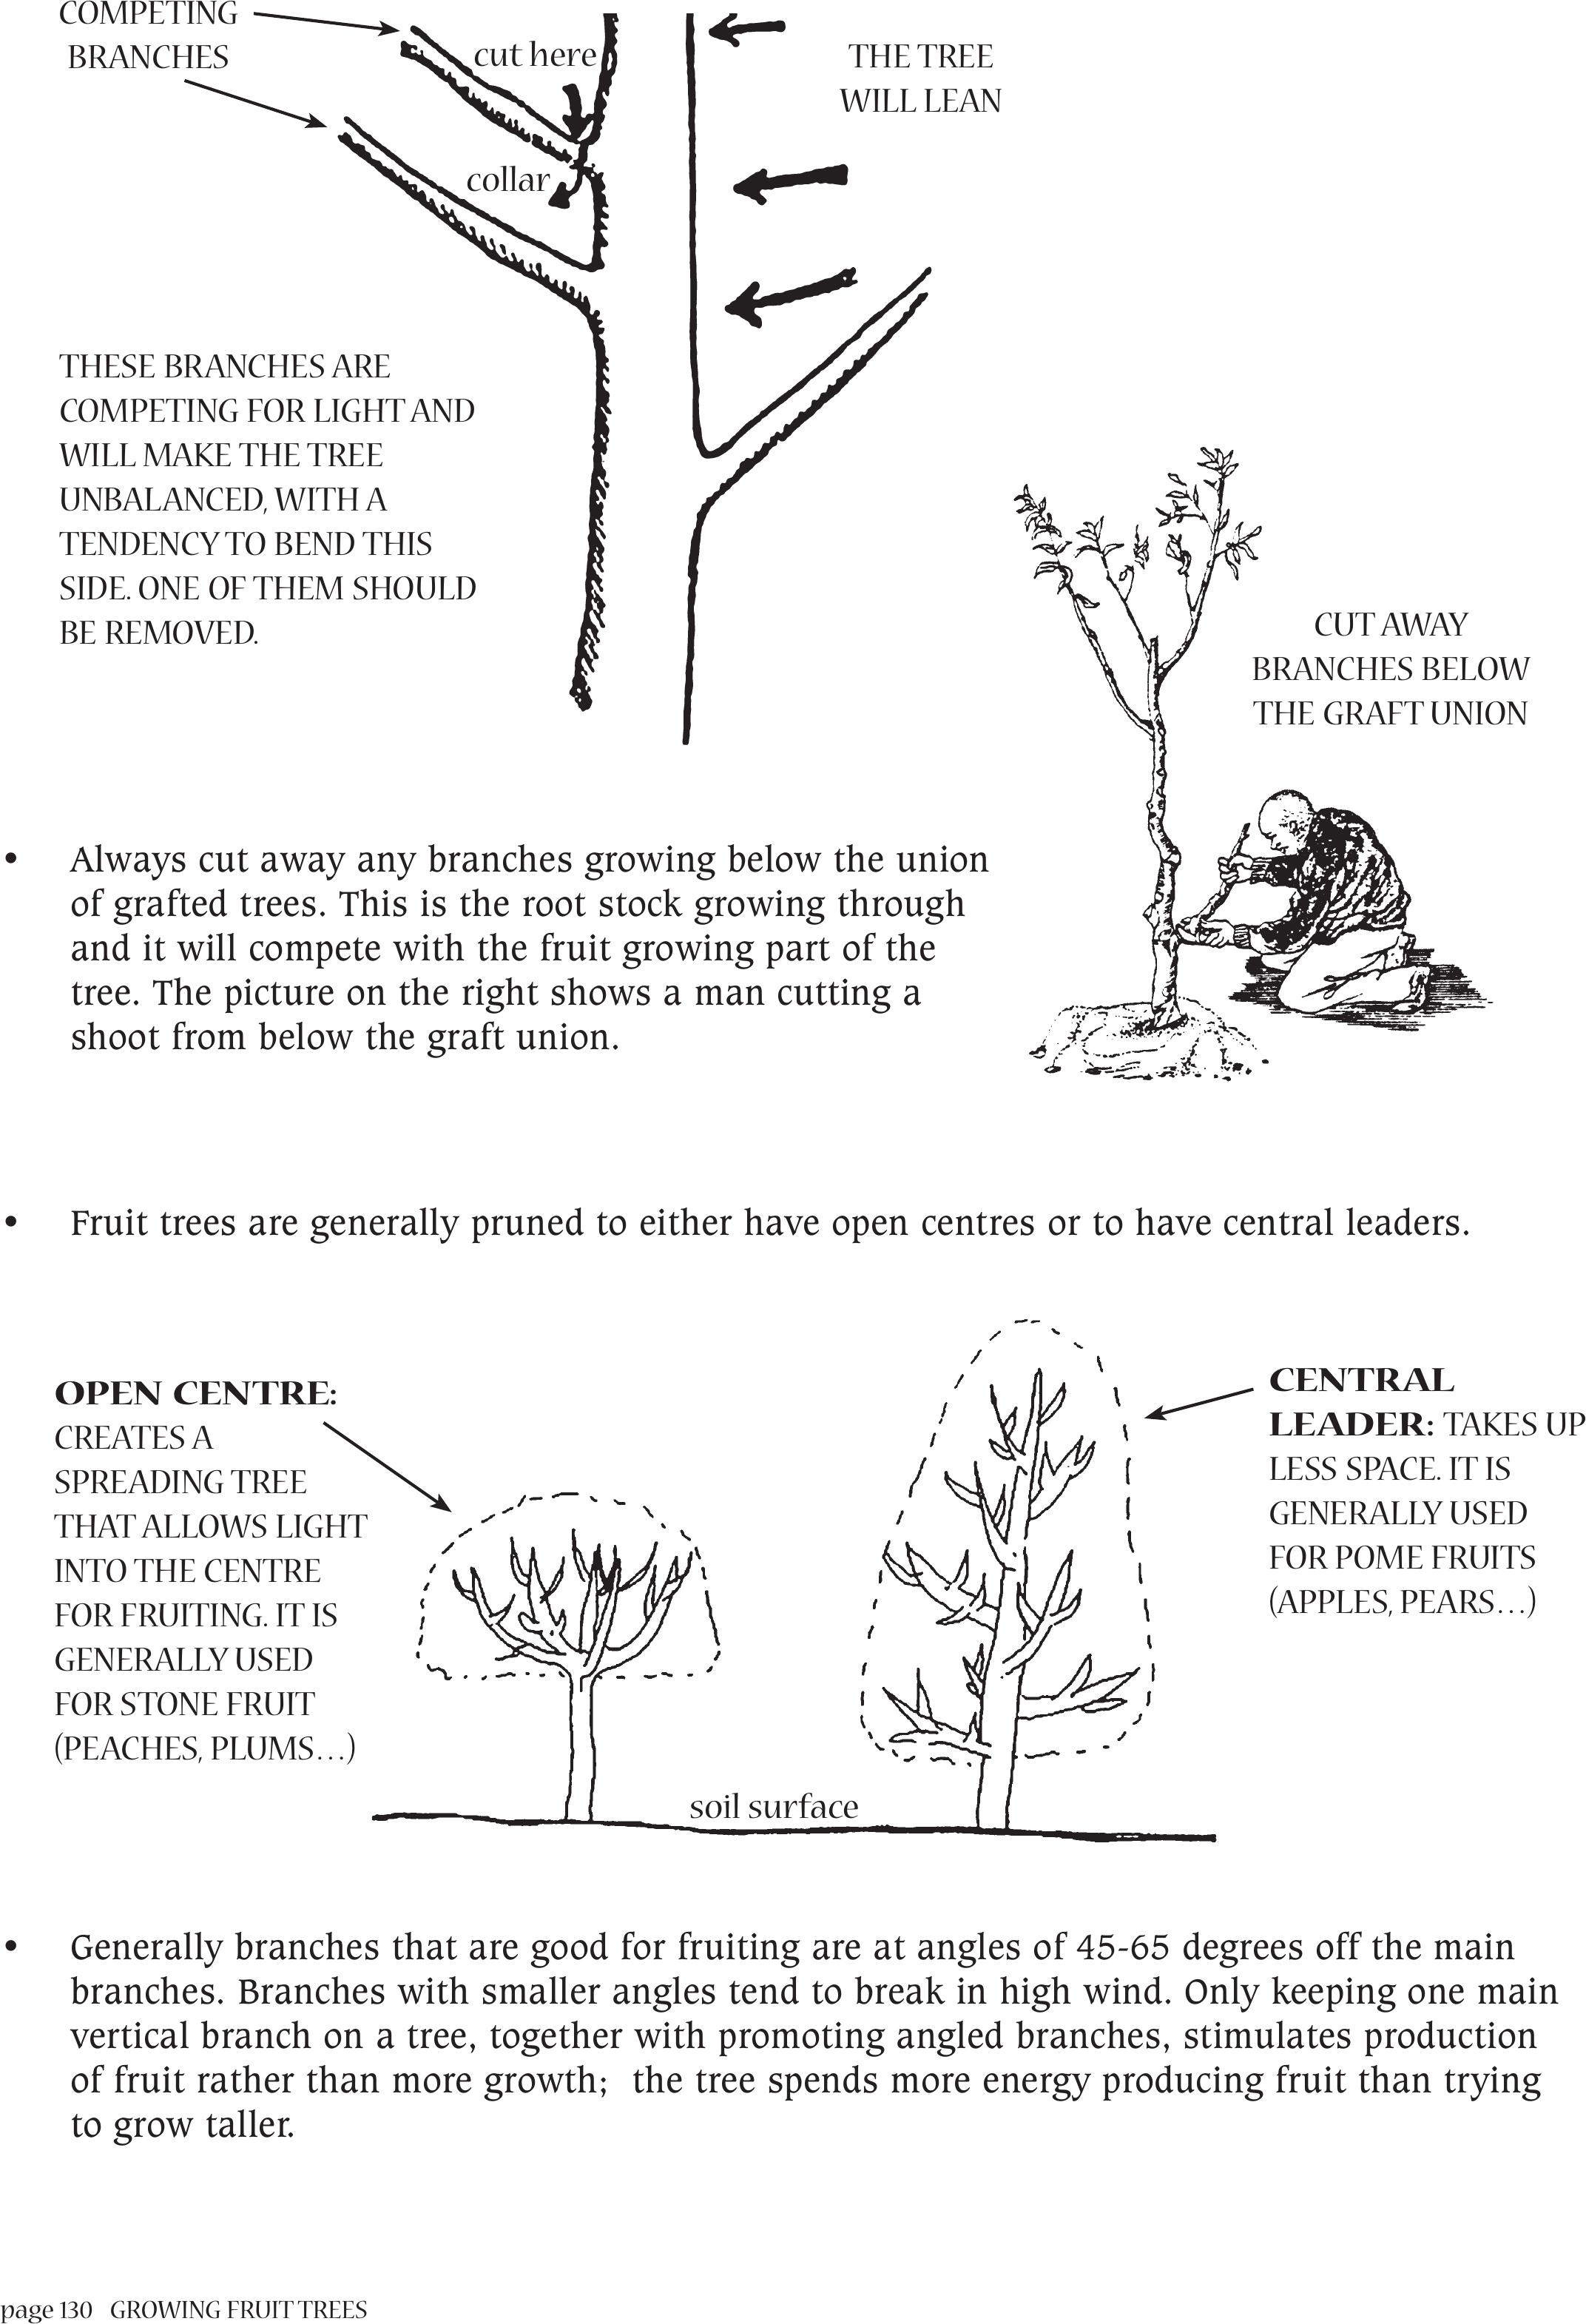
page 130 GROWING FRUIT TREES
• Always cut away any branches growing below the union
of grafted trees. This is the root stock growing through
and it will compete with the fruit growing part of the
tree. The picture on the right shows a man cutting a
shoot from below the graft union.
• Fruit trees are generally pruned to either have open centres or to have central leaders.
• Generally branches that are good for fruiting are at angles of 45-65 degrees off the main
branches. Branches with smaller angles tend to break in high wind. Only keeping one main
vertical branch on a tree, together with promoting angled branches, stimulates production
of fruit rather than more growth; the tree spends more energy producing fruit than trying
to grow taller.
THE TREE
WILL LEAN
COMPETING
BRANCHES
THESE BRANCHES ARE
COMPETING FOR LIGHT AND
WILL MAKE THE TREE
UNBALANCED, WITH A
TENDENCY TO BEND THIS
SIDE. ONE OF THEM SHOULD
BE REMOVED.
OPEN CENTRE:
CREATES A
SPREADING TREE
THAT ALLOWS LIGHT
INTO THE CENTRE
FOR FRUITING. IT IS
GENERALLY USED
FOR STONE FRUIT
(PEACHES, PLUMS…)
CENTRAL
LEADER:TAKES UP
LESS SPACE. IT IS
GENERALLY USED
FOR POME FRUITS
(APPLES, PEARS…)
cut here
collar
CUT AWAY
BRANCHES BELOW
THE GRAFT UNION
soil surface
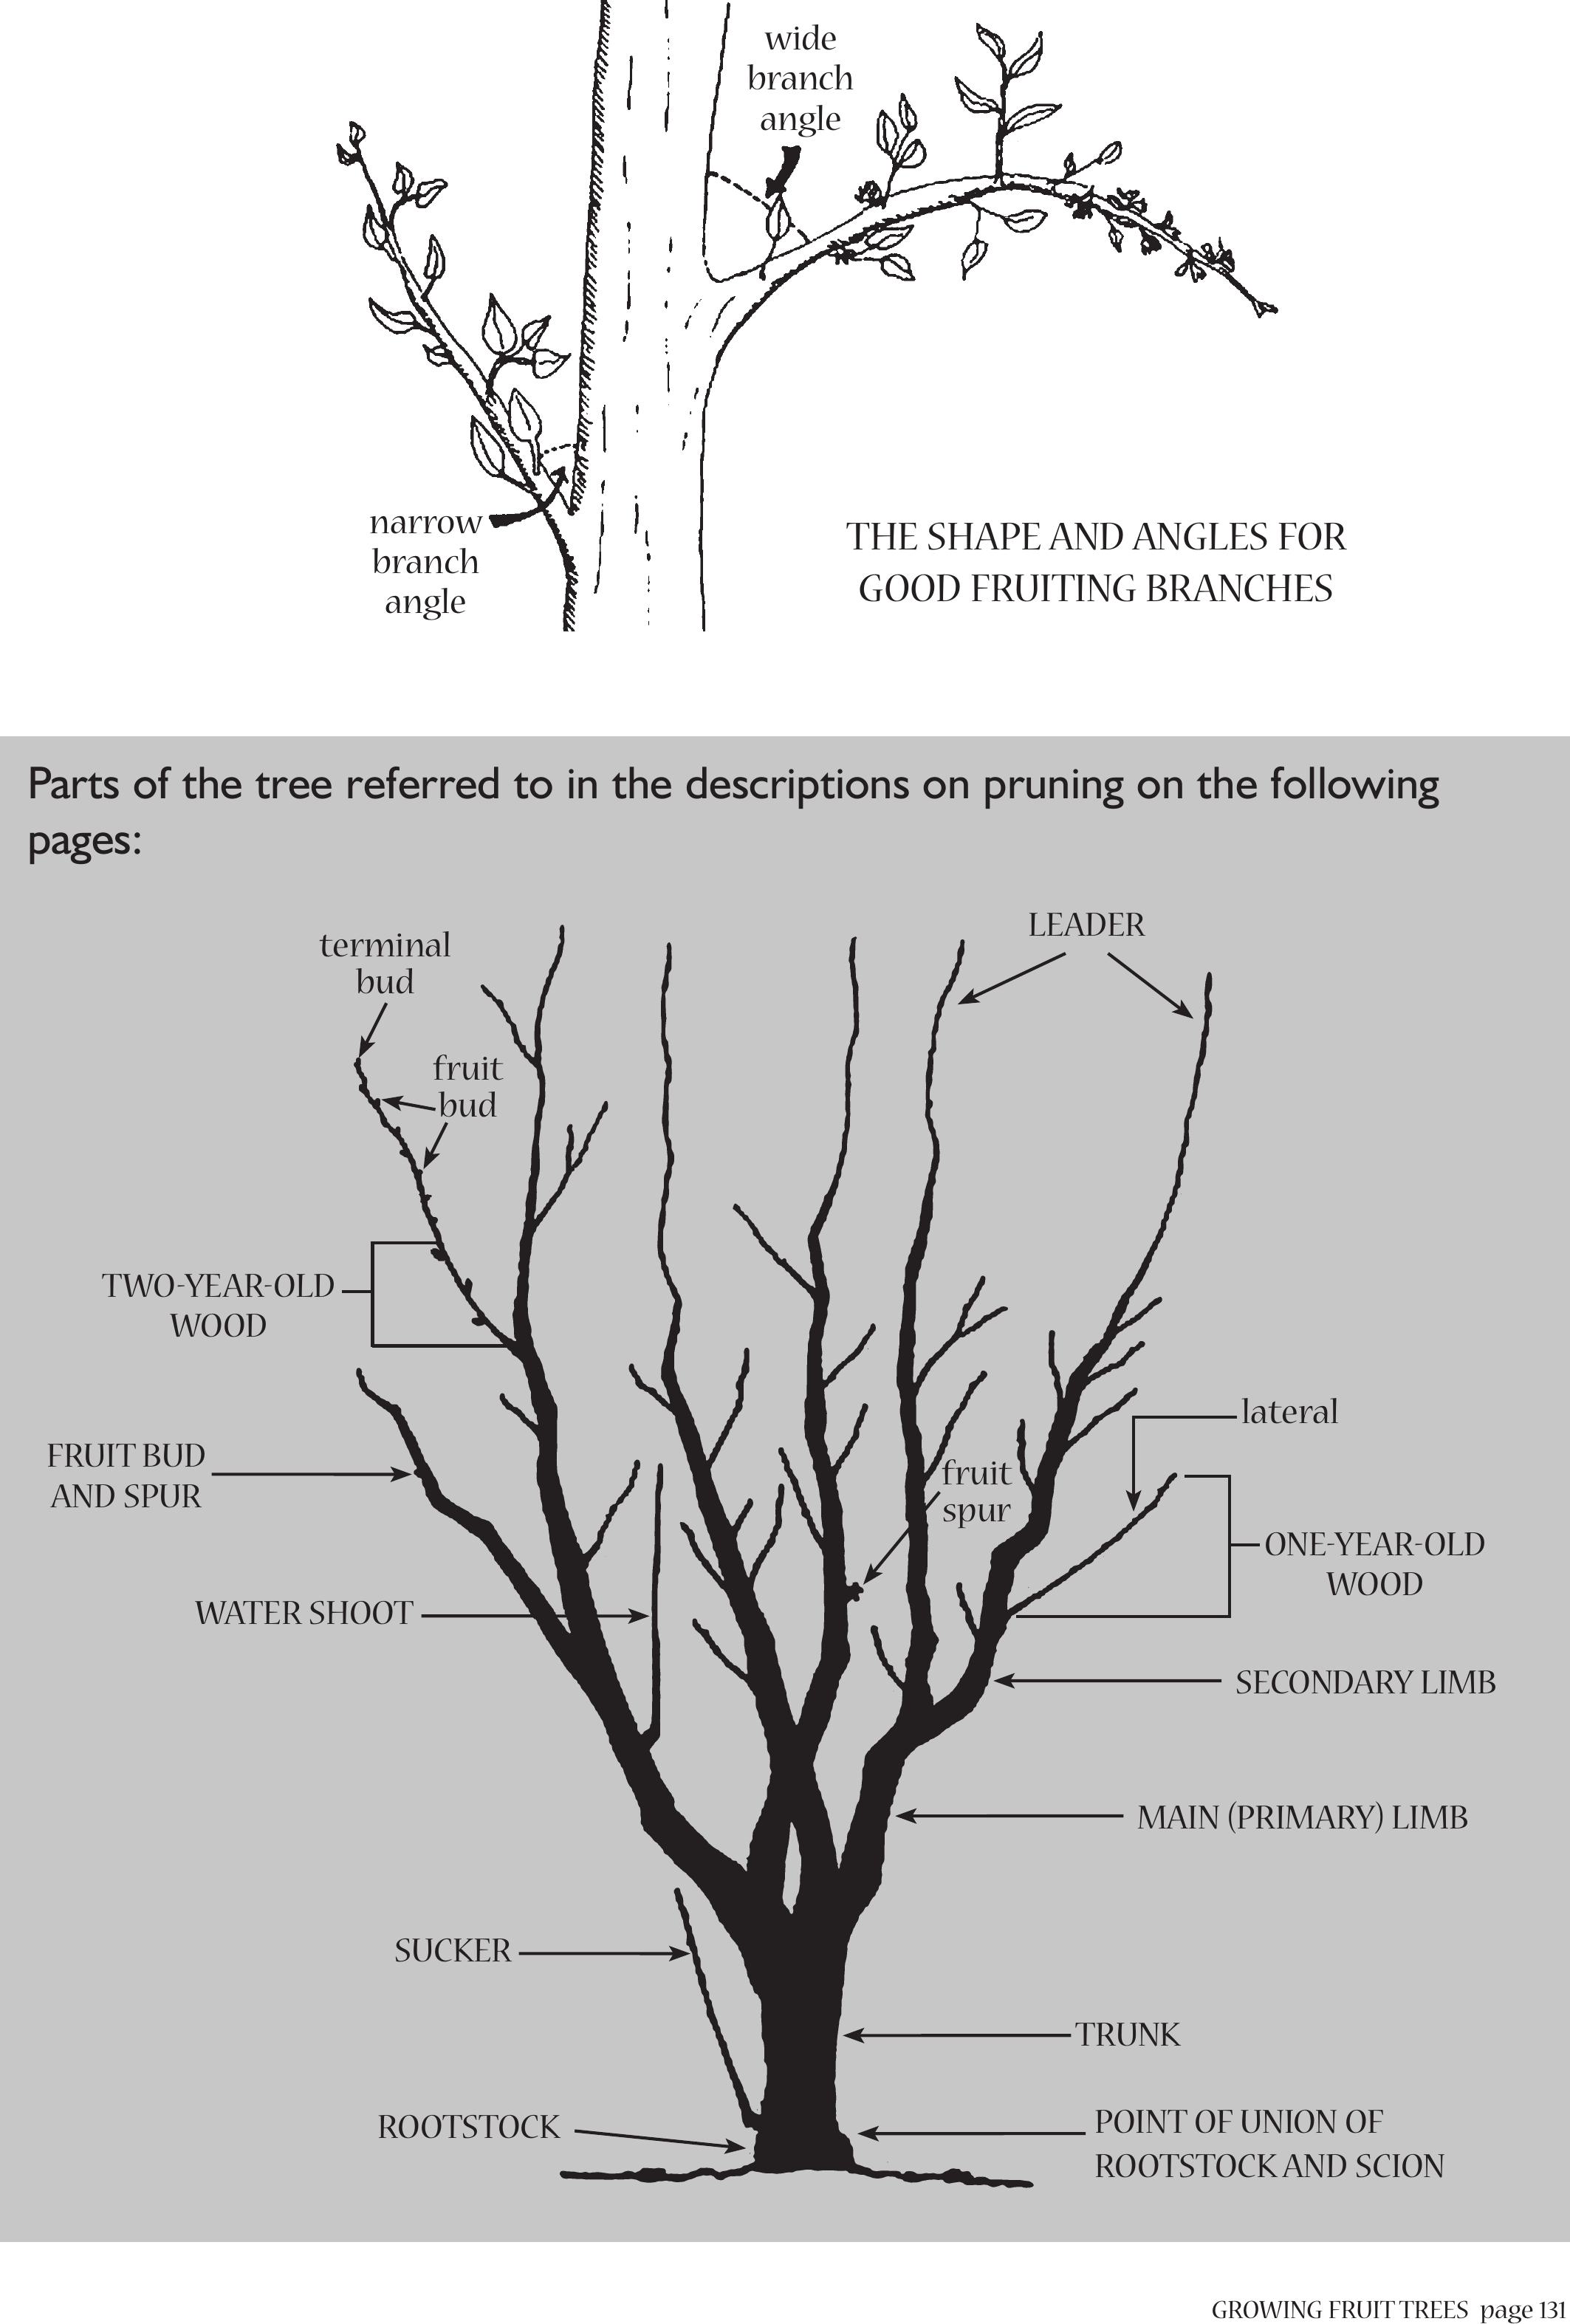
GROWING FRUIT TREESpage 131
wide
branch
angle
narrow
branch
angle
THE SHAPE AND ANGLES FOR
GOOD FRUITING BRANCHES
Parts of the tree referred to in the descriptions on pruning on the following
pages:
ROOTSTOCK
SUCKER
WATER SHOOT
SECONDARY LIMB
MAIN (PRIMARY) LIMB
TRUNK
POINT OF UNION OF
ROOTSTOCK AND SCION
ONE-YEAR-OLD
WOOD
LEADER
TWO-YEAR-OLD
WOOD
FRUIT BUD
AND SPUR
terminal
bud
fruit
bud
lateral
fruit
spur
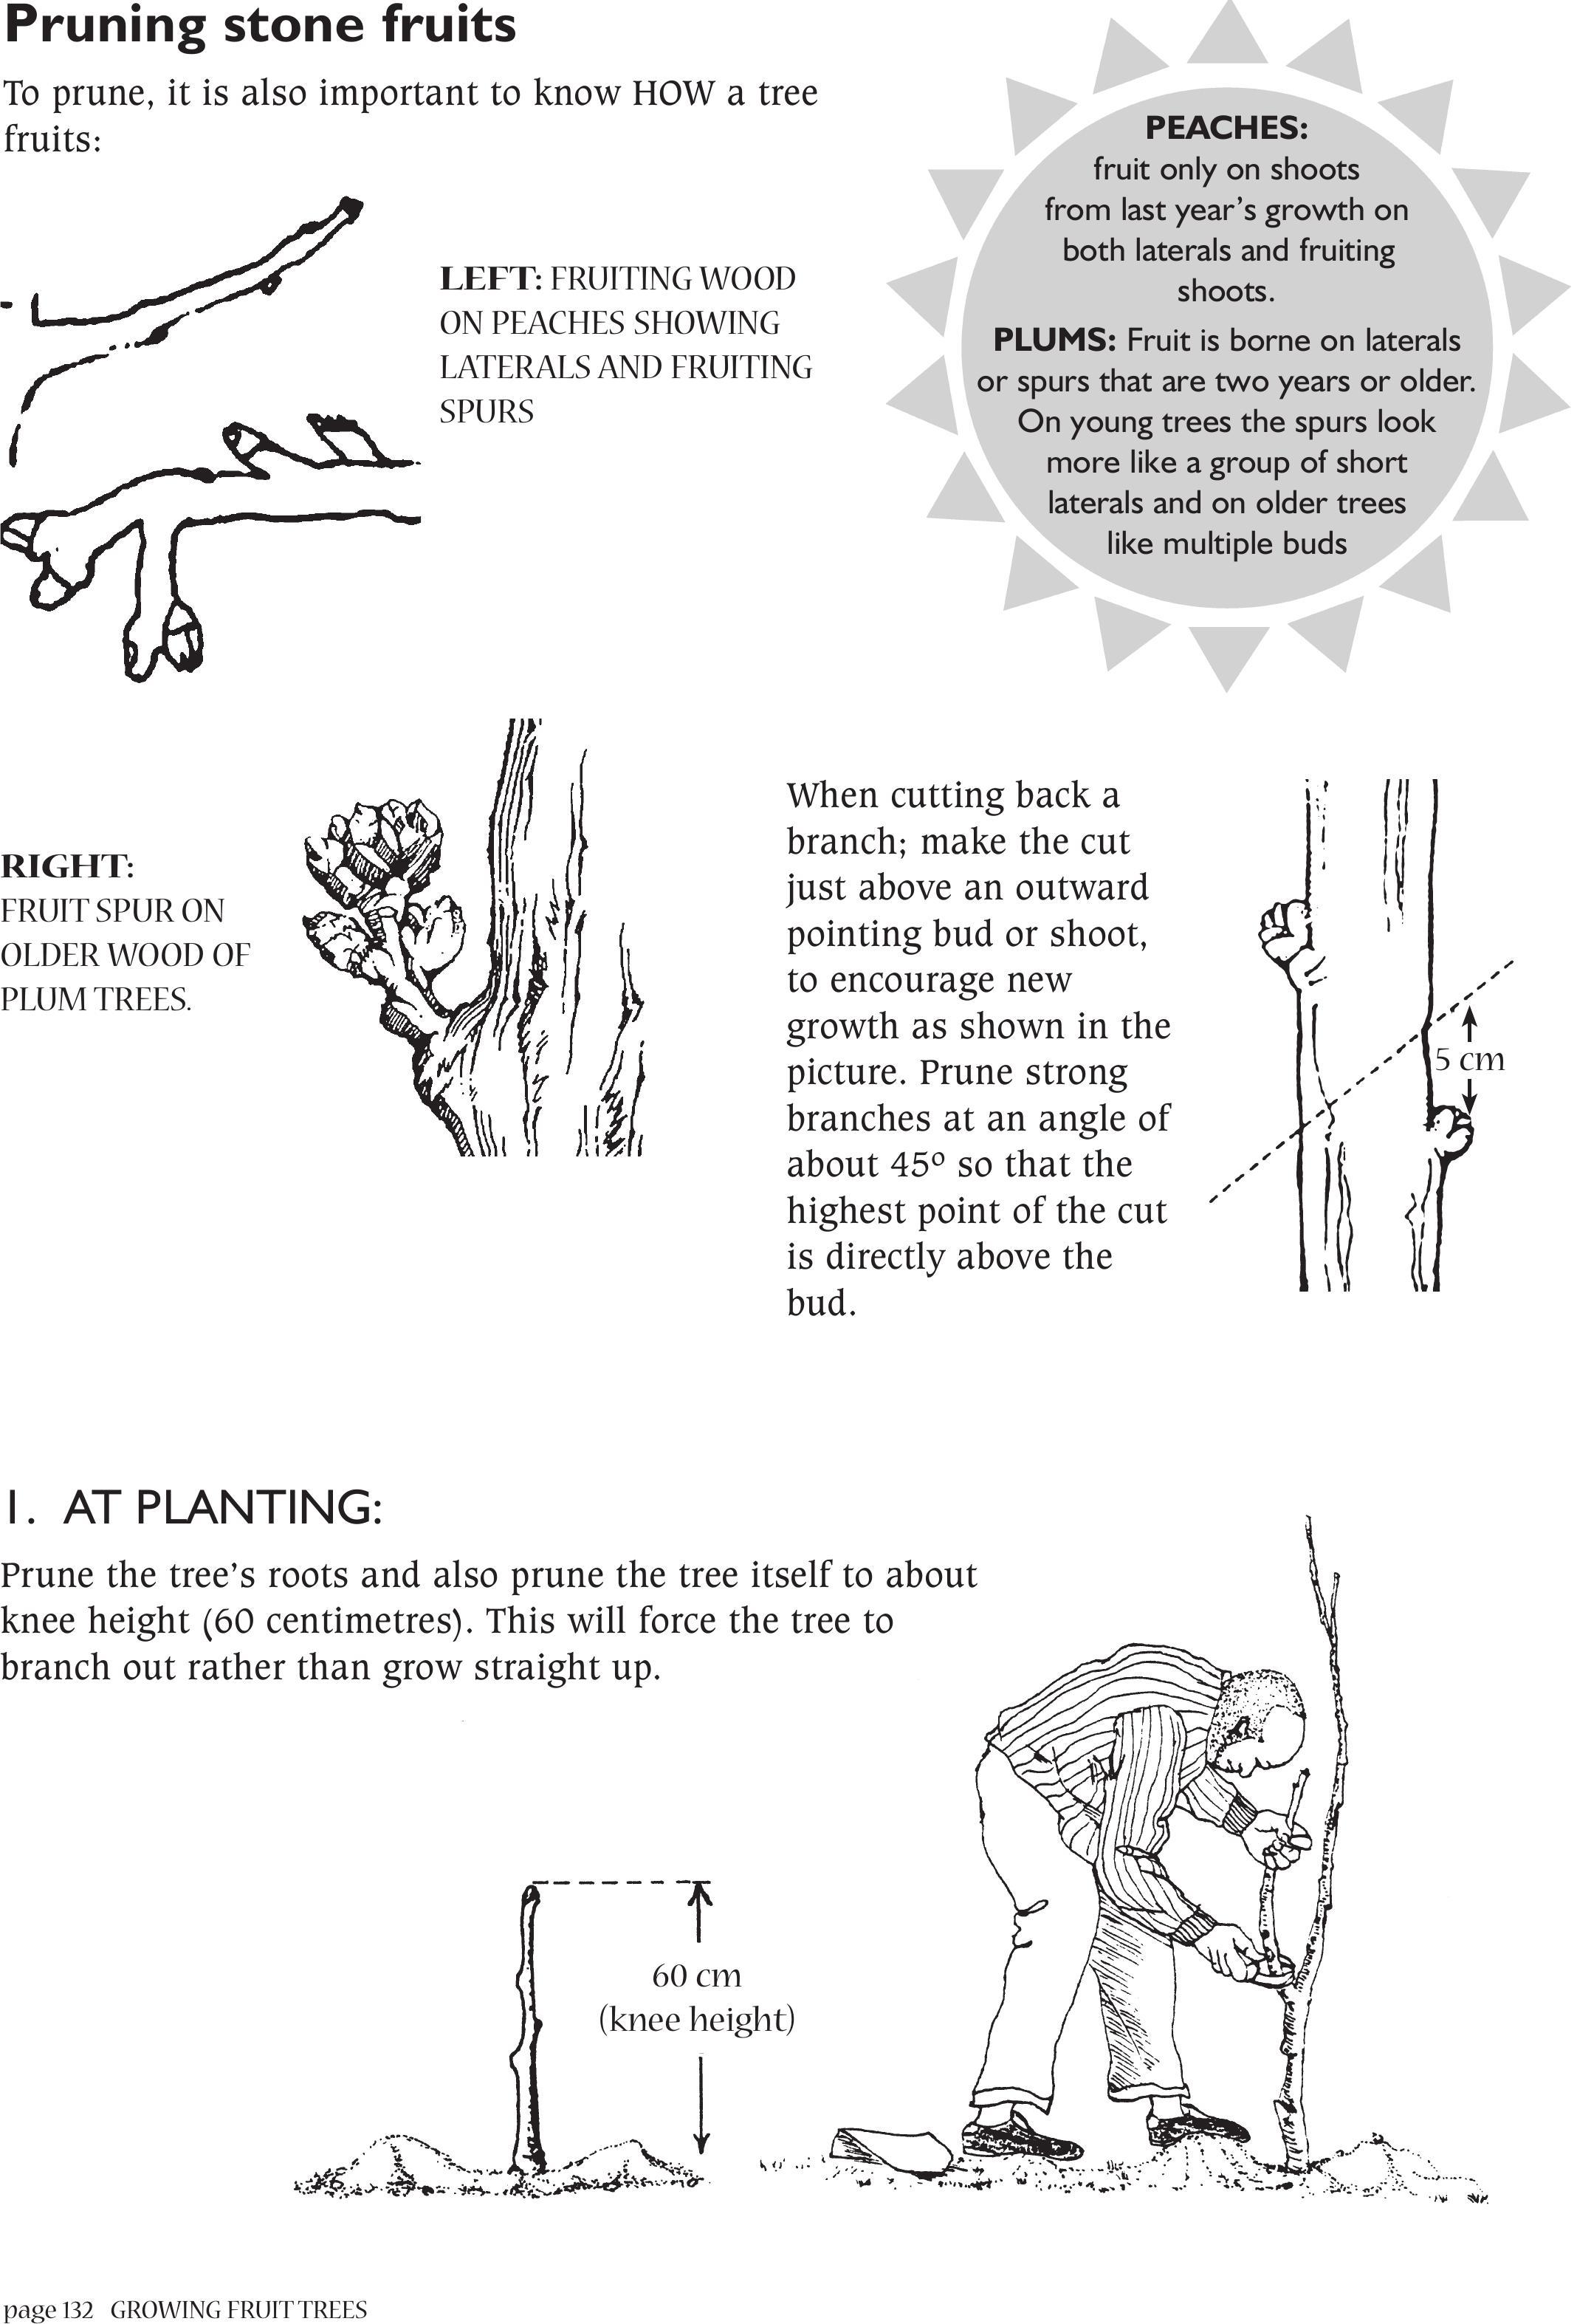
page 132 GROWING FRUIT TREES
Pruning stone fruits
To prune, it is also important to know HOW a tree
fruits:
LEFT: FRUITING WOOD
ON PEACHES SHOWING
LATERALS AND FRUITING
SPURS
RIGHT:
FRUIT SPUR ON
OLDER WOOD OF
PLUM TREES.
When cutting back a
branch; make the cut
just above an outward
pointing bud or shoot,
to encourage new
growth as shown in the
picture. Prune strong
branches at an angle of
about 45º so that the
highest point of the cut
is directly above the
bud.
PEACHES:
fruit only on shoots
from last year’s growth on
both laterals and fruiting
shoots.
PLUMS: Fruit is borne on laterals
or spurs that are two years or older.
On young trees the spurs look
more like a group of short
laterals and on older trees
like multiple buds
5 cm
1. AT PLANTING:
Prune the tree’s roots and also prune the tree itself to about
knee height (60 centimetres). This will force the tree to
branch out rather than grow straight up.
60 cm
(knee height)
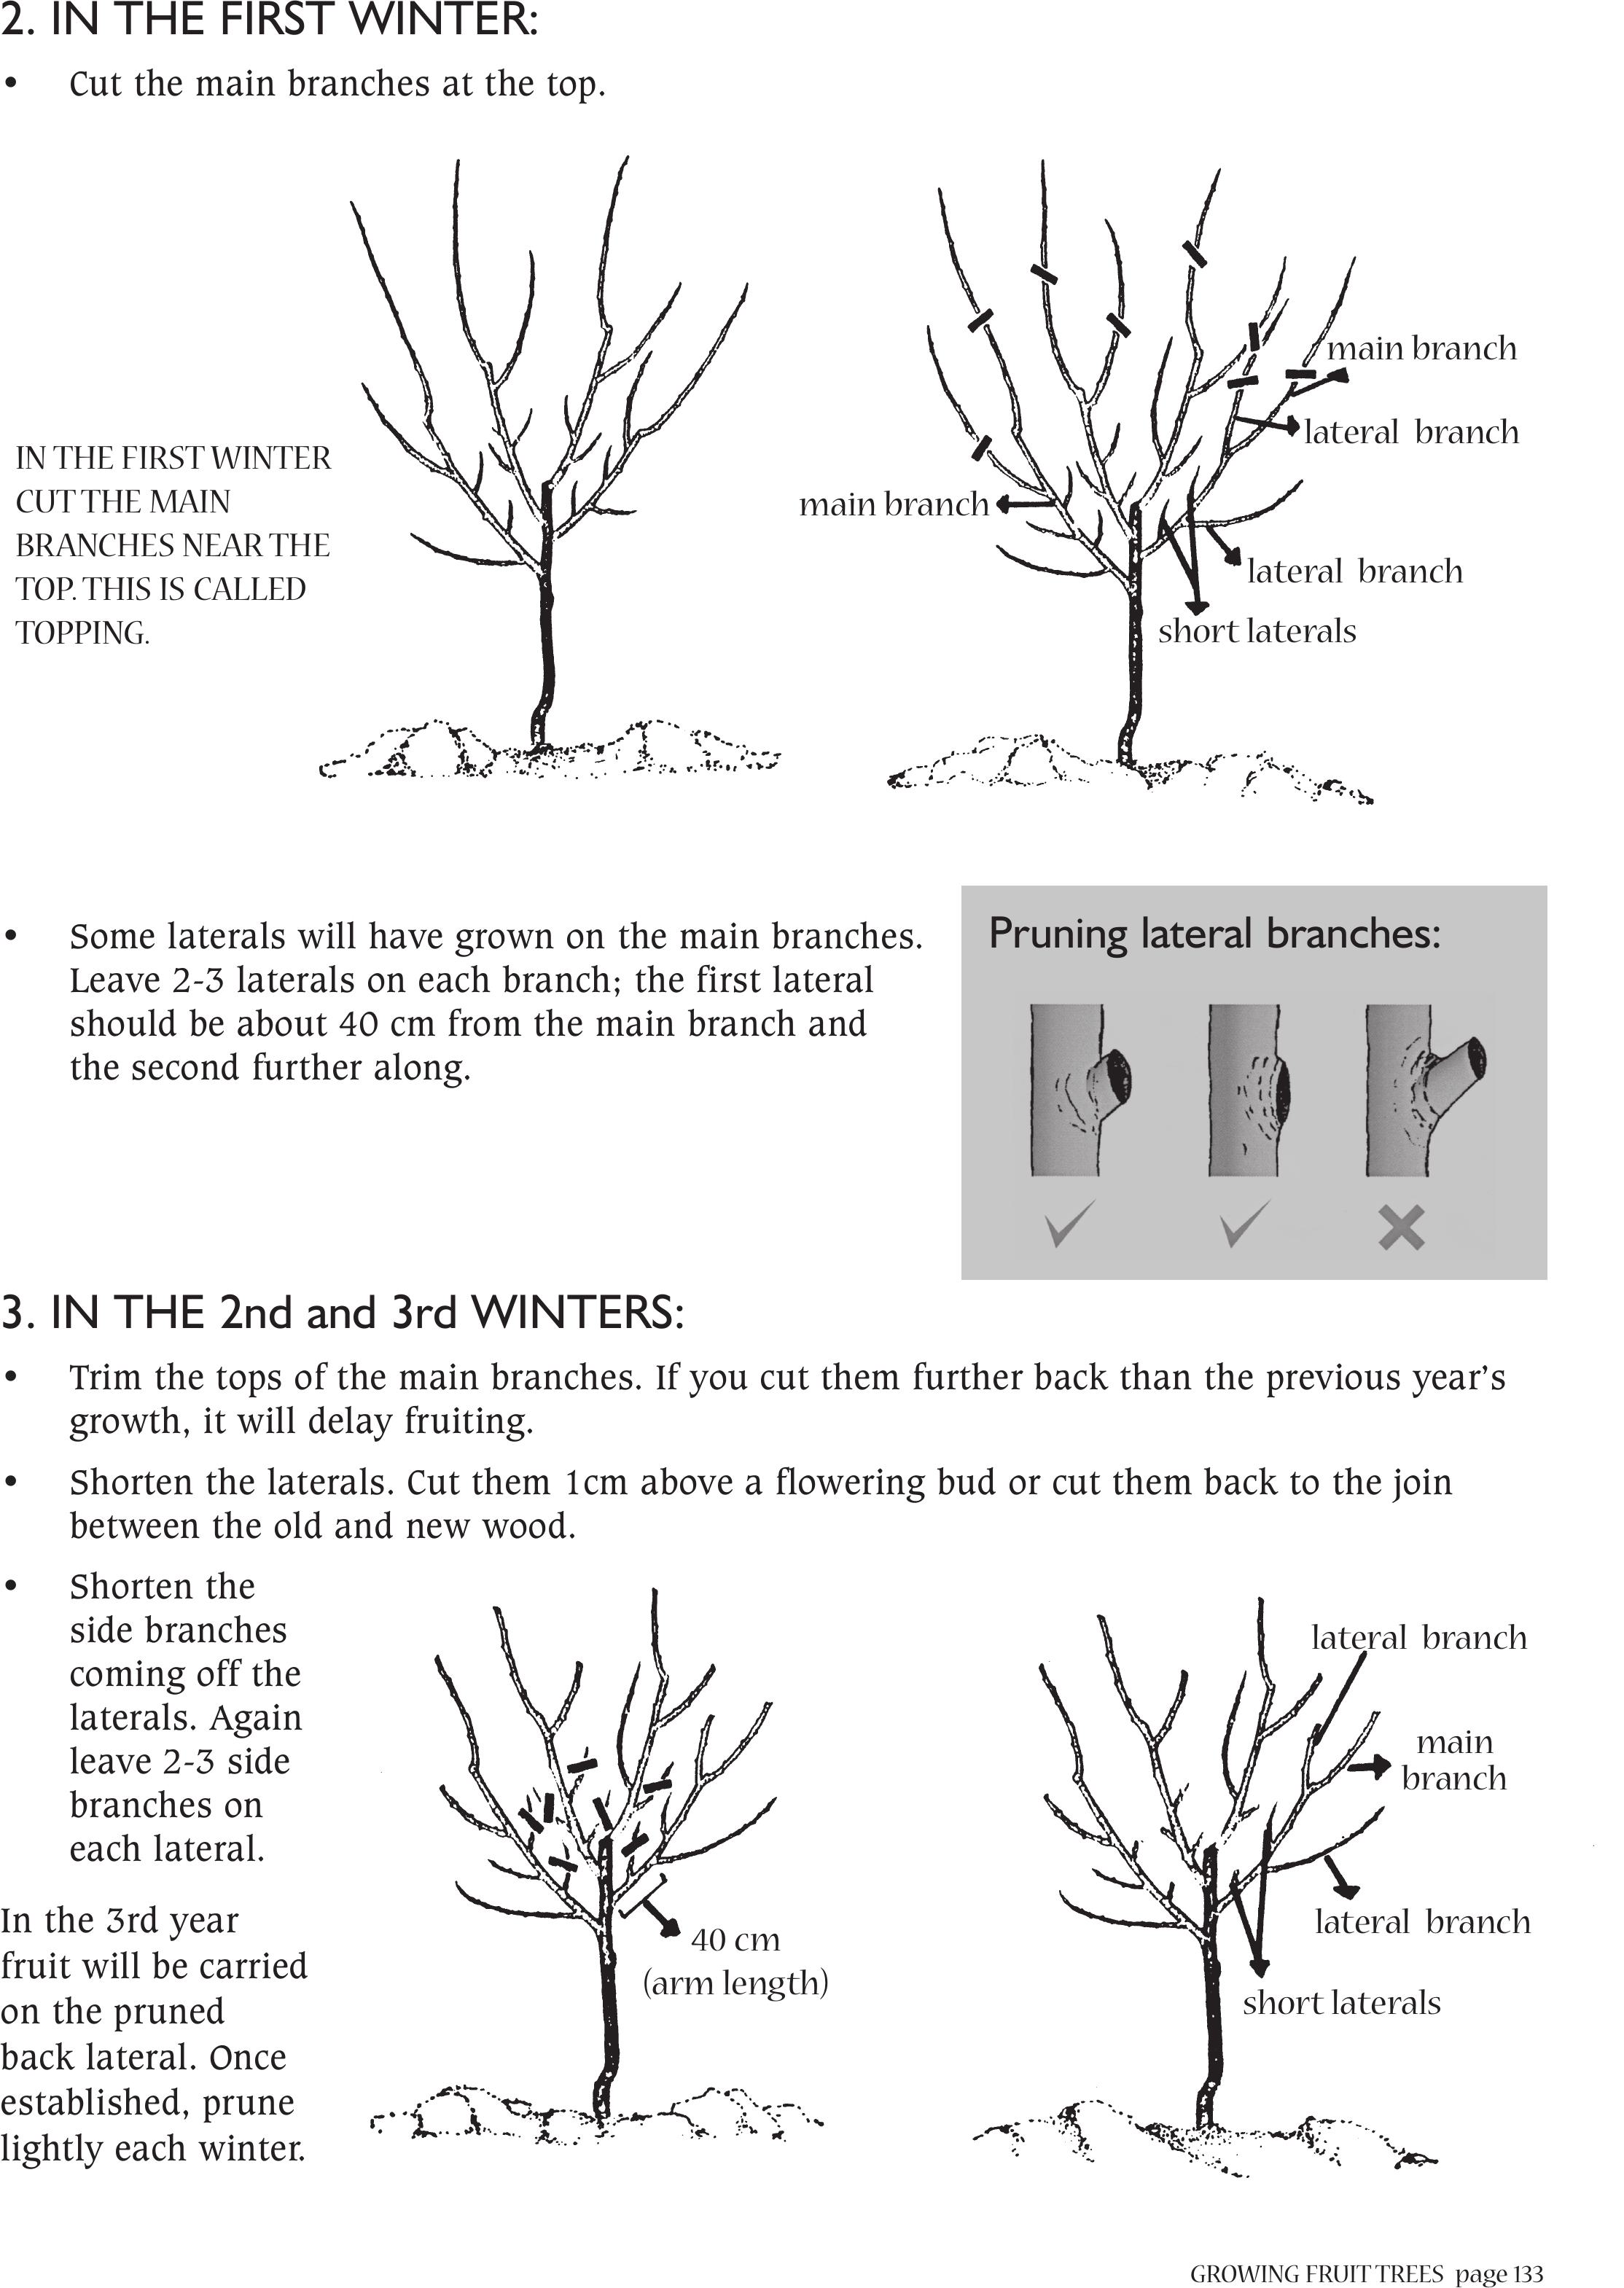
GROWING FRUIT TREESpage 133
2. IN THE FIRST WINTER:
• Cut the main branches at the top.
• Some laterals will have grown on the main branches.
Leave 2-3 laterals on each branch; the first lateral
should be about 40 cm from the main branch and
the second further along.
3. IN THE 2nd and 3rd WINTERS:
• Trim the tops of the main branches. If you cut them further back than the previous year’s
growth, it will delay fruiting.
• Shorten the laterals. Cut them 1cm above a flowering bud or cut them back to the join
between the old and new wood.
• Shorten the
side branches
coming off the
laterals. Again
leave 2-3 side
branches on
each lateral.
In the 3rd year
fruit will be carried
on the pruned
back lateral. Once
established, prune
lightly each winter.
Pruning lateral branches:
IN THE FIRST WINTER
CUT THE MAIN
BRANCHES NEAR THE
TOP. THIS IS CALLED
TOPPING.
main branch
main branch
lateral branch
lateral branch
short laterals
40 cm
(arm length)
lateral branch
lateral branch
short laterals
main
branch
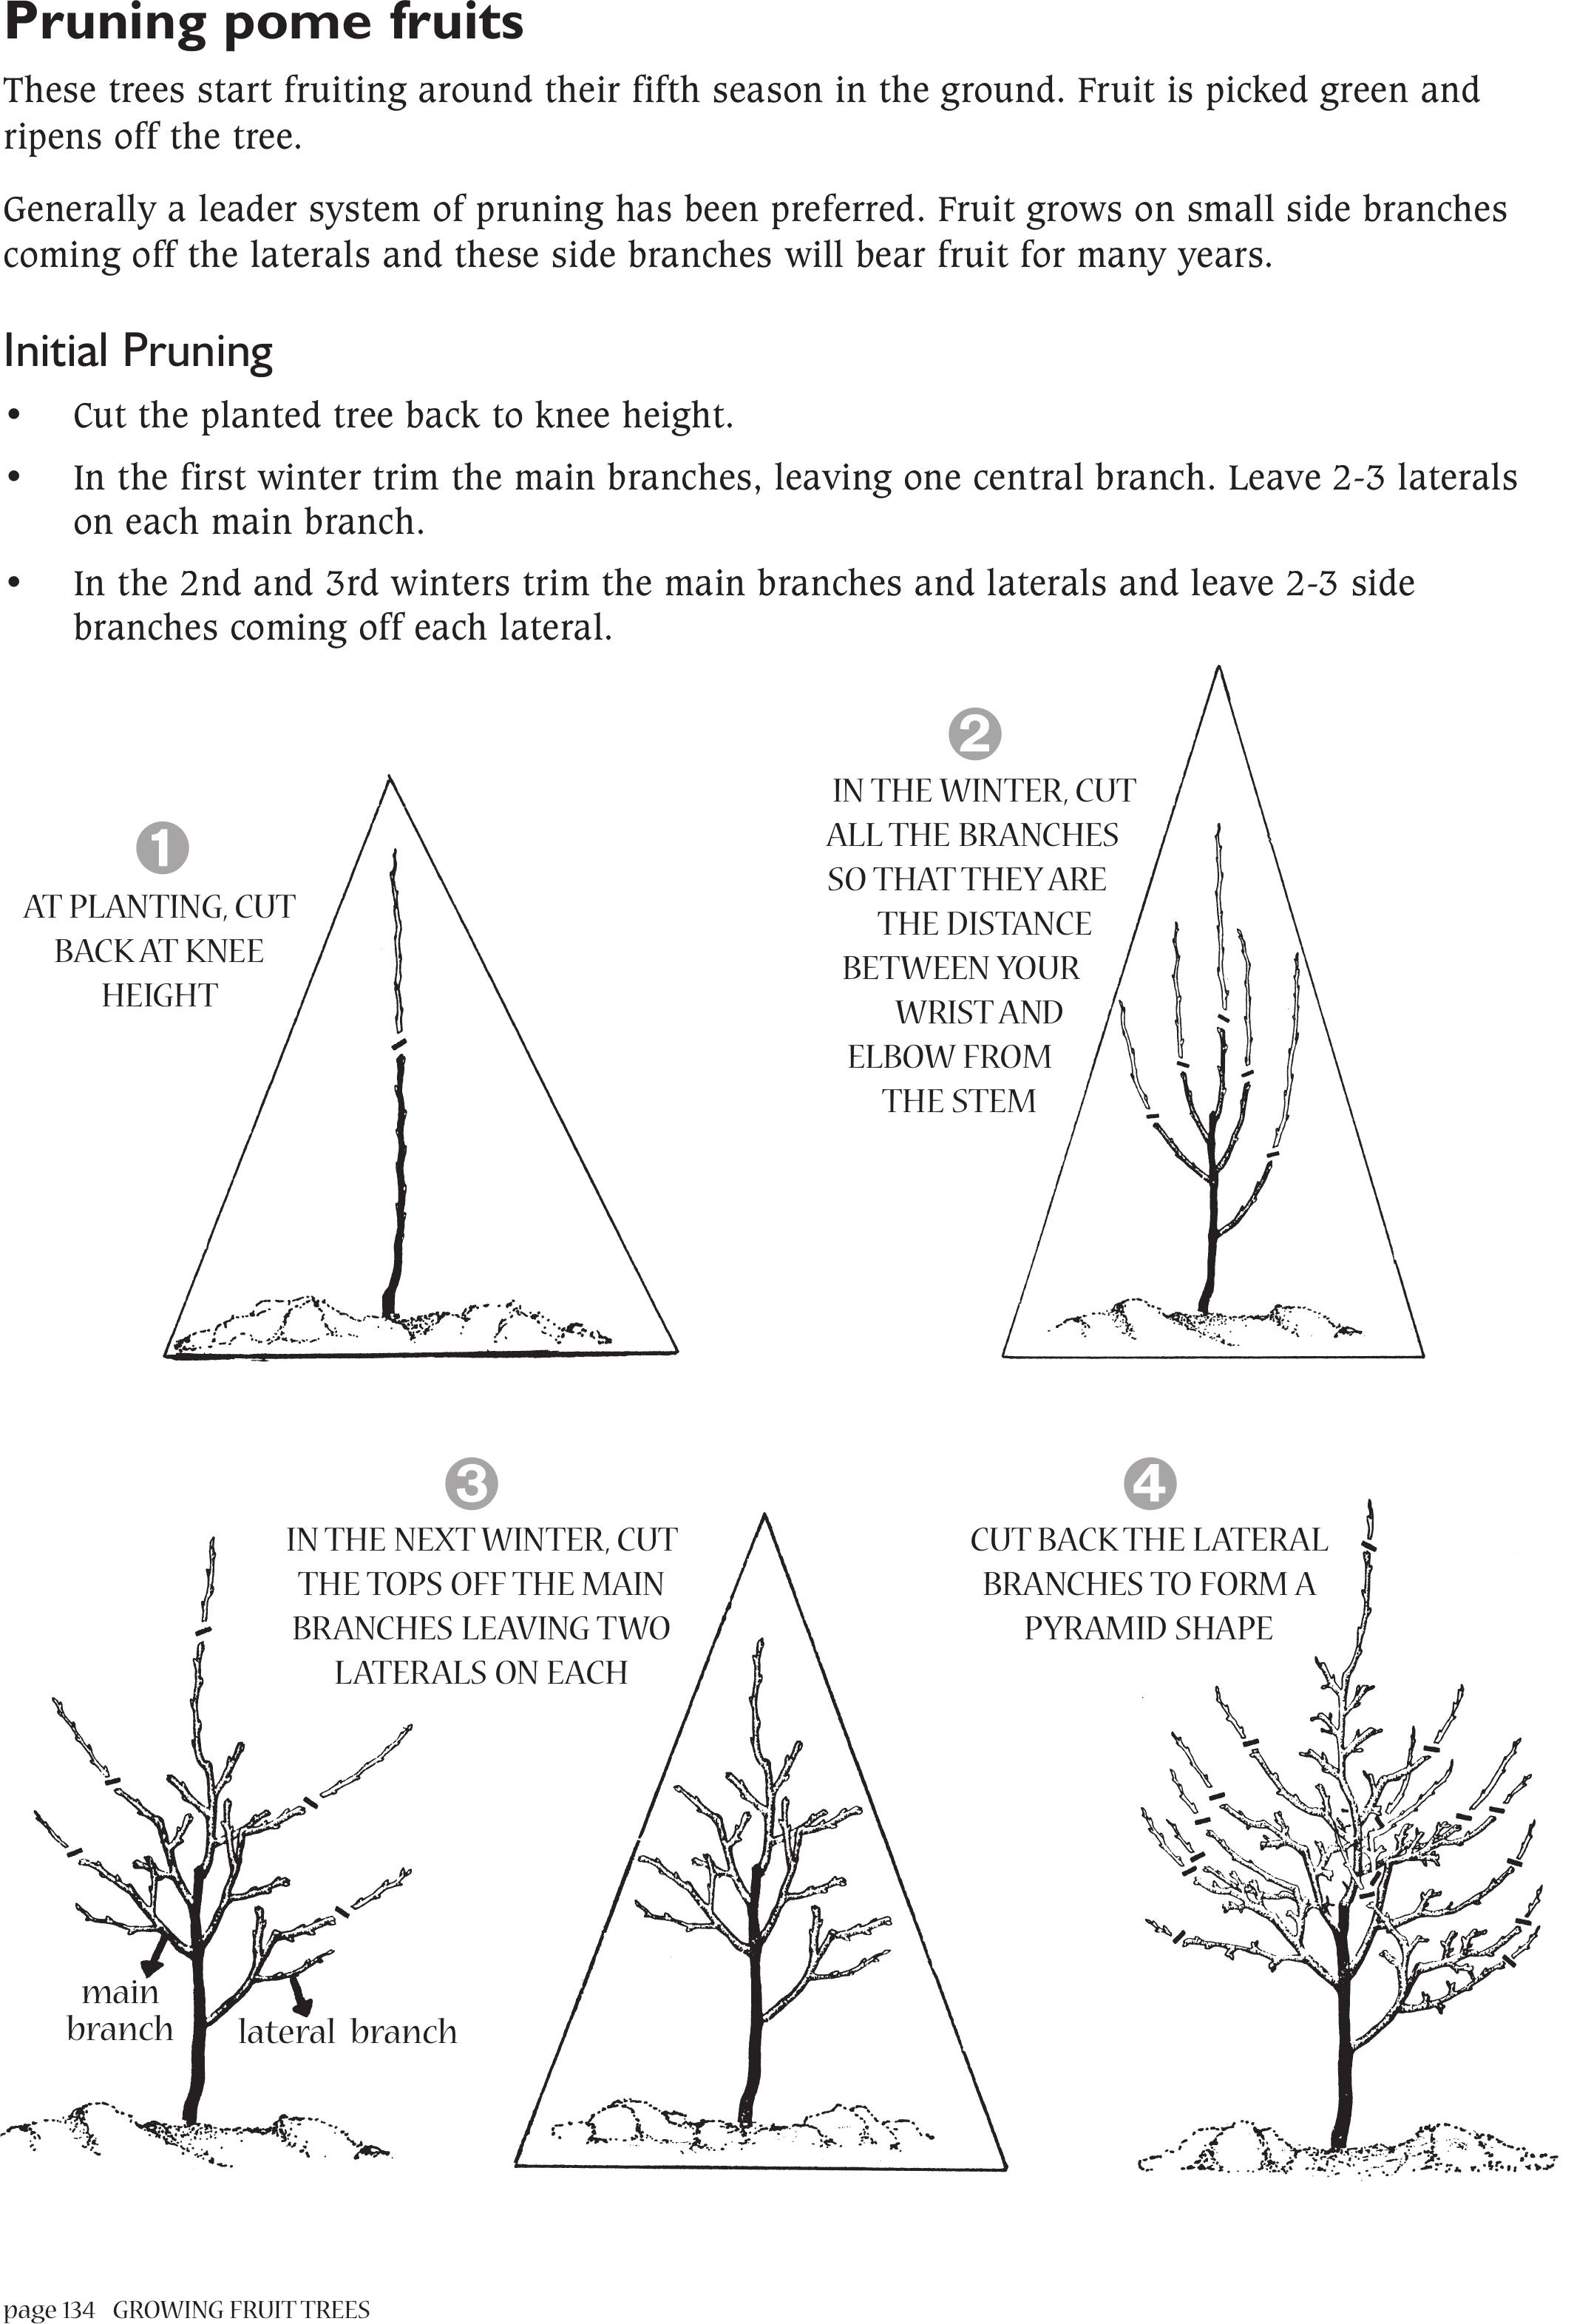
page 134 GROWING FRUIT TREES
Pruning pome fruits
These trees start fruiting around their fifth season in the ground. Fruit is picked green and
ripens off the tree.
Generally a leader system of pruning has been preferred. Fruit grows on small side branches
coming off the laterals and these side branches will bear fruit for many years.
Initial Pruning
• Cut the planted tree back to knee height.
• In the first winter trim the main branches, leaving one central branch. Leave 2-3 laterals
on each main branch.
• In the 2nd and 3rd winters trim the main branches and laterals and leave 2-3 side
branches coming off each lateral.
AT PLANTING, CUT
BACK AT KNEE
HEIGHT
IN THE NEXT WINTER, CUT
THE TOPS OFF THE MAIN
BRANCHES LEAVING TWO
LATERALS ON EACH
CUT BACK THE LATERAL
BRANCHES TO FORM A
PYRAMID SHAPE
IN THE WINTER,CUT
ALL THE BRANCHES
SO THAT THEY ARE
THE DISTANCE
BETWEEN YOUR
WRIST AND
ELBOW FROM
THE STEM
lateral branch
main
branch

GROWING FRUIT TREESpage 135
Pruning grapes
Grapes form fruit on one year old canes (the present year’s growth) that are growing off two
year old canes. If they are growing off older wood they will not always bear a lot of fruit.
• In the first winter, cut the vine to about 30 cm high.
• In the 2nd winter, prune the vine hard to leave 3-4 main branches that are about 30-40 cm
long.
• Retain well positioned shoots for the development of the secondary limbs/canes.
• In the 3rd and subsequent years, remove about 2/3 of the annual growth.

page 136
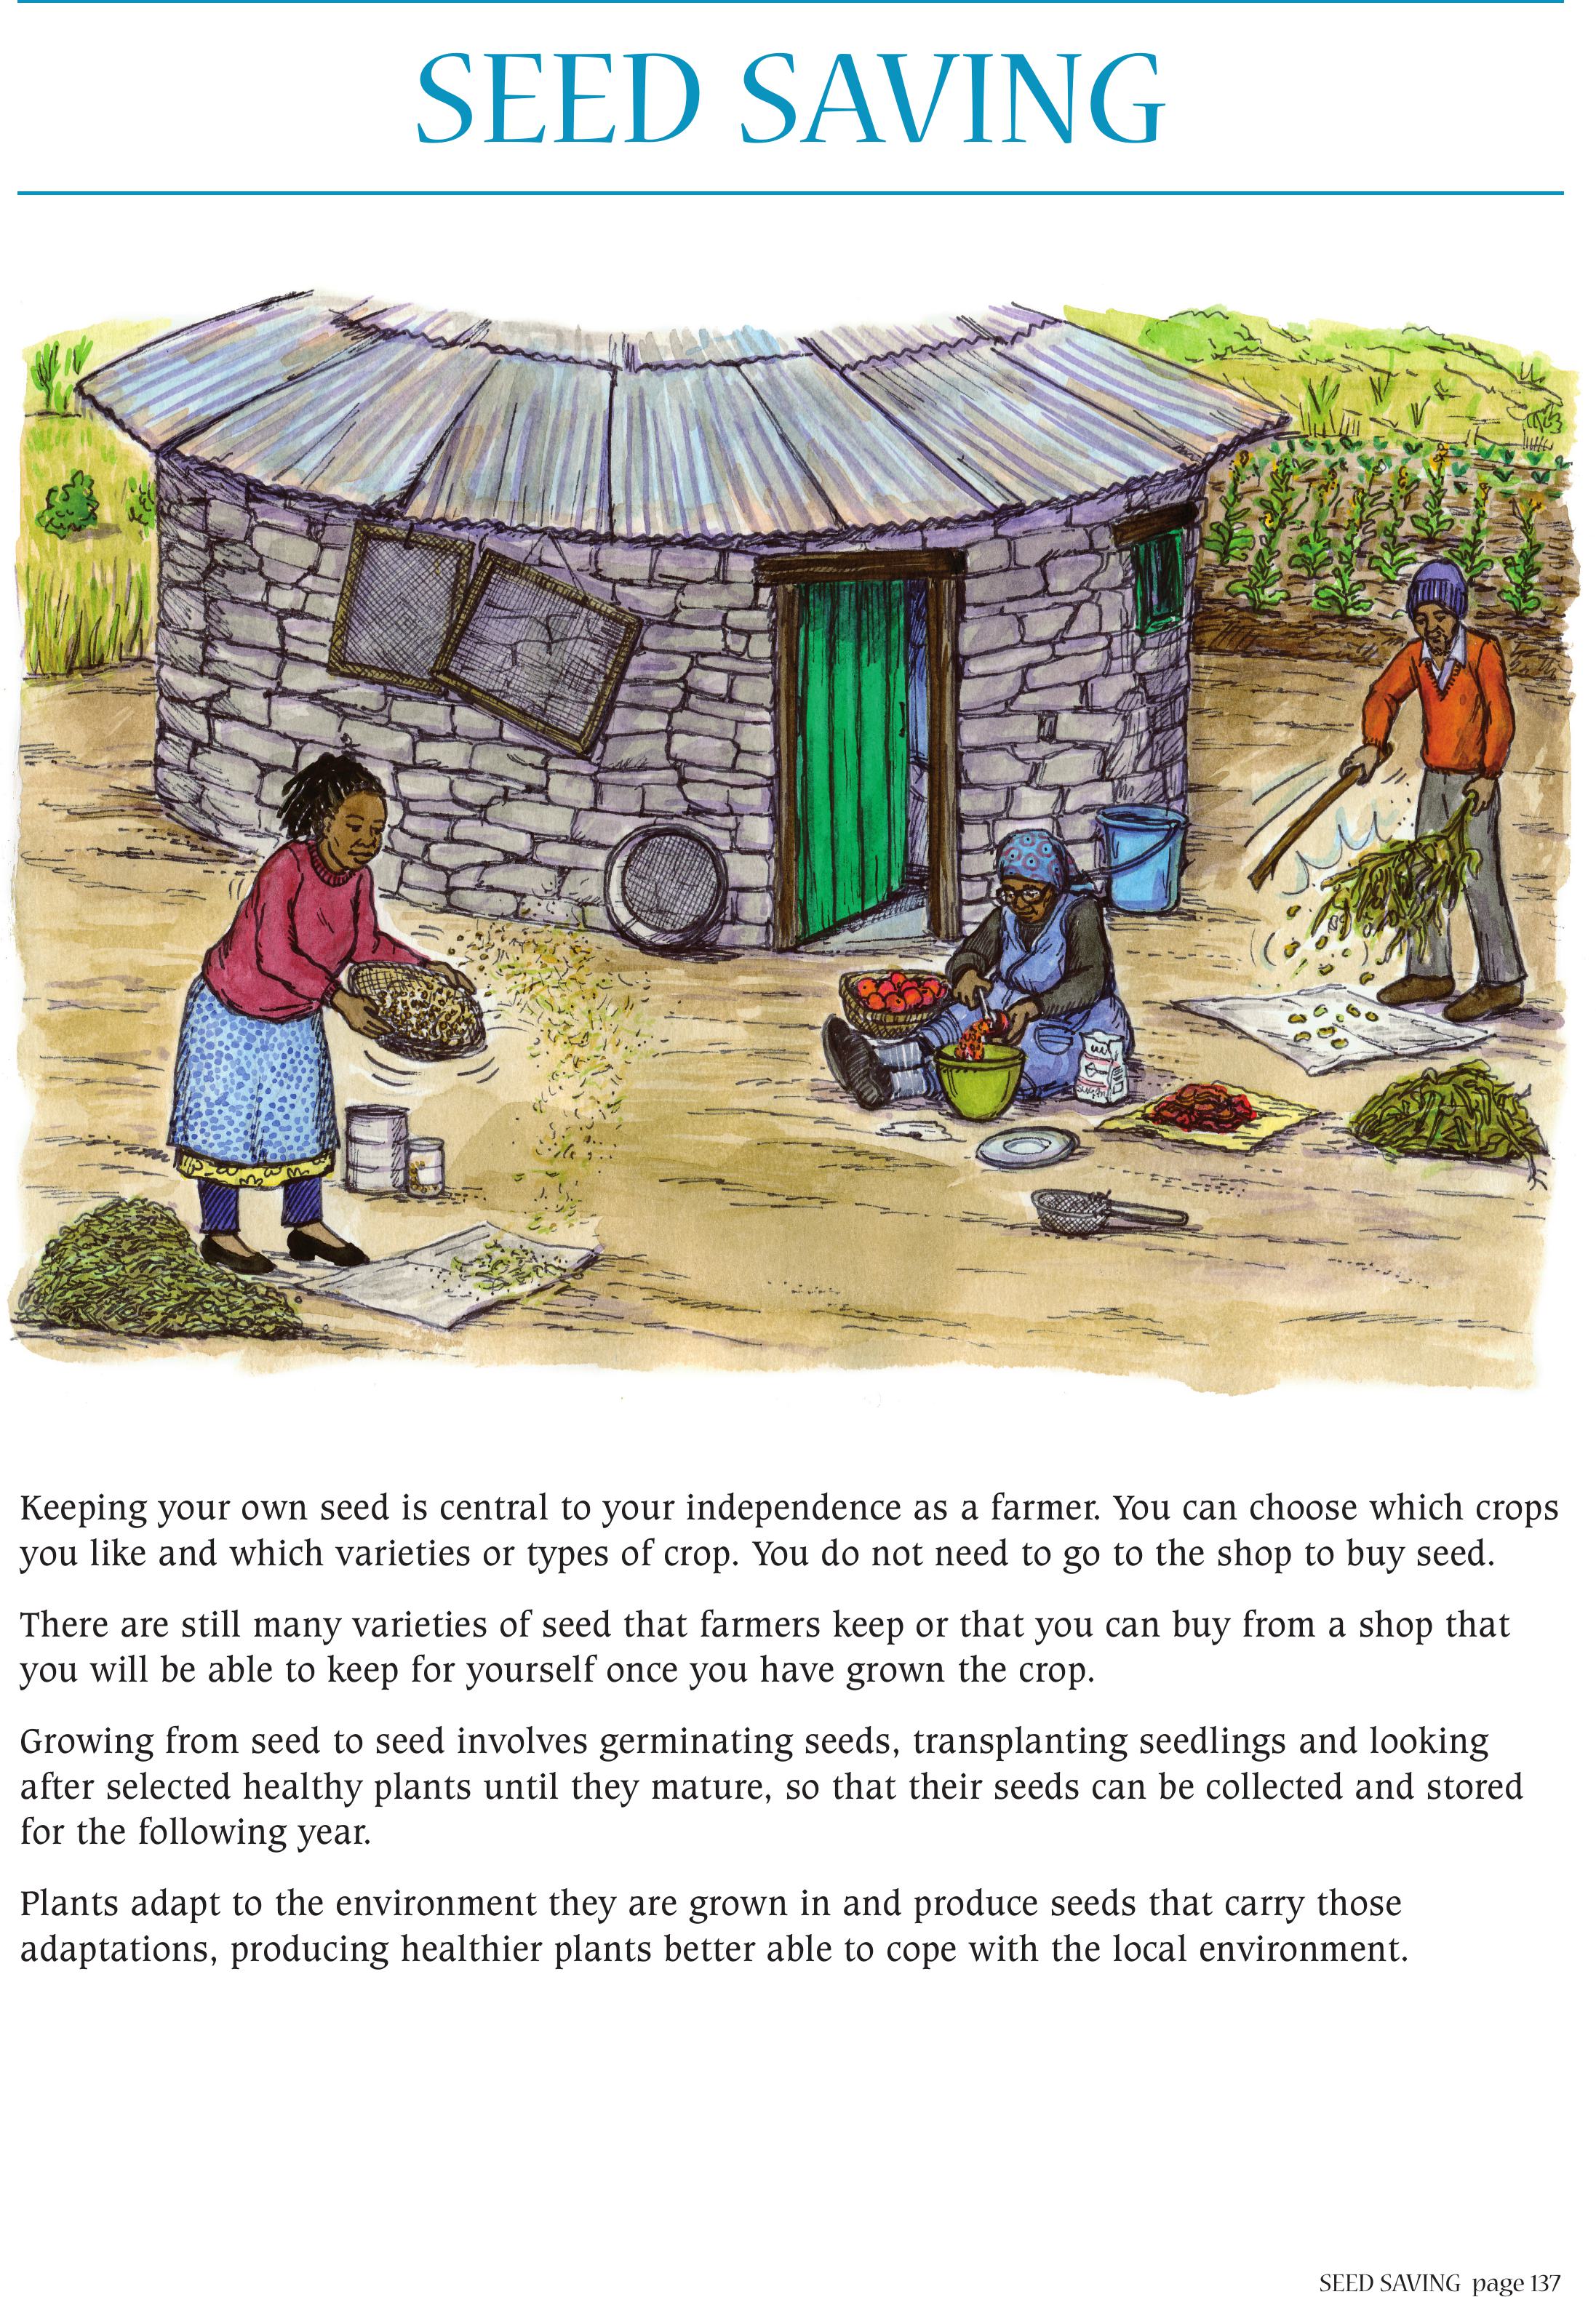
SEED SAVINGpage 137
Keeping your own seed is central to your independence as a farmer. You can choose which crops
you like and which varieties or types of crop. You do not need to go to the shop to buy seed.
There are still many varieties of seed that farmers keep or that you can buy from a shop that
you will be able to keep for yourself once you have grown the crop.
Growing from seed to seed involves germinating seeds, transplanting seedlings and looking
after selected healthy plants until they mature, so that their seeds can be collected and stored
for the following year.
Plants adapt to the environment they are grown in and produce seeds that carry those
adaptations, producing healthier plants better able to cope with the local environment.
SEED SAVING
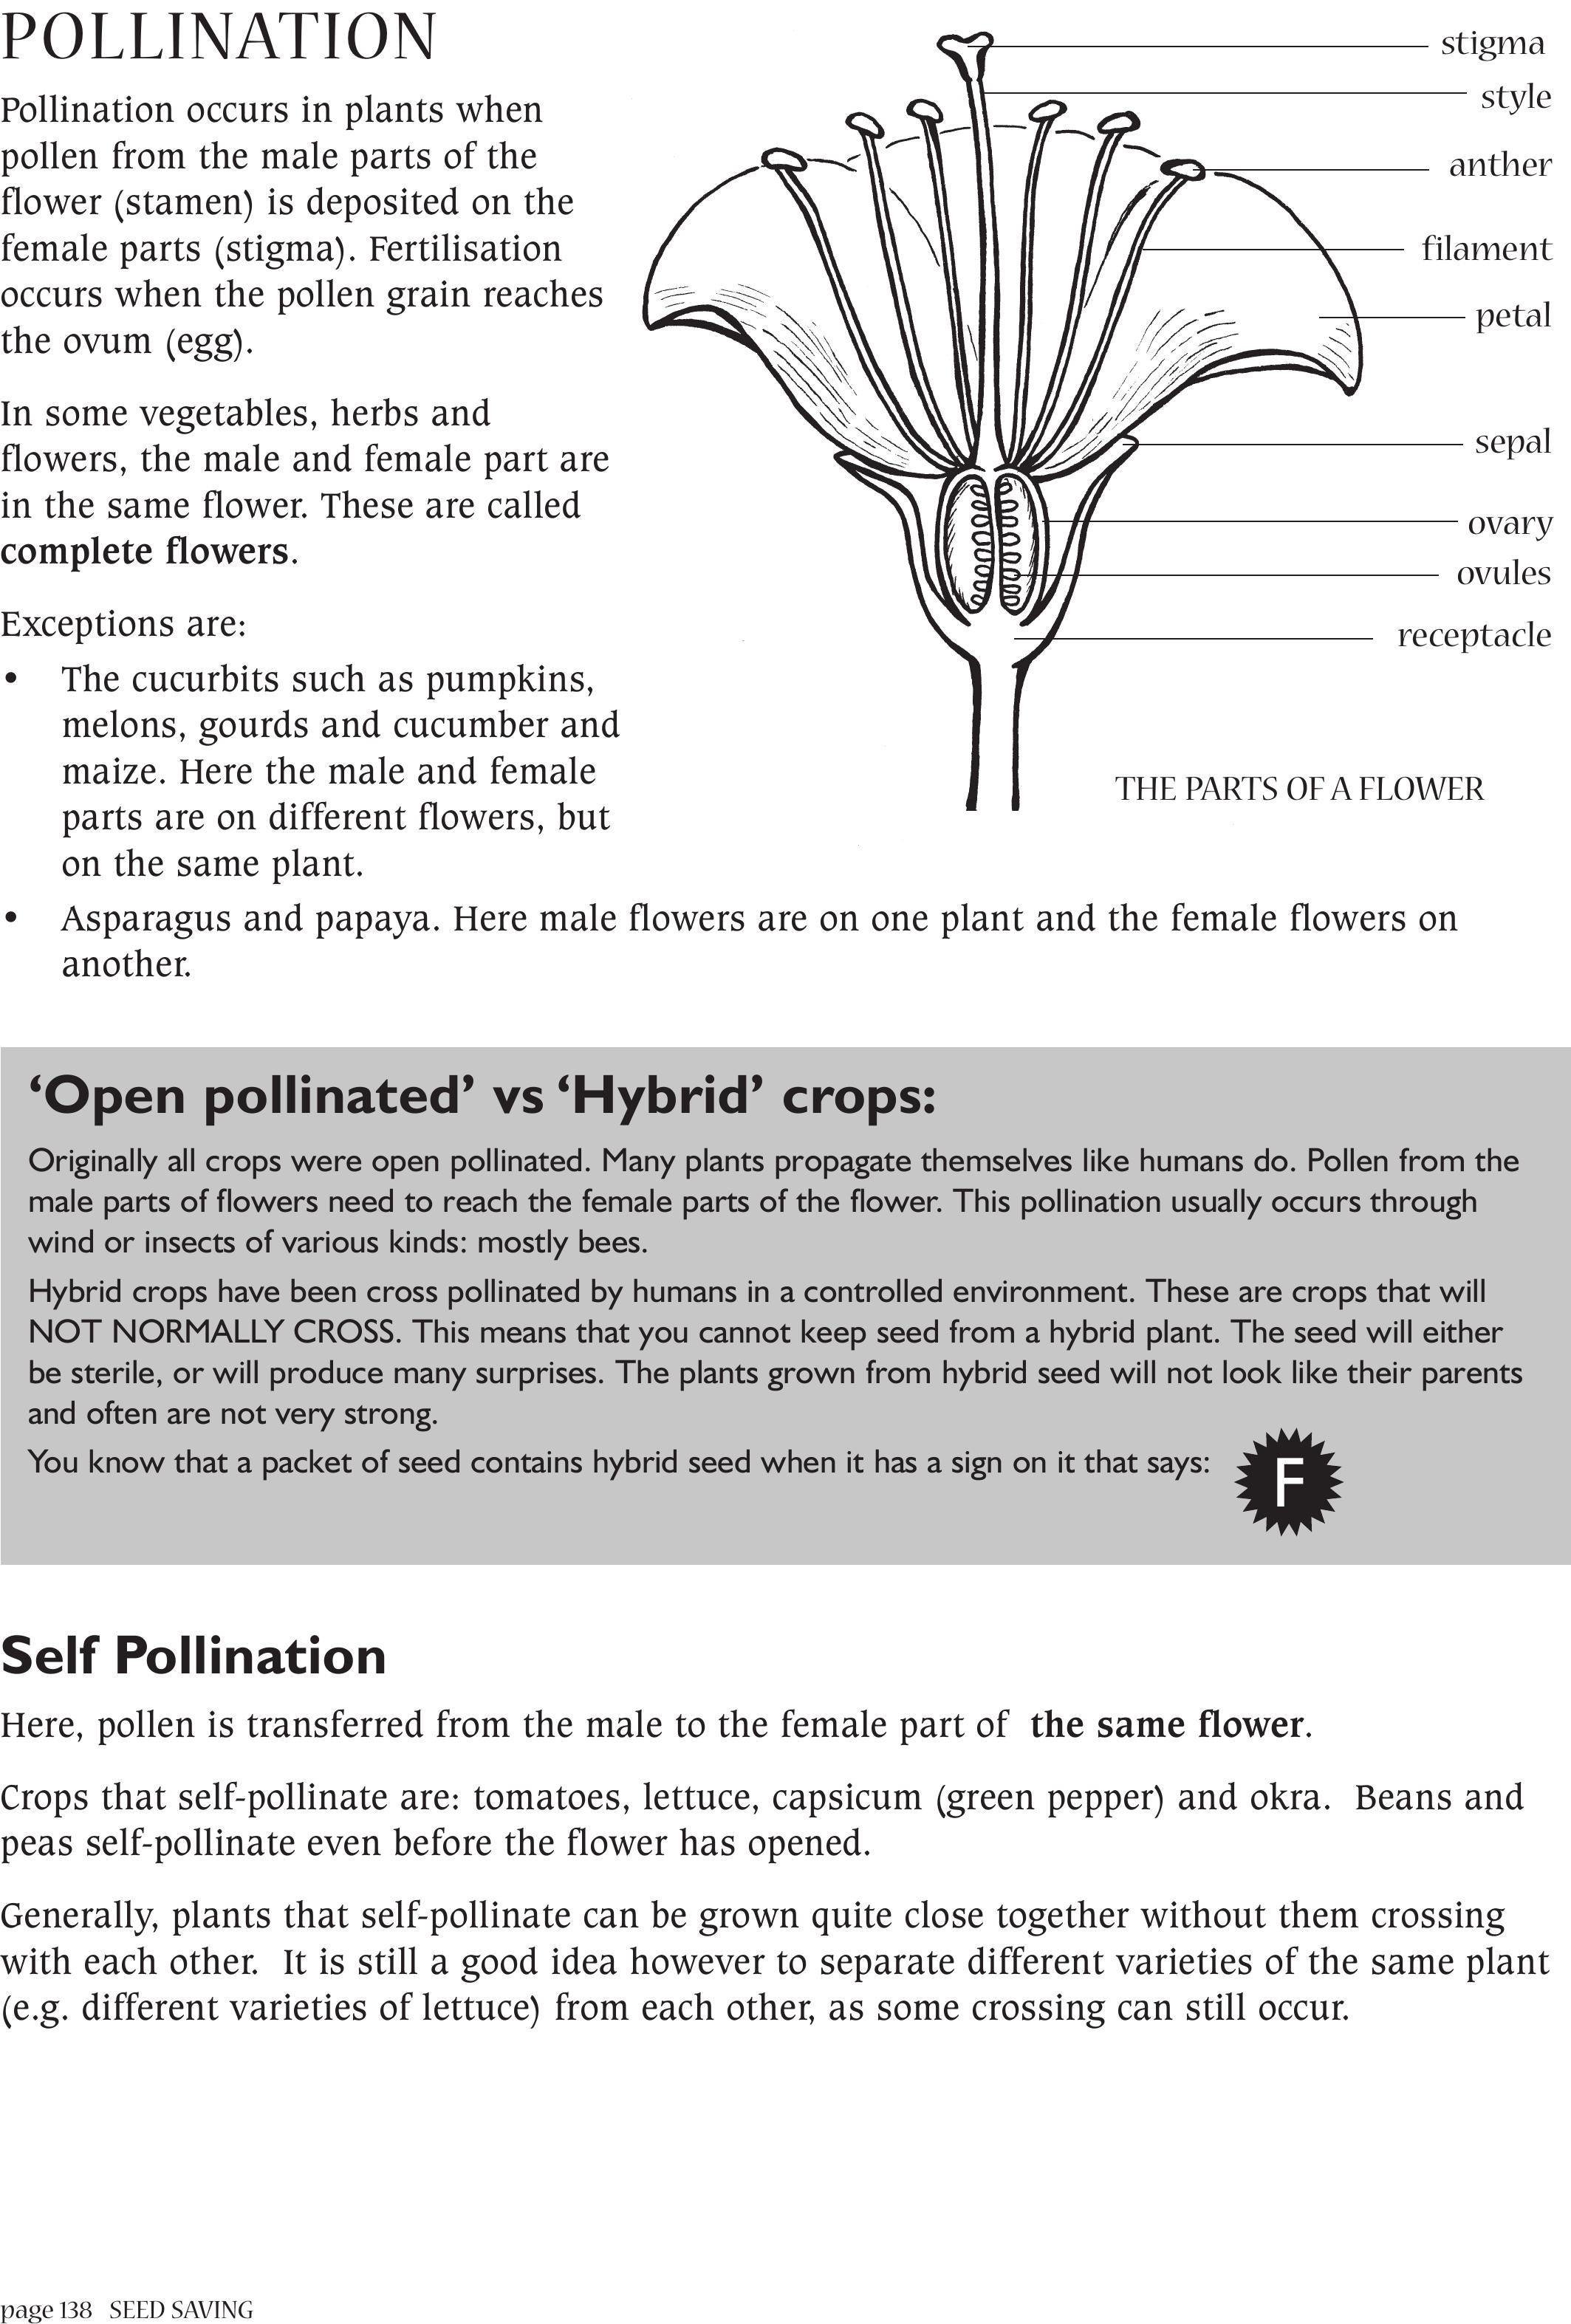
page 138 SEED SAVING
POLLINATION
Pollination occurs in plants when
pollen from the male parts of the
flower (stamen) is deposited on the
female parts (stigma). Fertilisation
occurs when the pollen grain reaches
the ovum (egg).
In some vegetables, herbs and
flowers, the male and female part are
in the same flower. These are called
complete flowers.
Exceptions are:
• The cucurbits such as pumpkins,
melons, gourds and cucumber and
maize. Here the male and female
parts are on different flowers, but
on the same plant.
• Asparagus and papaya. Here male flowers are on one plant and the female flowers on
another.
‘Open pollinated’ vs ‘Hybrid’ crops:
Originally all crops were open pollinated. Many plants propagate themselves like humans do. Pollen from the
male parts of flowers need to reach the female parts of the flower. This pollination usually occurs through
wind or insects of various kinds: mostly bees.
Hybrid crops have been cross pollinated by humans in a controlled environment. These are crops that will
NOT NORMALLY CROSS. This means that you cannot keep seed from a hybrid plant. The seed will either
be sterile, or will produce many surprises. The plants grown from hybrid seed will not look like their parents
and often are not very strong.
You know that a packet of seed contains hybrid seed when it has a sign on it that says:F
Self Pollination
Here, pollen is transferred from the male to the female part of the same flower.
Crops that self-pollinate are: tomatoes, lettuce, capsicum (green pepper) and okra. Beans and
peas self-pollinate even before the flower has opened.
Generally, plants that self-pollinate can be grown quite close together without them crossing
with each other. It is still a good idea however to separate different varieties of the same plant
(e.g. different varieties of lettuce) from each other, as some crossing can still occur.
stigma
style
anther
filament
petal
sepal
ovary
ovules
receptacle
THE PARTS OF A FLOWER
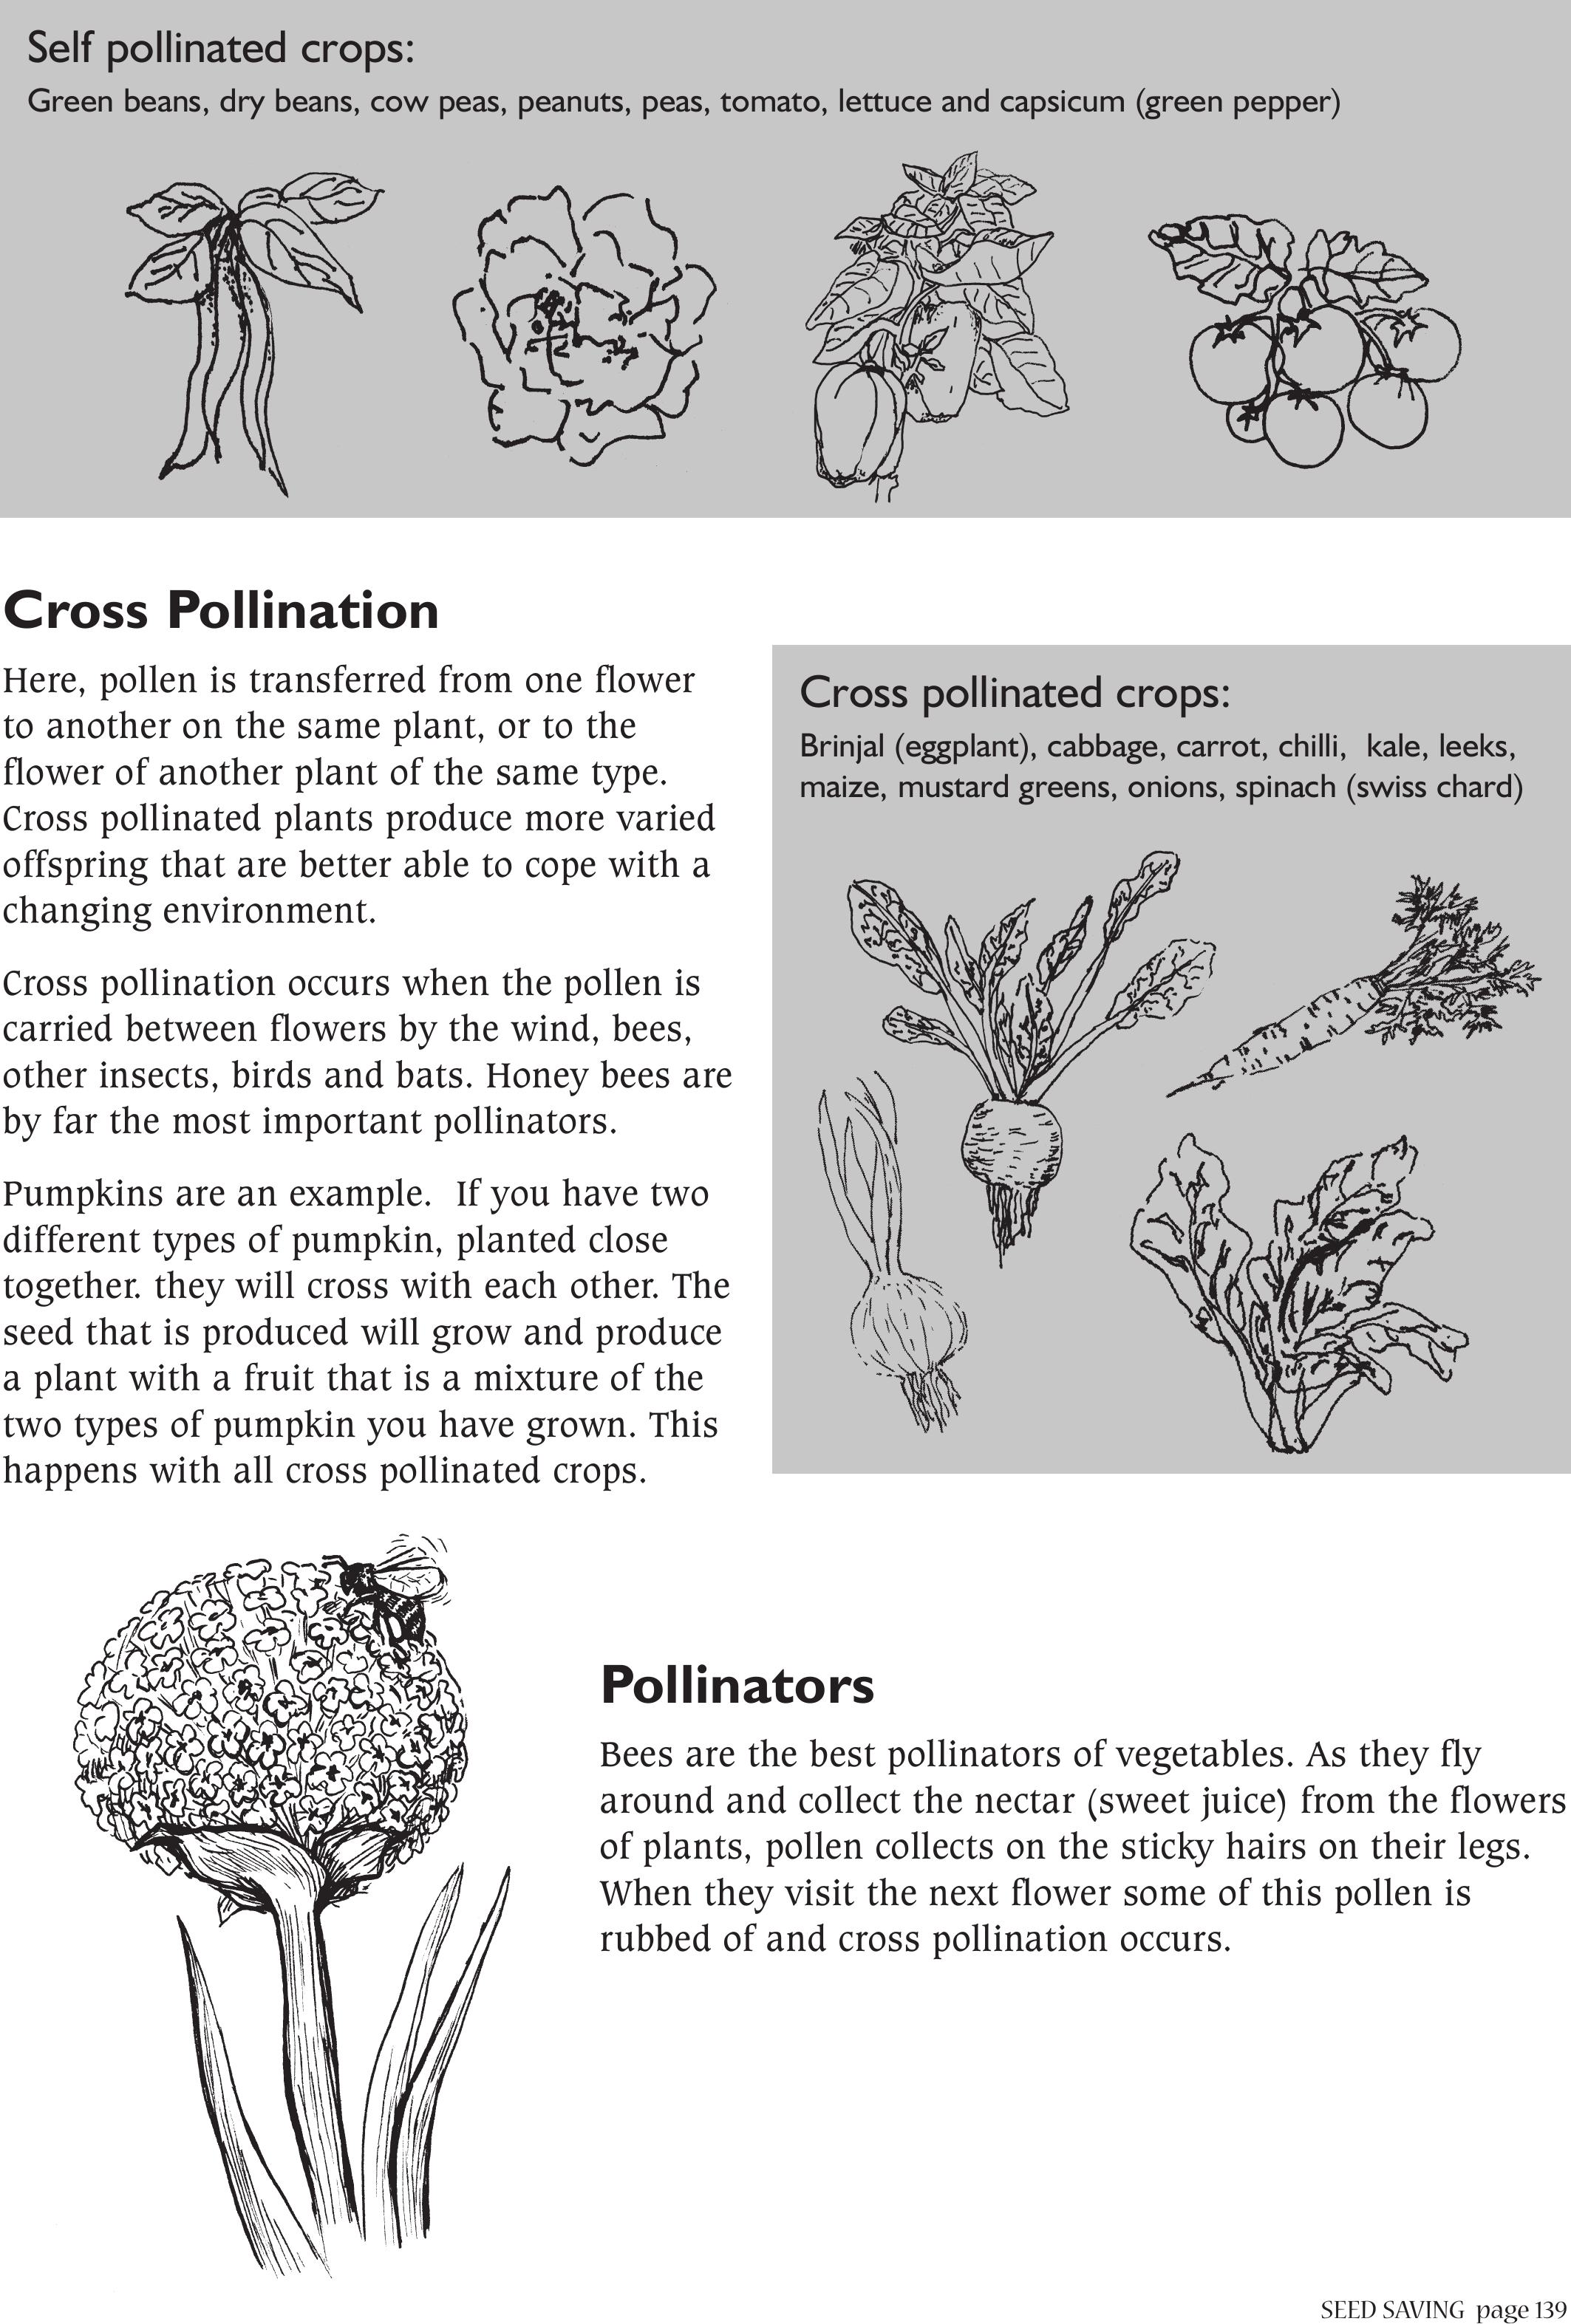
SEED SAVINGpage 139
Cross Pollination
Here, pollen is transferred from one flower
to another on the same plant, or to the
flower of another plant of the same type.
Cross pollinated plants produce more varied
offspring that are better able to cope with a
changing environment.
Cross pollination occurs when the pollen is
carried between flowers by the wind, bees,
other insects, birds and bats. Honey bees are
by far the most important pollinators.
Pumpkins are an example. If you have two
different types of pumpkin, planted close
together. they will cross with each other. The
seed that is produced will grow and produce
a plant with a fruit that is a mixture of the
two types of pumpkin you have grown. This
happens with all cross pollinated crops.
Pollinators
Bees are the best pollinators of vegetables. As they fly
around and collect the nectar (sweet juice) from the flowers
of plants, pollen collects on the sticky hairs on their legs.
When they visit the next flower some of this pollen is
rubbed of and cross pollination occurs.
Self pollinated crops:
Green beans, dry beans, cow peas, peanuts, peas, tomato, lettuce and capsicum (green pepper)
Cross pollinated crops:
Brinjal (eggplant), cabbage, carrot, chilli, kale, leeks,
maize, mustard greens, onions, spinach (swiss chard)
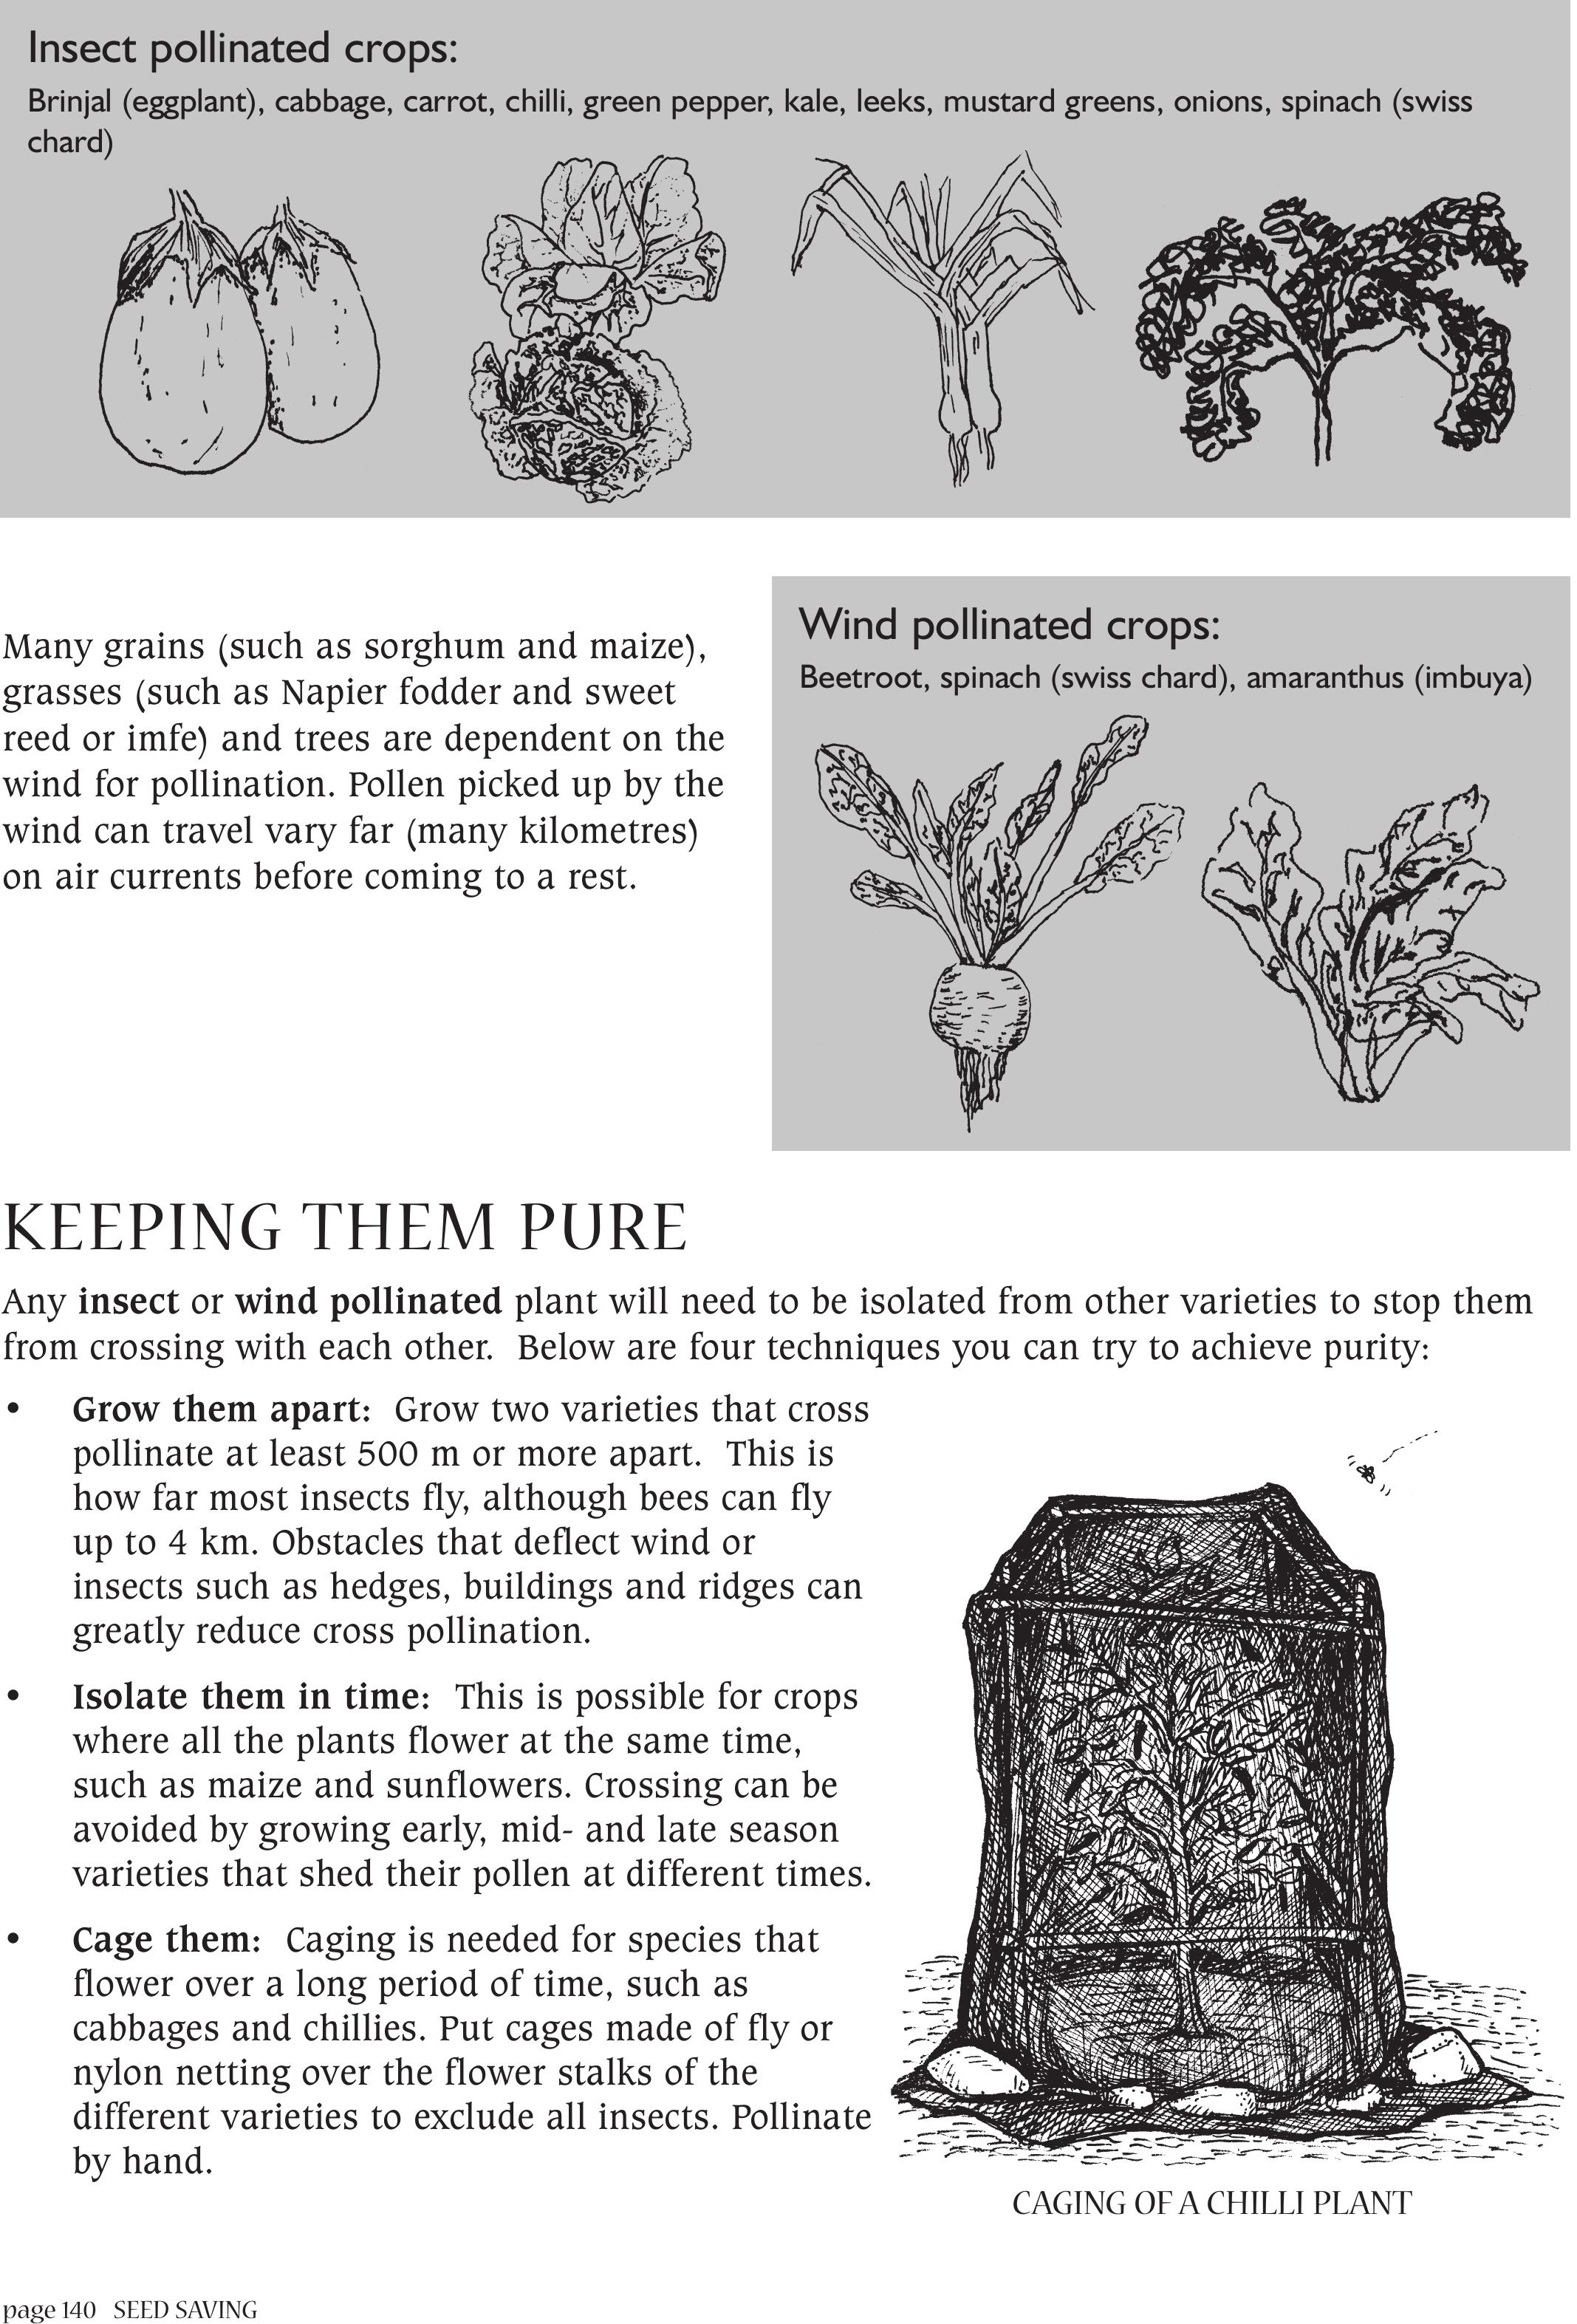
page 140 SEED SAVING
Many grains (such as sorghum and maize),
grasses (such as Napier fodder and sweet
reed or imfe) and trees are dependent on the
wind for pollination. Pollen picked up by the
wind can travel vary far (many kilometres)
on air currents before coming to a rest.
KEEPING THEM PURE
Any insect or wind pollinated plant will need to be isolated from other varieties to stop them
from crossing with each other. Below are four techniques you can try to achieve purity:
• Grow them apart: Grow two varieties that cross
pollinate at least 500 m or more apart. This is
how far most insects fly, although bees can fly
up to 4 km. Obstacles that deflect wind or
insects such as hedges, buildings and ridges can
greatly reduce cross pollination.
• Isolate them in time: This is possible for crops
where all the plants flower at the same time,
such as maize and sunflowers. Crossing can be
avoided by growing early, mid- and late season
varieties that shed their pollen at different times.
• Cage them: Caging is needed for species that
flower over a long period of time, such as
cabbages and chillies. Put cages made of fly or
nylon netting over the flower stalks of the
different varieties to exclude all insects. Pollinate
by hand.
Insect pollinated crops:
Brinjal (eggplant), cabbage, carrot, chilli, green pepper, kale, leeks, mustard greens, onions, spinach (swiss
chard)
Wind pollinated crops:
Beetroot, spinach (swiss chard), amaranthus (imbuya)
CAGING OF A CHILLI PLANT
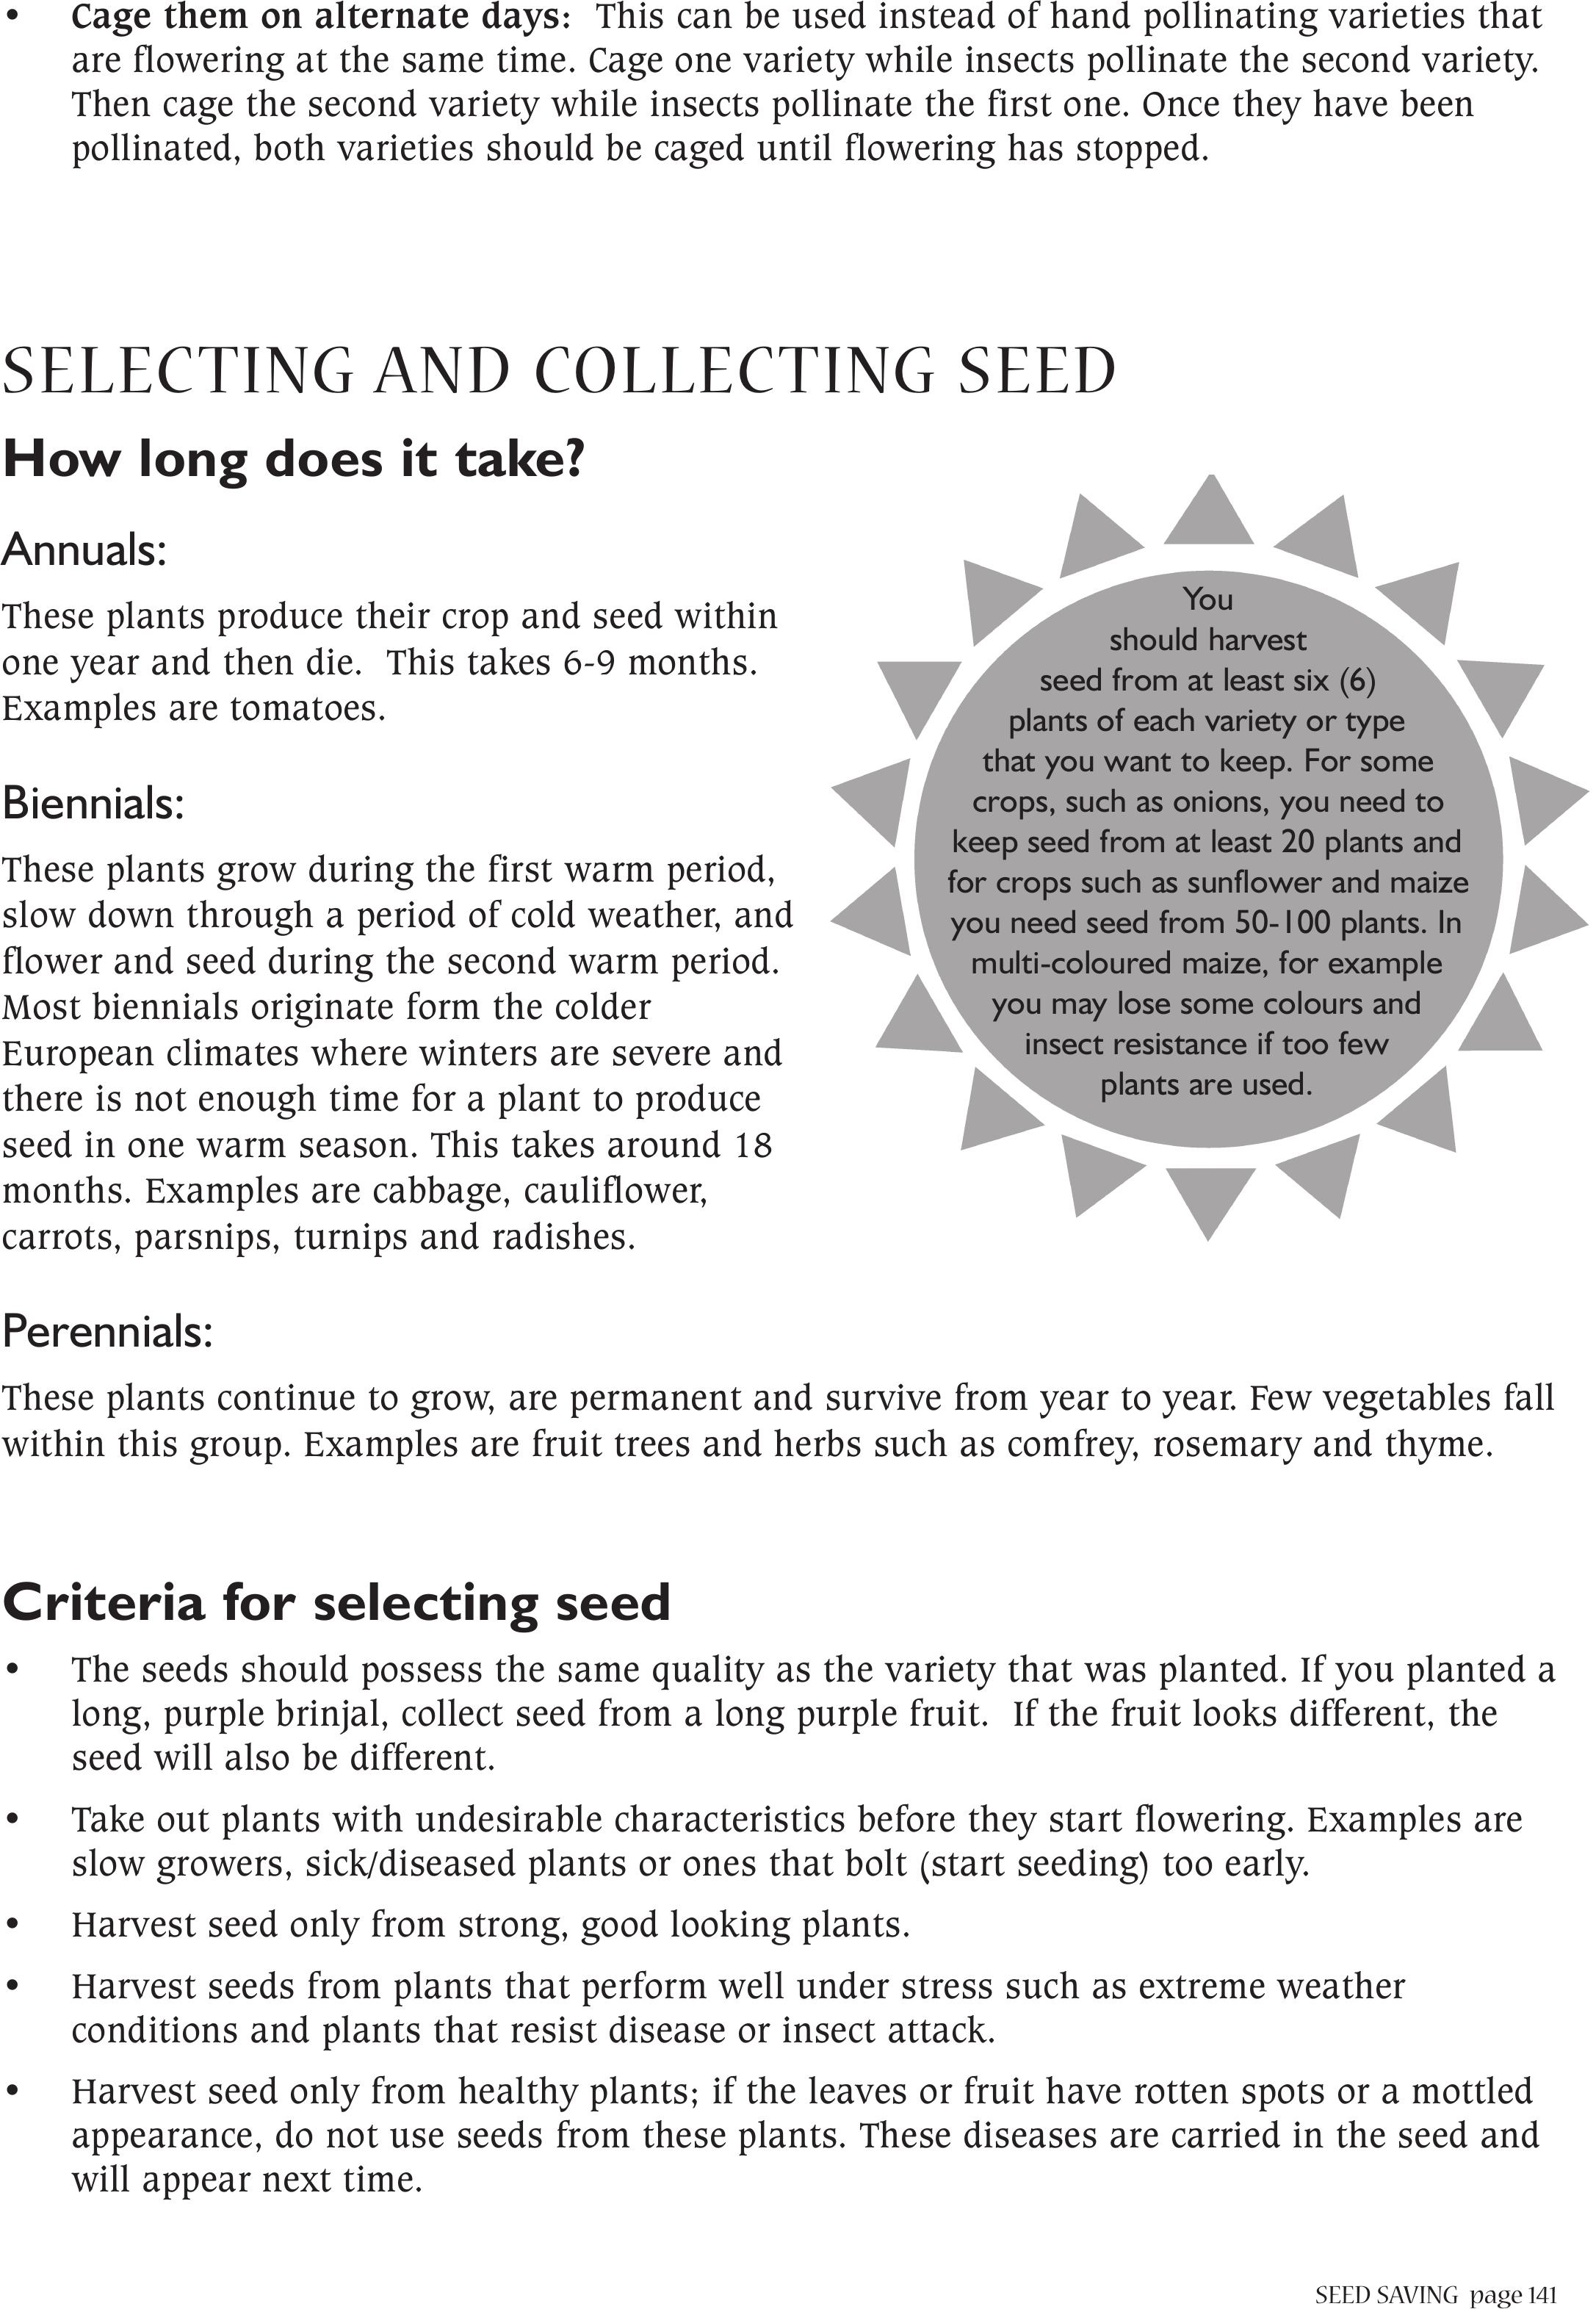
SEED SAVINGpage 141
• Cage them on alternate days: This can be used instead of hand pollinating varieties that
are flowering at the same time. Cage one variety while insects pollinate the second variety.
Then cage the second variety while insects pollinate the first one. Once they have been
pollinated, both varieties should be caged until flowering has stopped.
SELECTING AND COLLECTING SEED
How long does it take?
Annuals:
These plants produce their crop and seed within
one year and then die. This takes 6-9 months.
Examples are tomatoes.
Biennials:
These plants grow during the first warm period,
slow down through a period of cold weather, and
flower and seed during the second warm period.
Most biennials originate form the colder
European climates where winters are severe and
there is not enough time for a plant to produce
seed in one warm season. This takes around 18
months. Examples are cabbage, cauliflower,
carrots, parsnips, turnips and radishes.
Perennials:
These plants continue to grow, are permanent and survive from year to year. Few vegetables fall
within this group. Examples are fruit trees and herbs such as comfrey, rosemary and thyme.
Criteria for selecting seed
• The seeds should possess the same quality as the variety that was planted. If you planted a
long, purple brinjal, collect seed from a long purple fruit. If the fruit looks different, the
seed will also be different.
• Take out plants with undesirable characteristics before they start flowering. Examples are
slow growers, sick/diseased plants or ones that bolt (start seeding) too early.
• Harvest seed only from strong, good looking plants.
• Harvest seeds from plants that perform well under stress such as extreme weather
conditions and plants that resist disease or insect attack.
• Harvest seed only from healthy plants; if the leaves or fruit have rotten spots or a mottled
appearance, do not use seeds from these plants. These diseases are carried in the seed and
will appear next time.
You
should harvest
seed from at least six (6)
plants of each variety or type
that you want to keep. For some
crops, such as onions, you need to
keep seed from at least 20 plants and
for crops such as sunflower and maize
you need seed from 50-100 plants. In
multi-coloured maize, for example
you may lose some colours and
insect resistance if too few
plants are used.
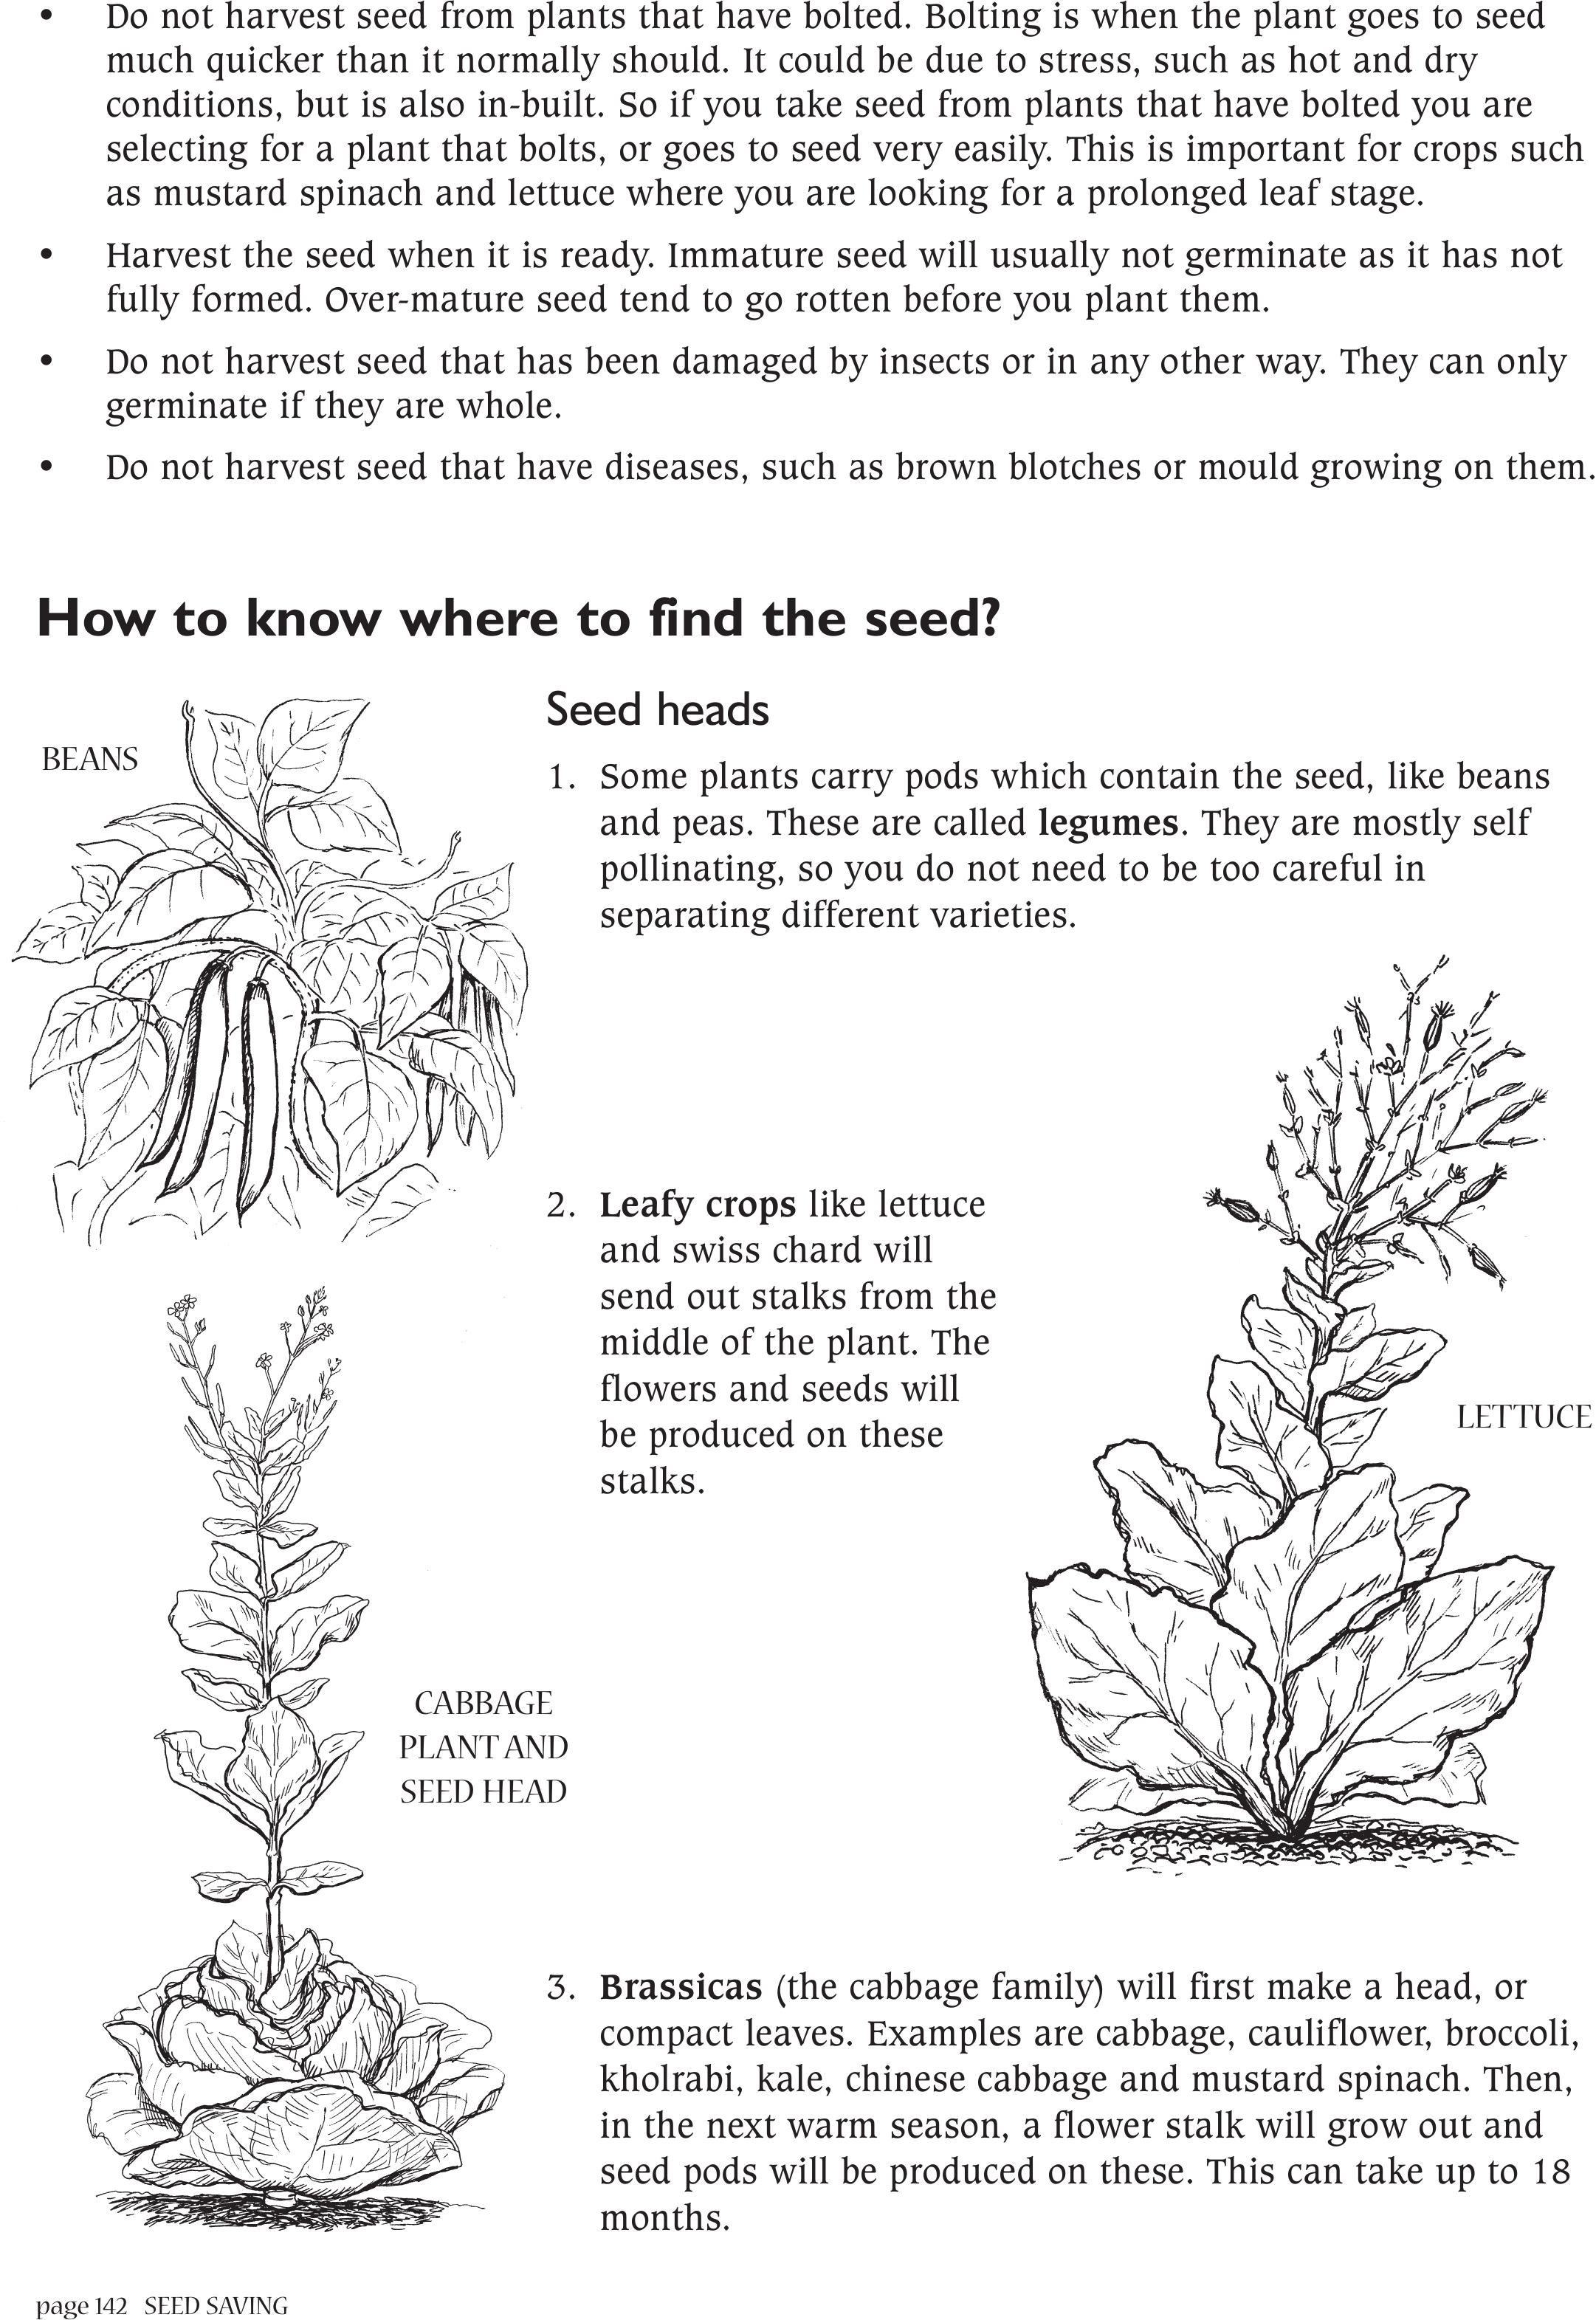
page 142 SEED SAVING
• Do not harvest seed from plants that have bolted. Bolting is when the plant goes to seed
much quicker than it normally should. It could be due to stress, such as hot and dry
conditions, but is also in-built. So if you take seed from plants that have bolted you are
selecting for a plant that bolts, or goes to seed very easily. This is important for crops such
as mustard spinach and lettuce where you are looking for a prolonged leaf stage.
• Harvest the seed when it is ready. Immature seed will usually not germinate as it has not
fully formed. Over-mature seed tend to go rotten before you plant them.
• Do not harvest seed that has been damaged by insects or in any other way. They can only
germinate if they are whole.
• Do not harvest seed that have diseases, such as brown blotches or mould growing on them.
How to know where to find the seed?
Seed heads
1. Some plants carry pods which contain the seed, like beans
and peas. These are called legumes. They are mostly self
pollinating, so you do not need to be too careful in
separating different varieties.
2. Leafy crops like lettuce
and swiss chard will
send out stalks from the
middle of the plant. The
flowers and seeds will
be produced on these
stalks.
3. Brassicas (the cabbage family) will first make a head, or
compact leaves. Examples are cabbage, cauliflower, broccoli,
kholrabi, kale, chinese cabbage and mustard spinach. Then,
in the next warm season, a flower stalk will grow out and
seed pods will be produced on these. This can take up to 18
months.
BEANS
LETTUCE
CABBAGE
PLANT AND
SEED HEAD
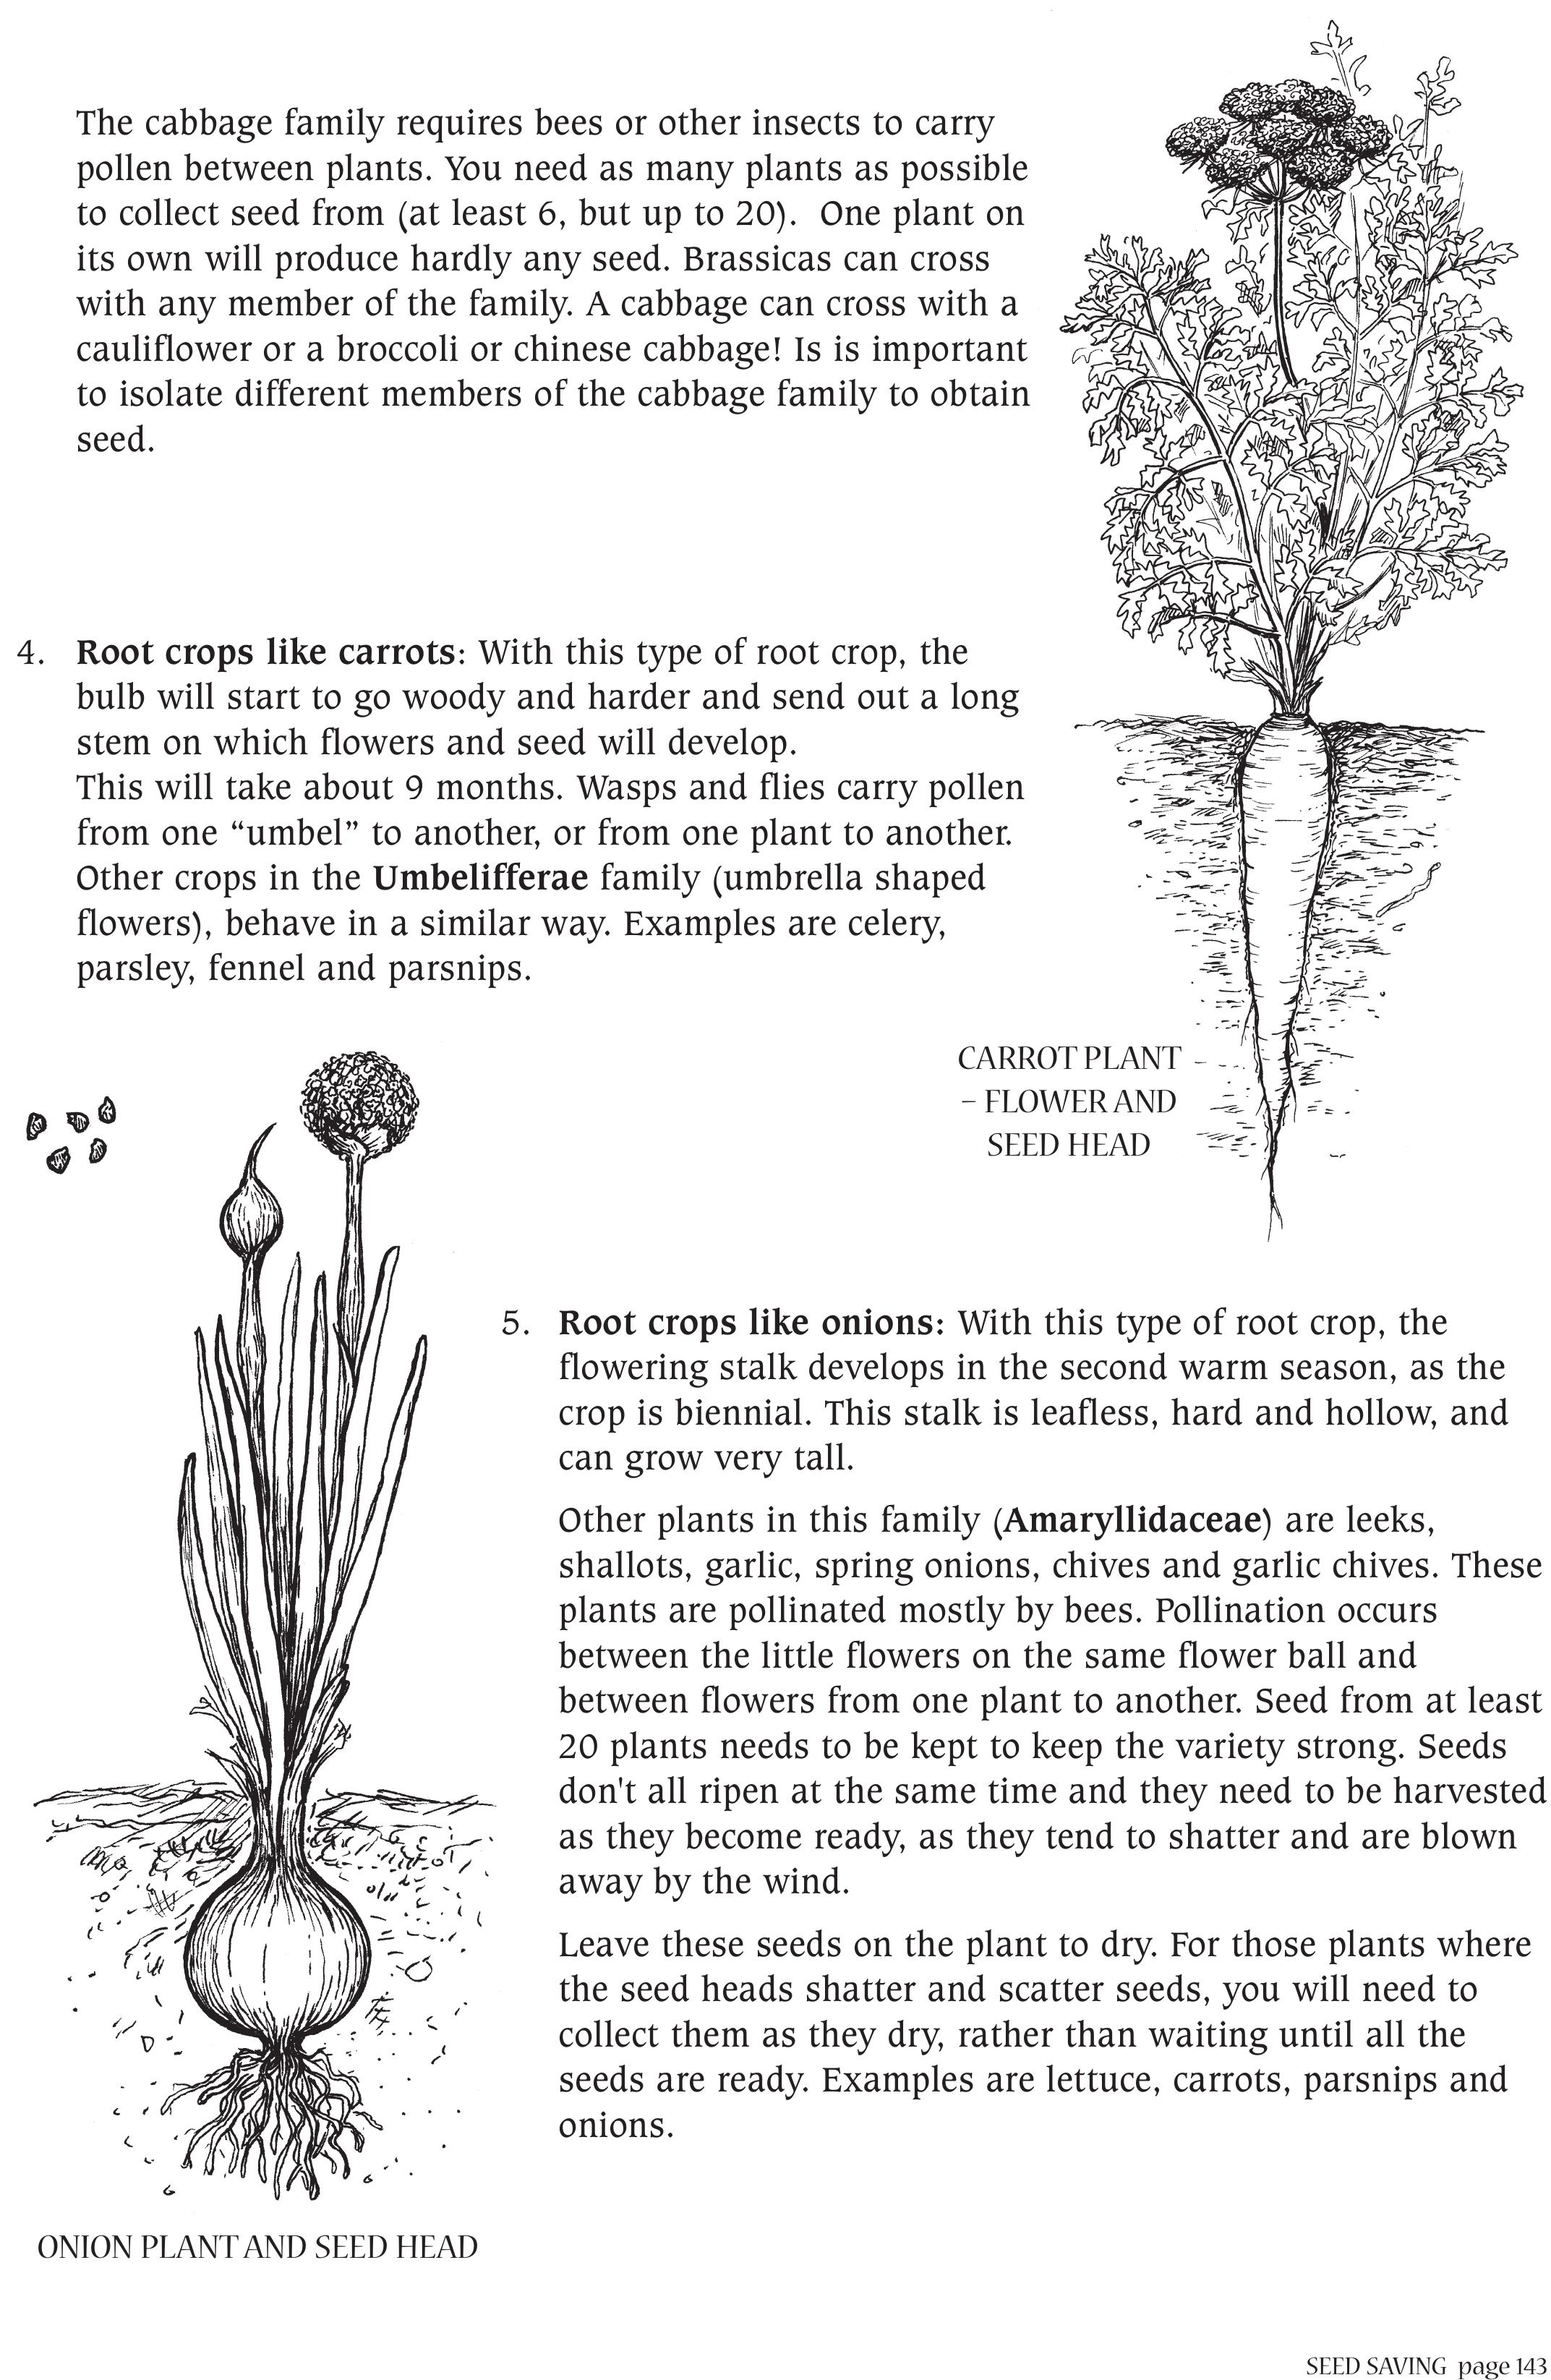
SEED SAVINGpage 143
The cabbage family requires bees or other insects to carry
pollen between plants. You need as many plants as possible
to collect seed from (at least 6, but up to 20). One plant on
its own will produce hardly any seed. Brassicas can cross
with any member of the family. A cabbage can cross with a
cauliflower or a broccoli or chinese cabbage! Is is important
to isolate different members of the cabbage family to obtain
seed.
4. Root crops like carrots: With this type of root crop, the
bulb will start to go woody and harder and send out a long
stem on which flowers and seed will develop.
This will take about 9 months. Wasps and flies carry pollen
from one “umbel” to another, or from one plant to another.
Other crops in the Umbelifferae family (umbrella shaped
flowers), behave in a similar way. Examples are celery,
parsley, fennel and parsnips.
5. Root crops like onions: With this type of root crop, the
flowering stalk develops in the second warm season, as the
crop is biennial. This stalk is leafless, hard and hollow, and
can grow very tall.
Other plants in this family (Amaryllidaceae) are leeks,
shallots, garlic, spring onions, chives and garlic chives. These
plants are pollinated mostly by bees. Pollination occurs
between the little flowers on the same flower ball and
between flowers from one plant to another. Seed from at least
20 plants needs to be kept to keep the variety strong. Seeds
don't all ripen at the same time and they need to be harvested
as they become ready, as they tend to shatter and are blown
away by the wind.
Leave these seeds on the plant to dry. For those plants where
the seed heads shatter and scatter seeds, you will need to
collect them as they dry, rather than waiting until all the
seeds are ready. Examples are lettuce, carrots, parsnips and
onions.
CARROT PLANT
– FLOWER AND
SEED HEAD
ONION PLANT AND SEED HEAD
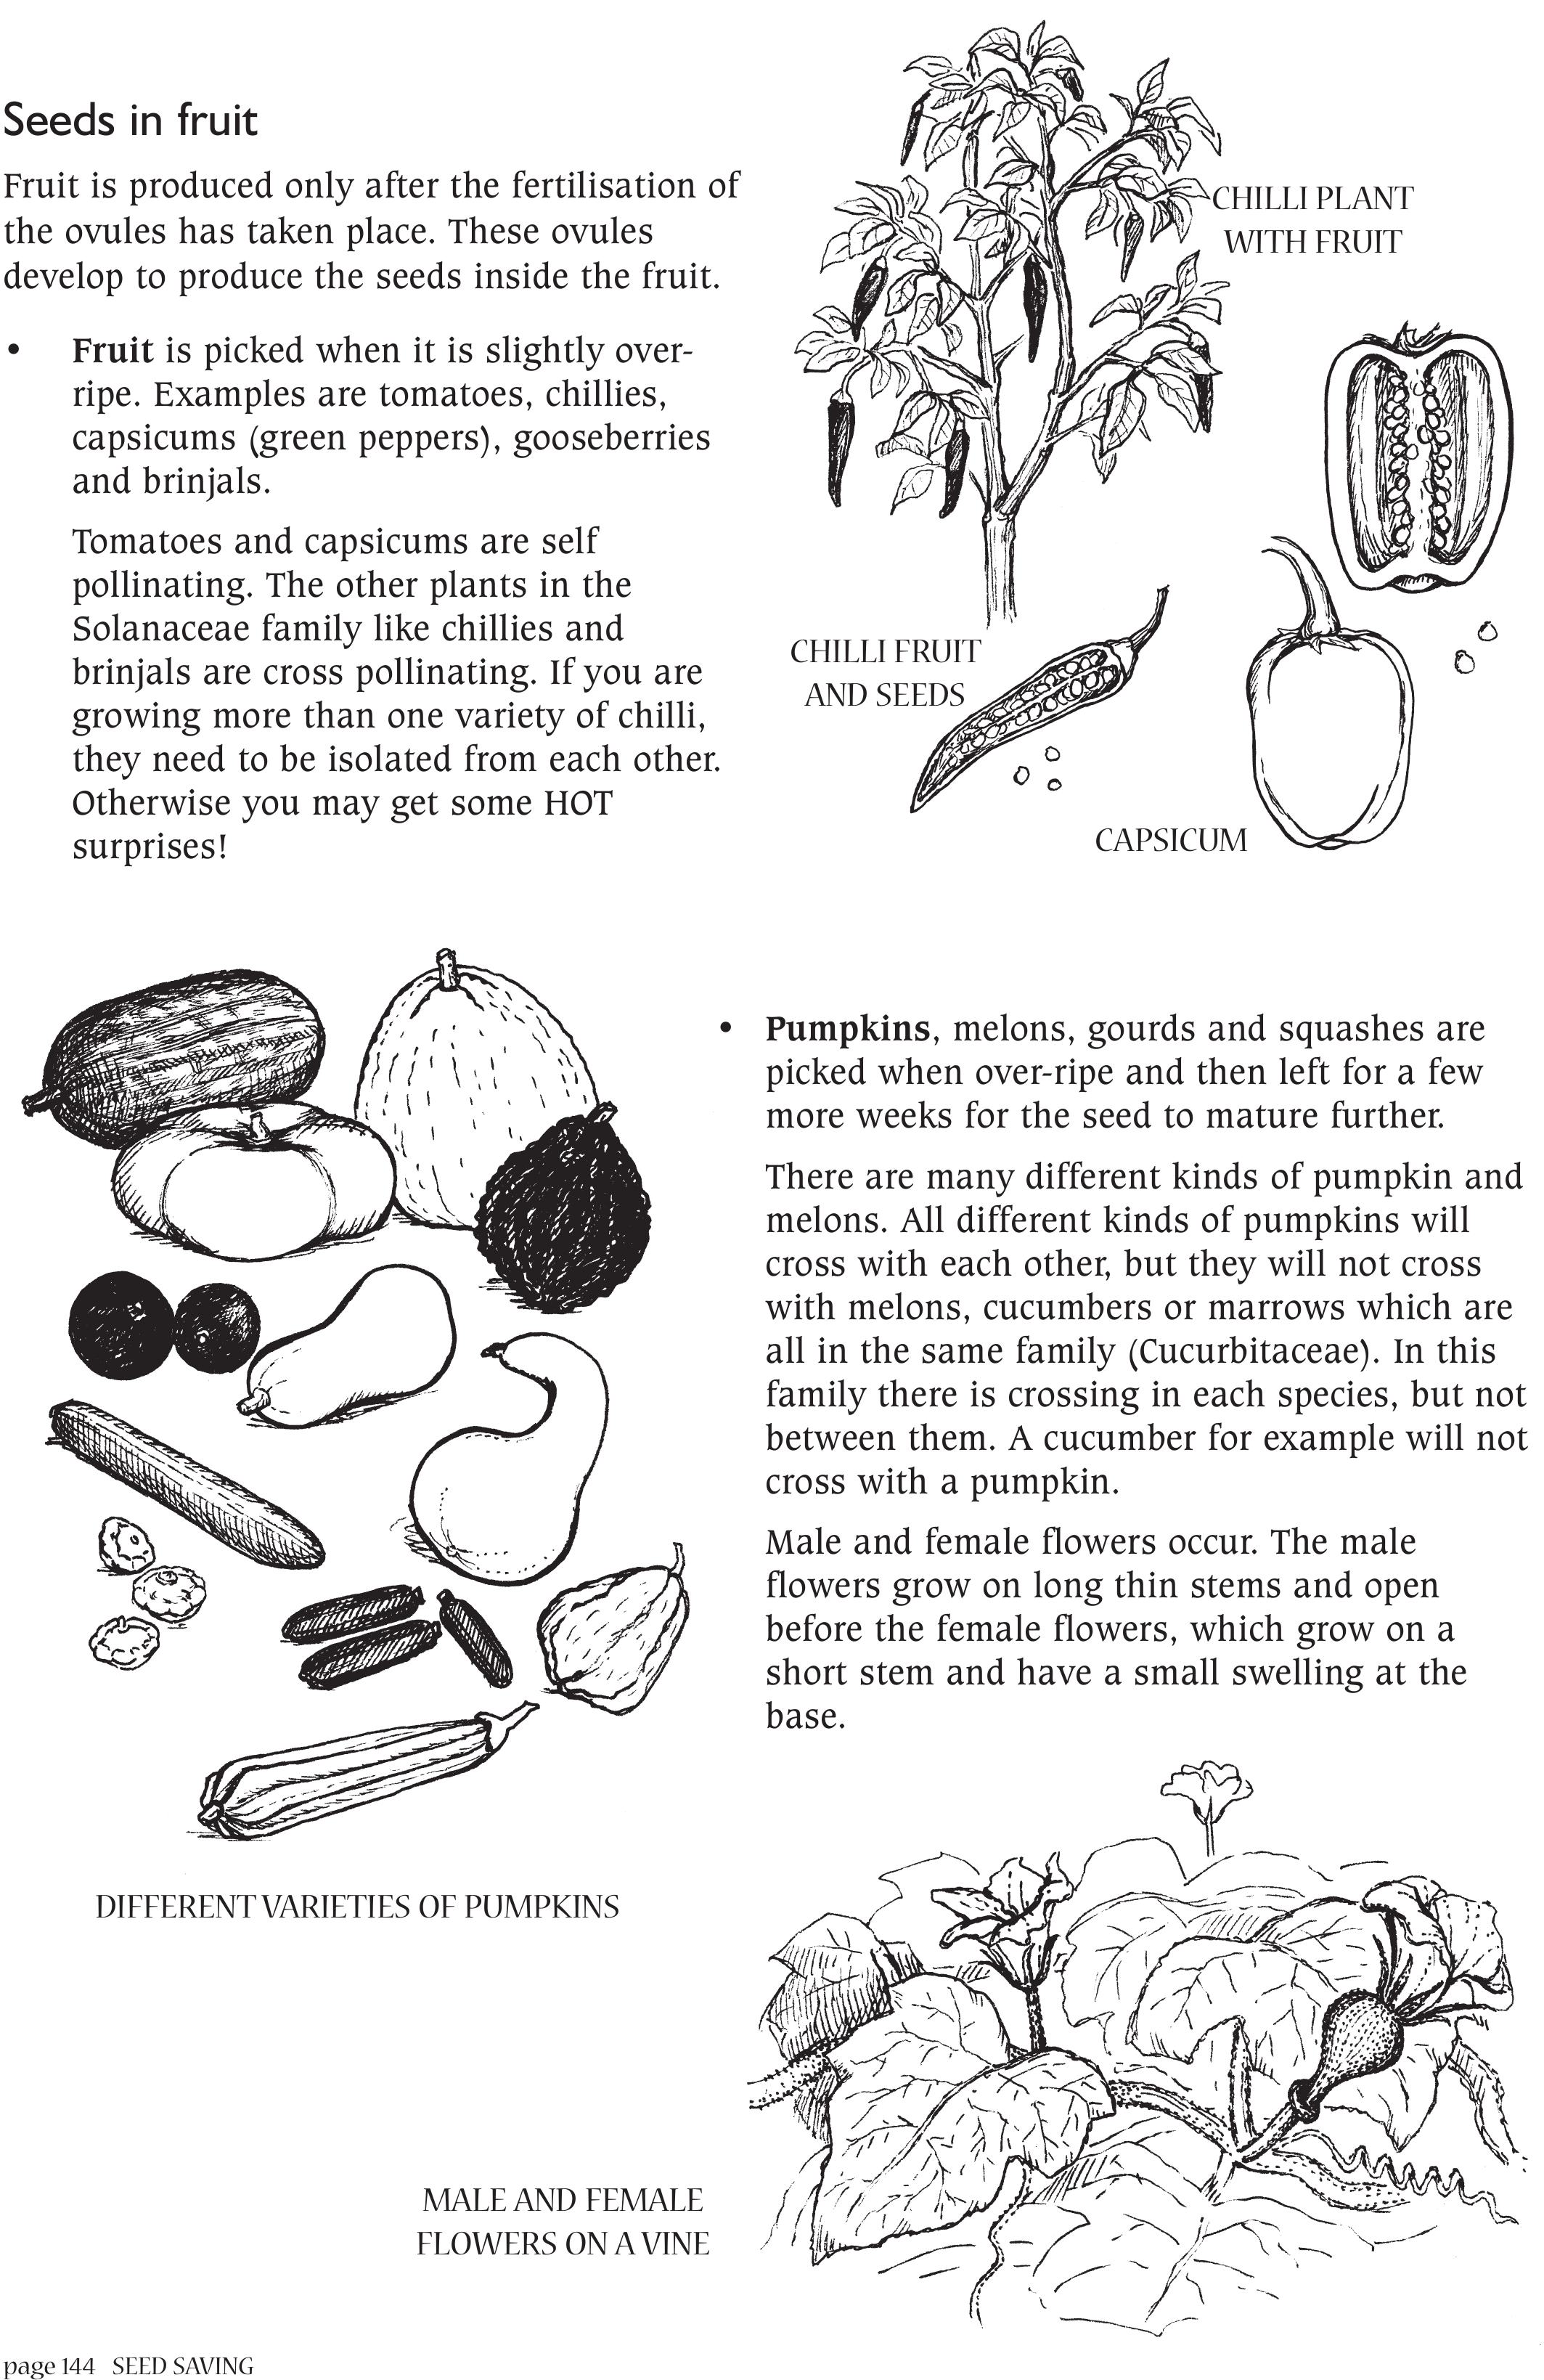
page 144 SEED SAVING
Seeds in fruit
Fruit is produced only after the fertilisation of
the ovules has taken place. These ovules
develop to produce the seeds inside the fruit.
• Fruit is picked when it is slightly over-
ripe. Examples are tomatoes, chillies,
capsicums (green peppers), gooseberries
and brinjals.
Tomatoes and capsicums are self
pollinating. The other plants in the
Solanaceae family like chillies and
brinjals are cross pollinating. If you are
growing more than one variety of chilli,
they need to be isolated from each other.
Otherwise you may get some HOT
surprises!
• Pumpkins, melons, gourds and squashes are
picked when over-ripe and then left for a few
more weeks for the seed to mature further.
There are many different kinds of pumpkin and
melons. All different kinds of pumpkins will
cross with each other, but they will not cross
with melons, cucumbers or marrows which are
all in the same family (Cucurbitaceae). In this
family there is crossing in each species, but not
between them. A cucumber for example will not
cross with a pumpkin.
Male and female flowers occur. The male
flowers grow on long thin stems and open
before the female flowers, which grow on a
short stem and have a small swelling at the
base.
CHILLI PLANT
WITH FRUIT
CHILLI FRUIT
AND SEEDS
CAPSICUM
DIFFERENT VARIETIES OF PUMPKINS
MALE AND FEMALE
FLOWERS ON A VINE
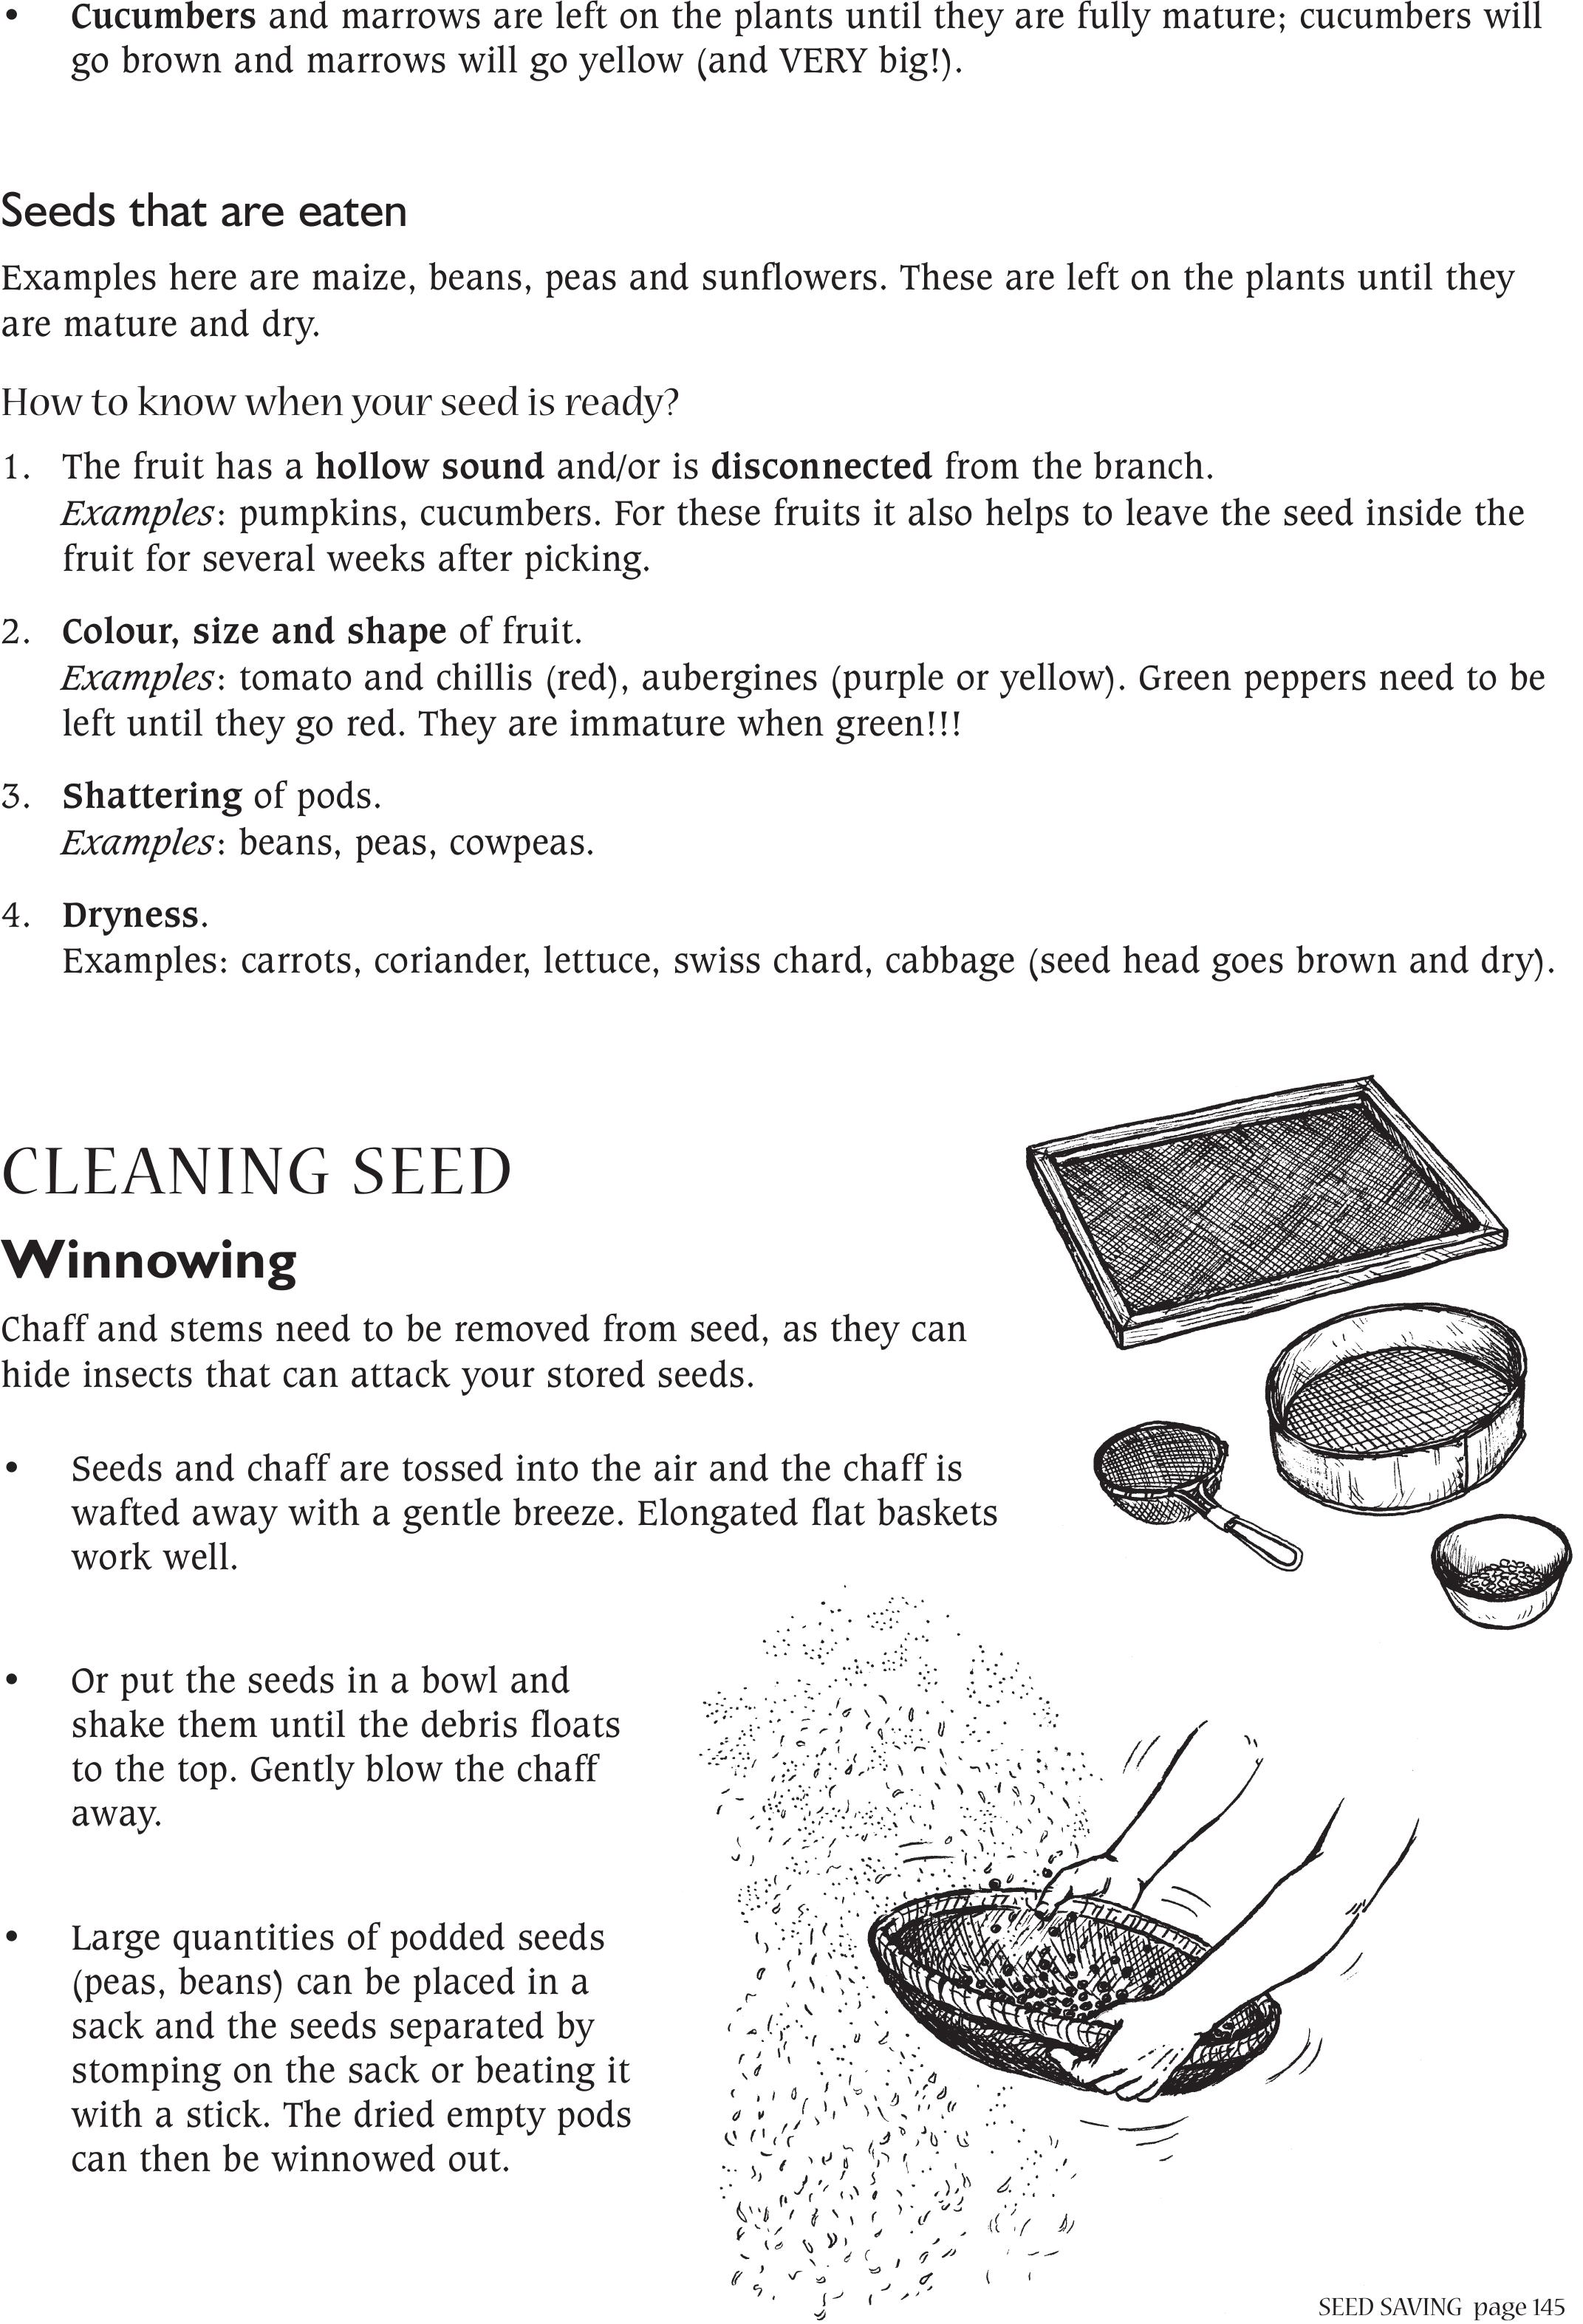
SEED SAVINGpage 145
• Cucumbers and marrows are left on the plants until they are fully mature; cucumbers will
go brown and marrows will go yellow (and VERY big!).
Seeds that are eaten
Examples here are maize, beans, peas and sunflowers. These are left on the plants until they
are mature and dry.
How to know when your seed is ready?
1. The fruit has a hollow sound and/or is disconnected from the branch.
Examples: pumpkins, cucumbers. For these fruits it also helps to leave the seed inside the
fruit for several weeks after picking.
2. Colour, size and shape of fruit.
Examples: tomato and chillis (red), aubergines (purple or yellow). Green peppers need to be
left until they go red. They are immature when green!!!
3. Shattering of pods.
Examples: beans, peas, cowpeas.
4. Dryness.
Examples: carrots, coriander, lettuce, swiss chard, cabbage (seed head goes brown and dry).
CLEANING SEED
Winnowing
Chaff and stems need to be removed from seed, as they can
hide insects that can attack your stored seeds.
• Seeds and chaff are tossed into the air and the chaff is
wafted away with a gentle breeze. Elongated flat baskets
work well.
• Or put the seeds in a bowl and
shake them until the debris floats
to the top. Gently blow the chaff
away.
• Large quantities of podded seeds
(peas, beans) can be placed in a
sack and the seeds separated by
stomping on the sack or beating it
with a stick. The dried empty pods
can then be winnowed out.
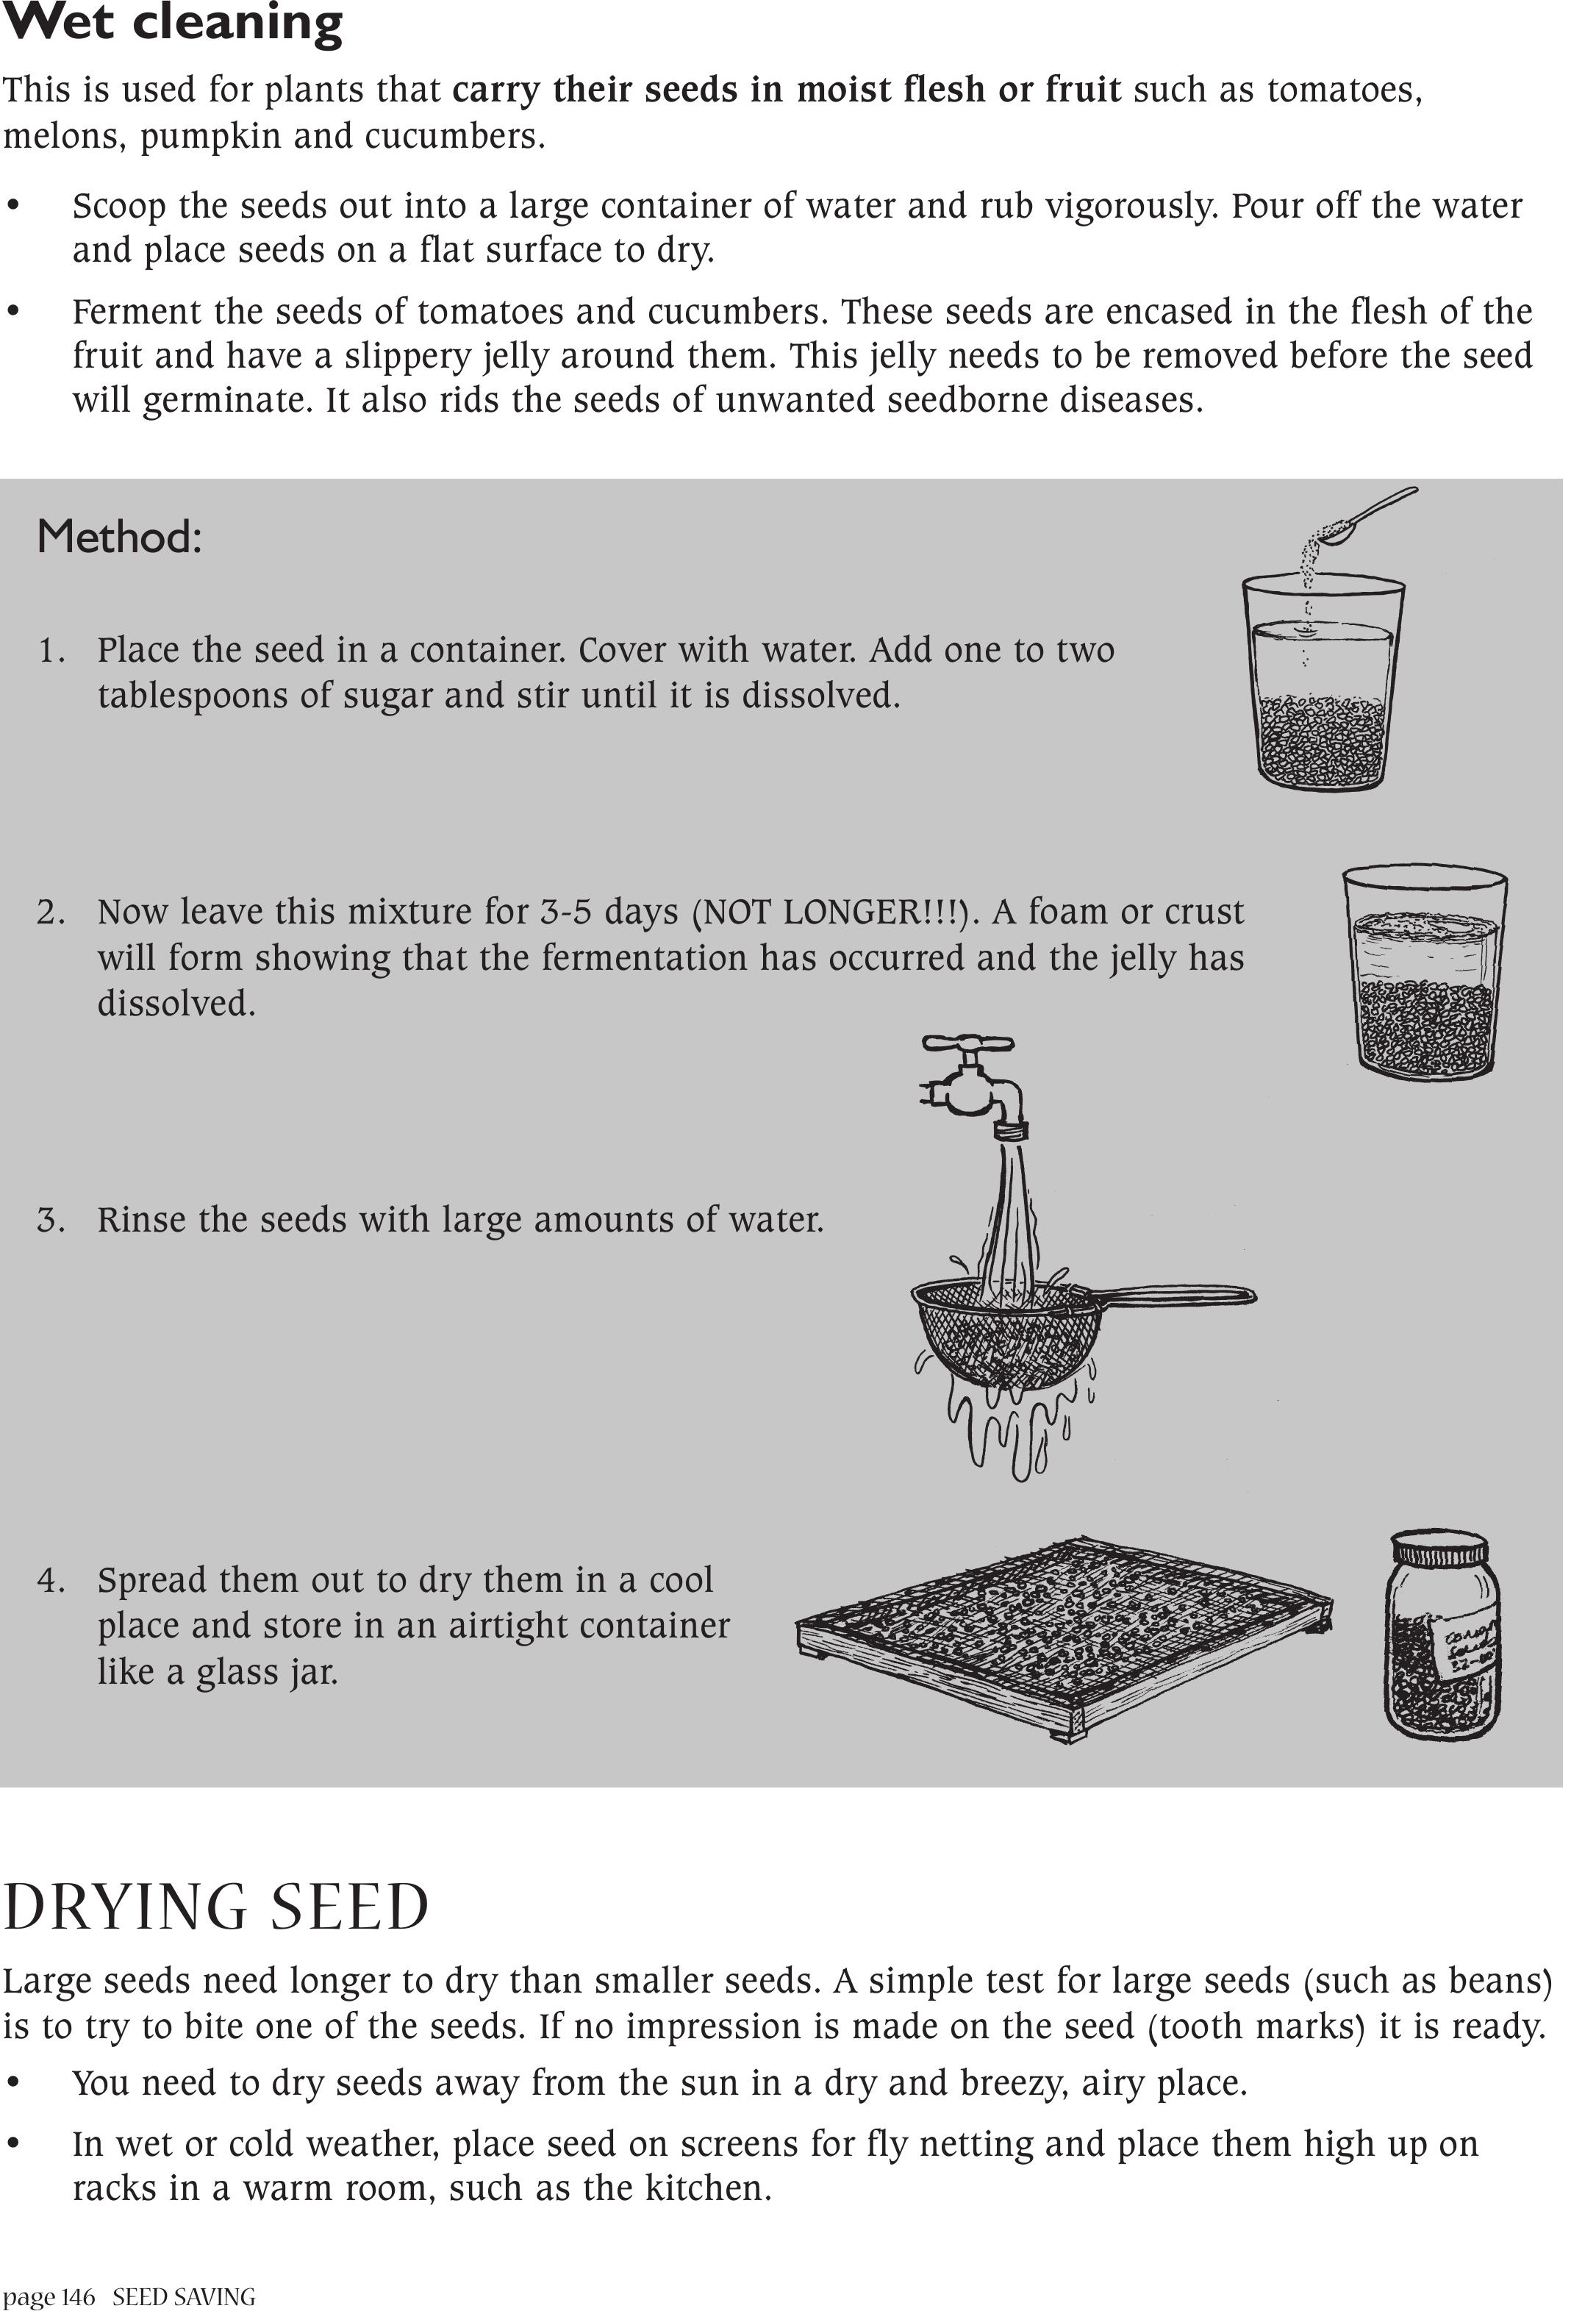
page 146 SEED SAVING
Wet cleaning
This is used for plants that carry their seeds in moist flesh or fruit such as tomatoes,
melons, pumpkin and cucumbers.
• Scoop the seeds out into a large container of water and rub vigorously. Pour off the water
and place seeds on a flat surface to dry.
• Ferment the seeds of tomatoes and cucumbers. These seeds are encased in the flesh of the
fruit and have a slippery jelly around them. This jelly needs to be removed before the seed
will germinate. It also rids the seeds of unwanted seedborne diseases.
DRYING SEED
Large seeds need longer to dry than smaller seeds. A simple test for large seeds (such as beans)
is to try to bite one of the seeds. If no impression is made on the seed (tooth marks) it is ready.
• You need to dry seeds away from the sun in a dry and breezy, airy place.
• In wet or cold weather, place seed on screens for fly netting and place them high up on
racks in a warm room, such as the kitchen.
Method:
1.Place the seed in a container. Cover with water. Add one to two
tablespoons of sugar and stir until it is dissolved.
2. Now leave this mixture for 3-5 days (NOT LONGER!!!). A foam or crust
will form showing that the fermentation has occurred and the jelly has
dissolved.
3. Rinse the seeds with large amounts of water.
4. Spread them out to dry them in a cool
place and store in an airtight container
like a glass jar.
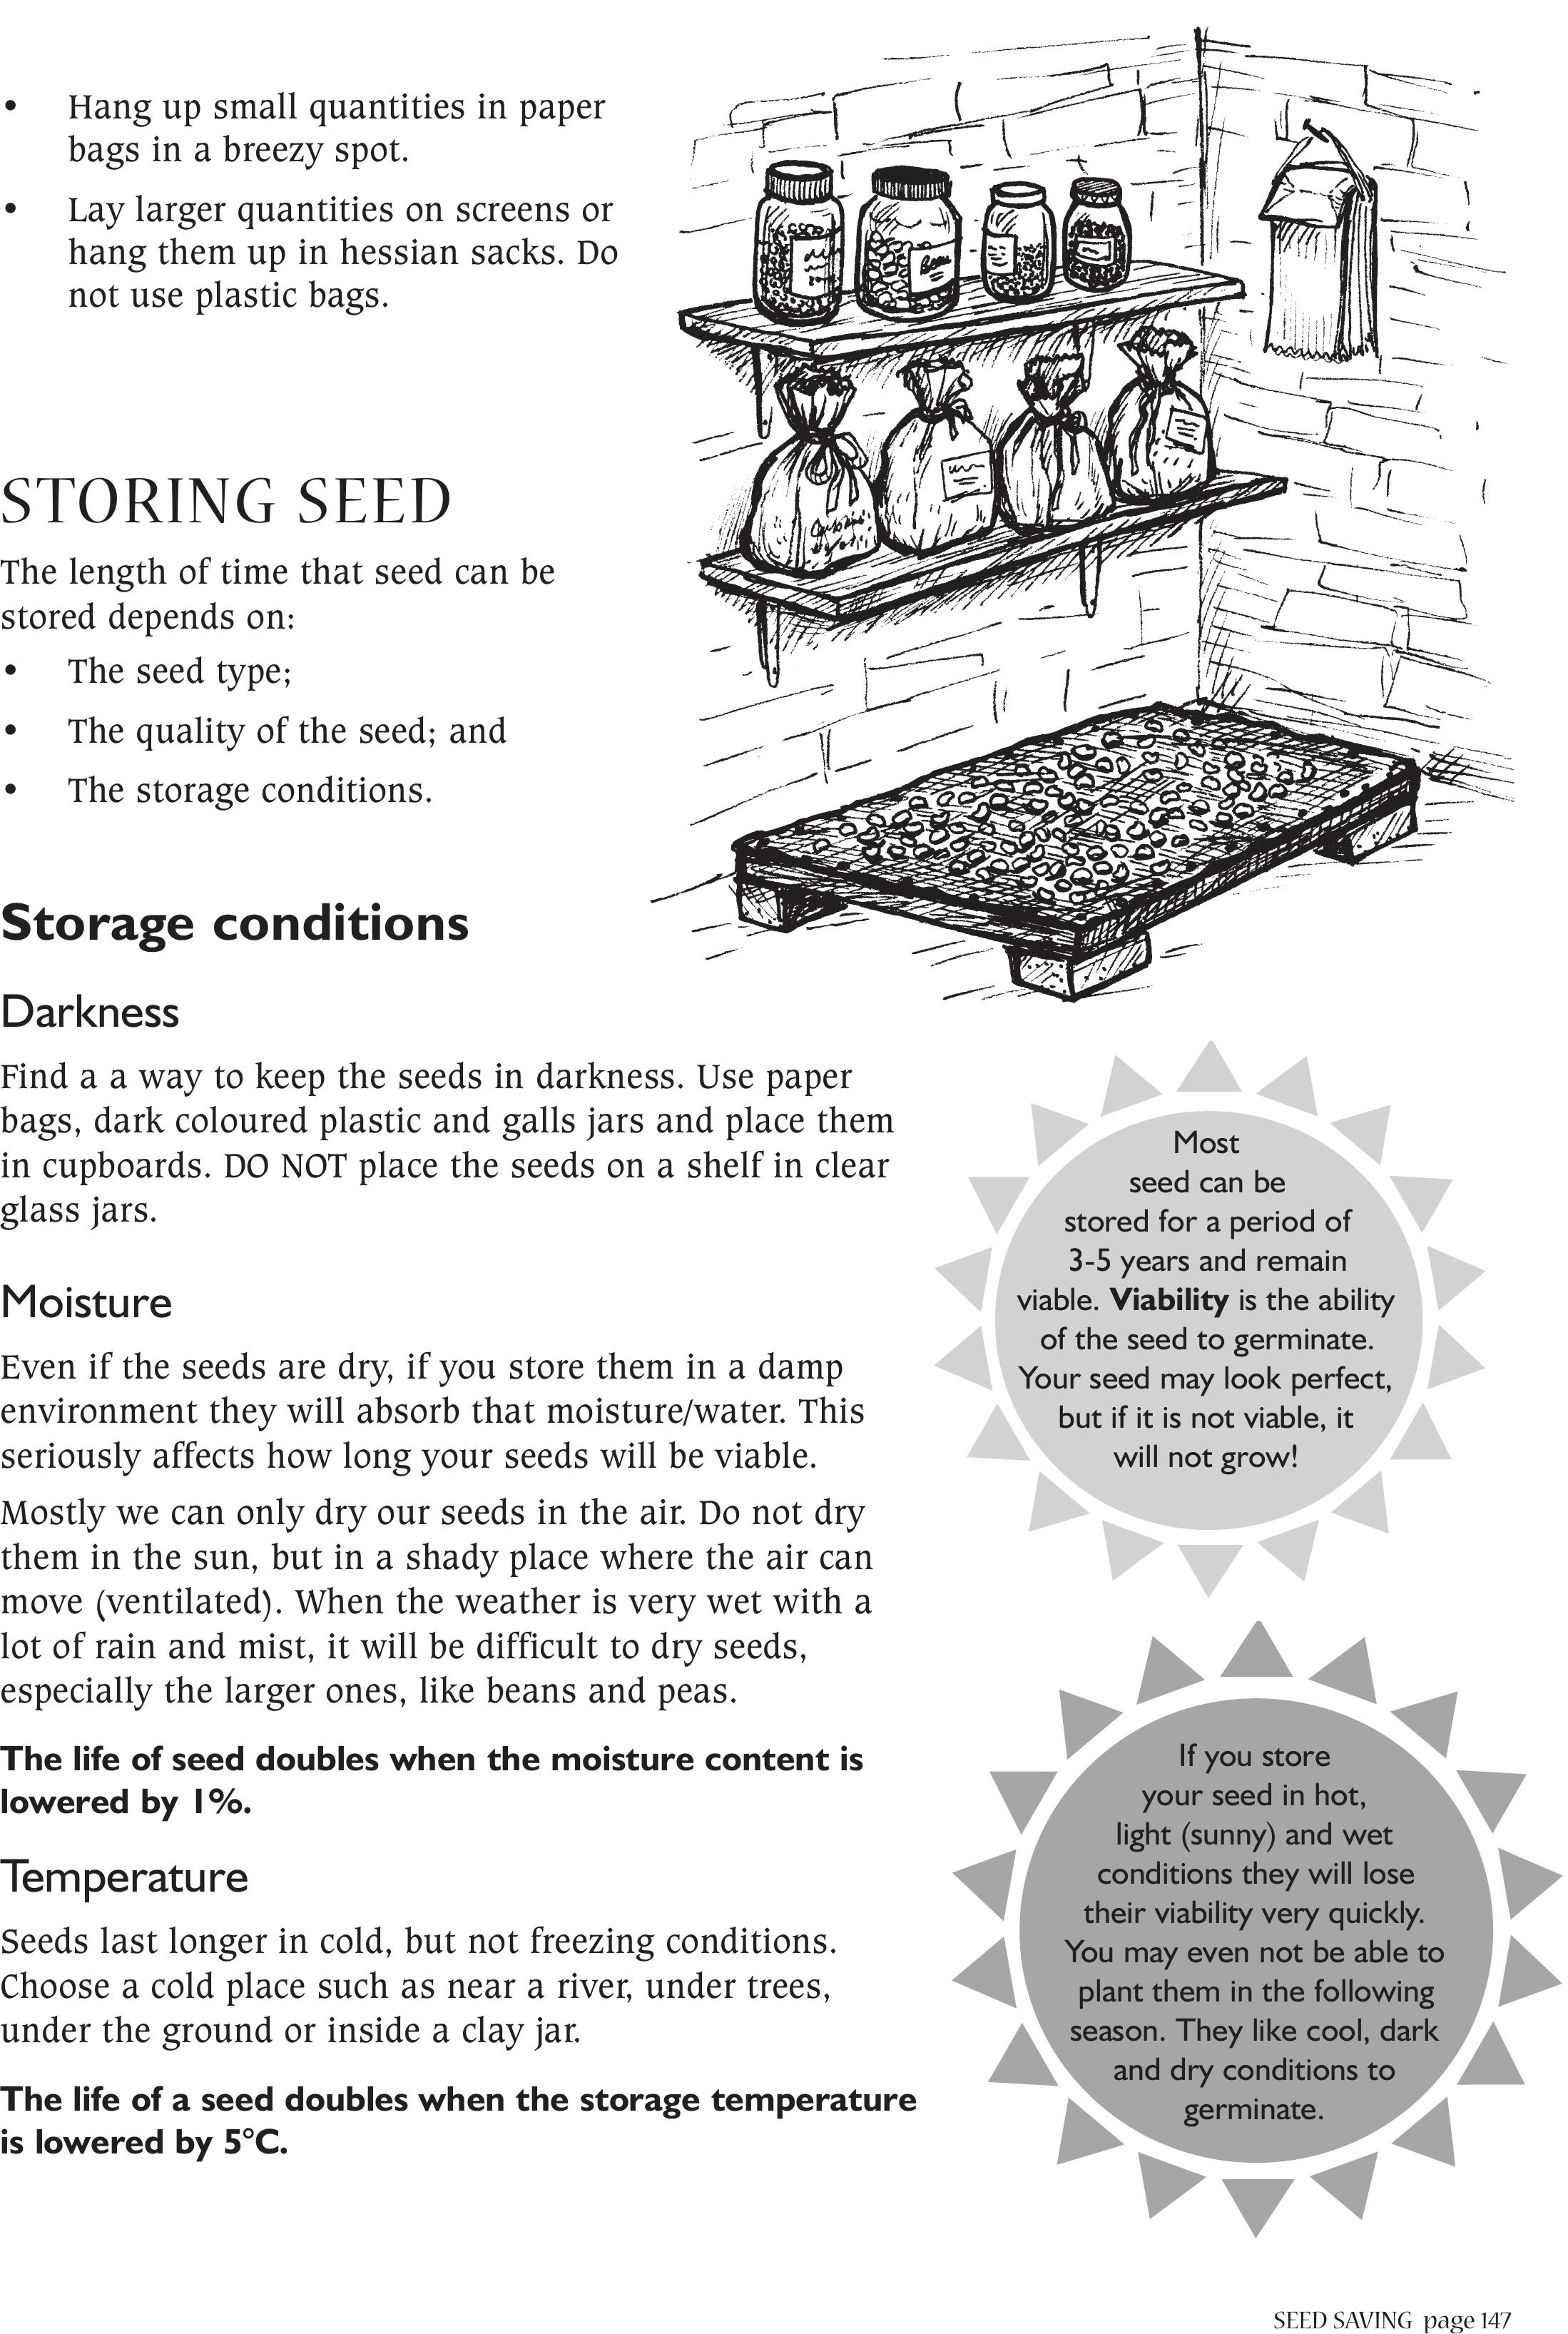
SEED SAVINGpage 147
• Hang up small quantities in paper
bags in a breezy spot.
• Lay larger quantities on screens or
hang them up in hessian sacks. Do
not use plastic bags.
STORING SEED
The length of time that seed can be
stored depends on:
• The seed type;
• The quality of the seed; and
• The storage conditions.
Storage conditions
Darkness
Find a a way to keep the seeds in darkness. Use paper
bags, dark coloured plastic and galls jars and place them
in cupboards. DO NOT place the seeds on a shelf in clear
glass jars.
Moisture
Even if the seeds are dry, if you store them in a damp
environment they will absorb that moisture/water. This
seriously affects how long your seeds will be viable.
Mostly we can only dry our seeds in the air. Do not dry
them in the sun, but in a shady place where the air can
move (ventilated). When the weather is very wet with a
lot of rain and mist, it will be difficult to dry seeds,
especially the larger ones, like beans and peas.
The life of seed doubles when the moisture content is
lowered by 1%.
Temperature
Seeds last longer in cold, but not freezing conditions.
Choose a cold place such as near a river, under trees,
under the ground or inside a clay jar.
The life of a seed doubles when the storage temperature
is lowered by 5°C.
Most
seed can be
stored for a period of
3-5 years and remain
viable. Viability is the ability
of the seed to germinate.
Your seed may look perfect,
but if it is not viable, it
will not grow!
If you store
your seed in hot,
light (sunny) and wet
conditions they will lose
their viability very quickly.
You may even not be able to
plant them in the following
season. They like cool, dark
and dry conditions to
germinate.
page 148 SEED SAVING
Pests
Storage weevils, fungi and bacteria shorten the life of seeds.
• Weevils begin to multiply when the moisture content gets high enough
(10% or more). The eggs are laid inside the seed, under the seed coat, and
the insects hatch from there.
• Storage fungi/ moulds begin to grow
when the moisture content is high
enough (around 13% or more) and
bacteria start growing around (20%
moisture). Mostly we cannot measure
the moisture content of our seed. All we
can do is keep our seed as dry as
possible.
Materials that stop the growth of pests can be used:
• Dry ash: this absorbs moisture inside the container and also prevents the growth and
increase of weevils. Add ½ kilogram ash to 1 kilogram seed.
• Lime: can be used in the same way as dry ash. Mix 15 teaspoons (50 grams) with every
kilogram of seed.
• Cooking oil: mix cooking oil with your seeds to prevent increase of weevils. Use only 1
teaspoon of oil for every kilogram of seeds.
• Dried and powdered leaves of different aromatic plants: weevils are sensitive to
aromatic or strong smelling plants. Try the following:
– CHILLI: mix 4-6 teaspoons of chilli powder with 1 kilogram of seed.
– WORMWOOD (MHLONYANE): Dry and crush the leaves and mix with seed. Use 4-6
teaspoons for every kilogram of seed.
– ALOE: As above.
Store
your seeds in
dry, clean, airtight
glass jars or other airtight
containers. AND LABEL
THEM – Give them names!!
By next year you will not
remember what it
was.
SEED SAVINGpage 149
Seed production
Seed security is the mother of food security
Climate and Soil
Lesotho’s climate and soil is well suited for seed production of cabbage, cauliflower, carrot, beetroot, turnip,
spinach (Swiss chard), lettuce, onion, etc.
Time
Seed production of the above crops is carried out in winter months (from mid May to mid July)
Varieties
Only open pollinated varieties can be used for production as follows:
1. Cole crops: belonging to cabbage family including cauliflower.
Cabbage Varieties: drumhead, cape spitz, Copenhagen, snowball (cauliflower) etc.
2. Root crops:
Carrot varieties: Nantes, chant nay karoo, kuroda, Ideal Red, Cape market, etc.
Beetroot varieties: Dark Red, Blood Red, Crimson Globe, etc.
Turnip varieties: Purple Top, White Globe, etc.
3. Bulb Crops:
Onion Varieties: Texas Grano, Australian Brown, Caledon Globe, etc.
4. Leafy Vegetables: Mainly used for their leaves whether eaten raw or cooked.
Swiss chards varieties: Ford hook giant, etc.
Lettuce varieties: Great Lake, Winter Crisp, Grand Rapid, etc.
Methods of Seed Production
Seed production is carried out by two methods; in situ in which the plants are kept intact where they are grown.
The second method is by transplanting them along with the roots when they are fully mature.
Selection:
In case of cabbage, the heads that are well developed, hard, true to type and free of diseases, uproot both the •
head and the roots;
In case of cauliflower, the curds should be well developed, milky colour, compact, true to type, free from •
diseases, uproot both the head and the roots;
In case of root crops like carrot, turnip, beetroot, they should be well developed, true to type, free from •
diseases;
In case of leafy vegetables like spinach and lettuce they should be free from diseases, mature and true to type•
In case of onion, it should be well developed, free from diseases and true to type•
Operation
In case of transplanting of cabbage, the whole plant (that is both head and roots are taken) to the place for
growing. After 20-25 days, the heads are cut horizontally into halves for facilitating flower development. There are
various methods of cutting, but the half cut has proven to be the best. In case of cauliflower, tie the leaves into a
knot, so that the curd is well covered and not exposed to the sun. The whole plant along with the roots is taken
for transplanting, the knot is removed and the leaves are allowed to come to normal.
In case of carrots, turnip the roots are cut into halves and the leaves are cut leaving at the height of 3 to 6 cm
from the crown. In case of spinach (Swiss chard) and lettuce the whole plant along with the roots is transplanted.
Spacing
For all these crops, the distance from plant to plant and from raw to raw should be between 90-100cm both ways.
Manure
One spade full of well decomposed cattle manure and table spoonful of 2:3:2(22) fertilizers. Repeat same
application after 45 days.
page 150 SEED SAVING
Irrigation
Watering should be done at least one bucket full (15-20 litres). Follow after every 3 days for the next 20 days and
then at an interval of 5-7 days, depending upon the temperature and humidity.
Plant protection measures
The pests are mainly aphids during flowering and pods formation. Leaf eating insect also attack; spray any
insecticide such as Malathion (at the rate of 1ml/liter or 1 teaspoon /5 litres of water), as and when the insects are
observed.
Staking
Staking may be required at the time of flowering and pod formation to prevent breakage of the soft stems due to
wind during spring. Four sticks are placed on the four sides of the plant.
Bagging
To prevent cross-pollination, bagging may be required, in which a piece of cloth, preferable cotton and white in
colour is stitched in the form of a bag and placed upside down covering the whole plant. It is supported by four
sticks, which will prevent insects like bees and wasps from entering and thereby stopping cross-pollination.
Harvesting and yield
In case of cabbage and cauliflower, the harvesting time will be after 4-5 months and the yield ranges from •
20-50 grams/plant;
In case of carrots, harvesting will be after 5-6 months and the yield is from 30-80 grams/plant;•
In the case of beetroot and spinach (Swiss chard), the harvesting time is after 4-5 months and yield 30-60 •
grams/plant;
In case of turnip from 3-4 months and yield is from 20-40 grams/plant;•
In case of lettuce from 2-4 months and yield is from 15-30 grams/plant;•
In case of onion from 4-5 months and yield is from 15-25 grams/plant.•
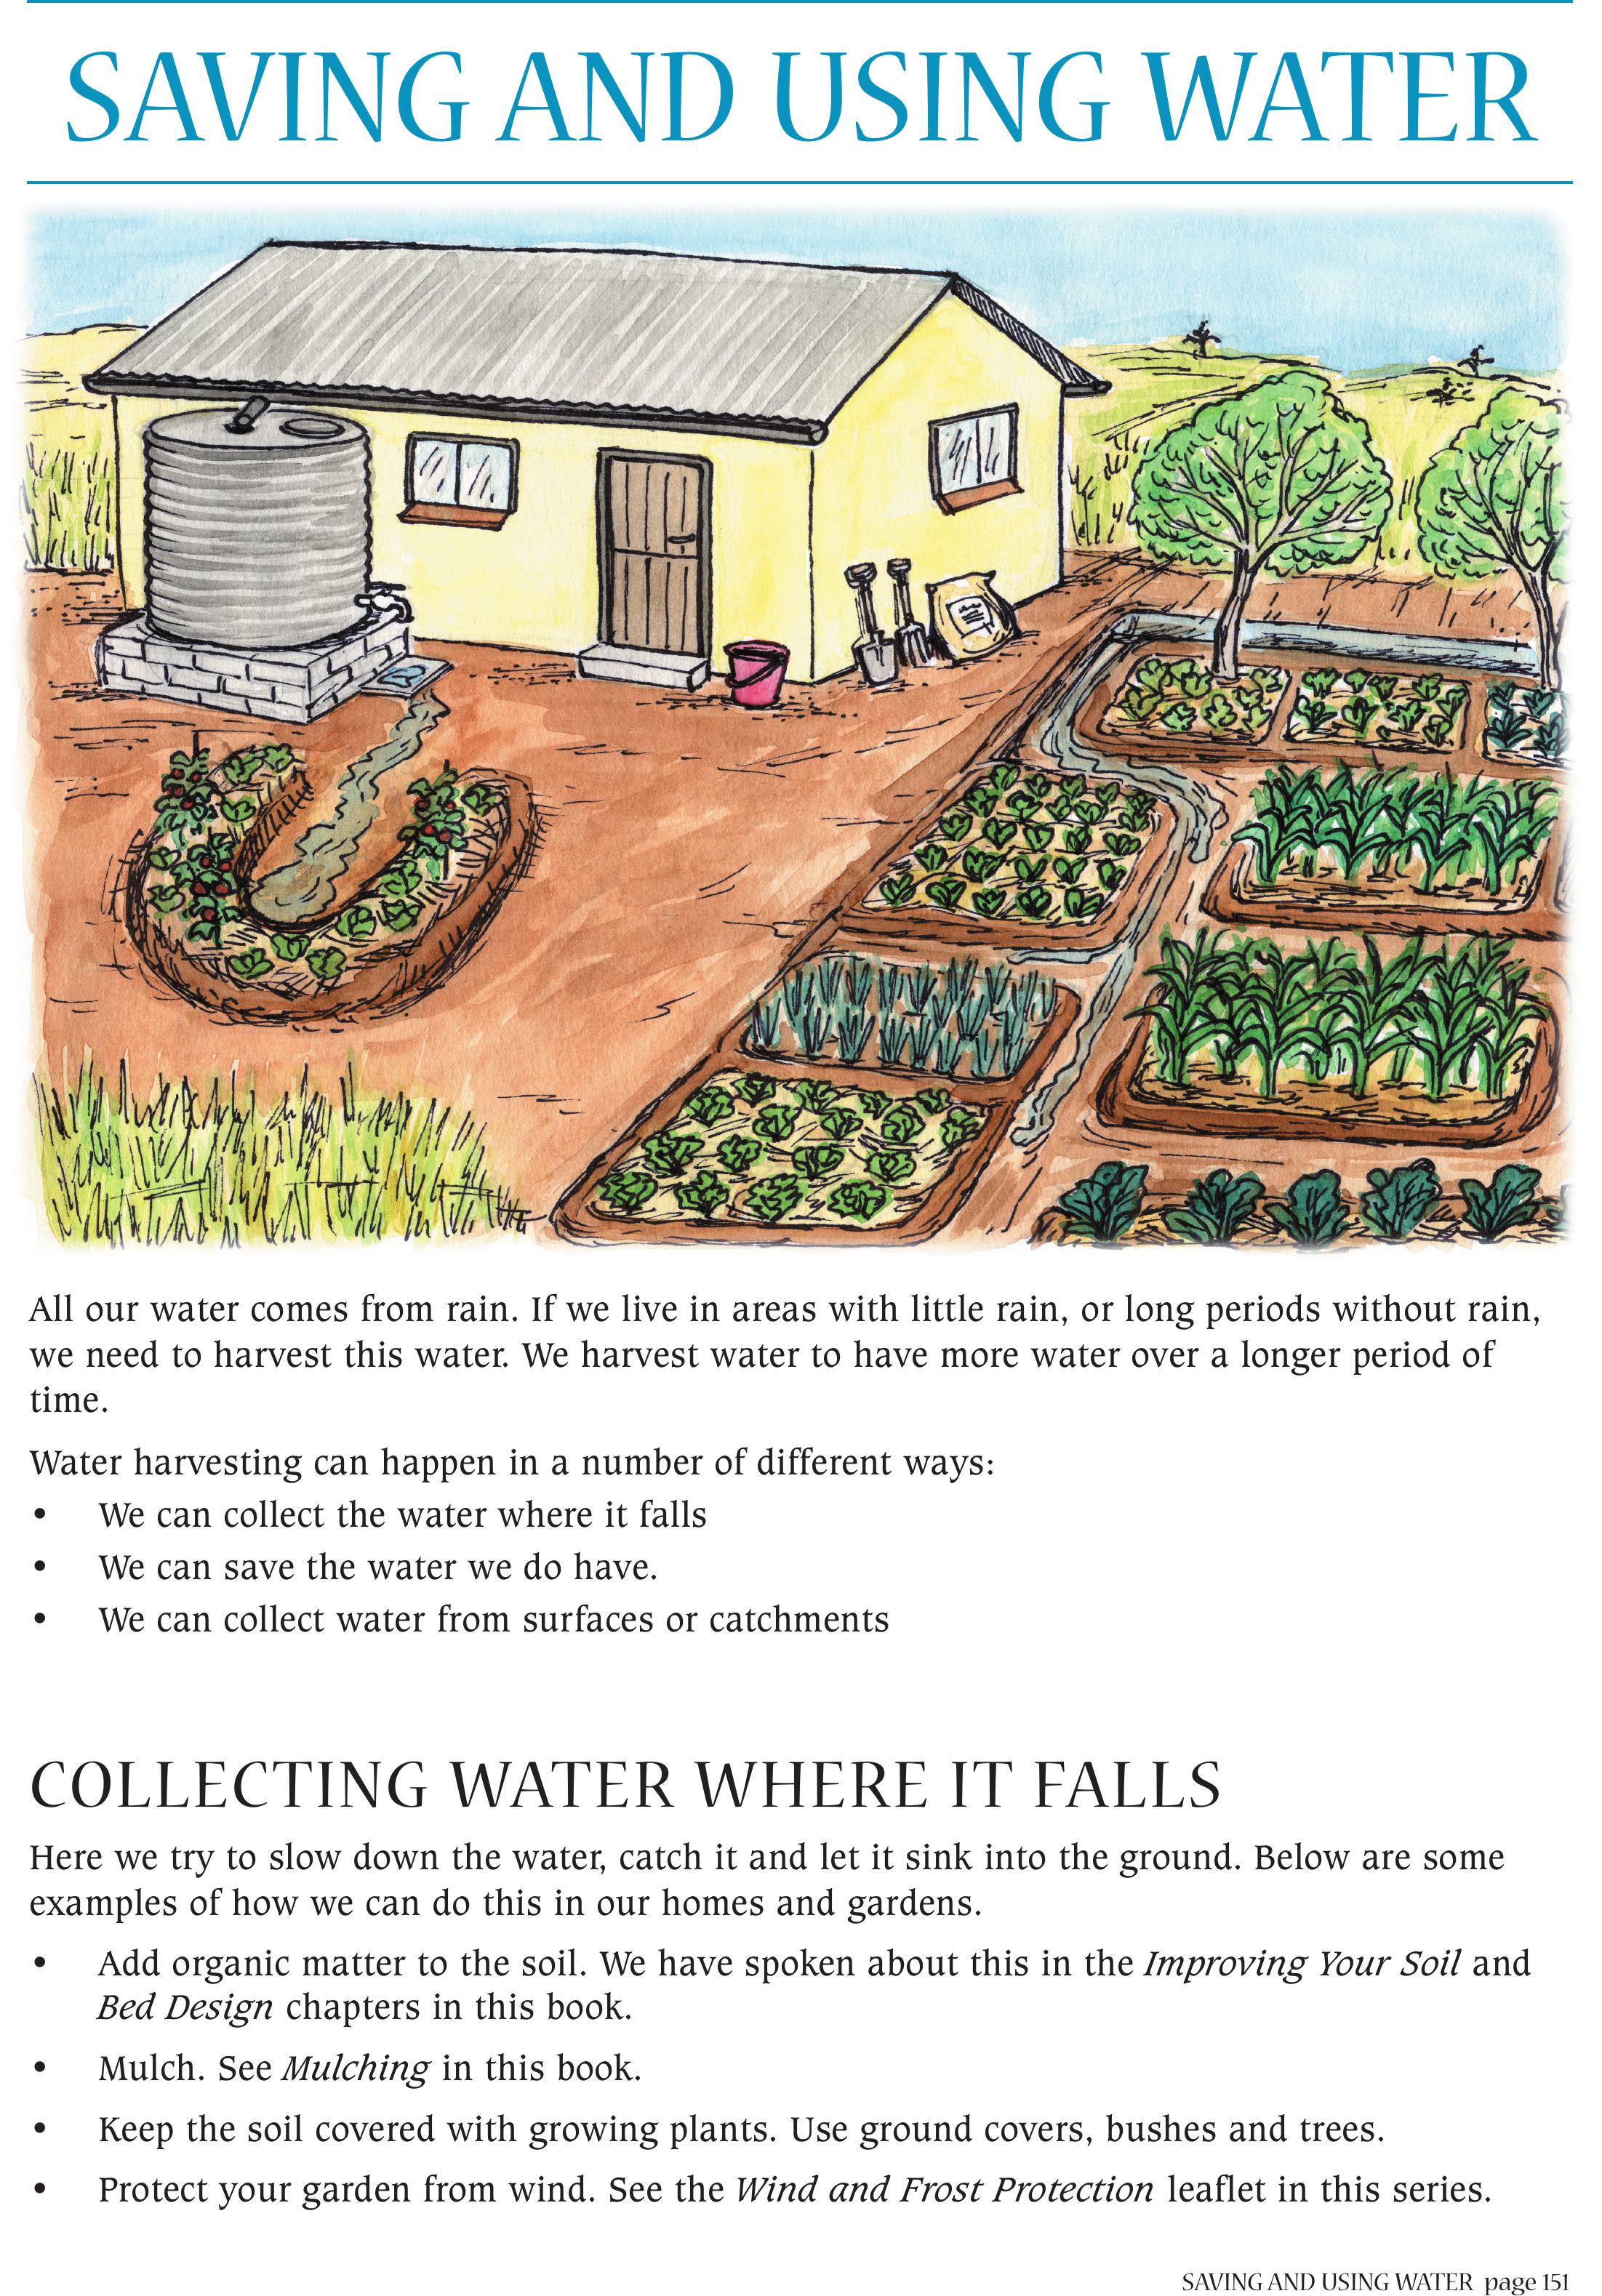
SAVING AND USING WATERpage 151
All our water comes from rain. If we live in areas with little rain, or long periods without rain,
we need to harvest this water. We harvest water to have more water over a longer period of
time.
Water harvesting can happen in a number of different ways:
• We can collect the water where it falls
• We can save the water we do have.
• We can collect water from surfaces or catchments
COLLECTING WATER WHERE ITFALLS
Here we try to slow down the water, catch it and let it sink into the ground. Below are some
examples of how we can do this in our homes and gardens.
• Add organic matter to the soil. We have spoken about this in the Improving Your Soil and
Bed Design chapters in this book.
• Mulch. See Mulching in this book.
• Keep the soil covered with growing plants. Use ground covers, bushes and trees.
• Protect your garden from wind. See the Wind and Frost Protection leaflet in this series.
SAVING AND USING WATER
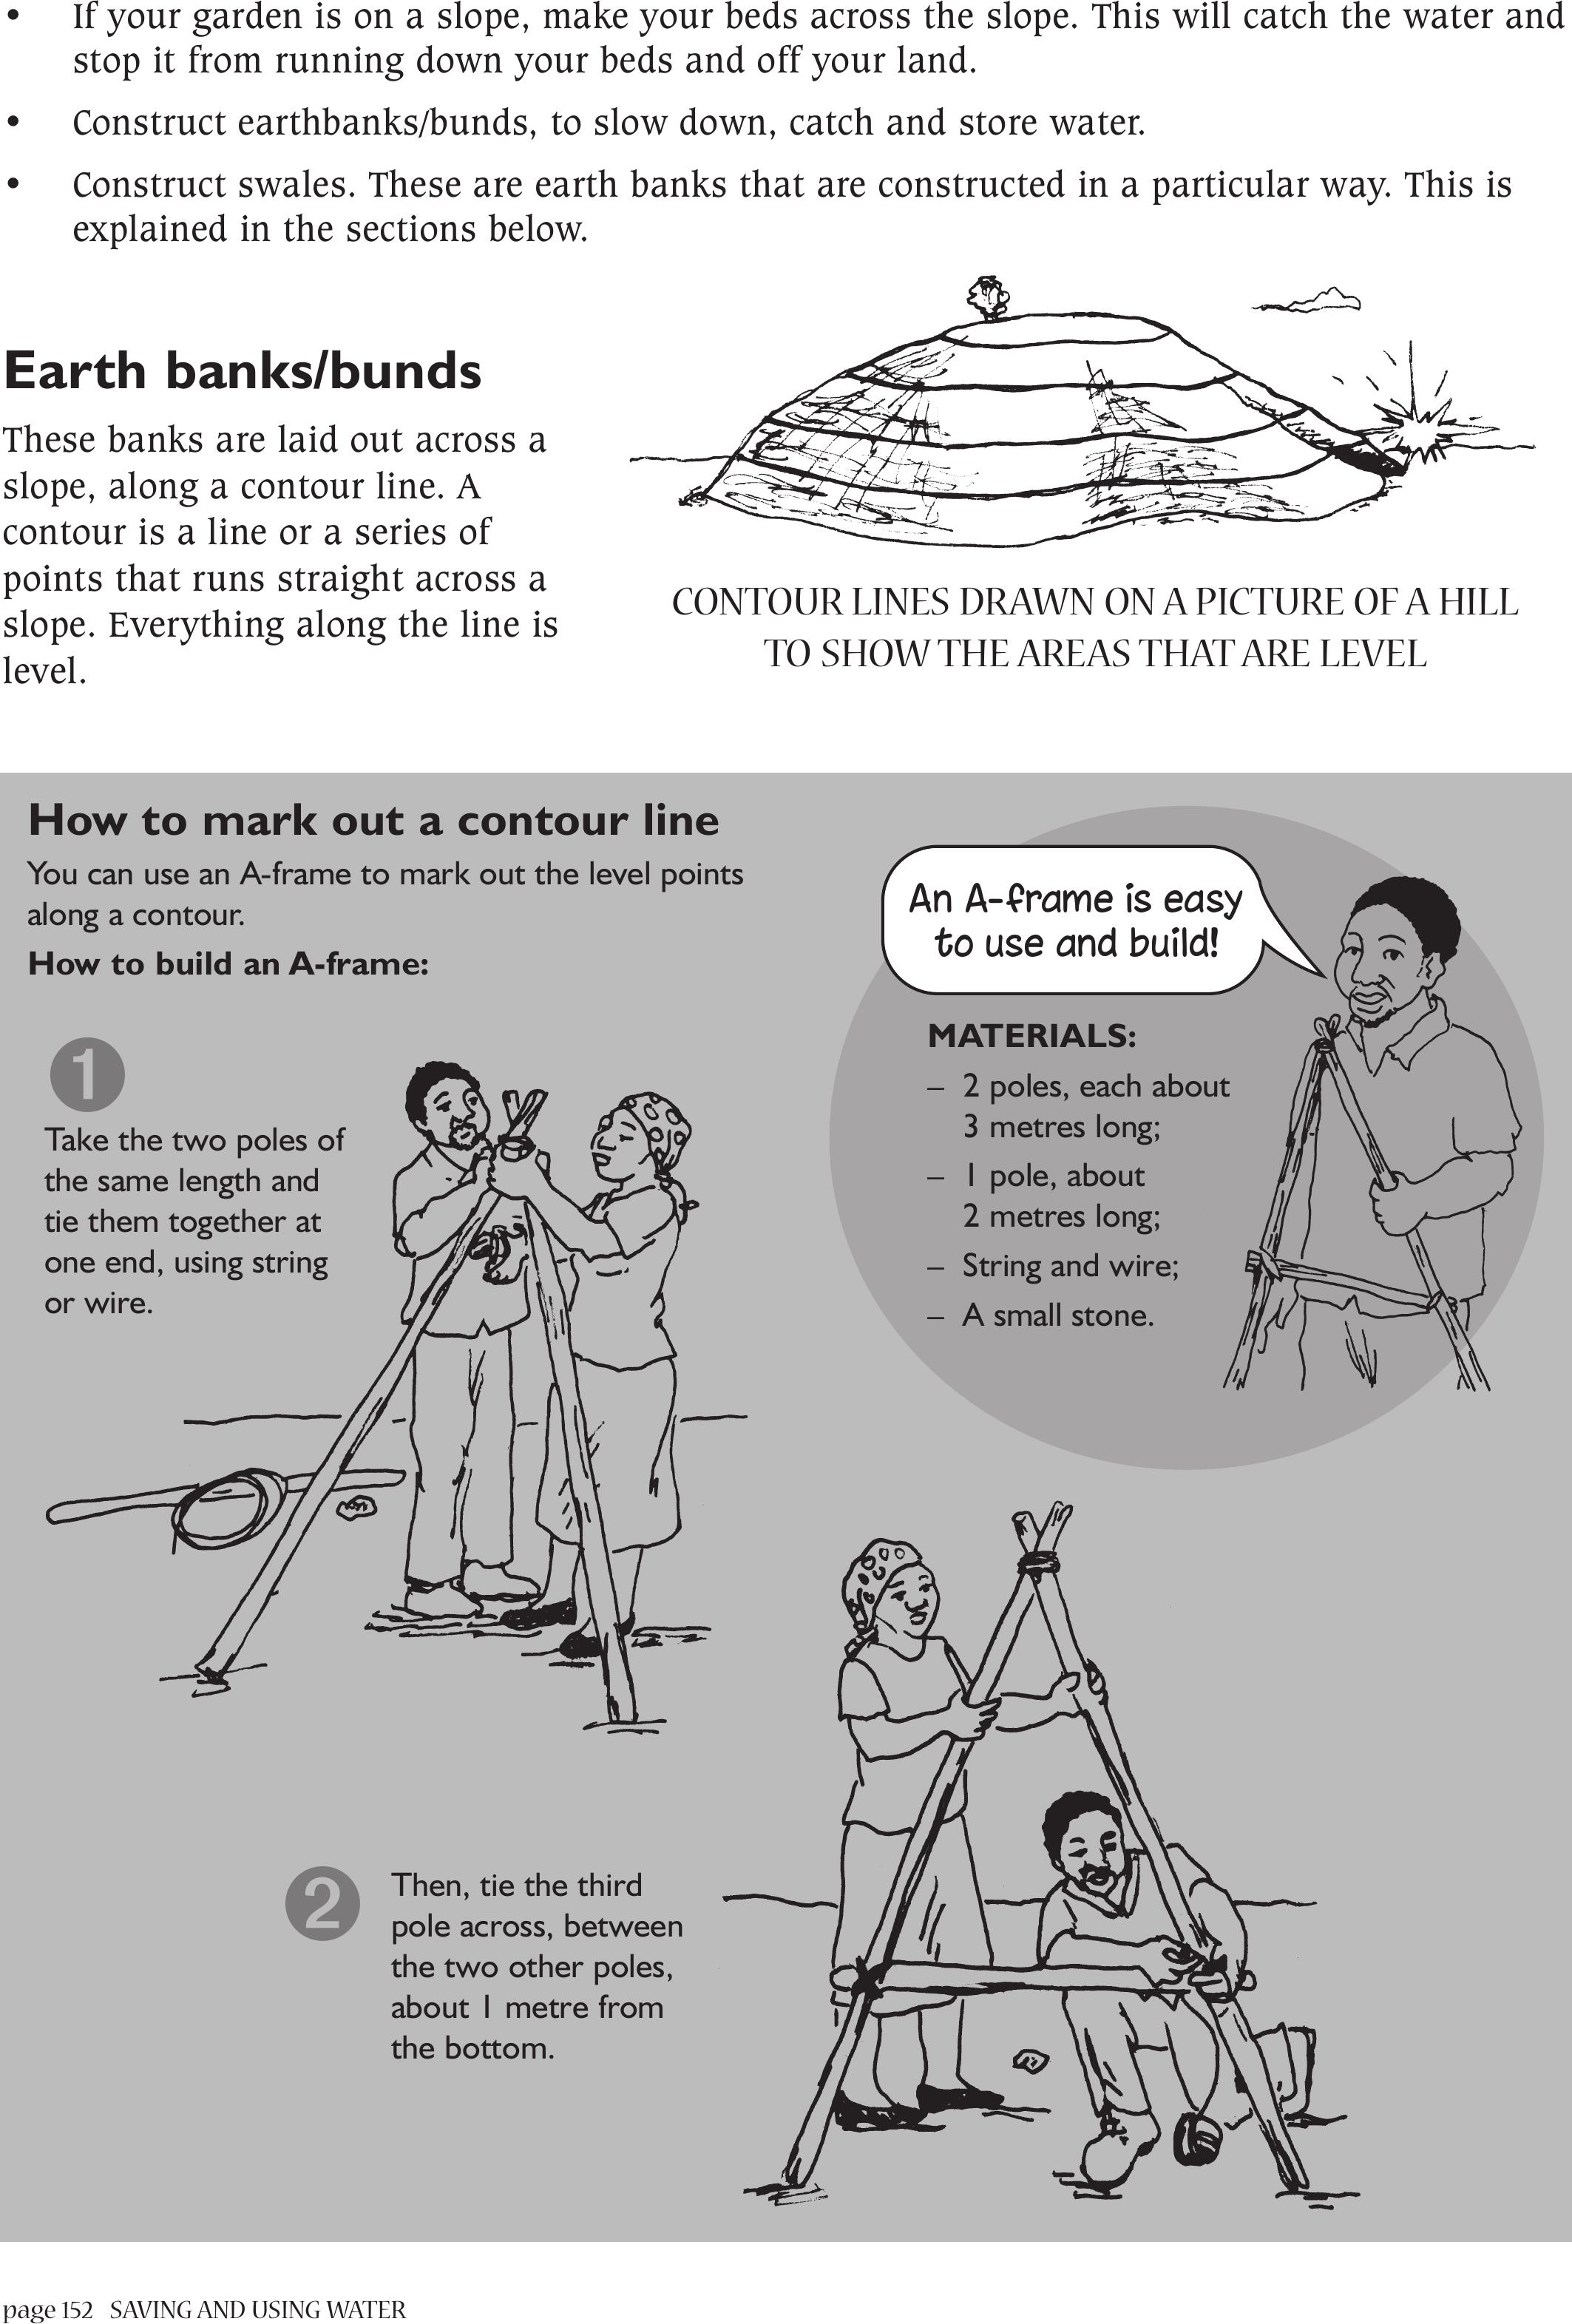
page 152 SAVING AND USING WATER
How to mark out a contour line
You can use an A-frame to mark out the level points
along a contour.
How to build an A-frame:
• If your garden is on a slope, make your beds across the slope. This will catch the water and
stop it from running down your beds and off your land.
• Construct earthbanks/bunds, to slow down, catch and store water.
• Construct swales. These are earth banks that are constructed in a particular way. This is
explained in the sections below.
Earth banks/bunds
These banks are laid out across a
slope, along a contour line. A
contour is a line or a series of
points that runs straight across a
slope. Everything along the line is
level.
CONTOUR LINES DRAWN ON A PICTURE OFA HILL
TO SHOW THE AREAS THAT ARE LEVEL
Take the two poles of
the same length and
tie them together at
one end, using string
or wire.
➊
Then, tie the third
pole across, between
the two other poles,
about 1 metre from
the bottom.
➋
An A-frame is easy
to use and build!
MATERIALS:
– 2 poles, each about
3 metres long;
– 1 pole, about
2 metres long;
– String and wire;
– A small stone.
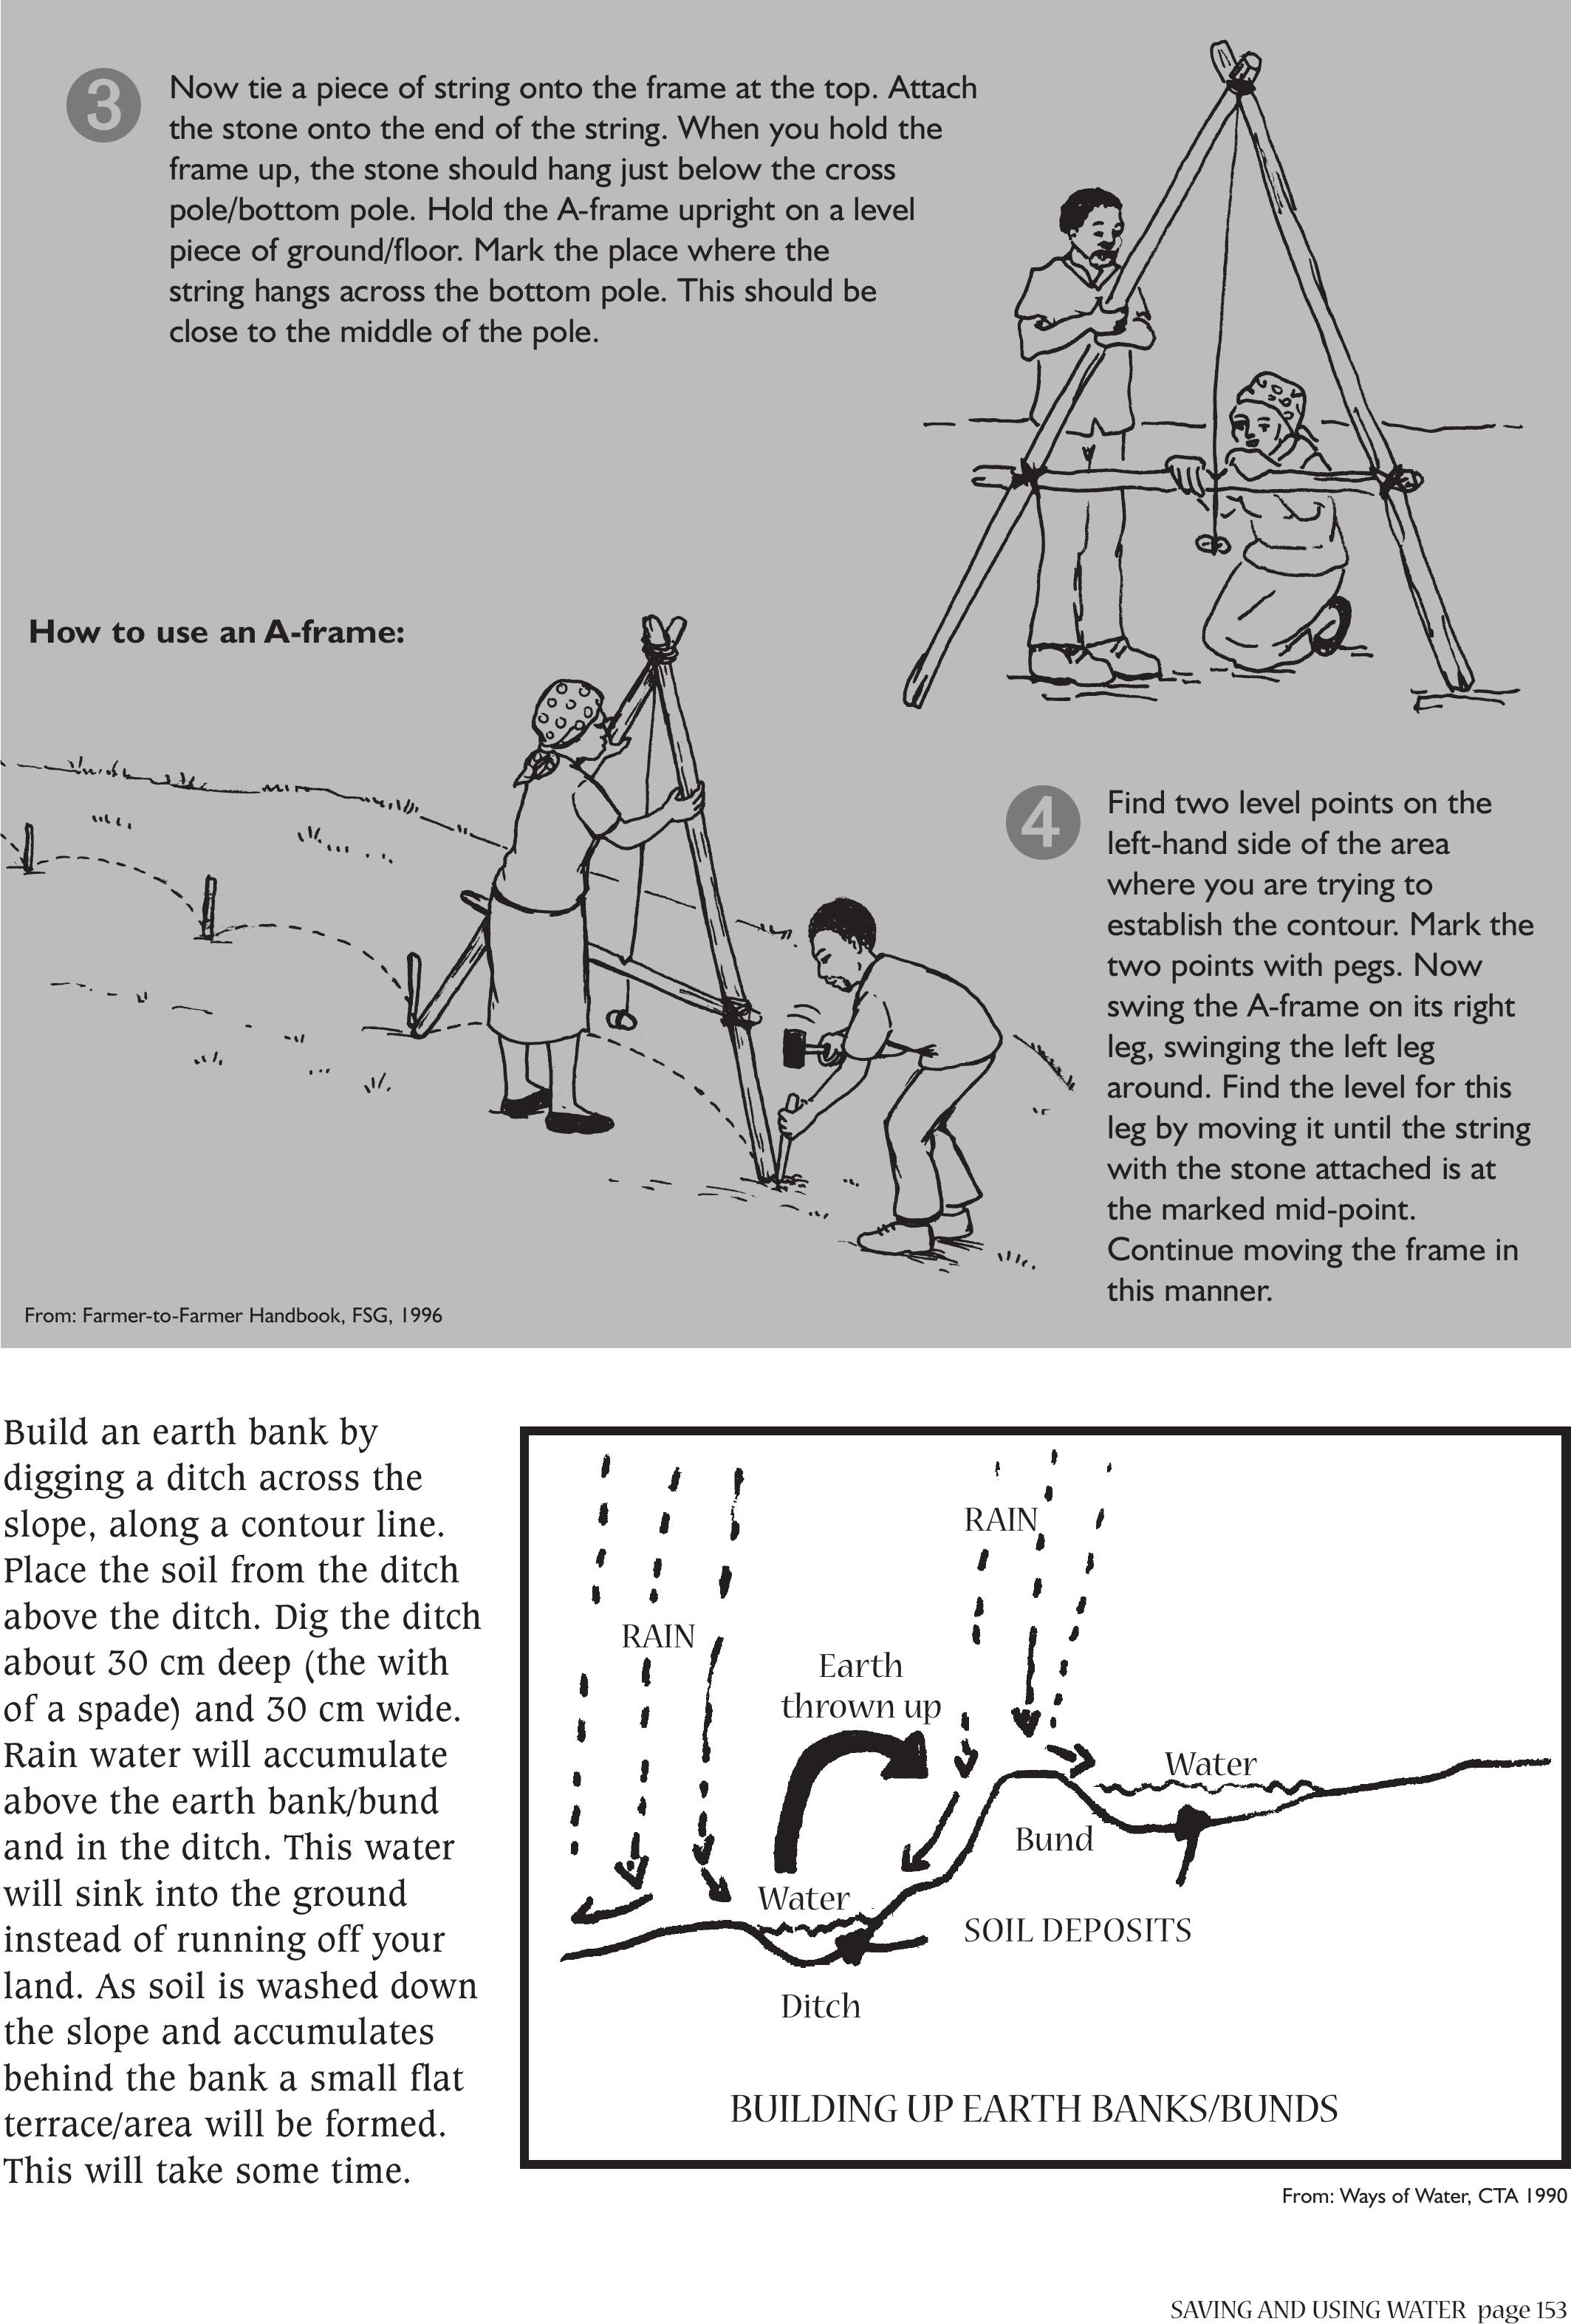
SAVING AND USING WATERpage 153
Build an earth bank by
digging a ditch across the
slope, along a contour line.
Place the soil from the ditch
above the ditch. Dig the ditch
about 30 cm deep (the with
of a spade) and 30 cm wide.
Rain water will accumulate
above the earth bank/bund
and in the ditch. This water
will sink into the ground
instead of running off your
land. As soil is washed down
the slope and accumulates
behind the bank a small flat
terrace/area will be formed.
This will take some time.
How to use an A-frame:
BUILDING UP EARTH BANKS/BUNDS
From: Ways of Water, CTA 1990
Now tie a piece of string onto the frame at the top. Attach
the stone onto the end of the string. When you hold the
frame up, the stone should hang just below the cross
pole/bottom pole. Hold the A-frame upright on a level
piece of ground/floor. Mark the place where the
string hangs across the bottom pole. This should be
close to the middle of the pole.
➌
Find two level points on the
left-hand side of the area
where you are trying to
establish the contour. Mark the
two points with pegs. Now
swing the A-frame on its right
leg, swinging the left leg
around. Find the level for this
leg by moving it until the string
with the stone attached is at
the marked mid-point.
Continue moving the frame in
this manner.
RAIN Earth
thrown up
RAIN
Bund
Water SOIL DEPOSITS
Ditch
Water
From: Farmer-to-Farmer Handbook, FSG, 1996
➍
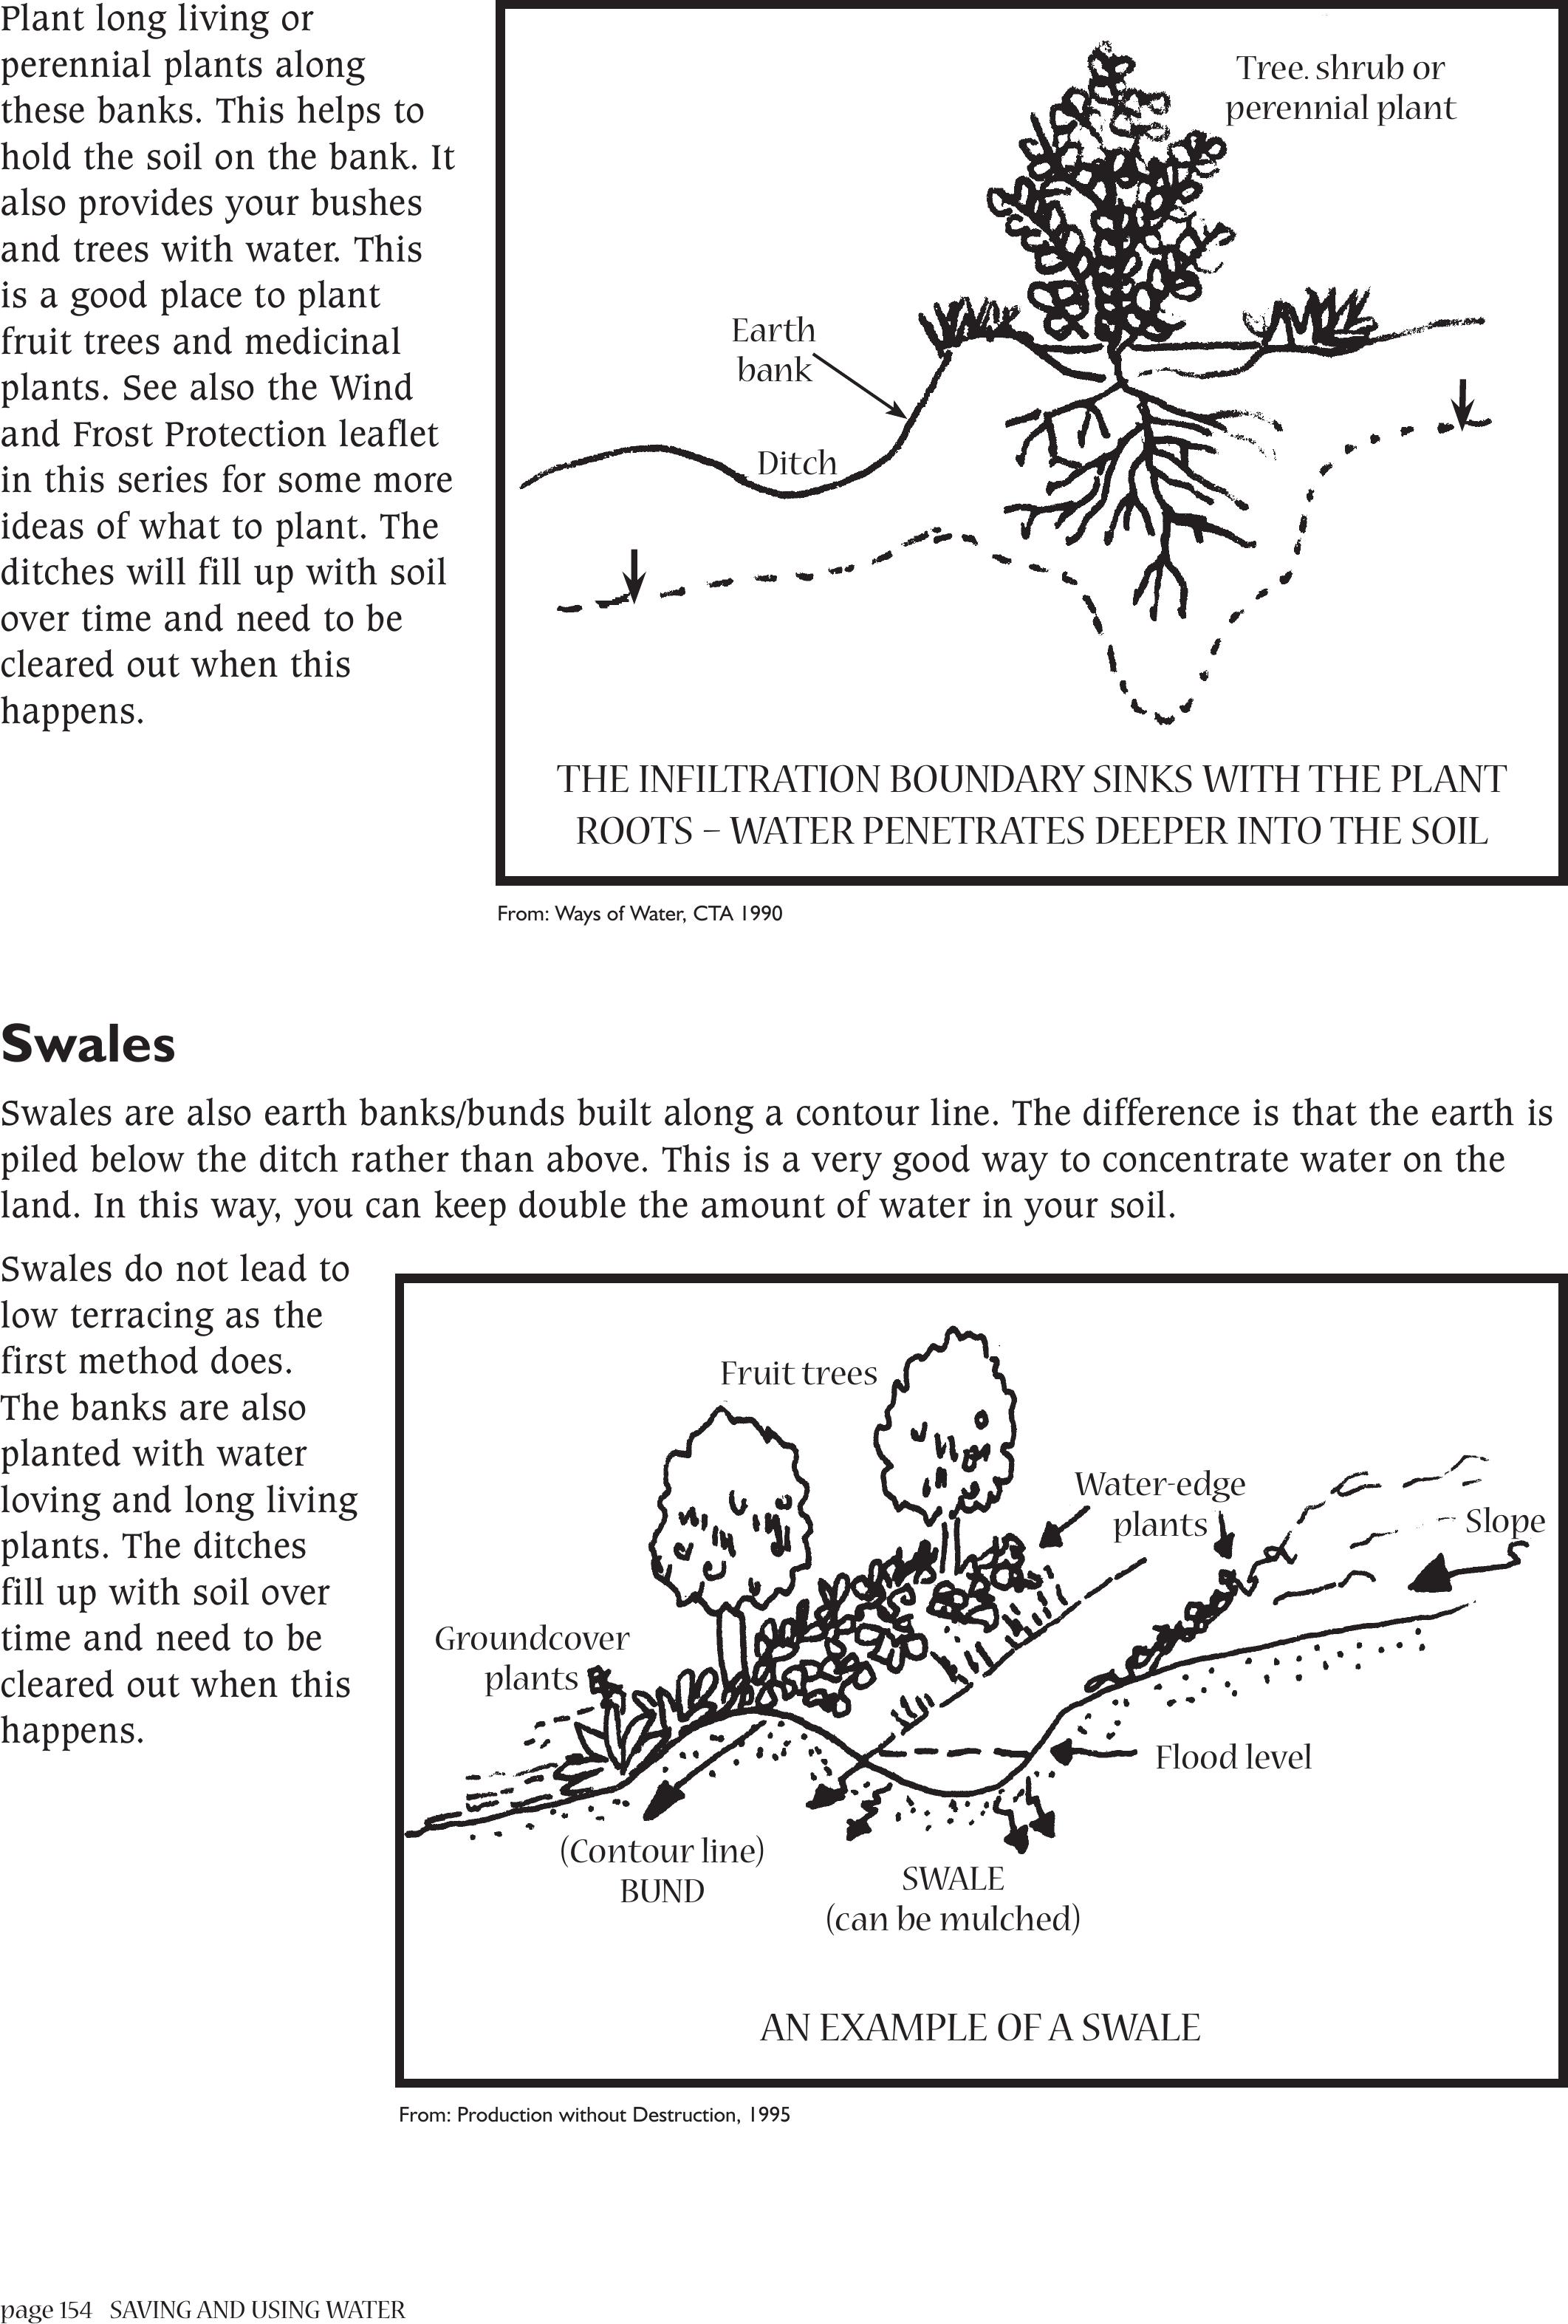
page 154 SAVING AND USING WATER
Plant long living or
perennial plants along
these banks. This helps to
hold the soil on the bank. It
also provides your bushes
and trees with water. This
is a good place to plant
fruit trees and medicinal
plants. See also the Wind
and Frost Protection leaflet
in this series for some more
ideas of what to plant. The
ditches will fill up with soil
over time and need to be
cleared out when this
happens.
Swales
Swales are also earth banks/bunds built along a contour line. The difference is that the earth is
piled below the ditch rather than above. This is a very good way to concentrate water on the
land. In this way, you can keep double the amount of water in your soil.
Swales do not lead to
low terracing as the
first method does.
The banks are also
planted with water
loving and long living
plants. The ditches
fill up with soil over
time and need to be
cleared out when this
happens.
THE INFILTRATION BOUNDARY SINKS WITH THE PLANT
ROOTS – WATER PENETRATES DEEPER INTO THE SOIL
From: Ways of Water, CTA 1990
Tree. shrub or
perennial plant
Ditch
Earth
bank
AN EXAMPLE OF A SWALE
From: Production without Destruction, 1995
Fruit trees
Water-edge
plants Slope
Flood level
SWALE
(can be mulched)
(Contour line)
BUND
Groundcover
plants
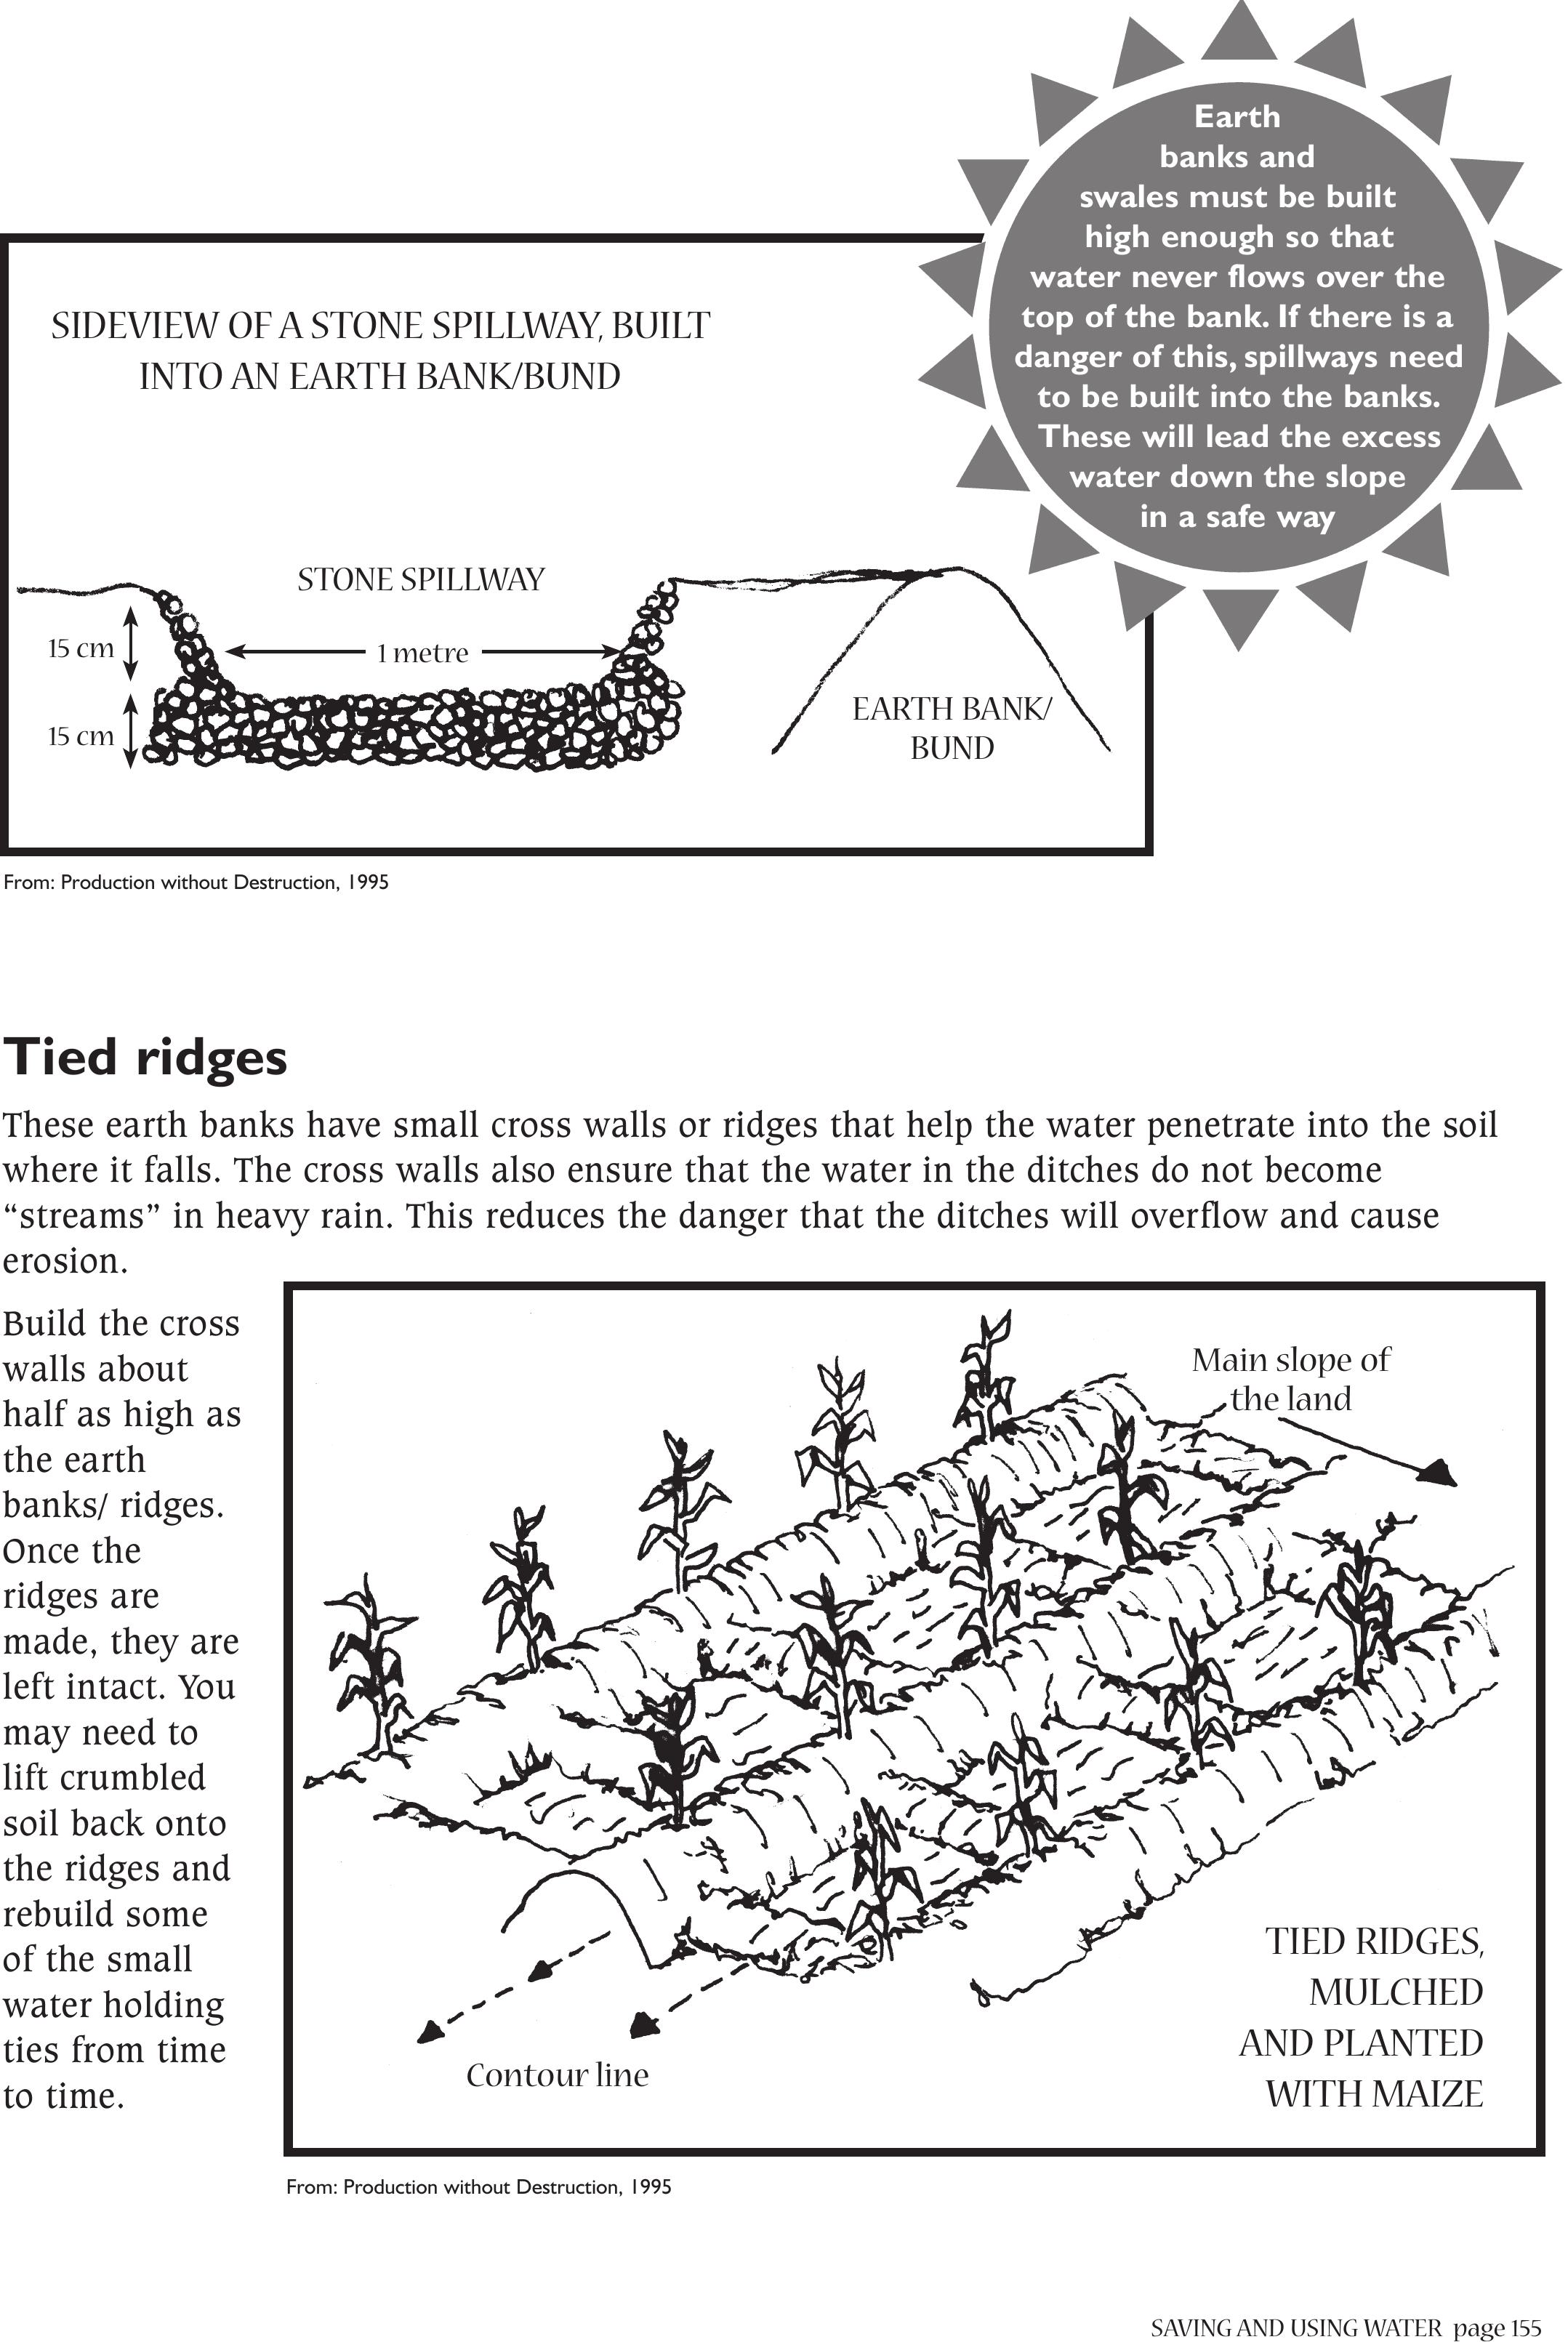
SAVING AND USING WATERpage 155
Tied ridges
These earth banks have small cross walls or ridges that help the water penetrate into the soil
where it falls. The cross walls also ensure that the water in the ditches do not become
“streams” in heavy rain. This reduces the danger that the ditches will overflow and cause
erosion.
Build the cross
walls about
half as high as
the earth
banks/ ridges.
Once the
ridges are
made, they are
left intact. You
may need to
lift crumbled
soil back onto
the ridges and
rebuild some
of the small
water holding
ties from time
to time.
SIDEVIEW OF A STONE SPILLWAY, BUILT
INTO AN EARTH BANK/BUND
From: Production without Destruction, 1995
STONE SPILLWAY
1 metre
EARTH BANK/
BUND
15 cm
15 cm
TIED RIDGES,
MULCHED
AND PLANTED
WITH MAIZE
From: Production without Destruction, 1995
Main slope of
the land
Earth
banks and
swales must be built
high enough so that
water never flows over the
top of the bank. If there is a
danger of this, spillways need
to be built into the banks.
These will lead the excess
water down the slope
in a safe way
Contour line
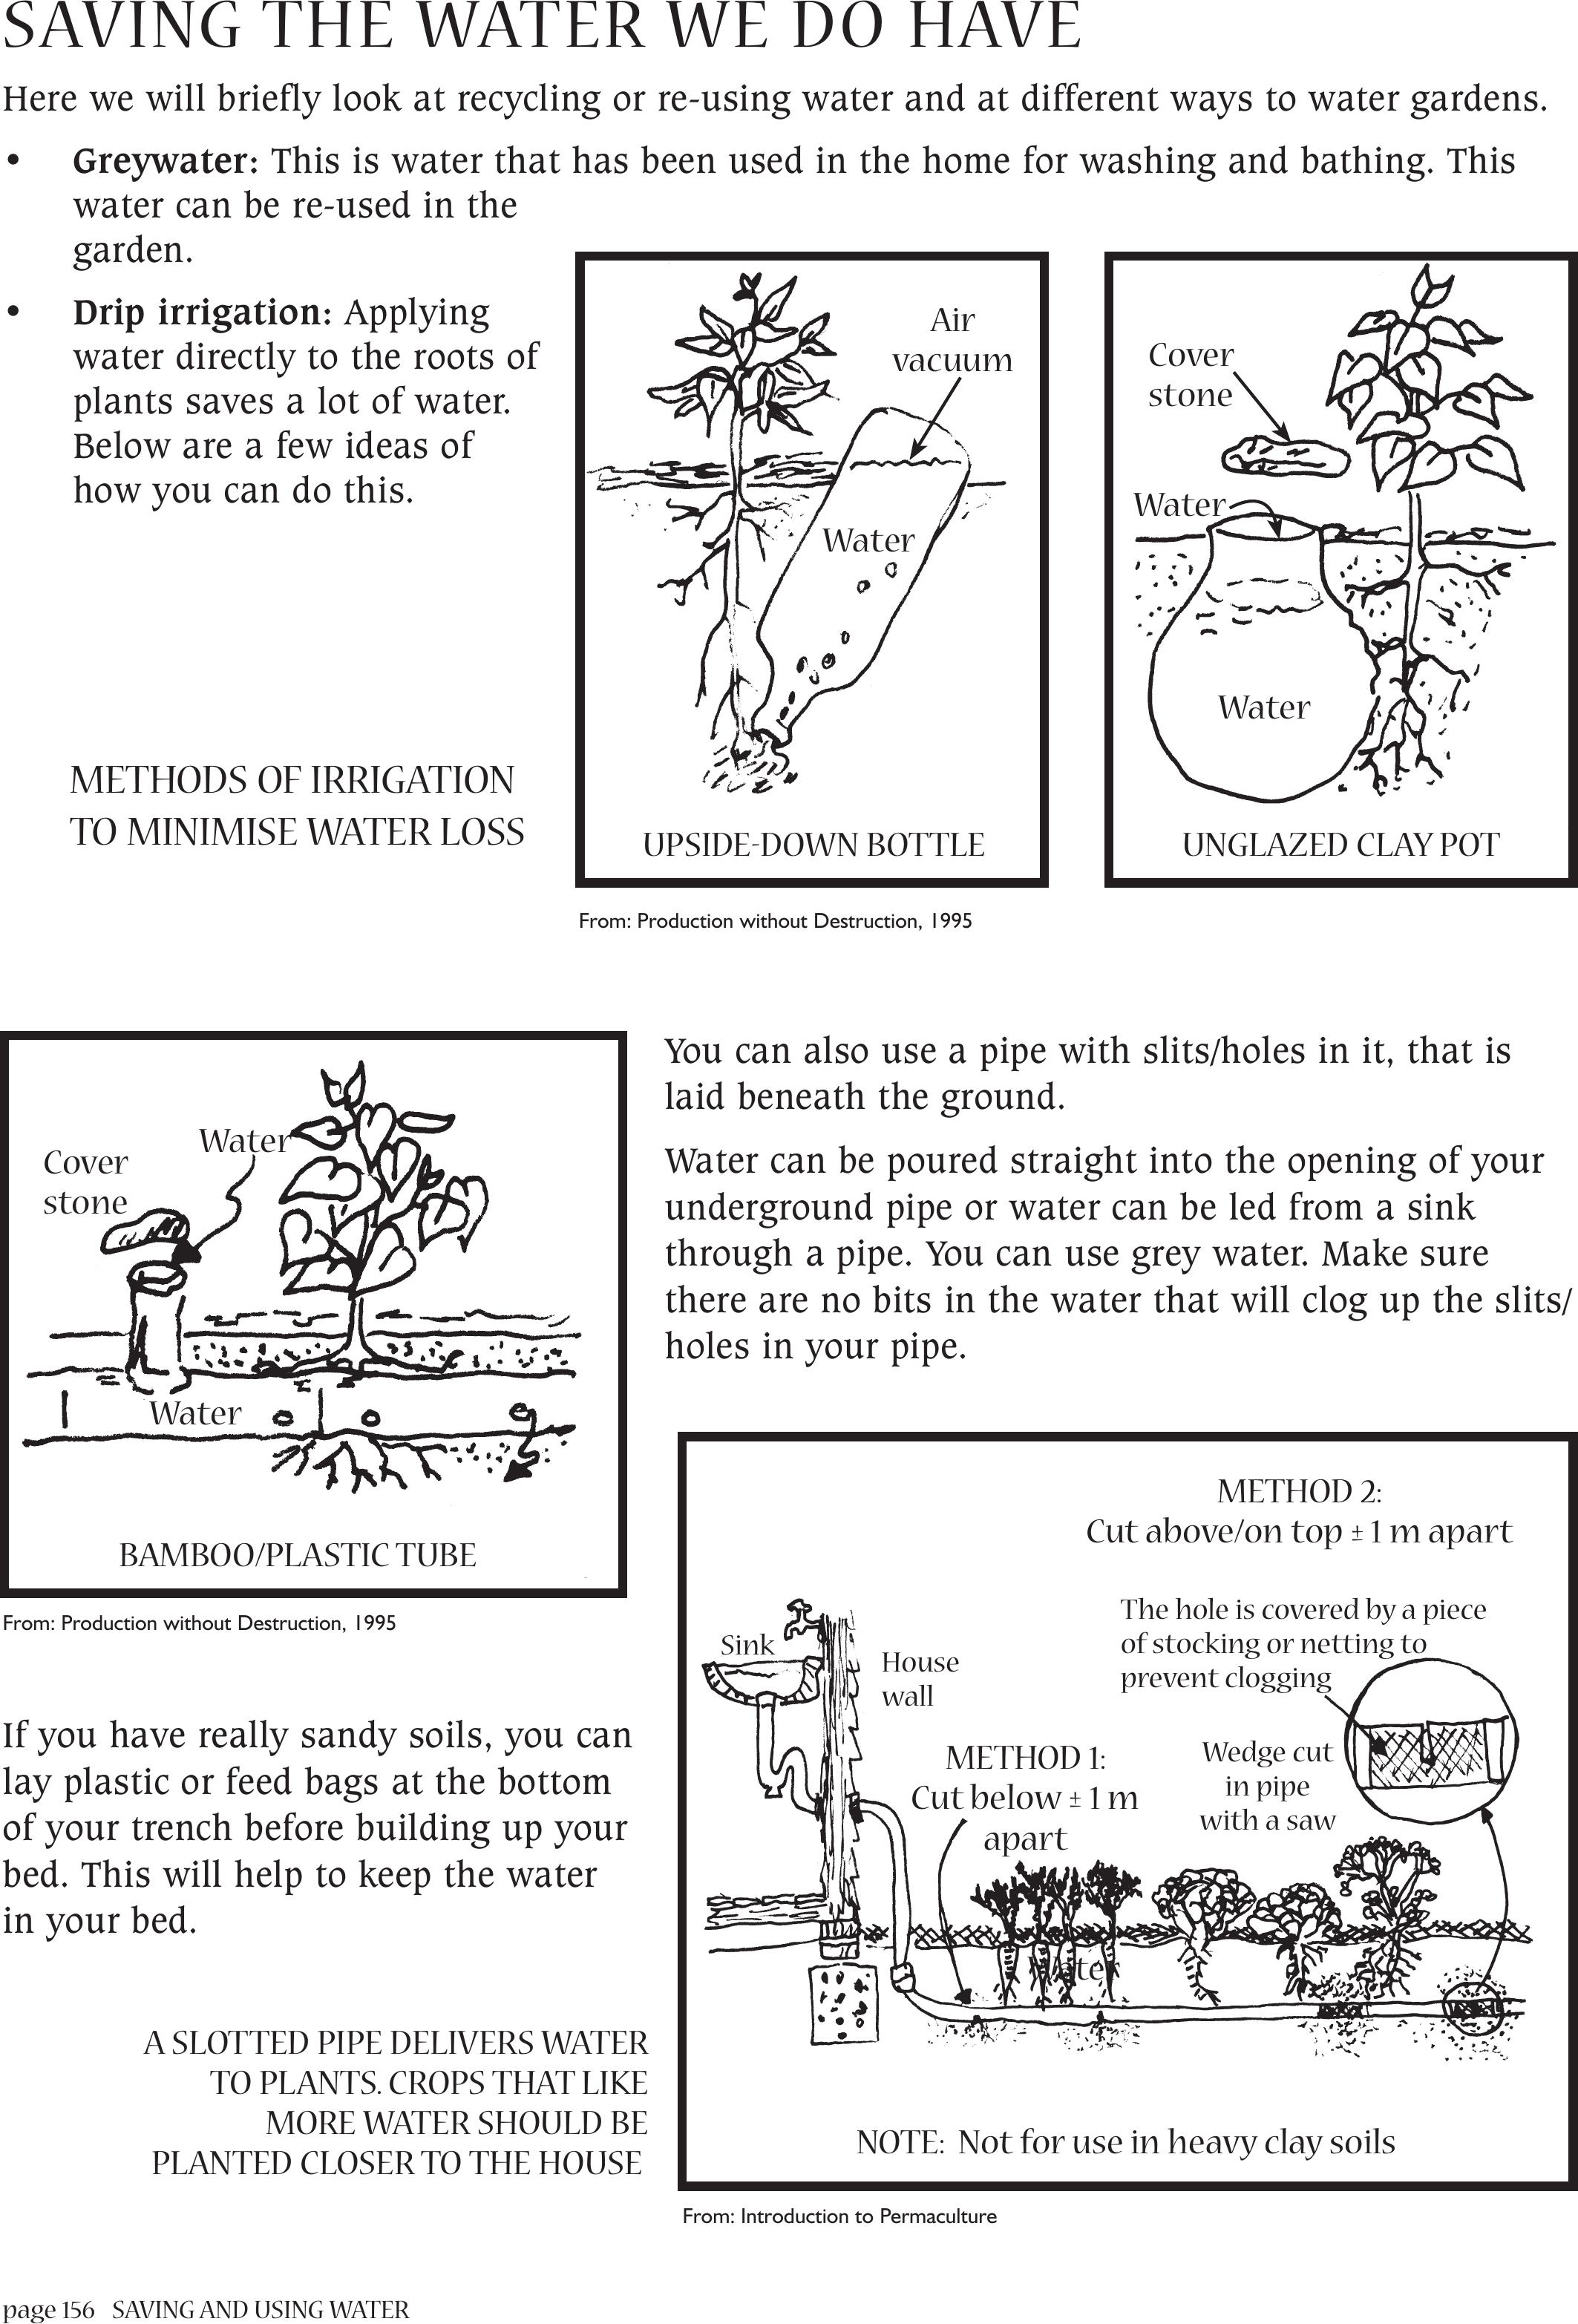
page 156 SAVING AND USING WATER
SAVING THE WATER WE DO HAVE
Here we will briefly look at recycling or re-using water and at different ways to water gardens.
• Greywater: This is water that has been used in the home for washing and bathing. This
water can be re-used in the
garden.
• Drip irrigation: Applying
water directly to the roots of
plants saves a lot of water.
Below are a few ideas of
how you can do this.
You can also use a pipe with slits/holes in it, that is
laid beneath the ground.
Water can be poured straight into the opening of your
underground pipe or water can be led from a sink
through a pipe. You can use grey water. Make sure
there are no bits in the water that will clog up the slits/
holes in your pipe.
If you have really sandy soils, you can
lay plastic or feed bags at the bottom
of your trench before building up your
bed. This will help to keep the water
in your bed.
UPSIDE-DOWN BOTTLE
Water
Air
vacuum
UNGLAZED CLAY POT
Cover
stone
Cover
stone
Water
Water
METHODS OF IRRIGATION
TO MINIMISE WATER LOSS
From: Production without Destruction, 1995
Water
Water
From: Production without Destruction, 1995Sink House
wall
Water
NOTE: Not for use in heavy clay soils
METHOD 1:
Cut below ± 1 m
apart
METHOD 2:
Cut above/on top ± 1 m apart
The hole is covered by a piece
of stocking or netting to
prevent clogging
Wedge cut
in pipe
with a saw
A SLOTTED PIPE DELIVERS WATER
TO PLANTS. CROPS THAT LIKE
MORE WATER SHOULD BE
PLANTED CLOSER TO THE HOUSE
From: Introduction to Permaculture
BAMBOO/PLASTIC TUBE
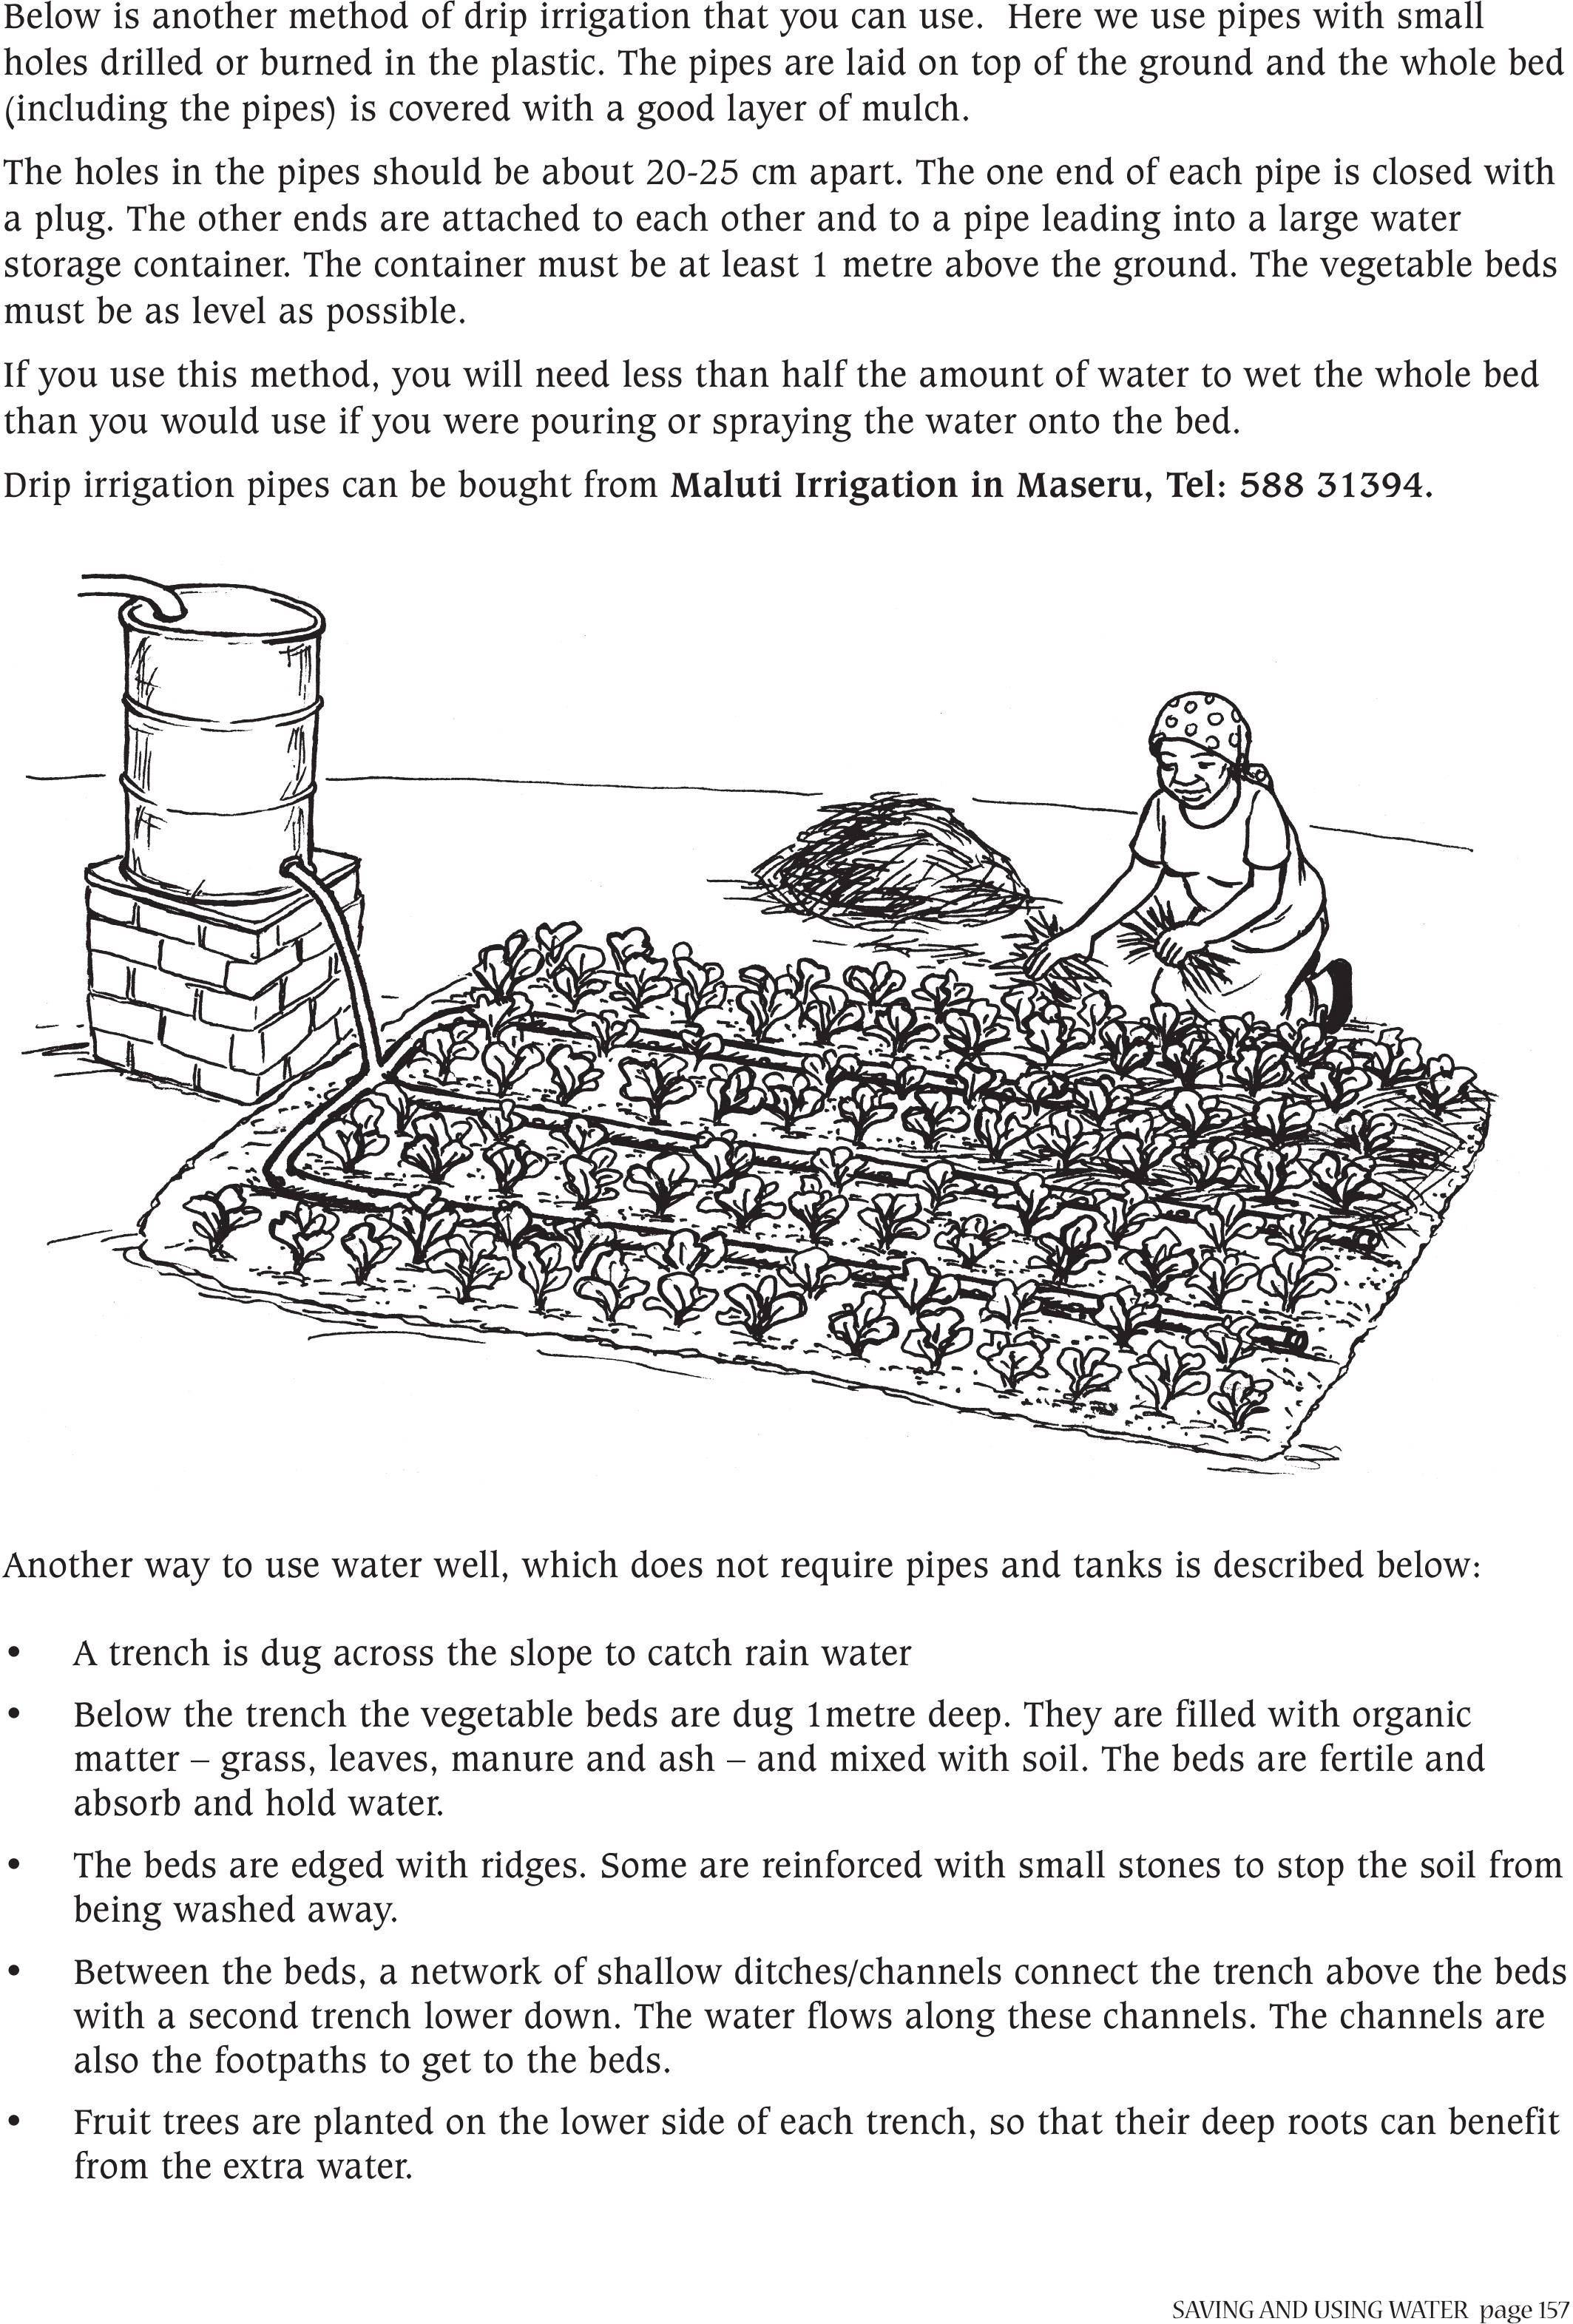
SAVING AND USING WATERpage 157
Below is another method of drip irrigation that you can use. Here we use pipes with small
holes drilled or burned in the plastic. The pipes are laid on top of the ground and the whole bed
(including the pipes) is covered with a good layer of mulch.
The holes in the pipes should be about 20-25 cm apart. The one end of each pipe is closed with
a plug. The other ends are attached to each other and to a pipe leading into a large water
storage container. The container must be at least 1 metre above the ground. The vegetable beds
must be as level as possible.
If you use this method, you will need less than half the amount of water to wet the whole bed
than you would use if you were pouring or spraying the water onto the bed.
Drip irrigation pipes can be bought from Maluti Irrigation in Maseru, Tel: 588 31394.
Another way to use water well, which does not require pipes and tanks is described below:
• A trench is dug across the slope to catch rain water
• Below the trench the vegetable beds are dug 1metre deep. They are filled with organic
matter – grass, leaves, manure and ash – and mixed with soil. The beds are fertile and
absorb and hold water.
• The beds are edged with ridges. Some are reinforced with small stones to stop the soil from
being washed away.
• Between the beds, a network of shallow ditches/channels connect the trench above the beds
with a second trench lower down. The water flows along these channels. The channels are
also the footpaths to get to the beds.
• Fruit trees are planted on the lower side of each trench, so that their deep roots can benefit
from the extra water.
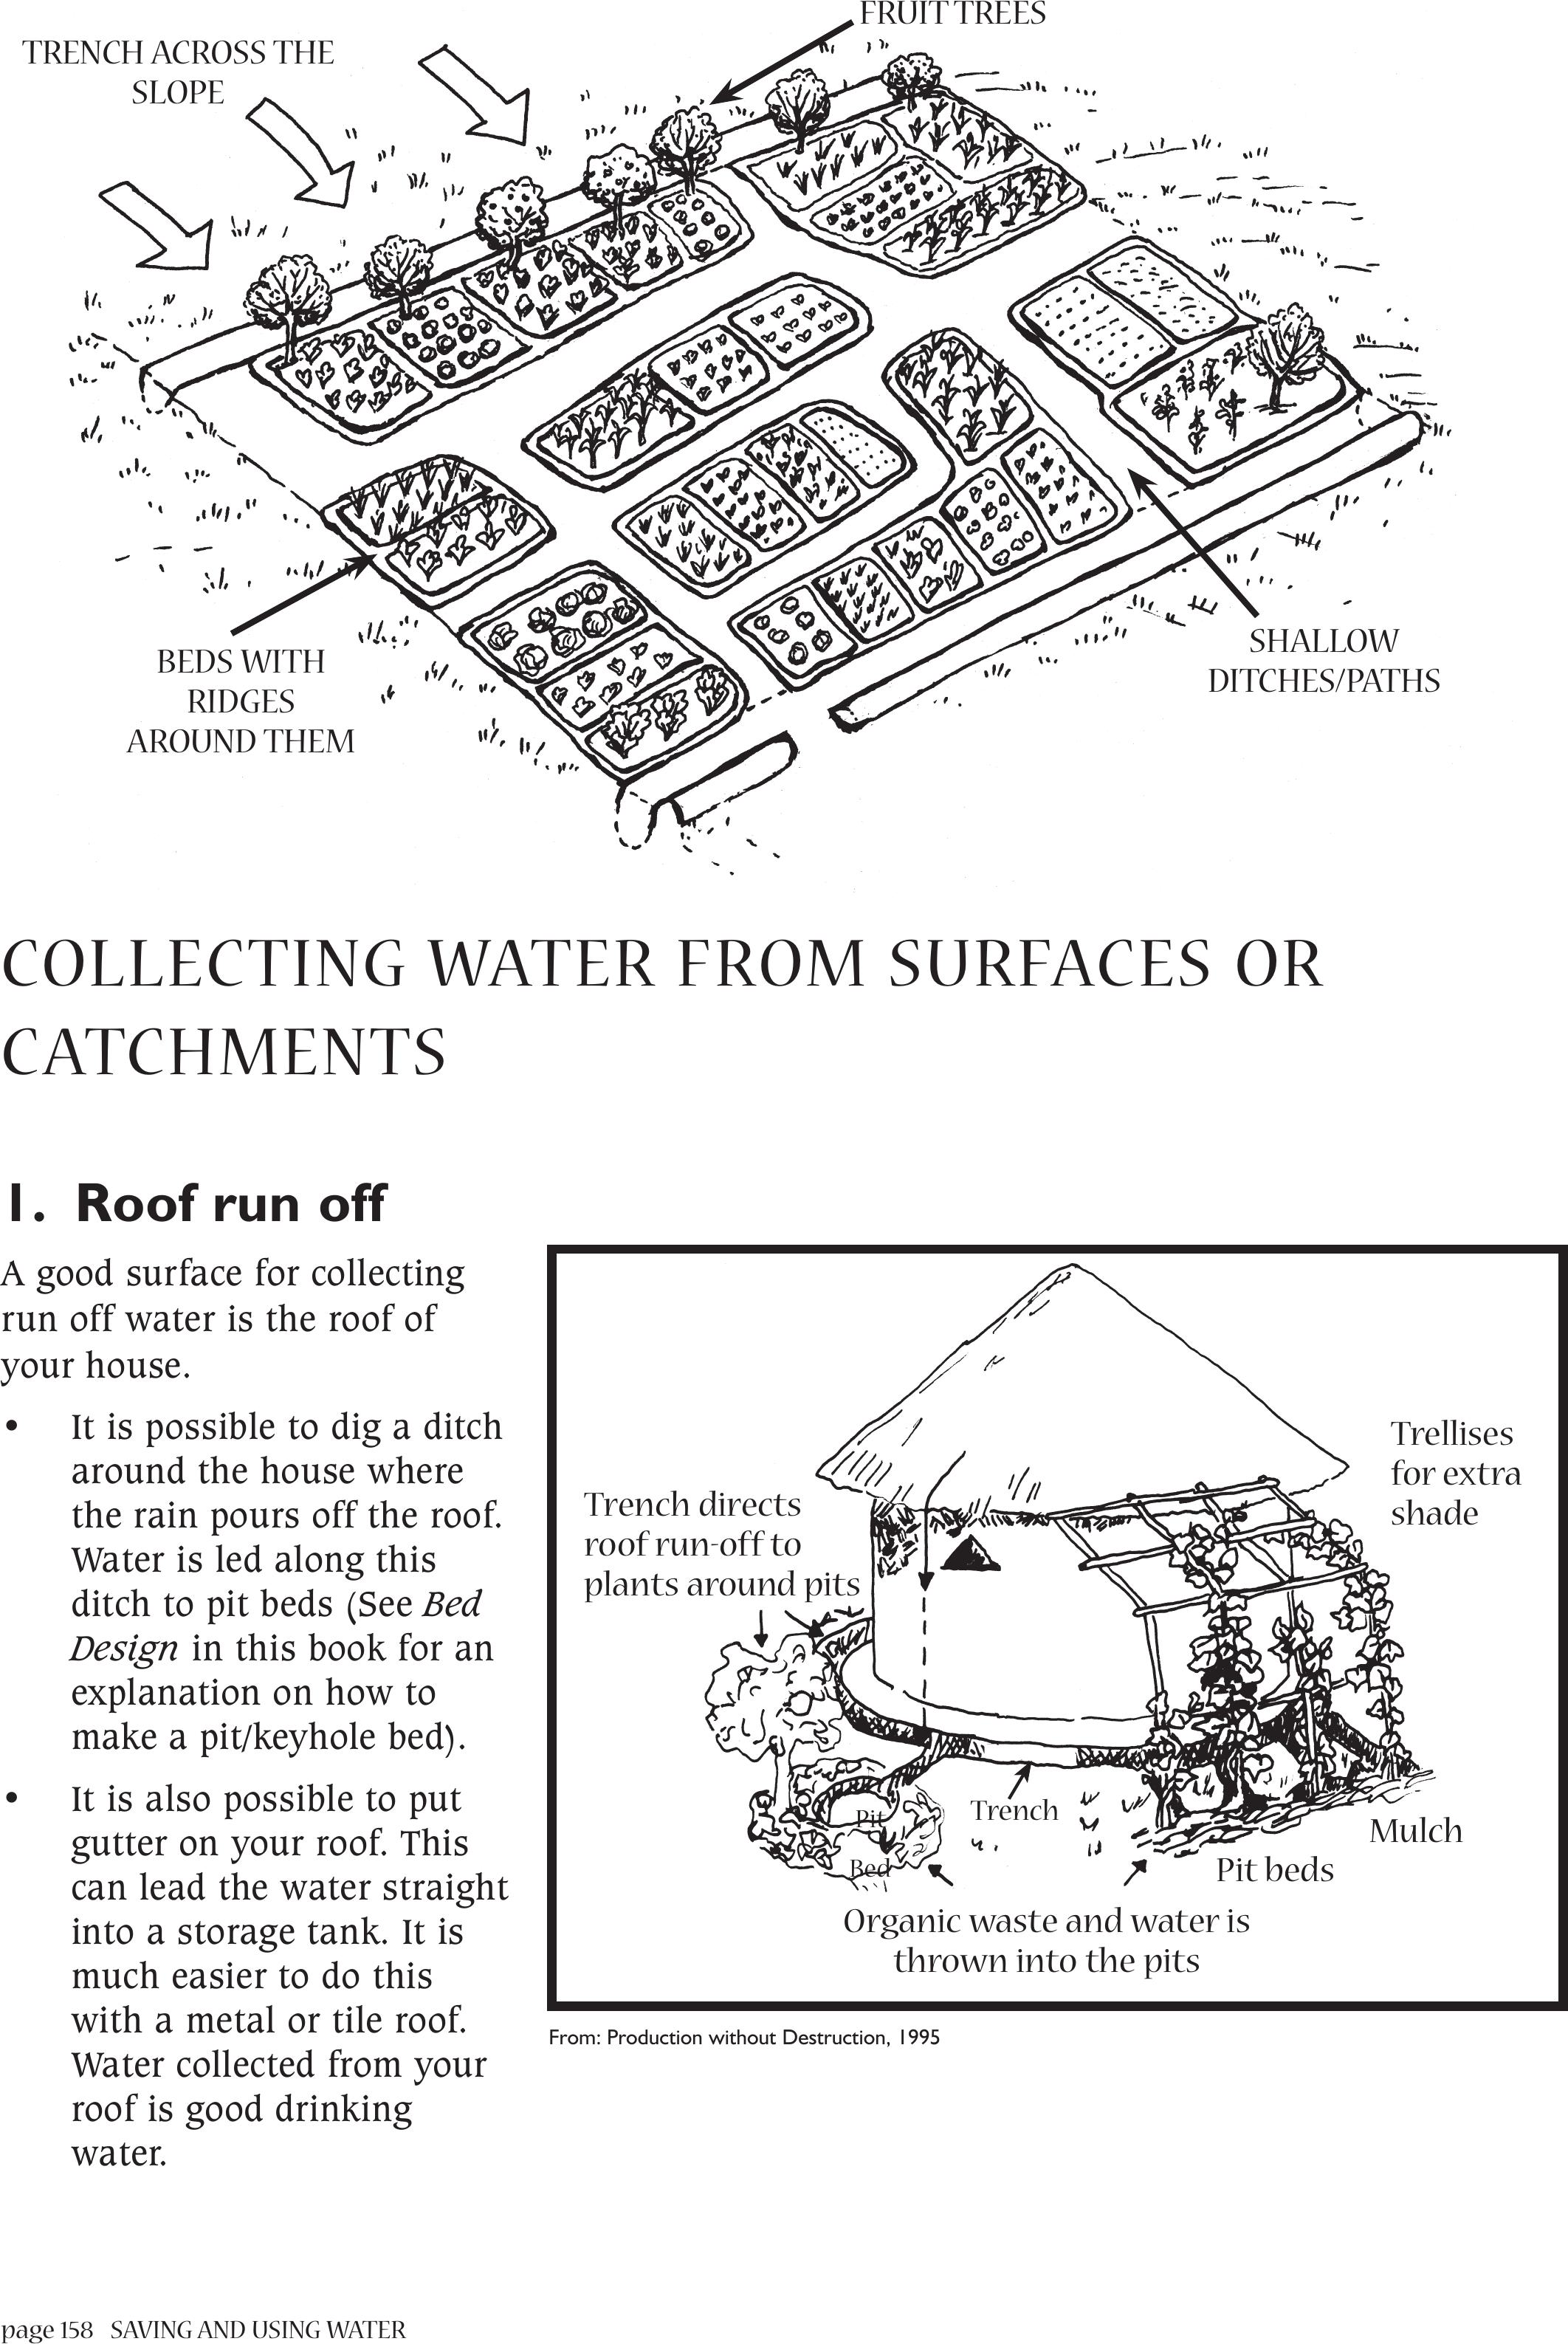
page 158 SAVING AND USING WATER
COLLECTING WATER FROM SURFACES OR
CATCHMENTS
1. Roof run off
A good surface for collecting
run off water is the roof of
your house.
• It is possible to dig a ditch
around the house where
the rain pours off the roof.
Water is led along this
ditch to pit beds (See Bed
Design in this book for an
explanation on how to
make a pit/keyhole bed).
• It is also possible to put
gutter on your roof. This
can lead the water straight
into a storage tank. It is
much easier to do this
with a metal or tile roof.
Water collected from your
roof is good drinking
water.
From: Production without Destruction, 1995
Trench directs
roof run-off to
plants around pits
Trellises
for extra
shade
Pit
Organic waste and water is
thrown into the pits
Pit beds
Mulch
Bed
Trench
TRENCH ACROSS THE
SLOPE
FRUIT TREES
BEDS WITH
RIDGES
AROUND THEM
SHALLOW
DITCHES/PATHS
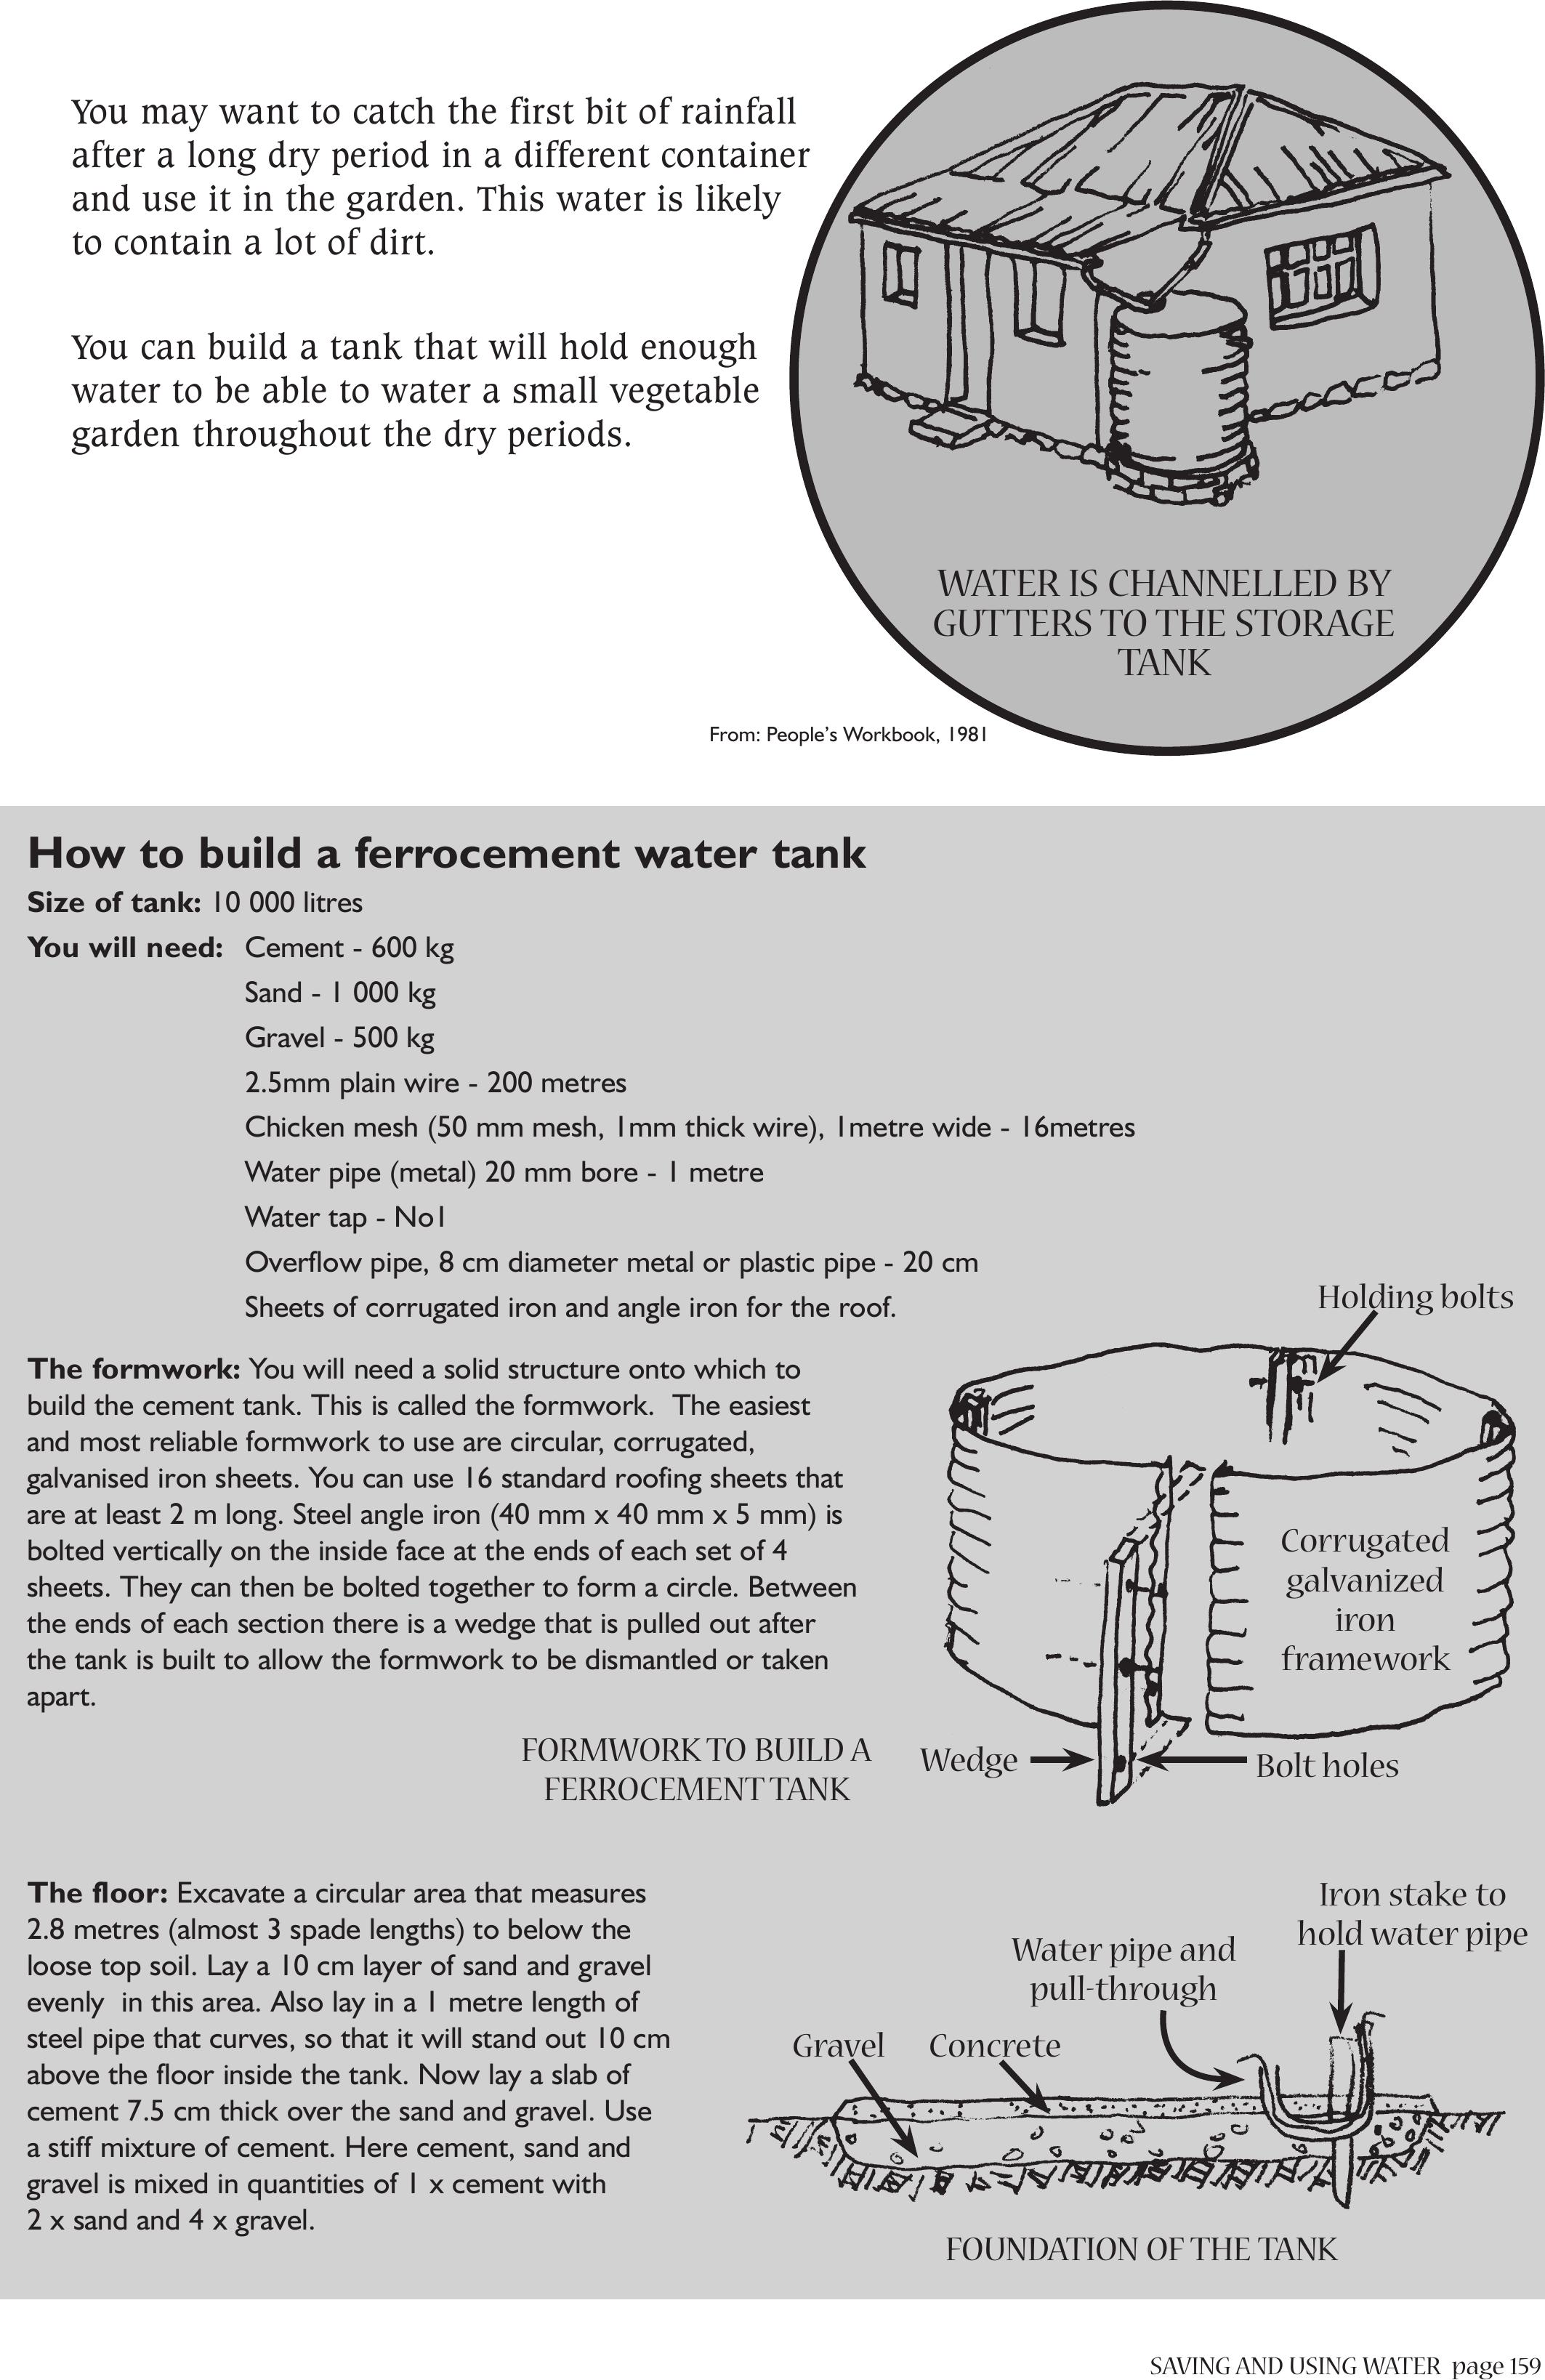
SAVING AND USING WATERpage 159
You may want to catch the first bit of rainfall
after a long dry period in a different container
and use it in the garden. This water is likely
to contain a lot of dirt.
You can build a tank that will hold enough
water to be able to water a small vegetable
garden throughout the dry periods.
From: People’s Workbook, 1981
WATER IS CHANNELLED BY
GUTTERS TO THE STORAGE
TANK
How to build a ferrocement water tank
Size of tank: 10 000 litres
You will need:Cement - 600 kg
Sand - 1 000 kg
Gravel - 500 kg
2.5mm plain wire - 200 metres
Chicken mesh (50 mm mesh, 1mm thick wire), 1metre wide - 16metres
Water pipe (metal) 20 mm bore - 1 metre
Water tap - No1
Overflow pipe, 8 cm diameter metal or plastic pipe - 20 cm
Sheets of corrugated iron and angle iron for the roof.
The formwork: You will need a solid structure onto which to
build the cement tank. This is called the formwork. The easiest
and most reliable formwork to use are circular, corrugated,
galvanised iron sheets. You can use 16 standard roofing sheets that
are at least 2 m long. Steel angle iron (40 mm x 40 mm x 5 mm) is
bolted vertically on the inside face at the ends of each set of 4
sheets. They can then be bolted together to form a circle. Between
the ends of each section there is a wedge that is pulled out after
the tank is built to allow the formwork to be dismantled or taken
apart.
The floor: Excavate a circular area that measures
2.8 metres (almost 3 spade lengths) to below the
loose top soil. Lay a 10 cm layer of sand and gravel
evenly in this area. Also lay in a 1 metre length of
steel pipe that curves, so that it will stand out 10 cm
above the floor inside the tank. Now lay a slab of
cement 7.5 cm thick over the sand and gravel. Use
a stiff mixture of cement. Here cement, sand and
gravel is mixed in quantities of 1 x cement with
2 x sand and 4 x gravel.
Holding bolts
Bolt holes
Wedge
Corrugated
galvanized
iron
framework
FORMWORK TO BUILD A
FERROCEMENT TANK
FOUNDATION OF THE TANK
Gravel Concrete
Water pipe and
pull-through
Iron stake to
hold water pipe
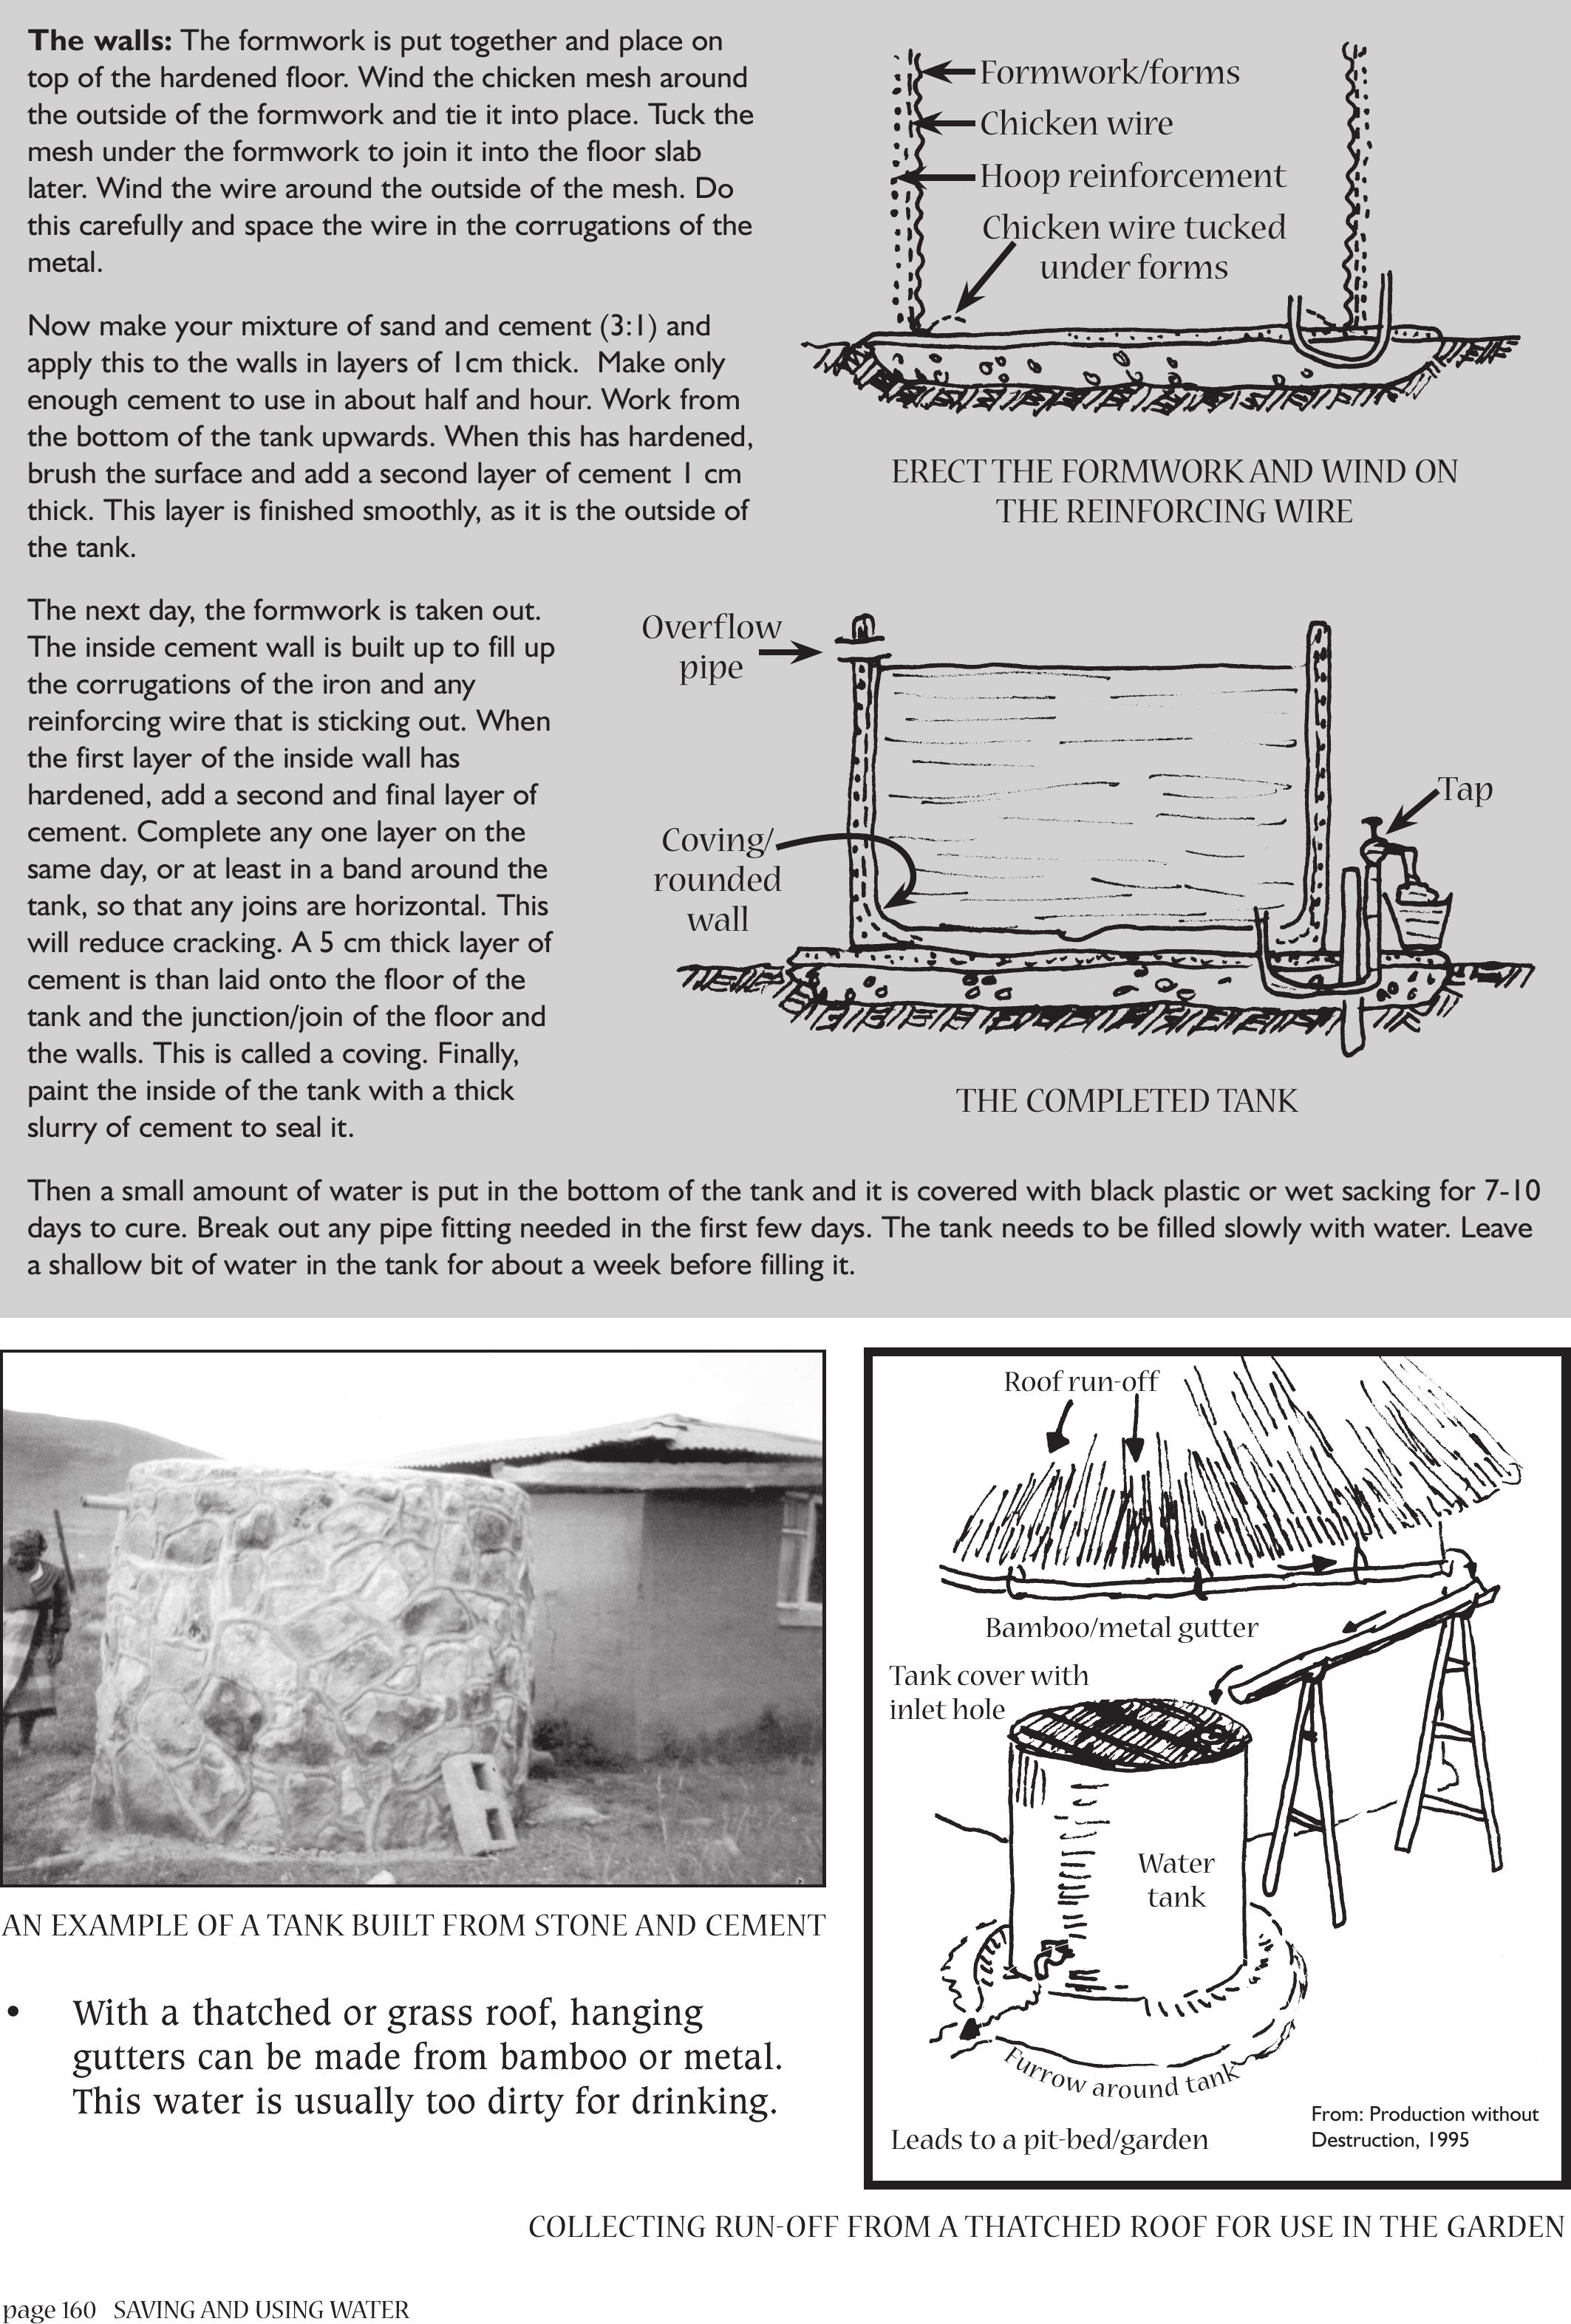
page 160 SAVING AND USING WATER
• With a thatched or grass roof, hanging
gutters can be made from bamboo or metal.
This water is usually too dirty for drinking.
The walls: The formwork is put together and place on
top of the hardened floor. Wind the chicken mesh around
the outside of the formwork and tie it into place. Tuck the
mesh under the formwork to join it into the floor slab
later. Wind the wire around the outside of the mesh. Do
this carefully and space the wire in the corrugations of the
metal.
Now make your mixture of sand and cement (3:1) and
apply this to the walls in layers of 1cm thick. Make only
enough cement to use in about half and hour. Work from
the bottom of the tank upwards. When this has hardened,
brush the surface and add a second layer of cement 1 cm
thick. This layer is finished smoothly, as it is the outside of
the tank.
The next day, the formwork is taken out.
The inside cement wall is built up to fill up
the corrugations of the iron and any
reinforcing wire that is sticking out. When
the first layer of the inside wall has
hardened, add a second and final layer of
cement. Complete any one layer on the
same day, or at least in a band around the
tank, so that any joins are horizontal. This
will reduce cracking. A 5 cm thick layer of
cement is than laid onto the floor of the
tank and the junction/join of the floor and
the walls. This is called a coving. Finally,
paint the inside of the tank with a thick
slurry of cement to seal it.
Then a small amount of water is put in the bottom of the tank and it is covered with black plastic or wet sacking for 7-10
days to cure. Break out any pipe fitting needed in the first few days. The tank needs to be filled slowly with water. Leave
a shallow bit of water in the tank for about a week before filling it.
ERECT THE FORMWORK AND WIND ON
THE REINFORCING WIRE
Formwork/forms
Chicken wire
Hoop reinforcement
Chicken wire tucked
under forms
Overflow
pipe
Coving/
rounded
wall
Tap
THE COMPLETED TANK
From: Production without
Destruction, 1995
Roof run-off
Bamboo/metal gutter
Tank cover with
inlet hole
Water
tank
Leads to a pit-bed/garden
F
u
r
r
o
w
a
r
o
u
n
d
t
a
n
k
COLLECTING RUN-OFF FROM A THATCHED ROOF FOR USE IN THE GARDEN
AN EXAMPLE OF ATANK BUILT FROM STONE AND CEMENT
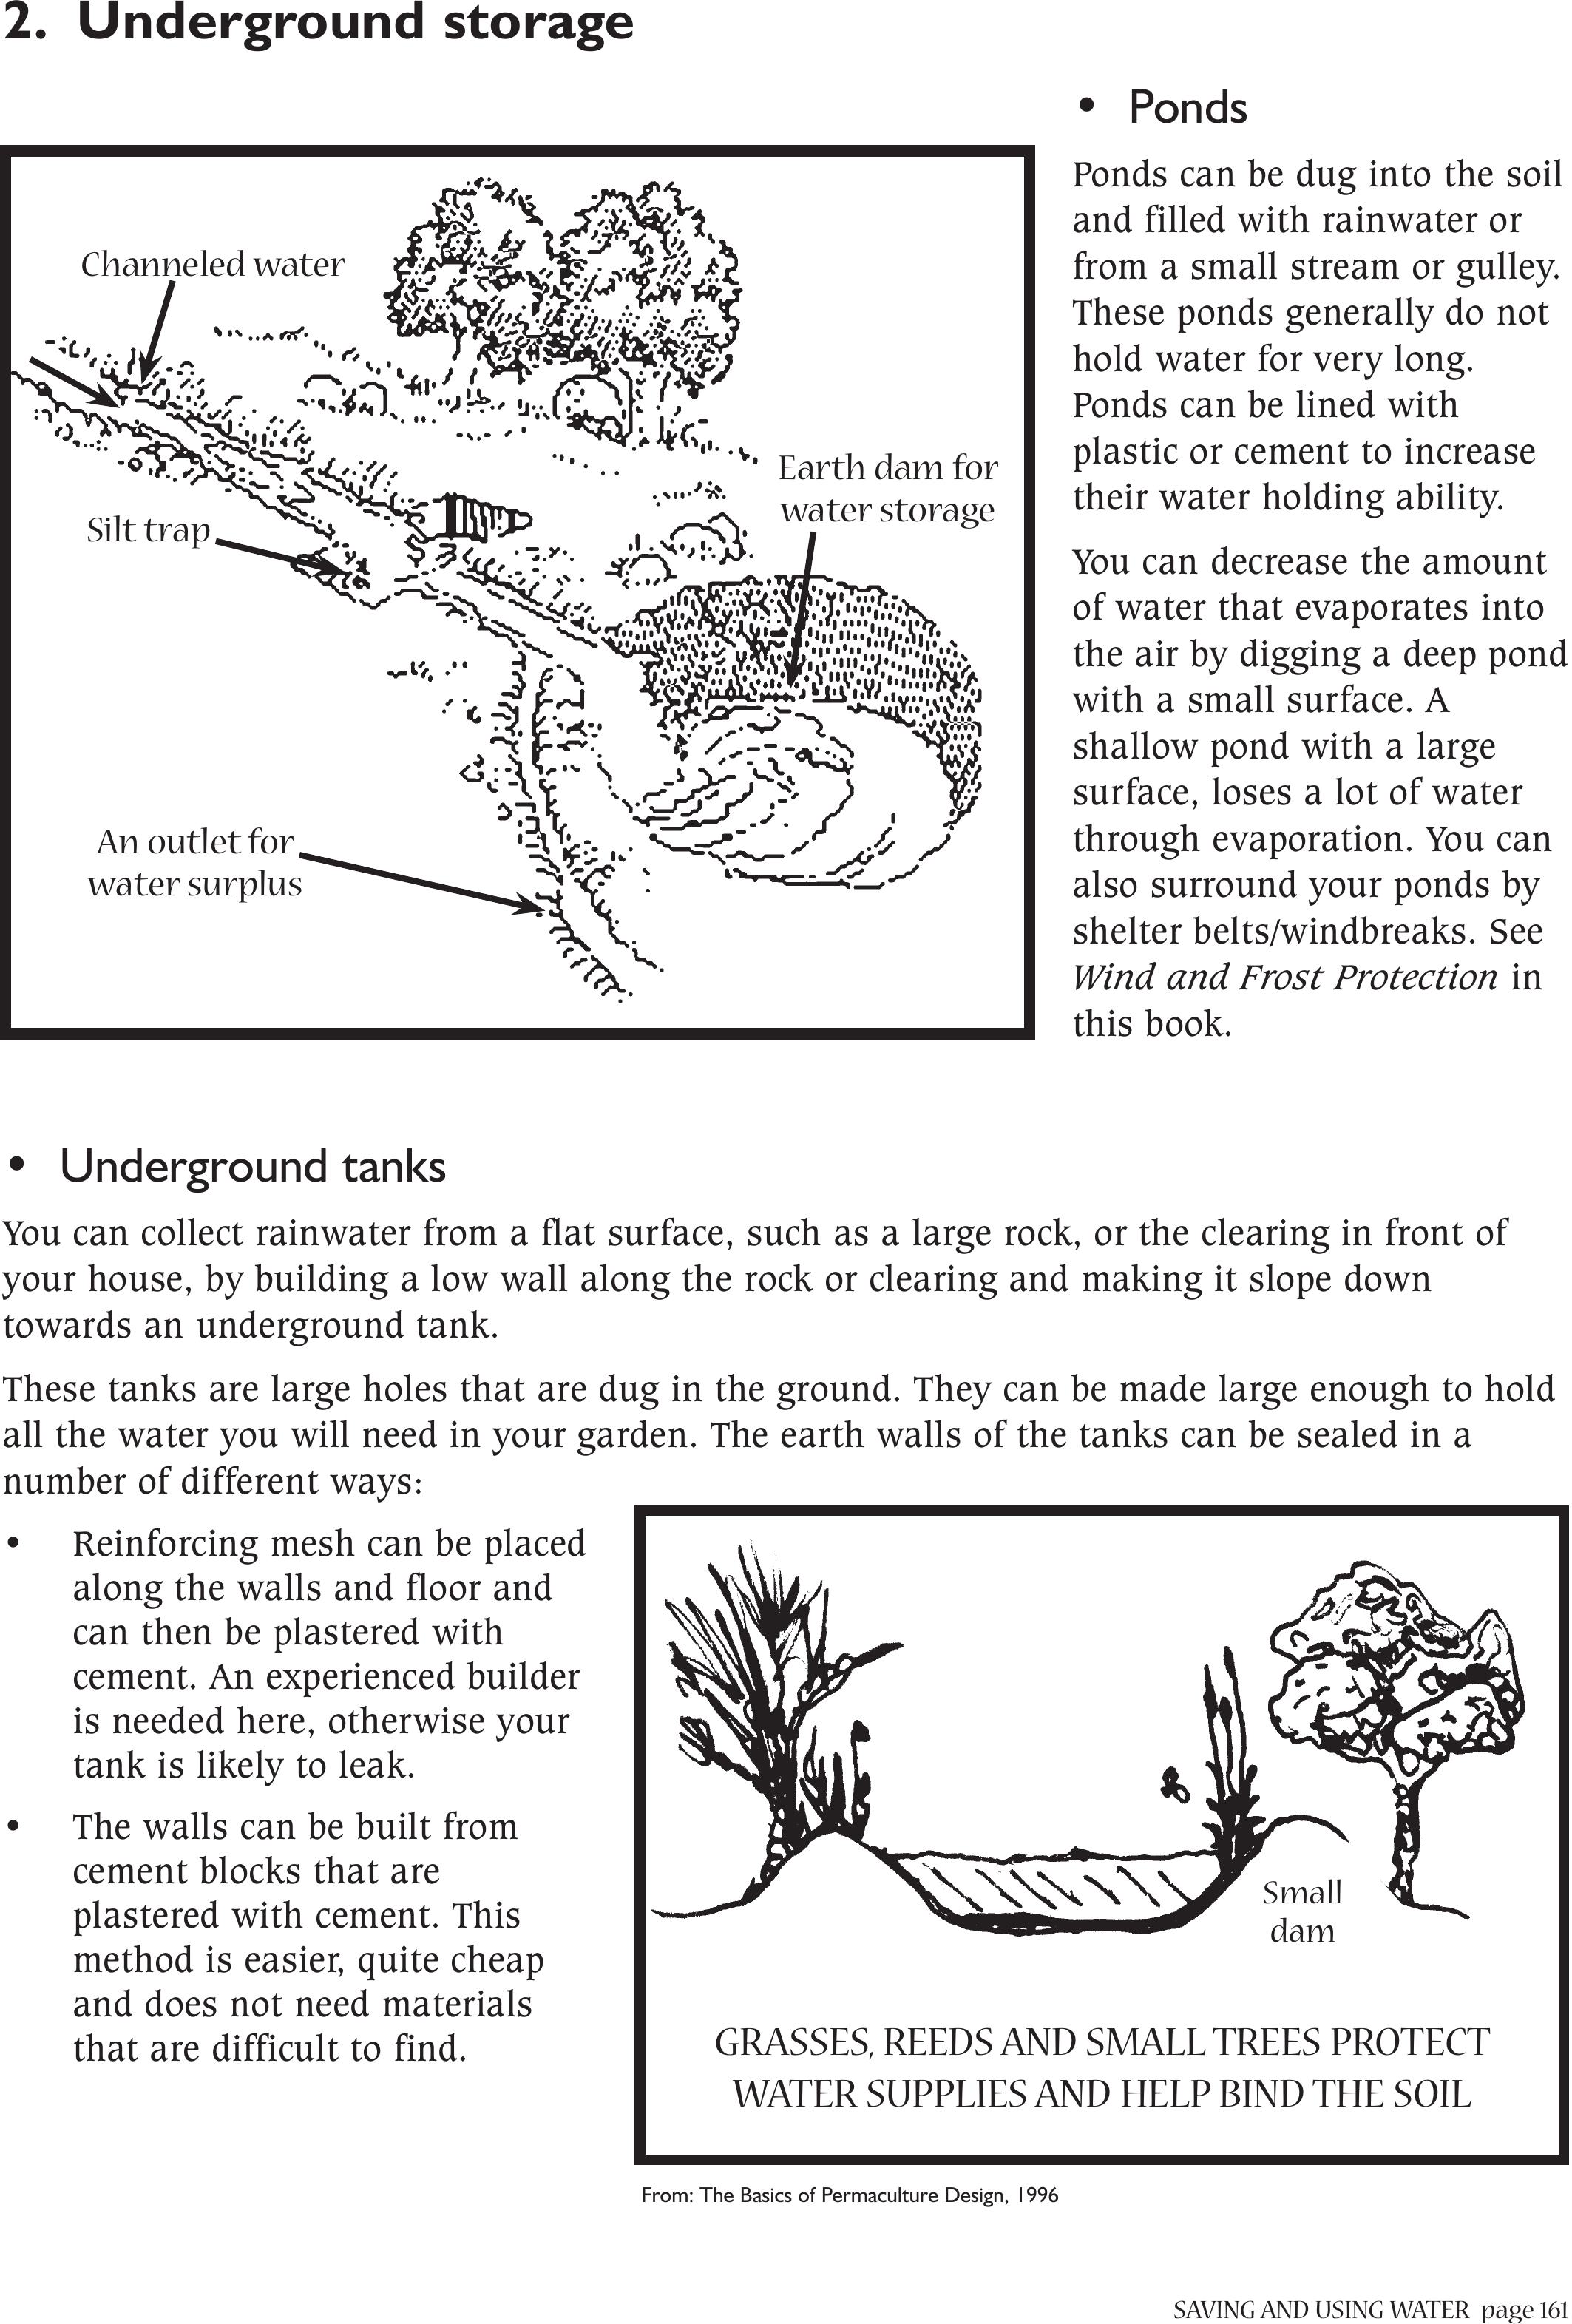
SAVING AND USING WATERpage 161
2. Underground storage
• Ponds
Ponds can be dug into the soil
and filled with rainwater or
from a small stream or gulley.
These ponds generally do not
hold water for very long.
Ponds can be lined with
plastic or cement to increase
their water holding ability.
You can decrease the amount
of water that evaporates into
the air by digging a deep pond
with a small surface. A
shallow pond with a large
surface, loses a lot of water
through evaporation. You can
also surround your ponds by
shelter belts/windbreaks. See
Wind and Frost Protection in
this book.
• Underground tanks
You can collect rainwater from a flat surface, such as a large rock, or the clearing in front of
your house, by building a low wall along the rock or clearing and making it slope down
towards an underground tank.
These tanks are large holes that are dug in the ground. They can be made large enough to hold
all the water you will need in your garden. The earth walls of the tanks can be sealed in a
number of different ways:
• Reinforcing mesh can be placed
along the walls and floor and
can then be plastered with
cement. An experienced builder
is needed here, otherwise your
tank is likely to leak.
• The walls can be built from
cement blocks that are
plastered with cement. This
method is easier, quite cheap
and does not need materials
that are difficult to find.
Channeled water
Earth dam for
water storage
An outlet for
water surplus
Silt trap
Small
dam
GRASSES, REEDS AND SMALL TREES PROTECT
WATER SUPPLIES AND HELP BIND THE SOIL
From: The Basics of Permaculture Design, 1996
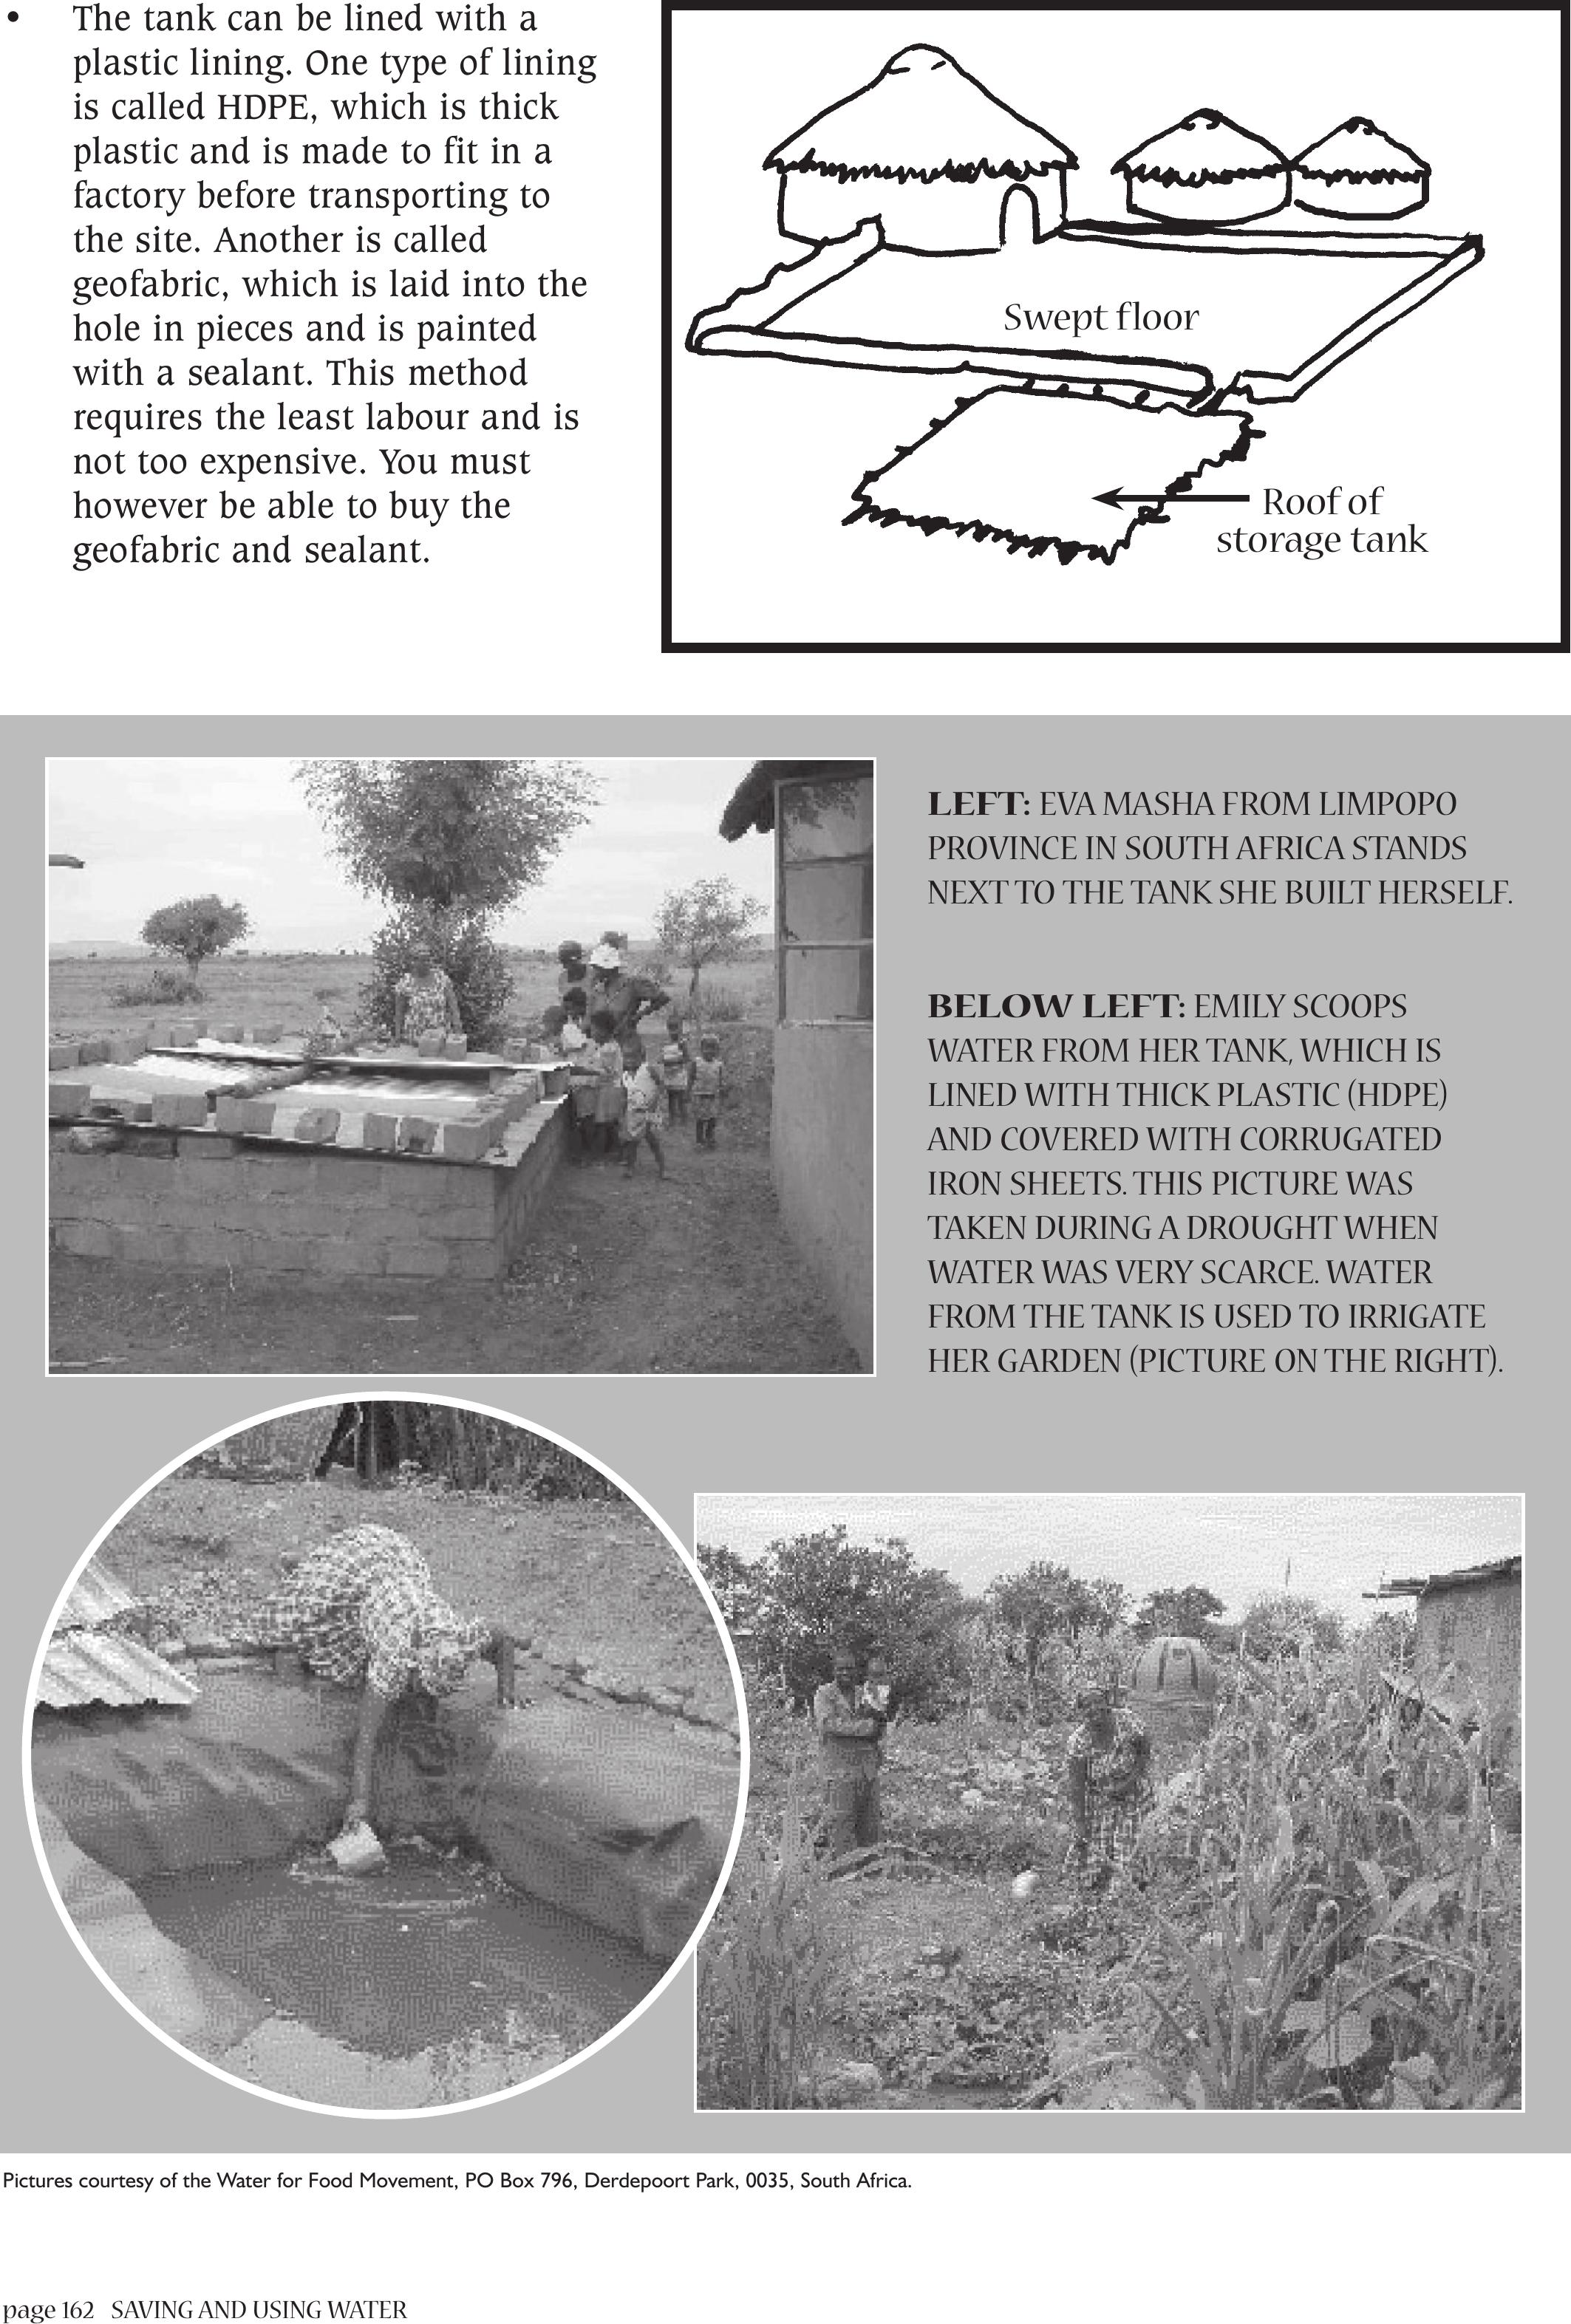
page 162 SAVING AND USING WATER
• The tank can be lined with a
plastic lining. One type of lining
is called HDPE, which is thick
plastic and is made to fit in a
factory before transporting to
the site. Another is called
geofabric, which is laid into the
hole in pieces and is painted
with a sealant. This method
requires the least labour and is
not too expensive. You must
however be able to buy the
geofabric and sealant.
Pictures courtesy of the Water for Food Movement, PO Box 796, Derdepoort Park, 0035, South Africa.
Swept floor
Roof of
storage tank
LEFT: EVA MASHA FROM LIMPOPO
PROVINCE IN SOUTH AFRICA STANDS
NEXT TO THE TANK SHE BUILT HERSELF.
BELOW LEFT: EMILY SCOOPS
WATER FROM HER TANK, WHICH IS
LINED WITH THICK PLASTIC (HDPE)
AND COVERED WITH CORRUGATED
IRON SHEETS.THIS PICTURE WAS
TAKEN DURING A DROUGHT WHEN
WATER WAS VERYSCARCE. WATER
FROM THE TANK IS USED TO IRRIGATE
HER GARDEN (PICTURE ON THE RIGHT).
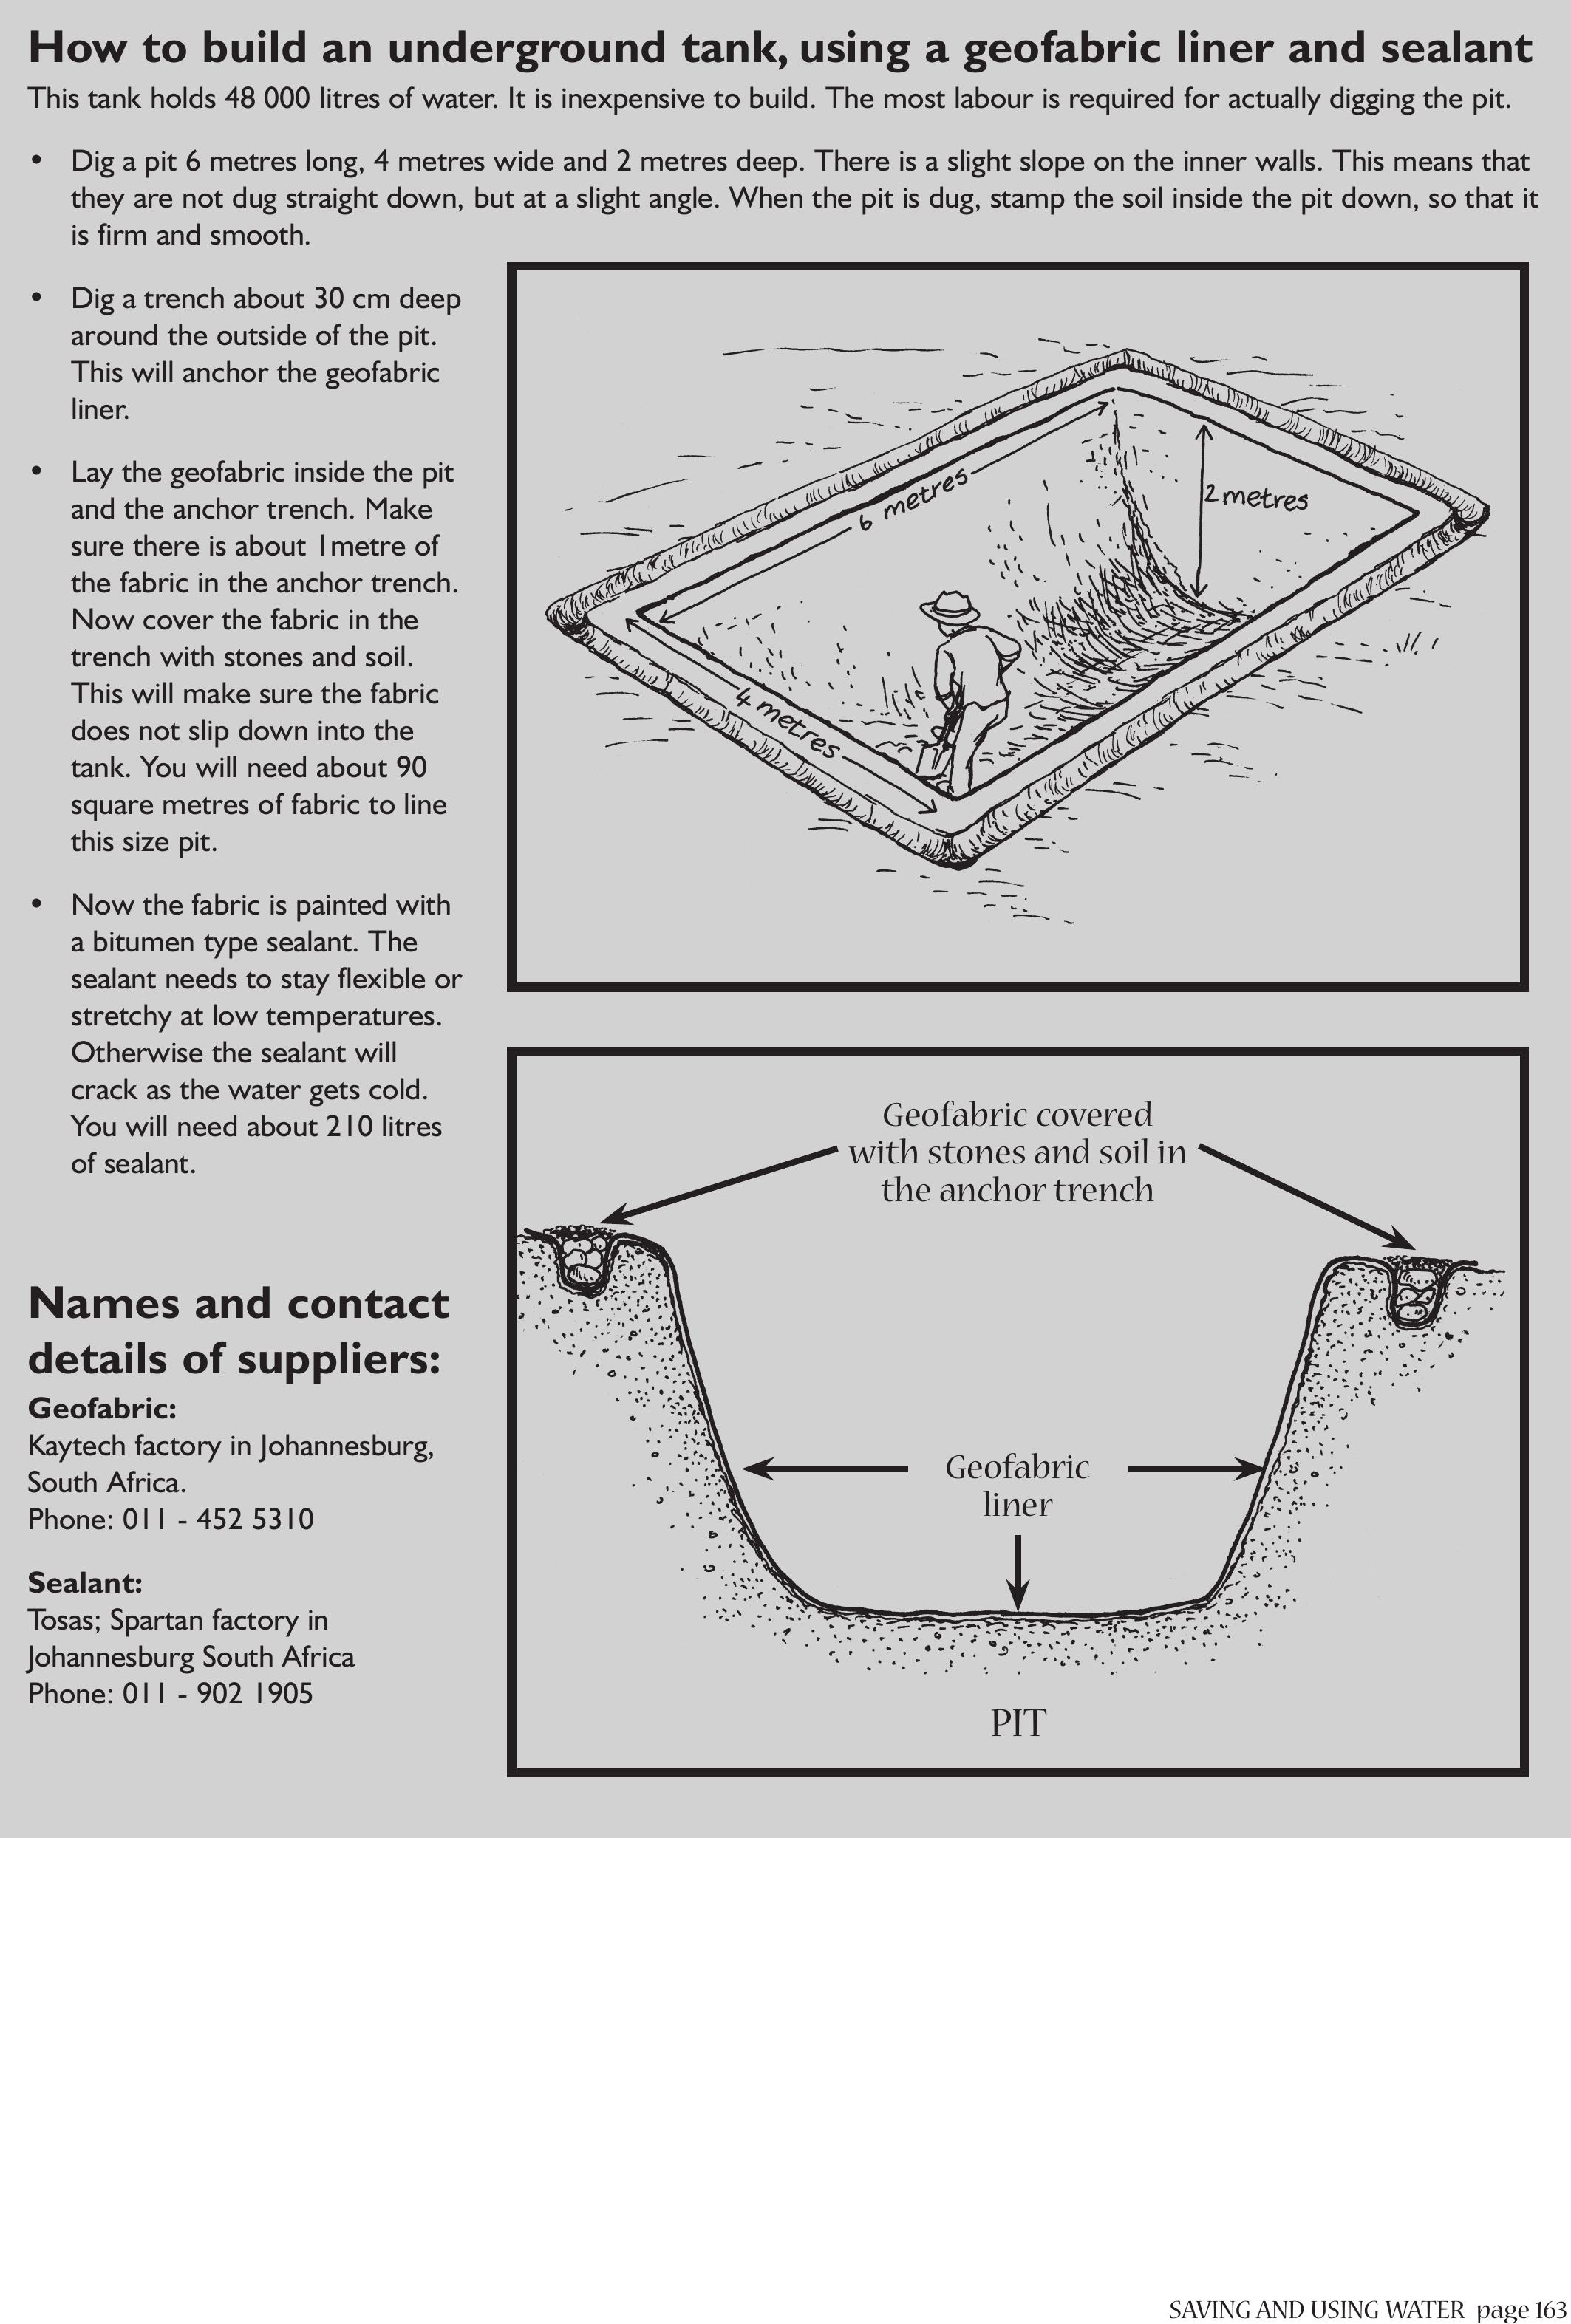
SAVING AND USING WATERpage 163
How to build an underground tank, using a geofabric liner and sealant
This tank holds 48 000 litres of water. It is inexpensive to build. The most labour is required for actually digging the pit.
• Dig a pit 6 metres long, 4 metres wide and 2 metres deep. There is a slight slope on the inner walls. This means that
they are not dug straight down, but at a slight angle. When the pit is dug, stamp the soil inside the pit down, so that it
is firm and smooth.
• Dig a trench about 30 cm deep
around the outside of the pit.
This will anchor the geofabric
liner.
• Lay the geofabric inside the pit
and the anchor trench. Make
sure there is about 1metre of
the fabric in the anchor trench.
Now cover the fabric in the
trench with stones and soil.
This will make sure the fabric
does not slip down into the
tank. You will need about 90
square metres of fabric to line
this size pit.
• Now the fabric is painted with
a bitumen type sealant. The
sealant needs to stay flexible or
stretchy at low temperatures.
Otherwise the sealant will
crack as the water gets cold.
You will need about 210 litres
of sealant.
Names and contact
details of suppliers:
Geofabric:
Kaytech factory in Johannesburg,
South Africa.
Phone: 011 - 452 5310
Sealant:
Tosas; Spartan factory in
Johannesburg South Africa
Phone: 011 - 902 1905PIT
Geofabric
liner
Geofabric covered
with stones and soil in
the anchor trench

page 164
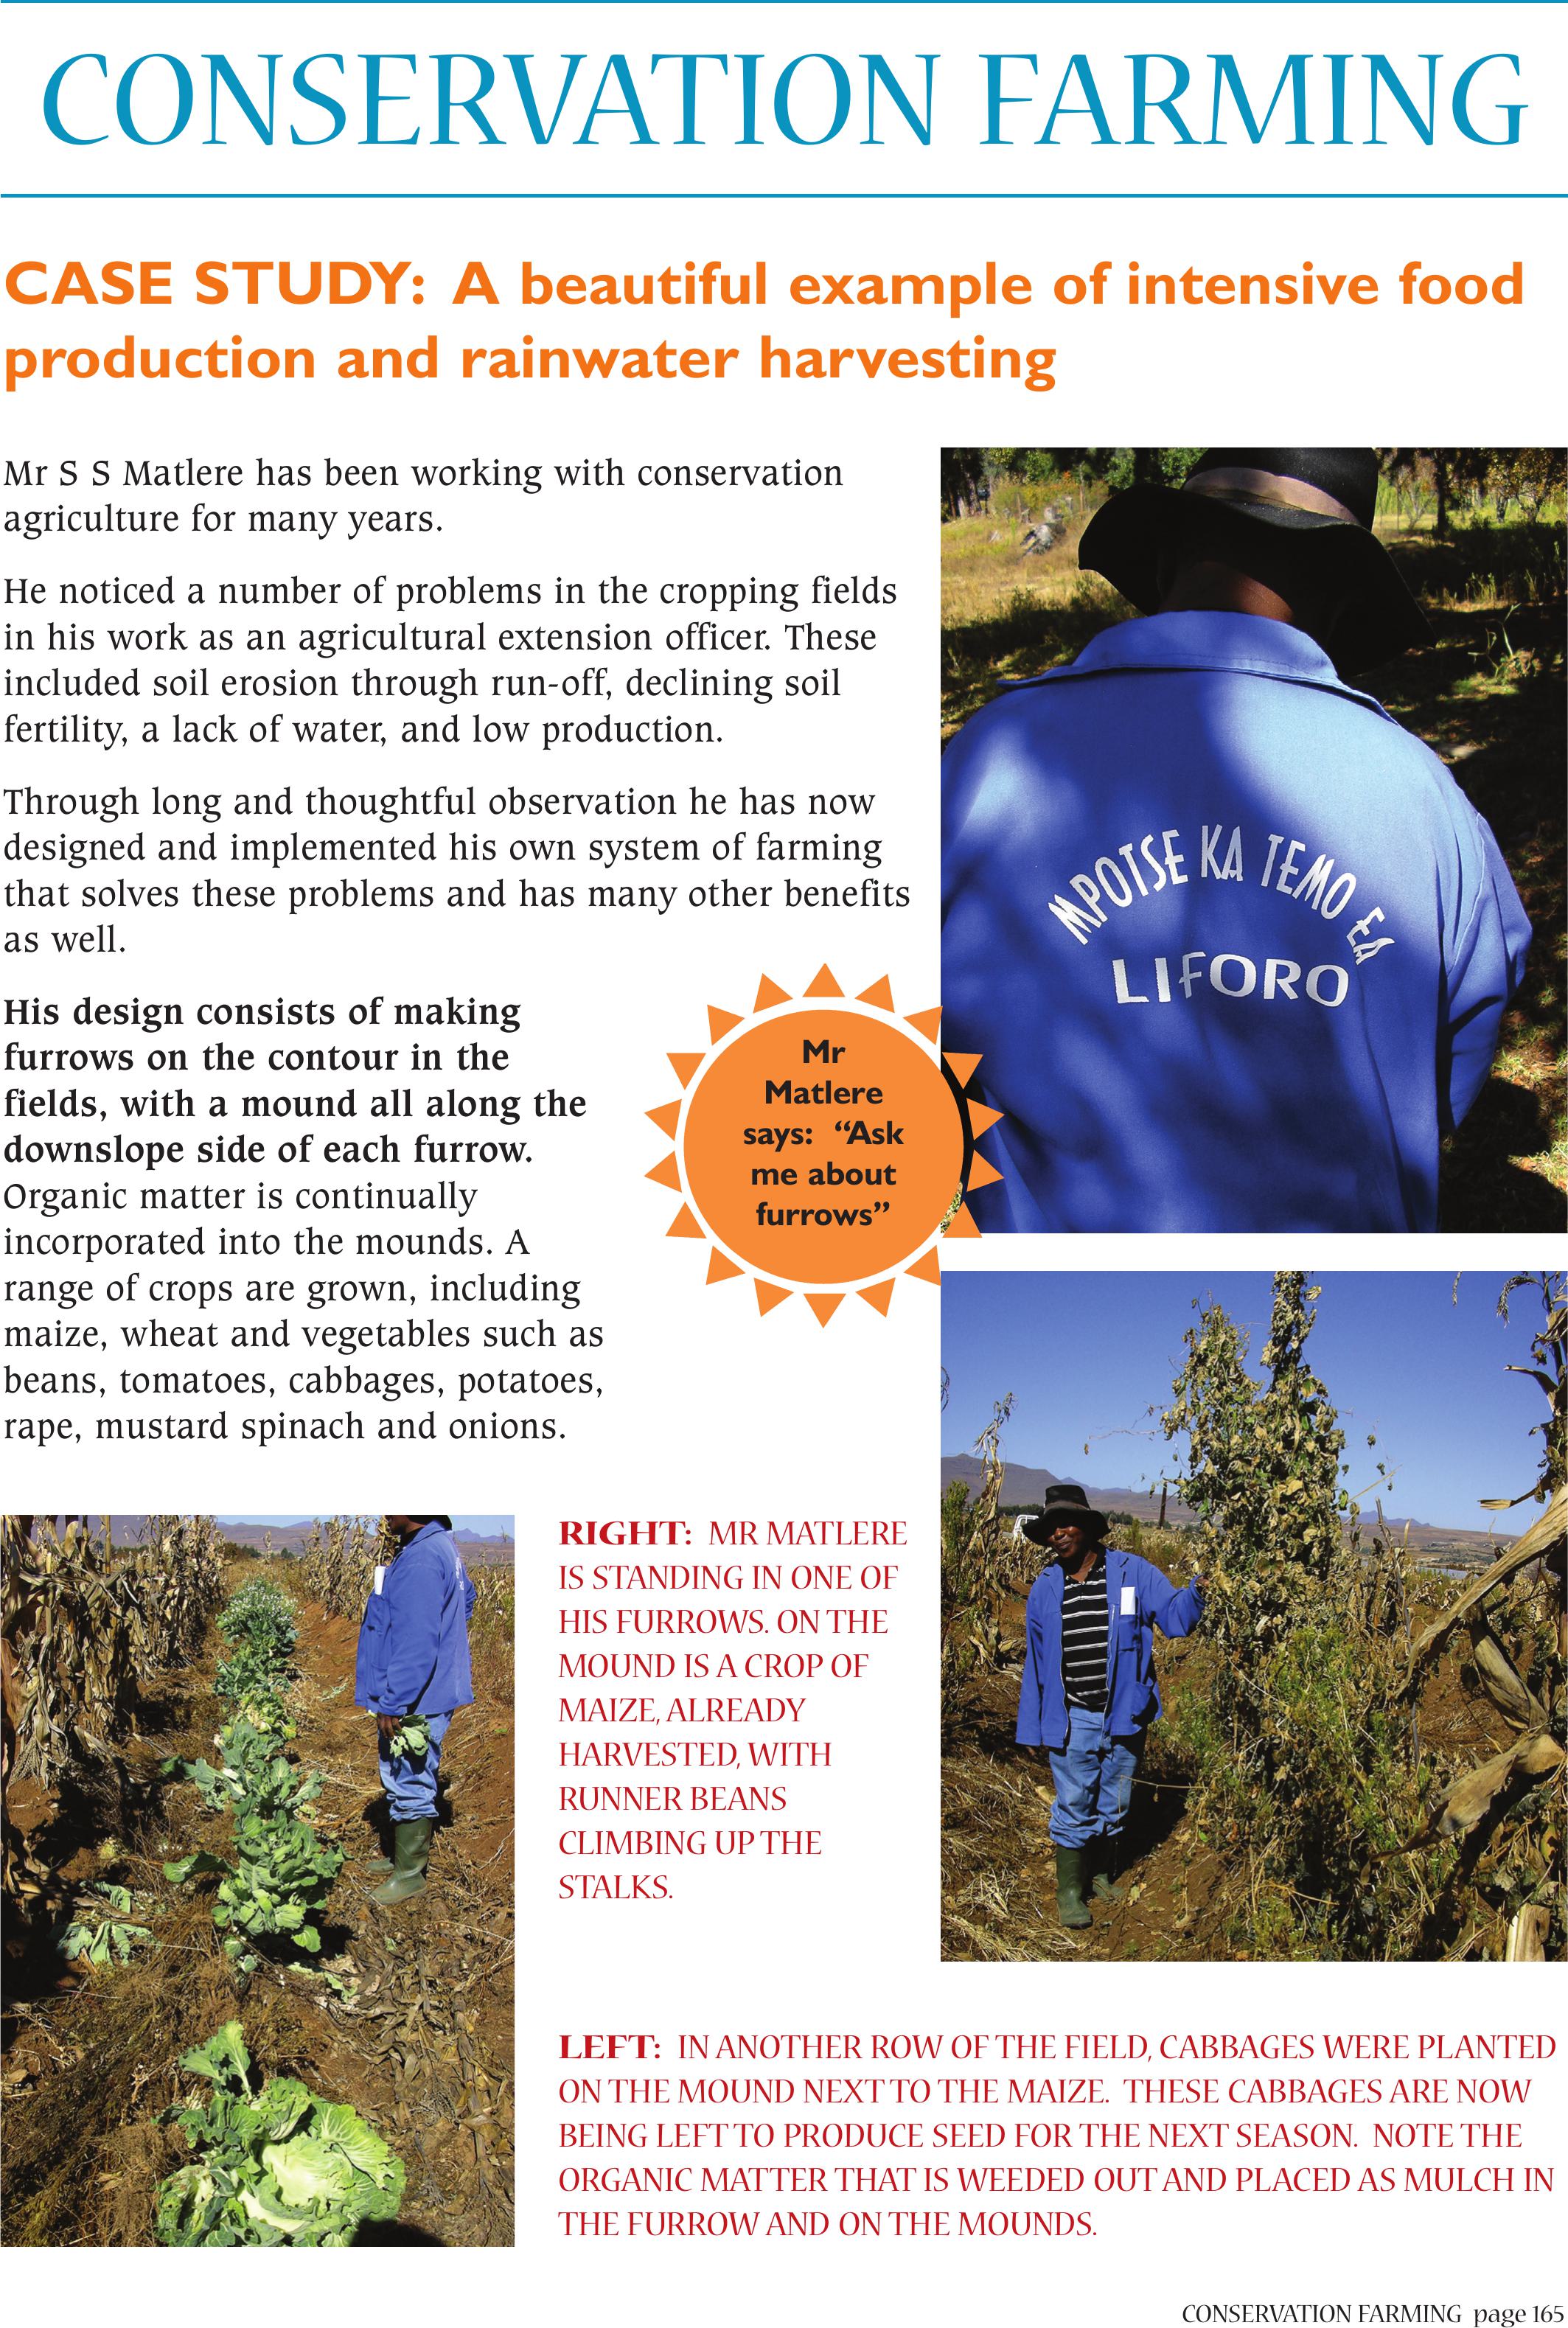
CONSERVATION FARMINGpage 165
CASE STUDY:A beautiful example of intensive food
production and rainwater harvesting
Mr S S Matlere has been working with conservation
agriculture for many years.
He noticed a number of problems in the cropping fields
in his work as an agricultural extension officer. These
included soil erosion through run-off, declining soil
fertility, a lack of water, and low production.
Through long and thoughtful observation he has now
designed and implemented his own system of farming
that solves these problems and has many other benefits
as well.
His design consists of making
furrows on the contour in the
fields, with a mound all along the
downslope side of each furrow.
Organic matter is continually
incorporated into the mounds. A
range of crops are grown, including
maize, wheat and vegetables such as
beans, tomatoes, cabbages, potatoes,
rape, mustard spinach and onions.
CONSERVATION FARMING
Mr
Matlere
says: “Ask
me about
furrows”
RIGHT: MR MATLERE
IS STANDING IN ONE OF
HIS FURROWS. ON THE
MOUND IS A CROP OF
MAIZE, ALREADY
HARVESTED, WITH
RUNNER BEANS
CLIMBING UPTHE
STALKS.
LEFT: IN ANOTHER ROW OF THE FIELD, CABBAGES WERE PLANTED
ON THE MOUND NEXT TO THE MAIZE.THESE CABBAGES ARE NOW
BEING LEFT TO PRODUCE SEED FOR THE NEXT SEASON. NOTE THE
ORGANIC MATTER THAT IS WEEDED OUT AND PLACED AS MULCH IN
THE FURROW AND ON THE MOUNDS.
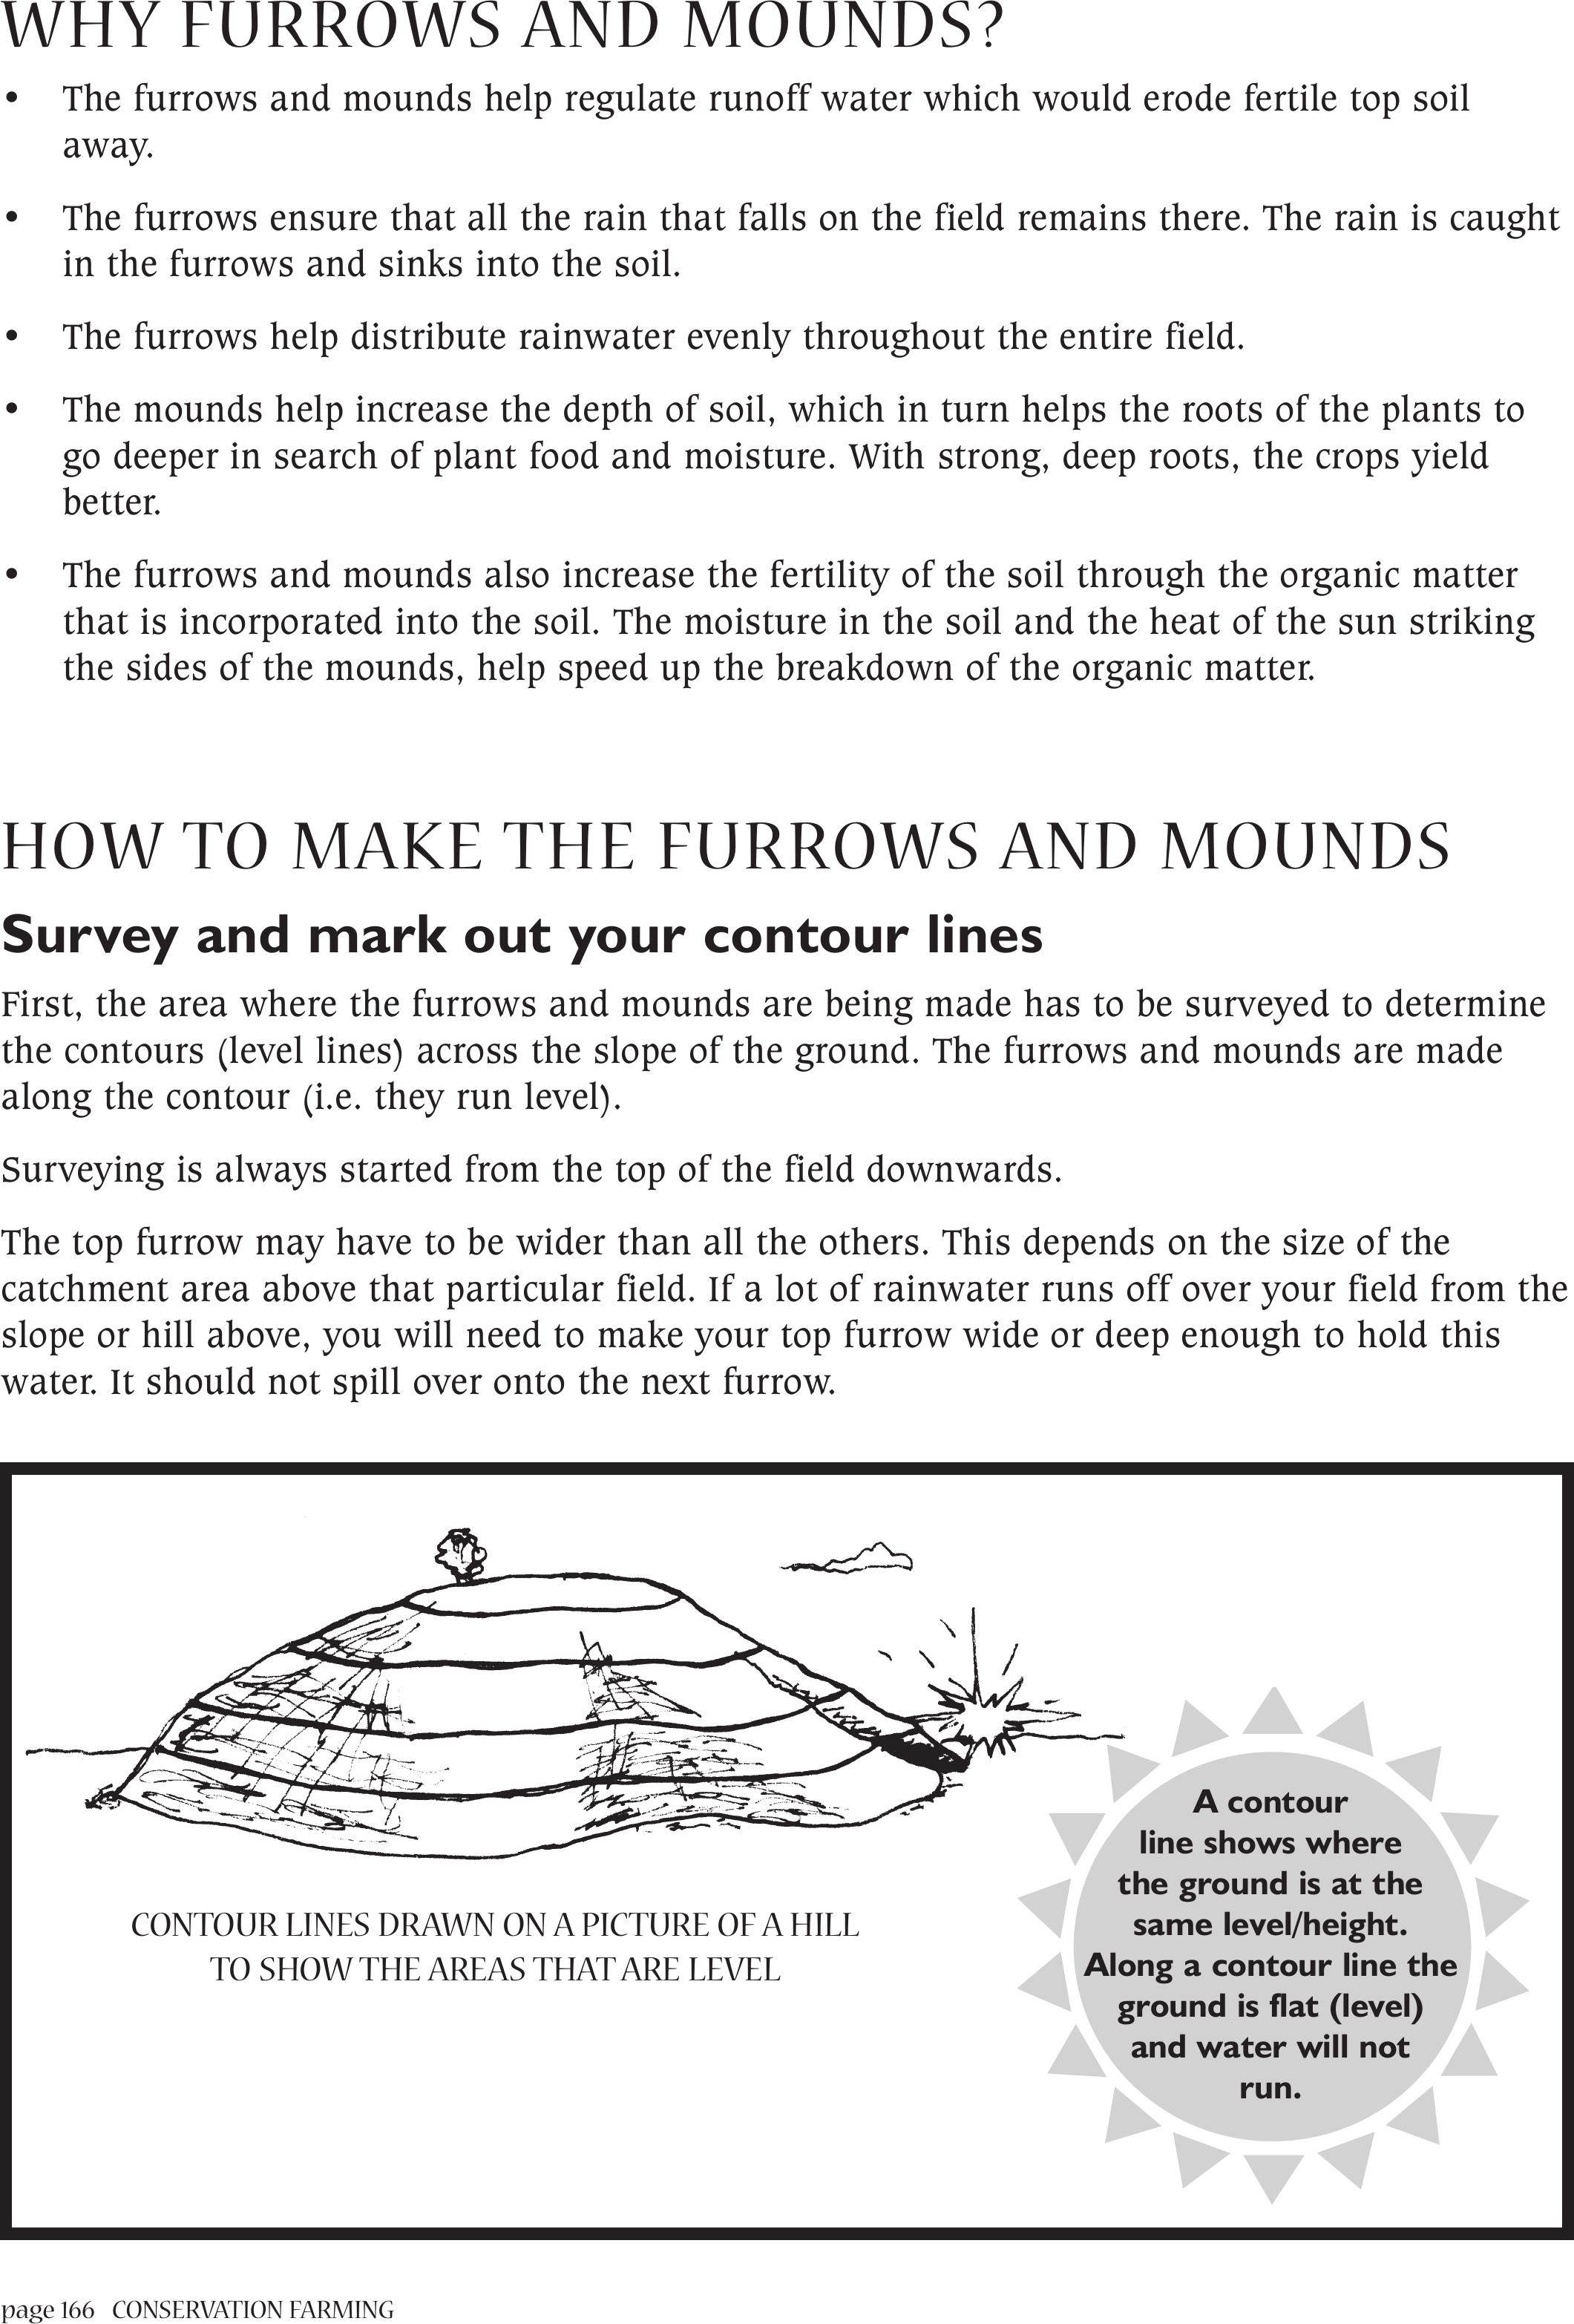
page 166 CONSERVATION FARMING
WHY FURROWS AND MOUNDS?
• The furrows and mounds help regulate runoff water which would erode fertile top soil
away.
• The furrows ensure that all the rain that falls on the field remains there. The rain is caught
in the furrows and sinks into the soil.
• The furrows help distribute rainwater evenly throughout the entire field.
• The mounds help increase the depth of soil, which in turn helps the roots of the plants to
go deeper in search of plant food and moisture. With strong, deep roots, the crops yield
better.
• The furrows and mounds also increase the fertility of the soil through the organic matter
that is incorporated into the soil. The moisture in the soil and the heat of the sun striking
the sides of the mounds, help speed up the breakdown of the organic matter.
HOW TO MAKE THE FURROWS AND MOUNDS
Survey and mark out your contour lines
First, the area where the furrows and mounds are being made has to be surveyed to determine
the contours (level lines) across the slope of the ground. The furrows and mounds are made
along the contour (i.e. they run level).
Surveying is always started from the top of the field downwards.
The top furrow may have to be wider than all the others. This depends on the size of the
catchment area above that particular field. If a lot of rainwater runs off over your field from the
slope or hill above, you will need to make your top furrow wide or deep enough to hold this
water. It should not spill over onto the next furrow.
CONTOUR LINES DRAWN ON A PICTURE OF A HILL
TO SHOW THE AREAS THAT ARE LEVEL
A contour
line shows where
the ground is at the
same level/height.
Along a contour line the
ground is flat (level)
and water will not
run.
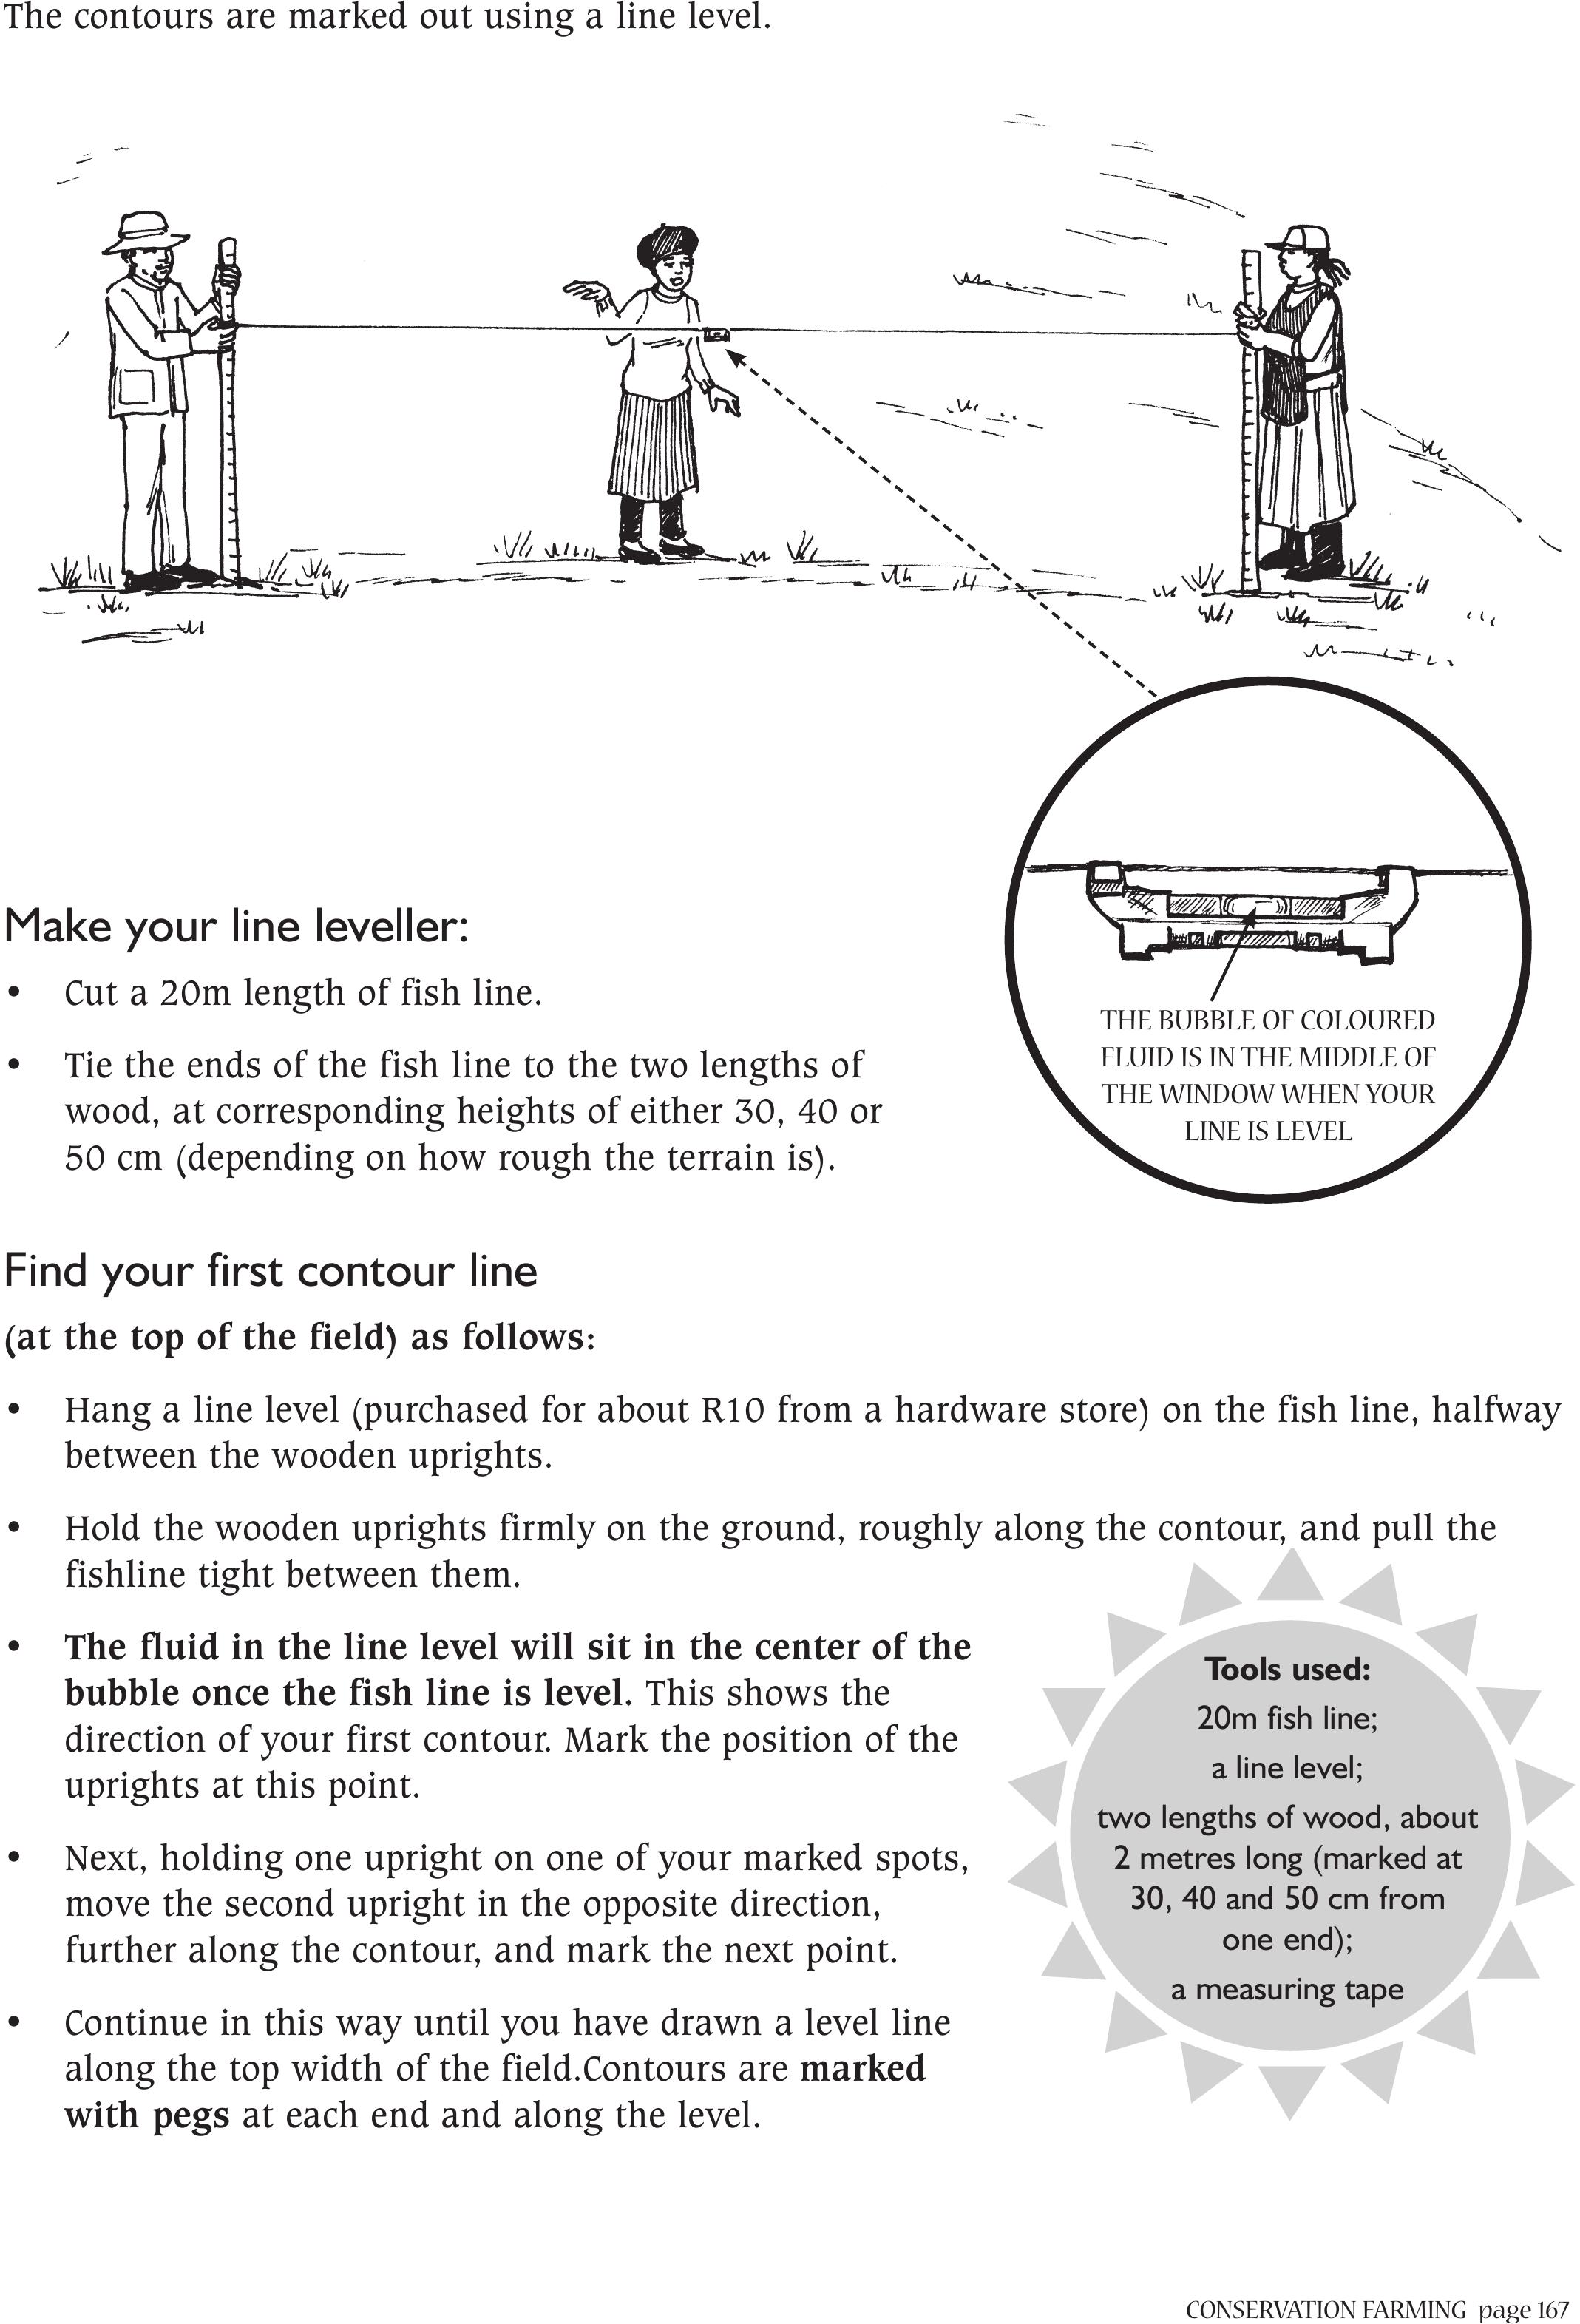
CONSERVATION FARMINGpage 167
The contours are marked out using a line level.
Make your line leveller:
• Cut a 20m length of fish line.
• Tie the ends of the fish line to the two lengths of
wood, at corresponding heights of either 30, 40 or
50 cm (depending on how rough the terrain is).
Find your first contour line
(at the top of the field) as follows:
• Hang a line level (purchased for about R10 from a hardware store) on the fish line, halfway
between the wooden uprights.
• Hold the wooden uprights firmly on the ground, roughly along the contour, and pull the
fishline tight between them.
• The fluid in the line level will sit in the center of the
bubble once the fish line is level. This shows the
direction of your first contour. Mark the position of the
uprights at this point.
• Next, holding one upright on one of your marked spots,
move the second upright in the opposite direction,
further along the contour, and mark the next point.
• Continue in this way until you have drawn a level line
along the top width of the field.Contours are marked
with pegs at each end and along the level.
THE BUBBLE OF COLOURED
FLUID IS IN THE MIDDLE OF
THE WINDOW WHEN YOUR
LINE IS LEVEL
Tools used:
20m fish line;
a line level;
two lengths of wood, about
2 metres long (marked at
30, 40 and 50 cm from
one end);
a measuring tape
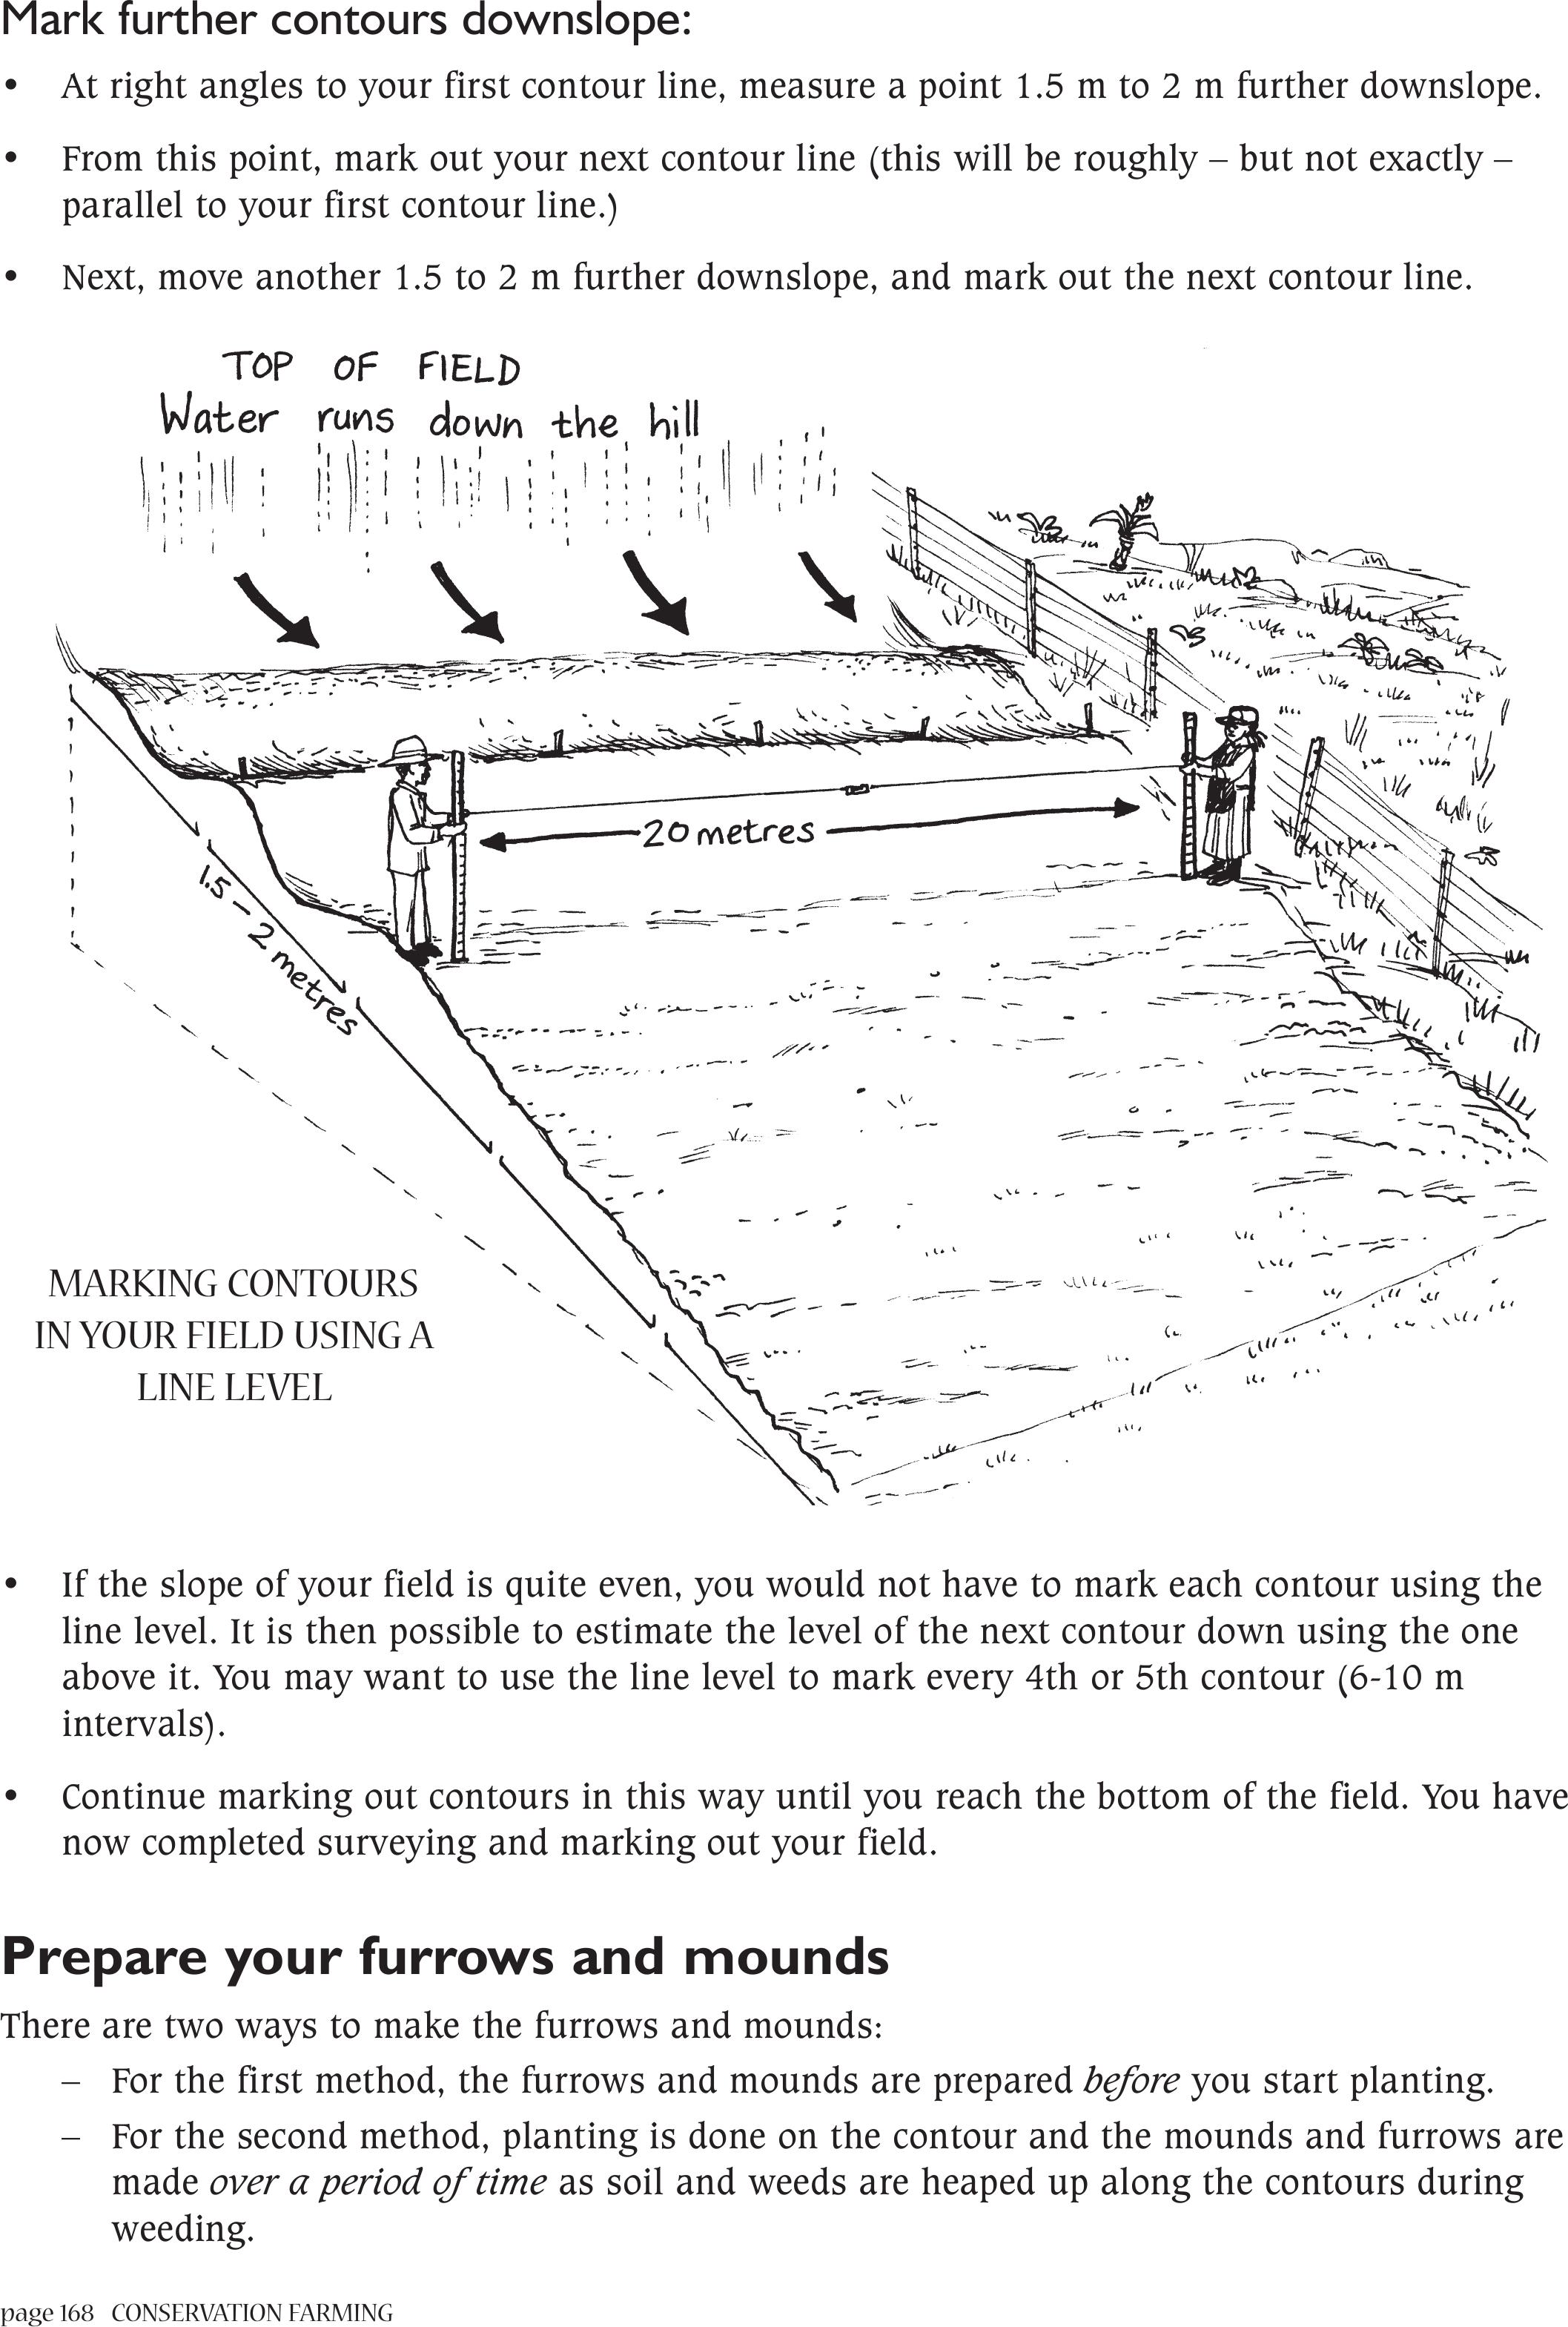
page 168 CONSERVATION FARMING
Mark further contours downslope:
• At right angles to your first contour line, measure a point 1.5 m to 2 m further downslope.
• From this point, mark out your next contour line (this will be roughly – but not exactly –
parallel to your first contour line.)
• Next, move another 1.5 to 2 m further downslope, and mark out the next contour line.
• If the slope of your field is quite even, you would not have to mark each contour using the
line level. It is then possible to estimate the level of the next contour down using the one
above it. You may want to use the line level to mark every 4th or 5th contour (6-10 m
intervals).
• Continue marking out contours in this way until you reach the bottom of the field. You have
now completed surveying and marking out your field.
Prepare your furrows and mounds
There are two ways to make the furrows and mounds:
– For the first method, the furrows and mounds are prepared before you start planting.
– For the second method, planting is done on the contour and the mounds and furrows are
made over a period of time as soil and weeds are heaped up along the contours during
weeding.
MARKING CONTOURS
IN YOUR FIELD USING A
LINE LEVEL
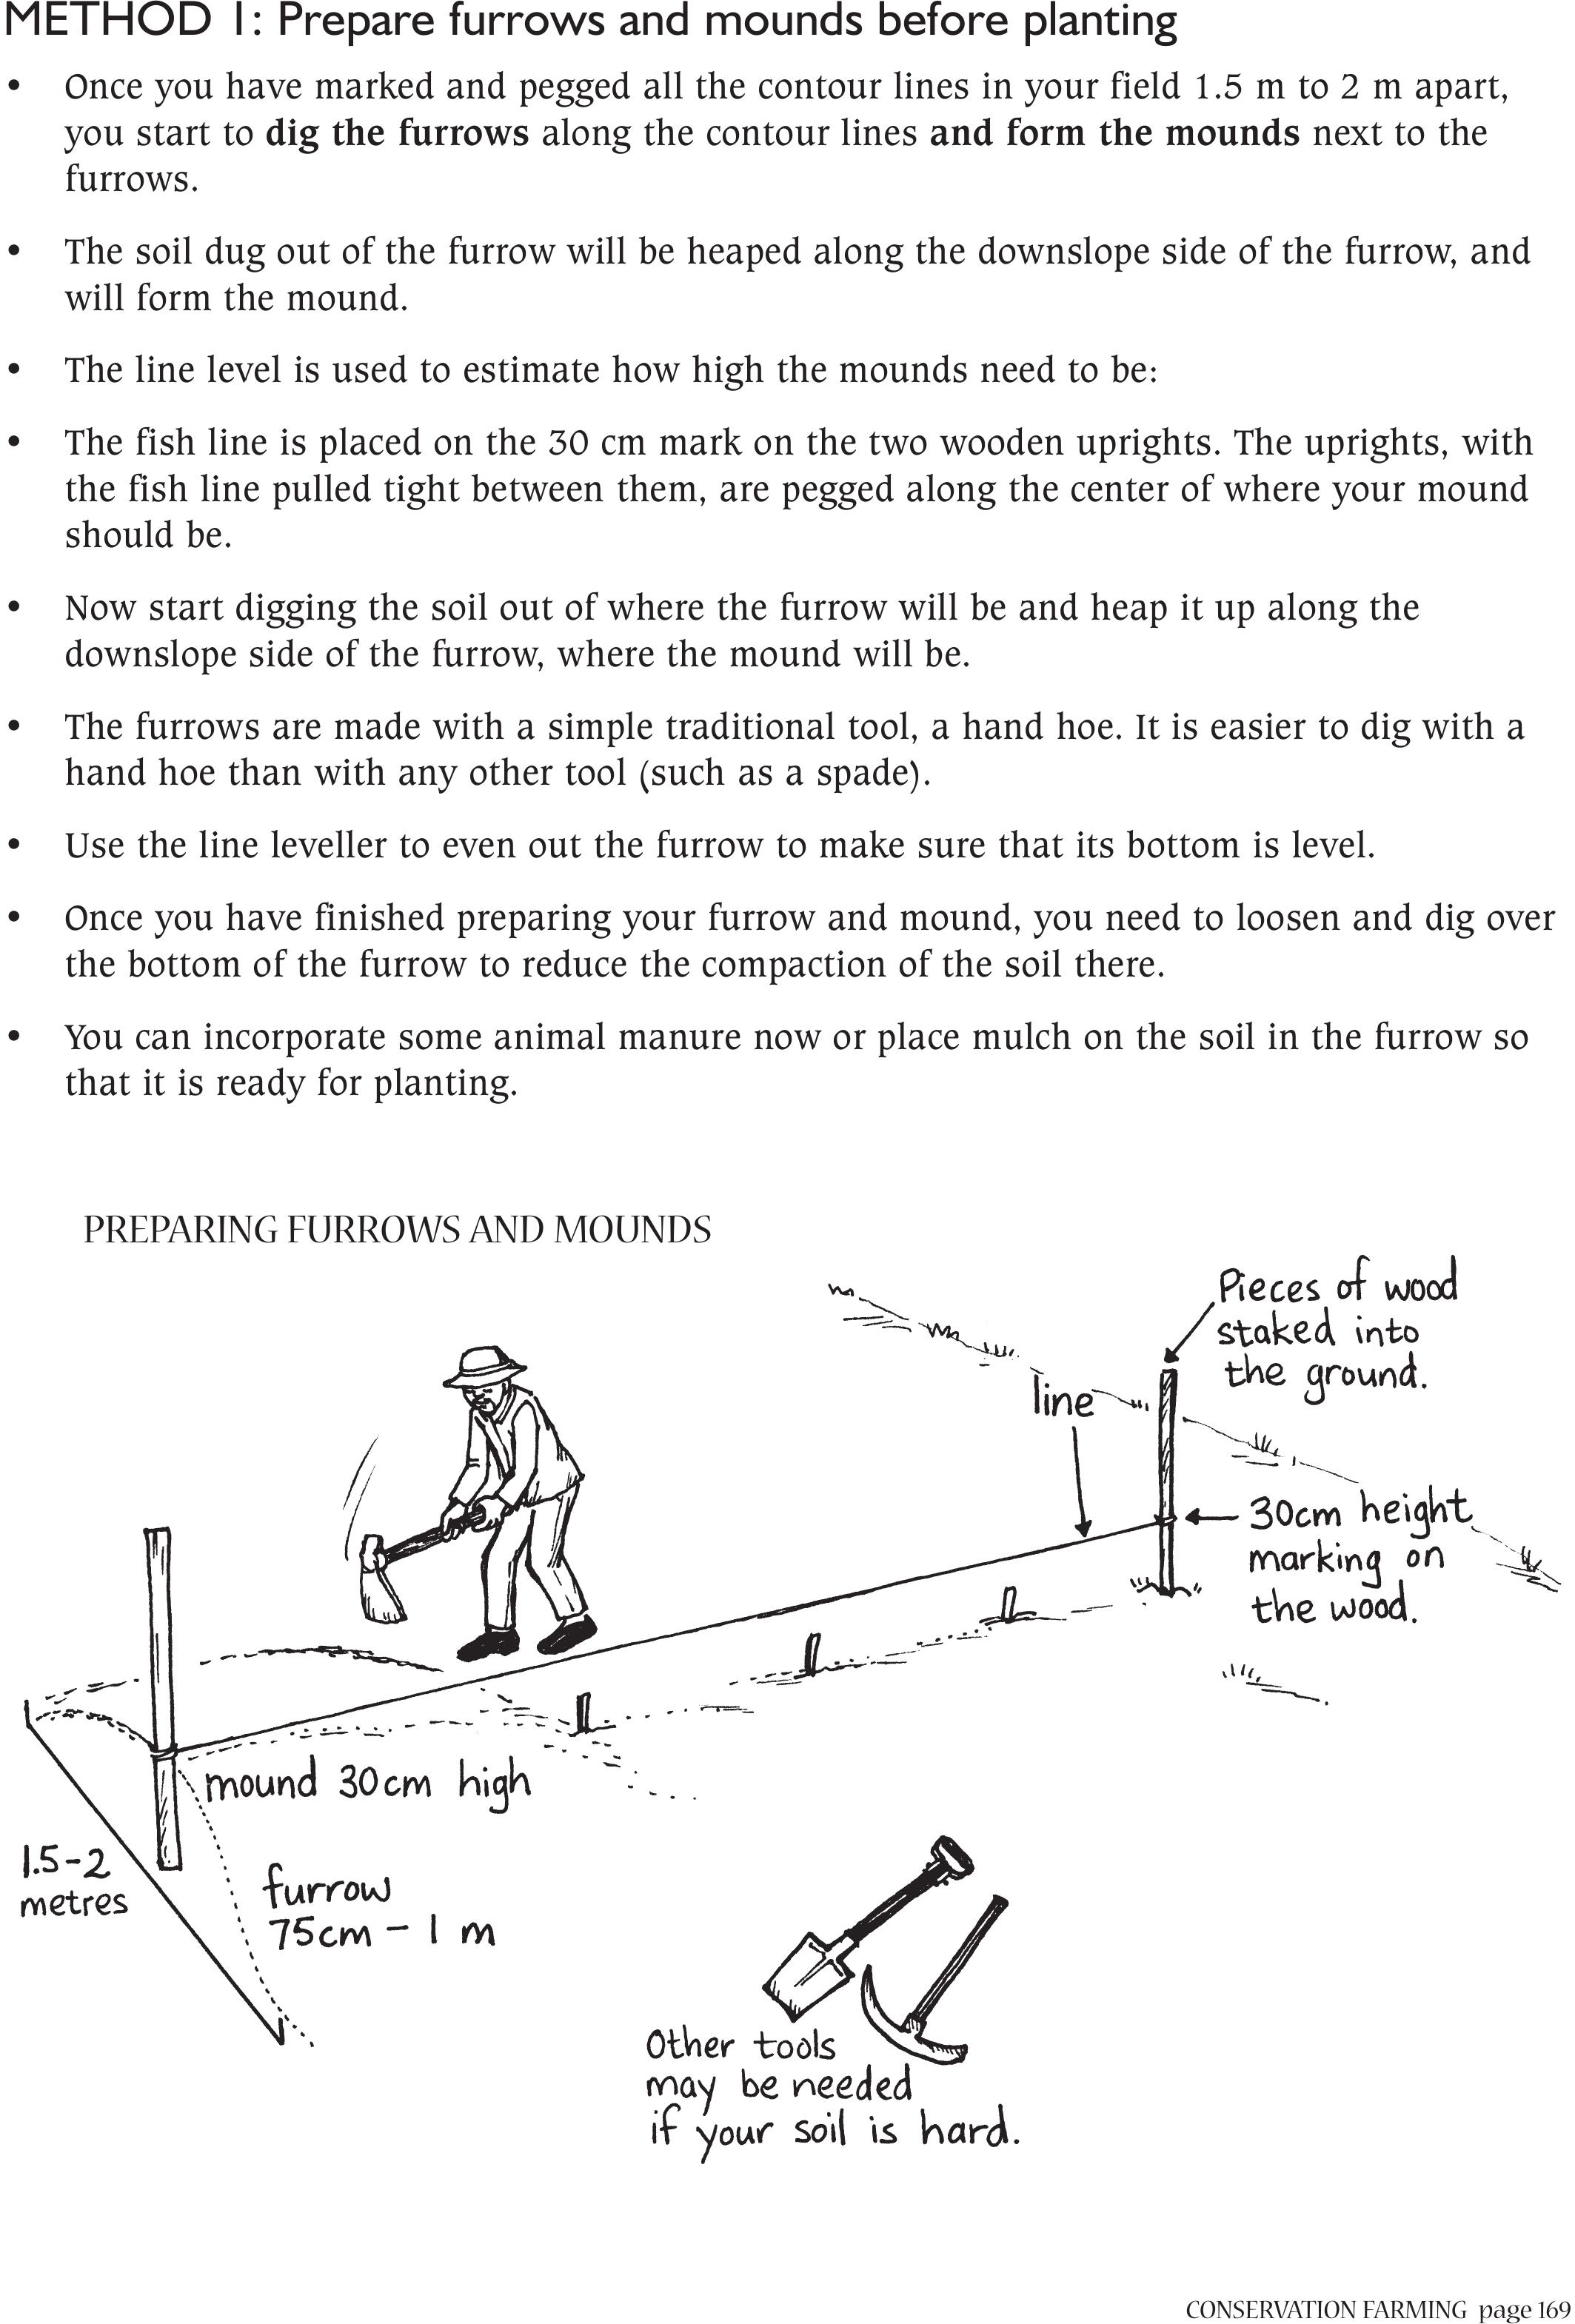
CONSERVATION FARMINGpage 169
METHOD 1: Prepare furrows and mounds before planting
• Once you have marked and pegged all the contour lines in your field 1.5 m to 2 m apart,
you start to dig the furrows along the contour lines and form the mounds next to the
furrows.
• The soil dug out of the furrow will be heaped along the downslope side of the furrow, and
will form the mound.
• The line level is used to estimate how high the mounds need to be:
• The fish line is placed on the 30 cm mark on the two wooden uprights. The uprights, with
the fish line pulled tight between them, are pegged along the center of where your mound
should be.
• Now start digging the soil out of where the furrow will be and heap it up along the
downslope side of the furrow, where the mound will be.
• The furrows are made with a simple traditional tool, a hand hoe. It is easier to dig with a
hand hoe than with any other tool (such as a spade).
• Use the line leveller to even out the furrow to make sure that its bottom is level.
• Once you have finished preparing your furrow and mound, you need to loosen and dig over
the bottom of the furrow to reduce the compaction of the soil there.
• You can incorporate some animal manure now or place mulch on the soil in the furrow so
that it is ready for planting.
PREPARING FURROWS AND MOUNDS
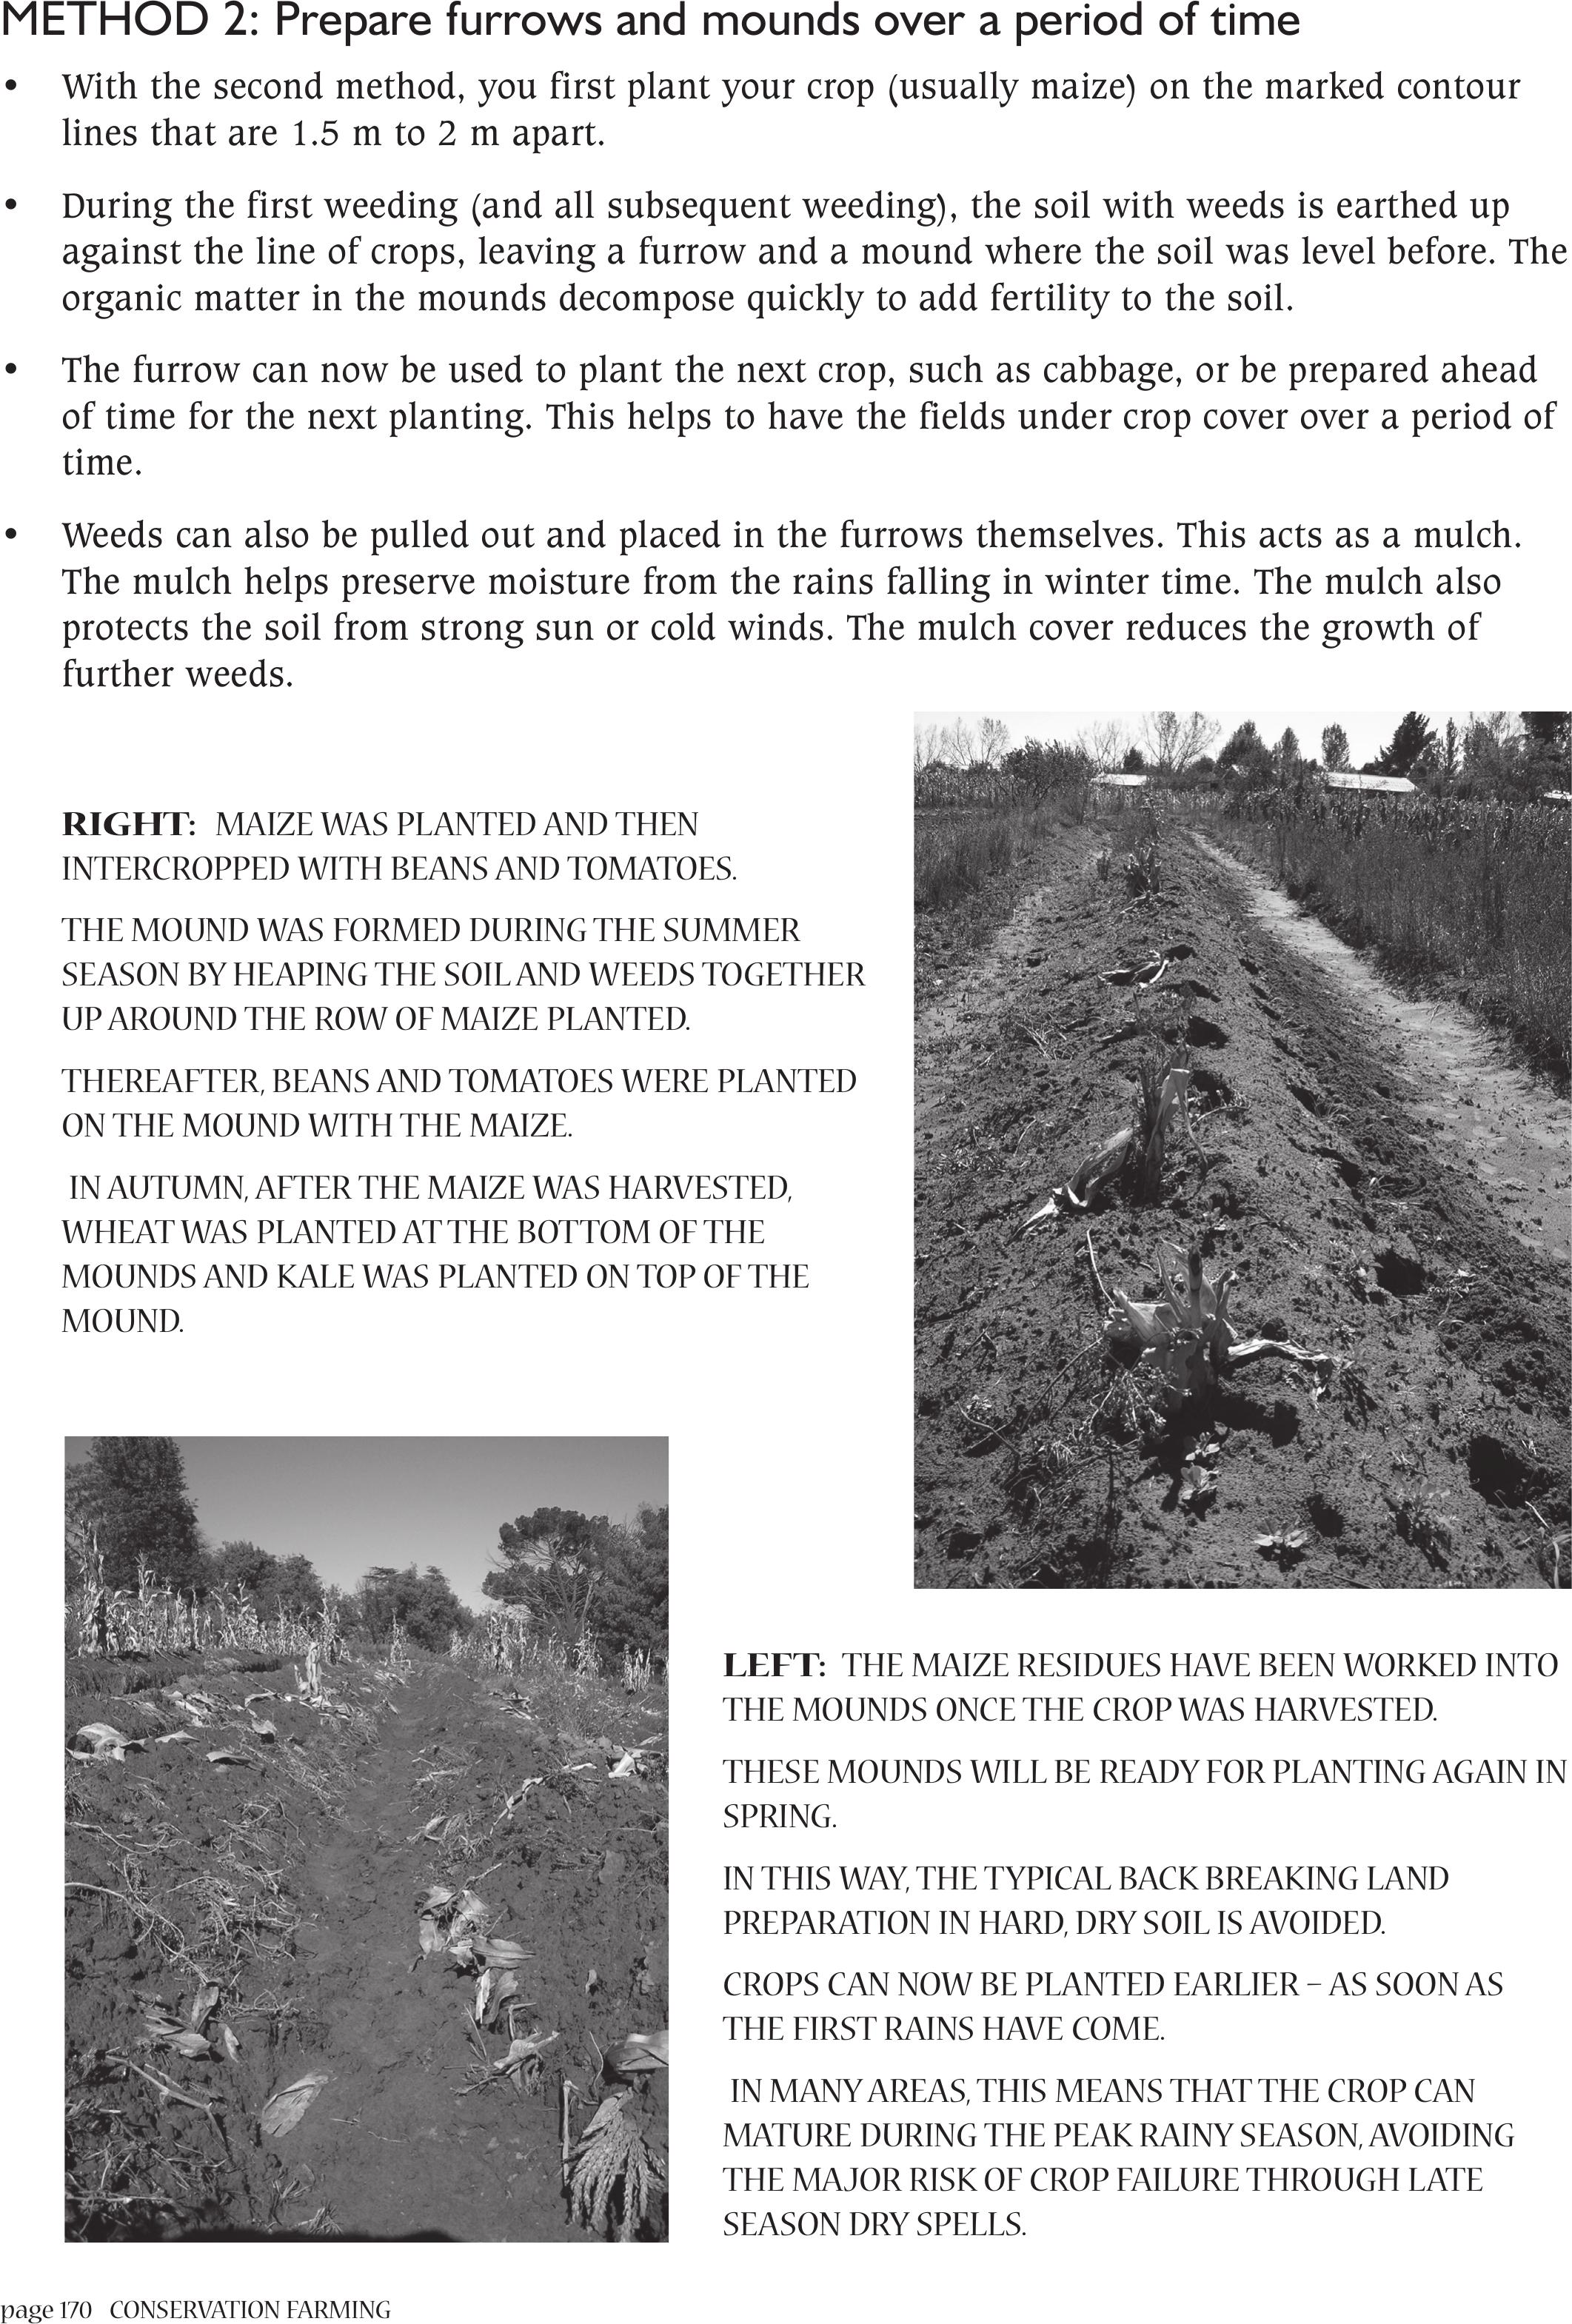
page 170CONSERVATION FARMING
METHOD 2: Prepare furrows and mounds over a period of time
• With the second method, you first plant your crop (usually maize) on the marked contour
lines that are 1.5 m to 2 m apart.
• During the first weeding (and all subsequent weeding), the soil with weeds is earthed up
against the line of crops, leaving a furrow and a mound where the soil was level before. The
organic matter in the mounds decompose quickly to add fertility to the soil.
• The furrow can now be used to plant the next crop, such as cabbage, or be prepared ahead
of time for the next planting. This helps to have the fields under crop cover over a period of
time.
• Weeds can also be pulled out and placed in the furrows themselves. This acts as a mulch.
The mulch helps preserve moisture from the rains falling in winter time. The mulch also
protects the soil from strong sun or cold winds. The mulch cover reduces the growth of
further weeds.
RIGHT: MAIZE WAS PLANTED AND THEN
INTERCROPPED WITH BEANS AND TOMATOES.
THE MOUND WAS FORMED DURING THE SUMMER
SEASON BY HEAPING THE SOIL AND WEEDS TOGETHER
UP AROUND THE ROW OF MAIZE PLANTED.
THEREAFTER,BEANS AND TOMATOES WERE PLANTED
ON THE MOUND WITH THE MAIZE.
IN AUTUMN, AFTER THE MAIZE WAS HARVESTED,
WHEAT WAS PLANTED AT THE BOTTOM OF THE
MOUNDS AND KALE WAS PLANTED ON TOP OF THE
MOUND.
LEFT: THE MAIZE RESIDUES HAVE BEEN WORKED INTO
THE MOUNDS ONCE THE CROP WAS HARVESTED.
THESE MOUNDS WILL BE READY FOR PLANTING AGAIN IN
SPRING.
IN THIS WAY, THE TYPICALBACKBREAKING LAND
PREPARATION IN HARD, DRY SOIL IS AVOIDED.
CROPS CAN NOW BE PLANTED EARLIER – AS SOON AS
THE FIRST RAINS HAVE COME.
IN MANY AREAS, THIS MEANS THAT THE CROP CAN
MATURE DURING THE PEAK RAINY SEASON,AVOIDING
THE MAJOR RISK OF CROP FAILURE THROUGH LATE
SEASON DRY SPELLS.
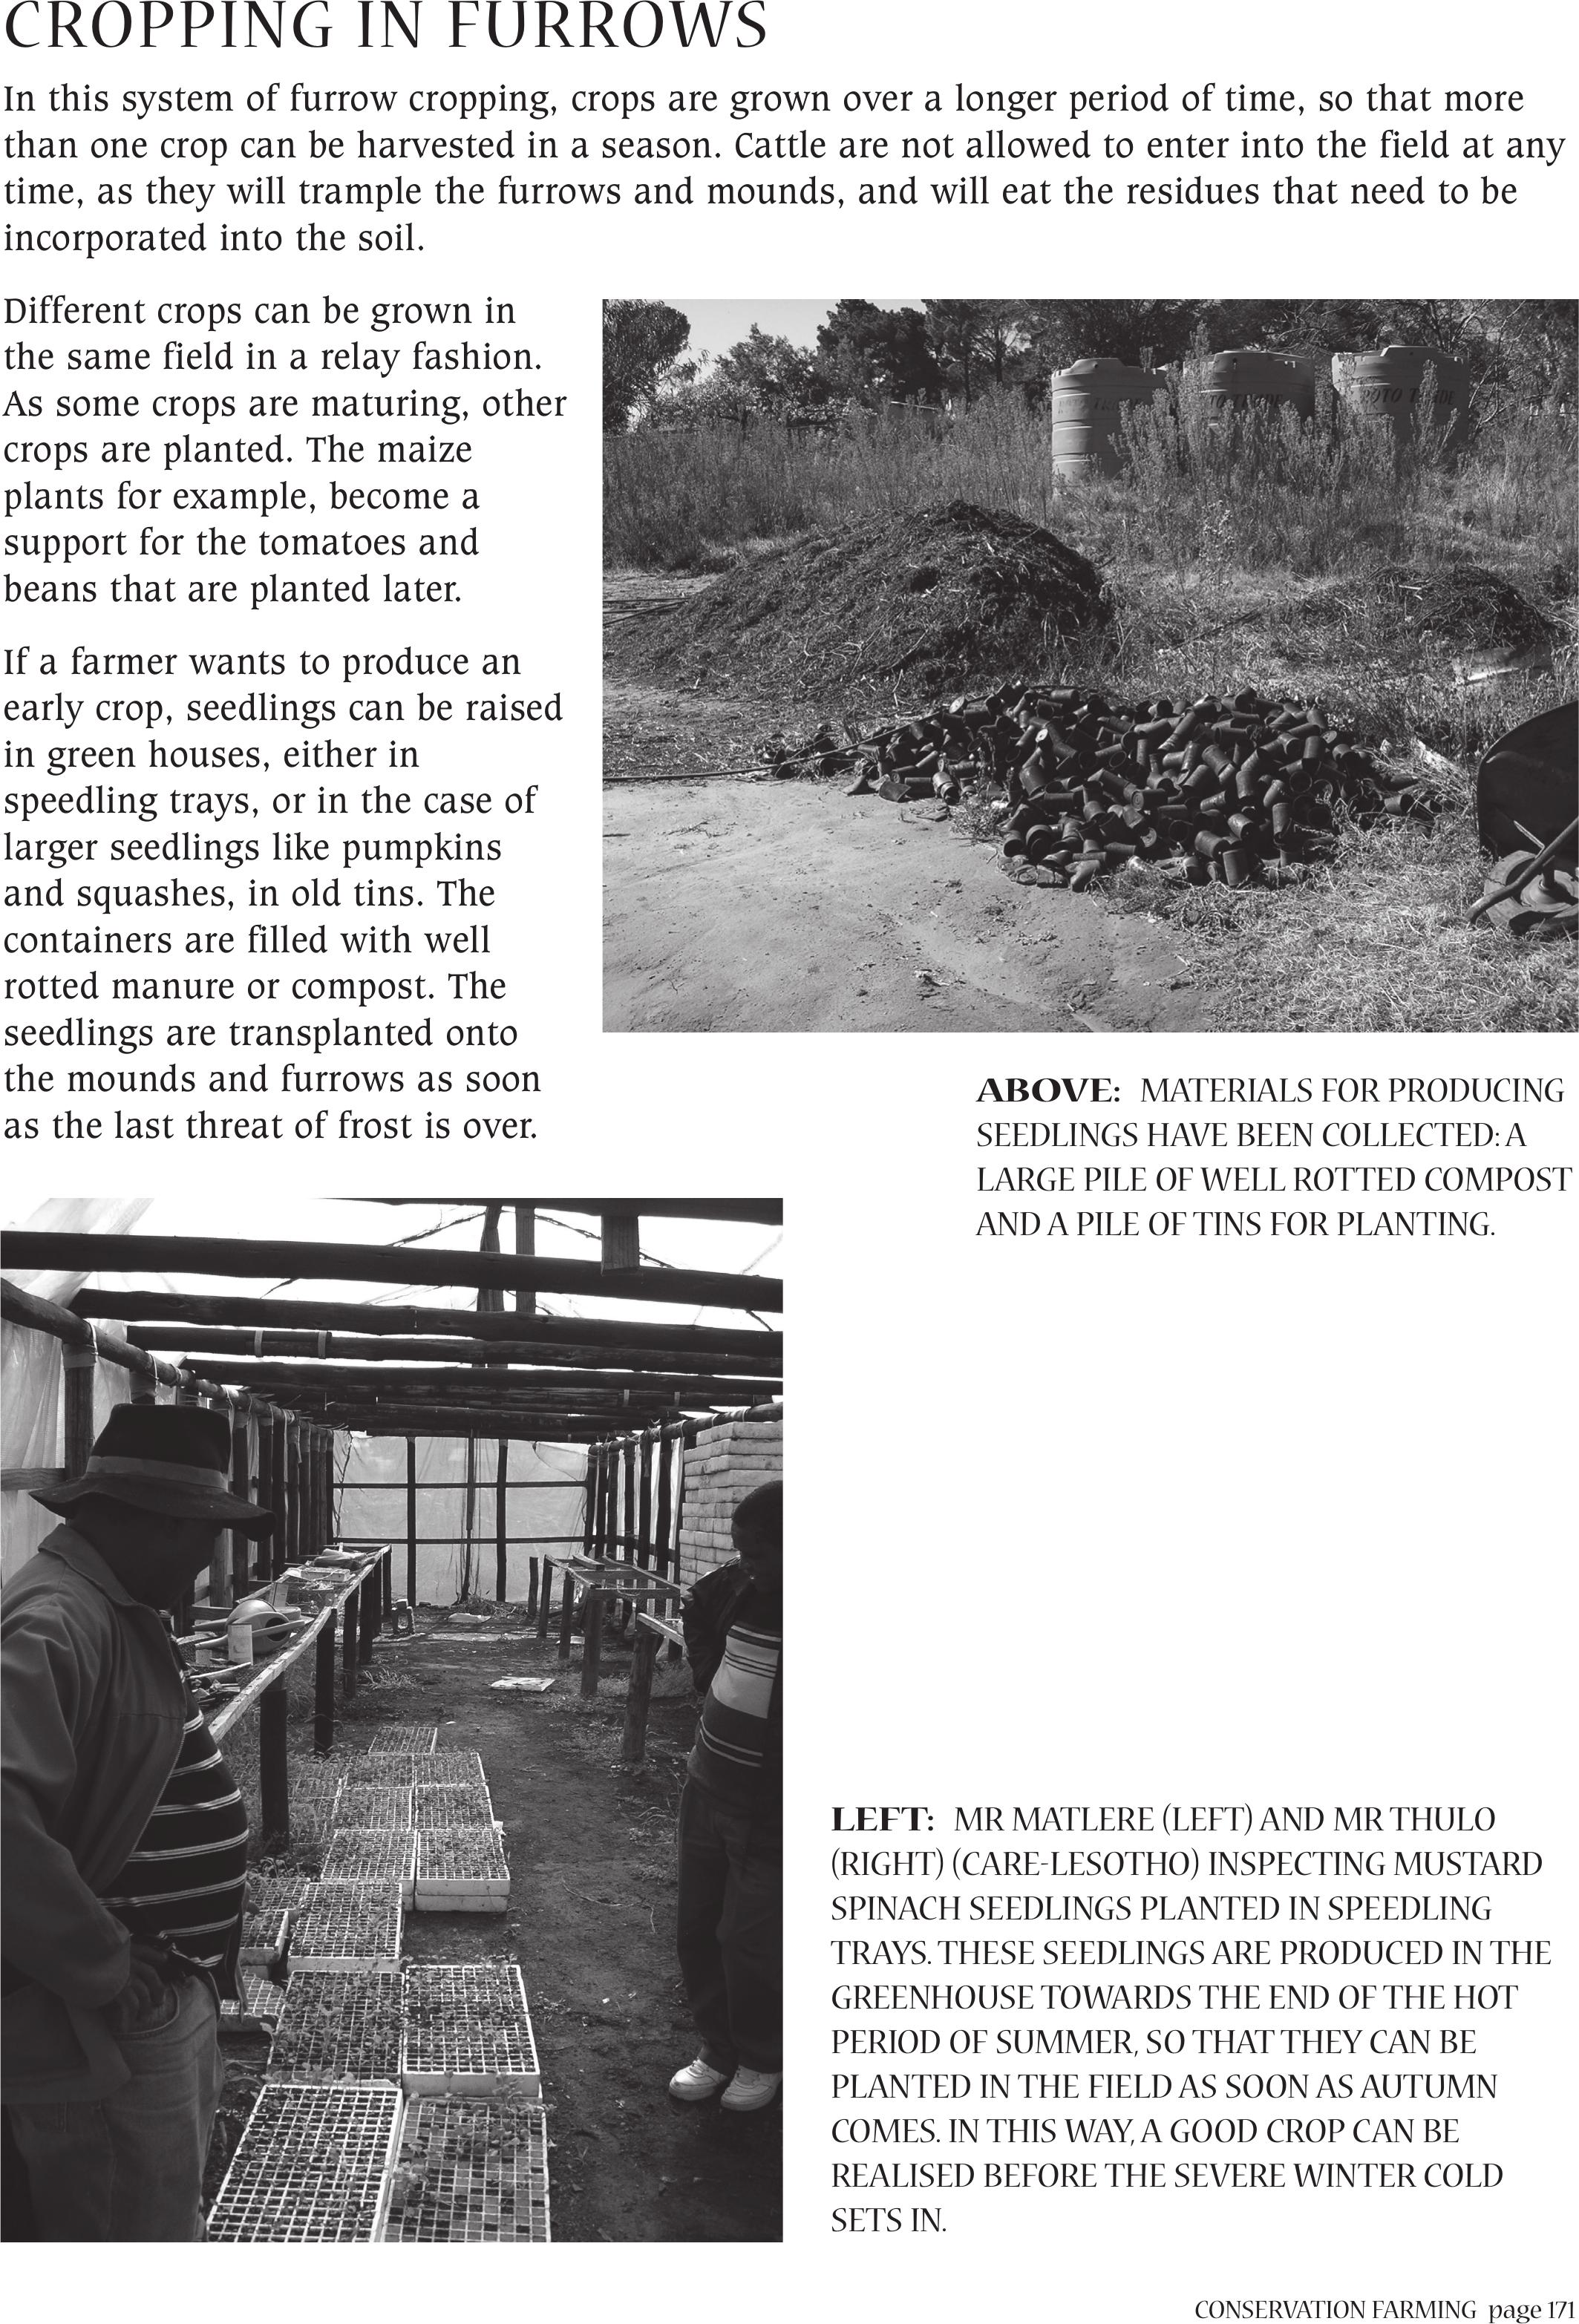
CONSERVATION FARMINGpage 171
CROPPING IN FURROWS
In this system of furrow cropping, crops are grown over a longer period of time, so that more
than one crop can be harvested in a season. Cattle are not allowed to enter into the field at any
time, as they will trample the furrows and mounds, and will eat the residues that need to be
incorporated into the soil.
Different crops can be grown in
the same field in a relay fashion.
As some crops are maturing, other
crops are planted. The maize
plants for example, become a
support for the tomatoes and
beans that are planted later.
If a farmer wants to produce an
early crop, seedlings can be raised
in green houses, either in
speedling trays, or in the case of
larger seedlings like pumpkins
and squashes, in old tins. The
containers are filled with well
rotted manure or compost. The
seedlings are transplanted onto
the mounds and furrows as soon
as the last threat of frost is over.
ABOVE: MATERIALS FOR PRODUCING
SEEDLINGS HAVE BEEN COLLECTED: A
LARGE PILE OF WELL ROTTED COMPOST
AND A PILE OF TINS FOR PLANTING.
LEFT:MR MATLERE (LEFT) AND MR THULO
(RIGHT) (CARE-LESOTHO) INSPECTING MUSTARD
SPINACH SEEDLINGS PLANTED IN SPEEDLING
TRAYS. THESE SEEDLINGS ARE PRODUCED IN THE
GREENHOUSE TOWARDS THE END OF THE HOT
PERIOD OF SUMMER, SO THAT THEY CAN BE
PLANTED IN THE FIELD AS SOON AS AUTUMN
COMES. IN THIS WAY, A GOOD CROP CAN BE
REALISED BEFORE THE SEVERE WINTER COLD
SETS IN.
page 172 CONSERVATION FARMING
SOME INTERESTING OUTCOMES
• The continued absorption of rainwater into the furrows and mounds, tends to influence the
moisture in the area over time. Mr Matlere has experienced that two days after some days
of soaking rain, the sun that strikes the sides of the mounds creates a mist that rises up
from the beds. This happens due to the warmth generated in the mounds from the
decomposing grasses, weeds and maize stalks. It provides a warm, moist micro-climate in
an area that would otherwise be quite dry. This provides very favourable conditions for the
growth of vegetables and pumpkins.
• The silt that collects in the furrows during heavy rains provides some more fertility,
moisture and a better foothold to the crops planted there. Mr Matlere has noticed that the
stand of maize is much better with this system. The maize does not fall over in heavy rains
and winds, as they do under normal conditions.
• With the mounds, the organic matter that has been incorporated decomposes faster than it
would without the mounds. The climate in Lesotho is mild and many months are quite cold
and dry. The mounds provide a surface that is heated by the sun and the organic matter
holds more moisture. Thus decomposition happens faster.
• Because there is more organic matter in the soil, it becomes fertile without the need even to
add manure, if it is in short supply.
• Mr Matlere has noticed that with the increase in fertility and organic matter (humus) in the
soil, there are fewer problems with pests and diseases.
• Because the spacings of the crops are quite wide with this system, the maize matures faster,
there are more cobs per plant (4-5) and cobs are bigger. So, even though fewer plants are in
the ground, a better harvest is achieved. This applies also to other crops like cabbage and
wheat.
– The wide spacing of the rows facilitates early weeding which is important.
– Spacings are generally up to 2 m between the rows (on the mounds) and up to 60 cm
between plants in the row (on the mounds).
– This wide spacing can also facilitate the use of animal drawn implements (oxen or
horses) for weeding.
– For smaller crops like kale and tomatoes, the spacing between the plants in the row is
30 cm.
– For row crops like wheat and onions, 2-3 rows are planted, with a spacing of 40-50 cm
between rows and 30 cm between plants in the rows.
• In this system seeds are planted by hand, rather than by animal drawn planters. Mr Matlere
also only plants crops from which he can keep his own seed.
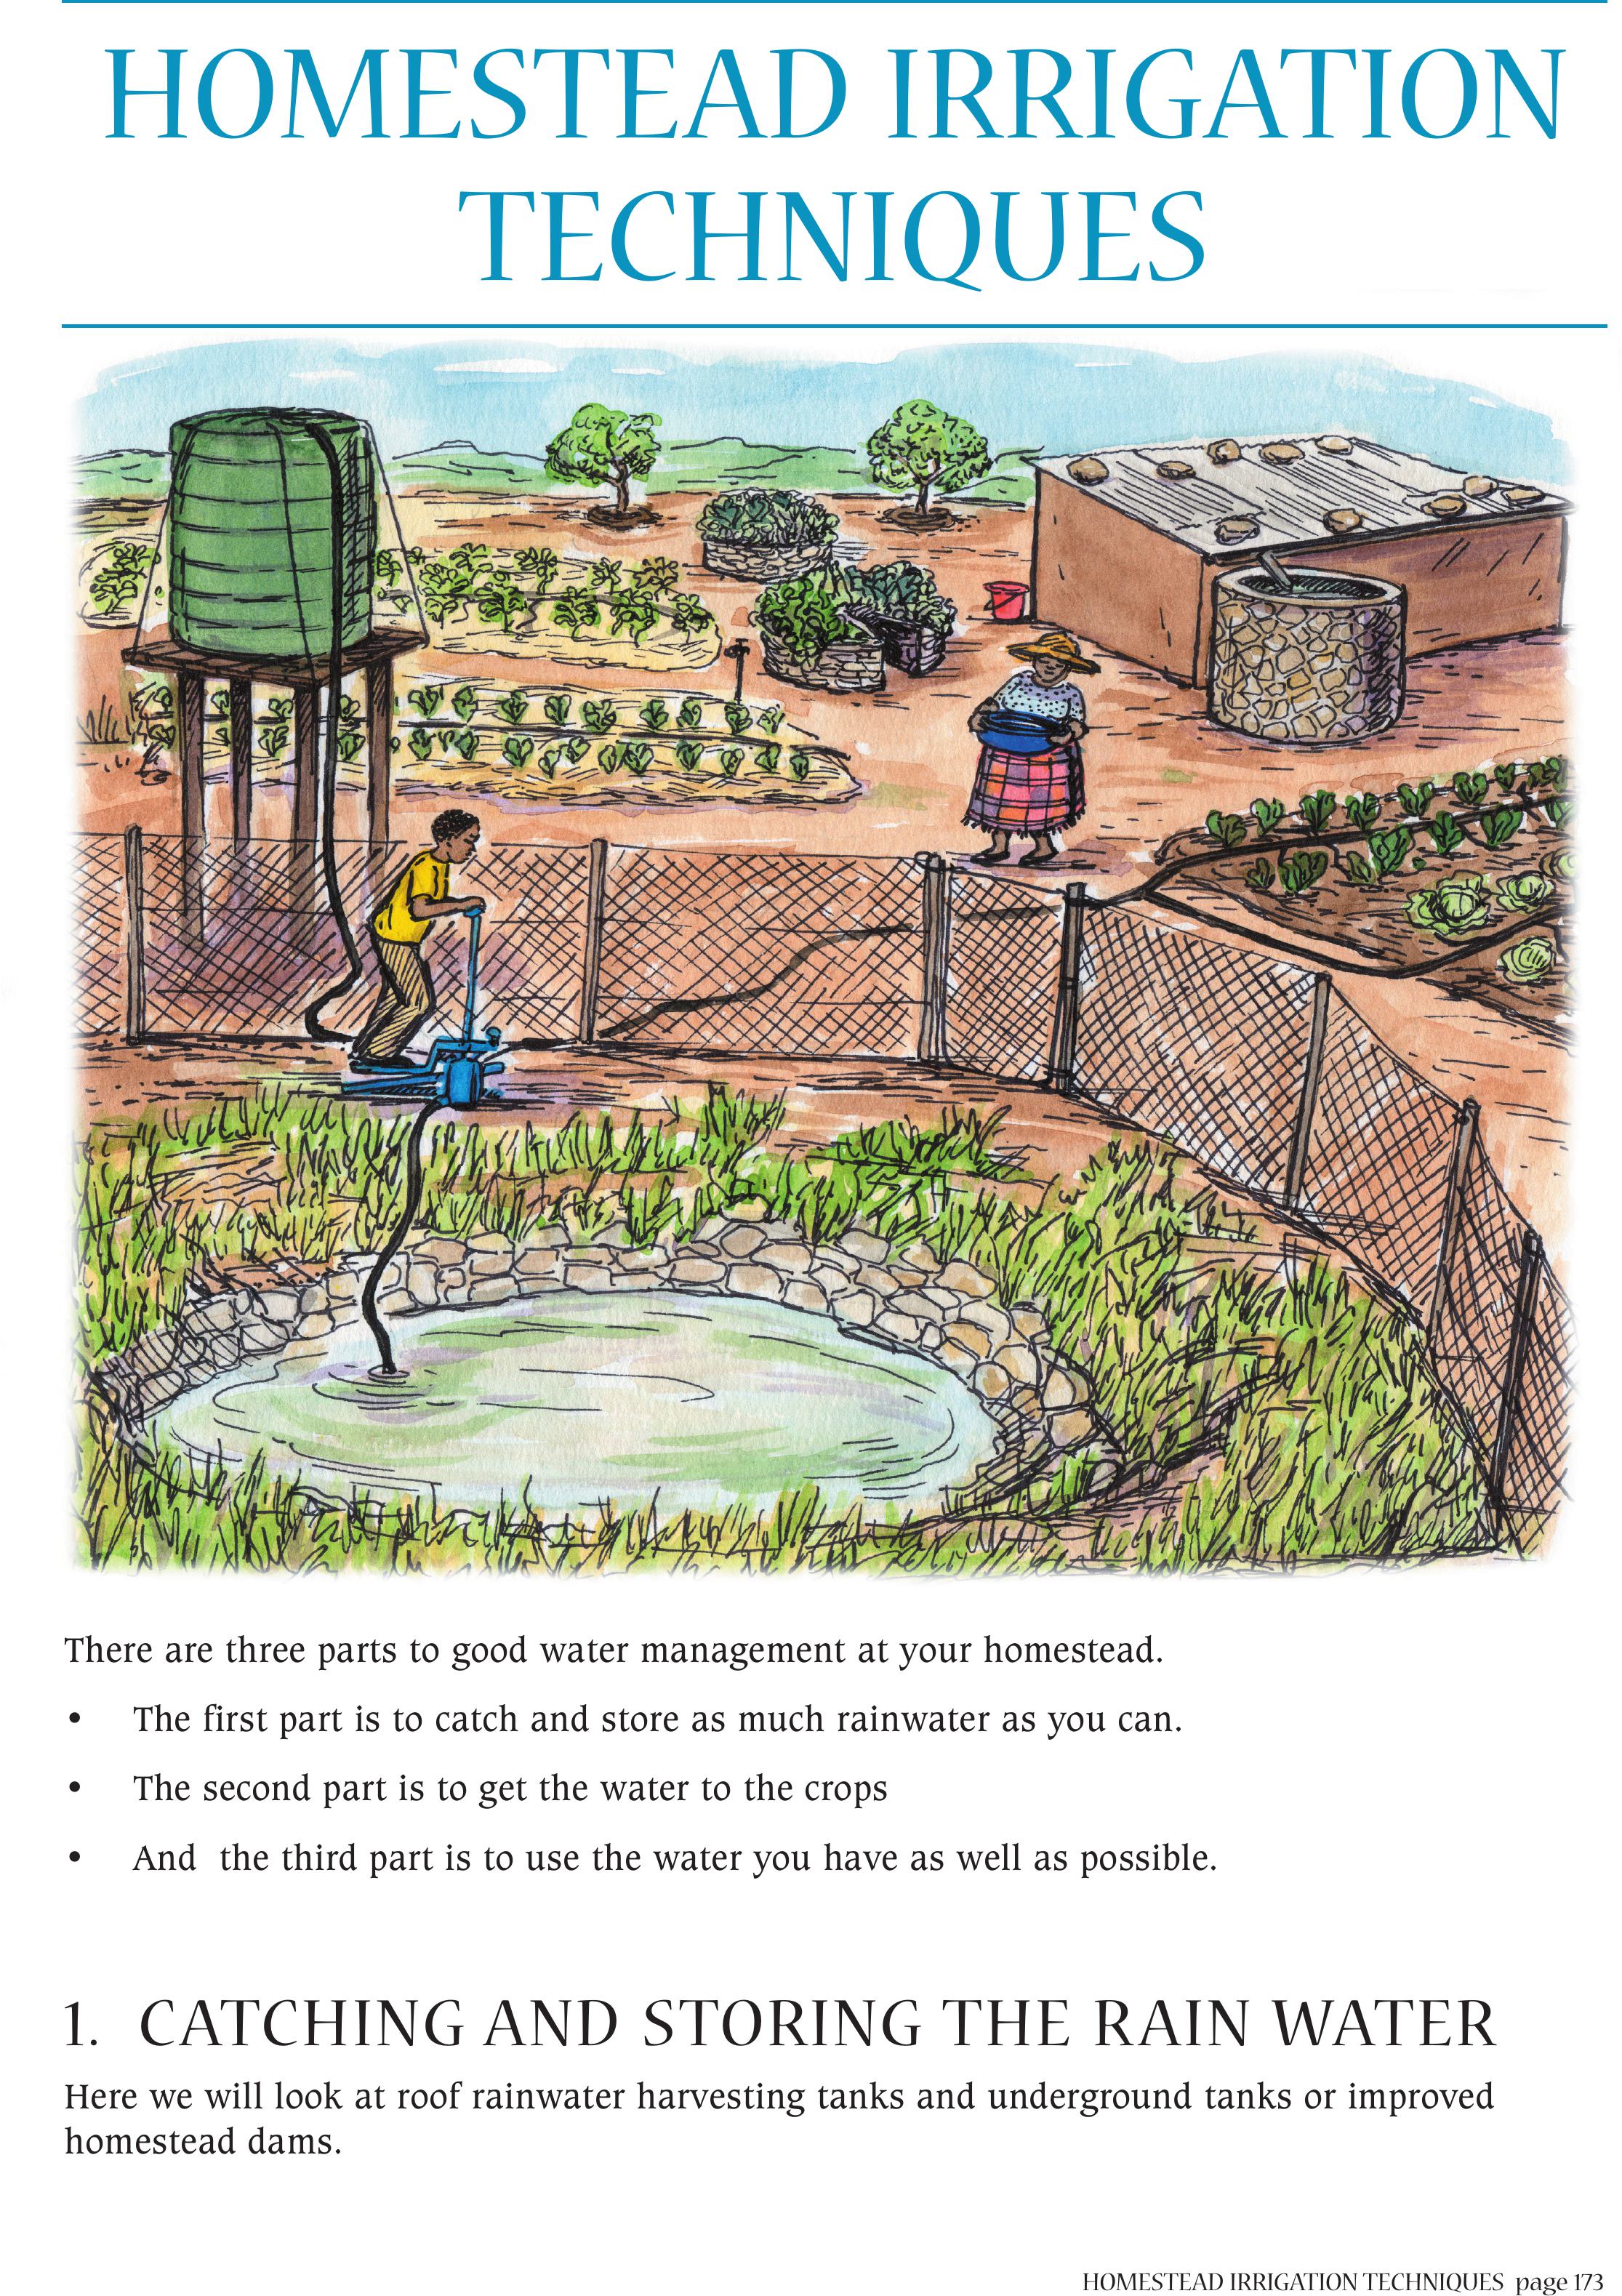
HOMESTEAD IRRIGATION TECHNIQUESpage 173
There are three parts to good water management at your homestead.
• The first part is to catch and store as much rainwater as you can.
• The second part is to get the water to the crops
• And the third part is to use the water you have as well as possible.
1. CATCHING AND STORING THE RAIN WATER
Here we will look at roof rainwater harvesting tanks and underground tanks or improved
homestead dams.
HOMESTEAD IRRIGATION
TECHNIQUES
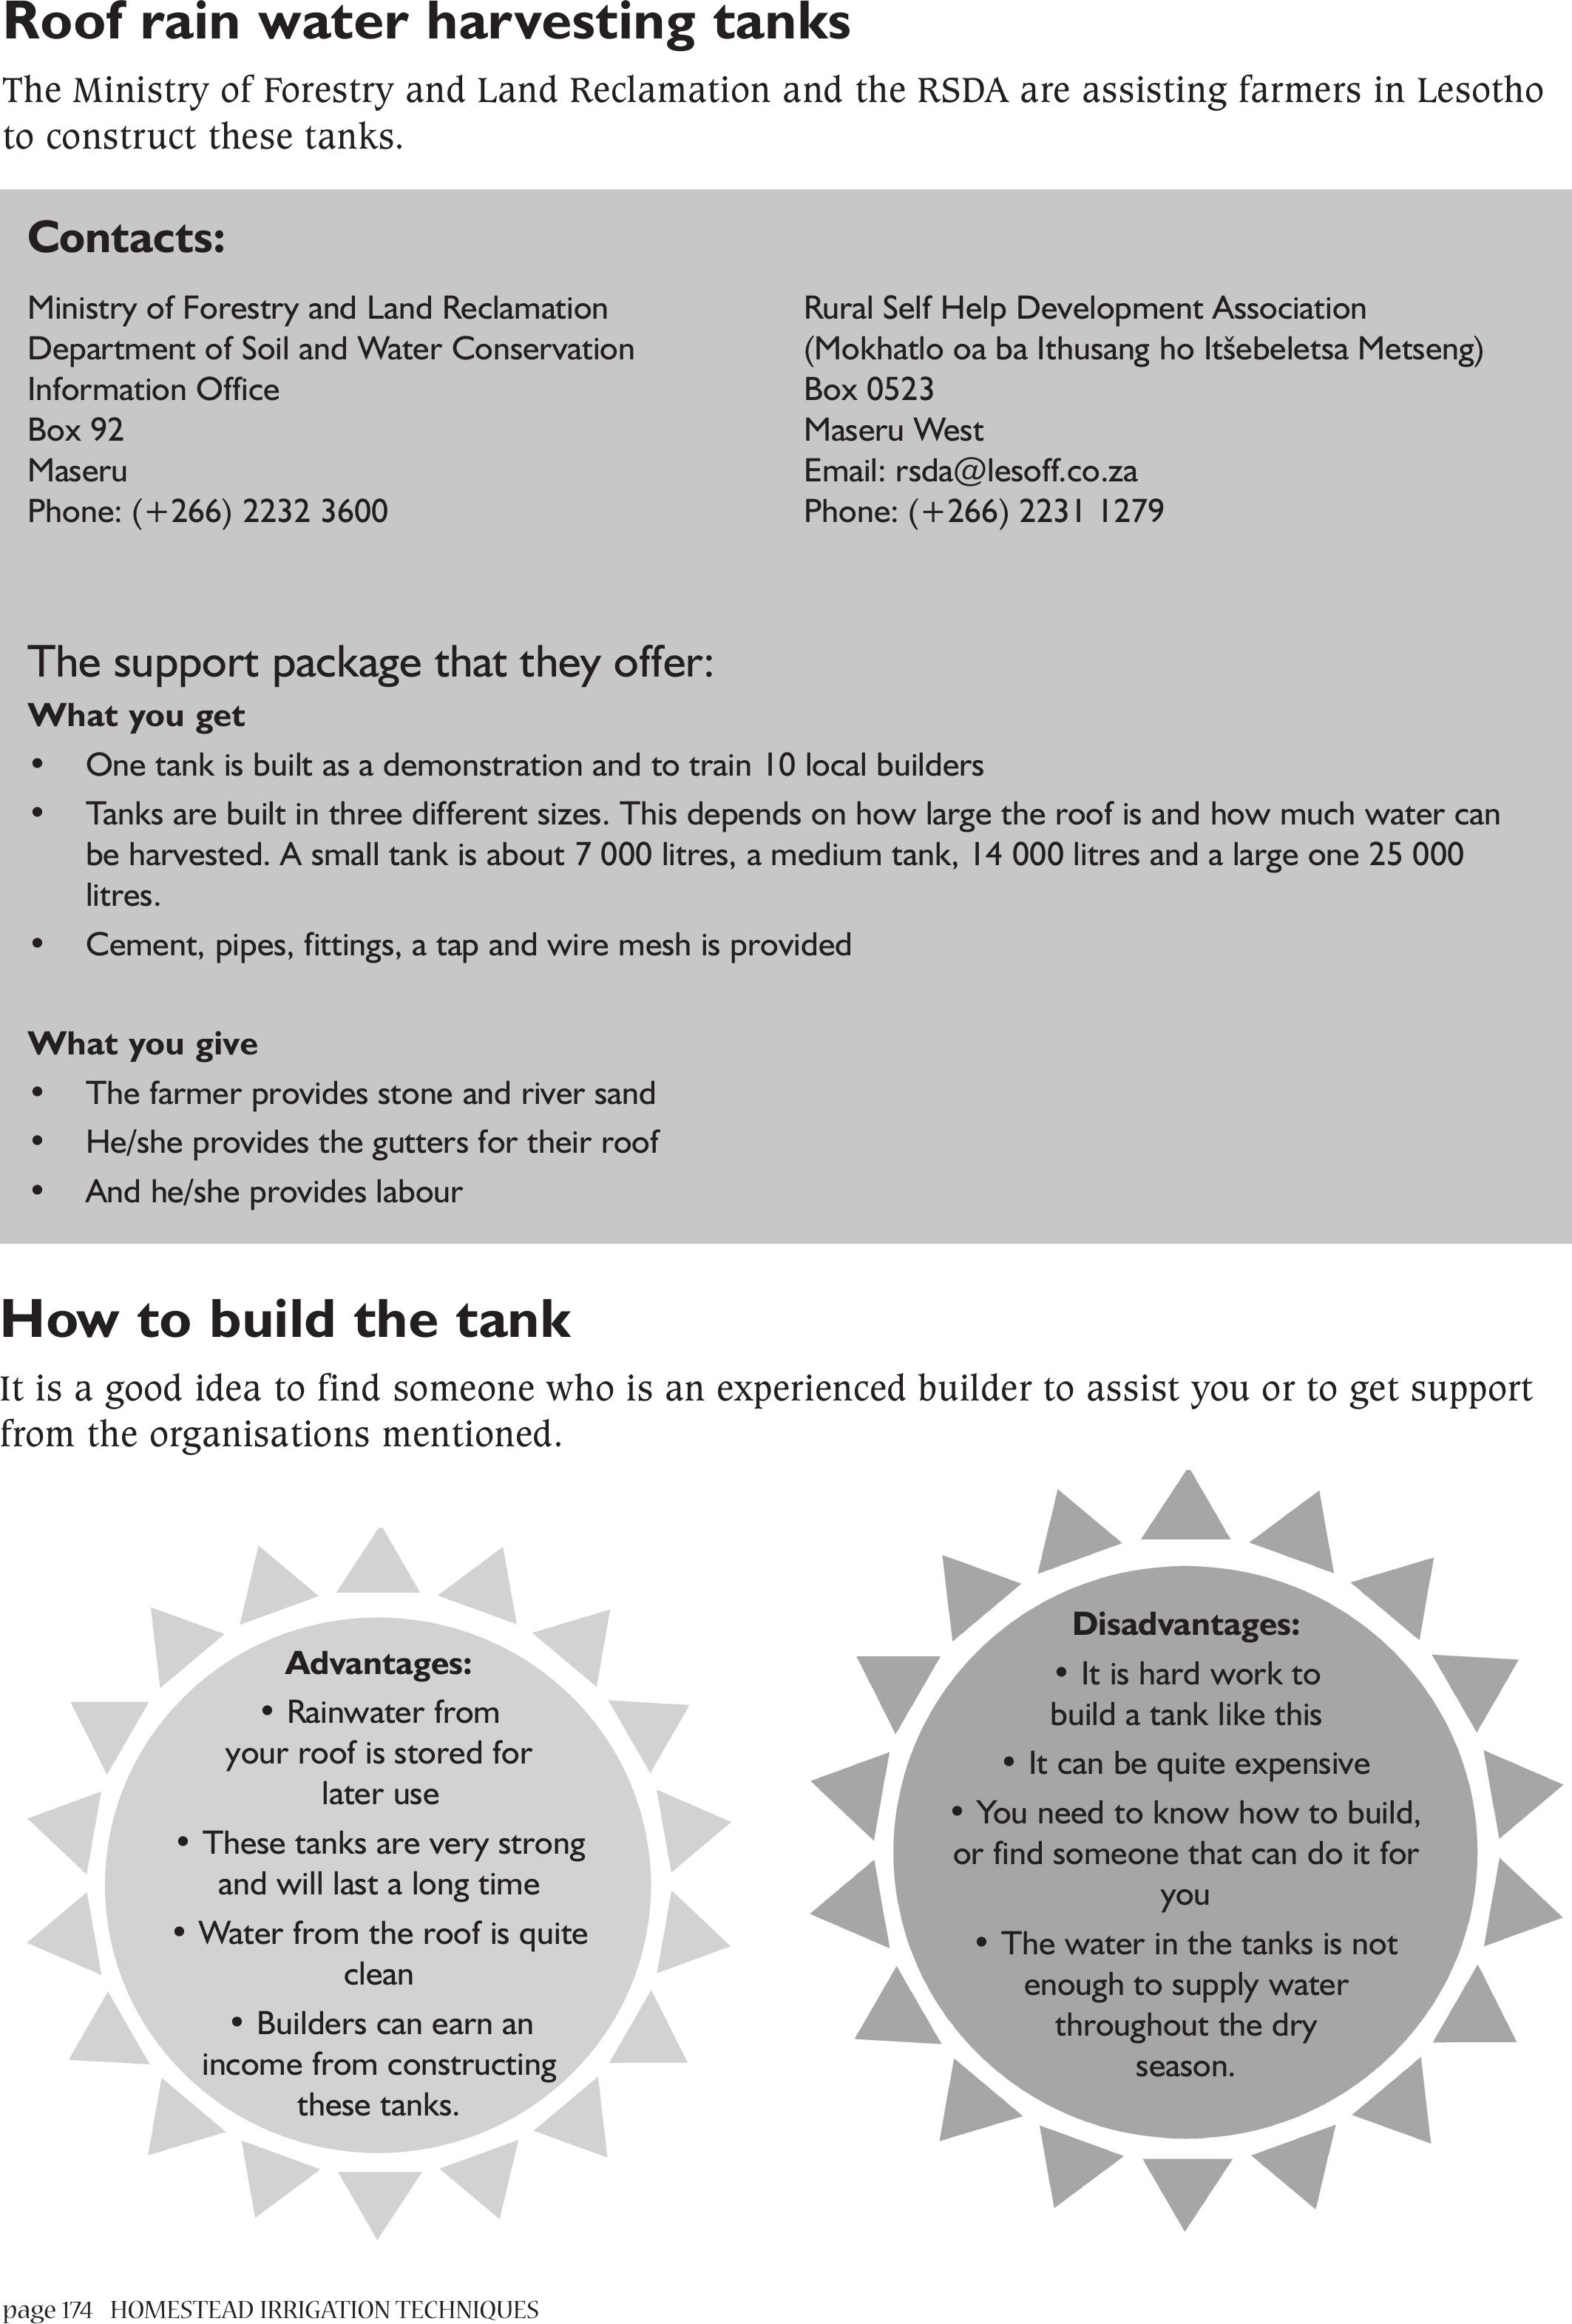
page 174 HOMESTEAD IRRIGATION TECHNIQUES
Contacts:
Ministry of Forestry and Land Reclamation Rural Self Help Development Association
Department of Soil and Water Conservation (Mokhatlo oa ba Ithusang ho Itšebeletsa Metseng)
Information Office Box 0523
Box 92 Maseru West
Maseru Email: rsda@lesoff.co.za
Phone: (+266) 2232 3600 Phone: (+266) 2231 1279
The support package that they offer:
What you get
• One tank is built as a demonstration and to train 10 local builders
• Tanks are built in three different sizes. This depends on how large the roof is and how much water can
be harvested. A small tank is about 7 000 litres, a medium tank, 14 000 litres and a large one 25 000
litres.
• Cement, pipes, fittings, a tap and wire mesh is provided
What you give
• The farmer provides stone and river sand
• He/she provides the gutters for their roof
• And he/she provides labour
Advantages:
• Rainwater from
your roof is stored for
later use
• These tanks are very strong
and will last a long time
• Water from the roof is quite
clean
• Builders can earn an
income from constructing
these tanks.
Disadvantages:
• It is hard work to
build a tank like this
• It can be quite expensive
• You need to know how to build,
or find someone that can do it for
you
• The water in the tanks is not
enough to supply water
throughout the dry
season.
How to build the tank
It is a good idea to find someone who is an experienced builder to assist you or to get support
from the organisations mentioned.
Roof rain water harvesting tanks
The Ministry of Forestry and Land Reclamation and the RSDA are assisting farmers in Lesotho
to construct these tanks.
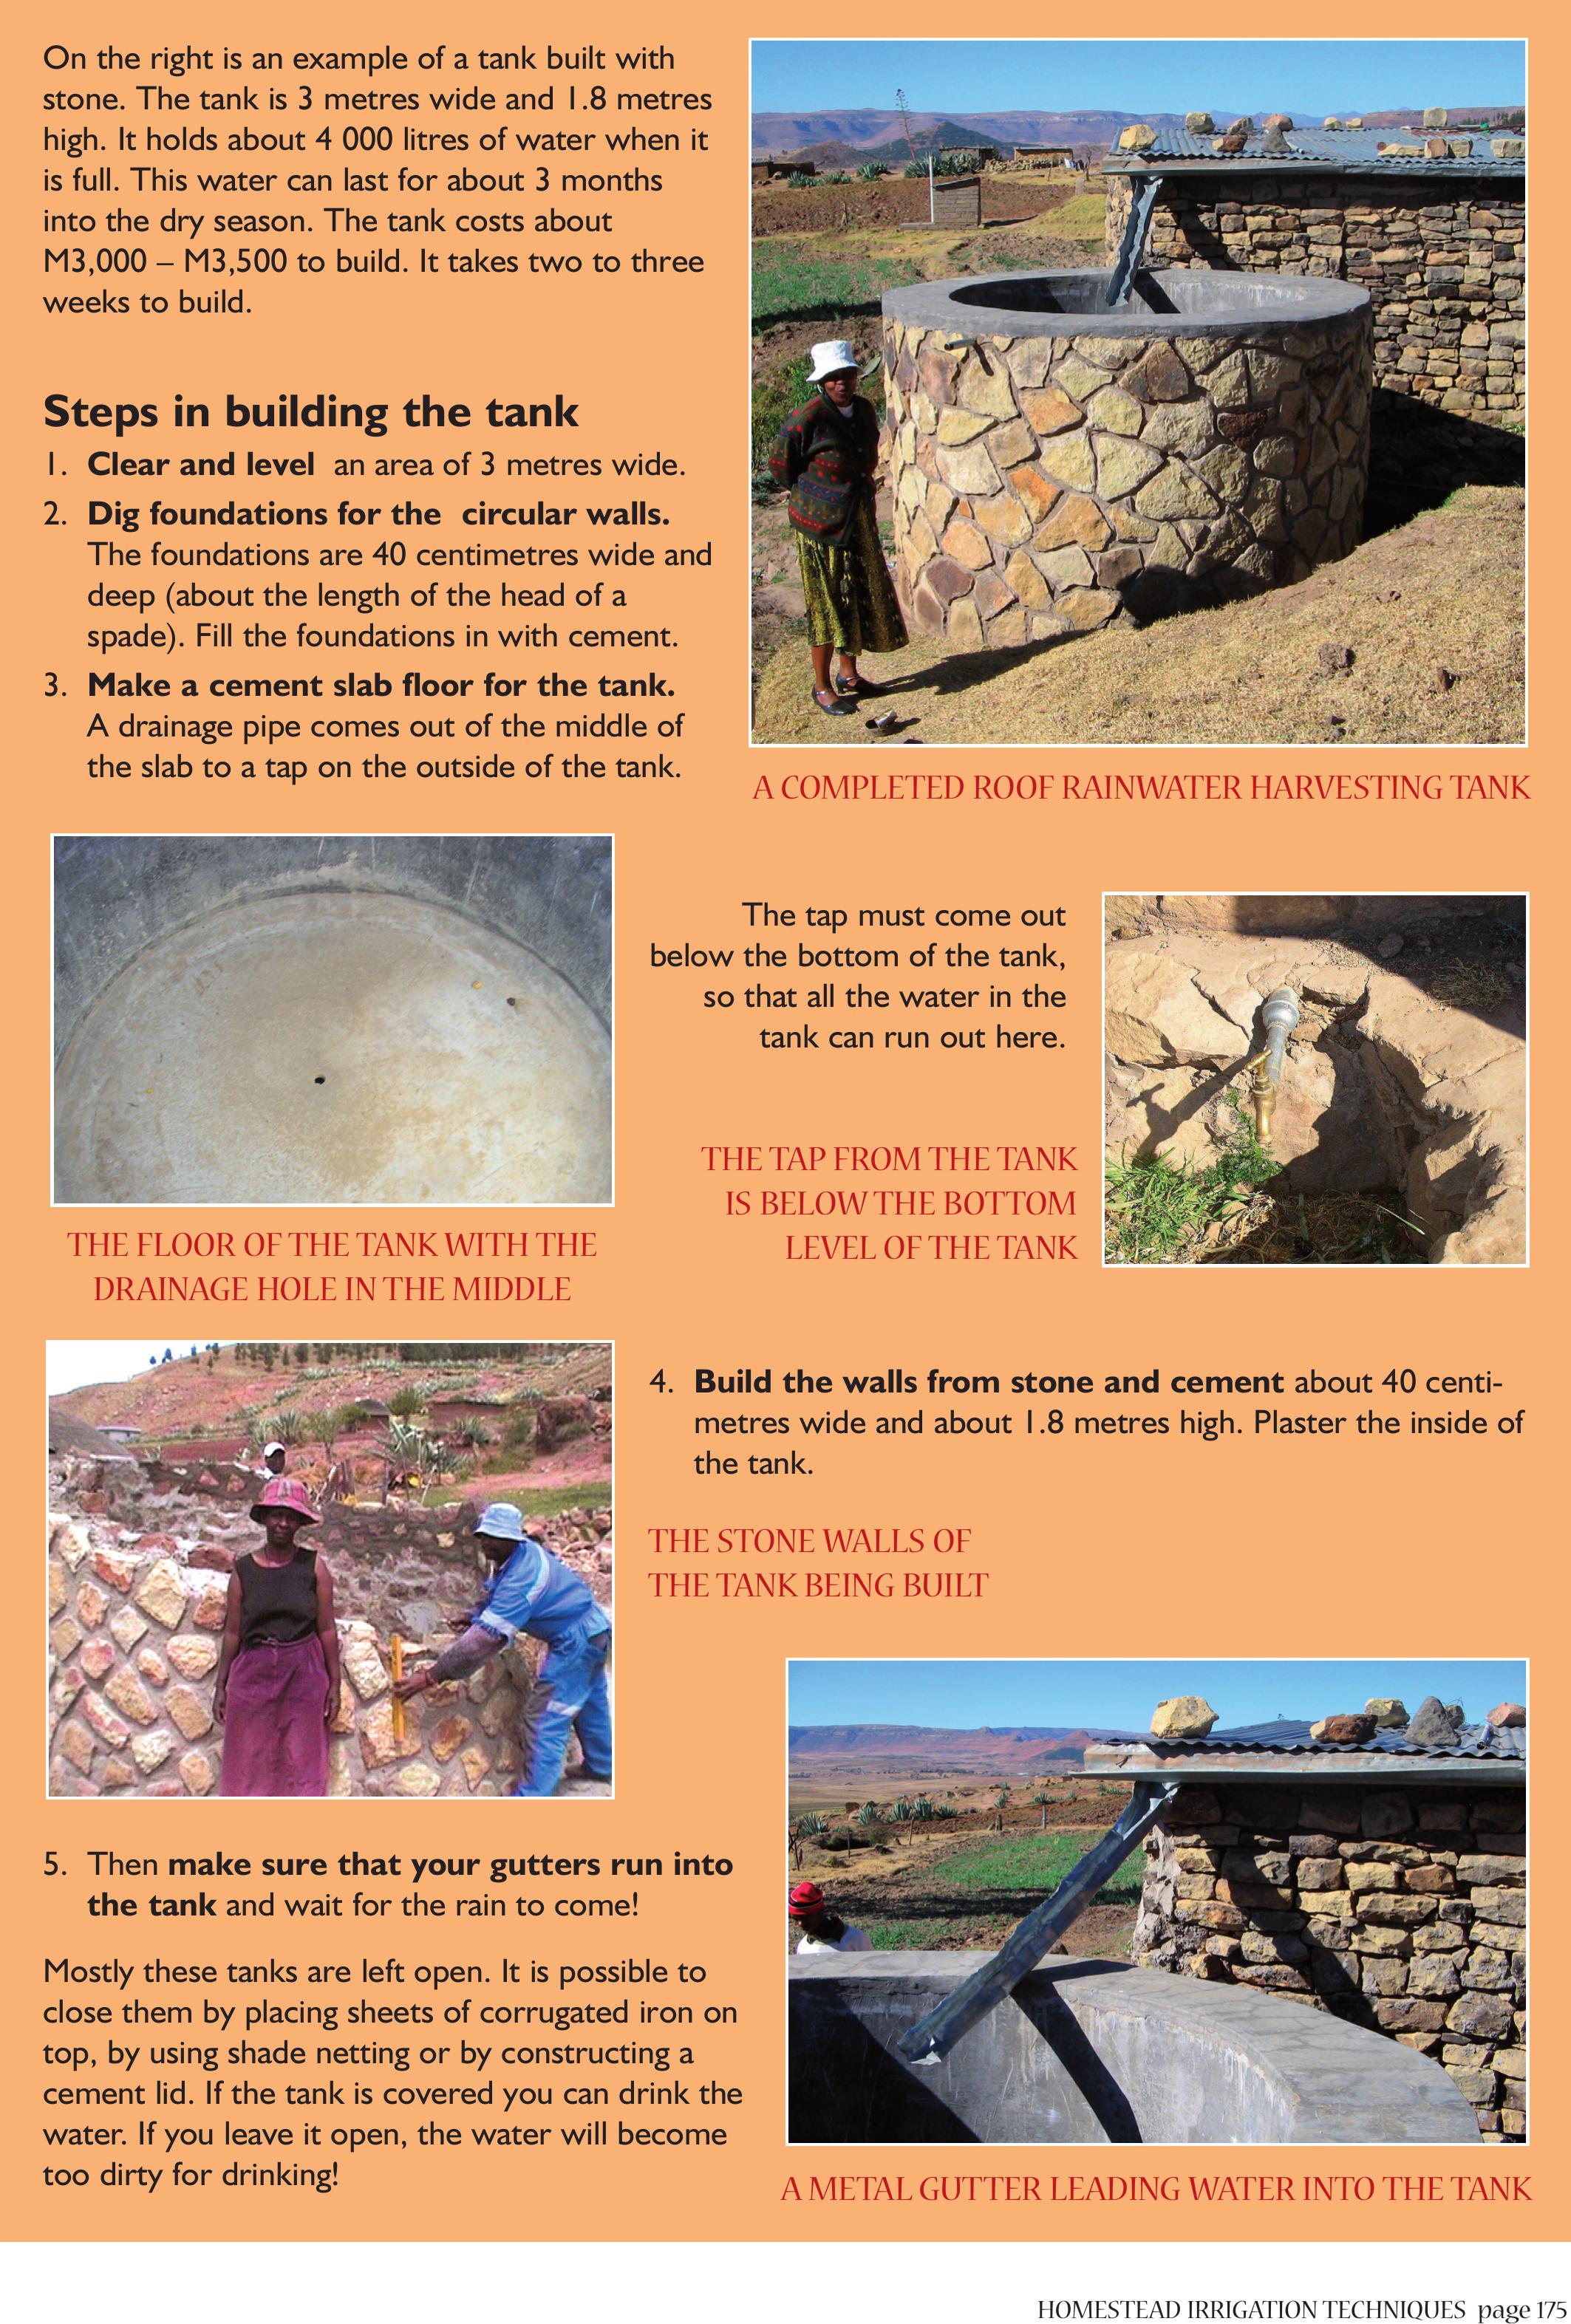
HOMESTEAD IRRIGATION TECHNIQUESpage 175
On the right is an example of a tank built with
stone. The tank is 3 metres wide and 1.8 metres
high. It holds about 4 000 litres of water when it
is full. This water can last for about 3 months
into the dry season. The tank costs about
M3,000 – M3,500 to build. It takes two to three
weeks to build.
Steps in building the tank
1. Clear and level an area of 3 metres wide.
2. Dig foundations for the circular walls.
The foundations are 40 centimetres wide and
deep (about the length of the head of a
spade). Fill the foundations in with cement.
3. Make a cement slab floor for the tank.
A drainage pipe comes out of the middle of
the slab to a tap on the outside of the tank.
The tap must come out
below the bottom of the tank,
so that all the water in the
tank can run out here.
4. Build the walls from stone and cement about 40 centi-
metres wide and about 1.8 metres high. Plaster the inside of
the tank.
5. Then make sure that your gutters run into
the tank and wait for the rain to come!
Mostly these tanks are left open. It is possible to
close them by placing sheets of corrugated iron on
top, by using shade netting or by constructing a
cement lid. If the tank is covered you can drink the
water. If you leave it open, the water will become
too dirty for drinking!
A COMPLETED ROOF RAINWATER HARVESTING TANK
THE TAP FROM THE TANK
IS BELOW THE BOTTOM
LEVELOF THE TANK
THE STONE WALLS OF
THE TANK BEING BUILT
THE FLOOR OF THE TANK WITH THE
DRAINAGE HOLE IN THE MIDDLE
A METAL GUTTER LEADING WATER INTO THE TANK
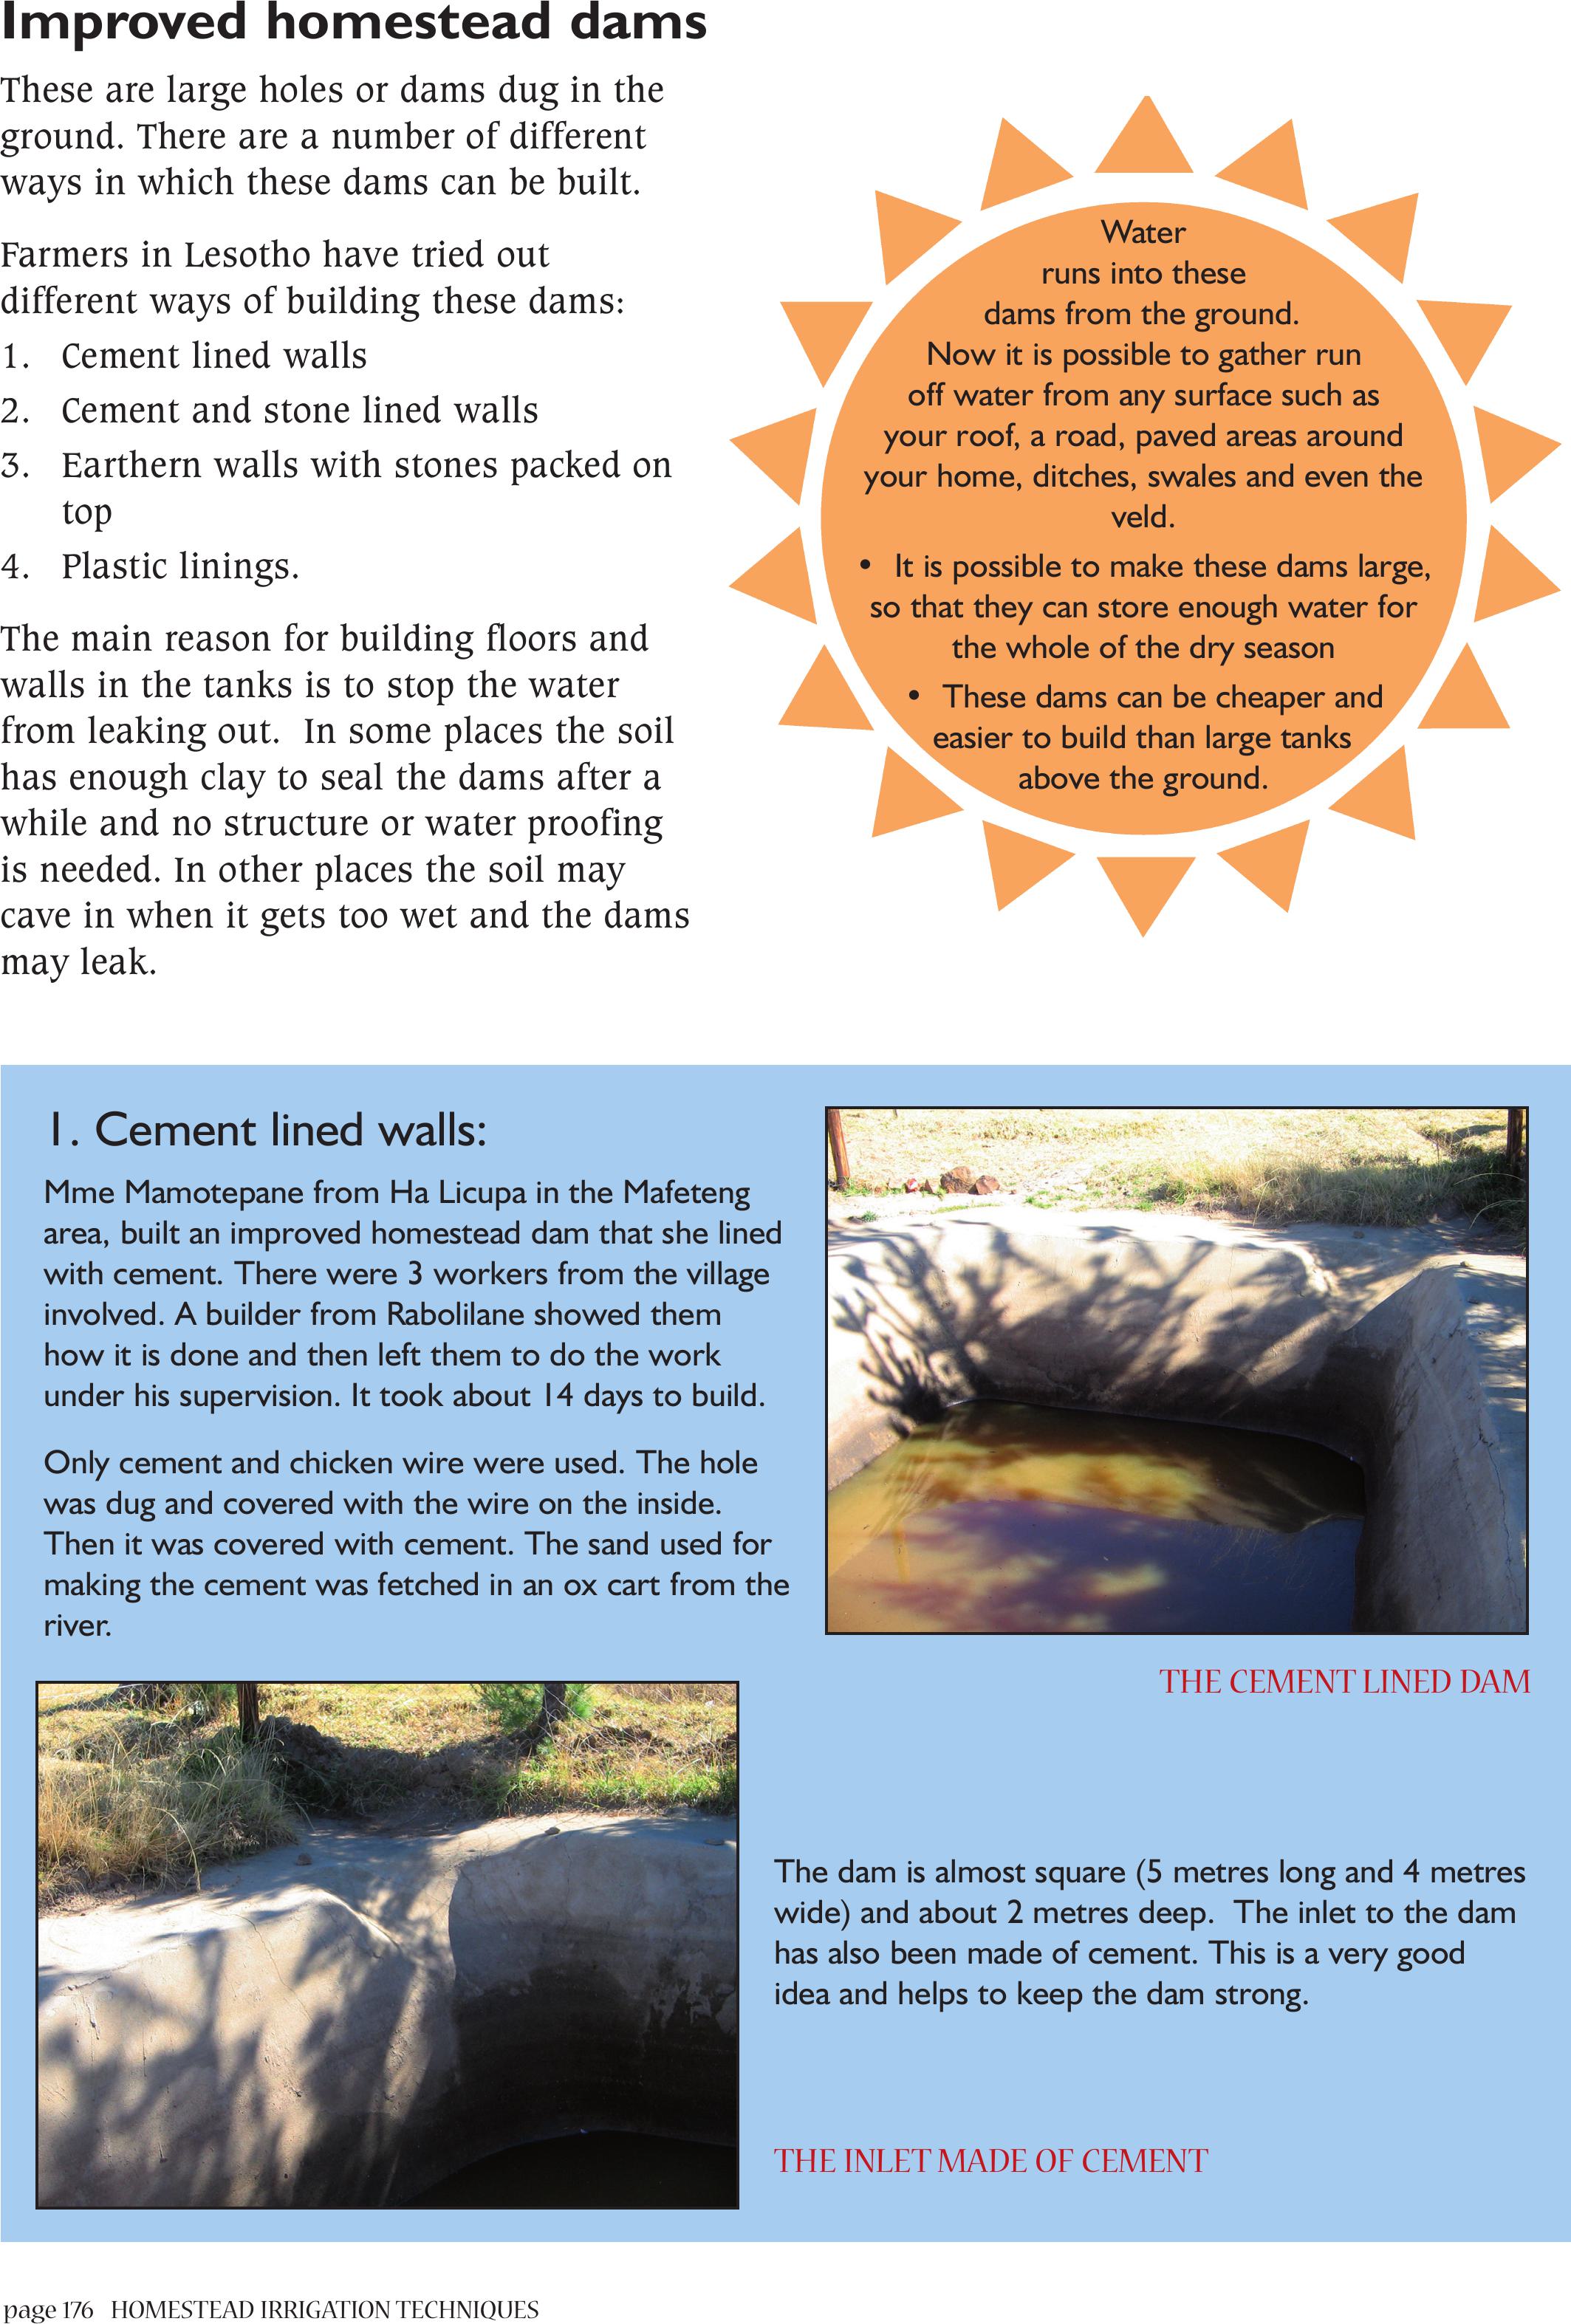
page 176 HOMESTEAD IRRIGATION TECHNIQUES
Improved homestead dams
These are large holes or dams dug in the
ground. There are a number of different
ways in which these dams can be built.
Farmers in Lesotho have tried out
different ways of building these dams:
1. Cement lined walls
2. Cement and stone lined walls
3. Earthern walls with stones packed on
top
4. Plastic linings.
The main reason for building floors and
walls in the tanks is to stop the water
from leaking out. In some places the soil
has enough clay to seal the dams after a
while and no structure or water proofing
is needed. In other places the soil may
cave in when it gets too wet and the dams
may leak.
Water
runs into these
dams from the ground.
Now it is possible to gather run
off water from any surface such as
your roof, a road, paved areas around
your home, ditches, swales and even the
veld.
• It is possible to make these dams large,
so that they can store enough water for
the whole of the dry season
• These dams can be cheaper and
easier to build than large tanks
above the ground.
1. Cement lined walls:
Mme Mamotepane from Ha Licupa in the Mafeteng
area, built an improved homestead dam that she lined
with cement. There were 3 workers from the village
involved. A builder from Rabolilane showed them
how it is done and then left them to do the work
under his supervision. It took about 14 days to build.
Only cement and chicken wire were used. The hole
was dug and covered with the wire on the inside.
Then it was covered with cement. The sand used for
making the cement was fetched in an ox cart from the
river.
The dam is almost square (5 metres long and 4 metres
wide) and about 2 metres deep. The inlet to the dam
has also been made of cement. This is a very good
idea and helps to keep the dam strong.
THE INLET MADE OF CEMENT
THE CEMENT LINED DAM
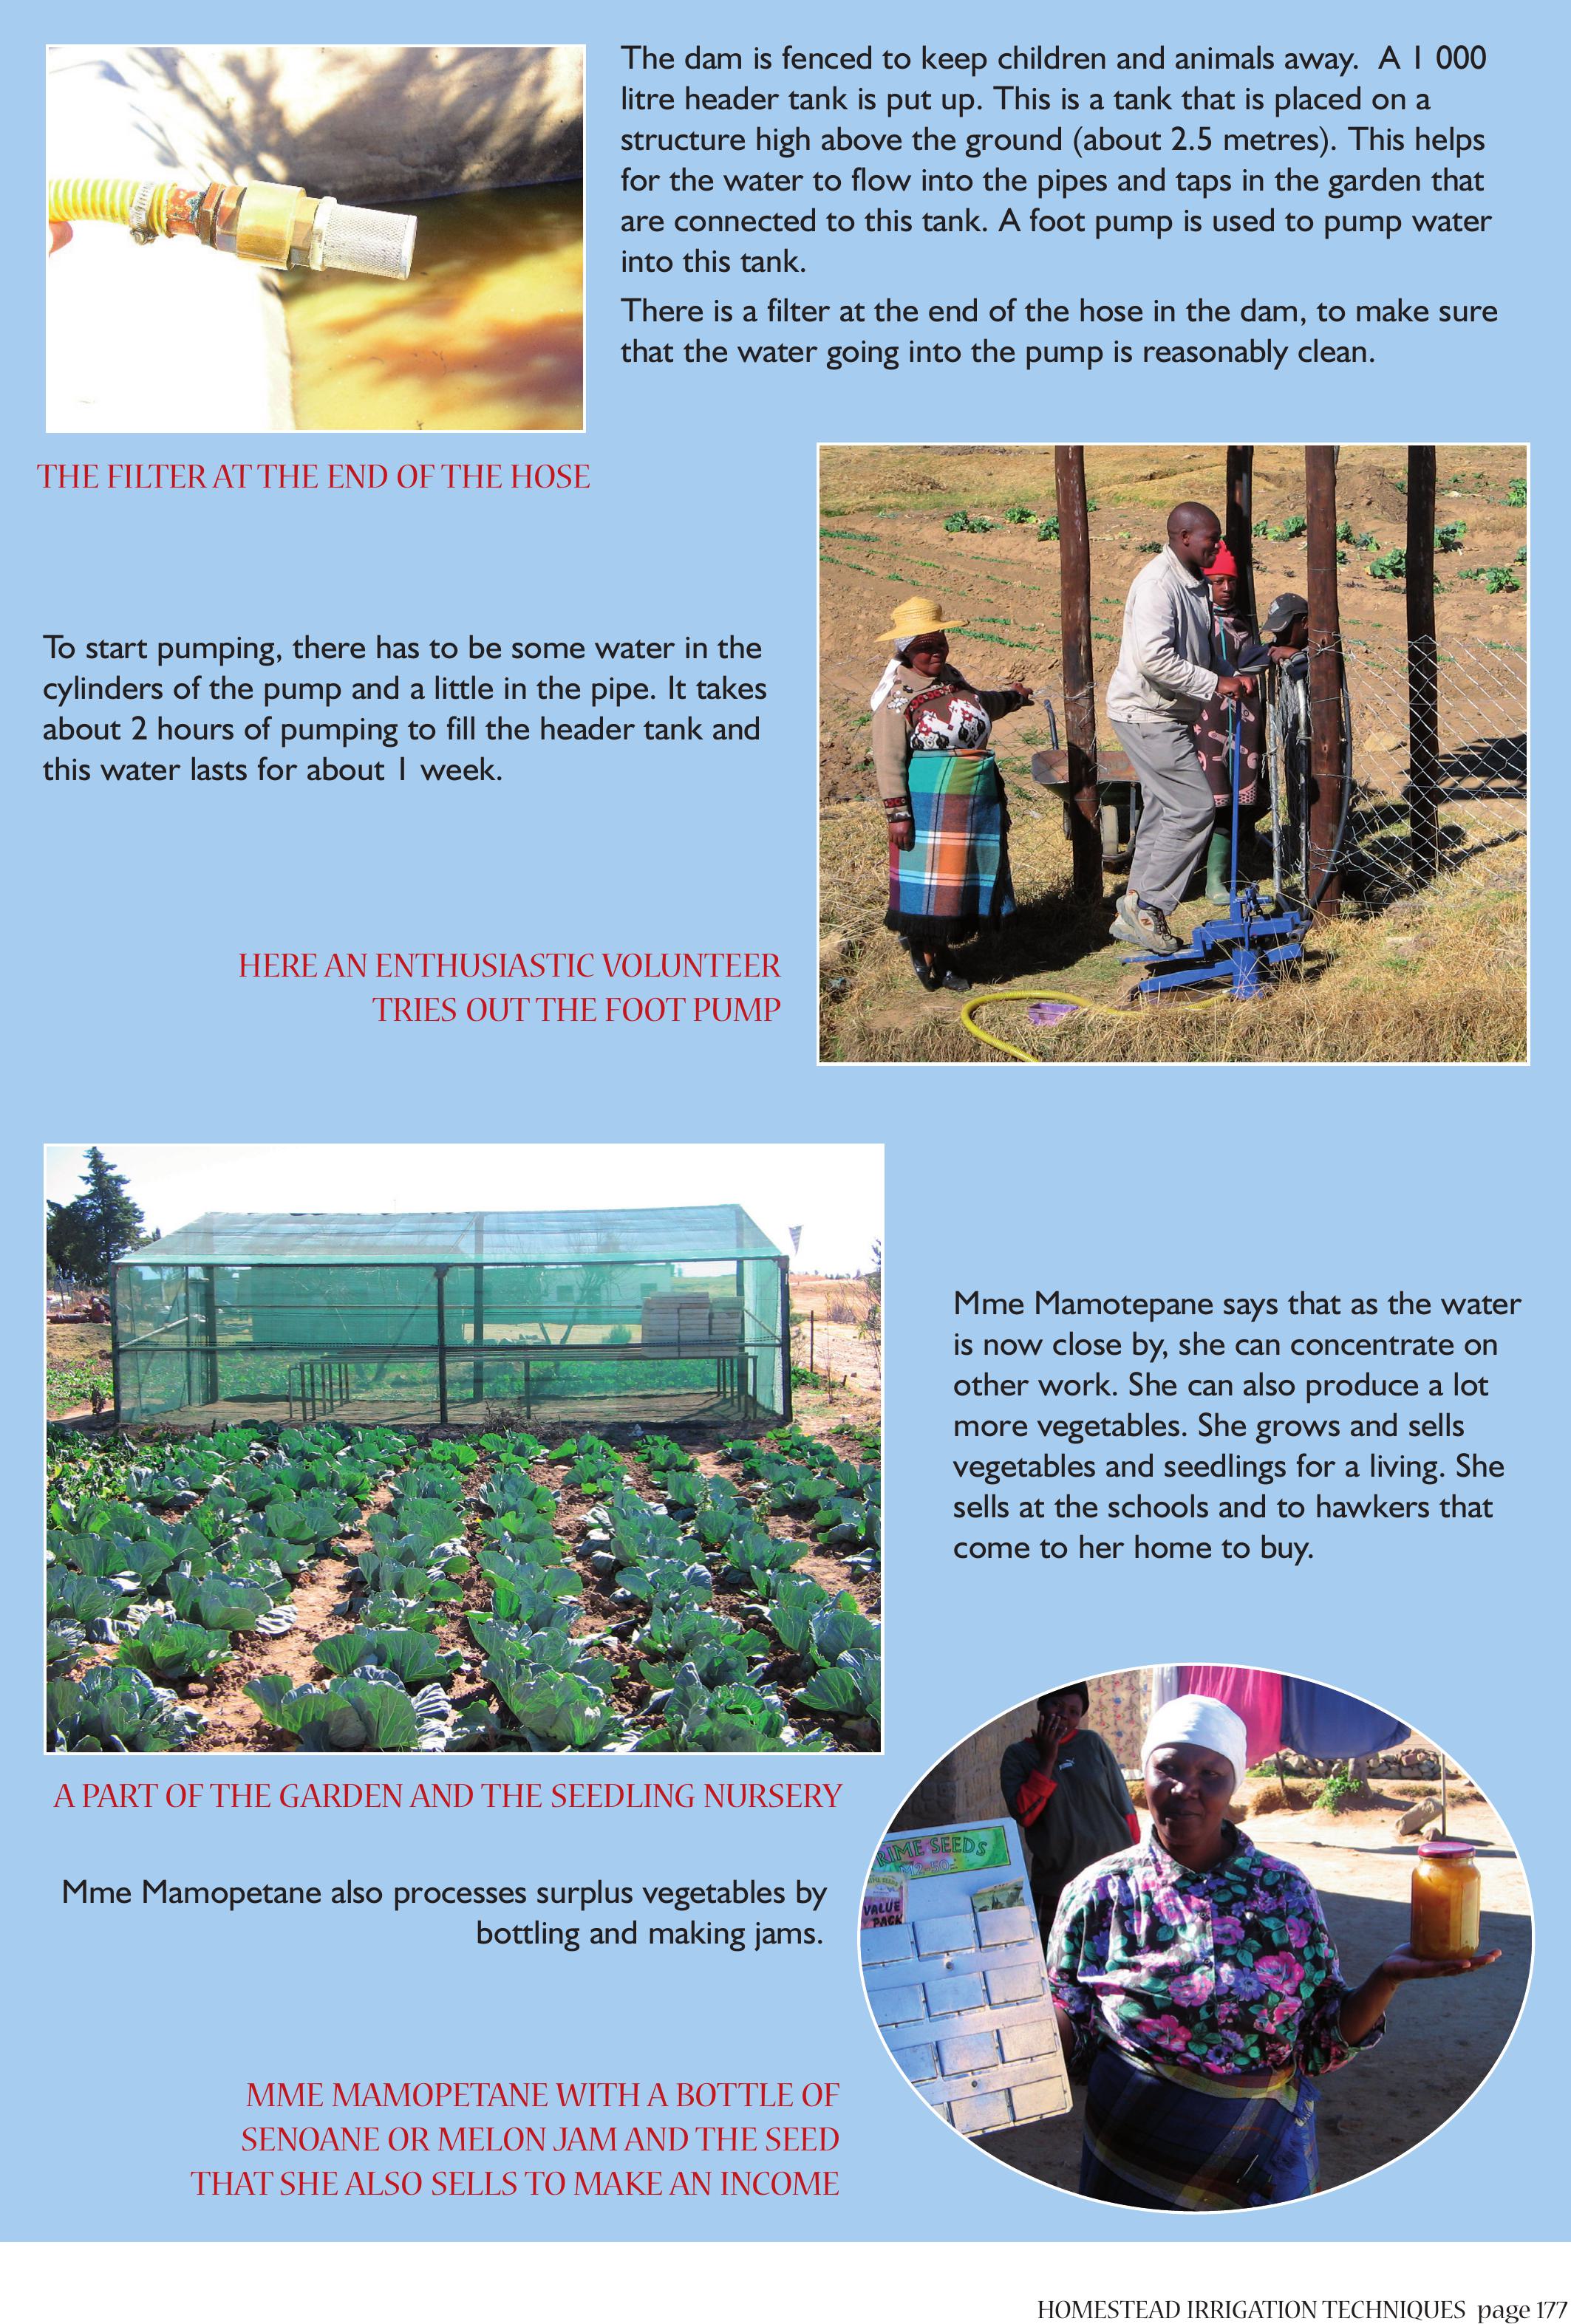
HOMESTEAD IRRIGATION TECHNIQUESpage 177
The dam is fenced to keep children and animals away. A 1 000
litre header tank is put up. This is a tank that is placed on a
structure high above the ground (about 2.5 metres). This helps
for the water to flow into the pipes and taps in the garden that
are connected to this tank. A foot pump is used to pump water
into this tank.
There is a filter at the end of the hose in the dam, to make sure
that the water going into the pump is reasonably clean.
To start pumping, there has to be some water in the
cylinders of the pump and a little in the pipe. It takes
about 2 hours of pumping to fill the header tank and
this water lasts for about 1 week.
Mme Mamotepane says that as the water
is now close by, she can concentrate on
other work. She can also produce a lot
more vegetables. She grows and sells
vegetables and seedlings for a living. She
sells at the schools and to hawkers that
come to her home to buy.
Mme Mamopetane also processes surplus vegetables by
bottling and making jams.
THE FILTER AT THE END OF THE HOSE
HERE AN ENTHUSIASTIC VOLUNTEER
TRIES OUT THE FOOT PUMP
A PART OF THE GARDEN AND THE SEEDLING NURSERY
MME MAMOPETANE WITH A BOTTLE OF
SENOANE OR MELON JAM AND THE SEED
THAT SHE ALSO SELLS TO MAKE AN INCOME
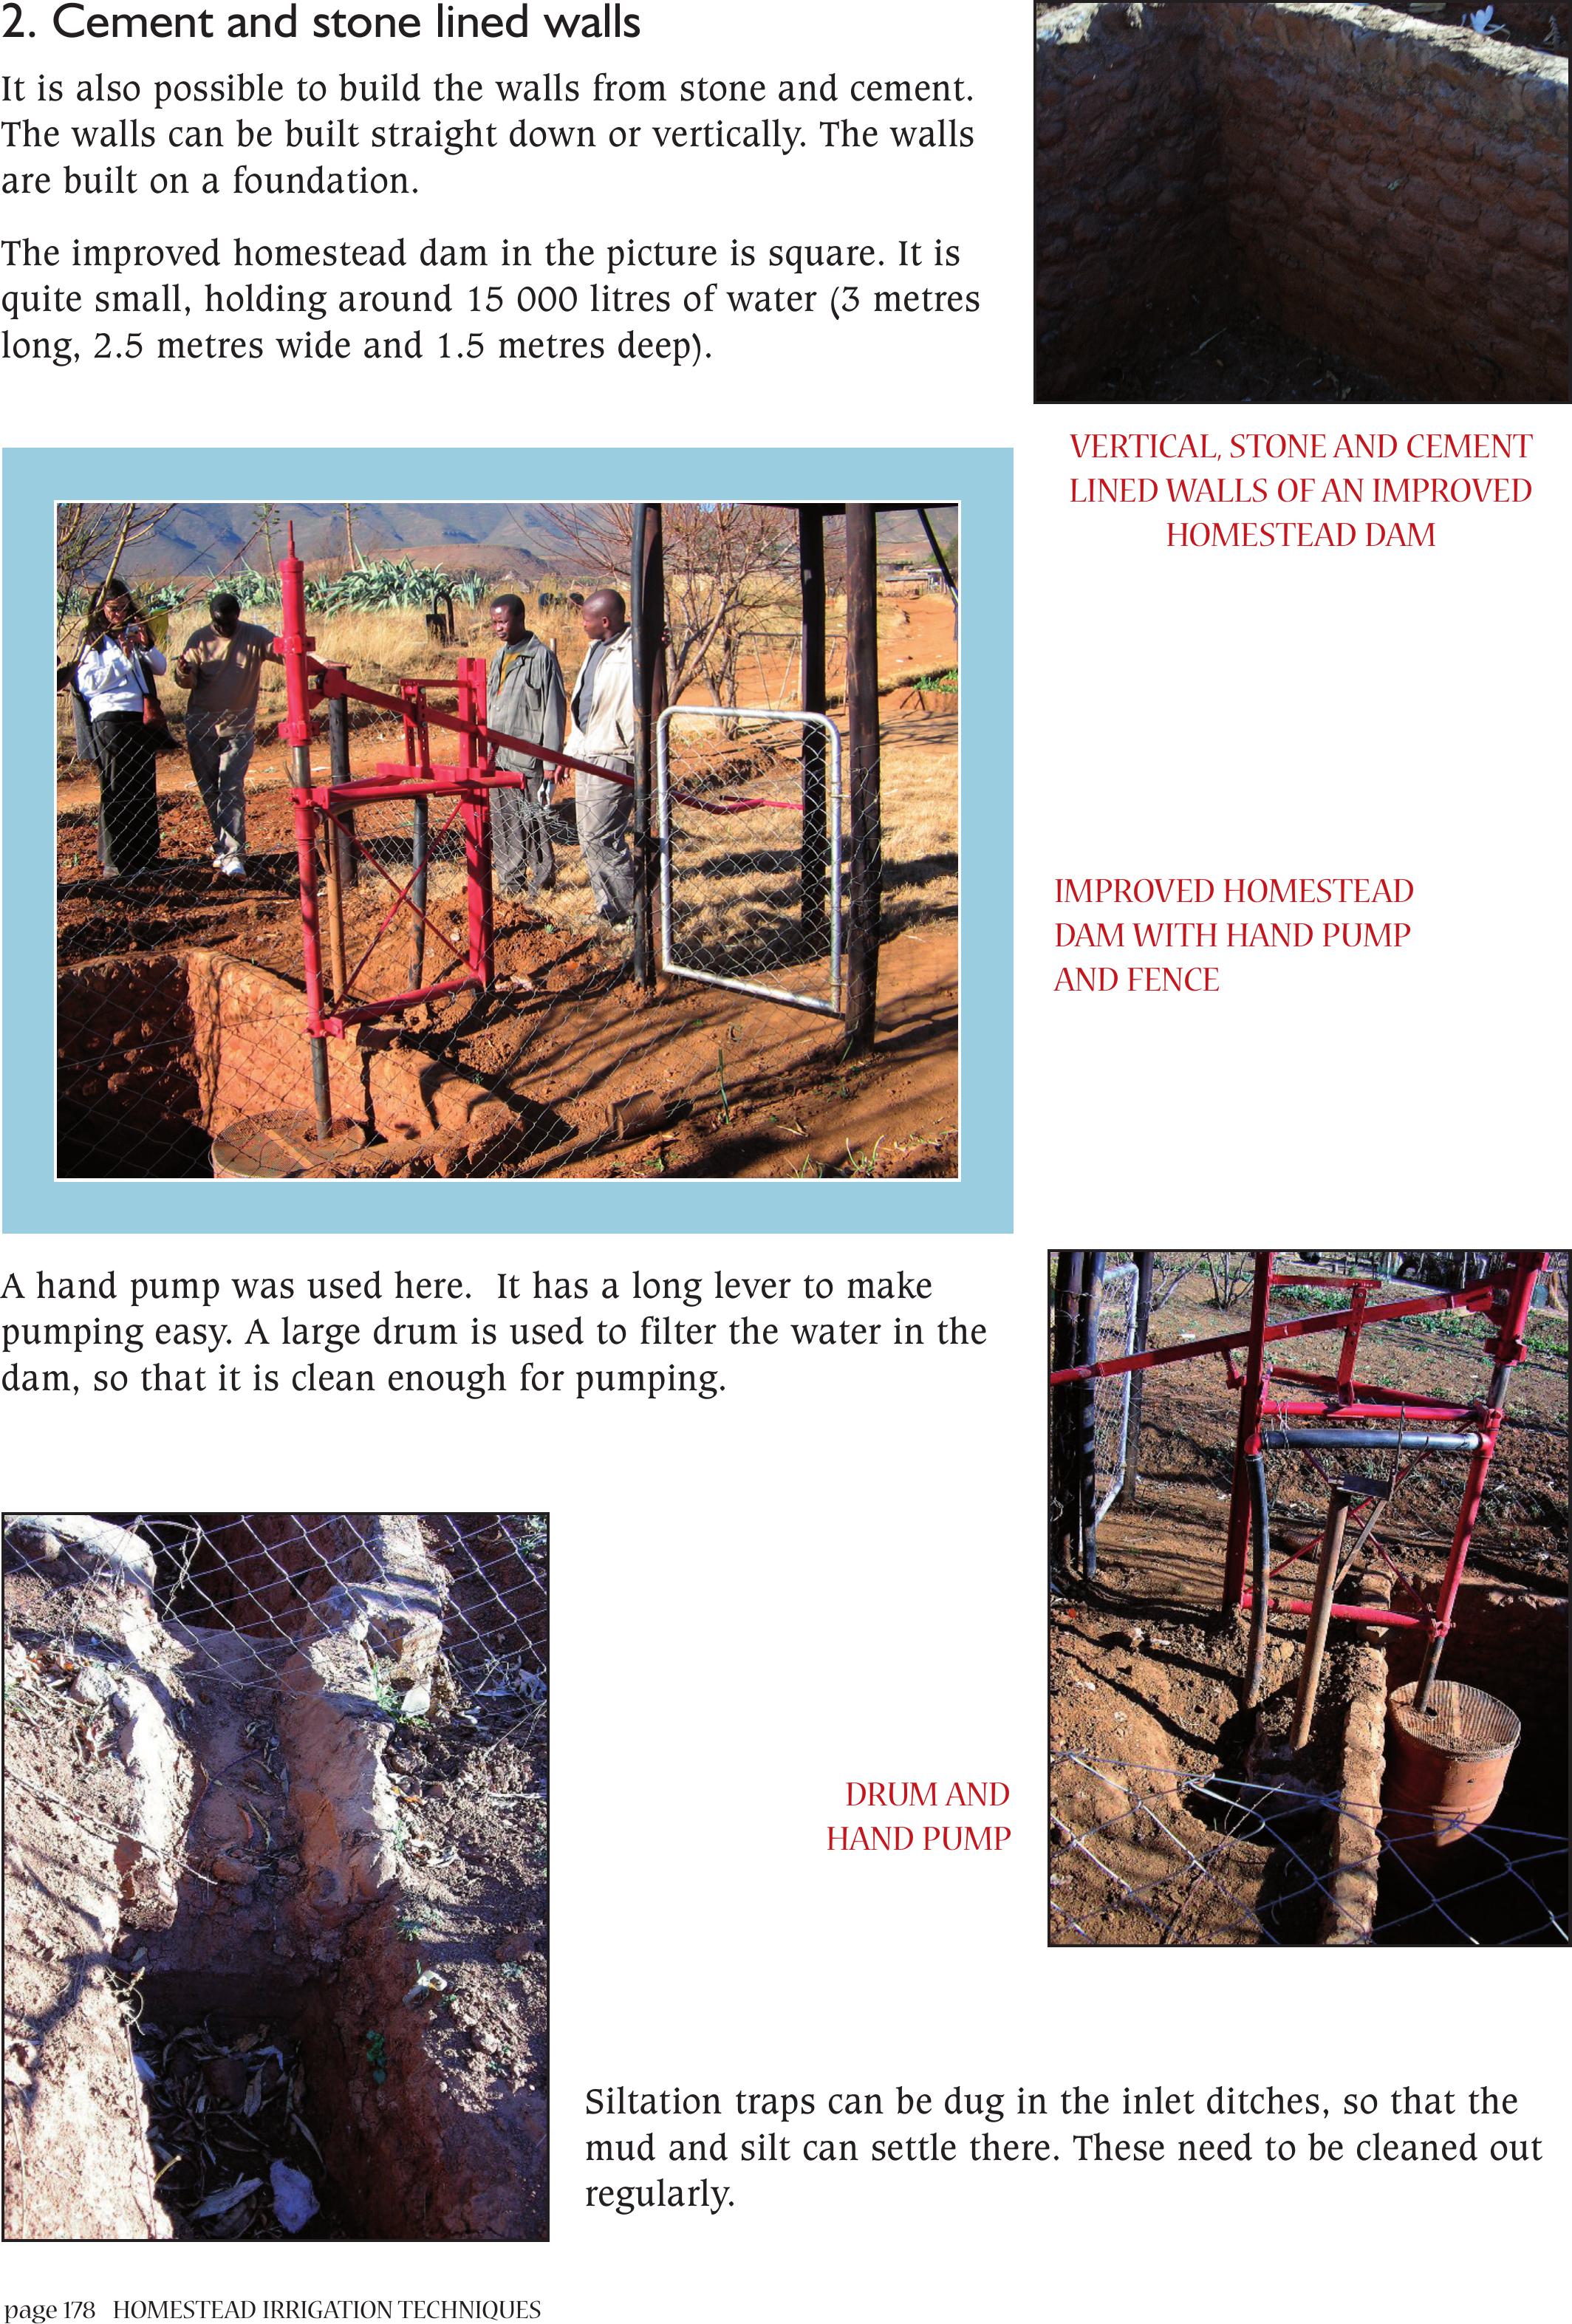
page 178 HOMESTEAD IRRIGATION TECHNIQUES
2. Cement and stone lined walls
It is also possible to build the walls from stone and cement.
The walls can be built straight down or vertically. The walls
are built on a foundation.
The improved homestead dam in the picture is square. It is
quite small, holding around 15 000 litres of water (3 metres
long, 2.5 metres wide and 1.5 metres deep).
A hand pump was used here. It has a long lever to make
pumping easy. A large drum is used to filter the water in the
dam, so that it is clean enough for pumping.
Siltation traps can be dug in the inlet ditches, so that the
mud and silt can settle there. These need to be cleaned out
regularly.
VERTICAL, STONE AND CEMENT
LINED WALLS OF AN IMPROVED
HOMESTEAD DAM
IMPROVED HOMESTEAD
DAM WITH HAND PUMP
AND FENCE
DRUM AND
HAND PUMP
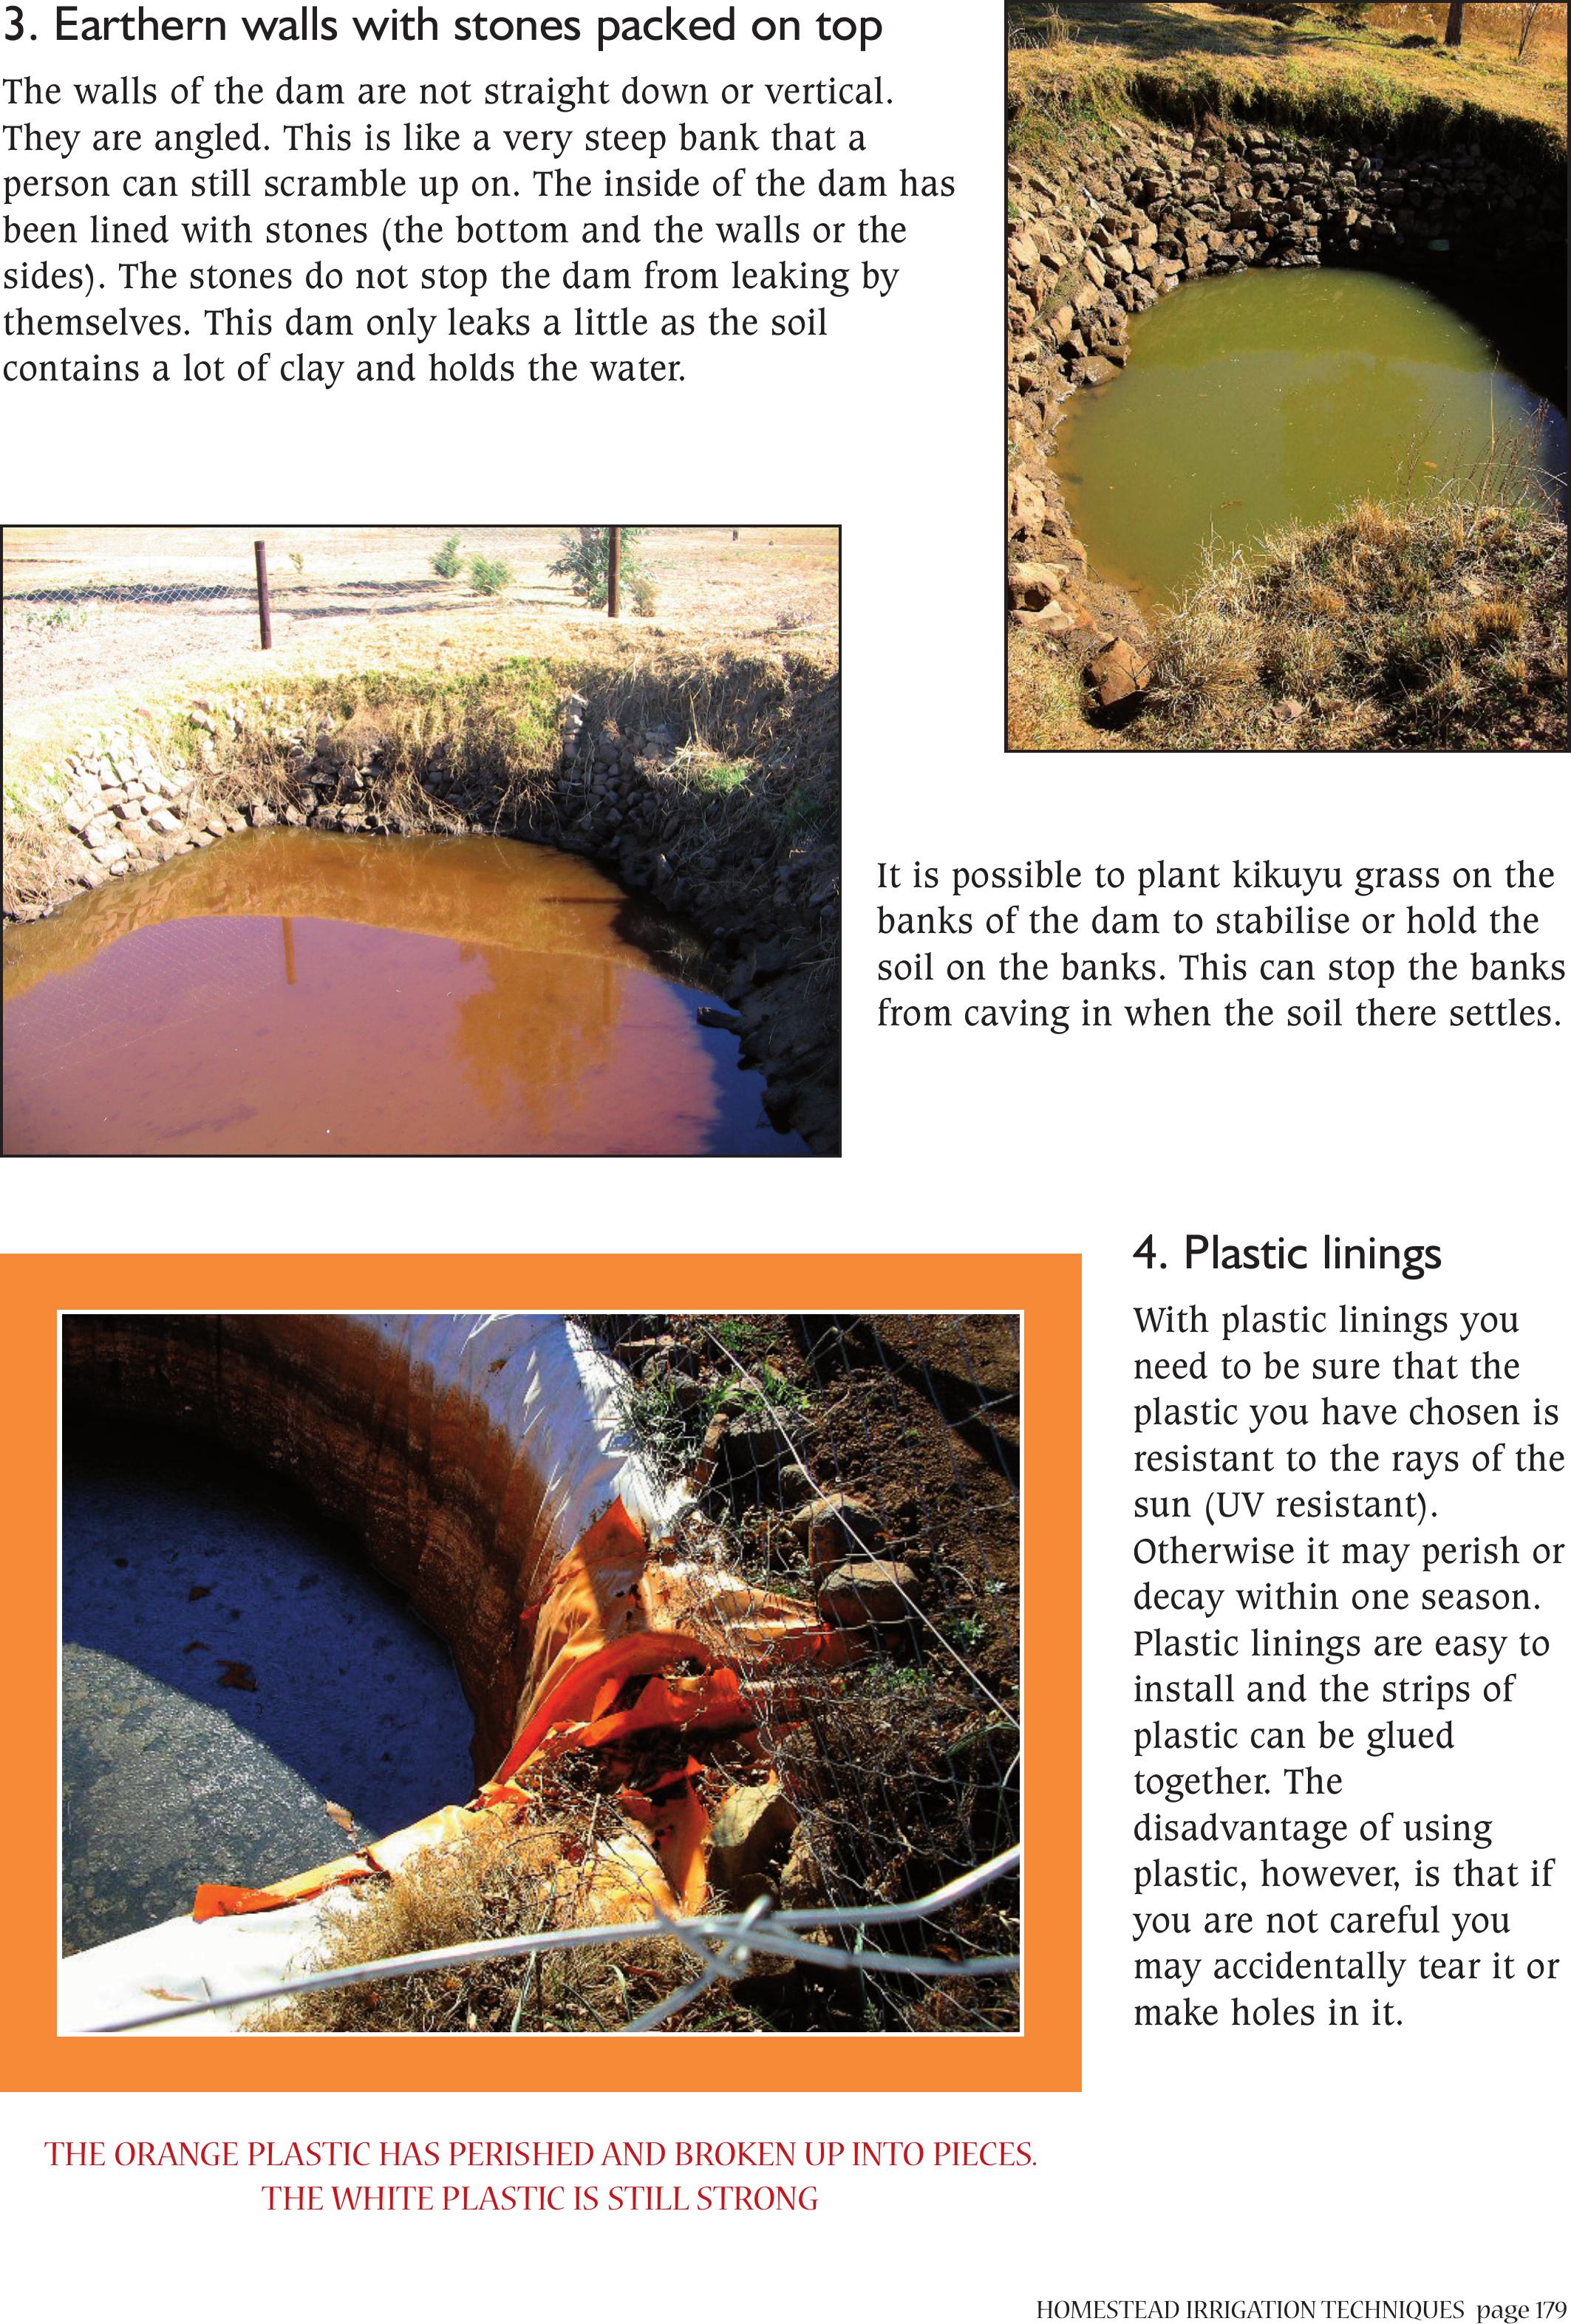
HOMESTEAD IRRIGATION TECHNIQUESpage 179
3. Earthern walls with stones packed on top
The walls of the dam are not straight down or vertical.
They are angled. This is like a very steep bank that a
person can still scramble up on. The inside of the dam has
been lined with stones (the bottom and the walls or the
sides). The stones do not stop the dam from leaking by
themselves. This dam only leaks a little as the soil
contains a lot of clay and holds the water.
It is possible to plant kikuyu grass on the
banks of the dam to stabilise or hold the
soil on the banks. This can stop the banks
from caving in when the soil there settles.
4. Plastic linings
With plastic linings you
need to be sure that the
plastic you have chosen is
resistant to the rays of the
sun (UV resistant).
Otherwise it may perish or
decay within one season.
Plastic linings are easy to
install and the strips of
plastic can be glued
together. The
disadvantage of using
plastic, however, is that if
you are not careful you
may accidentally tear it or
make holes in it.
THE ORANGE PLASTIC HAS PERISHED AND BROKEN UP INTO PIECES.
THE WHITE PLASTIC IS STILL STRONG
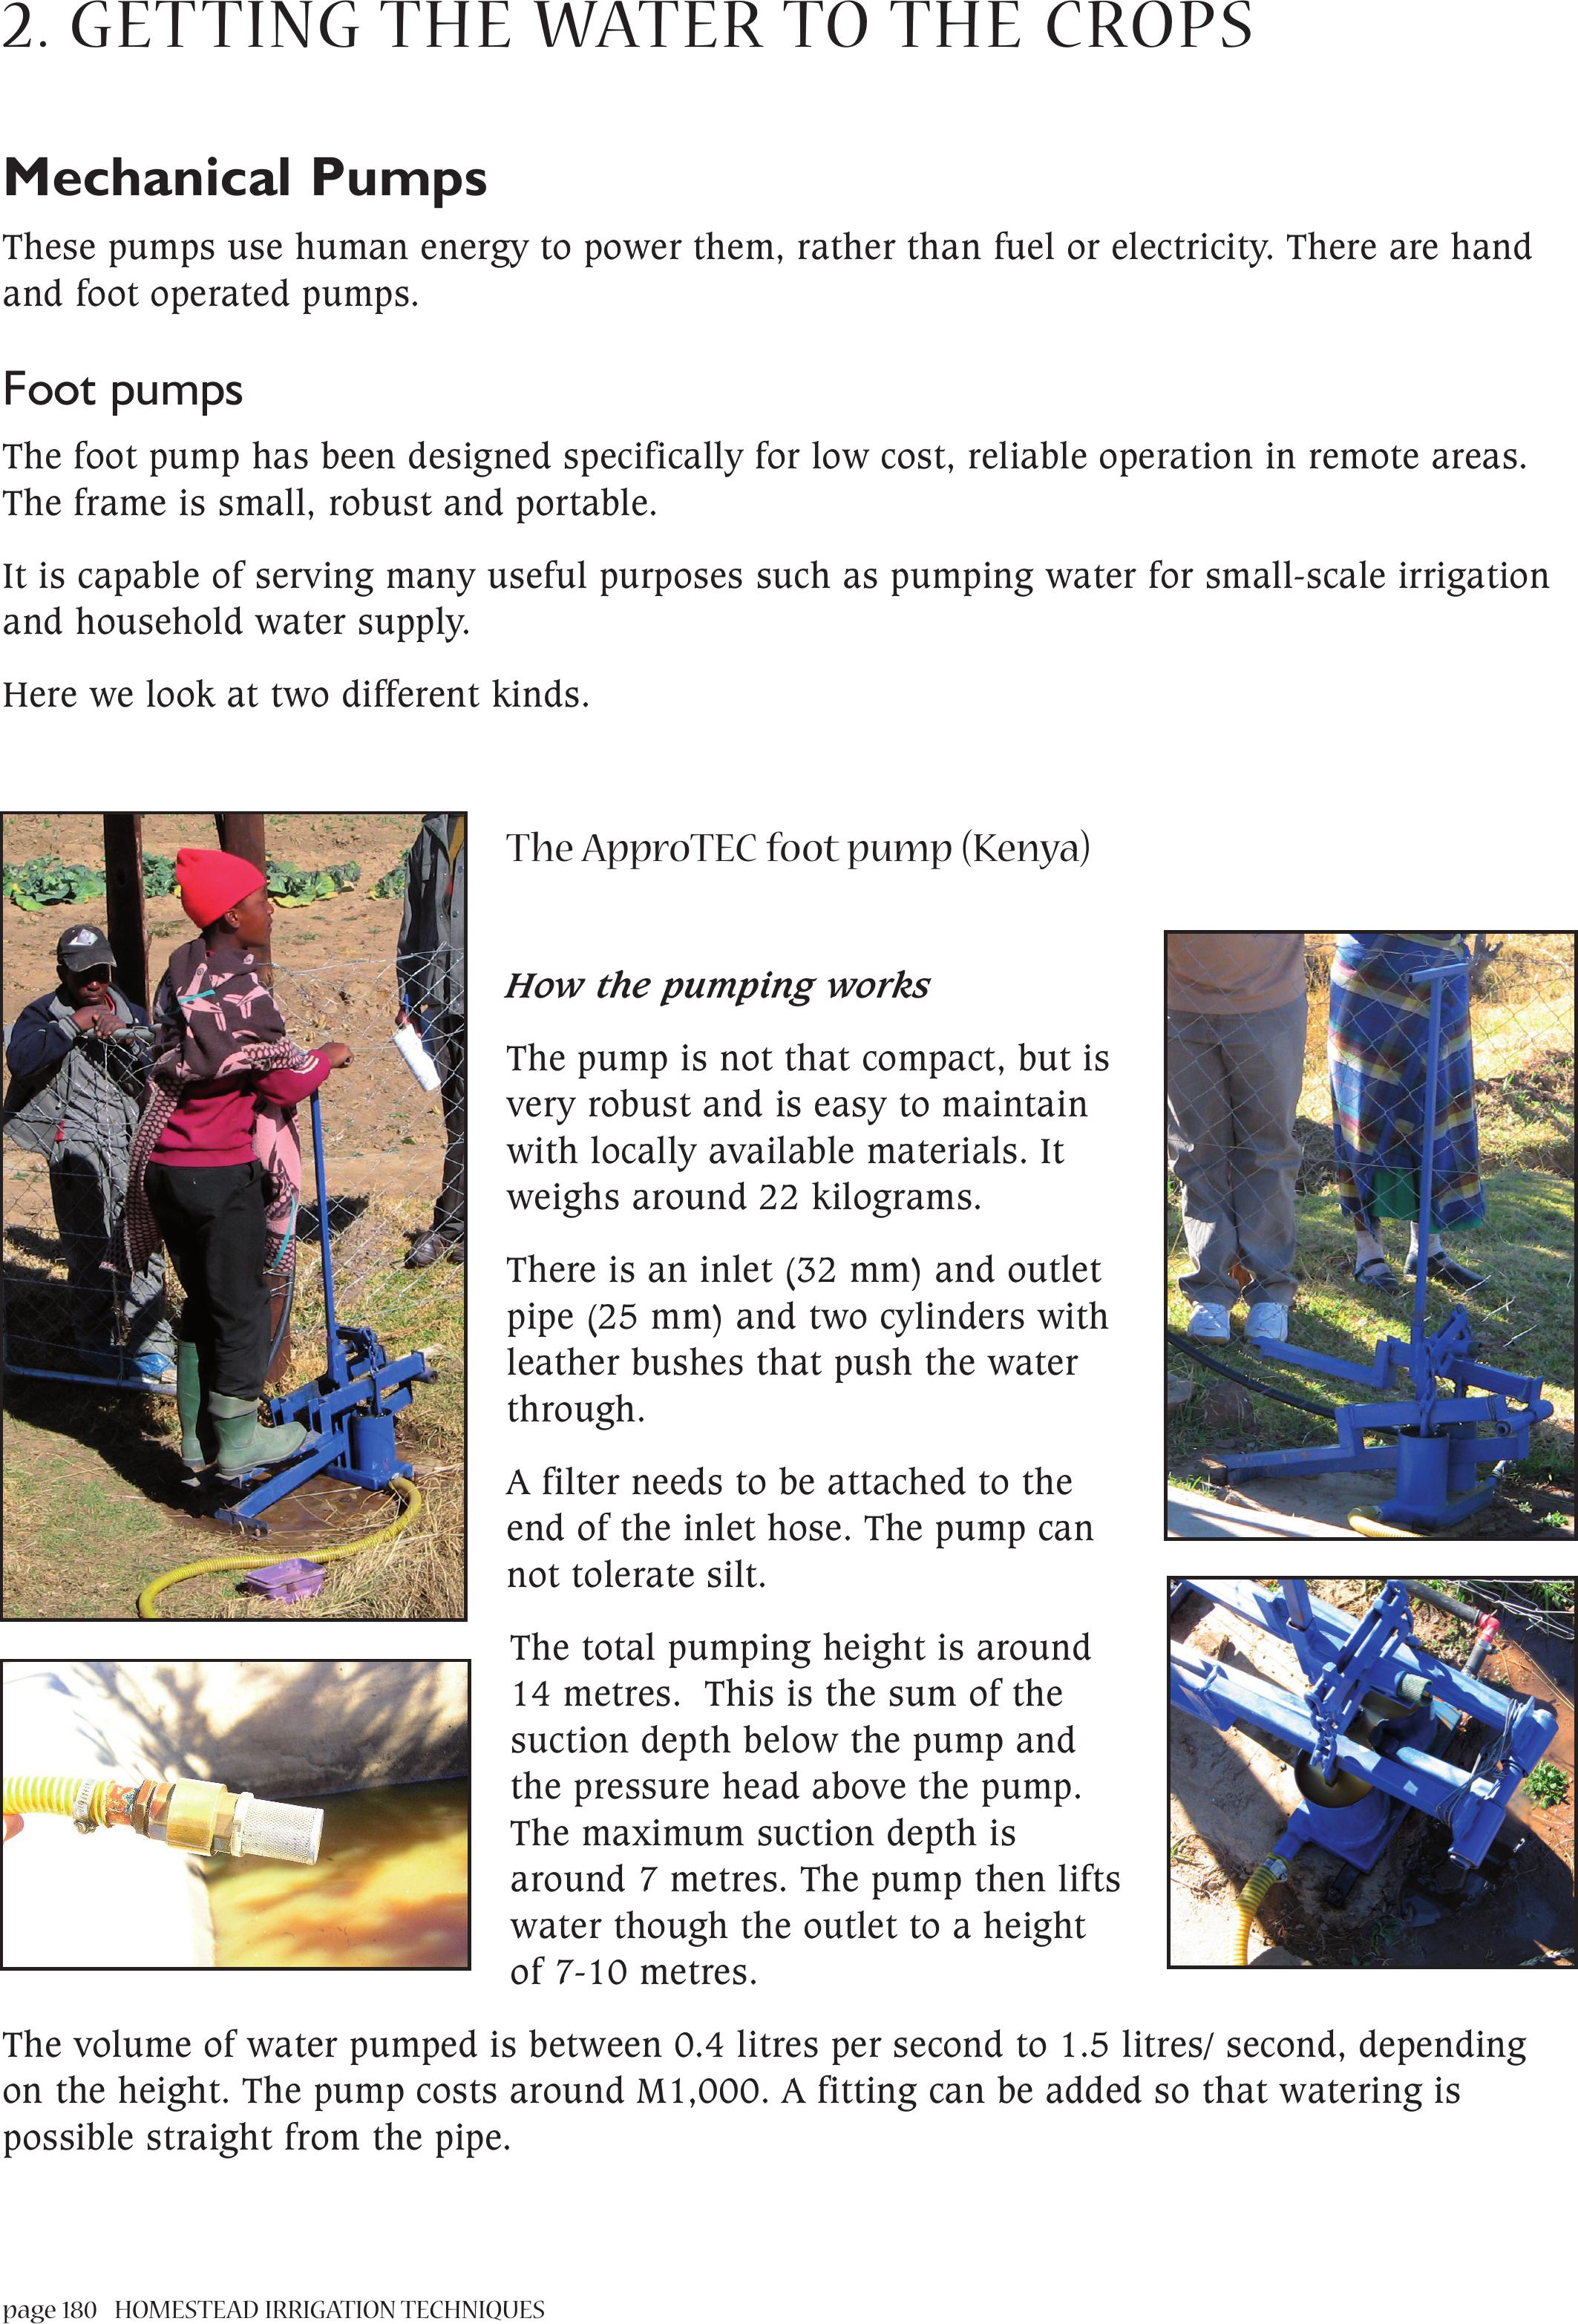
page 180 HOMESTEAD IRRIGATION TECHNIQUES
2.GETTING THE WATER TO THE CROPS
Mechanical Pumps
These pumps use human energy to power them, rather than fuel or electricity. There are hand
and foot operated pumps.
Foot pumps
The foot pump has been designed specifically for low cost, reliable operation in remote areas.
The frame is small, robust and portable.
It is capable of serving many useful purposes such as pumping water for small-scale irrigation
and household water supply.
Here we look at two different kinds.
The ApproTEC foot pump (Kenya)
How the pumping works
The pump is not that compact, but is
very robust and is easy to maintain
with locally available materials. It
weighs around 22 kilograms.
There is an inlet (32 mm) and outlet
pipe (25 mm) and two cylinders with
leather bushes that push the water
through.
A filter needs to be attached to the
end of the inlet hose. The pump can
not tolerate silt.
The total pumping height is around
14 metres. This is the sum of the
suction depth below the pump and
the pressure head above the pump.
The maximum suction depth is
around 7 metres. The pump then lifts
water though the outlet to a height
of 7-10 metres.
The volume of water pumped is between 0.4 litres per second to 1.5 litres/ second, depending
on the height. The pump costs around M1,000. A fitting can be added so that watering is
possible straight from the pipe.
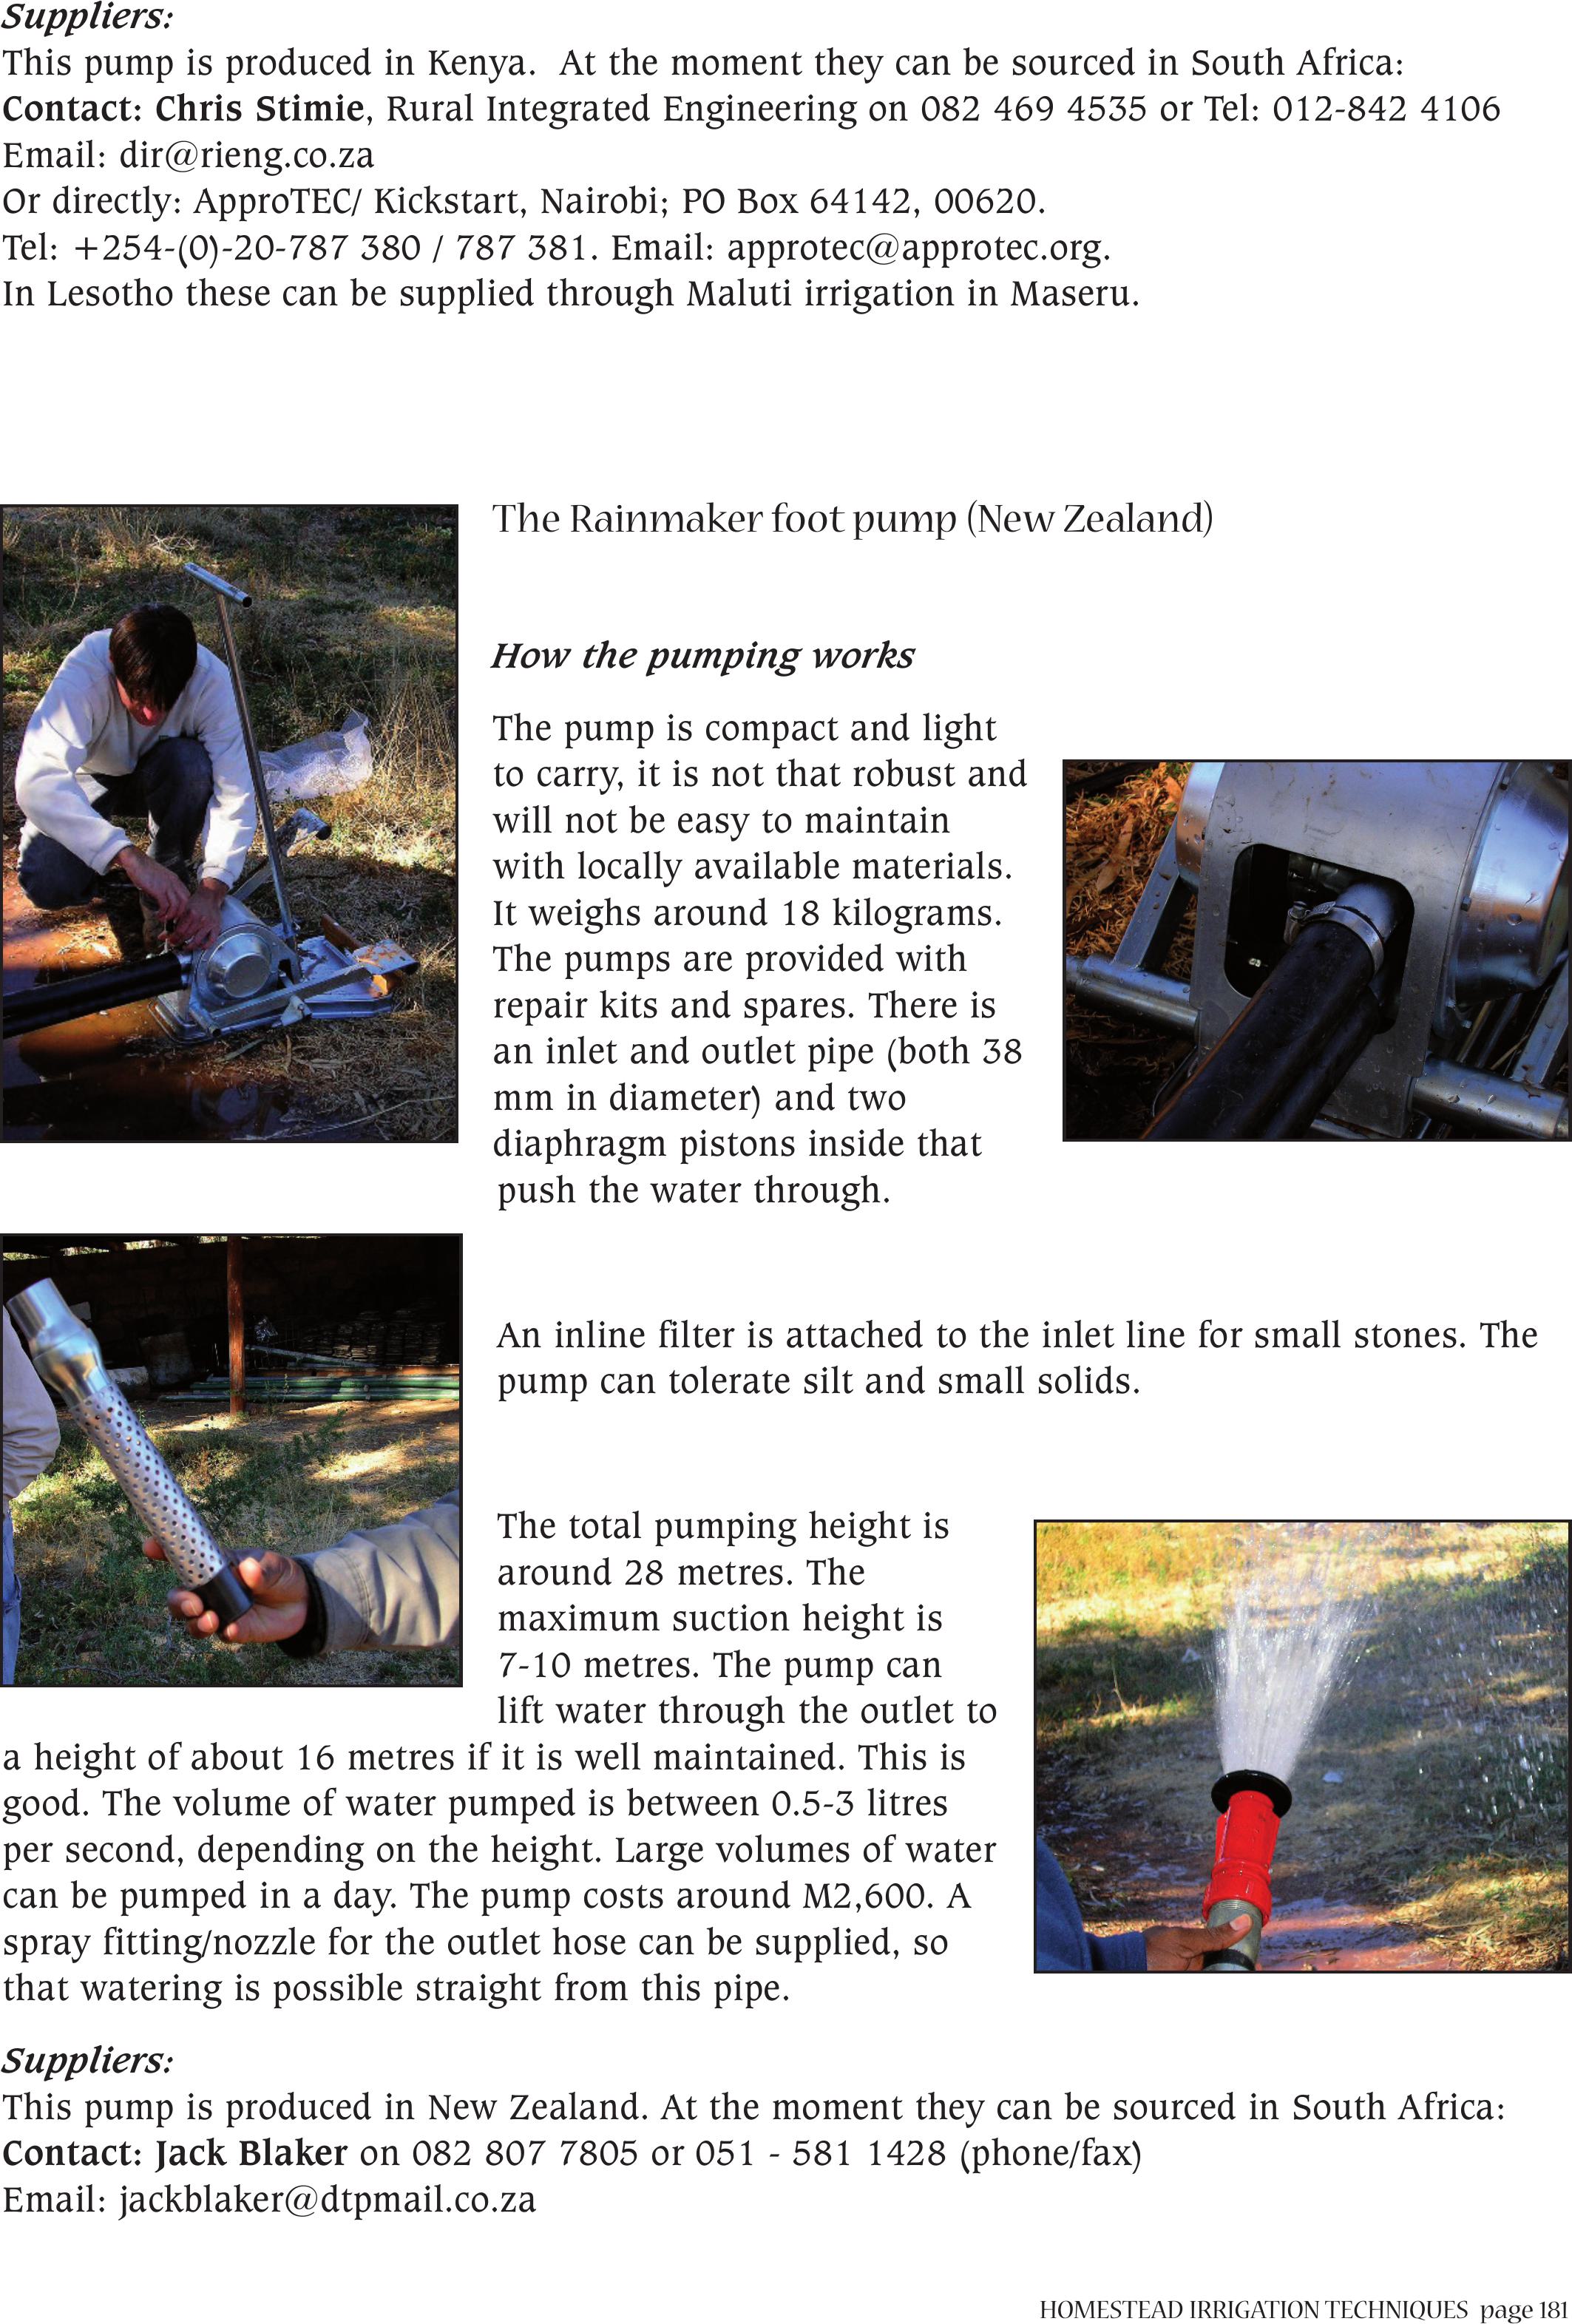
HOMESTEAD IRRIGATION TECHNIQUESpage 181
Suppliers:
This pump is produced in Kenya. At the moment they can be sourced in South Africa:
Contact: Chris Stimie, Rural Integrated Engineering on 082 469 4535 or Tel: 012-842 4106
Email: dir@rieng.co.za
Or directly: ApproTEC/ Kickstart, Nairobi; PO Box 64142, 00620.
Tel: +254-(0)-20-787 380 / 787 381. Email: approtec@approtec.org.
In Lesotho these can be supplied through Maluti irrigation in Maseru.
The Rainmaker foot pump (New Zealand)
How the pumping works
The pump is compact and light
to carry, it is not that robust and
will not be easy to maintain
with locally available materials.
It weighs around 18 kilograms.
The pumps are provided with
repair kits and spares. There is
an inlet and outlet pipe (both 38
mm in diameter) and two
diaphragm pistons inside that
push the water through.
An inline filter is attached to the inlet line for small stones. The
pump can tolerate silt and small solids.
The total pumping height is
around 28 metres. The
maximum suction height is
7-10 metres. The pump can
lift water through the outlet to
a height of about 16 metres if it is well maintained. This is
good. The volume of water pumped is between 0.5-3 litres
per second, depending on the height. Large volumes of water
can be pumped in a day. The pump costs around M2,600. A
spray fitting/nozzle for the outlet hose can be supplied, so
that watering is possible straight from this pipe.
Suppliers:
This pump is produced in New Zealand. At the moment they can be sourced in South Africa:
Contact: Jack Blaker on 082 807 7805 or 051 - 581 1428 (phone/fax)
Email: jackblaker@dtpmail.co.za
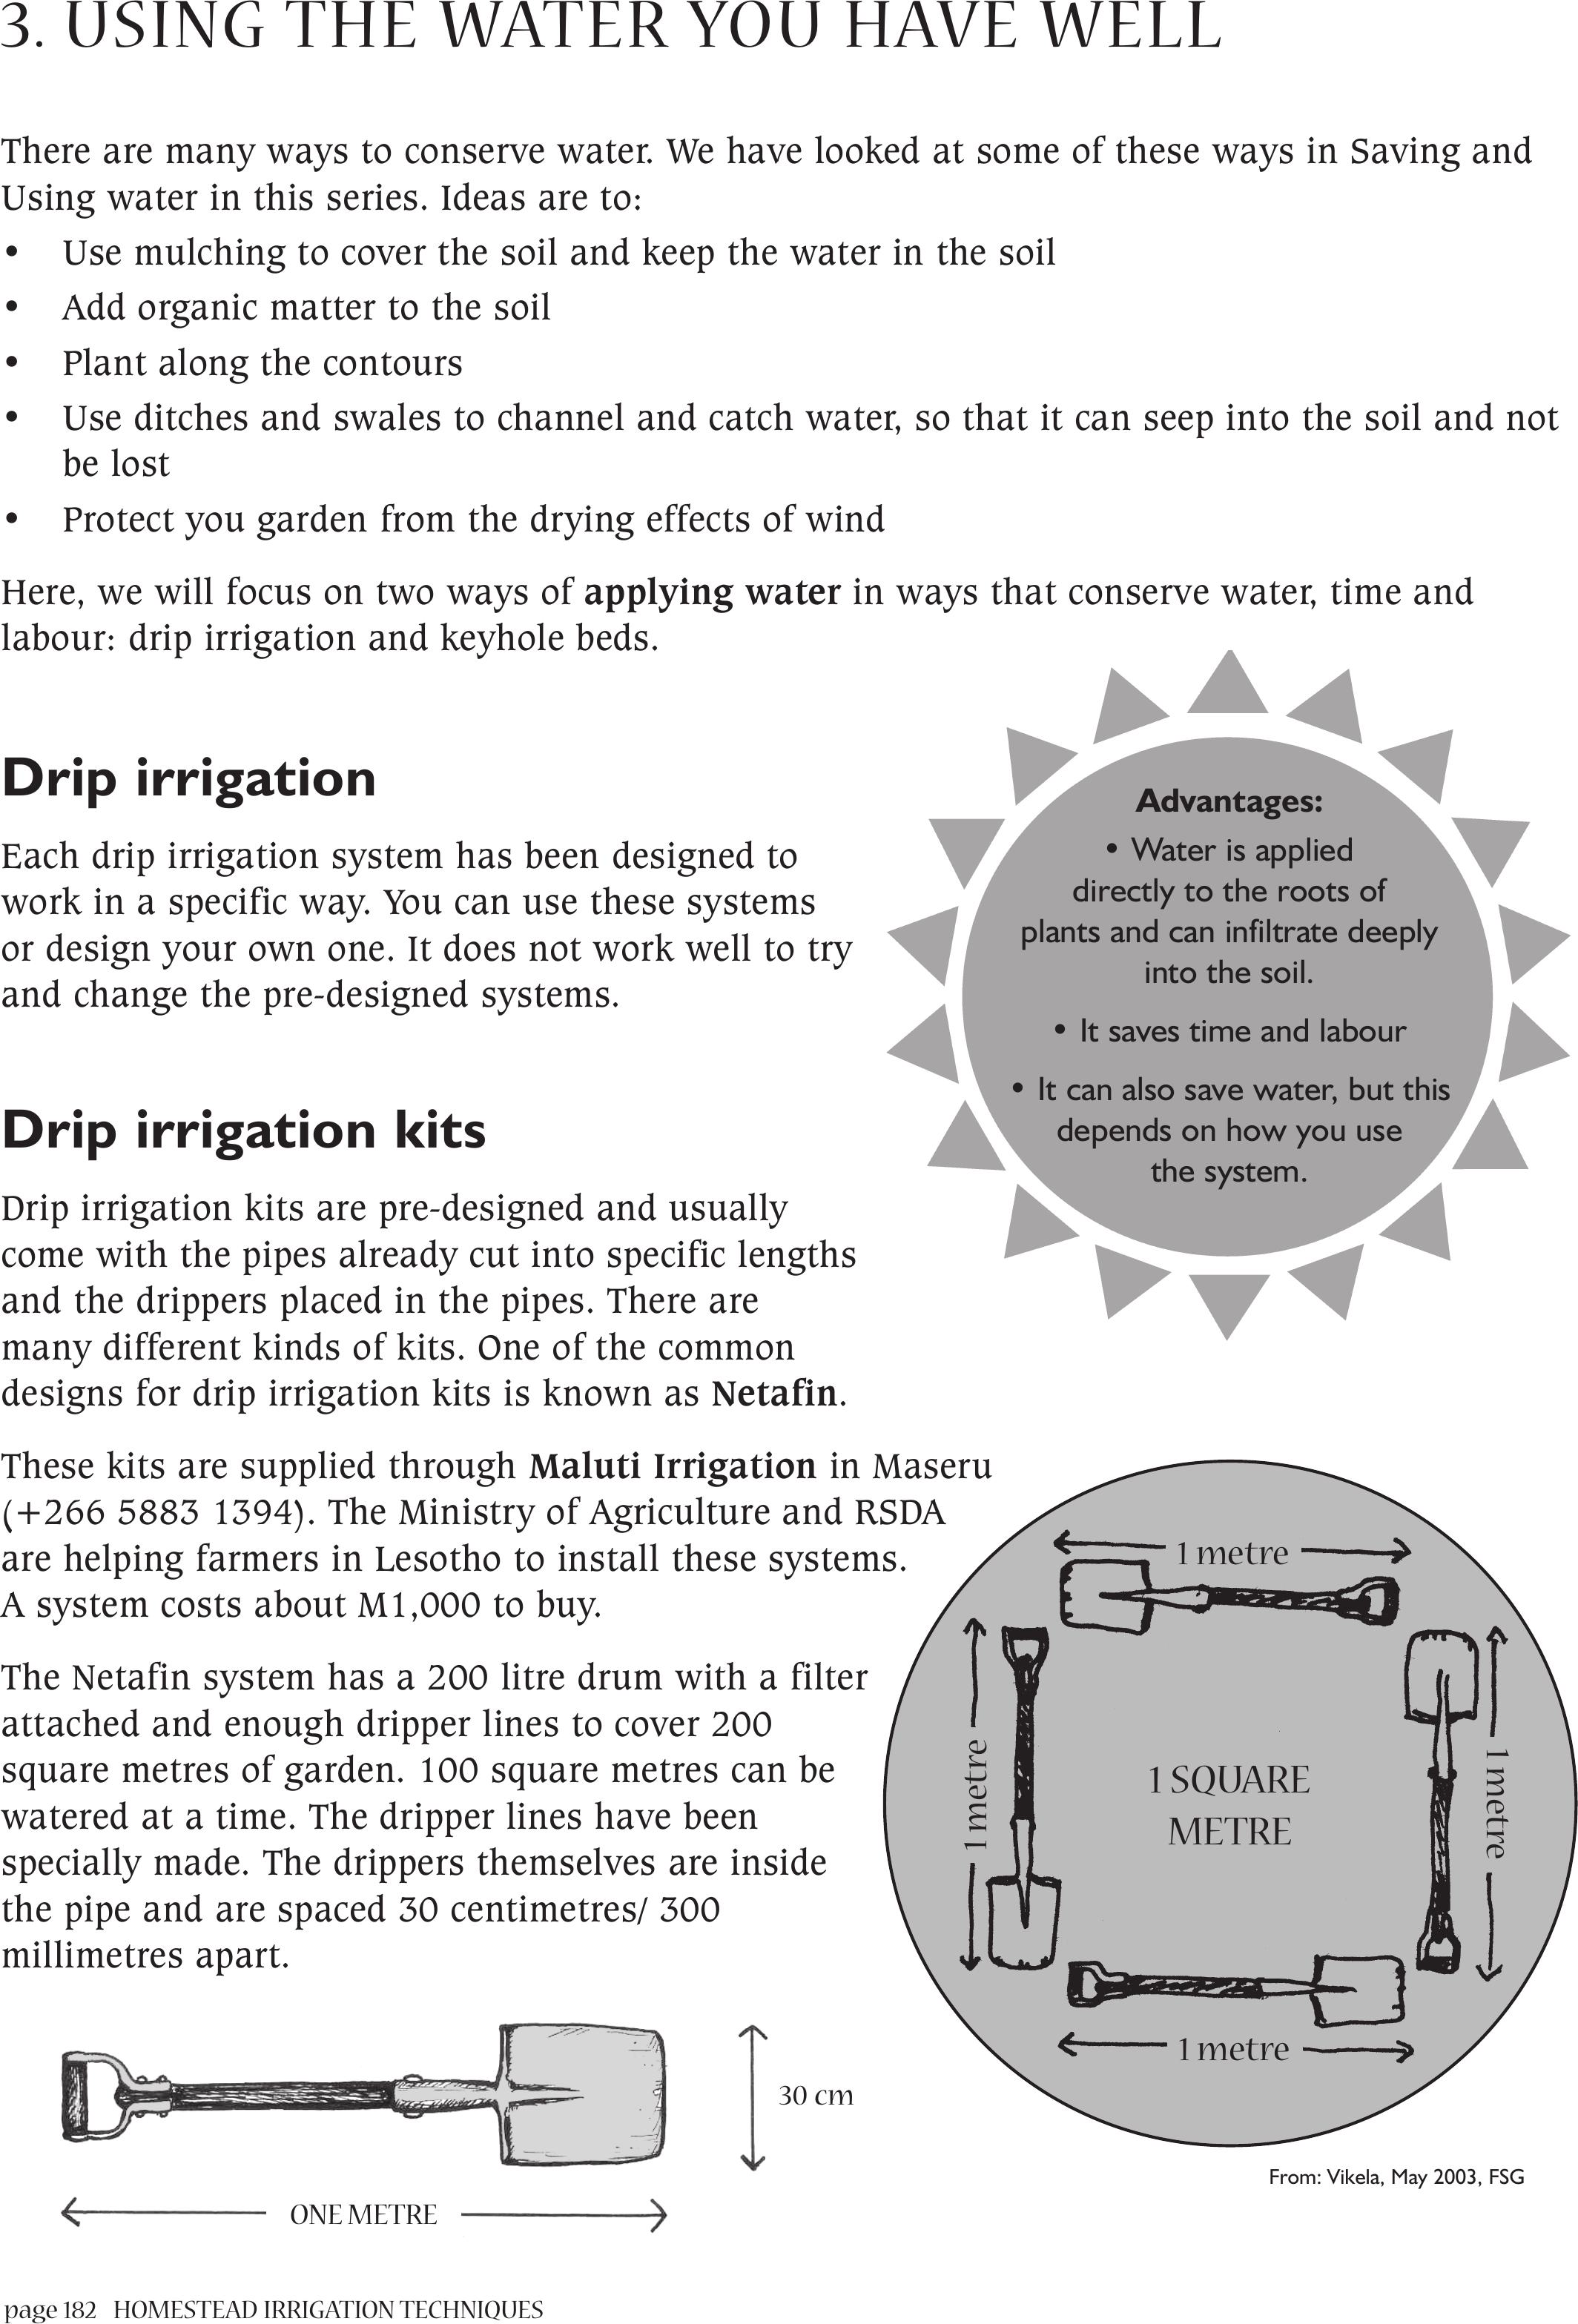
page 182 HOMESTEAD IRRIGATION TECHNIQUES
3.USING THE WATER YOU HAVE WELL
There are many ways to conserve water. We have looked at some of these ways in Saving and
Using water in this series. Ideas are to:
• Use mulching to cover the soil and keep the water in the soil
• Add organic matter to the soil
• Plant along the contours
• Use ditches and swales to channel and catch water, so that it can seep into the soil and not
be lost
• Protect you garden from the drying effects of wind
Here, we will focus on two ways of applying water in ways that conserve water, time and
labour: drip irrigation and keyhole beds.
Drip irrigation
Each drip irrigation system has been designed to
work in a specific way. You can use these systems
or design your own one. It does not work well to try
and change the pre-designed systems.
ONE METRE
30 cm
Drip irrigation kits
Drip irrigation kits are pre-designed and usually
come with the pipes already cut into specific lengths
and the drippers placed in the pipes. There are
many different kinds of kits. One of the common
designs for drip irrigation kits is known as Netafin.
These kits are supplied through Maluti Irrigation in Maseru
(+266 5883 1394). The Ministry of Agriculture and RSDA
are helping farmers in Lesotho to install these systems.
A system costs about M1,000 to buy.
The Netafin system has a 200 litre drum with a filter
attached and enough dripper lines to cover 200
square metres of garden. 100 square metres can be
watered at a time. The dripper lines have been
specially made. The drippers themselves are inside
the pipe and are spaced 30 centimetres/ 300
millimetres apart.
1 SQUARE
METRE
1 metre
1 metre
1 metre
1 metre
From: Vikela, May 2003, FSG
Advantages:
• Water is applied
directly to the roots of
plants and can infiltrate deeply
into the soil.
• It saves time and labour
• It can also save water, but this
depends on how you use
the system.
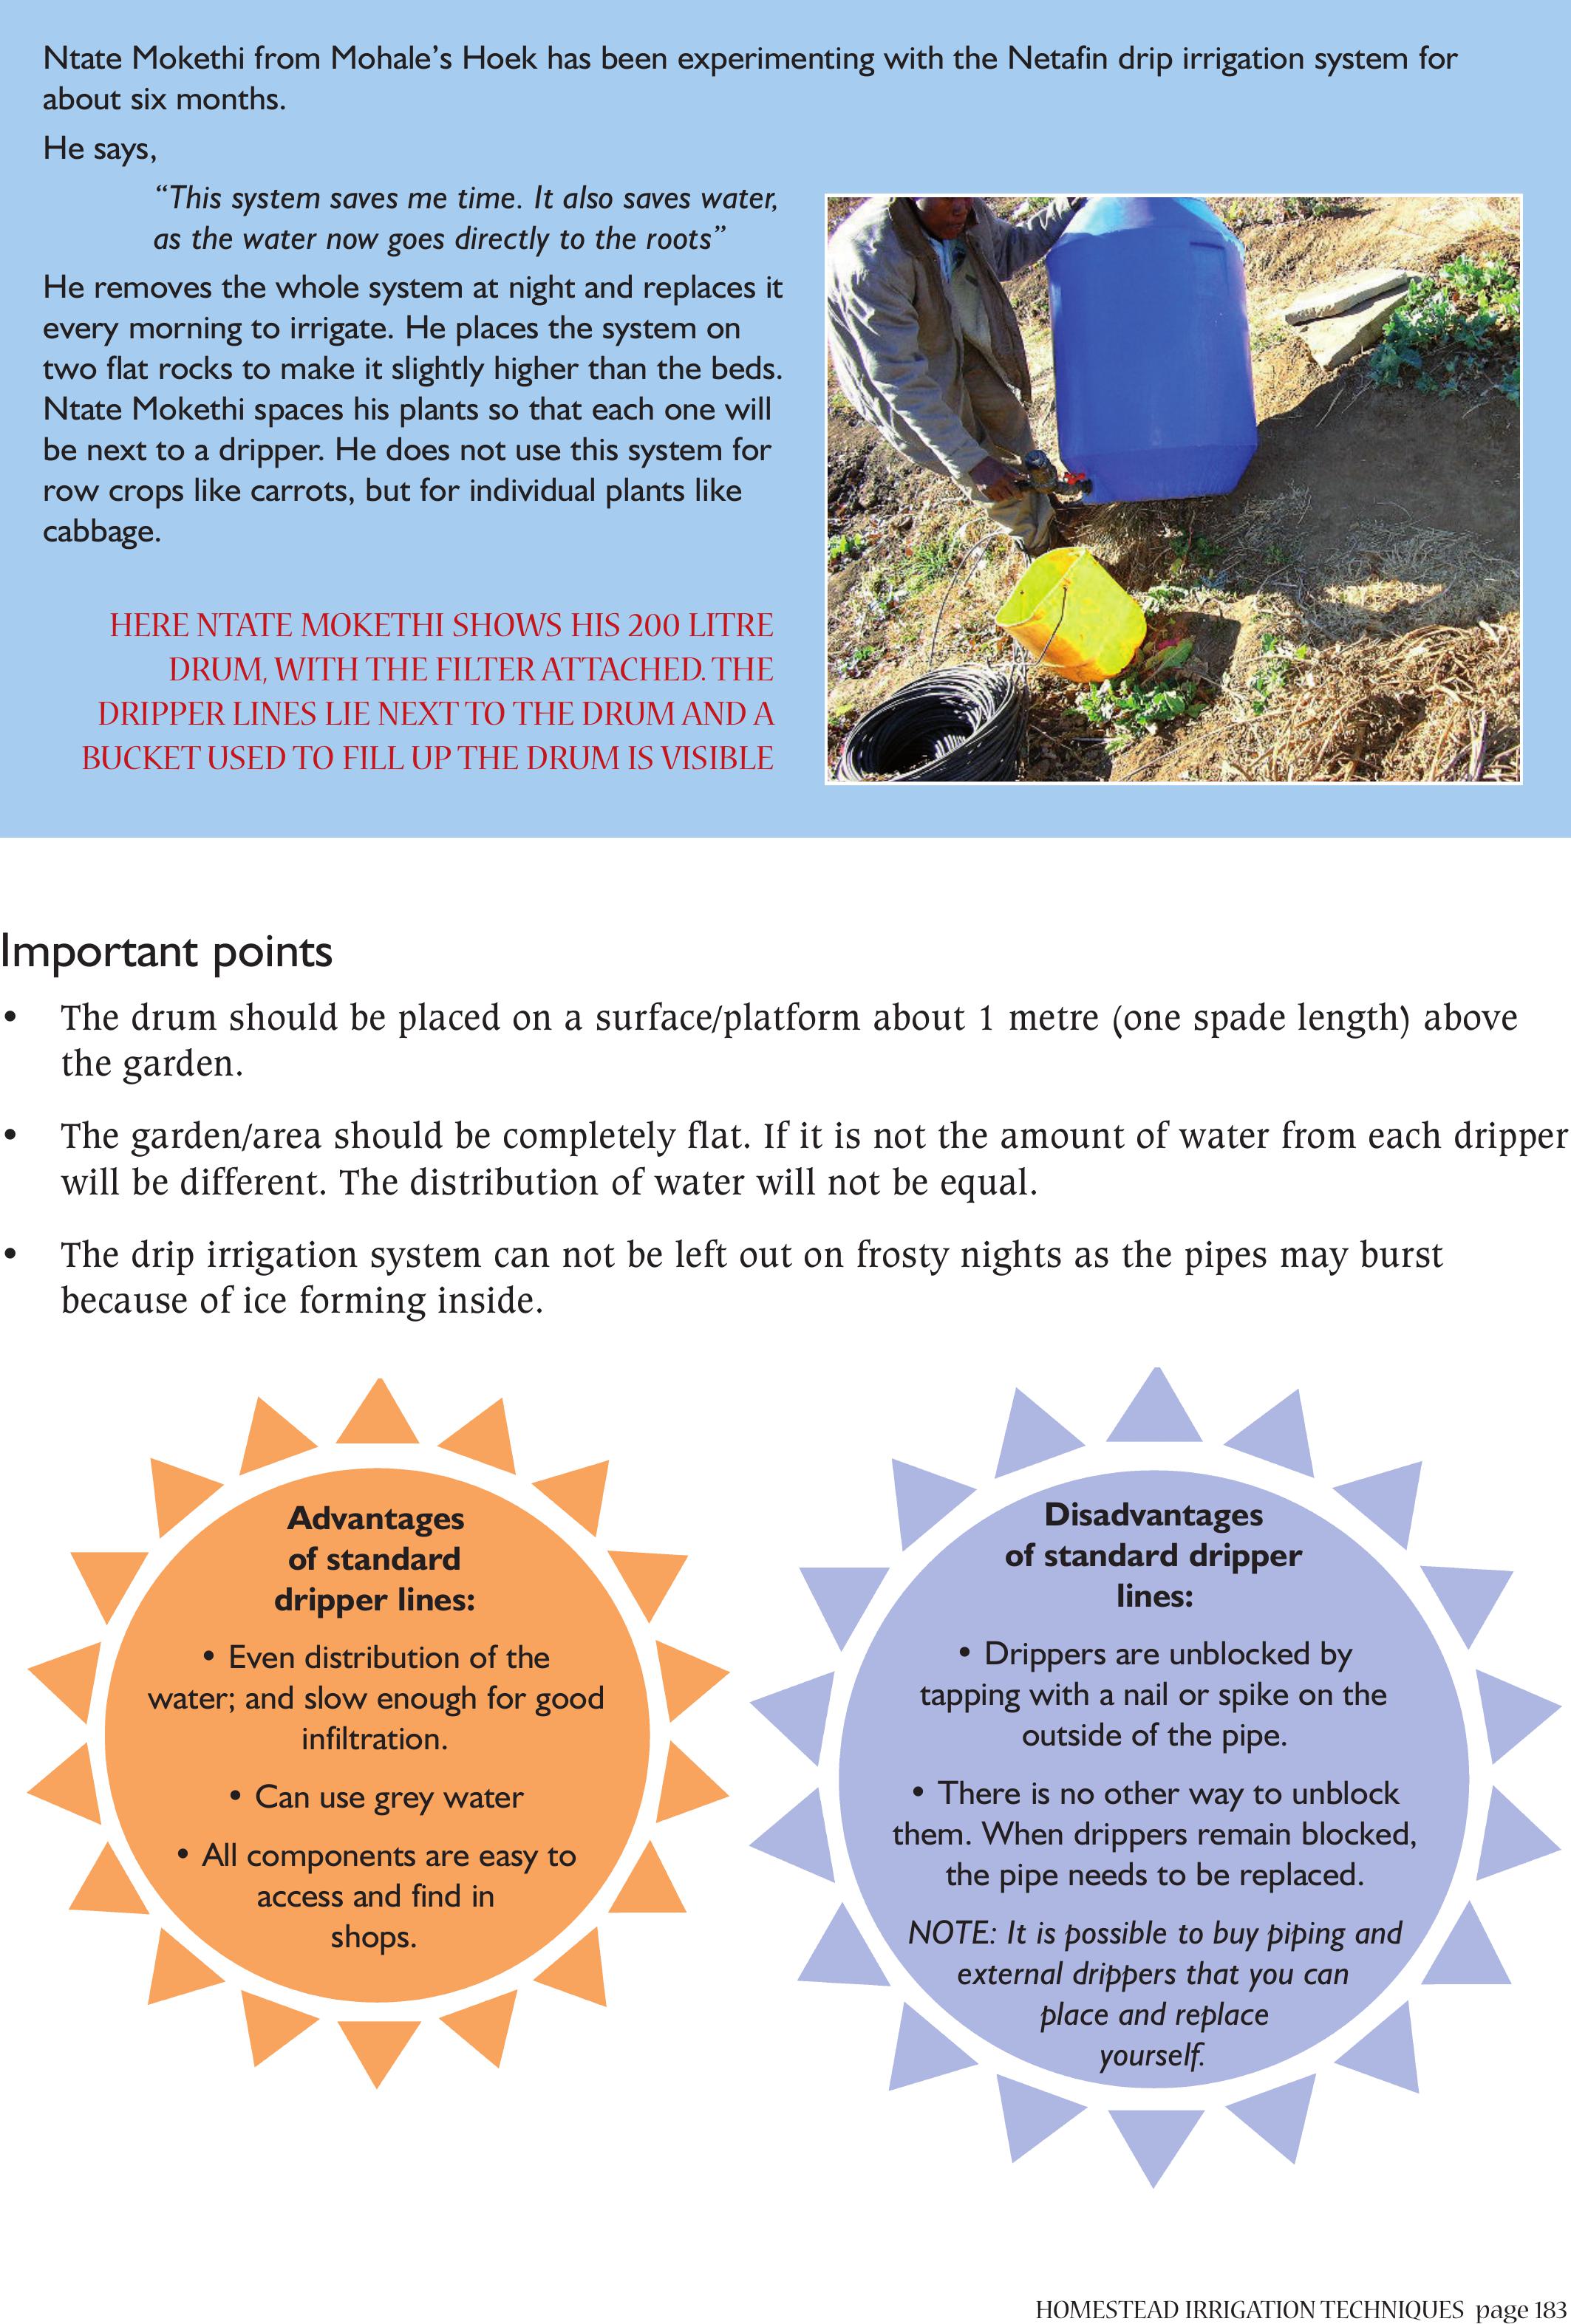
HOMESTEAD IRRIGATION TECHNIQUESpage 183
Ntate Mokethi from Mohale’s Hoek has been experimenting with the Netafin drip irrigation system for
about six months.
He says,
“This system saves me time. It also saves water,
as the water now goes directly to the roots”
He removes the whole system at night and replaces it
every morning to irrigate. He places the system on
two flat rocks to make it slightly higher than the beds.
Ntate Mokethi spaces his plants so that each one will
be next to a dripper. He does not use this system for
row crops like carrots, but for individual plants like
cabbage.
HERE NTATE MOKETHI SHOWS HIS 200 LITRE
DRUM,WITH THE FILTER ATTACHED. THE
DRIPPER LINES LIE NEXT TO THE DRUM AND A
BUCKET USED TO FILL UP THE DRUM IS VISIBLE
Important points
• The drum should be placed on a surface/platform about 1 metre (one spade length) above
the garden.
• The garden/area should be completely flat. If it is not the amount of water from each dripper
will be different. The distribution of water will not be equal.
• The drip irrigation system can not be left out on frosty nights as the pipes may burst
because of ice forming inside.
Disadvantages
of standard dripper
lines:
• Drippers are unblocked by
tapping with a nail or spike on the
outside of the pipe.
• There is no other way to unblock
them. When drippers remain blocked,
the pipe needs to be replaced.
NOTE: It is possible to buy piping and
external drippers that you can
place and replace
yourself.
Advantages
of standard
dripper lines:
• Even distribution of the
water; and slow enough for good
infiltration.
• Can use grey water
• All components are easy to
access and find in
shops.
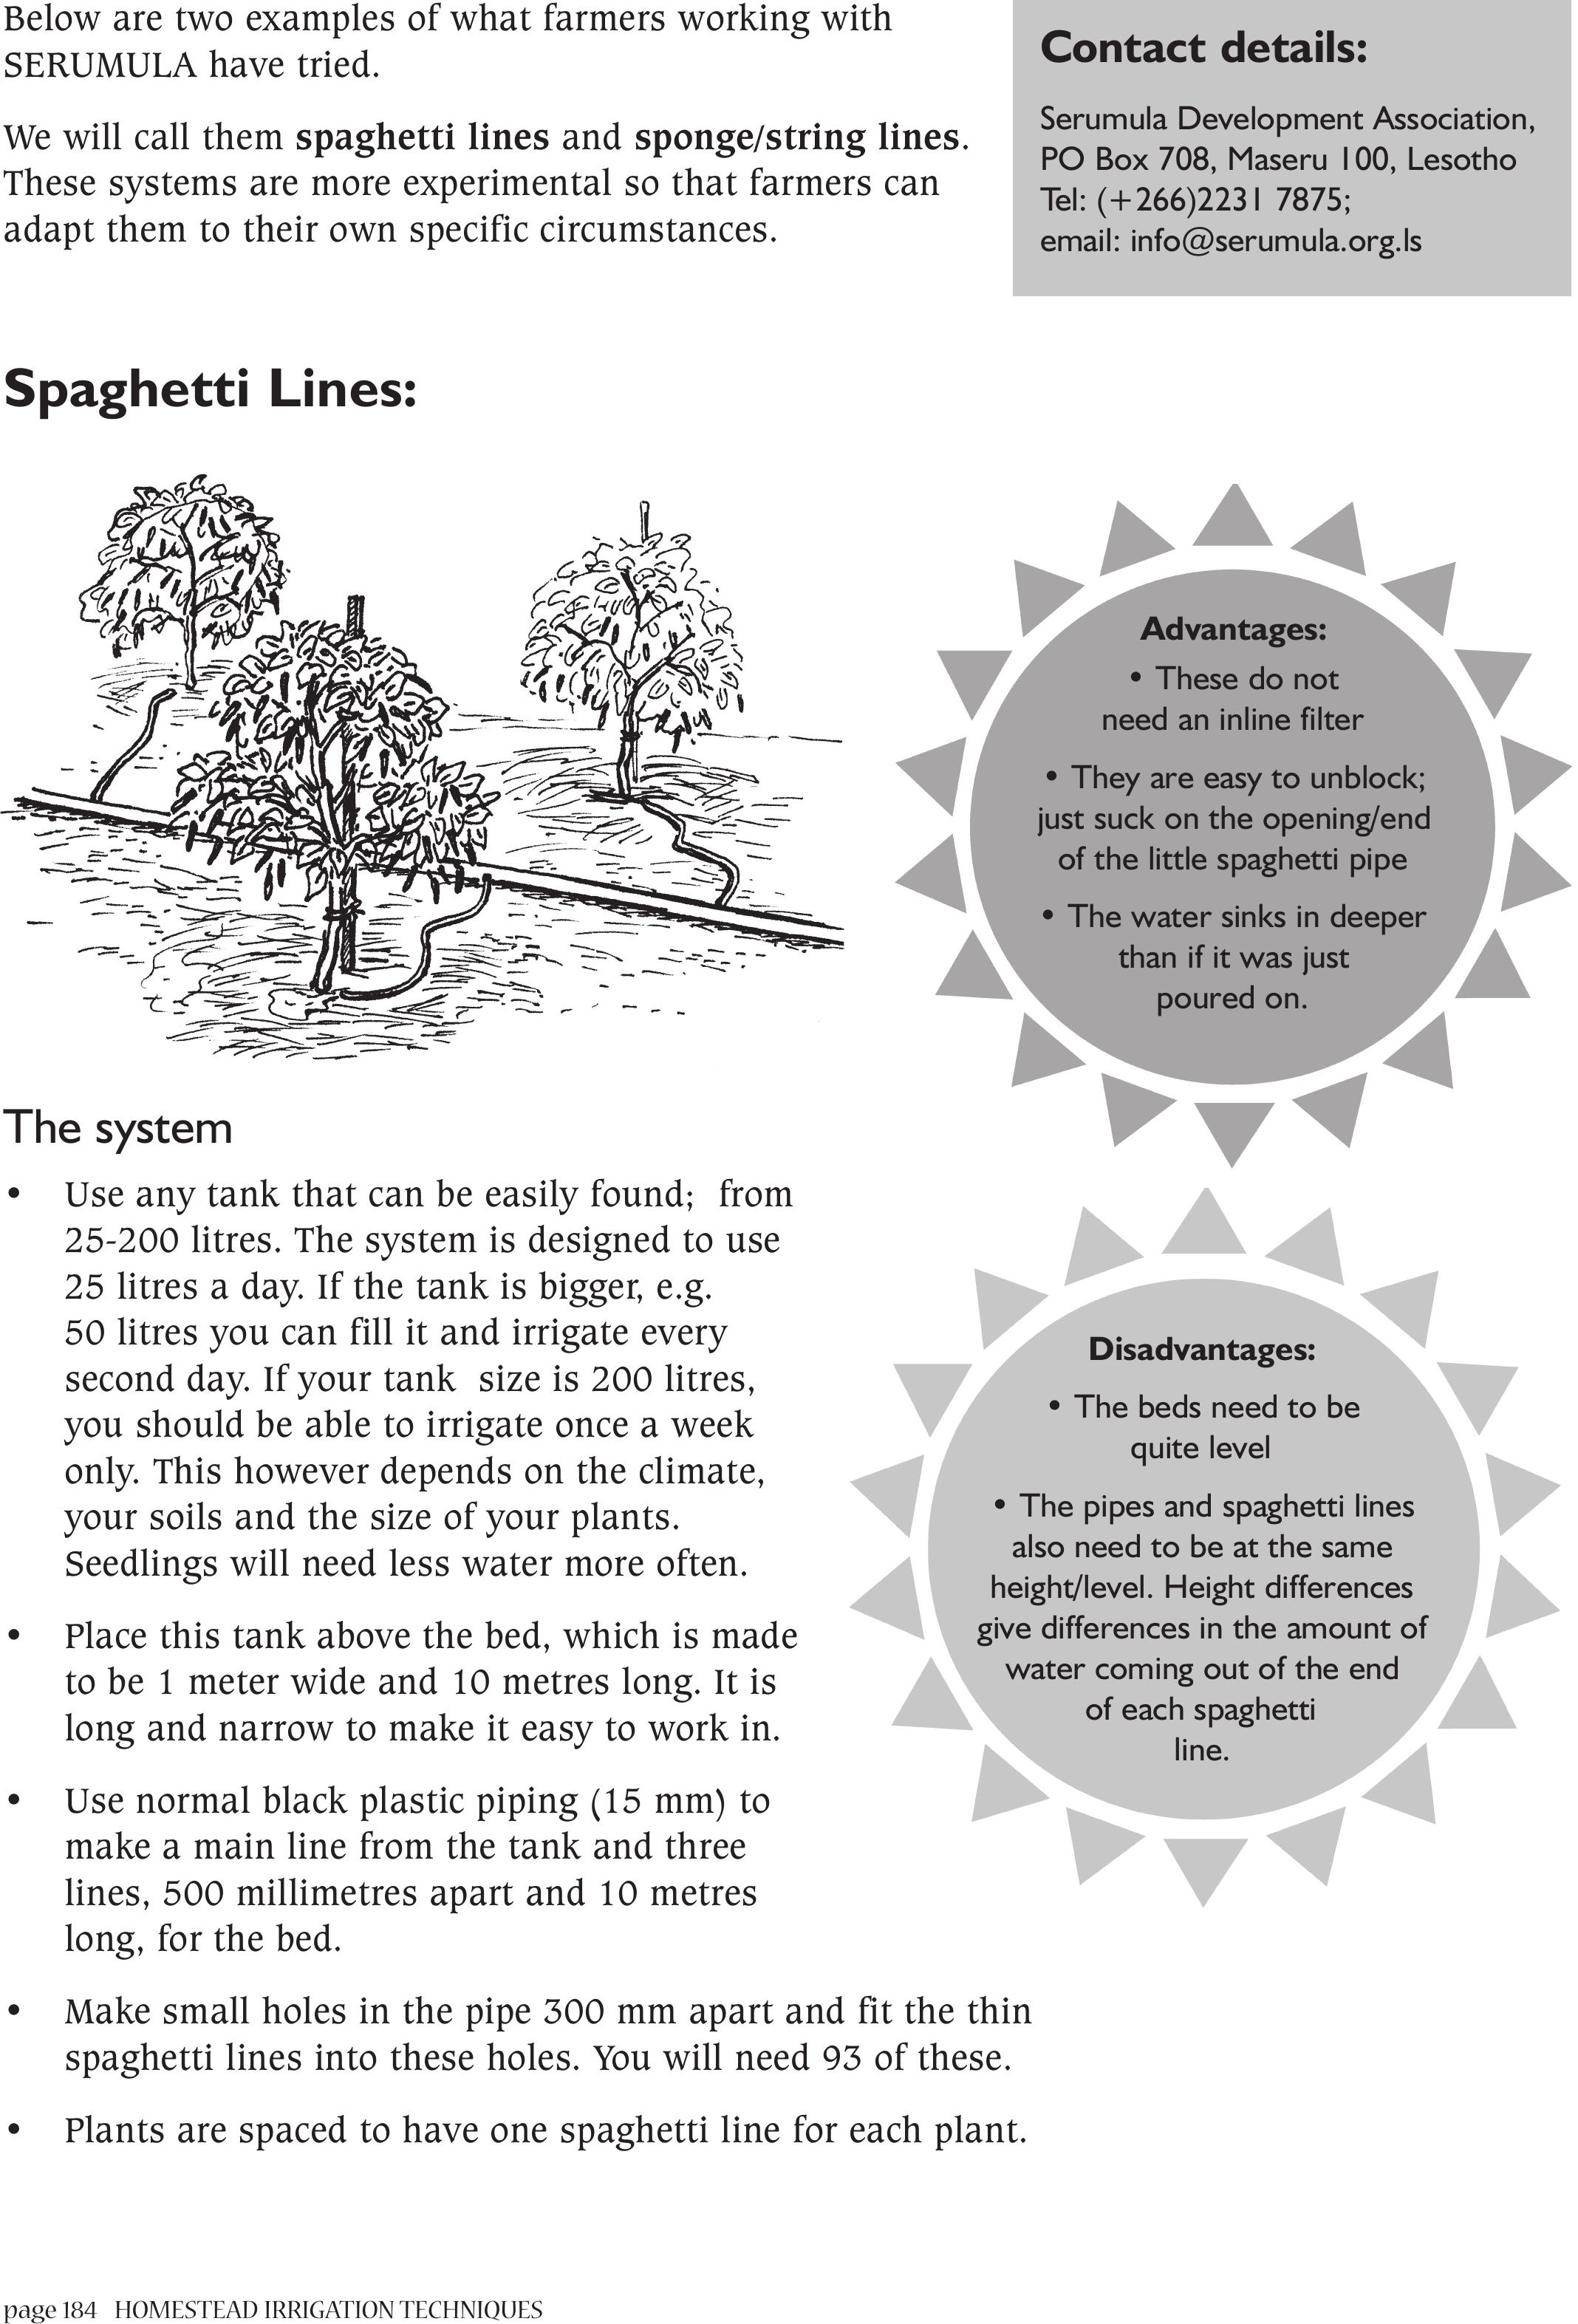
page 184 HOMESTEAD IRRIGATION TECHNIQUES
Below are two examples of what farmers working with
SERUMULA have tried.
We will call them spaghetti lines and sponge/string lines.
These systems are more experimental so that farmers can
adapt them to their own specific circumstances.
Spaghetti Lines:
The system
• Use any tank that can be easily found; from
25-200 litres. The system is designed to use
25 litres a day. If the tank is bigger, e.g.
50 litres you can fill it and irrigate every
second day. If your tank size is 200 litres,
you should be able to irrigate once a week
only. This however depends on the climate,
your soils and the size of your plants.
Seedlings will need less water more often.
• Place this tank above the bed, which is made
to be 1 meter wide and 10 metres long. It is
long and narrow to make it easy to work in.
• Use normal black plastic piping (15 mm) to
make a main line from the tank and three
lines, 500 millimetres apart and 10 metres
long, for the bed.
• Make small holes in the pipe 300 mm apart and fit the thin
spaghetti lines into these holes. You will need 93 of these.
• Plants are spaced to have one spaghetti line for each plant.
Contact details:
Serumula Development Association,
PO Box 708, Maseru 100, Lesotho
Tel: (+266)2231 7875;
email: info@serumula.org.ls
Advantages:
• These do not
need an inline filter
• They are easy to unblock;
just suck on the opening/end
of the little spaghetti pipe
• The water sinks in deeper
than if it was just
poured on.
Disadvantages:
• The beds need to be
quite level
• The pipes and spaghetti lines
also need to be at the same
height/level. Height differences
give differences in the amount of
water coming out of the end
of each spaghetti
line.
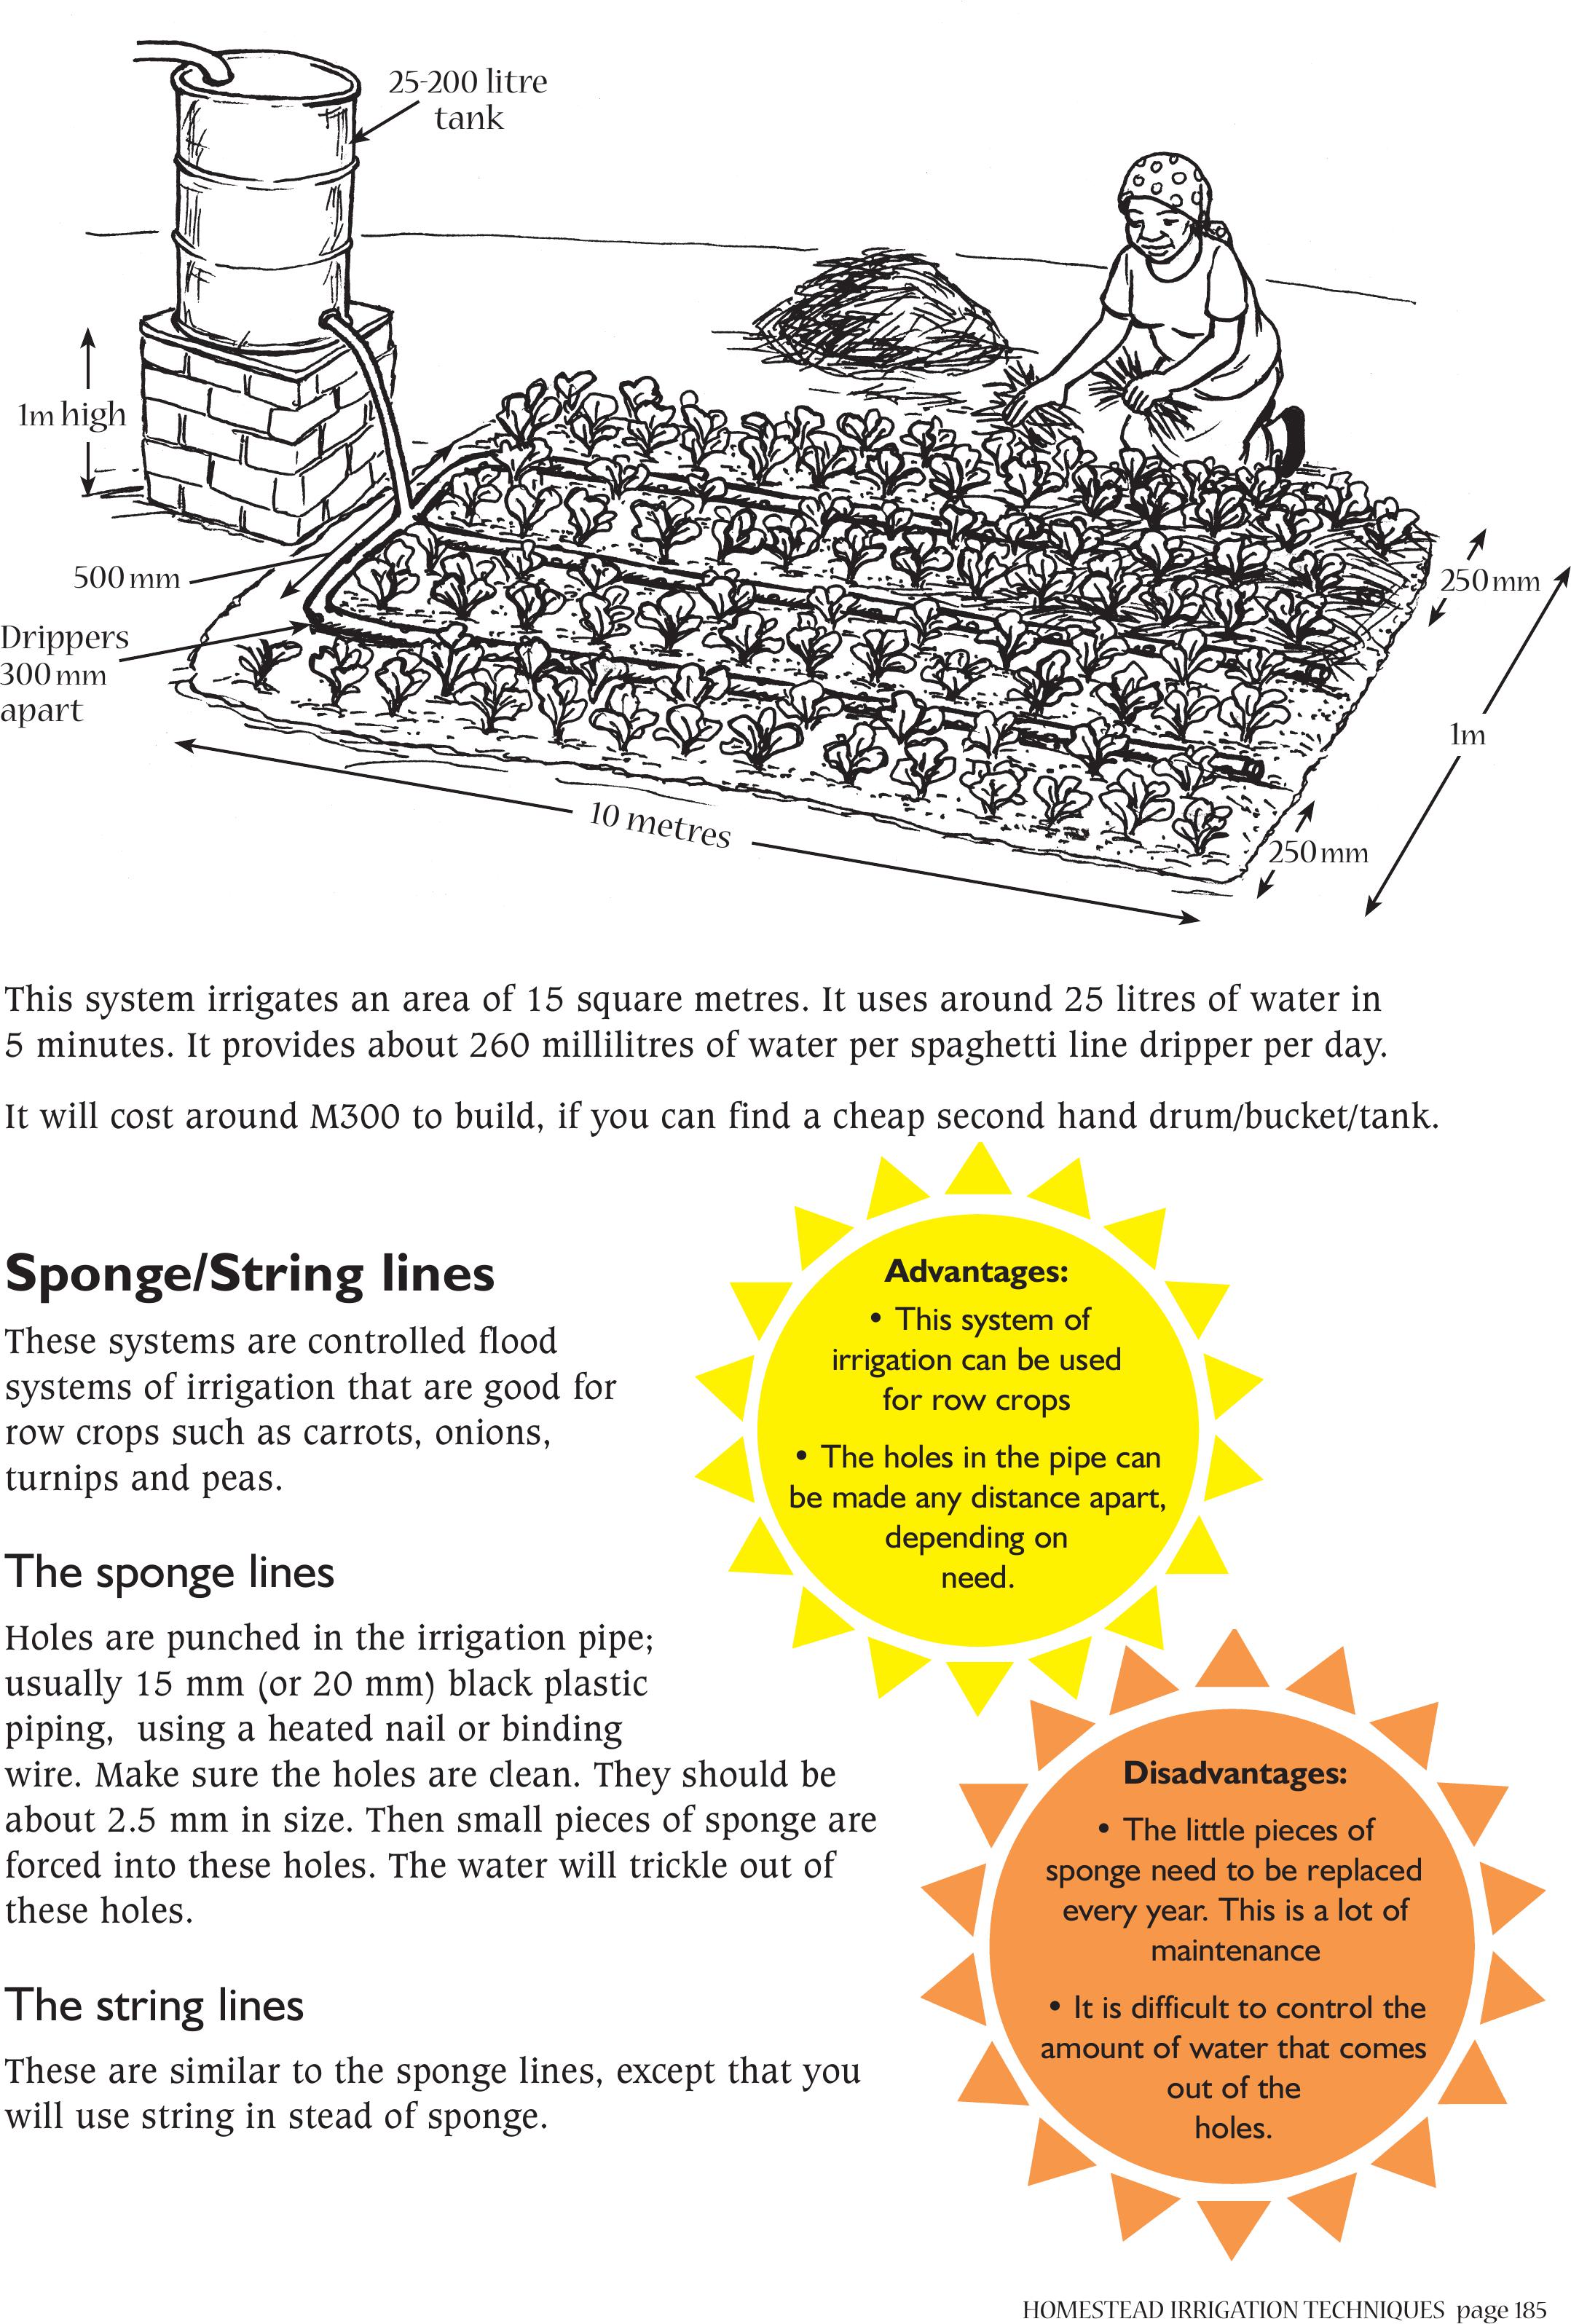
HOMESTEAD IRRIGATION TECHNIQUESpage 185
1m high
25-200 litre
tank
500mm
10 metres
Drippers
300mm
apart
250
mm
1m
250
mm
This system irrigates an area of 15 square metres. It uses around 25 litres of water in
5 minutes. It provides about 260 millilitres of water per spaghetti line dripper per day.
It will cost around M300 to build, if you can find a cheap second hand drum/bucket/tank.
Sponge/String lines
These systems are controlled flood
systems of irrigation that are good for
row crops such as carrots, onions,
turnips and peas.
The sponge lines
Holes are punched in the irrigation pipe;
usually 15 mm (or 20 mm) black plastic
piping, using a heated nail or binding
wire. Make sure the holes are clean. They should be
about 2.5 mm in size. Then small pieces of sponge are
forced into these holes. The water will trickle out of
these holes.
The string lines
These are similar to the sponge lines, except that you
will use string in stead of sponge.
Advantages:
• This system of
irrigation can be used
for row crops
• The holes in the pipe can
be made any distance apart,
depending on
need.
Disadvantages:
• The little pieces of
sponge need to be replaced
every year. This is a lot of
maintenance
• It is difficult to control the
amount of water that comes
out of the
holes.
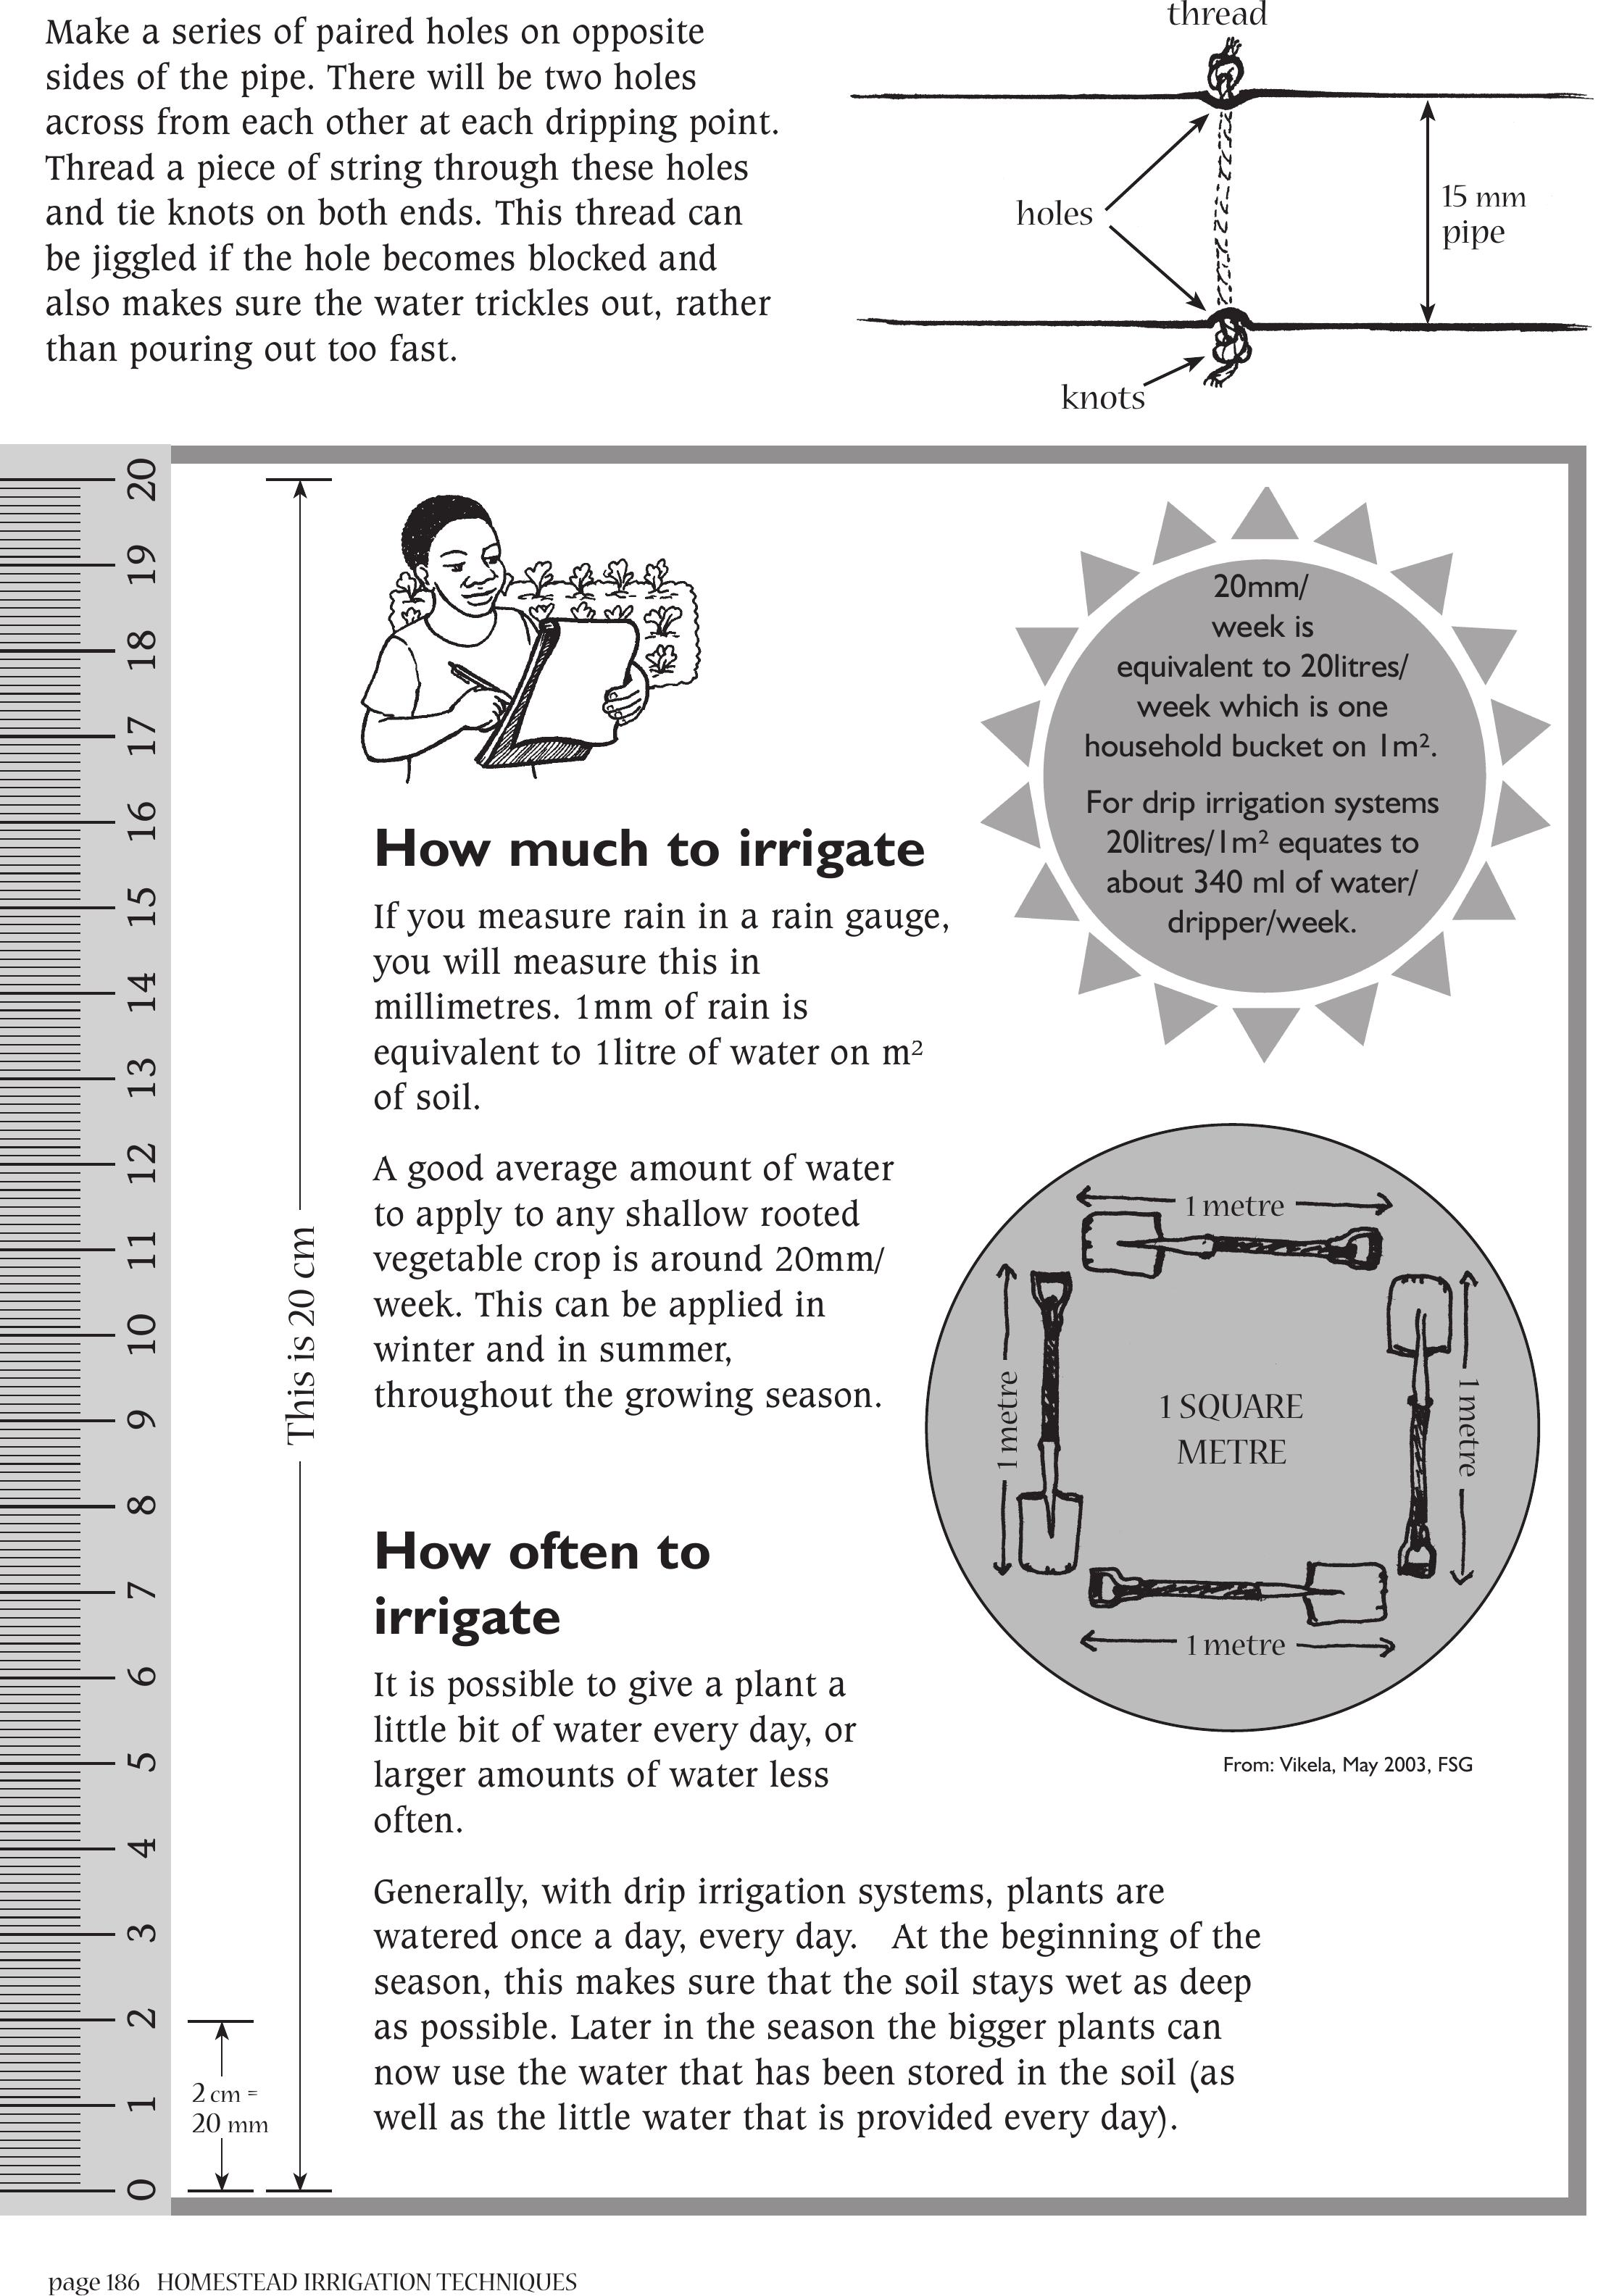
page 186 HOMESTEAD IRRIGATION TECHNIQUES
10 234567891011121314151617181920
This is 20 cm
2cm =
20 mm
How much to irrigate
If you measure rain in a rain gauge,
you will measure this in
millimetres. 1mm of rain is
equivalent to 1litre of water on m²
of soil.
A good average amount of water
to apply to any shallow rooted
vegetable crop is around 20mm/
week. This can be applied in
winter and in summer,
throughout the growing season.
How often to
irrigate
It is possible to give a plant a
little bit of water every day, or
larger amounts of water less
often.
Generally, with drip irrigation systems, plants are
watered once a day, every day. At the beginning of the
season, this makes sure that the soil stays wet as deep
as possible. Later in the season the bigger plants can
now use the water that has been stored in the soil (as
well as the little water that is provided every day).
20mm/
week is
equivalent to 20litres/
week which is one
household bucket on 1m².
For drip irrigation systems
20litres/1m² equates to
about 340 ml of water/
dripper/week.
1 SQUARE
METRE
1 metre
1 metre
1 metre
1 metre
Make a series of paired holes on opposite
sides of the pipe. There will be two holes
across from each other at each dripping point.
Thread a piece of string through these holes
and tie knots on both ends. This thread can
be jiggled if the hole becomes blocked and
also makes sure the water trickles out, rather
than pouring out too fast.
15 mm
pipe
thread
knots
holes
From: Vikela, May 2003, FSG
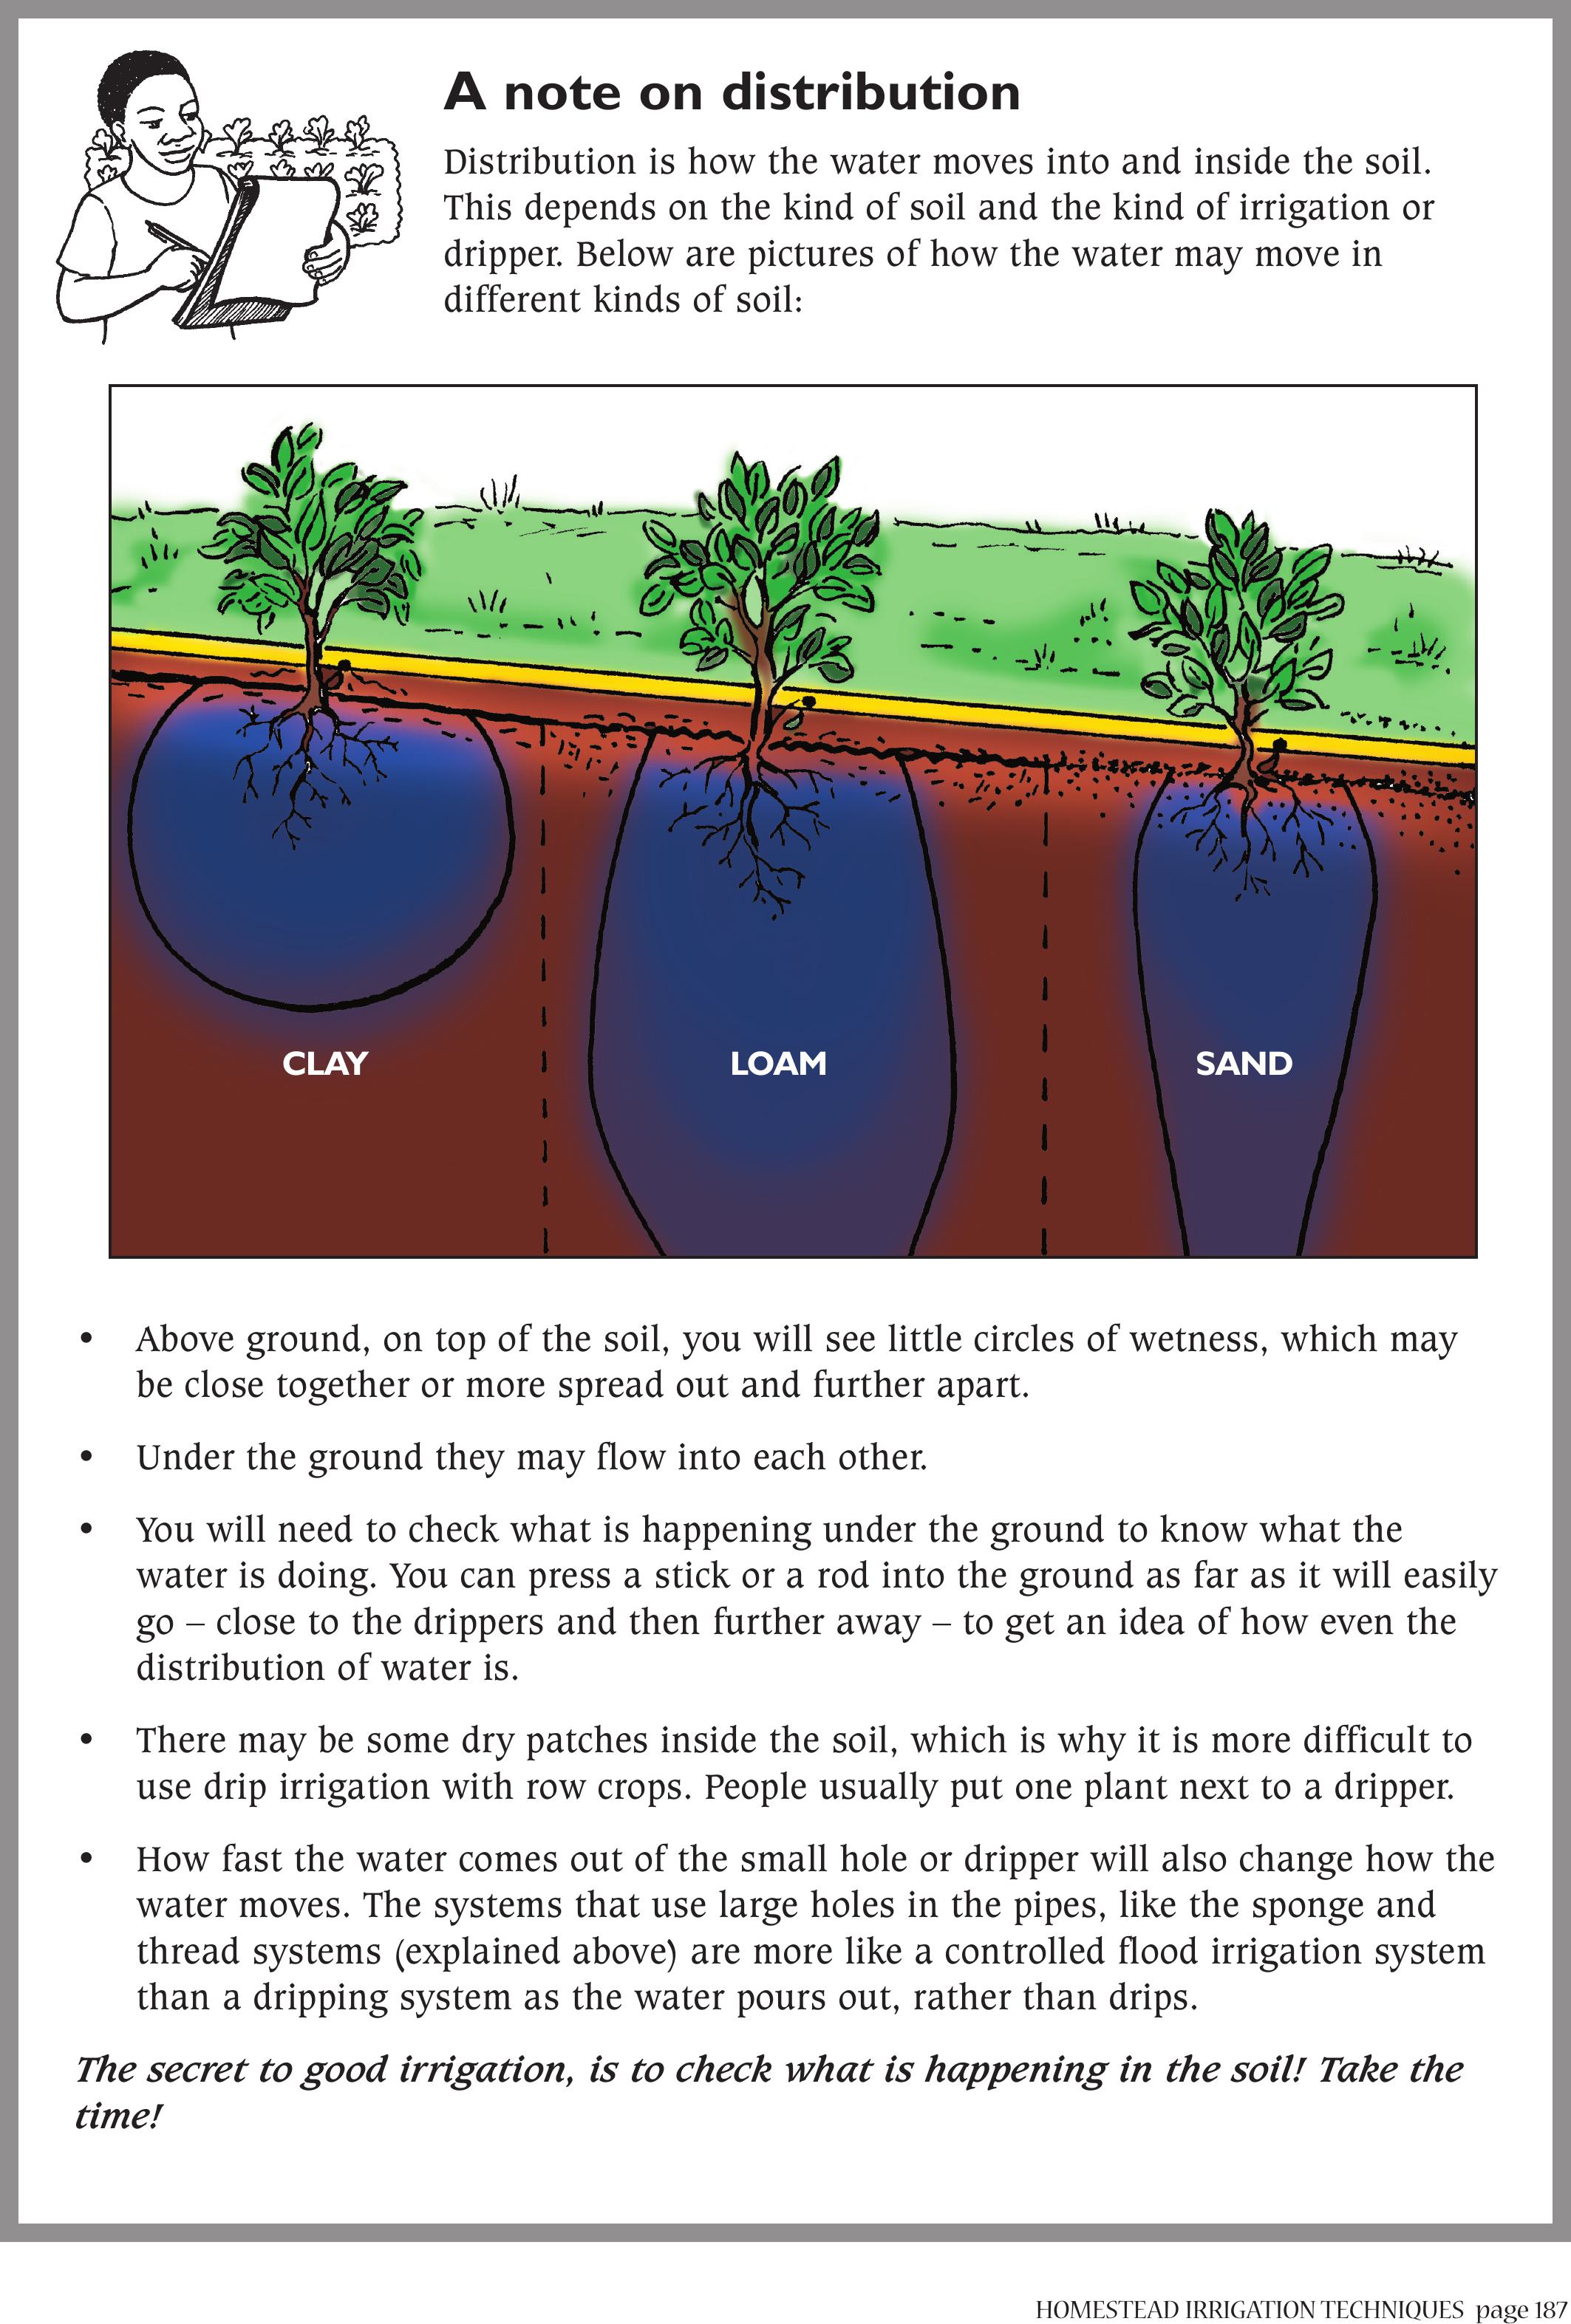
HOMESTEAD IRRIGATION TECHNIQUESpage 187
A note on distribution
Distribution is how the water moves into and inside the soil.
This depends on the kind of soil and the kind of irrigation or
dripper. Below are pictures of how the water may move in
different kinds of soil:
• Above ground, on top of the soil, you will see little circles of wetness, which may
be close together or more spread out and further apart.
• Under the ground they may flow into each other.
• You will need to check what is happening under the ground to know what the
water is doing. You can press a stick or a rod into the ground as far as it will easily
go – close to the drippers and then further away – to get an idea of how even the
distribution of water is.
• There may be some dry patches inside the soil, which is why it is more difficult to
use drip irrigation with row crops. People usually put one plant next to a dripper.
• How fast the water comes out of the small hole or dripper will also change how the
water moves. The systems that use large holes in the pipes, like the sponge and
thread systems (explained above) are more like a controlled flood irrigation system
than a dripping system as the water pours out, rather than drips.
The secret to good irrigation, is to check what is happening in the soil! Take the
time!
CLAY LOAMSAND
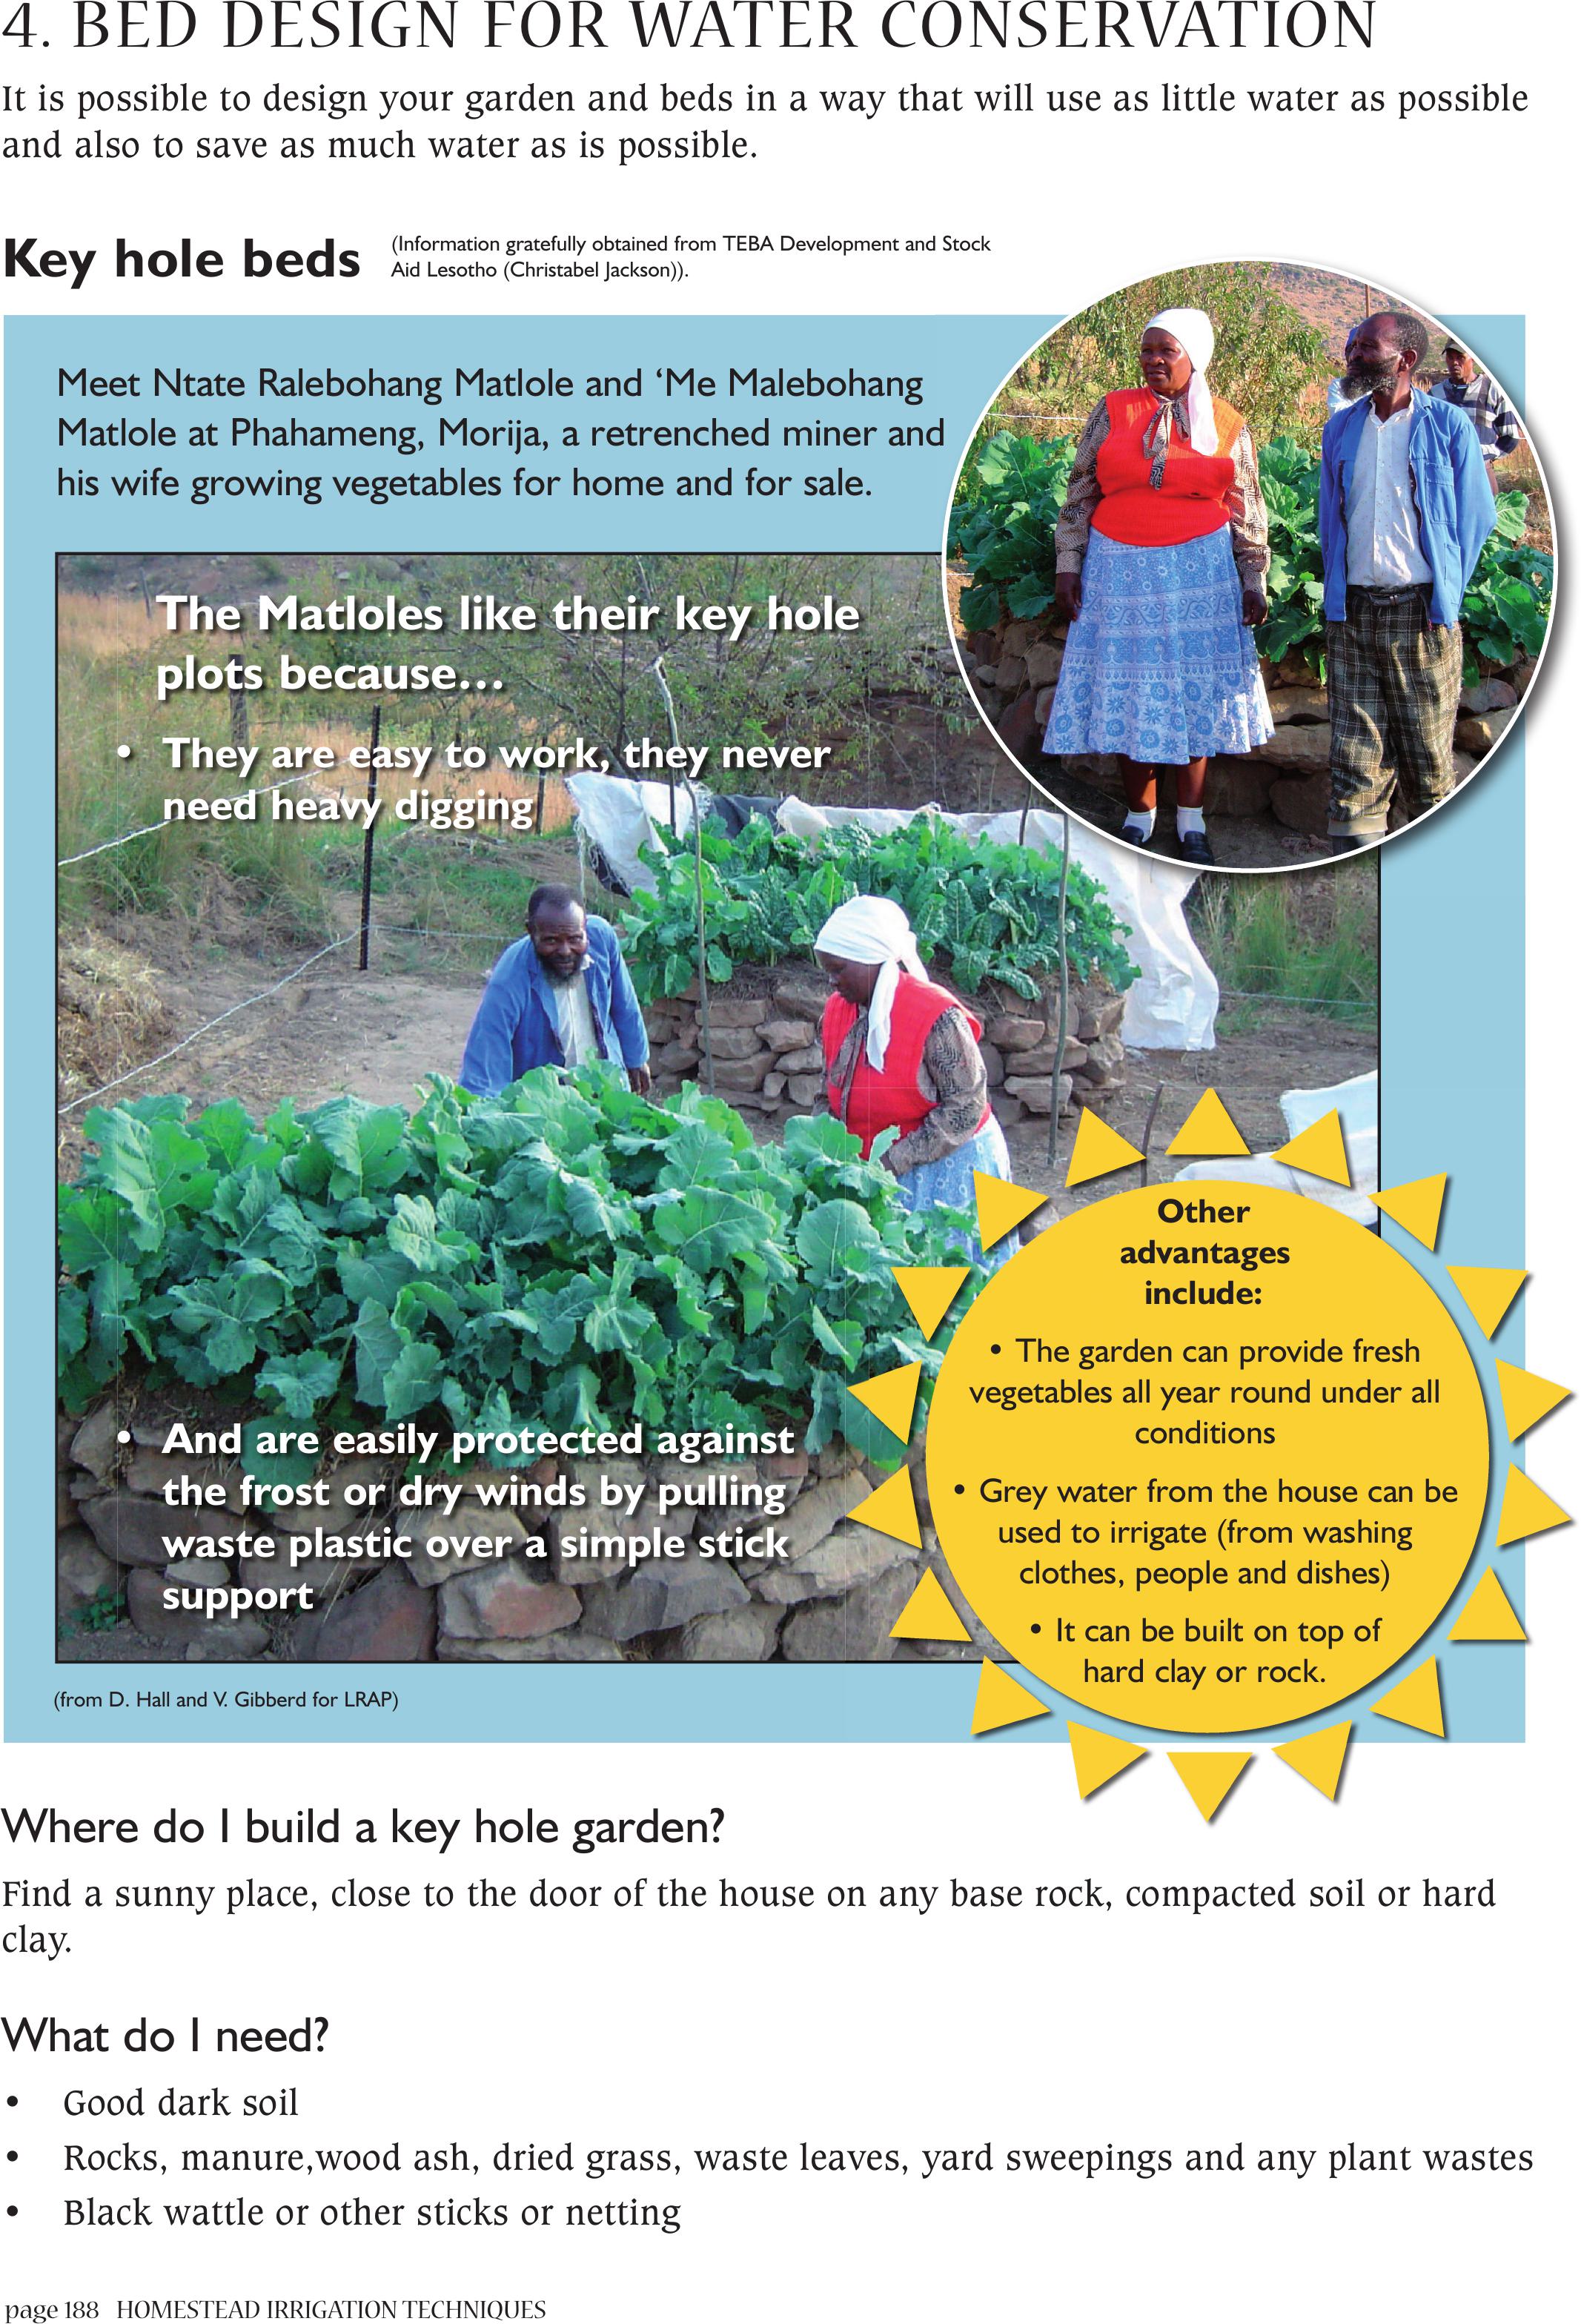
page 188 HOMESTEAD IRRIGATION TECHNIQUES
4. BED DESIGN FOR WATER CONSERVATION
It is possible to design your garden and beds in a way that will use as little water as possible
and also to save as much water as is possible.
Key hole beds
Where do I build a key hole garden?
Find a sunny place, close to the door of the house on any base rock, compacted soil or hard
clay.
What do I need?
• Good dark soil
• Rocks, manure,wood ash, dried grass, waste leaves, yard sweepings and any plant wastes
• Black wattle or other sticks or netting
Other
advantages
include:
• The garden can provide fresh
vegetables all year round under all
conditions
• Grey water from the house can be
used to irrigate (from washing
clothes, people and dishes)
• It can be built on top of
hard clay or rock.
Meet Ntate Ralebohang Matlole and ‘Me Malebohang
Matlole at Phahameng, Morija, a retrenched miner and
his wife growing vegetables for home and for sale.
The Matloles like their key hole
plots because…
• They are easy to work, they never
need heavy digging
• And are easily protected against
the frost or dry winds by pulling
waste plastic over a simple stick
support
(from D. Hall and V. Gibberd for LRAP)
(Information gratefully obtained from TEBA Development and Stock
Aid Lesotho (Christabel Jackson)).
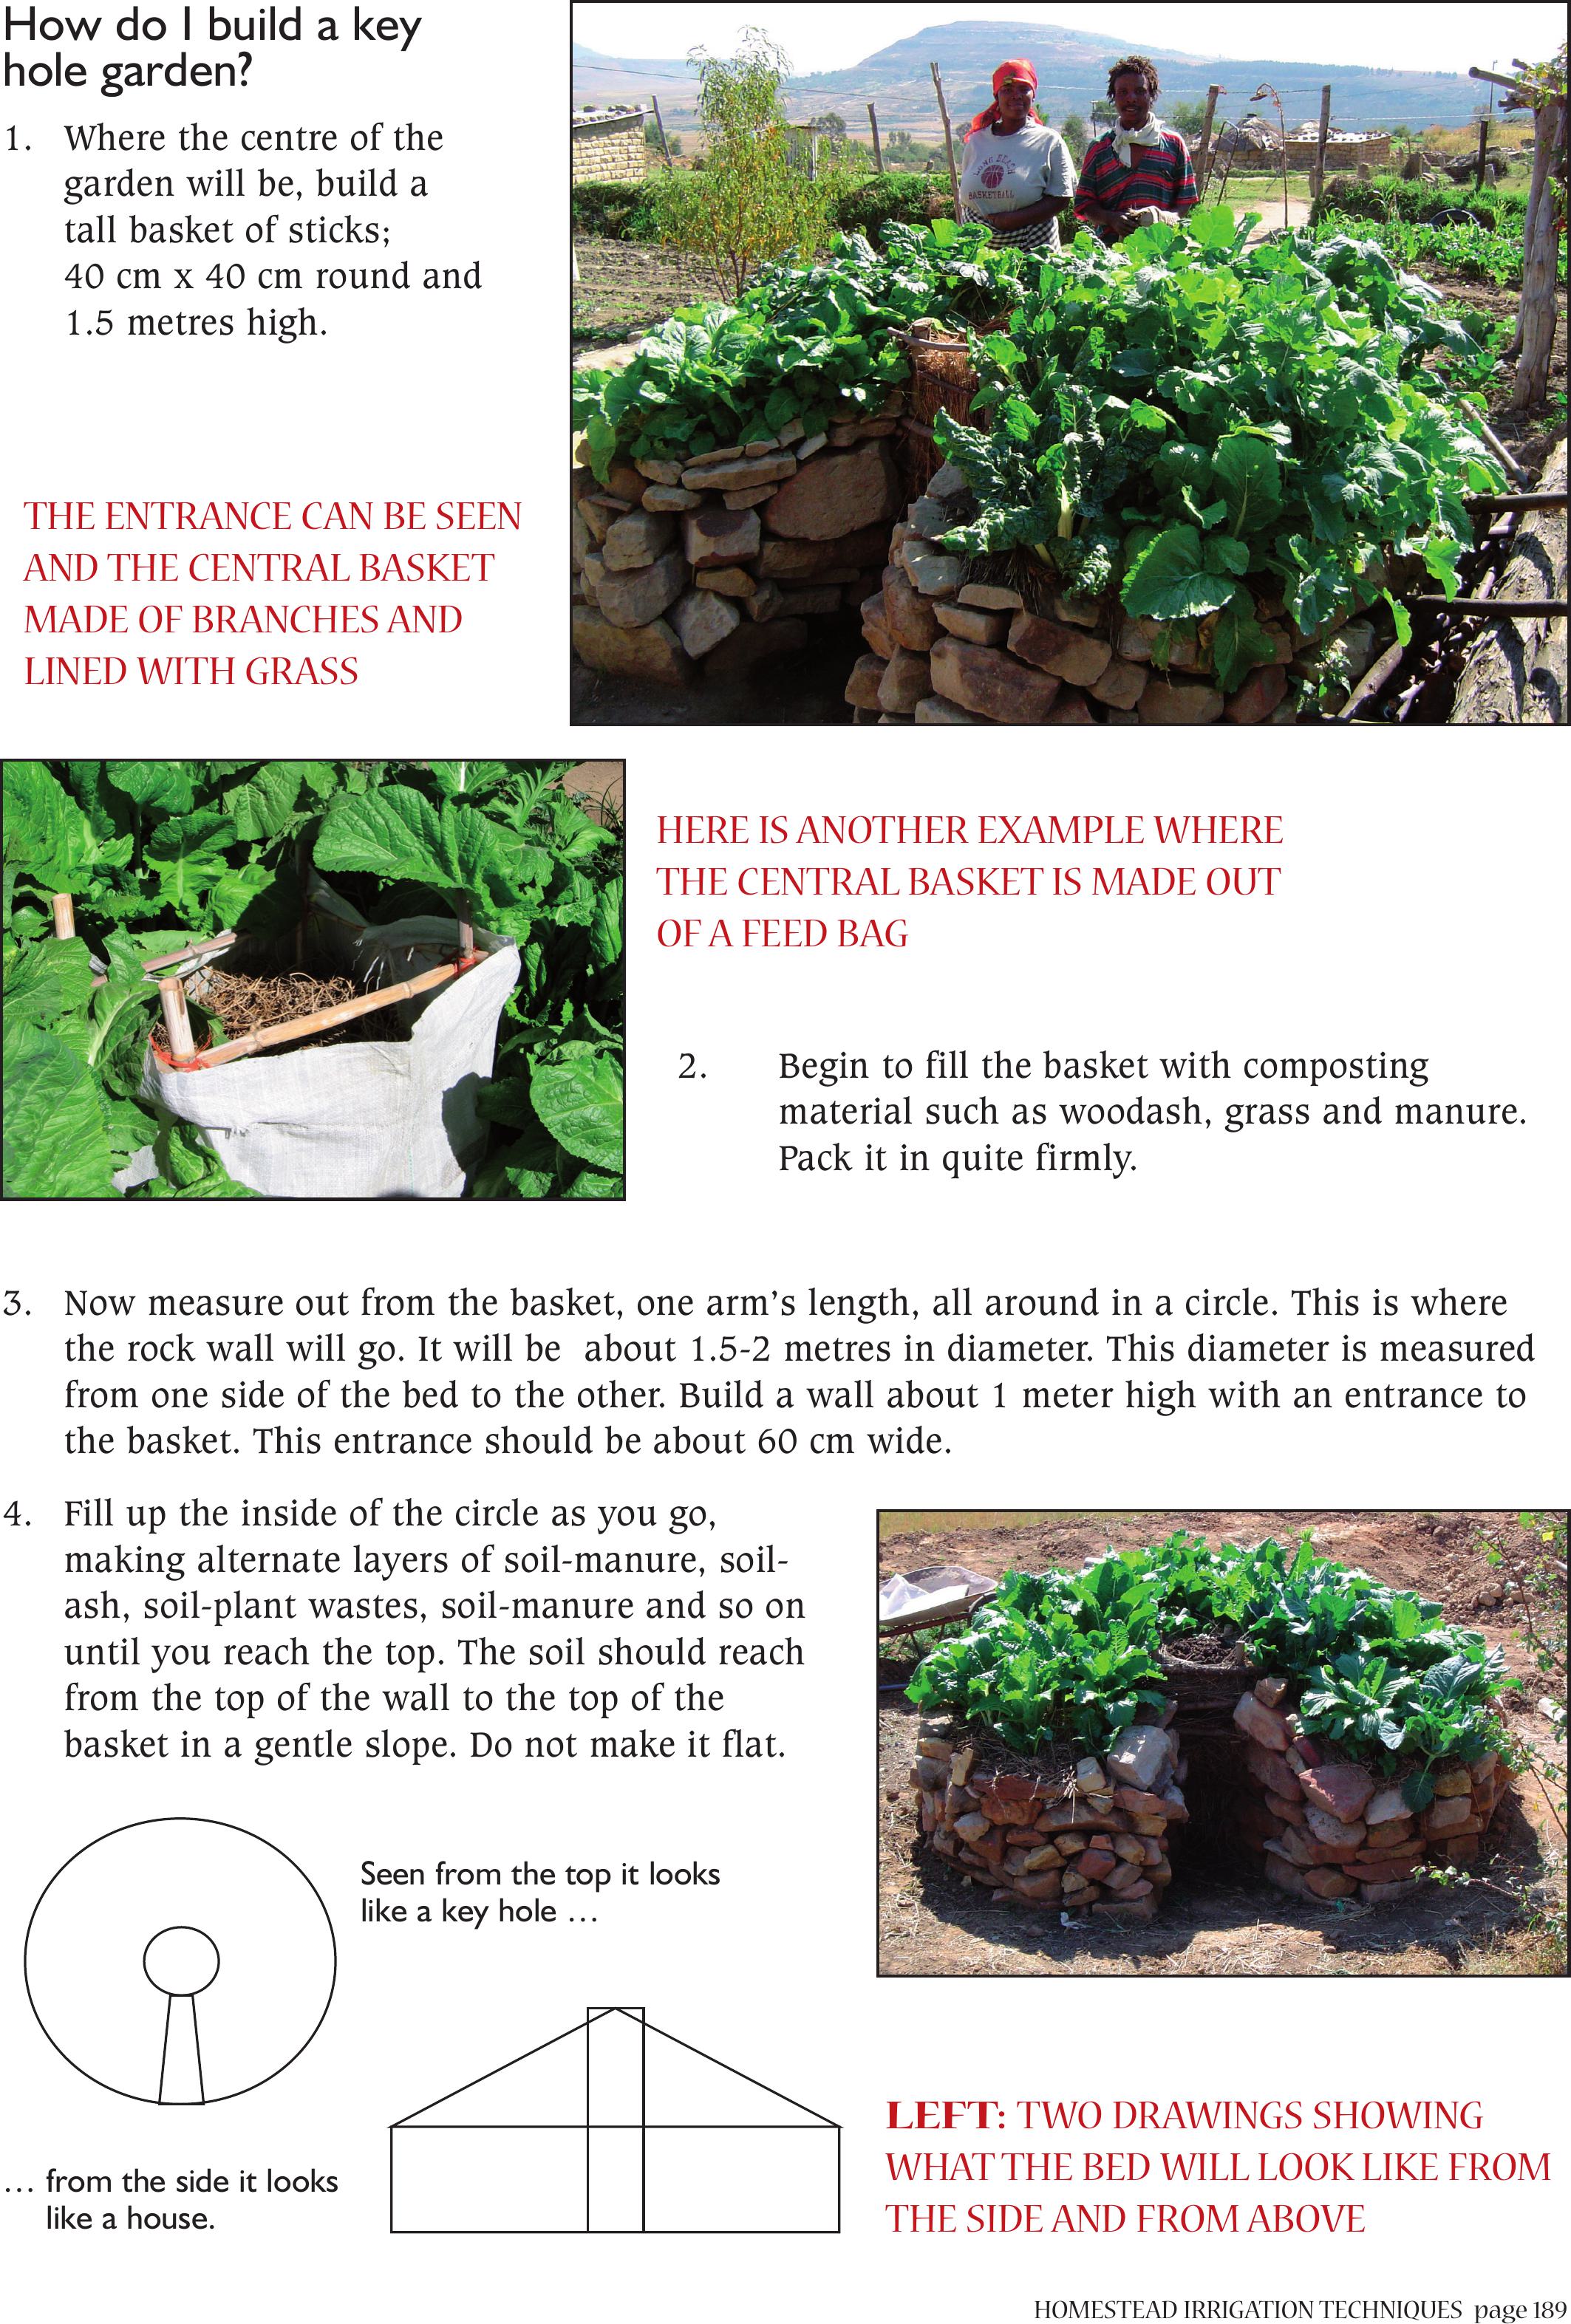
HOMESTEAD IRRIGATION TECHNIQUESpage 189
How do I build a key
hole garden?
1. Where the centre of the
garden will be, build a
tall basket of sticks;
40 cm x 40 cm round and
1.5 metres high.
2. Begin to fill the basket with composting
material such as woodash, grass and manure.
Pack it in quite firmly.
3. Now measure out from the basket, one arm’s length, all around in a circle. This is where
the rock wall will go. It will be about 1.5-2 metres in diameter. This diameter is measured
from one side of the bed to the other. Build a wall about 1 meter high with an entrance to
the basket. This entrance should be about 60 cm wide.
4. Fill up the inside of the circle as you go,
making alternate layers of soil-manure, soil-
ash, soil-plant wastes, soil-manure and so on
until you reach the top. The soil should reach
from the top of the wall to the top of the
basket in a gentle slope. Do not make it flat.
HERE IS ANOTHER EXAMPLE WHERE
THE CENTRAL BASKET IS MADE OUT
OFA FEED BAG
LEFT:TWO DRAWINGS SHOWING
WHAT THE BED WILL LOOK LIKE FROM
THE SIDE AND FROM ABOVE
Seen from the top it looks
like a key hole …
… from the side it looks
like a house.
THE ENTRANCE CAN BE SEEN
AND THE CENTRAL BASKET
MADE OF BRANCHES AND
LINED WITH GRASS
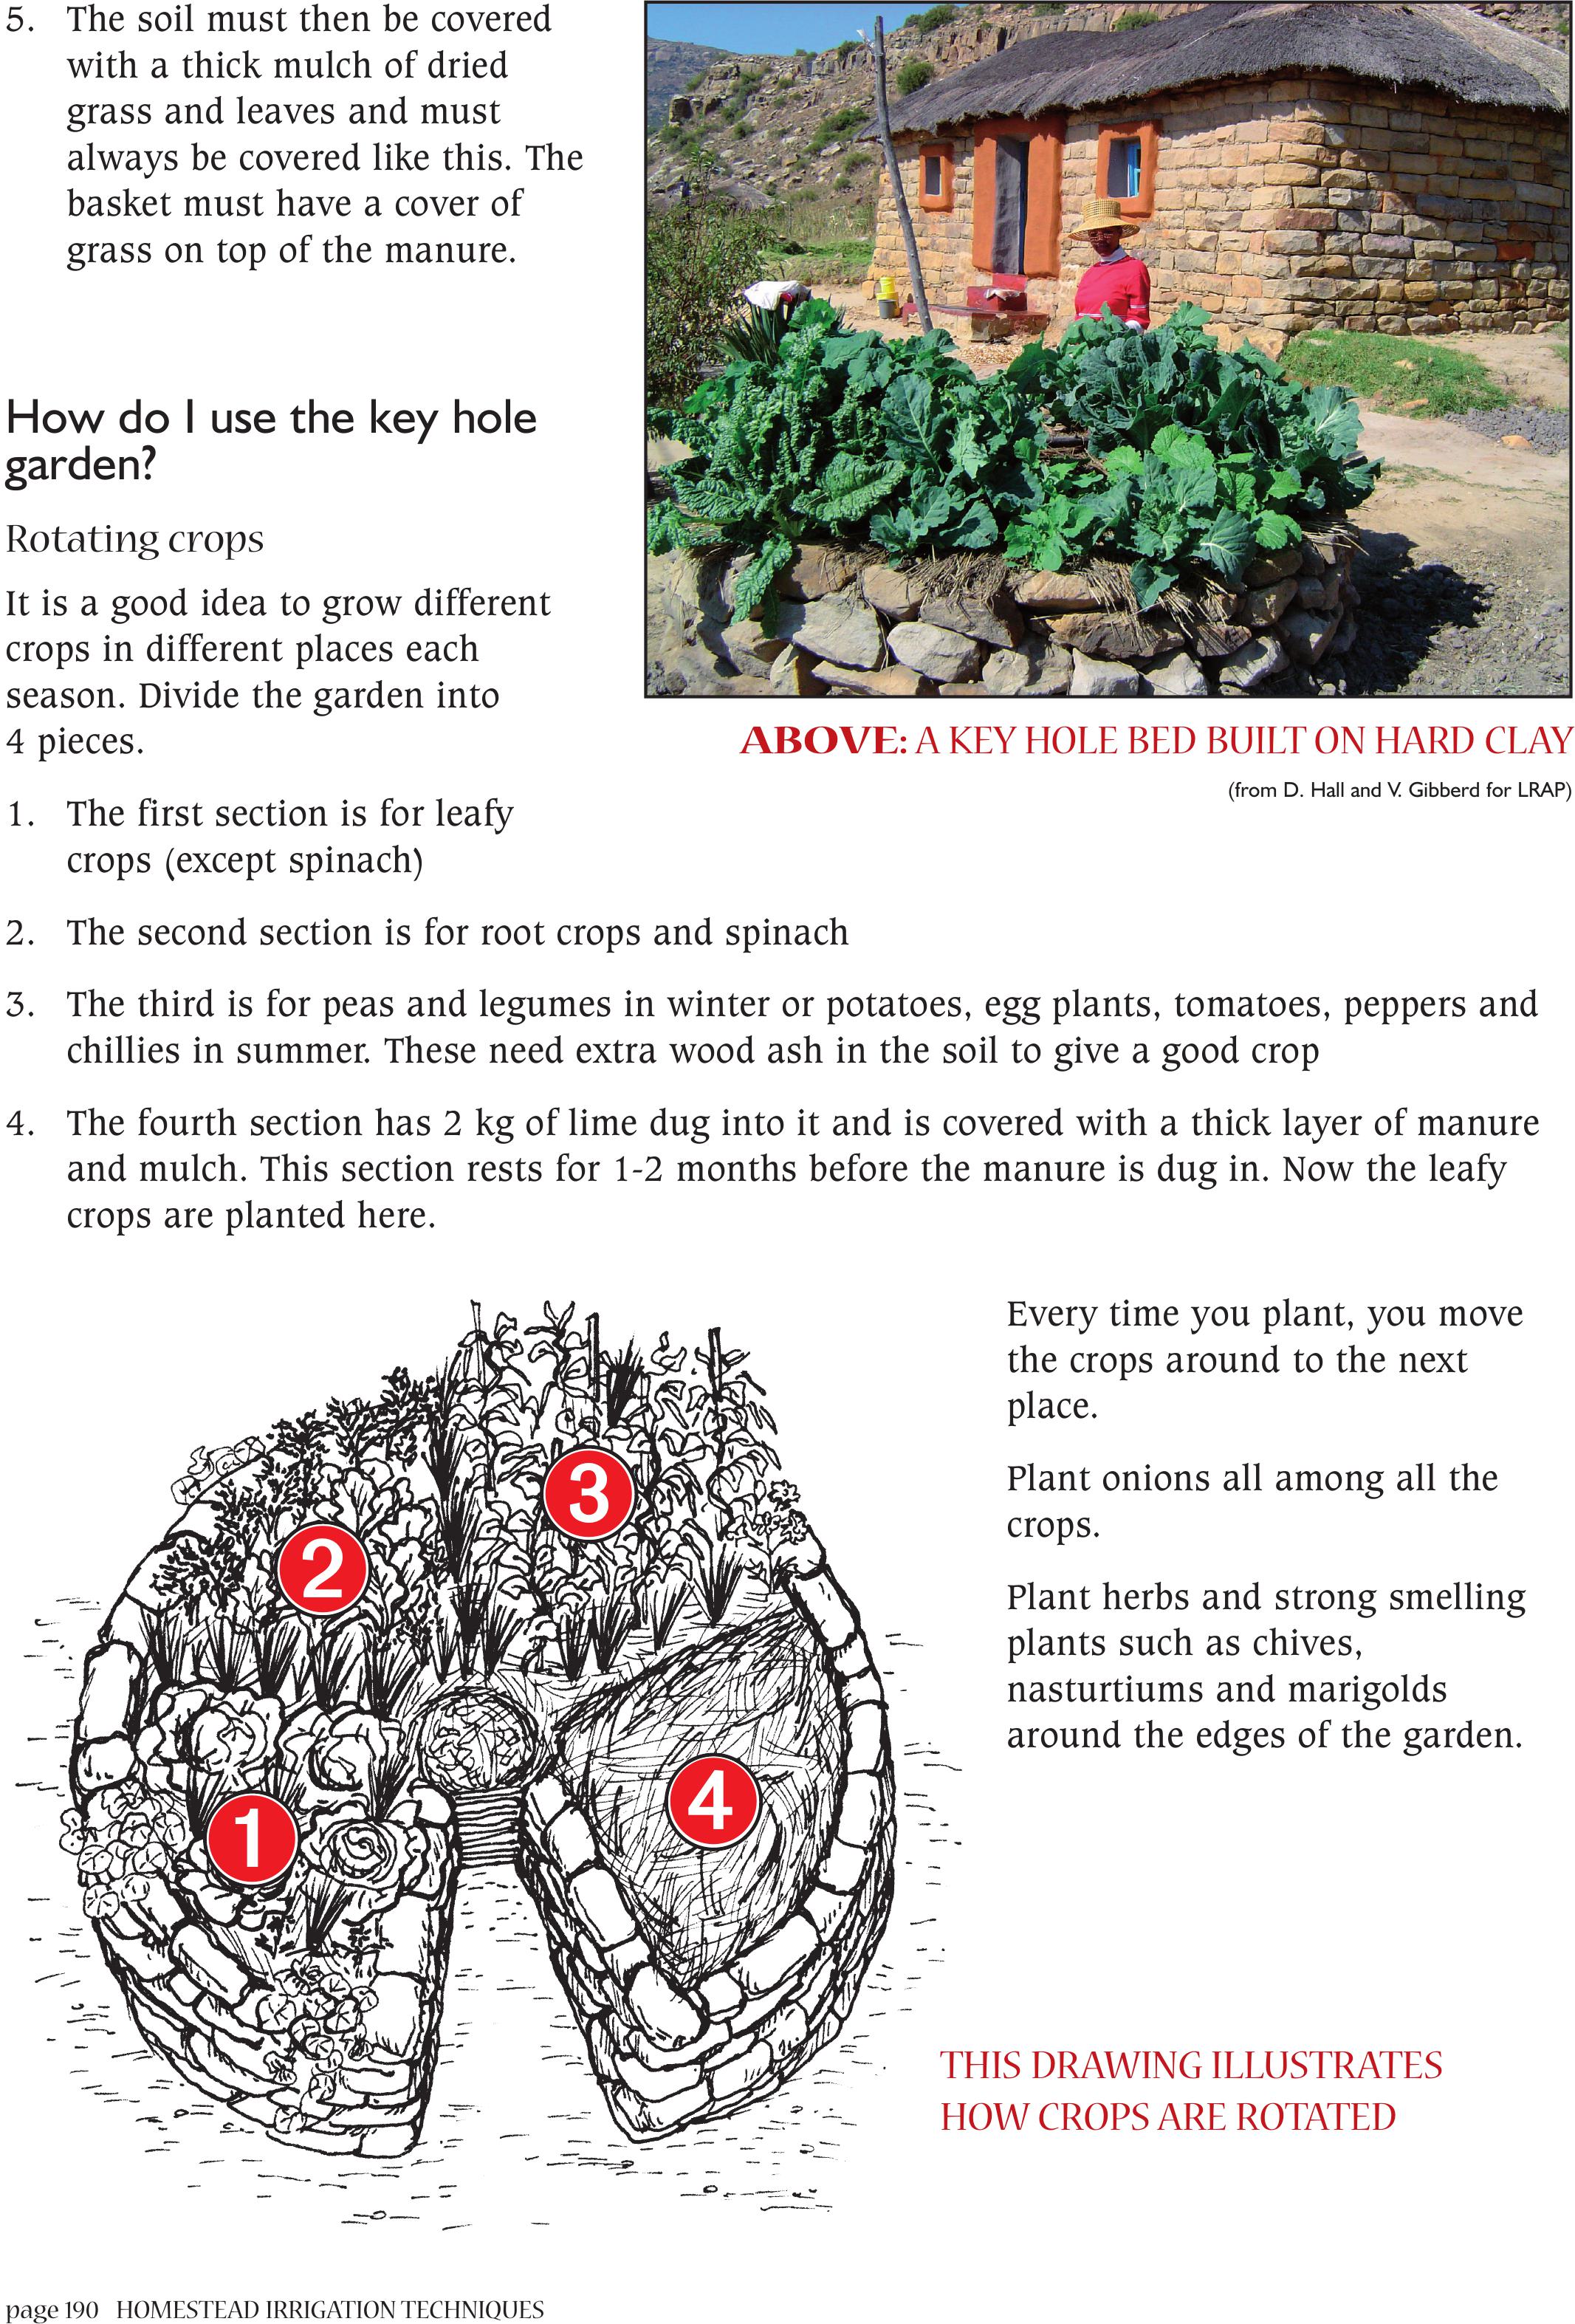
page 190 HOMESTEAD IRRIGATION TECHNIQUES
5. The soil must then be covered
with a thick mulch of dried
grass and leaves and must
always be covered like this. The
basket must have a cover of
grass on top of the manure.
How do I use the key hole
garden?
Rotating crops
It is a good idea to grow different
crops in different places each
season. Divide the garden into
4 pieces.
1. The first section is for leafy
crops (except spinach)
2. The second section is for root crops and spinach
3. The third is for peas and legumes in winter or potatoes, egg plants, tomatoes, peppers and
chillies in summer. These need extra wood ash in the soil to give a good crop
4. The fourth section has 2 kg of lime dug into it and is covered with a thick layer of manure
and mulch. This section rests for 1-2 months before the manure is dug in. Now the leafy
crops are planted here.
Every time you plant, you move
the crops around to the next
place.
Plant onions all among all the
crops.
Plant herbs and strong smelling
plants such as chives,
nasturtiums and marigolds
around the edges of the garden.
ABOVE:A KEY HOLE BED BUILT ON HARD CLAY
(from D. Hall and V. Gibberd for LRAP)
➋
➊
➌
➍
THIS DRAWING ILLUSTRATES
HOW CROPS ARE ROTATED
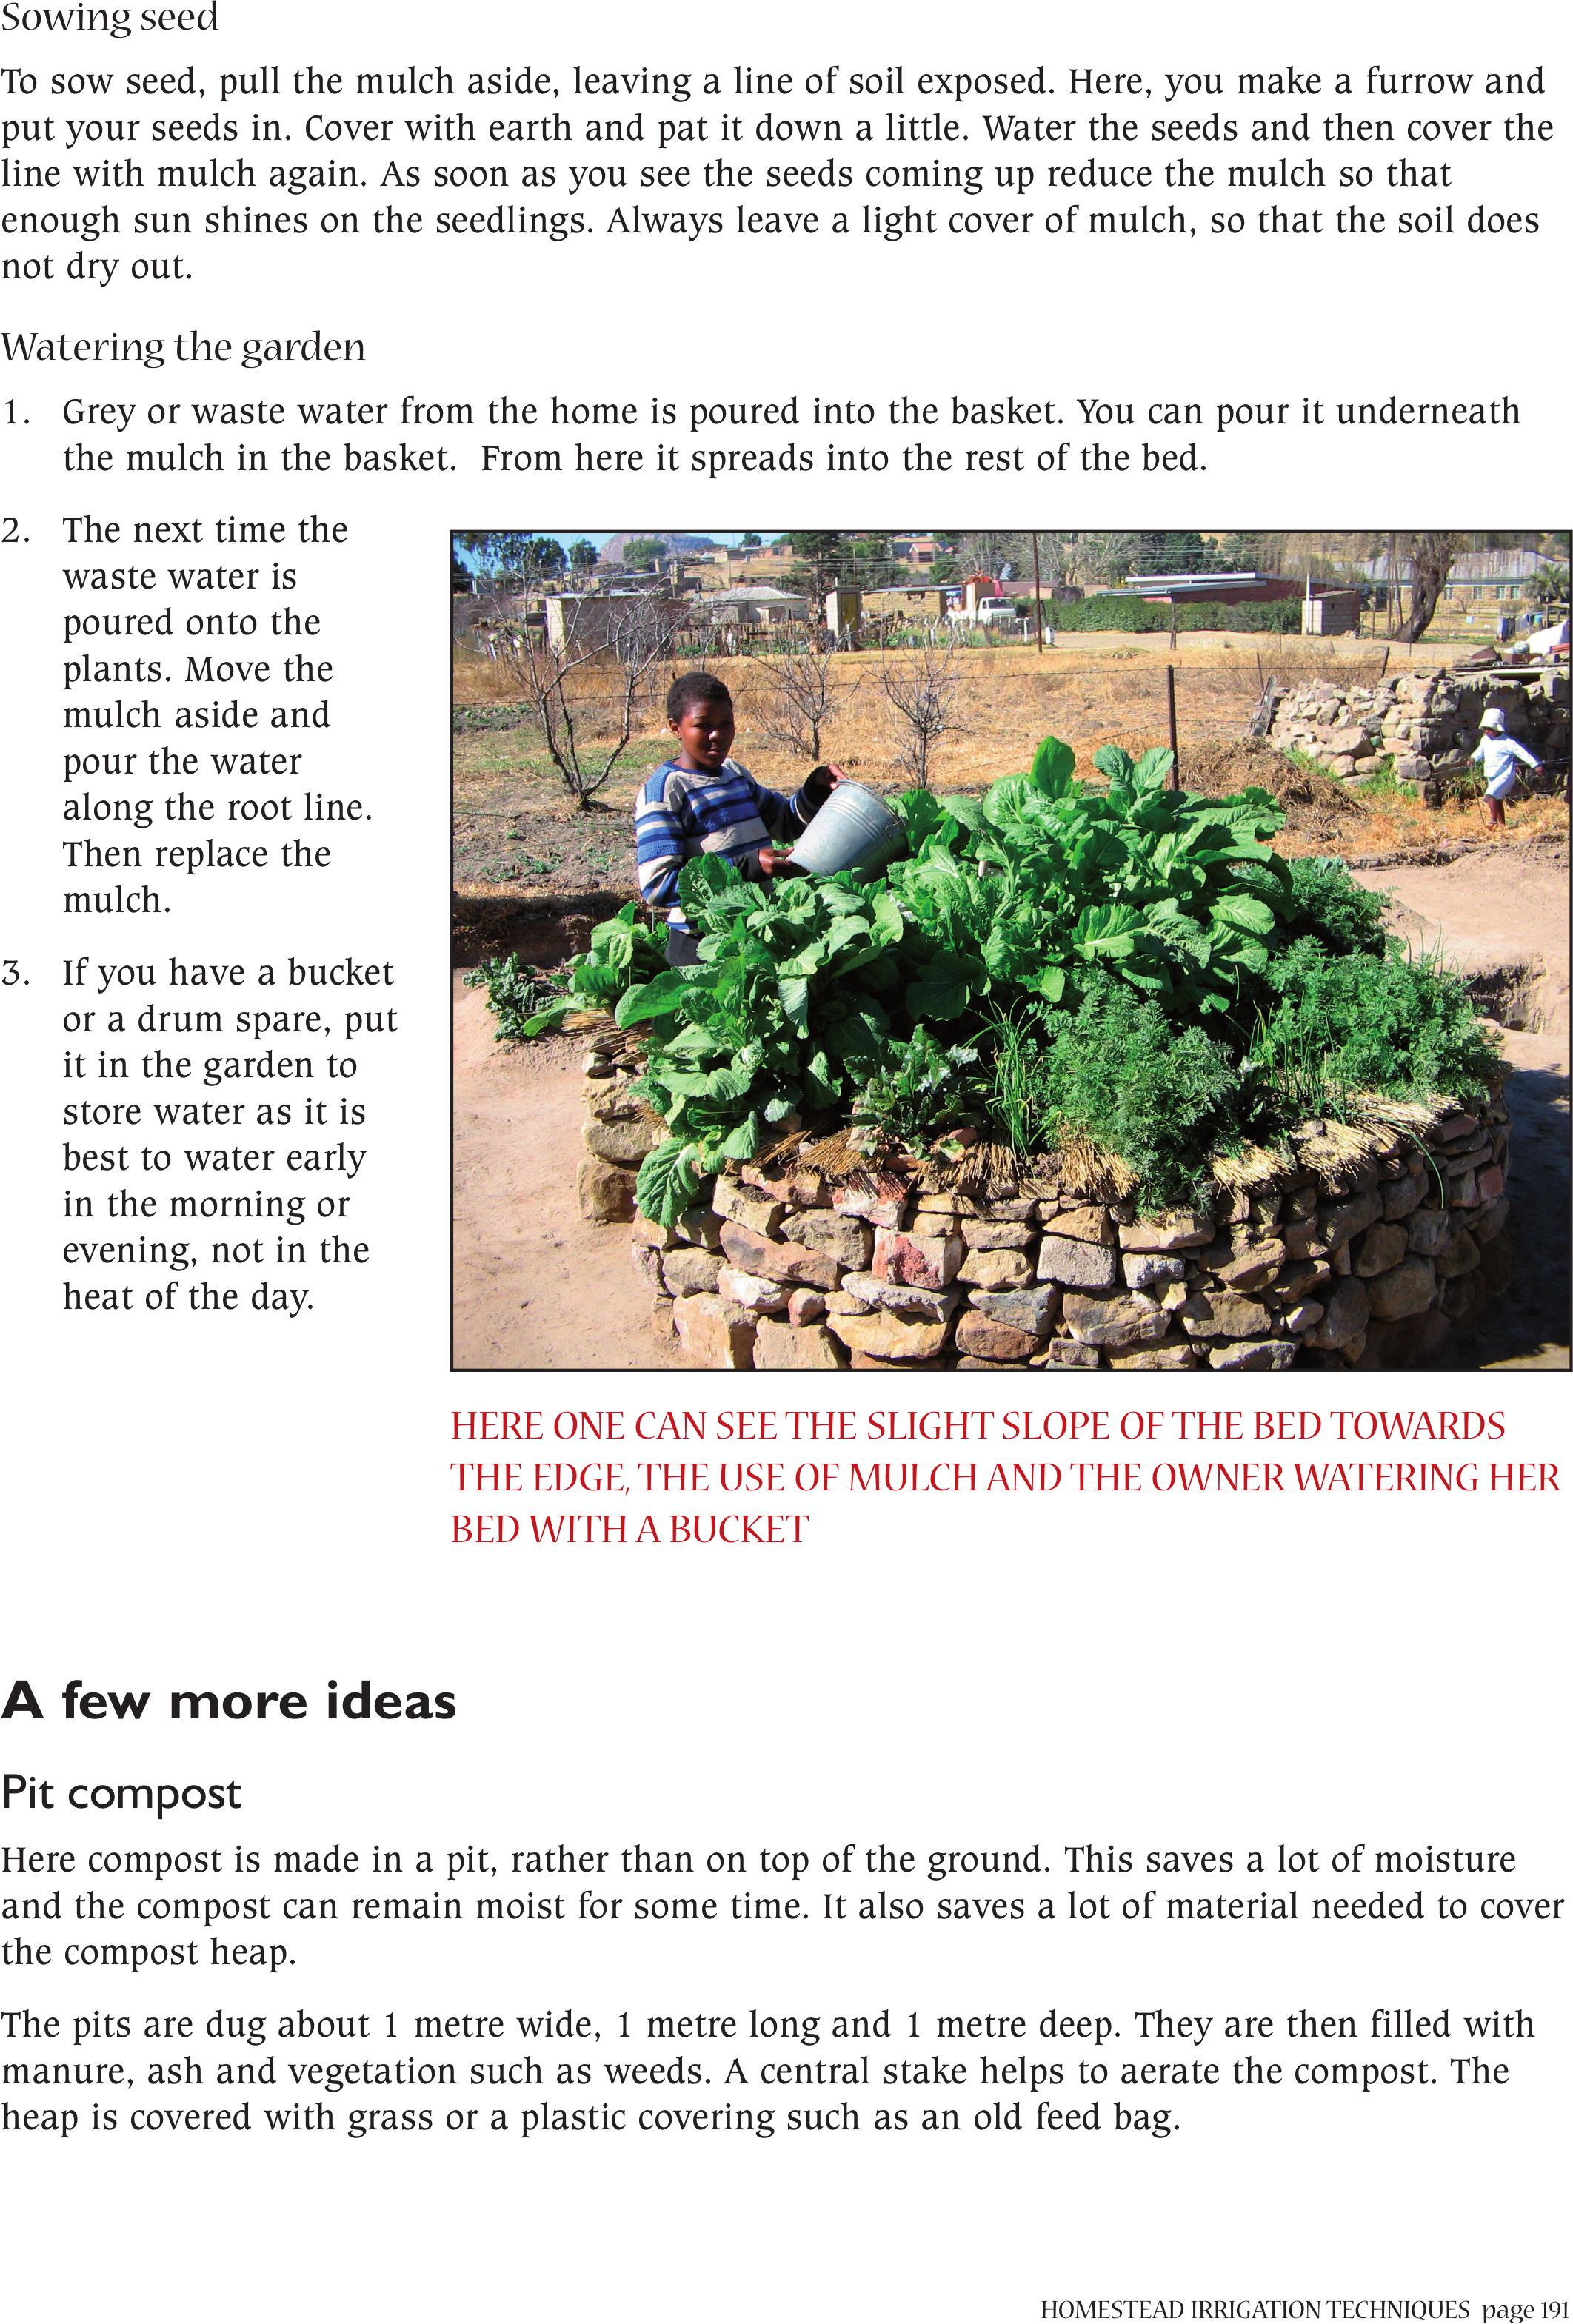
HOMESTEAD IRRIGATION TECHNIQUESpage 191
Sowing seed
To sow seed, pull the mulch aside, leaving a line of soil exposed. Here, you make a furrow and
put your seeds in. Cover with earth and pat it down a little. Water the seeds and then cover the
line with mulch again. As soon as you see the seeds coming up reduce the mulch so that
enough sun shines on the seedlings. Always leave a light cover of mulch, so that the soil does
not dry out.
Watering the garden
1. Grey or waste water from the home is poured into the basket. You can pour it underneath
the mulch in the basket. From here it spreads into the rest of the bed.
2. The next time the
waste water is
poured onto the
plants. Move the
mulch aside and
pour the water
along the root line.
Then replace the
mulch.
3. If you have a bucket
or a drum spare, put
it in the garden to
store water as it is
best to water early
in the morning or
evening, not in the
heat of the day.
A few more ideas
Pit compost
Here compost is made in a pit, rather than on top of the ground. This saves a lot of moisture
and the compost can remain moist for some time. It also saves a lot of material needed to cover
the compost heap.
The pits are dug about 1 metre wide, 1 metre long and 1 metre deep. They are then filled with
manure, ash and vegetation such as weeds. A central stake helps to aerate the compost. The
heap is covered with grass or a plastic covering such as an old feed bag.
HERE ONE CAN SEE THE SLIGHT SLOPE OF THE BED TOWARDS
THE EDGE, THE USE OF MULCH AND THE OWNER WATERING HER
BED WITH A BUCKET
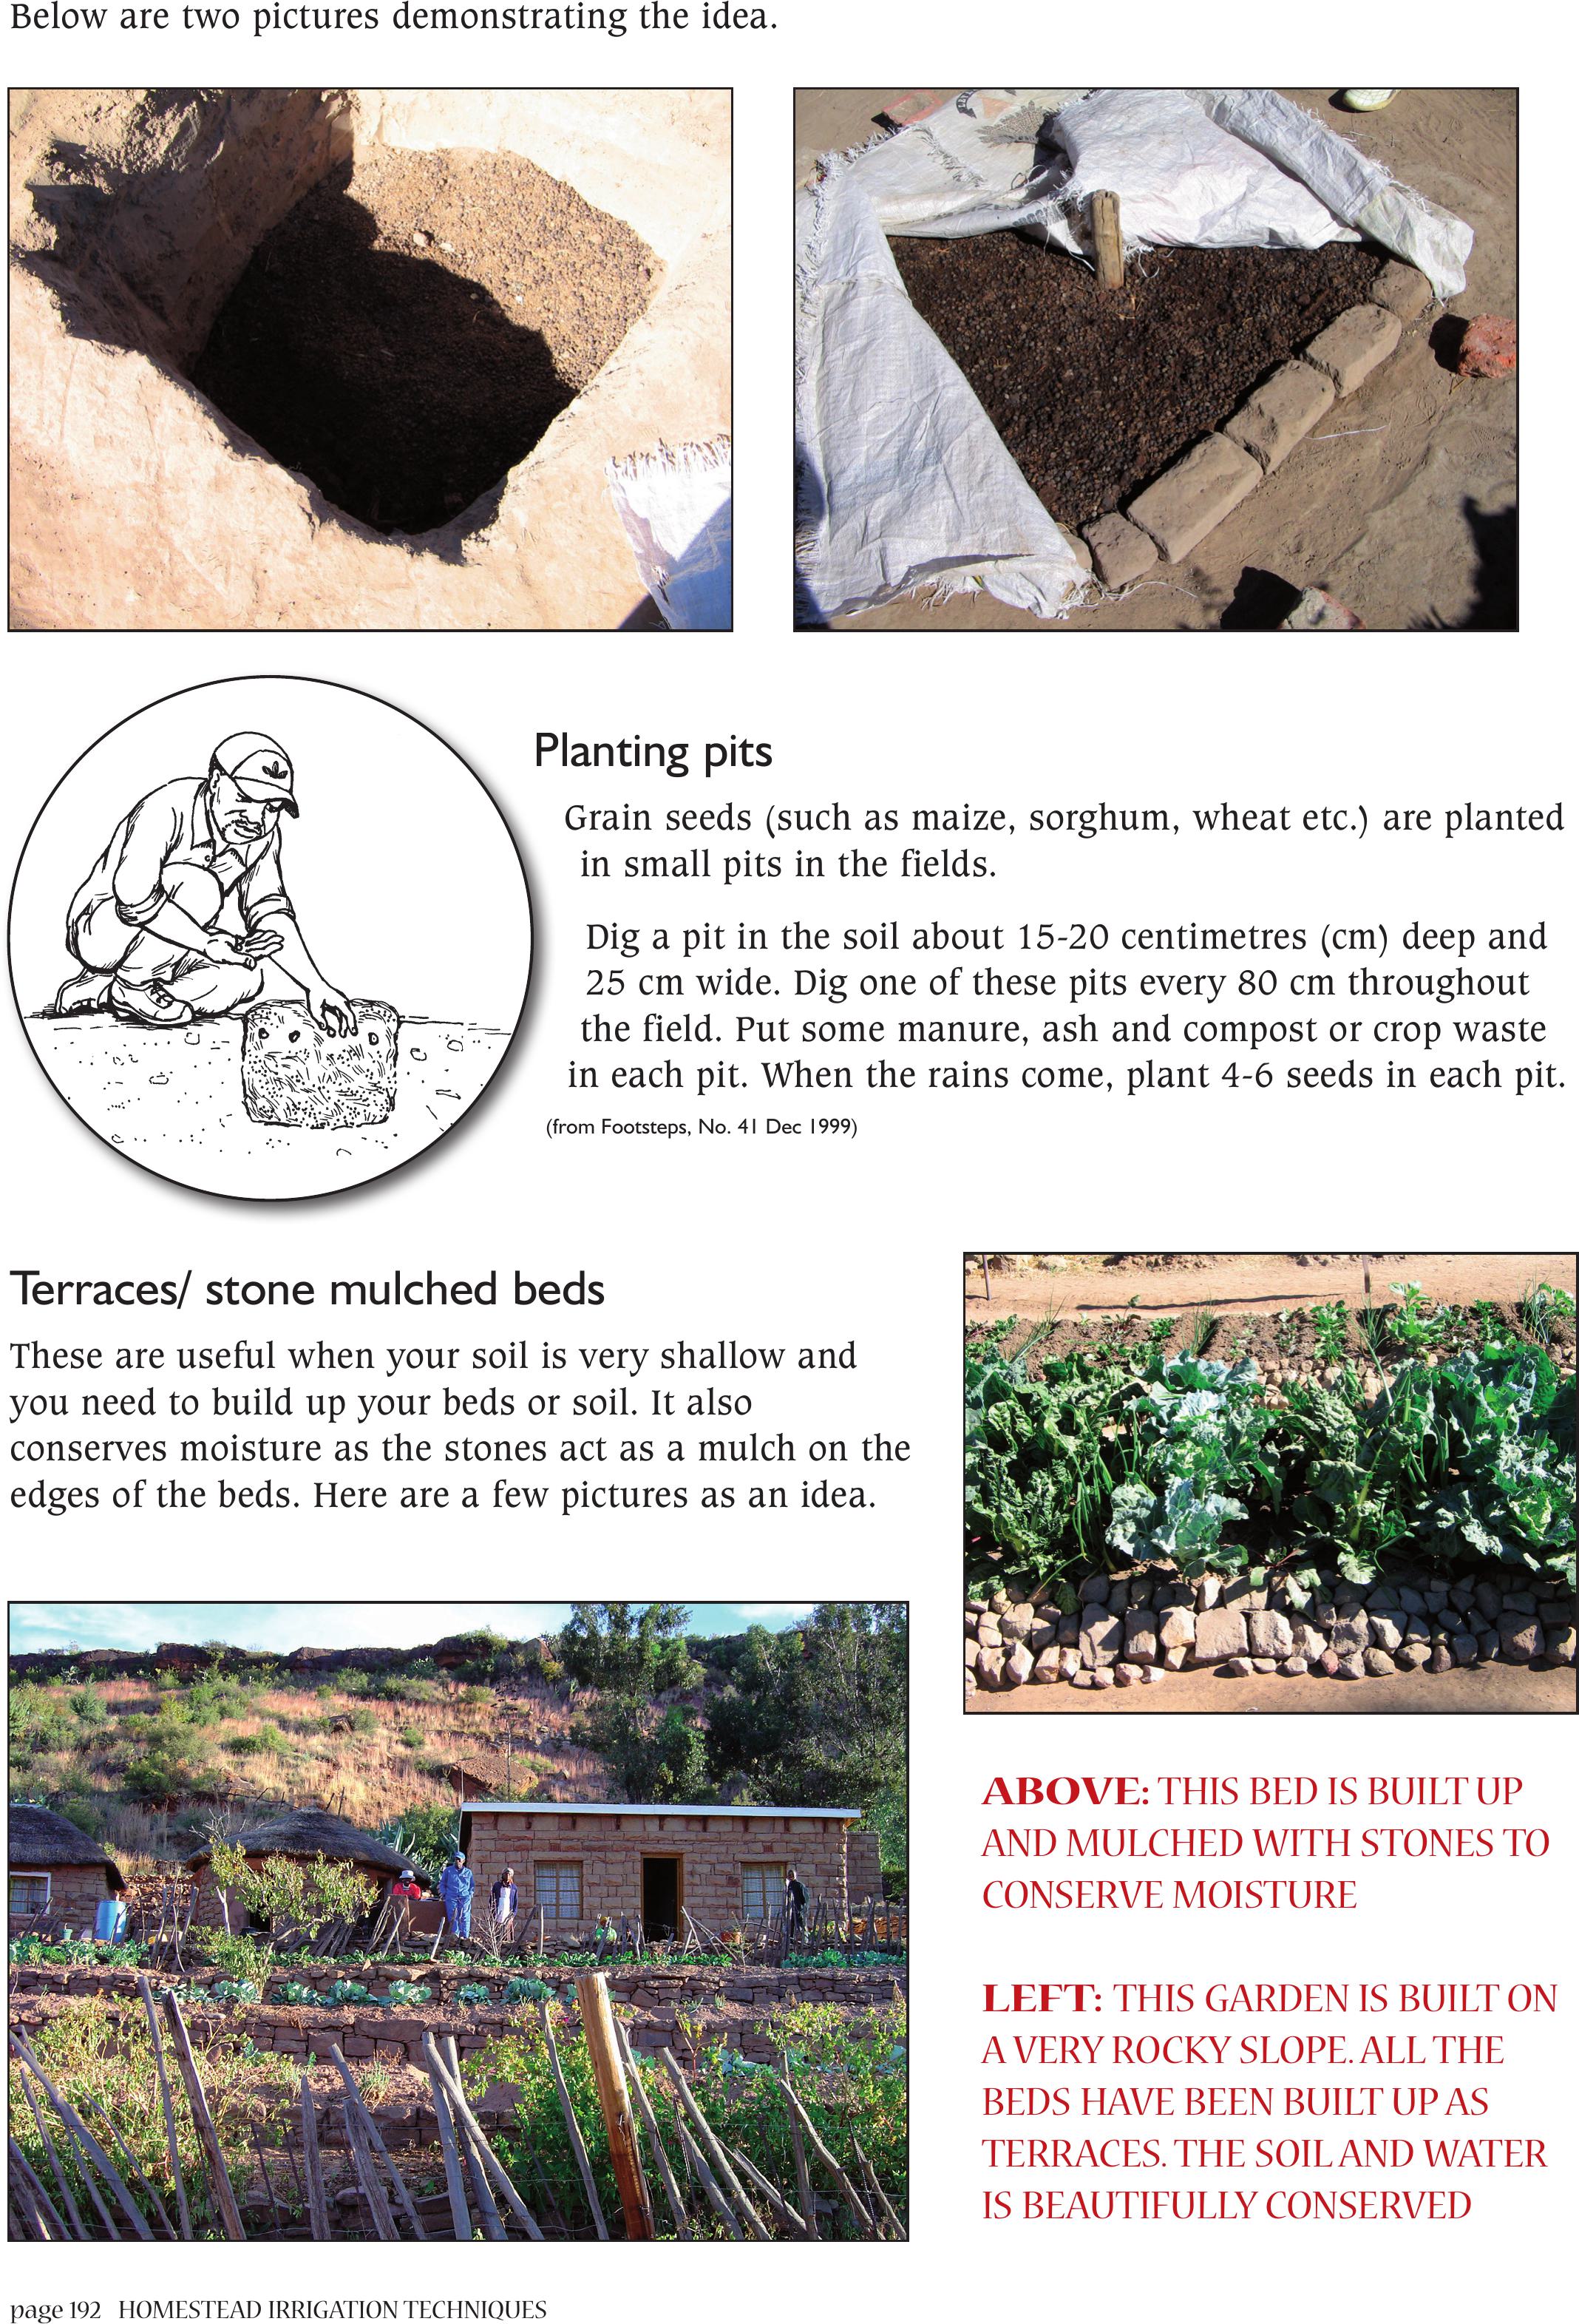
page 192 HOMESTEAD IRRIGATION TECHNIQUES
Below are two pictures demonstrating the idea.
Planting pits
Grain seeds (such as maize, sorghum, wheat etc.) are planted
in small pits in the fields.
Dig a pit in the soil about 15-20 centimetres (cm) deep and
25 cm wide. Dig one of these pits every 80 cm throughout
the field. Put some manure, ash and compost or crop waste
in each pit. When the rains come, plant 4-6 seeds in each pit.
(from Footsteps, No. 41 Dec 1999)
Terraces/ stone mulched beds
These are useful when your soil is very shallow and
you need to build up your beds or soil. It also
conserves moisture as the stones act as a mulch on the
edges of the beds. Here are a few pictures as an idea.
ABOVE:THIS BED IS BUILT UP
AND MULCHED WITH STONES TO
CONSERVE MOISTURE
LEFT:THIS GARDEN IS BUILT ON
A VERYROCKY SLOPE. ALL THE
BEDS HAVE BEEN BUILT UP AS
TERRACES. THE SOIL AND WATER
IS BEAUTIFULLY CONSERVED
P
(f